
Craving a tasty yet healthy snack? Look no further! These No-Bake Chocolate Peanut Butter Protein Bars are the perfect treat. They are simple to make and packed with protein. I promise, you won’t need your oven! With just a few basic ingredients, you’ll whip up a delicious snack ideal for workouts or afternoon cravings. Let’s dive into the easy steps to make these delightful bars!
Ingredients
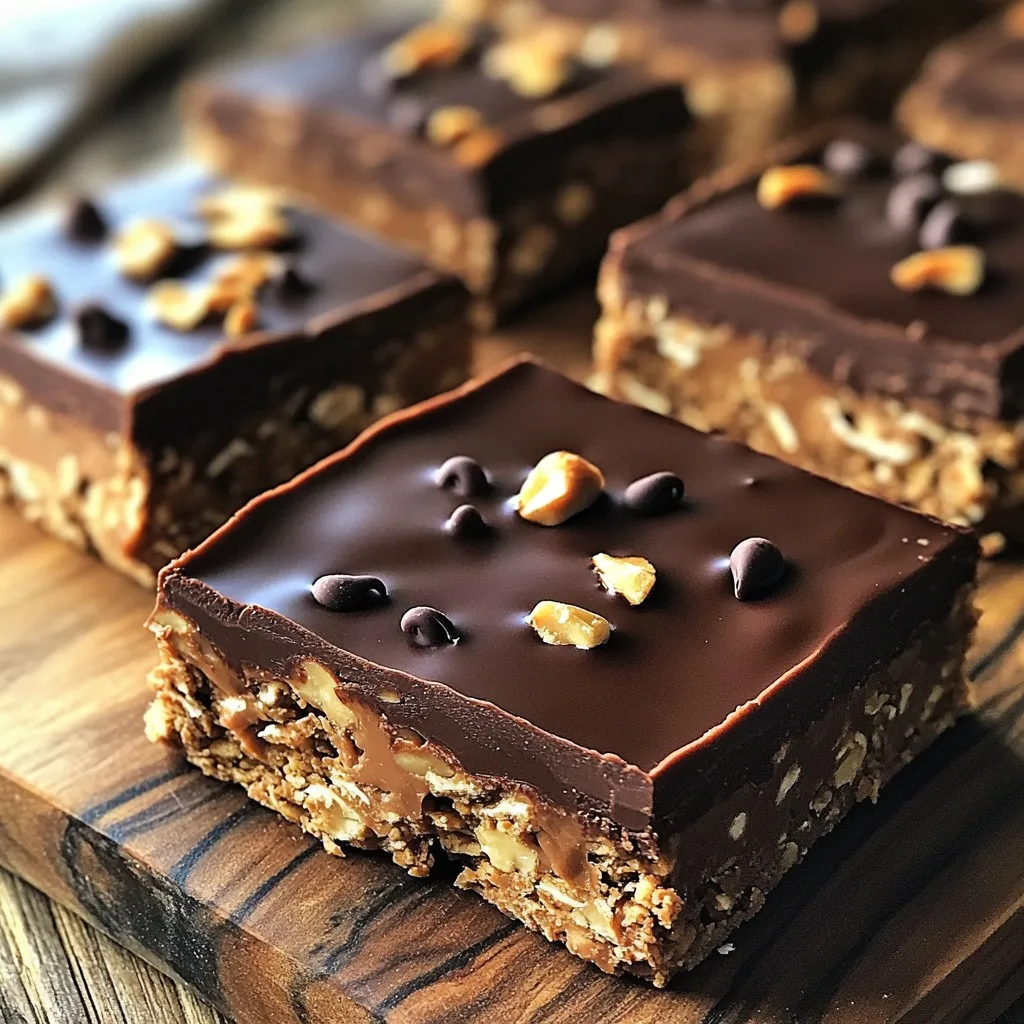
To make these tasty no-bake chocolate peanut butter protein bars, you need just a few simple ingredients. Here’s the list:
– 1 cup rolled oats
– 1/2 cup natural peanut butter
– 1/4 cup honey or maple syrup
– 1/2 cup protein powder
– 1/4 cup dark chocolate chips
– 1/4 teaspoon sea salt
– 1 teaspoon vanilla extract
– Optional toppings: extra chocolate chips or chopped nuts
Each ingredient plays a role. The rolled oats give a nice chewy base. Natural peanut butter adds creaminess and flavor. Honey or maple syrup brings sweetness and helps the bars stick together. Protein powder boosts the protein content, making these bars a great snack. Dark chocolate chips add a delightful touch of chocolate. Sea salt enhances the taste, and vanilla extract adds a warm flavor. You can also add extra toppings if you want some crunch.
Gather these ingredients, and let’s get ready to mix!
Step-by-Step Instructions
Preparation Steps
– Gather a large mixing bowl. Combine the rolled oats and protein powder.
– In a microwave-safe bowl, mix the peanut butter and honey. Microwave for 30 seconds.
– Stir the warm mixture until it blends well. Add vanilla and sea salt.
– Pour the warm peanut butter blend into the oats and protein powder. Mix until coated.
Shaping the Bars
– Line an 8×8 inch baking pan with parchment paper. This helps with easy removal.
– Transfer the mixture to the pan. Use your hands or a measuring cup to press it down.
– If you want, add extra chocolate chips or nuts on top. Press them in gently.
Chilling and Cutting
– Place the pan in the fridge. Chill for 1-2 hours to firm up the bars.
– Once set, lift the bars out using the parchment paper. Cut into squares or rectangles.
Tips & Tricks
Perfecting the Recipe
Choosing between smooth or crunchy peanut butter can change the bar’s texture. If you like a creamy feel, go with smooth. If you prefer a bit of crunch, choose crunchy. Both options offer a rich peanut flavor.
Selecting the right protein powder is key. I suggest chocolate for a rich taste or vanilla for a milder flavor. Check for one that fits your dietary needs and taste buds.
Pressing the mixture is important for a great bar. Use a measuring cup to pack it down firmly. This helps the bars hold together when you cut them. You want them nice and dense!
Serving Suggestions
For a quick snack, wrap each bar individually in parchment paper. This makes them easy to grab on busy days. You can also use plastic wrap if that’s easier for you.
Pair these bars with a warm cup of tea or coffee. The chocolate and peanut butter flavor works great with these drinks. You can even enjoy them with milk or a smoothie for a fun twist.
Health Benefits
These bars are high in protein, making them a great snack. Protein helps build muscles and keeps you full. Each bar packs a good punch of energy for your day.
The ingredients bring many nutritional perks. Rolled oats provide fiber, which is good for digestion. Peanut butter gives healthy fats, while dark chocolate adds antioxidants. Together, they make a tasty and healthy treat.
Variations
Flavor Variations
You can change the flavor of these bars easily. Try using different nut butters. Almond butter or cashew butter both work well. They add unique tastes and nutrition. You can also explore flavored protein powders. Chocolate mint or cookie dough flavors give a fun twist. Each variation can make the bars feel brand new.
Ingredient Substitutions
If you need vegan options, swap honey for maple syrup. This keeps the bars sweet and tasty without using animal products. For nut-free choices, use sunflower seed butter. It gives a similar texture and flavor without nuts. You can also skip the chocolate chips or use carob chips. These swaps keep the bars safe for everyone.
Seasonal Variations
Seasonal fruits and spices can add fun flavors. In summer, mix in chopped strawberries or blueberries. Fall spices like cinnamon or nutmeg can warm up the taste. You can also add pumpkin puree for a creamy texture. These changes let you enjoy the bars year-round.
Storage Info
Best Storage Practices
To keep your no-bake chocolate peanut butter protein bars fresh, use an airtight container. Glass or plastic containers work well. Make sure the bars are cool before storing them. In the fridge, these bars last up to one week. If you plan to eat them later, consider freezing them instead.
Freezing Options
To freeze the bars, cut them into squares first. Then, place them in a single layer on a baking sheet. Freeze them for about an hour. After that, transfer the bars to a freezer-safe bag. Remove as much air as possible before sealing. They can stay fresh in the freezer for up to three months. When you want to enjoy one, take it out and thaw in the fridge for a few hours. For a quick snack, you can eat them straight from the freezer!
FAQs
Common Questions
How to make these protein bars vegan?
To make these protein bars vegan, simply replace honey with maple syrup. This keeps the bars sweet and delicious without any animal products.
Can I use other types of protein powder?
Yes, you can use any protein powder you like. Chocolate or vanilla works best, but feel free to try other flavors. Just be sure to check the ingredients to ensure they fit your diet.
What can I substitute for honey?
You can use maple syrup instead of honey. Agave syrup is another great option. Both will keep the bars sweet and sticky.
How do I know when the bars are set?
The bars are set when they feel firm to the touch. After chilling them for 1-2 hours, you can check by gently pressing on the top. If it holds its shape, they are ready.
Are these bars gluten-free?
Yes, these bars are gluten-free if you use gluten-free oats. Always check the label on your oats to be sure. This makes them a great snack for those with gluten sensitivities.
These protein bars are simple and tasty. We covered all key steps, from mixing the ingredients to storage options. You learned about ingredients like oats, peanut butter, and protein powder that boost nutrition. Plus, you saw how to customize flavors and textures.
Enjoy experimenting with variations and keeping healthy snacks on hand. With these easy tips and insights, you will make delicious bars that suit your taste. Keep these ideas in mind to fuel your day with energy and satisfaction.
No-Bake Chocolate Peanut Butter Protein Bars
Delicious and nutritious no-bake protein bars made with oats, peanut butter, and chocolate.
Ingredients
Instructions
- 1
Begin by gathering a large mixing bowl. Combine the rolled oats and protein powder in the bowl, stirring them together until evenly blended.
- 2
In a separate microwave-safe bowl, combine the peanut butter and honey (or maple syrup). Microwave this mixture for approximately 30 seconds, or until it becomes warm and easily mixable. Stir gently to combine.
- 3
Incorporate the vanilla extract and sea salt into the warm peanut butter mixture, ensuring everything is well-mixed and harmonious.
- 4
Gradually pour the warm peanut butter blend over the dry oat and protein powder mixture. Stir thoroughly, ensuring all the dry ingredients are coated evenly.
- 5
Once combined, gently fold in the dark chocolate chips, distributing them evenly throughout the mixture to prevent clumping.
- 6
Prepare an 8x8 inch baking pan by lining it with parchment paper; leave some overhang for easy removal later.
- 7
Transfer the mixture into the prepared baking pan. Using the back of a measuring cup or your hands, press down firmly and evenly pack the mixture into the pan, ensuring a tight, even spread.
- 8
If desired, add extra chocolate chips or chopped nuts on top for added texture and visual appeal. Gently press them into the surface of the mixture.
- 9
Once complete, place the pan in the refrigerator and allow the bars to chill for at least 1-2 hours to firm up properly.
- 10
After the bars have set, carefully lift them out of the pan using the parchment paper. Cut into squares or rectangles, depending on your preferred serving size.
Chef's Notes
For a convenient on-the-go snack, wrap each bar individually in parchment paper or plastic wrap.


Recipe Creator
Remy
I’m Chef Remy, your recipe companion, here to bring warmth, bold taste, and simplicity to your kitchen.
View My Recipes