
If you crave a rich, creamy dessert that impresses, try my loaf pan burnt Basque cheesecake. This treat delights with its slightly charred top and smooth texture. I’ll guide you through simple steps, tips, and variations to make it your own. Whether you’re a baking pro or a beginner, this cheesecake will satisfy your sweet tooth and elevate your next gathering. Let’s dive into this delicious recipe!
Ingredients
Main ingredients for the loaf pan burnt Basque cheesecake
To make your loaf pan burnt Basque cheesecake, you will need:
– 2 cups cream cheese, softened to room temperature
– 1 cup heavy cream
– 3/4 cup granulated sugar
– 3 large eggs, at room temperature
– 1 tablespoon vanilla extract
– 1/4 cup all-purpose flour
– 1/4 teaspoon salt
These ingredients form the base of this creamy and rich dessert. The cream cheese and heavy cream give it a smooth texture. The sugar adds sweetness, while the eggs help bind everything together. The flour and salt balance the flavors.
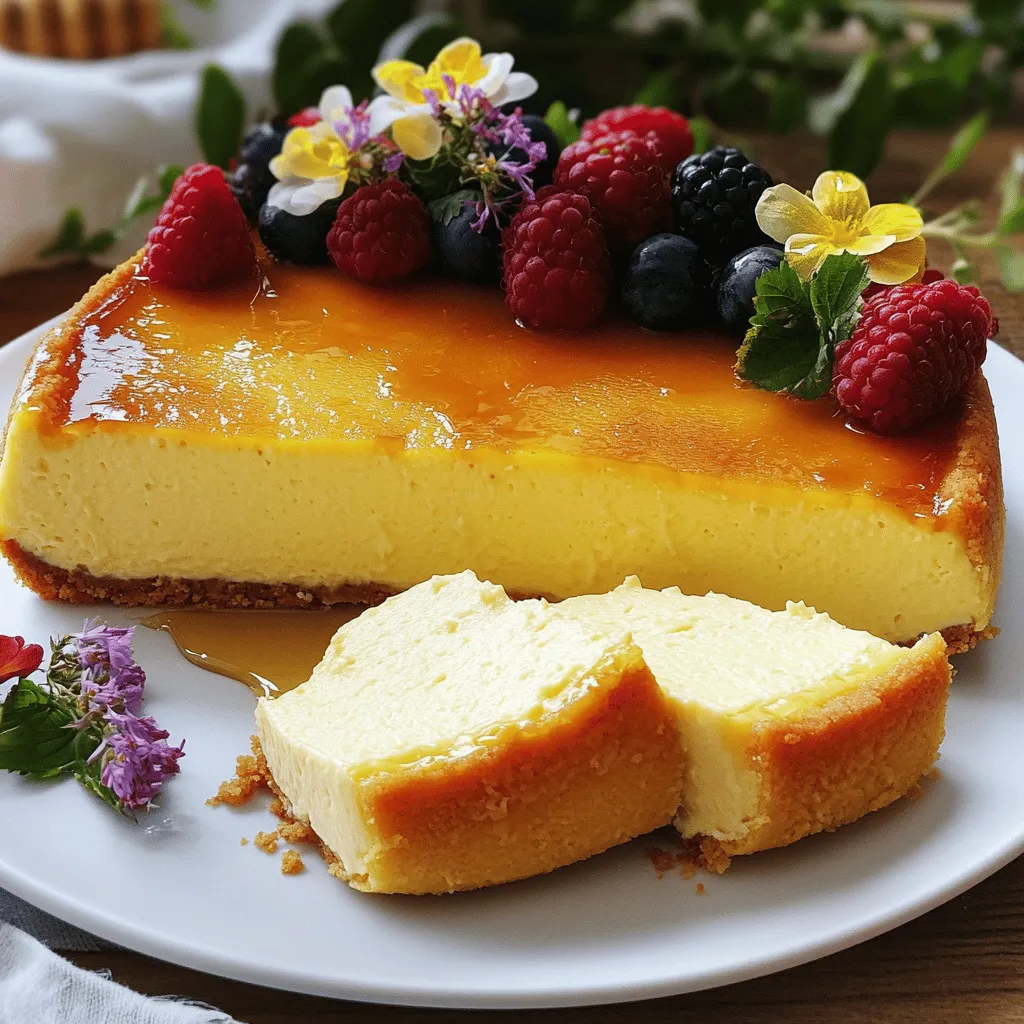
Optional garnishes and serving suggestions
For an extra touch, consider these garnishes and serving ideas:
– Fresh berries like strawberries or blueberries
– Edible flowers for a pop of color
– A drizzle of honey on each slice
– A spoonful of fruit compote for added sweetness
These options make your cheesecake look beautiful and taste even better. They add freshness and contrast to the rich cheesecake.
Ingredient substitutions for dietary preferences
If you have dietary needs, you can make some easy swaps:
– Use a dairy-free cream cheese for a vegan option.
– Swap heavy cream for coconut cream for a dairy-free cheesecake.
– Substitute granulated sugar with a sweetener like honey or maple syrup if you prefer natural sweeteners.
– Use gluten-free flour for a gluten-free version.
These substitutions let everyone enjoy this delicious dessert, no matter their diet. Making these changes keeps the flavor close to the original while being mindful of preferences.
Step-by-Step Instructions
Preheating and preparing the pan
First, you need to preheat your oven to 400°F (200°C). This high heat helps create that famous burnt top. Grab a 9×5 inch loaf pan and line it with parchment paper. Make sure the paper hangs over the edges. This makes it easy to lift the cheesecake out later.
Mixing the cream cheese and sugar
In a large mixing bowl, add 2 cups of softened cream cheese and 3/4 cup of granulated sugar. Using a hand mixer, beat the mixture on medium speed. Keep mixing until it’s smooth and creamy. You want to avoid lumps for a perfect texture.
Adding eggs and other wet ingredients
Next, add 3 large eggs one at a time. Mix well after each egg. This helps the eggs blend in fully. After the eggs, pour in 1 cup of heavy cream and 1 tablespoon of vanilla extract. Mix everything until just combined. Be careful not to overmix.
Incorporating dry ingredients and transferring to the pan
Now, sift 1/4 cup of all-purpose flour and 1/4 teaspoon of salt over your creamy mix. Use a spatula to fold these dry ingredients in gently. Stop mixing as soon as you no longer see dry flour. This keeps the texture light and creamy. Pour the batter into the loaf pan, smoothing the top for an even finish.
Baking process and signs of doneness
Place the loaf pan in your preheated oven. Bake for 50 to 60 minutes. Look for a deep golden brown top. The center should still be slightly jiggly, while the edges are set. This contrast is key to the cheesecake’s unique texture.
Cooling and chilling the cheesecake
Once baked, take the cheesecake out of the oven. Let it cool in the pan for about 30 minutes at room temperature. After that, cover it and move it to the fridge. Chill for at least 4 hours, but overnight is best for flavor. When ready, lift the cheesecake out using the parchment paper. Cut into thick slices and enjoy!
Tips & Tricks
Achieving the perfect burnt top
To get that perfect burnt top, bake your cheesecake at 400°F (200°C). This high heat helps create a wonderful char. Keep a close eye on it. You want a deep golden brown color. The center should remain a bit jiggly. This signals that it is creamy inside.
Common mistakes to avoid
One big mistake is overmixing the batter. When you add the flour, fold it in gently. Overmixing can make the cheesecake dense, not light. Also, don’t skip chilling it. Chilling for at least four hours is key. It helps the flavors come together.
Ensuring the right texture and flavor
For creamy texture, use softened cream cheese. Mixing it with sugar until smooth is crucial. Incorporate the eggs one at a time. This helps keep the batter light. Use fresh vanilla extract for a rich flavor. Finally, remember to serve it cold. The taste and texture shine when it’s chilled.
Variations
Flavor variations
To make your loaf pan burnt Basque cheesecake even more exciting, try adding flavors. Citrus zest, like lemon or orange, brightens the taste. Just add one tablespoon of zest when you mix in the cream. Chocolate lovers can stir in melted chocolate. Use about half a cup of dark chocolate for a rich flavor. You can also add a splash of coffee for a deep twist.
Crust options and no-crust variations
Many love a crust, but a no-crust cheesecake works great too. If you want a crust, use crushed cookies. Graham crackers or digestive biscuits work well. Mix crumbs with melted butter and press them into the bottom of the pan. For no-crust, just follow the recipe as is. The cheesecake stands out even without a crust.
Serving variations
How you serve your cheesecake can change the experience. Fresh berries, like strawberries or blueberries, make a tasty topping. A drizzle of honey adds sweetness. For a fun touch, serve it with fruit compote. You can also pair it with chocolate sauce for a decadent dessert. Experiment with different toppings to find what you like best!
Storage Info
How to store leftovers
To store leftovers of your loaf pan burnt Basque cheesecake, wrap each slice in plastic wrap. This keeps the cheesecake fresh and moist. Place the wrapped slices in an airtight container. Store them in the refrigerator for up to five days.
Freezing instructions for longer preservation
If you want to save your cheesecake for later, freezing is a great option. First, let the cheesecake cool completely. Then, wrap the entire cheesecake or individual slices tightly in plastic wrap. After that, place them in a freezer-safe container or bag. This way, you can store it for up to three months. When you’re ready to enjoy it again, simply thaw it in the fridge overnight.
Best practices for reheating or serving after chilling
When you’re ready to serve your cheesecake, take it out of the fridge and let it sit at room temperature for about 30 minutes. This helps enhance its creamy texture. If you frozen it, thaw it in the fridge overnight first. You can serve it cold or gently warm it in the oven at a low temperature for a few minutes. Enjoy it with fresh toppings like berries or a drizzle of honey for extra flavor.
FAQs
What is a Basque cheesecake, and how does it differ from regular cheesecake?
A Basque cheesecake is unique. It is rich and creamy, with a burnt top. Unlike regular cheesecake, it has no crust. The smooth texture comes from blending cream cheese, heavy cream, and eggs. This cheesecake is baked at a high temperature, creating its signature charred look. Regular cheesecake is often baked at lower heat, resulting in a lighter color.
Can I make this recipe gluten-free?
Yes, you can make this recipe gluten-free! Simply replace the all-purpose flour with a gluten-free blend. Look for a mix that works well for baking. This way, you can enjoy the cheesecake without worrying about gluten.
What can I do if my cheesecake cracks?
If your cheesecake cracks, don’t worry! This can happen, especially with high-heat baking. To avoid cracks, mix gently and don’t overbake. If it does crack, you can cover it with toppings. Fresh fruit or a drizzle of chocolate works well.
How long can I store the cheesecake?
You can store the cheesecake for up to five days in the fridge. Keep it covered to maintain freshness. If you want to enjoy it later, consider freezing it. Wrap it well and store it for up to two months.
Can I use a different type of pan?
You can use different pans, but the results may vary. A round pan works, but adjust the baking time. A springform pan can also work well. Just make sure to line it properly to prevent sticking.
You learned how to make a delicious burnt Basque cheesecake from scratch. We covered ingredients, preparation steps, and helpful tips. You now know storage basics and creative variations to try. Remember, the perfect cheesecake has a unique burnt top and creamy texture. Explore different flavors and toppings to make it your own. Enjoy baking, and delight in sharing this treat with others. Your homemade cheesecake will impress everyone!
Loaf Pan Burnt Basque Cheesecake
A rich and creamy cheesecake with a beautifully burnt top, baked in a loaf pan for easy serving.
Ingredients
Instructions
- 1
Preheat your oven to 400°F (200°C). Prepare a 9x5 inch loaf pan by lining it with parchment paper; allow the paper to hang over the edges to facilitate easy removal once baked.
- 2
In a spacious mixing bowl, add the softened cream cheese along with the granulated sugar. Using a hand mixer, beat on medium speed until the mixture becomes smooth and creamy, with no lumps remaining.
- 3
Incorporate the eggs one at a time. Mix well after each addition to ensure they are fully blended. Afterward, pour in the heavy cream and vanilla extract, continuing to mix until everything is just combined.
- 4
Sift the flour and salt over the creamy mixture. Carefully fold the dry ingredients into the batter using a spatula; take care not to overmix—stop as soon as no dry flour is visible.
- 5
Transfer the cheesecake batter into the prepared loaf pan, smoothing the top with your spatula to create an even surface.
- 6
Place the loaf pan in the preheated oven and bake for 50-60 minutes. Look for a deep golden brown on the top, while ensuring the center remains slightly jiggly and the edges are set.
- 7
Once baked, remove the cheesecake from the oven and let it cool in the pan for about 30 minutes at room temperature. After that, cover it and transfer to the refrigerator to chill for a minimum of 4 hours, although overnight is preferable for the best flavor and texture.
- 8
When ready to serve, gently lift the cheesecake out of the pan using the overhanging parchment paper. Cut into thick, generous slices for serving.
Chef's Notes
For a beautiful presentation, serve each slice on a clean, white plate. Garnish with fresh berries or edible flowers for an attractive pop of color. A drizzle of honey or a spoonful of fruit compote on top will add a delightful sweetness and enhance the visual appeal.


Recipe Creator
Remy
I’m Chef Remy, your recipe companion, here to bring warmth, bold taste, and simplicity to your kitchen.
View My Recipes