Go Back
To make the best fudgy red velvet brownies, you need simple ingredients. Here’s what you will need: - 1 cup (2 sticks) unsalted butter, melted - 1 1/2 cups granulated sugar - 1/2 cup packed brown sugar - 4 large eggs - 1 tablespoon vanilla extract - 1 tablespoon red food coloring - 1 1/4 cups all-purpose flour - 1/2 cup unsweetened cocoa powder - 1 teaspoon baking powder - 1/2 teaspoon baking soda - 1/2 teaspoon salt - 1 cup semi-sweet chocolate chips For the frosting, you will need: - 1/2 cup cream cheese, softened - 1 cup powdered sugar - 1 tablespoon milk - Optional: white chocolate chips for garnish Using high-quality ingredients makes a big difference. Choose a good cocoa powder for rich flavor. Fresh eggs add moisture and fluffiness. Always use unsalted butter to control the salt level. The red food coloring is key for that vibrant hue. If you want a sweeter taste, add more brown sugar. For a richer texture, use dark chocolate chips instead of semi-sweet. If you have allergies, there are easy swaps. Use dairy-free butter and cream cheese for a vegan option. You can also try gluten-free flour if you need a gluten-free recipe. If you dislike red food coloring, substitute with beet juice for color. Remember, these swaps can change the texture and taste slightly, so adjust your baking time as needed. For the full recipe, check the detailed steps to make these delicious brownies. Start by preheating your oven to 350°F (175°C). Grab a 9x13 inch baking pan. Lightly grease it with butter or cooking spray. Next, line the pan with parchment paper. Make sure to let some paper hang over the edges. This helps you lift the brownies out later. In a large bowl, whisk together the melted butter, granulated sugar, and brown sugar. Mix for about 2-3 minutes until smooth. Next, add the eggs one at a time. Mix well after each egg. Then, stir in the vanilla extract and red food coloring. The batter should look bright and even. In another bowl, sift the all-purpose flour, cocoa powder, baking powder, baking soda, and salt. Gradually add this dry mix to the wet ingredients. Stir gently with a spatula until just combined. Don’t overmix! Finally, fold in the semi-sweet chocolate chips. Make sure they are spread throughout the batter. Pour the batter into the prepared pan. Use a spatula to spread it evenly. Bake for 25 to 30 minutes. Check with a toothpick in the center. It should come out with a few moist crumbs, not wet batter. Once done, let the brownies cool in the pan for about 10 minutes. Then, remove them using the parchment paper overhang. Allow them to cool completely before cutting into squares. For the full recipe, refer to the section above. To get those rich, fudgy brownies, focus on how much you mix. Overmixing can make them dry. Stir just until your ingredients combine. Use semi-sweet chocolate chips. They add moisture and flavor. Don't bake too long; check them at 25 minutes. If a toothpick comes out with a few moist crumbs, they are perfect. For smooth cream cheese frosting, start with soft cream cheese. Beat it well before adding sugar. This helps create a creamy texture. Add milk slowly to control thickness. If it's too thick, add a bit more milk. Want extra flavor? Mix in a splash of vanilla extract. This gives your frosting a lovely taste. If your brownies turn out too cakey, reduce the mixing time. This helps keep them fudgy. If they are too dry, check your oven temperature. It might be too hot. Use an oven thermometer for accuracy. If your brownies stick to the pan, line it with parchment paper. This makes removal easy. For soft brownies, allow them to cool fully before cutting. {{image_4}} You can change the flavor and fun of your brownies by adding mix-ins. Chopped nuts like walnuts or pecans add a nice crunch. You can also use chocolate chips, peanut butter chips, or even butterscotch chips for a sweet twist. Try adding a cup of shredded coconut for a tropical vibe. Mix these in after folding in your main chocolate chips. This step makes each bite different and exciting. Switching up chocolate types can change the taste of your brownies. Instead of semi-sweet chocolate chips, use dark chocolate for a rich flavor. Milk chocolate gives a sweeter taste, which kids often love. You can even try white chocolate chips for a unique twist. Each type brings its own character to the dish. Experiment with your favorites to find the perfect match for your taste buds. You can make these brownies fit any season or holiday. For fall, add pumpkin spice or chopped apples. In winter, sprinkle crushed candy canes on top for a festive touch. During summer, mix in fresh berries for a burst of flavor. You can even dye the frosting different colors for special occasions. These small changes keep every batch fresh and fun. For the full recipe, check out the details above. After baking, allow your brownies to cool completely. This step keeps them soft and moist. Use an airtight container for storage. If you want, line it with parchment paper. This helps to prevent sticking. Keep the container at room temperature if you plan to eat them in a few days. If stored correctly, these brownies stay fresh for up to five days. If you want them to last longer, consider freezing them. Wrap each brownie in plastic wrap, then place them in a freezer bag. They can last up to three months in the freezer, but I recommend eating them sooner for the best taste. To enjoy warm brownies, preheat your oven to 350°F (175°C). Place the brownies on a baking sheet. Heat them for about 10 minutes. You can also use a microwave. Heat a single brownie for about 10-15 seconds. This warms them up nicely without drying them out. Enjoy your fudgy red velvet brownies warm for the best experience! To make brownies fudgier, you need to adjust a few key things. First, use more fat. Adding an extra tablespoon of butter makes a big difference. Second, don't overmix your batter; mix it just until everything is combined. This keeps the brownies dense. Lastly, bake them for a shorter time. Check them at the 25-minute mark. If a toothpick comes out with a few moist crumbs, they are ready. This will give you that rich, fudgy texture you want. Yes, you can use different food coloring. While red is classic for red velvet, you can try other colors too. Gel food coloring works best because it gives vibrant color without adding too much liquid. If you want a different shade, feel free to mix colors. Just remember that using a lot of food coloring may change the taste slightly. Yes, you can make this recipe gluten-free. Substitute all-purpose flour with a 1:1 gluten-free flour blend. Make sure your baking powder is gluten-free as well. When baking, check for the same texture and doneness. The brownies should still be fudgy and delicious. Enjoy your gluten-free treat! For the complete recipe, check out the Full Recipe section! This blog post covered how to create delicious brownies. We explored key ingredients for the best flavor and tips for making them fudgy. I shared step-by-step instructions for mixing batter and baking techniques. You learned handy tips for cream cheese frosting and how to fix common baking problems. We discussed fun variations and smart storage methods. With these insights, you can bake brownies that taste great and wow your friends. Enjoy your baking journey, and have fun experimenting with flavors and techniques!

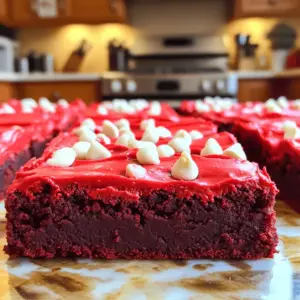
The Best Fudgy Red Velvet Brownies

Indulge in the ultimate chocolate treat with these best fudgy red velvet brownies! Rich, creamy, and topped with delicious cream cheese frosting, these brownies are the perfect dessert for any occasion. Made with simple ingredients and easy-to-follow steps, you'll impress everyone with your baking skills. Click through to explore the full recipe and make these mouthwatering brownies that everyone will love!

Ingredients
  

1 cup (2 sticks) unsalted butter, melted

1 1/2 cups granulated sugar

1/2 cup packed brown sugar

4 large eggs

1 tablespoon vanilla extract

1 tablespoon red food coloring

1 1/4 cups all-purpose flour

1/2 cup unsweetened cocoa powder

1 teaspoon baking powder

1/2 teaspoon baking soda

1/2 teaspoon salt

1 cup semi-sweet chocolate chips

For the Frosting:

1/2 cup cream cheese, softened

1 cup powdered sugar

1 tablespoon milk

Optional: white chocolate chips for garnish

Instructions
 

Preheat and Prepare: Begin by preheating your oven to 350°F (175°C). Prepare a 9x13 inch baking pan by greasing it lightly and lining it with parchment paper. Make sure to leave some overhang on the sides to facilitate easy removal later.

    Mix Wet Ingredients: In a large mixing bowl, whisk together the melted butter, granulated sugar, and brown sugar until the mixture is smooth and well combined. This should take about 2-3 minutes.

      Incorporate Eggs and Flavorings: Add the eggs to the sugar mixture one at a time, mixing thoroughly after each addition to ensure they are fully incorporated. Then, stir in the vanilla extract and red food coloring until the batter is vibrant and evenly mixed.

        Combine Dry Ingredients: In a separate bowl, sift together the all-purpose flour, cocoa powder, baking powder, baking soda, and salt. Gradually add this dry mixture to the wet ingredients, stirring gently using a spatula or wooden spoon. Mix just until combined to avoid overmixing.

          Add Chocolate Chips: Fold in the semi-sweet chocolate chips evenly throughout the brownie batter. Make sure they are well distributed for bits of chocolate in every bite.

            Bake the Brownies: Pour the batter into the prepared baking pan, using a spatula to spread it out evenly. Bake in your preheated oven for 25 to 30 minutes, or until a toothpick inserted into the center comes out with a few moist crumbs attached (not wet batter).

              Prepare Cream Cheese Frosting: While the brownies are cooling, prepare the cream cheese frosting. In a mixing bowl, beat the softened cream cheese until smooth. Gradually add the powdered sugar and milk, mixing until you achieve a creamy consistency.

                Frost the Brownies: Once the brownies have cooled for at least 10 minutes, carefully spread an even layer of the cream cheese frosting over the top. For an additional touch of sweetness and a decorative flair, sprinkle white chocolate chips on top if desired.

                  Cool and Cut: Allow the brownies to cool completely in the pan (about 30 minutes) before lifting them out using the parchment paper overhang. Cut into squares for serving.

                    Prep Time: 15 minutes | Total Time: 1 hour | Servings: 24 squares

                      - Serving Suggestions: Serve these fudgy delights warm or at room temperature. Pair with a scoop of vanilla ice cream for an indulgent treat! Place a few fresh raspberries or strawberries on the side for a pop of color and freshness. Enjoy!