Go Back
- 1 cup graham cracker crumbs - 1/4 cup unsalted butter, melted - 2 tablespoons brown sugar - 8 oz cream cheese, softened at room temperature - 1 cup pumpkin puree (canned or fresh) - 1/2 cup powdered sugar - 1 teaspoon pure vanilla extract - 1 teaspoon pumpkin spice mix - 1/2 cup heavy whipping cream - Whipped cream for topping - Ground cinnamon for garnish Each ingredient plays a key role in creating these mini cheesecakes. The graham cracker crumbs make a crunchy base. Butter helps bind the crumbs together, while brown sugar adds sweetness and depth. Cream cheese gives the cheesecake its rich and creamy texture. Pumpkin puree provides that classic autumn flavor, and powdered sugar sweetens the mix. Vanilla extract enhances the overall taste, while pumpkin spice mix brings warmth and spice to every bite. Heavy whipping cream adds lightness and fluffiness to the filling. You can make these mini cheesecakes even more special with a few tasty toppings. Whipped cream is a must for that fluffy finish. You might also add chocolate shavings for a sweet touch. If you want to play with flavors, consider a drizzle of caramel sauce or a sprinkle of crushed nuts. For a twist, try adding more spices like nutmeg or even a hint of ginger. Each option adds a new layer of flavor and fun to your dessert experience. To start, gather your graham cracker crumbs, melted butter, and brown sugar. In a medium bowl, mix these three ingredients well. You want every crumb to soak up the butter and sugar. This step is key for a tasty crust. Next, grab your mini cheesecake cups or a muffin tin. Spoon about one tablespoon of the crumb mixture into each cup. Use the back of a spoon or your fingers to press it down firmly. This helps create a solid base. After pressing, place the crusts in the fridge. This will help them firm up while you make the filling. Now, let’s make the filling. In a large bowl, beat the softened cream cheese with an electric mixer. Mix until it’s smooth and creamy. Next, add the pumpkin puree, powdered sugar, vanilla extract, and pumpkin spice. Mix these together thoroughly. A good blend makes for a smooth and creamy texture. After mixing, it’s time to whip the cream. In a separate bowl, whip the heavy cream until it forms stiff peaks. Then, carefully fold the whipped cream into the pumpkin mixture. Use a spatula for this step. You want them to mix well without losing all the air from the whipped cream. Take the crusts out of the fridge. Now, it’s time to fill them. Spoon or pipe the pumpkin cheesecake filling into each crust. Fill them generously, but avoid overflowing. Once filled, return the mini cheesecakes to the fridge. Let them chill for at least four hours. For the best taste and texture, I recommend chilling them overnight. This step is crucial for letting the flavors meld together. For the full recipe, check the details above. To make your mini cheesecakes creamy, start with cold heavy cream. Whip it until you see stiff peaks. This step adds air and lightness to your filling. Next, let your cream cheese sit out for 30 minutes. This helps it soften and blend smoothly. If the cream cheese is too cold, it won't mix well. A common mistake is not pressing the crust firmly enough. If the crust is loose, it can crumble. Use the back of a spoon to press it down well. For the filling, watch the mixing time. If you over-mix, it can become too runny. Mix just until smooth and creamy. These mini cheesecakes are perfect for parties. Serve them on a pretty platter with a dollop of whipped cream. You can also sprinkle some ground cinnamon on top for extra flavor. They pair well with hot apple cider or spiced coffee. Try serving them alongside chocolate treats for a fun contrast. If you want more ideas, check the Full Recipe for additional tips! {{image_4}} You can make these mini cheesecakes even more fun. Try adding different spices. Cinnamon gives a warm flavor. Nutmeg adds a nice touch too. You can mix them in the filling or sprinkle on top. Consider chocolate or caramel layers. A chocolate layer can add a rich taste. Melt chocolate and pour over the crust. Or, layer caramel on top of the cheesecake. These choices make your dessert unique and tasty. If you want a gluten-free version, swap the graham crackers. Use gluten-free cookies or nuts for the crust. Crush them and mix with melted butter. This keeps the base crunchy and delicious. For a dairy-free option, choose plant-based cream cheese. It works well with pumpkin. You can also use coconut cream instead of heavy cream. This gives a rich flavor without dairy. These swaps let everyone enjoy your cheesecake! For the full recipe, refer to the main section. To keep your mini cheesecakes fresh, store them in the fridge. Use an airtight container. This will help prevent any odors from other foods. These treats can stay good for about 3 to 5 days in the fridge. If you want to keep them longer, you can freeze them. Just wrap each cheesecake tightly in plastic wrap and then in foil. They can last up to 2 months in the freezer. If you freeze the cheesecakes, you need to thaw them. Take them out of the freezer and place them in the fridge overnight. This slow thaw helps keep their creamy texture. After thawing, serve them cold for the best taste. If you want them a bit warmer, you can let them sit at room temperature for about 15 minutes before serving. This makes the flavors pop! For an extra touch, add whipped cream and a sprinkle of cinnamon just before serving. Enjoy your creamy delight! Yes, you can use homemade pumpkin puree. Just make sure it is thick and not watery. If you use fresh pumpkin, roast it first to bring out the best flavor. Strain any excess liquid to keep your filling creamy. Homemade puree adds a lovely taste and can make your mini cheesecakes even better. These mini cheesecakes should not sit out for more than two hours. Bacteria can grow quickly at room temperature. After serving, refrigerate any leftovers to keep them fresh. Make sure to cover them well. This way, they stay tasty for later. Absolutely! You can make these mini cheesecakes up to two days ahead. Just store them in the fridge covered with plastic wrap. This helps the flavors blend and makes them even more delicious. Remember to add whipped cream just before serving. You’ll keep it looking fresh and pretty. For the full recipe, check out the detailed instructions above. In this post, we explored how to make no-bake pumpkin mini cheesecakes. We discussed essential ingredients and their roles, plus optional toppings to enhance flavor. I provided clear steps for preparing the crust, making the filling, and chilling for the best texture. You learned tips to avoid common mistakes and how to customize flavors. Remember to store them properly for fresh enjoyment later. These mini cheesecakes are great for any gathering. Enjoy your delicious creation, and share with friends and family. It’s a dessert everyone will love!

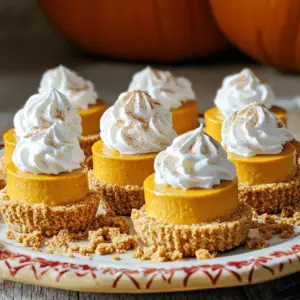
No-Bake Pumpkin Mini Cheesecakes

Satisfy your fall cravings with these delightful creamy no-bake pumpkin mini cheesecakes! Perfect for gatherings, these individual treats feature a buttery graham cracker crust and a rich pumpkin filling that's easy to whip up. With just a few simple ingredients, you’ll create a festive dessert that everyone will love. Click to explore the full recipe and impress your friends and family with this seasonal favorite!

Ingredients
  

1 cup graham cracker crumbs

1/4 cup unsalted butter, melted

2 tablespoons brown sugar

8 oz cream cheese, softened at room temperature

1 cup pumpkin puree (canned or fresh)

1/2 cup powdered sugar

1 teaspoon pure vanilla extract

1 teaspoon pumpkin spice mix

1/2 cup heavy whipping cream

Whipped cream for topping

Ground cinnamon for garnish

Instructions
 

Prepare the Crust: In a medium-sized mixing bowl, combine the graham cracker crumbs, melted butter, and brown sugar. Stir the mixture well until all crumbs are evenly coated with the butter and sugar.

    Form the Bases: Spoon approximately 1 tablespoon of the crumb mixture into the bottom of each mini cheesecake cup or muffin tin compartment. Use the back of a spoon or your fingers to press down firmly, creating a compact and even base. Place the assembled crusts in the refrigerator to firm up while you prepare the filling.

      Make the Cheesecake Filling: In a large mixing bowl, use an electric mixer to beat the softened cream cheese until it's smooth and creamy. Gradually add the pumpkin puree, powdered sugar, vanilla extract, and pumpkin spice, mixing thoroughly until the mixture is completely blended and silky.

        Whip the Cream: In a separate mixing bowl, whip the heavy cream using a hand mixer or a stand mixer until stiff peaks form. Carefully fold the whipped cream into the pumpkin cheesecake mixture using a spatula, ensuring the two are well-combined without deflating the whipped cream.

          Fill the Cups: Retrieve the chilled crusts from the refrigerator. Spoon or pipe the luscious pumpkin cheesecake filling over each crust, making sure to fill each cup generously without overflowing.

            Chill: Return the filled mini cheesecake cups to the refrigerator, allowing them to chill and set for at least 4 hours or preferably overnight for optimal texture and flavor.

              Serve: Once the cheesecake filling has set, take the mini cheesecakes out of the fridge. Top each one with a delightful dollop of whipped cream and a sprinkle of ground cinnamon just before serving for that perfect fall touch.

                Prep Time: 20 minutes | Total Time: 4 hours 20 minutes | Servings: 12 mini cheesecakes

                  - Presentation Tips: Arrange the mini cheesecakes on a decorative serving platter. For an extra touch, sprinkle some crushed graham crackers around them, enhancing both the aesthetic and flavor of your delightful dessert.