Go Back
- 1 cup crushed graham crackers - 1/4 cup unsweetened cocoa powder - 1/4 cup melted coconut oil - 1/2 cup cream cheese, softened to room temperature - 1/2 cup hazelnut spread (like Nutella) - 1/4 cup powdered sugar - 1 teaspoon pure vanilla extract - 1 cup whipped cream (store-bought or homemade) - 1/2 cup chopped hazelnuts (for garnish) - Chocolate shavings (for garnish) These ingredients create a rich and creamy cheesecake. The graham crackers form a crunchy base that pairs well with the smooth filling. The cocoa powder adds a deep chocolate flavor, while the hazelnut spread brings in nutty sweetness. You can customize this recipe too! Try using different nut spreads, like almond or peanut. If you want more texture, add crushed cookies or nuts to the crust. You can also swap whipped cream with a dairy-free version to meet dietary needs. Each change can give the cheesecake a fresh twist. Enjoy your creative cooking! Mixing the crust First, grab a medium bowl. Add 1 cup of crushed graham crackers and 1/4 cup of unsweetened cocoa powder. Mix them well until they are evenly combined. This will be the base of your cheesecake cups. Next, pour in 1/4 cup of melted coconut oil. Stir the mixture until it looks like wet sand. This helps bind the crust together. Creating the cheesecake filling In a separate bowl, add 1/2 cup of softened cream cheese. Then, mix in 1/2 cup of hazelnut spread, 1/4 cup of powdered sugar, and 1 teaspoon of pure vanilla extract. Use an electric mixer or a whisk to blend these until smooth and creamy. Once that’s done, gently fold in 1 cup of whipped cream. This makes the filling light and fluffy. Assembling the cups Now it’s time to assemble! Take your graham cracker mixture and divide it evenly among four serving cups. Press it down firmly to create a solid base. Next, spoon the cheesecake filling over the crust in each cup. Smooth the tops with a spatula for a nice finish. Chill time requirements After assembly, place your cheesecake cups in the refrigerator. They need to chill for at least 2 hours. This helps the filling set properly and ensures a good texture. Importance of setting in the refrigerator Setting the cheesecake in the fridge is key. It allows the flavors to meld and the texture to firm up. This step ensures that every bite is creamy and delicious. Don’t skip it! Mixing is key to a great cheesecake. Start with room temperature cream cheese. This helps it blend smoothly. Use a hand mixer or whisk to beat the cream cheese and hazelnut spread. Mix until it is creamy and free of lumps. For the right consistency, fold in the whipped cream gently. Use a spatula and be careful not to deflate it. This keeps your cheesecake light and fluffy. If the mixture feels too thick, add a tiny bit of milk to loosen it. To present your cheesecake cups nicely, place them on a pretty tray. You can layer them with fresh berries for color. Raspberries and strawberries look great and add a tangy flavor. For a fun twist, serve with a drizzle of chocolate sauce. This adds extra sweetness and makes it even more appealing. Enjoy these cups as a treat after dinner or at a gathering with friends! {{image_4}} You can make these cheesecake cups even more fun! Try adding different nut spreads. Almond butter or peanut butter can bring a new taste. Each nut spread gives a unique twist to the flavor. You can also mix in extra flavors or spices. A pinch of cinnamon or a splash of espresso can enhance the chocolate. For a fruity vibe, blend in some raspberry or orange zest. These small changes can make a big impact! If you need gluten-free options, swap graham crackers for gluten-free cookies. Almond flour or oats can work well too. Just make sure to check the labels for gluten-free marks. For dairy-free alternatives, use a dairy-free cream cheese. There are many brands available now. You can also use coconut cream instead of whipped cream. This keeps the cheesecake rich and creamy without dairy. These swaps ensure everyone can enjoy this dessert! To keep your no-bake chocolate hazelnut cheesecake cups fresh, use airtight containers. Glass jars or plastic food storage containers work well. They protect the cups from drying out and keep flavors strong. Store them in the fridge for up to three days. After that, the texture may change, but they will still taste good. If you want to save some for later, you can freeze these cheesecake cups. First, cover each cup with plastic wrap or aluminum foil. Then, place them in a freezer-safe container. This helps prevent freezer burn. They can last in the freezer for up to three months. When ready to enjoy, take the cups out and place them in the fridge overnight. This allows them to thaw slowly and stay smooth. Avoid microwaving them, as it can ruin the texture. Enjoy your delicious treats when they are perfectly chilled! Can I use a different type of cracker for the crust? Yes, you can use different crackers. Try digestive biscuits or vanilla wafers. Both give a nice flavor and texture. Just crush them to a fine crumb. What can I substitute for coconut oil? If you don’t have coconut oil, you can use unsalted butter. It adds a rich taste and helps the crust hold together. Melt the butter before mixing it in. How can I make these ahead of time? You can prepare these cheesecake cups a day in advance. Just chill them in the fridge. They will taste even better after resting overnight. What to do if the cheesecake filling is too runny? If your filling is too runny, try adding more cream cheese. Mix it in well. You can also chill the cups longer to help them set. How to ensure the crust holds together? Make sure to mix the melted coconut oil well with the crumbs. Press the crust down firmly in the cups. This helps it stay together when you scoop out the cheesecake. You learned how to make delicious cheesecake cups from scratch. We covered the key ingredients, step-by-step instructions, tips for perfecting your treats, and fun variations. Remember, chilling is crucial for the best texture. Use proper storage to keep them fresh longer. These cheesecake cups can impress anyone and suit various diets. So, gather your tools, get creative, and enjoy this tasty treat at home!

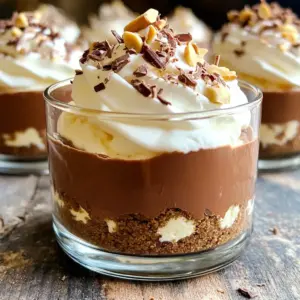
No-Bake Chocolate Hazelnut Cheesecake Cups

Indulge in these decadent no-bake chocolate hazelnut cheesecake cups that are perfect for any dessert lover! Easy to make and bursting with rich flavors, these creamy treats combine crunchy graham cracker crust with a silky cheese filling and a hint of hazelnut. Ready in just 20 minutes and chilled for two hours, this recipe is a must-try! Click through for the full recipe and get ready to impress your guests!

Ingredients
  

1 cup crushed graham crackers

1/4 cup unsweetened cocoa powder

1/4 cup melted coconut oil

1/2 cup cream cheese, softened to room temperature

1/2 cup hazelnut spread (like Nutella)

1/4 cup powdered sugar

1 teaspoon pure vanilla extract

1 cup whipped cream (store-bought or homemade)

1/2 cup chopped hazelnuts (for garnish)

Chocolate shavings (for garnish)

Instructions
 

In a medium mixing bowl, combine the crushed graham crackers and cocoa powder, mixing thoroughly to ensure even distribution.

    Pour the melted coconut oil over the crumb mixture, stirring until every crumb is coated and the mixture resembles wet sand.

      Evenly distribute the graham cracker mixture among four serving cups or ramekins, pressing it down firmly with your fingers or a spoon to form a solid base.

        In a separate bowl, beat the softened cream cheese, hazelnut spread, powdered sugar, and vanilla extract together using an electric mixer or whisk, until the mixture is smooth and creamy.

          Carefully fold in the whipped cream, using a spatula, until fully combined without deflating the mixture, resulting in a beautifully light cheesecake filling.

            Spoon the luscious cheesecake mixture on top of the crusts in the cups, smoothing the tops gently with a spatula or the back of a spoon for an elegant finish.

              Place the cheesecake cups in the refrigerator for a minimum of 2 hours, allowing them to chill and set perfectly.

                Just before serving, sprinkle the chopped hazelnuts and delicate chocolate shavings on top of each cheesecake cup to add a delightful crunch and a stylish finishing touch.

                  - Prep Time: 20 minutes

                    - Total Time: 2 hours 20 minutes

                      - Servings: 4

                        - Presentation Tips: For an elegant touch, consider serving the cheesecake cups on a decorative tray and pairing them with fresh berries for added color and flavor.