Go Back
To create your No-Bake Chocolate Chip Cheesecake Bars, gather these simple ingredients: - 1 ½ cups graham cracker crumbs - ½ cup unsalted butter, melted - 2 tablespoons granulated sugar - 16 oz cream cheese, softened at room temperature - ½ cup powdered sugar - 1 teaspoon pure vanilla extract - 1 cup heavy whipping cream, chilled - ½ cup mini chocolate chips - Additional mini chocolate chips for garnish Each ingredient plays a key role in building flavor and texture. The graham cracker crumbs give a buttery base. The unsalted butter binds the crumbs together. Granulated sugar adds a touch of sweetness to the crust. Cream cheese is the star of this recipe, providing a rich and creamy filling. Powdered sugar sweetens the filling without any graininess. Pure vanilla extract brings warmth to the flavor. Heavy whipping cream is crucial. When whipped, it adds lightness to the cheesecake. Mini chocolate chips offer delightful bursts of chocolate throughout the bars. Use extra chocolate chips on top for decoration and added taste. With these ingredients, you can create a sweet and creamy treat that everyone will love. Enjoy the simple pleasure of making these no-bake bars! 1. Mixing graham cracker crumbs and butter: Start by taking a medium bowl. Add 1 ½ cups of graham cracker crumbs, ½ cup of melted unsalted butter, and 2 tablespoons of granulated sugar. Stir this mixture until it looks like wet sand. This mix will be your crust. 2. Pressing crust into the pan: Next, grab a 9x9 inch baking pan. Pour the crumb mixture into the pan. Use the back of a measuring cup or your fingers to press it down firmly. Make sure the crust is even and solid. 1. Beating cream cheese: In a large bowl, take 16 oz of softened cream cheese. Beat it with an electric mixer on medium speed until it is smooth. Make sure there are no lumps. Gradually add ½ cup of powdered sugar and 1 teaspoon of pure vanilla extract. Mix well until combined. 2. Whipping heavy cream: In another bowl, pour in 1 cup of chilled heavy whipping cream. Use the electric mixer on high speed to whip it until stiff peaks form. This adds a light texture to your filling. 3. Folding mixtures together: Now, take the whipped cream and gently fold it into the cream cheese mixture. Use a spatula and be gentle to keep the airiness. The mix should be fluffy and smooth. Then, fold in ½ cup of mini chocolate chips evenly. 1. Pouring filling over the crust: Pour the cheesecake filling over your pressed crust. Use a spatula to spread it evenly. 2. Garnishing with chocolate chips: Sprinkle additional mini chocolate chips on top. Press them lightly into the filling for a nice look and added flavor. 3. Refrigerating to set: Cover the pan with plastic wrap. Place it in the fridge for at least 4 hours. This helps it to set and become firm. After chilling, lift the cheesecake out of the pan. Cut into bars and serve! To whip cream to stiff peaks, start with chilled heavy cream. Use a clean bowl and beaters. Beat on high speed until you see firm peaks. This step makes your filling light and fluffy. To avoid lumps in cream cheese, ensure it is softened first. Leave it at room temperature for about 30 minutes. Mix it well with an electric mixer on medium speed. This helps create a smooth base. Serve your cheesecake bars chilled for the best taste. Place each bar on a pretty dessert plate. For a fancy touch, drizzle with chocolate sauce. You can also dust with cocoa powder for added flair. Add extra mini chocolate chips on top. Press them lightly into the filling. This makes the bars look even more inviting. If your filling is runny, try chilling it longer. Sometimes, a bit more time in the fridge helps it set properly. You can also add more whipped cream to thicken it. For a firm crust, press the graham cracker mixture down well. Use a measuring cup or your fingers. Make sure it is packed tightly in the pan. This helps hold everything together when you cut the bars. {{image_4}} You can spice up your no-bake chocolate chip cheesecake bars in fun ways. Adding fruit flavors makes a big difference. For example, you can fold in pureed strawberries or raspberries. This gives your bars a fresh twist and a pop of color. The tartness of berries pairs well with the sweet filling. Swapping chocolate chip types is another great option. Instead of regular mini chocolate chips, you can try dark chocolate or white chocolate chips. Dark chocolate adds a rich, deep flavor. White chocolate gives a creamy sweetness. Experimenting with these flavors can lead to surprising and tasty results. If you need gluten-free options, you can easily switch the crust. Use gluten-free graham cracker crumbs instead of regular ones. This way, everyone can enjoy your bars without worry. For a vegan version, you can replace cream cheese with a plant-based alternative. Brands like Tofutti or Daiya offer great vegan cream cheeses. You can also use coconut cream in place of heavy whipping cream. This creates a creamy texture while keeping it dairy-free. These swaps help you cater to different dietary needs while keeping the taste delicious. To keep your No-Bake Chocolate Chip Cheesecake Bars fresh, store them in the refrigerator. Place the bars in an airtight container. This helps maintain their creamy texture. If you don’t have a container, cover the pan tightly with plastic wrap. This also works well. If you want to save some for later, you can freeze the cheesecake bars. Cut the bars into pieces first. Wrap each piece in plastic wrap and then place them in a freezer-safe bag. This keeps them from getting freezer burn. These cheesecake bars can last up to five days in the fridge. Check for a firm texture and fresh smell to ensure they’re still good. If you freeze them, they can last up to two months. Just remember to thaw them in the fridge before eating. Watch for signs of spoilage, such as a change in color or a sour smell. If you notice these signs, it’s best to throw them out. Enjoy your cheesecake bars while they are fresh! Yes, you can use ricotta or mascarpone. Both create a rich and creamy texture. Ricotta gives a slightly lighter taste, while mascarpone adds a luxurious mouthfeel. If you swap cream cheese for either, the overall flavor changes. You may need to adjust sugar amounts based on the cheese's sweetness. Experiment to find your favorite! The bars need at least 4 hours to chill. This time helps them set properly. For best results, I suggest chilling overnight. This allows the flavors to blend well. If you want quicker results, make sure your cheesecake mix is smooth and your heavy cream is whipped to stiff peaks. You can check if they’re ready by gently pressing the top. If it feels firm, they are set. Yes! You can prepare these bars up to two days in advance. Just keep them covered in the fridge. This makes them perfect for parties or gatherings. If you want to serve them later, slice them before serving. This way, everyone gets a piece easily. Enjoy your tasty treat whenever you like! These cheesecake bars are easy and fun to make. You learned how to create a great crust, mix a smooth filling, and assemble everything perfectly. Remember to use my tips for the best texture and presentation. Feel free to explore fun variations, like fruit flavors or gluten-free options. Store the bars well for tasty treats later. Enjoy making and sharing these cheesecake bars! You'll impress everyone with your skills and creativity. Make this recipe your own and have fun!

No-Bake Chocolate Chip Cheesecake Bars

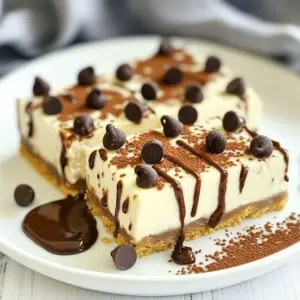
Indulge in the ultimate treat with these no-bake chocolate chip cheesecake bars! This simple recipe combines a buttery graham cracker crust with a fluffy cream cheese filling loaded with mini chocolate chips. Perfect for any occasion, these bars are quick to prepare and require no baking. Click through to explore the full recipe and impress your friends and family with this delicious dessert that’s sure to satisfy every sweet tooth!

Ingredients
  

1 ½ cups graham cracker crumbs

½ cup unsalted butter, melted

2 tablespoons granulated sugar

16 oz cream cheese, softened at room temperature

½ cup powdered sugar

1 teaspoon pure vanilla extract

1 cup heavy whipping cream, chilled

½ cup mini chocolate chips

Additional mini chocolate chips for garnish

Instructions
 

In a medium mixing bowl, combine the graham cracker crumbs, melted butter, and granulated sugar. Stir until the mixture is evenly blended and resembles wet sand.

    Transfer the crumb mixture into a 9x9 inch baking pan. Use the back of a measuring cup or your fingers to press the mixture firmly and evenly into the bottom of the pan to create a solid crust.

      In a large mixing bowl, beat the softened cream cheese using an electric mixer on medium speed until smooth and creamy, ensuring there are no lumps. Gradually incorporate the powdered sugar and vanilla extract, continuing to mix until fully combined.

        In a separate bowl, pour in the chilled heavy cream. Whip the cream with an electric mixer on high speed until stiff peaks form—this will add a light and airy texture to your cheesecake filling.

          Carefully fold the whipped cream into the cream cheese mixture using a spatula, being gentle to retain as much of the airiness as possible. The mixture should be fluffy and smooth.

            Gently fold in the mini chocolate chips, ensuring they are evenly distributed throughout the cheesecake filling for delightful bursts of chocolate in every bite.

              Pour the cheesecake filling over the prepared graham cracker crust, spreading it out evenly with a spatula to create a smooth top.

                Sprinkle additional mini chocolate chips over the top for a decorative garnish, pressing them lightly into the filling.

                  Cover the pan tightly with plastic wrap and refrigerate for a minimum of 4 hours, or until the cheesecake is set and firm to the touch.

                    Once fully chilled and set, lift the cheesecake out of the pan using parchment overhang if available. Cut into bars and serve!

                      Prep Time: 20 mins | Total Time: 4 hrs 20 mins | Servings: 12 bars

                        - Presentation Tips: Serve chilled, elevating your presentation by placing each bar on a decorative dessert plate. For an elegant touch, drizzle with homemade chocolate sauce or dust with cocoa powder before serving. Enjoy the luscious layers of flavor!