
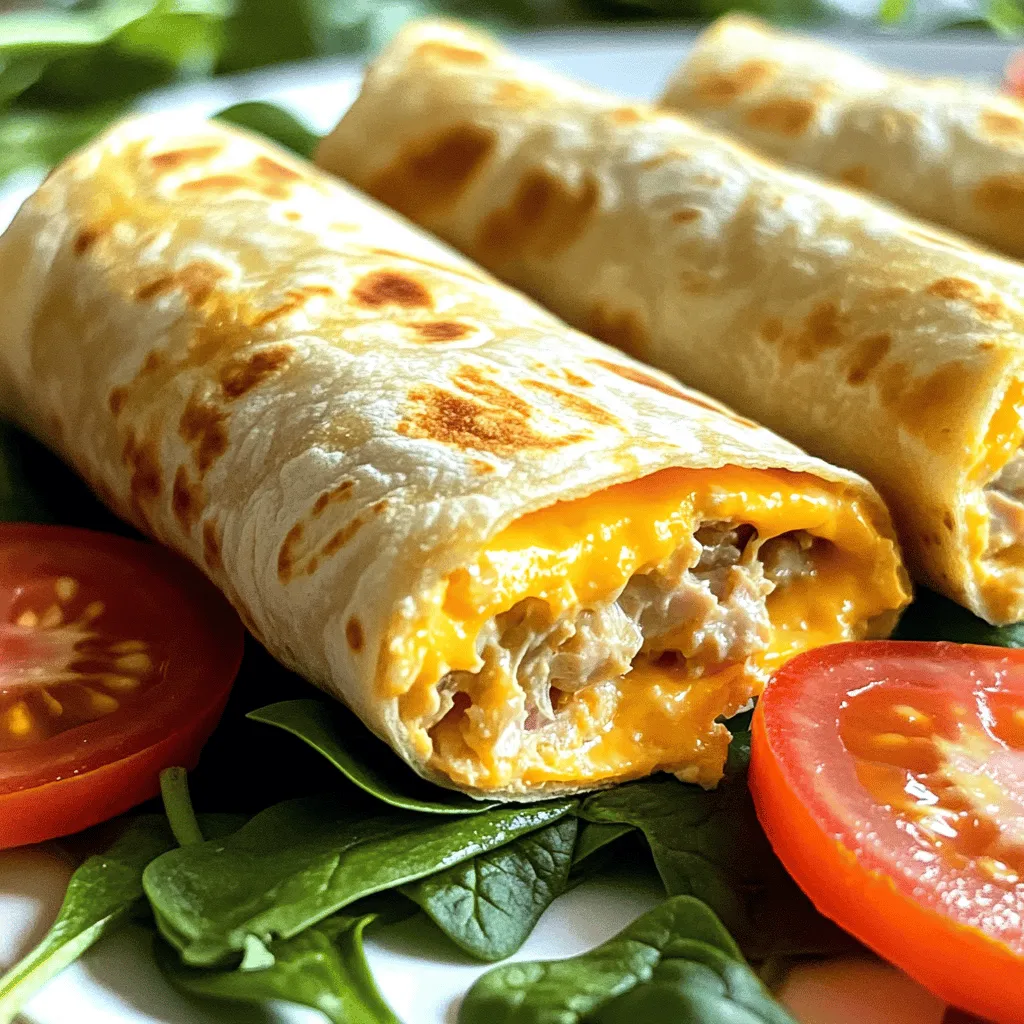
Looking for a quick, tasty meal? The Tuna Melt Wrap is your answer! This easy dish combines creamy tuna with warm, melty cheese, all wrapped up in a soft tortilla. Whether you’re a busy parent or just need a simple, delightful dinner, this recipe is your go-to. Let’s dive into the ingredients, simple steps, and clever tips to enhance your Tuna Melt Wrap experience!
Ingredients
Full Recipe Overview
The tuna melt wrap is a tasty meal option. It combines creamy tuna with fresh veggies and gooey cheese. This recipe is quick and easy, perfect for lunch or a light dinner. You can find the full recipe below for step-by-step guidance.
Essential Ingredients
– 1 can of tuna in water, drained
– 2 tablespoons creamy mayonnaise
– 1 tablespoon tangy Dijon mustard
– 1/4 cup finely chopped red onion
– 1/4 cup crisp diced celery
– 1/2 cup shredded sharp cheddar cheese
– 4 large flour tortillas
– 1 cup fresh baby spinach leaves
– Salt and freshly cracked black pepper to taste
– Olive oil for grilling
These ingredients come together to make a filling and satisfying wrap. The tuna adds protein, while the cheese brings richness. The veggies add crunch and freshness.
Optional Add-ins
You can make this wrap your own by adding extra ingredients. Here are some fun ideas:
– Sliced avocado for creaminess
– Chopped pickles for a tangy crunch
– Sliced jalapeños for heat
– Fresh herbs like dill or parsley for flavor
Feel free to mix and match these add-ins. They can elevate your wrap and make it even more enjoyable!
Step-by-Step Instructions
Preparation of Tuna Mixture
Start by draining the can of tuna. You want it dry to avoid a soggy wrap. In a medium bowl, mix the tuna with creamy mayonnaise and tangy Dijon mustard. Add chopped red onion and diced celery for crunch. Stir well to coat the tuna.
Next, fold in the shredded sharp cheddar cheese. It should blend evenly throughout the mixture. Add salt and black pepper to taste. Adjust as you like. This mixture is the heart of your wrap, so make it tasty!
Assembling the Wraps
Lay out the large flour tortillas on a clean surface. In the middle of each tortilla, place a handful of fresh baby spinach leaves. This adds a fresh touch and helps the wrap stay vibrant.
Spoon a good amount of the tuna mixture onto the spinach. Spread it out a bit for even coverage. Now, roll each tortilla tightly. Tuck in the sides as you go. This keeps all the yummy filling secure.
Grilling to Perfection
Heat a skillet over medium heat and add a drizzle of olive oil. Once the oil is hot, lay the wraps seam-side down in the skillet. Grill for about 3-4 minutes on each side. You want them golden brown and crispy, with the cheese melted inside.
After grilling, remove the wraps and let them cool for a minute. Slice them in half diagonally for a nice look. If you like, garnish with sliced ripe tomatoes. Now, your tuna melt wraps are ready to enjoy!
Find the full recipe [here](#).
Tips & Tricks
How to Choose the Best Tuna
When you pick tuna, look for high-quality options. Canned tuna should have a good color. Choose light tuna for a milder taste. If you want something richer, go for chunk white tuna. Always check the label for sustainability. Brands that use responsible fishing practices are the best choice. Your tuna melt will taste better and help the planet too.
Ensuring Perfectly Grilled Wraps
Grilling your wraps right makes all the difference. Use a non-stick skillet or grill pan. Heat it over medium heat and add olive oil. Make sure the oil is hot before adding the wraps. This helps them get golden brown and crispy. Grill each side for about 3-4 minutes. Keep an eye on them, so they don’t burn. You want that cheesy goodness to melt and ooze out!
Making Ahead for Quick Meals
Prep your tuna mixture ahead of time for quick meals. You can store it in the fridge for up to two days. Just keep it in an airtight container. When you’re ready to eat, grab your tortillas and spinach. Assemble your wraps in minutes. This saves you time on busy days. You’ll have a tasty meal ready to go without the fuss. For the full recipe, refer back to the initial section.
Variations
Vegetarian Option
You can make a tasty vegetarian version. Substitute the tuna with mashed chickpeas. Mash them well and mix with mayonnaise and mustard. Add in red onion, celery, and cheese. You can also add diced bell peppers for a crunchy twist. This keeps the same great wrap feel while being meat-free.
Spicy Tuna Melt Upgrade
If you like heat, try this spicy twist. Add chopped jalapeños or a splash of hot sauce to the tuna mix. You can even stir in some sriracha for extra kick. Consider using pepper jack cheese. This adds a creamy, spicy flavor that will excite your taste buds.
Gluten-Free Alternative
For a gluten-free option, swap flour tortillas for gluten-free wraps. Many good brands offer tasty choices. Always check the label for hidden gluten. You can also use lettuce leaves for a low-carb wrap option. This keeps your meal light and fresh while packing in the flavor.
Storage Info
Proper Refrigeration
To keep your tuna melt wraps fresh, store them in the fridge. Place any leftovers in an airtight container. This helps to keep the flavors intact. The wraps will stay good for about three days. If you notice any off smells or changes in texture, it’s best to toss them. Always check your food before eating.
Freezing Tips
If you want to save some wraps for later, you can freeze them. Wrap each tuna melt in plastic wrap, then put them in a freezer bag. This prevents freezer burn and keeps them tasty. They will last in the freezer for about a month. When ready, thaw them in the fridge overnight before reheating.
Reheating Instructions
Reheating tuna melts can be easy. You can use a skillet or an oven. If using a skillet, heat it on medium. Place the wrap in the pan for about 3-4 minutes per side. This helps keep the outside crispy. If you prefer the oven, preheat it to 350°F (175°C). Bake the wraps for about 10-15 minutes, until warm. Enjoy your tasty tuna melt again! For the full recipe, refer to the earlier sections.
FAQs
What can I substitute for mayonnaise?
You can use Greek yogurt instead of mayonnaise. It gives a creamy texture and adds protein. Another good option is avocado. It adds rich flavor and healthy fats. You can also try hummus for a unique twist. This makes your tuna melt wrap light and fresh.
Can I add other vegetables?
Yes, you can add many vegetables. Chopped bell peppers add crunch and sweetness. Grated carrots can give more color and flavor. You can also use cucumber for a crisp bite. Just make sure to chop them small so they mix well with the tuna.
How can I make it healthier?
To make it healthier, use whole grain tortillas. They have more fiber and nutrients. You can also cut down on cheese or use a low-fat version. Adding more veggies boosts the nutrients too. Lastly, consider using less oil when grilling. This helps keep your meal light and nutritious.
For the full recipe, check out the Tuscan Tuna Melt Wrap.
This article covered all you need to make tasty tuna wraps. We talked about essential and optional ingredients, and I gave you clear steps for mixing, assembling, and grilling. I also shared tips on choosing quality tuna and ensuring a great grill. Plus, I offered variations for vegetarian diets or spicy lovers. Don’t forget to store them right for freshness. With these tips, you can prepare quick and healthy meals that everyone will love. Enjoy your cooking journey and have fun with your tuna wraps!
Tuna Melt Wrap
A delicious and easy-to-make wrap filled with tuna, cheese, and fresh vegetables, perfect for a quick meal.
Ingredients
Instructions
- 1
In a medium mixing bowl, combine the drained tuna, creamy mayonnaise, and tangy Dijon mustard. Add the finely chopped red onion and diced celery. Stir well until all ingredients are thoroughly mixed and the tuna is well coated.
- 2
Gently fold in the shredded sharp cheddar cheese, ensuring it’s evenly distributed throughout the mixture. Season with salt and freshly cracked black pepper to taste, adjusting the seasoning as desired.
- 3
Place the large flour tortillas on a clean, flat work surface. In the center of each tortilla, layer a handful of fresh baby spinach leaves to create a bed for the tuna mixture.
- 4
Spoon a generous portion of the tuna mixture on top of the spinach on each tortilla, spreading it out slightly for even coverage.
- 5
Carefully roll each tortilla tightly, tucking in the sides as you go to secure the delicious filling within. This will help prevent any spillage while grilling.
- 6
In a skillet over medium heat, add a drizzle of olive oil and allow it to heat up. Once the oil is shimmering, place the wraps seam-side down into the pan.
- 7
Grill the wraps for approximately 3-4 minutes on each side, or until they are golden brown and crispy, and the cheese has melted into a gooey delight.
- 8
Remove the wraps from the skillet and let them cool for a minute before slicing them in half diagonally for a beautiful presentation.
- 9
Optional: Garnish the wraps with sliced ripe tomatoes for a fresh complement and serve warm, inviting everyone to dig in!
Chef's Notes
Serve warm with sliced tomatoes for garnish.

Recipe Creator
Remy
I’m Chef Remy, your recipe companion, here to bring warmth, bold taste, and simplicity to your kitchen.
View My Recipes