Indulge in a slice of heaven with my Extra Moist Chocolate Peanut Butter Cake Delight! This rich and fluffy cake combines the deep flavors of chocolate with the creamy goodness of peanut butter. Whether you’re a novice baker or a pro, I’ll guide you through each step. Get ready to impress your friends and family with this crowd-pleaser. Let’s dive into the details and start baking your masterpiece!
Ingredients
List of Ingredients
To make this extra moist chocolate peanut butter cake, gather these ingredients:
– 1 ¾ cups all-purpose flour
– 1 ¾ cups granulated sugar
– ¾ cup unsweetened cocoa powder
– 1 ½ teaspoons baking powder
– 1 ½ teaspoons baking soda
– 1 teaspoon salt
– 2 large eggs
– 1 cup whole milk
– ½ cup vegetable oil
– 2 teaspoons vanilla extract
– 1 cup boiling water
– 1 cup creamy peanut butter
– ½ cup powdered sugar
– ½ cup heavy cream
Measurement Conversions
When working in the kitchen, you might need some common conversions:
– 1 cup = 240 ml
– 1 tablespoon = 15 ml
– 1 teaspoon = 5 ml
– ¾ cup = 180 ml
– ½ cup = 120 ml
Recommended Brands and Substitutes
Choosing the right brands can help make your cake great. Here are my favorites:
– Flour: King Arthur Flour is a reliable choice.
– Sugar: C&H Granulated Sugar works well.
– Cocoa Powder: Use Hershey’s Unsweetened Cocoa Powder for rich flavor.
– Baking Powder: Rumford is a great aluminum-free option.
– Peanut Butter: Jif or Skippy offer smooth and creamy textures.
– Vegetable Oil: Canola oil is a good substitute for vegetable oil.
– Milk: Whole milk gives the best taste, but you can use almond or soy milk.
If you need to adjust for allergies, consider these substitutes:
– Use gluten-free flour for a gluten-free version.
– Swap eggs with applesauce or flaxseed meal for a vegan cake.
For more details and precise measurements, check the Full Recipe.
Step-by-Step Instructions
Preparation Steps
1. Preheat the Oven: Set your oven to 350°F (175°C). Grease two 9-inch round cake pans with butter or cooking spray and dust with flour.
2. Combine Dry Ingredients: In a large bowl, sift together 1 ¾ cups all-purpose flour, 1 ¾ cups granulated sugar, ¾ cup unsweetened cocoa powder, 1 ½ teaspoons baking powder, 1 ½ teaspoons baking soda, and 1 teaspoon salt. Mix well.
3. Mix Wet Ingredients: Add 2 large eggs, 1 cup whole milk, ½ cup vegetable oil, and 2 teaspoons vanilla extract to the dry mix. Use an electric mixer on medium speed for 2 minutes until smooth.
4. Incorporate Boiling Water: Carefully stir in 1 cup boiling water. The batter will be thin, but that’s okay. This makes the cake moist.
5. Prepare for Baking: Pour the batter evenly into the two prepared pans. Make sure they are equal in size for even baking.
Baking Process
6. Bake the Cakes: Place both pans in the oven and bake for 30-35 minutes. Check if they are done by inserting a toothpick in the center. If it comes out clean, they are ready. Let the cakes cool in the pans for 10 minutes. Then turn them out onto wire racks to cool completely.
Frosting and Assembly
7. Make the Peanut Butter Frosting: While the cakes cool, prepare the frosting. In a medium bowl, mix 1 cup creamy peanut butter and ½ cup powdered sugar until smooth. Gradually add ½ cup heavy cream and beat until fluffy.
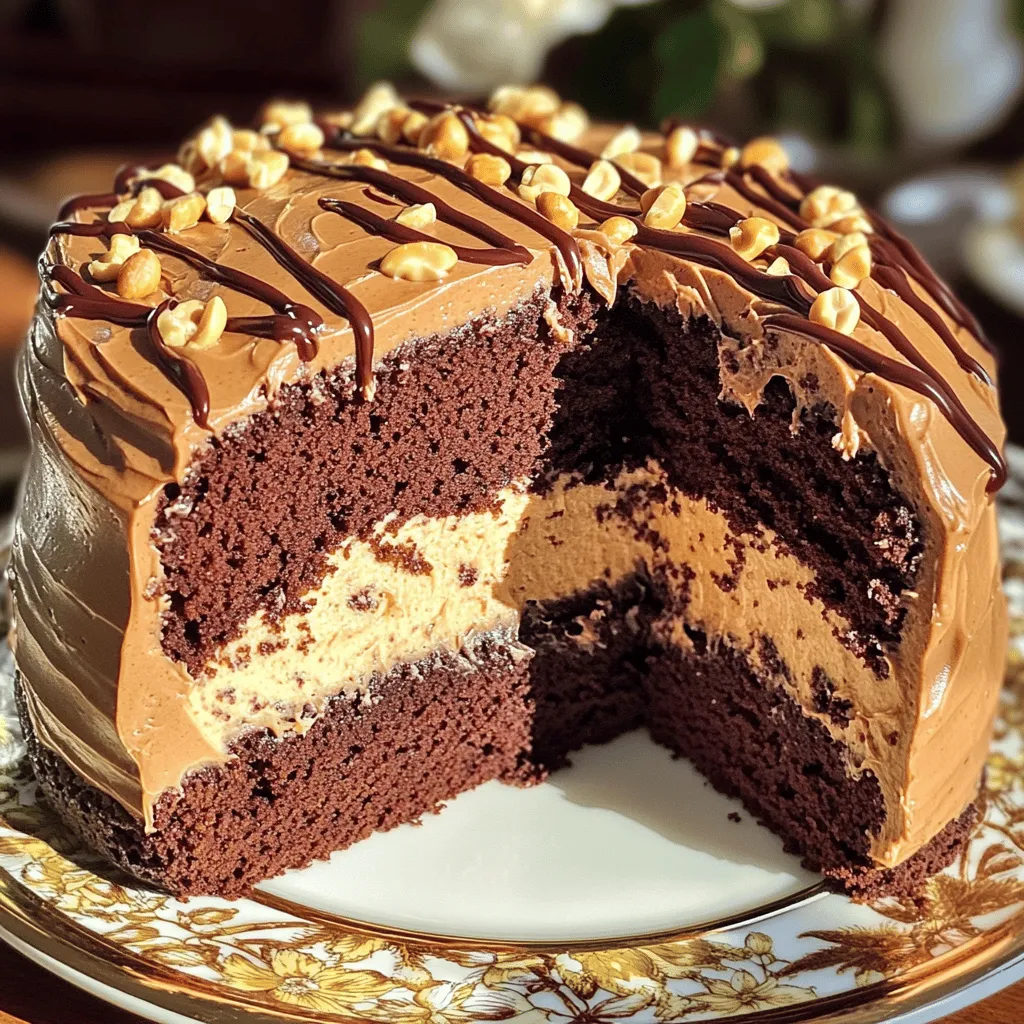
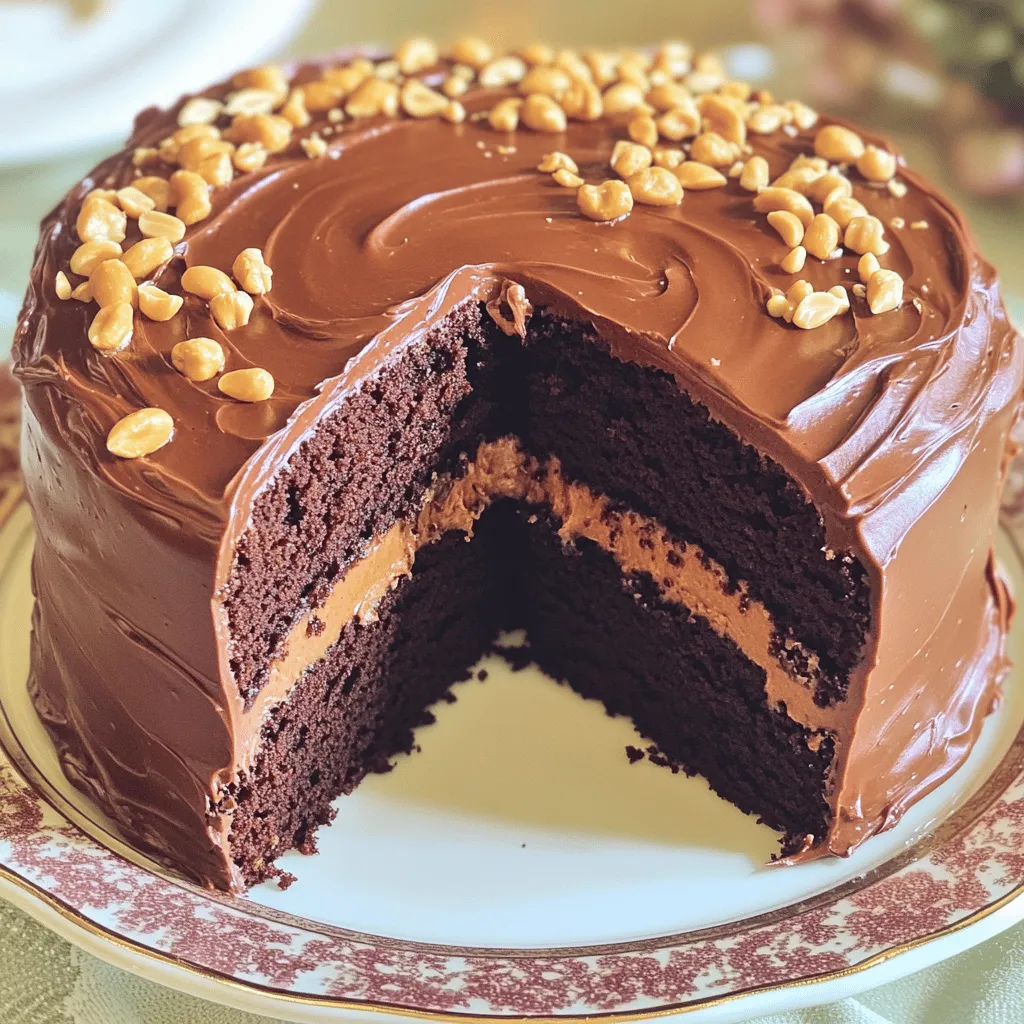
8. Assemble the Cake: Once the cakes are cool, place one layer on a serving plate. Spread a layer of peanut butter frosting on top. Carefully add the second layer and cover the entire cake with the rest of the frosting.
9. Decorate the Cake: For a fun touch, drizzle melted chocolate on top or sprinkle chopped peanuts for added crunch.
For the full recipe, refer to the earlier sections for all the details.
Tips & Tricks
Achieving Extra Moisture
To make this cake extra moist, I use boiling water. Adding it to the batter helps hydrate the dry ingredients. Do not skip this step! You can also replace some oil with applesauce. This swap adds moisture without extra fat. Using fresh ingredients is key, too. Fresh eggs and milk make a big difference.
Common Mistakes to Avoid
One big mistake is overmixing the batter. Mix just until combined to keep the cake light. Also, avoid baking too long. If you bake it too much, the cake becomes dry. Always check the oven time but use a toothpick to judge doneness. Insert it into the center and see if it comes out clean.
How to Check Cake Doneness
To check if the cake is done, use a toothpick. Insert it in the middle of the cake. If it comes out clean or with a few crumbs, it’s ready. If the toothpick has wet batter, bake a few more minutes. Let the cake cool in the pan for 10 minutes before moving it to a rack. This cooling time helps keep the cake moist.
For the full recipe, check out the Extra Moist Chocolate Peanut Butter Cake. Enjoy baking!
Variations
Gluten-Free Alternative
You can make this cake gluten-free by using a gluten-free flour blend. Look for a blend that has a good mix of starches and whole grains. A 1:1 gluten-free flour is easy to use. Just swap it for the all-purpose flour in the recipe. Your cake will still turn out moist and fluffy.
Vegan Option
To make a vegan version, replace the eggs with flaxseed meal. Mix 1 tablespoon of flaxseed meal with 2.5 tablespoons of water for each egg. Let it sit for five minutes to thicken. Use almond milk or any plant-based milk instead of whole milk. For the frosting, you can use coconut cream mixed with peanut butter and powdered sugar.
Flavor Additions and Enhancements
You can add different flavors to your cake. Try mixing in a teaspoon of instant coffee for a rich taste. For a fruit twist, add a half cup of mashed bananas to the batter. You can also fold in chocolate chips for extra sweetness. Don’t forget to top with crushed peanuts or mini chocolate chips for a fun crunch. Feel free to explore and find your favorite flavor! For the full recipe, check the main article.
Storage Info
How to Store the Cake
To keep your Extra Moist Chocolate Peanut Butter Cake fresh, store it in an airtight container. Place parchment paper between layers to prevent sticking. You can also wrap the cake in plastic wrap for extra protection. Store it at room temperature for up to three days. If you want to keep it longer, the fridge works too, but it may dry out a bit.
Freezing Instructions
Freezing is a great option for this cake. First, let the cake cool completely. Then, wrap each layer tightly in plastic wrap. After that, place the wrapped layers in a freezer bag. You can freeze the cake for up to three months. When you’re ready to enjoy it, just move it to the fridge to thaw overnight.
Best Practices for Reheating
If you want to enjoy a warm slice, reheating is easy. Preheat your oven to 350°F (175°C). Place a slice on a baking sheet and cover it with foil. Heat for about 10 minutes, or until warmed through. You can also use the microwave. Heat in short bursts of 15 seconds, checking often. Enjoy the cake warm for a cozy treat!
FAQs
Can I use a different frosting?
Yes, you can use a different frosting. Cream cheese frosting or chocolate ganache works well. Both add a nice flavor and texture. Just make sure the frosting complements the cake’s rich taste.
How long does the cake last?
The cake can last for up to five days when stored properly. Keep it in an airtight container at room temperature. If you place it in the fridge, it can last for a week.
Can I make this cake in advance?
Absolutely! You can bake the cake a day or two before. Just store the layers in plastic wrap. Frost the cake just before serving for the best taste and look.
What can I substitute for eggs in this recipe?
You can use applesauce or mashed bananas as an egg substitute. Use 1/4 cup of either per egg. This will keep the cake moist and fluffy while making it vegan-friendly.
In this post, I covered key ingredients, step-by-step instructions, and useful tips for baking. You learned about ingredient choices and measurement conversions, and I shared tips for moist cake and checking doneness. I also offered gluten-free and vegan options, as well as storage methods. Remember, baking is both an art and a science. Enjoy your baking adventure, and feel free to experiment with flavors and styles! Happy baking!
Extra Moist Chocolate Peanut Butter Cake
A rich and moist chocolate cake layered with creamy peanut butter frosting.
Ingredients
Instructions
- 1
Preheat your oven to 350°F (175°C) and prepare two 9-inch round cake pans by greasing them and dusting with flour.
- 2
In a large mixing bowl, sift together the flour, sugar, cocoa powder, baking powder, baking soda, and salt until well mixed.
- 3
Add the eggs, milk, vegetable oil, and vanilla extract to the dry mixture and beat on medium speed for about 2 minutes until smooth.
- 4
Gradually stir in the boiling water into the batter, being cautious as it will be thin.
- 5
Evenly divide the batter between the prepared cake pans.
- 6
Bake for 30-35 minutes, checking for doneness with a toothpick. Allow to cool in pans for 10 minutes before transferring to wire racks.
- 7
To make the peanut butter frosting, combine the peanut butter and powdered sugar in a medium bowl and beat until smooth. Gradually add the heavy cream and beat until fluffy.
- 8
Once the cake layers are cool, place one layer on a serving plate, spread frosting on top, and add the second layer. Cover the entire cake with remaining frosting.
- 9
Consider drizzling melted chocolate or sprinkling chopped peanuts for decoration.
Chef's Notes
For an elegant serving, consider garnishing with mini chocolate chips or vanilla ice cream.


Recipe Creator
Remy
I’m Chef Remy, your recipe companion, here to bring warmth, bold taste, and simplicity to your kitchen.
View My Recipes