Craving a sweet treat that’s easy to make? Try these Easy Boston Cream Pie Cookie Bites! They combine rich chocolate, creamy vanilla pudding, and soft cookie dough for a delightful mini dessert. Anyone can whip them up with just a few simple ingredients and easy steps. Grab your mixing bowl, and let’s bake something delicious that will impress your friends and family!
Ingredients
List of Ingredients for Easy Boston Cream Pie Cookie Bites
To make Easy Boston Cream Pie Cookie Bites, you will need the following:
– 1 cup all-purpose flour
– 1/2 teaspoon baking powder
– 1/4 teaspoon salt
– 1/2 cup unsalted butter, softened to room temperature
– 1/2 cup granulated sugar
– 1 large egg
– 1 teaspoon pure vanilla extract
– 1/2 cup instant vanilla pudding mix
– 1 cup cold milk
– 1/2 cup semi-sweet chocolate chips
– 1 tablespoon coconut oil
– A sprinkle of powdered sugar for finishing
Measuring Tips for Accurate Ingredient Quantities
Measuring ingredients correctly helps your cookies turn out perfect. Use dry measuring cups for flour and sugar. Fill the cup, then level it off with a knife. For butter, use a scale or cut the wrapper to get the right amount. Eggs should be large and fresh for the best taste. When measuring liquids, use a clear liquid measuring cup. Check the measurement at eye level for accuracy.
Substitutions for Common Ingredients
You can easily swap some ingredients if you need to. Here are a few ideas:
– Butter: Use margarine or coconut oil for a dairy-free option.
– Sugar: Try brown sugar for a richer flavor.
– Flour: Use almond flour for a gluten-free treat.
– Milk: Substitute with almond milk or oat milk for a dairy-free version.
– Chocolate Chips: Use white chocolate or dark chocolate chips for a different taste.
Feel free to get creative with these swaps while keeping the essence of Boston Cream Pie! For the complete recipe, check out the [Full Recipe].
Step-by-Step Instructions
Preparation Steps: Prepping the Dough
To start, preheat your oven to 350°F (175°C). This step ensures even baking. Line a baking sheet with parchment paper. This helps the cookies release easily. In a medium bowl, mix the all-purpose flour, baking powder, and salt. Whisk these dry ingredients until well combined. Set this bowl aside for now. In a larger mixing bowl, beat the softened butter and granulated sugar. Use a hand mixer for about 2-3 minutes. The mixture should turn light and fluffy. Next, add the egg and vanilla extract. Blend until everything is smooth and mixed well. Gradually add the dry flour mixture into the wet ingredients. Stir gently until just blended. Avoid overmixing to keep the cookies soft.
Baking Instructions for Perfect Cookie Bites
Now, take a cookie scoop or a spoon. Portion out small balls of dough and place them on the lined baking sheet. Space them about 1 inch apart for even baking. Lightly press each ball down to flatten them a bit. This helps them bake evenly. Place the baking sheet in the oven. Bake for 10-12 minutes. Look for lightly golden edges. When they are done, let the cookies cool on the baking sheet for about 5 minutes. Then, transfer them to a wire rack to cool completely.
Making and Assembling the Vanilla Pudding Filling
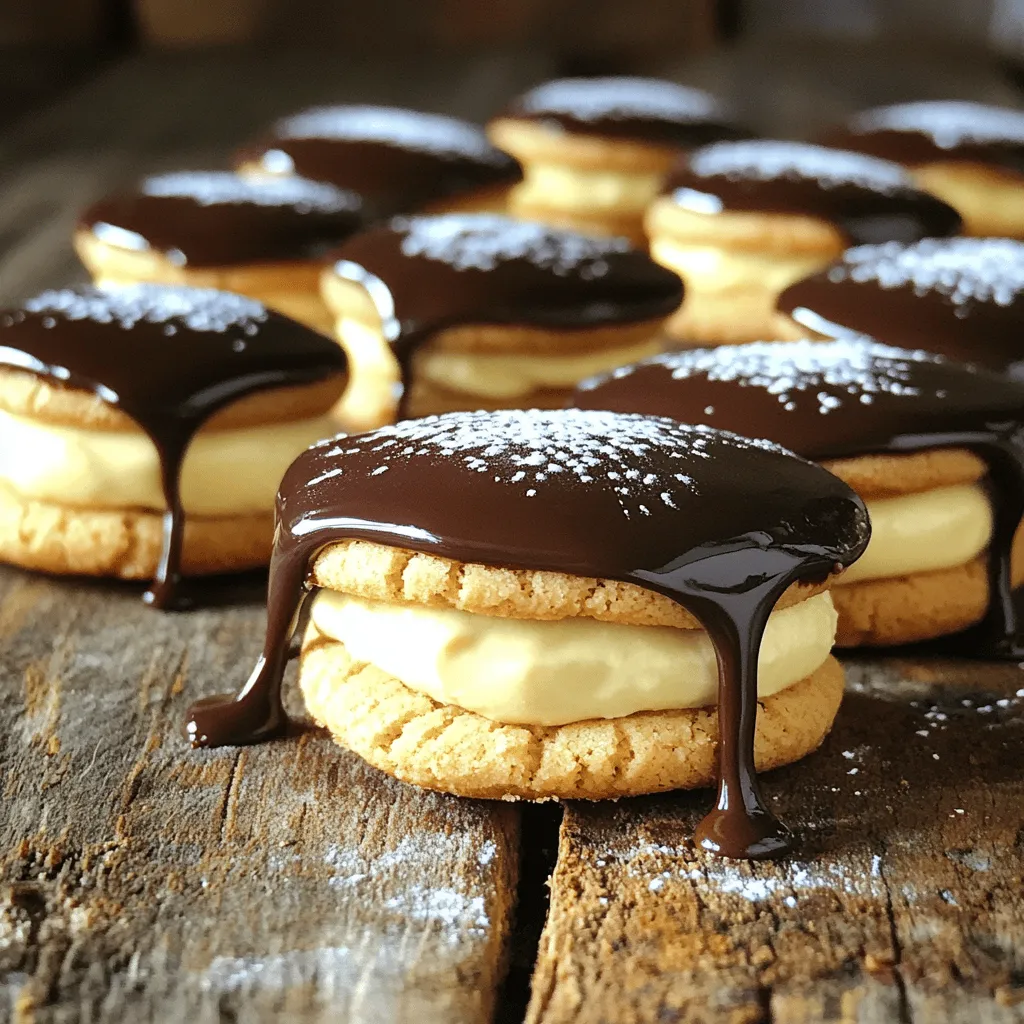
While your cookies cool, it’s time to prepare the vanilla pudding. In a medium bowl, whisk the instant vanilla pudding mix with cold milk. Stir until it thickens to a custard-like consistency. Cover the bowl and refrigerate for about 15 minutes. This helps the pudding set up nicely. Once the cookies are cool, take half of them. Spread a generous dollop of the prepared vanilla pudding on the flat side of each cookie. Top with the remaining cookies, pressing down gently to create delightful cookie sandwiches. For the final touch, melt semi-sweet chocolate chips with coconut oil in a microwave-safe bowl. Heat in 30-second intervals, stirring until smooth. Dip the tops of the cookie sandwiches into the warm chocolate glaze. Let any excess chocolate drip off before placing them back on the parchment paper. Once the chocolate sets, finish your treats with a light sprinkle of powdered sugar. Enjoy your Easy Boston Cream Pie Cookie Bites! For a full recipe, check out the link!
Tips & Tricks
Tips for Achieving the Best Texture
To get soft and chewy cookie bites, watch your mixing. Overmixing can make them tough. When you add the flour, mix just until you see no dry bits. Make sure your butter is at room temperature. This helps it blend smoothly with sugar, giving a great texture. When baking, check for light golden edges. This means they are perfect!
Common Mistakes to Avoid
One big mistake is not letting the cookies cool. If you don’t wait, the filling can ooze out. Another issue is using warm cookies for the chocolate glaze. Cold cookies help the glaze set better. Lastly, don’t skip the sprinkle of powdered sugar. It adds charm and sweetness!
Suggested Tools for Easier Preparation
Using a cookie scoop can save time. It helps you make uniform cookie sizes. A hand mixer works well for creaming butter and sugar. Keep a whisk on hand for mixing pudding. Finally, parchment paper is a must. It keeps cookies from sticking and makes cleanup easy.
For the complete recipe, check out the Full Recipe.

Variations
Flavor Variations: Adding Different Extracts
You can change the flavor of your cookie bites easily. Try adding almond or coconut extract. These add a nice twist to the classic taste. Just one teaspoon of your chosen extract will do. Mix it in with the butter and sugar for a new flavor.
Alternative Toppings and Fillings
You can get creative with toppings and fillings. Instead of vanilla pudding, use chocolate or butterscotch pudding. You can also try whipped cream for a light topping. If you want a crunchy texture, add crushed nuts or sprinkles on top of the chocolate glaze. This makes each bite unique and fun.
Gluten-Free or Dairy-Free Modifications
Making these cookie bites gluten-free is simple. Use a gluten-free flour blend instead of all-purpose flour. For a dairy-free option, switch to dairy-free butter and plant-based milk. This way, everyone can enjoy these tasty treats. You can still keep the flavor and texture while adapting for dietary needs.
Storage Info
Best Practices for Storing Cookie Bites
To keep your Boston cream pie cookie bites fresh, store them in an airtight container. I recommend placing a layer of parchment paper between the layers of cookies. This prevents them from sticking together. Make sure the container is kept in a cool, dry place. Avoid direct sunlight to maintain their texture and flavor.
How Long Do They Last?
When stored correctly, these cookie bites last about 3 to 5 days. If you notice any changes in smell or texture, it’s best to toss them out. For longer storage, freezing is a great option.
Freezing and Thawing Tips
You can freeze the cookie bites for up to three months. Make sure they are completely cooled before freezing. Wrap each cookie tightly in plastic wrap and place them in a freezer-safe bag. To thaw, simply leave them at room temperature for about an hour. Enjoy them fresh, and they will taste just as good! For best results, avoid refreezing thawed cookies.
FAQs
Can I Make These Cookies in Advance?
Yes, you can make these cookie bites ahead of time. Prepare the cookies and let them cool completely. You can store them in an airtight container for up to three days. If you want to keep them longer, freeze the cookie bites without the filling. When you’re ready to enjoy them, thaw and add the vanilla pudding and chocolate glaze before serving.
What Other Recipes Can I Use Vanilla Pudding In?
Vanilla pudding is super versatile! You can use it in many recipes. It works great in trifles, parfaits, and even as a filling for cakes. You can mix it into cupcakes for added moisture. It also shines in layered desserts or as a dip for fruits. The options are endless!
How Can I Make These Cookies Look More Presentable?
Making your cookie bites look pretty is fun! Here are some ideas:
– Arrange them on a colorful platter.
– Add fresh berries or mint leaves for color.
– Drizzle extra chocolate on top.
– Use a piping bag for even chocolate coating.
– Sprinkle with crushed nuts or coconut for texture.
Try these tips, and your cookie bites will impress everyone! For the complete recipe, check out the Full Recipe link.
You now know how to make Easy Boston Cream Pie Cookie Bites. We covered the key ingredients, measuring tips, and substitutions to fit your needs. I shared step-by-step instructions for prep and baking, plus how to make a tasty vanilla pudding filling.
I also provided tips for perfect texture and common mistakes to avoid. You can explore different flavors and toppings, or even make them gluten-free. Finally, we looked at smart storage methods for freshness.
Enjoy creating these treats that everyone will love!
Easy Boston Cream Pie Cookie Bites
Delicious cookie bites filled with creamy vanilla pudding and topped with a glossy chocolate glaze.
Ingredients
Instructions
- 1
Begin by preheating your oven to 350°F (175°C). Prepare a baking sheet by lining it with parchment paper for easy cookie removal.
- 2
In a medium-sized bowl, combine the all-purpose flour, baking powder, and salt. Whisk them together until well mixed, then set aside.
- 3
In a large mixing bowl, use a hand mixer or stand mixer to beat the softened butter and granulated sugar together until the mixture is light and fluffy, about 2-3 minutes.
- 4
Incorporate the egg and vanilla extract into the creamed mixture, blending until everything is thoroughly combined and smooth.
- 5
Gradually add the dry flour mixture to the butter mixture, stirring gently until just blended. Be careful not to overmix to keep the cookies tender.
- 6
Using a cookie scoop or spoon, portion out small balls of cookie dough onto the lined baking sheet, spacing them about 1 inch apart. Lightly press down each ball to flatten them slightly.
- 7
Place the baking sheet in the preheated oven and bake for 10-12 minutes, or until the edges are lightly golden brown. Once done, allow the cookies to cool on the baking sheet for 5 minutes before transferring them to a wire rack to cool completely.
- 8
While the cookies cool, prepare the vanilla pudding. In a separate medium bowl, whisk the instant pudding mix with the cold milk until it thickens to a custard-like consistency. Cover and refrigerate for about 15 minutes to set properly.
- 9
When the cookies are completely cooled, take half of them and spread a generous dollop of the vanilla pudding on the flat side of each one. Top with the remaining cookies, gently pressing down to create delightful cookie sandwiches.
- 10
For the glossy chocolate glaze, melt the semi-sweet chocolate chips together with coconut oil in a microwave-safe bowl. Heat in 30-second increments, stirring after each interval until the mixture is smooth and well combined.
- 11
Carefully dip the tops of each cookie sandwich into the warm chocolate glaze, letting any excess drip off before placing them back onto the parchment to set.
- 12
Once the chocolate has hardened, finish the cookies by lightly sprinkling them with powdered sugar, adding a touch of elegance to your delicious treats.
Chef's Notes
Arrange cookie bites on a beautiful platter, and consider garnishing with fresh berries or mint leaves for a pop of color!


Recipe Creator
Remy
I’m Chef Remy, your recipe companion, here to bring warmth, bold taste, and simplicity to your kitchen.
View My Recipes