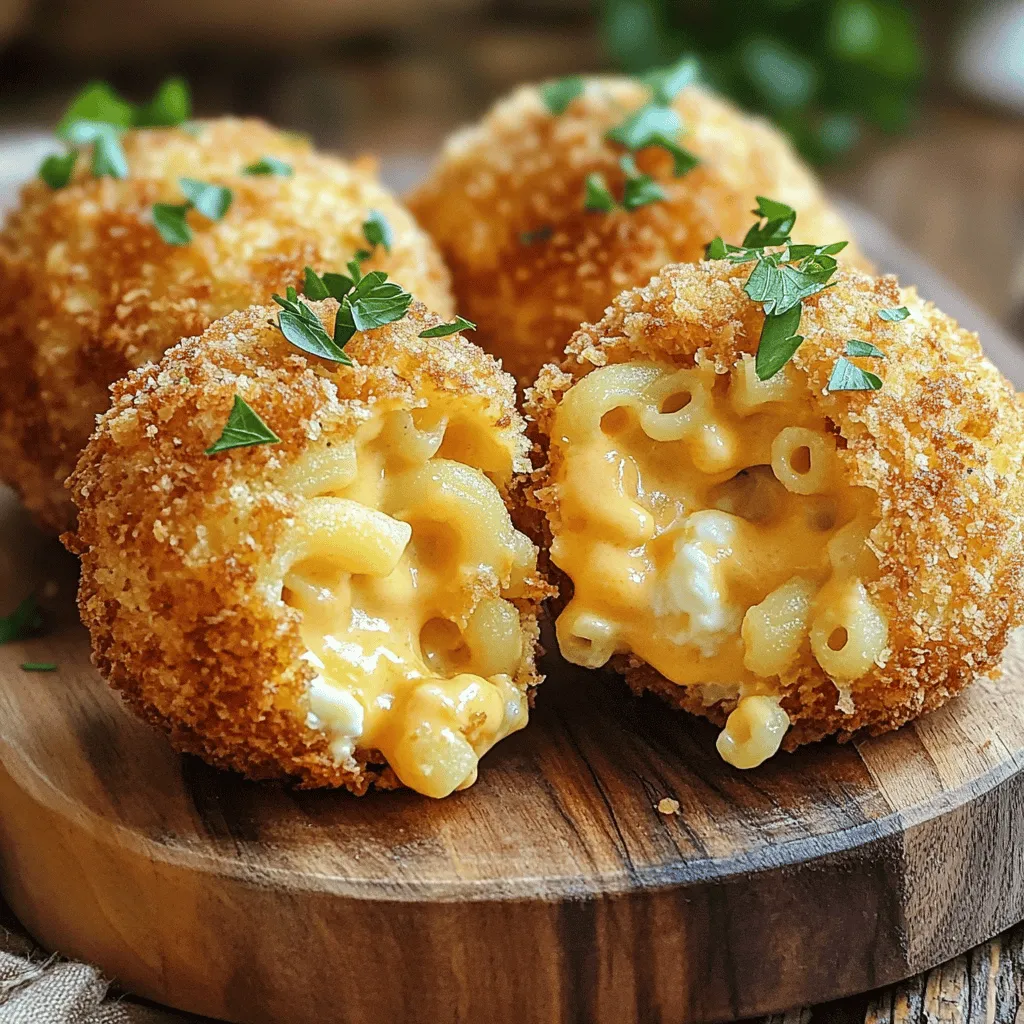
If you’re searching for the ultimate snack, look no further! Crispy Fried Mac and Cheese Balls are a game-changer. With gooey cheese and a crunchy outside, they are perfect for parties or a cozy night in. I’ll share all the tips to make these bites irresistible, including the best ingredients and step-by-step instructions. Get ready to wow your friends and family with this delicious treat!
Ingredients
Main Ingredients for Crispy Fried Mac and Cheese Balls
– 2 cups cooked macaroni
– 2 cups shredded sharp cheddar cheese
– 1/2 cup cream cheese, softened to room temperature
– 1/2 cup grated Parmesan cheese
The base of our crispy fried mac and cheese balls starts with cooked macaroni. This pasta gives the dish its shape and chewiness. Next, we add shredded sharp cheddar cheese. It melts beautifully and adds that classic mac and cheese flavor. Cream cheese brings a creamy texture, making each bite rich. Lastly, grated Parmesan cheese adds depth and a salty kick.
Seasoning and Coating Ingredients
– 1 teaspoon garlic powder
– 1/2 teaspoon onion powder
– 1/2 teaspoon smoked paprika
– Salt and freshly ground black pepper to taste
– 2 large eggs, beaten
– 1 cup all-purpose flour
– 2 cups Panko breadcrumbs (for extra crunch)
Seasoning is key. Garlic powder, onion powder, and smoked paprika enhance the flavors. Don’t forget salt and pepper to taste! To coat the balls, we will use eggs, flour, and Panko breadcrumbs. The eggs help the breadcrumbs stick. The flour gives a base layer for a crispy exterior. Panko breadcrumbs are light and crunchy, perfect for frying.
Oil for Frying
– Oil for frying (recommended: vegetable or canola oil)
Choosing the right oil is important. I recommend using vegetable or canola oil. These oils have a high smoke point, which means they can handle the heat without burning. This helps our mac and cheese balls get that golden, crispy look. Always heat the oil to about 350°F (175°C) for the best results.
Step-by-Step Instructions
Preparing the Cheese Mixture
First, gather your ingredients. In a large mixing bowl, combine the cooked macaroni with the cheeses: sharp cheddar, cream cheese, and Parmesan. This mix creates a creamy and rich flavor. Add your spices: garlic powder, onion powder, and smoked paprika. Don’t forget to sprinkle in some salt and pepper. Use a spatula to mix everything until it’s well blended. You want to ensure that the cheeses and spices coat the macaroni fully for the best taste.
Chilling the Mixture
Now, cover the bowl with plastic wrap. This step is key! Refrigerate the mixture for at least one hour. Chilling helps the mixture firm up. This makes it easier to shape into balls. If you skip this step, the balls may fall apart when frying.
Forming and Breading the Balls
After chilling, it’s time to shape the mixture. Use a tablespoon to scoop out the mixture. Roll it into small balls, about the size of a golf ball. Place the shaped balls on a lined baking sheet.
Next, set up your breading station. You’ll need three shallow bowls: one for flour, one for beaten eggs, and one for Panko breadcrumbs. This setup makes breading quick and easy.
For each mac and cheese ball, start by coating it in flour. Shake off any extra flour. Then, dip it in the beaten eggs for an even layer. Finally, roll it in the Panko breadcrumbs. Press gently to ensure they stick well.
Now your balls are ready for frying!
Tips & Tricks
Achieving the Perfect Crispiness
To get that ideal crunch, heat your oil to 350°F (175°C). If the oil is too cool, your mac and cheese balls will soak up excess oil. Fry in small batches. This keeps the oil hot and helps each ball fry evenly. Too many balls at once will lower the temperature and ruin the crispiness.
How to Prevent Sticking
Handling the mac and cheese balls can be tricky. Use flour on your hands to keep the mixture from sticking. If you find the mixture too sticky, chill it a bit longer. This makes shaping easier. Use a spoon to scoop the mixture. Keep your hands wet when rolling the balls to help them hold their shape.
Flavor Enhancements
Want to add some flair? Try mixing in spices like cayenne pepper for heat or Italian seasoning for a herby touch. Top your fried balls with fresh herbs or a sprinkle of Parmesan after frying. You can also serve them with different sauces. Marinara is classic, but ranch or spicy aioli can add a fun twist. Always feel free to experiment with flavors to make them your own.

Variations
Different Cheese Options
You can switch up the cheese in your mac and cheese balls. Sharp cheddar is great, but you can try others too. Think about mozzarella for a gooey center or gouda for a smoky twist. Mixing different cheeses can create unique flavors. A blend of cheddar and Monterey Jack gives a creamy texture. Experiment with blue cheese for a bold taste. The choice is yours!
Baked vs. Fried Versions
Frying gives a crispy outside, but baking is a healthier choice. If you want to bake, coat the balls with oil and place them on a baking sheet. Bake at 400°F for about 20 minutes, turning halfway through. They won’t be as crispy as fried, but they will still be tasty. Both options offer a delicious snack!
Creative Add-ins
Add a twist to your mac and cheese balls with fun ingredients! Crumbled bacon adds a smoky crunch. Diced jalapeños bring heat and flavor. Fresh herbs like chives or parsley can brighten the dish. You can even add sun-dried tomatoes for a Mediterranean flair. Mix and match your favorites to make each batch unique. The possibilities are endless!
For the full recipe, check out Crispy Fried Mac and Cheese Balls!
Storage Info
Storing Leftovers
To keep leftover crispy fried mac and cheese balls fresh, place them in an airtight container. Make sure they cool to room temperature first. Store them in the fridge for up to three days. Use parchment paper between layers if stacking. This helps prevent sticking.
Reheating Techniques
When it’s time to eat your leftovers, you want them crispy again. Preheat your oven to 375°F (190°C). Place the mac and cheese balls on a baking sheet. Bake for about 10-15 minutes until crispy. This method keeps the outside crunchy while warming the inside. Avoid using the microwave, as it can make them soggy.
Freezing Instructions
For longer storage, freeze the mac and cheese balls. After shaping them, place them on a baking sheet in a single layer. Freeze for about an hour until firm. Then, transfer to a freezer-safe bag or container. Seal tightly and label with the date. They can last for up to three months. When ready to eat, cook from frozen, frying directly in hot oil for a crispy treat. For the complete recipe, check out the full recipe link.
FAQs
What dipping sauces pair well with Crispy Fried Mac and Cheese Balls?
Dipping sauces can make or break your dish. Here are some great options:
– Marinara Sauce: A classic choice that balances the cheese.
– Ranch Dressing: Creamy and tangy, it adds a nice kick.
– Buffalo Sauce: For those who like a spicy twist.
– Honey Mustard: Sweet and tangy, a unique pairing.
– Sriracha Aioli: A creamy sauce with a spicy kick.
Feel free to mix and match. Try new sauces to find your favorite!
Can I make these ahead of time?
Yes, you can prepare these mac and cheese balls ahead of time. Here’s how:
1. Make the Mixture: Follow the recipe steps until you form the balls.
2. Chill: Place them on a tray and freeze until firm.
3. Store: Transfer them to a freezer bag for longer storage.
4. Fry Later: When ready, fry them straight from the freezer. Just add a minute or two to the cooking time.
This way, you can enjoy a fresh snack anytime!
Are there vegetarian or vegan versions of this recipe?
Yes, you can easily make this recipe vegetarian or vegan. Here are some simple swaps:
– Cheese: Use plant-based cheese or nutritional yeast for a cheesy flavor.
– Cream Cheese: Substitute with cashew cream or a vegan cream cheese.
– Eggs: Replace eggs with a flaxseed mixture or unsweetened applesauce.
These changes keep the flavor while making it suitable for more diets!
In this article, we covered how to make crispy fried mac and cheese balls. You learned about the main ingredients, how to prepare and chill the cheese mixture, and tips for perfecting the frying process. You also discovered various ways to customize your recipe and store leftovers.
Enjoy making this delicious snack. Remember to have fun experimenting with flavors and textures. With these tips, you can create a tasty treat that everyone will love!
Crispy Fried Mac and Cheese Balls
Deliciously crispy on the outside and creamy on the inside, these mac and cheese balls are perfect for a snack or appetizer.
Ingredients
Instructions
- 1
In a large mixing bowl, combine the cooked macaroni, shredded cheddar cheese, softened cream cheese, grated Parmesan cheese, garlic powder, onion powder, smoked paprika, and a pinch of salt and pepper. Use a spatula or spoon to mix thoroughly until all ingredients are well blended and the cheeses are evenly distributed.
- 2
Cover the bowl with plastic wrap and refrigerate the mixture for at least 1 hour. This chilling step helps the mixture set, making it easier to shape into balls.
- 3
After chilling, use a tablespoon to scoop out the mixture and form it into small balls, roughly the size of a golf ball. Repeat until all the mixture has been shaped, placing the formed balls on a lined baking sheet.
- 4
Prepare your breading station by arranging three shallow bowls: one with flour, one with the beaten eggs, and one with Panko breadcrumbs.
- 5
Take each mac and cheese ball and first dredge it in the flour, making sure to shake off any excess. Next, dip it into the beaten eggs for an even coating, and finally, roll the ball in the Panko breadcrumbs until fully coated. Ensure that the breadcrumbs adhere well by gently pressing them onto the surface.
- 6
In a deep frying pan or fryer, pour in enough oil to submerge the balls and heat over medium-high heat. The oil should reach about 350°F (175°C). Fry the balls in small batches to avoid overcrowding the pan, which can lower the oil temperature. Cook each batch for about 3-4 minutes, or until they are a rich golden brown and crispy on the outside.
- 7
Once golden and crispy, remove the balls from the oil and place them on a plate lined with paper towels to drain any excess oil.
- 8
Serve the crispy fried mac and cheese balls hot, paired with your favorite dipping sauce, such as marinara or ranch dressing, for a delightful flavor contrast.
Chef's Notes
Serve with your favorite dipping sauce for added flavor.


Recipe Creator
Remy
I’m Chef Remy, your recipe companion, here to bring warmth, bold taste, and simplicity to your kitchen.
View My Recipes