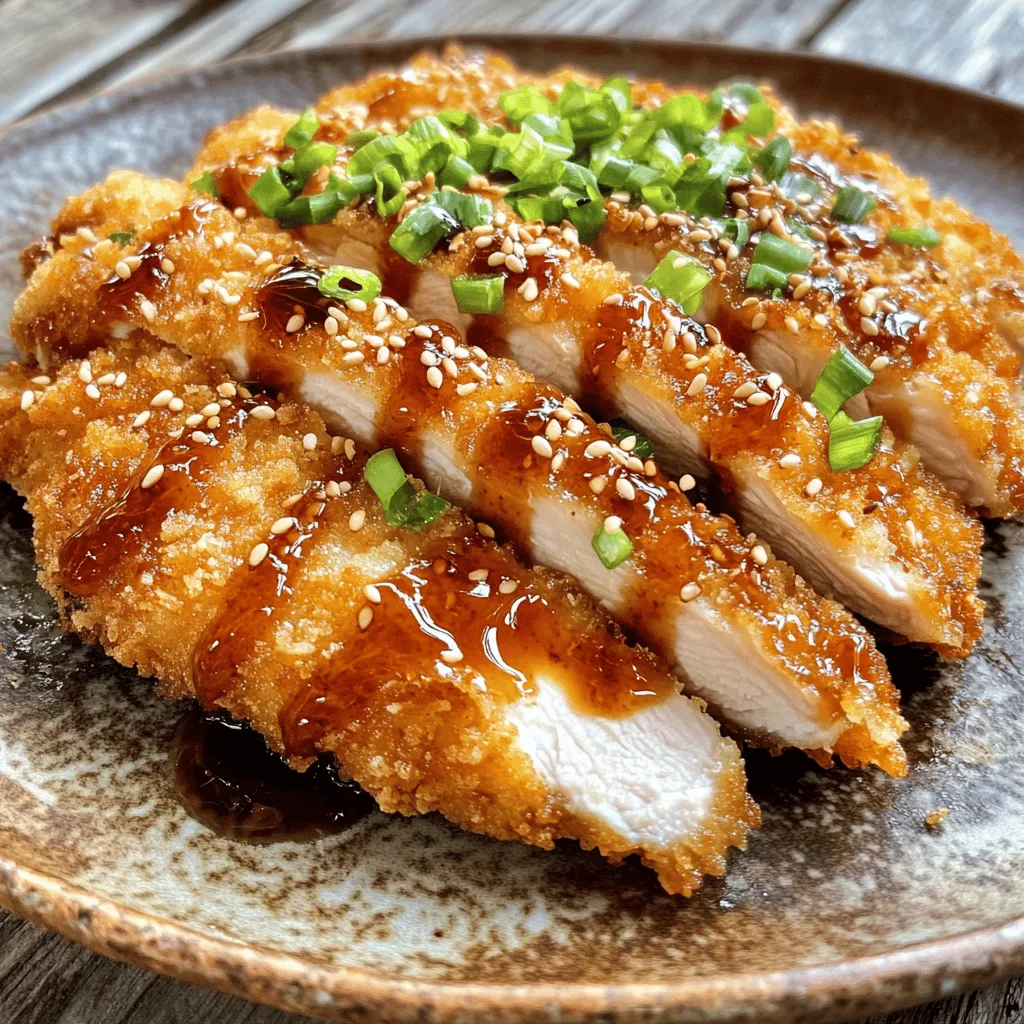
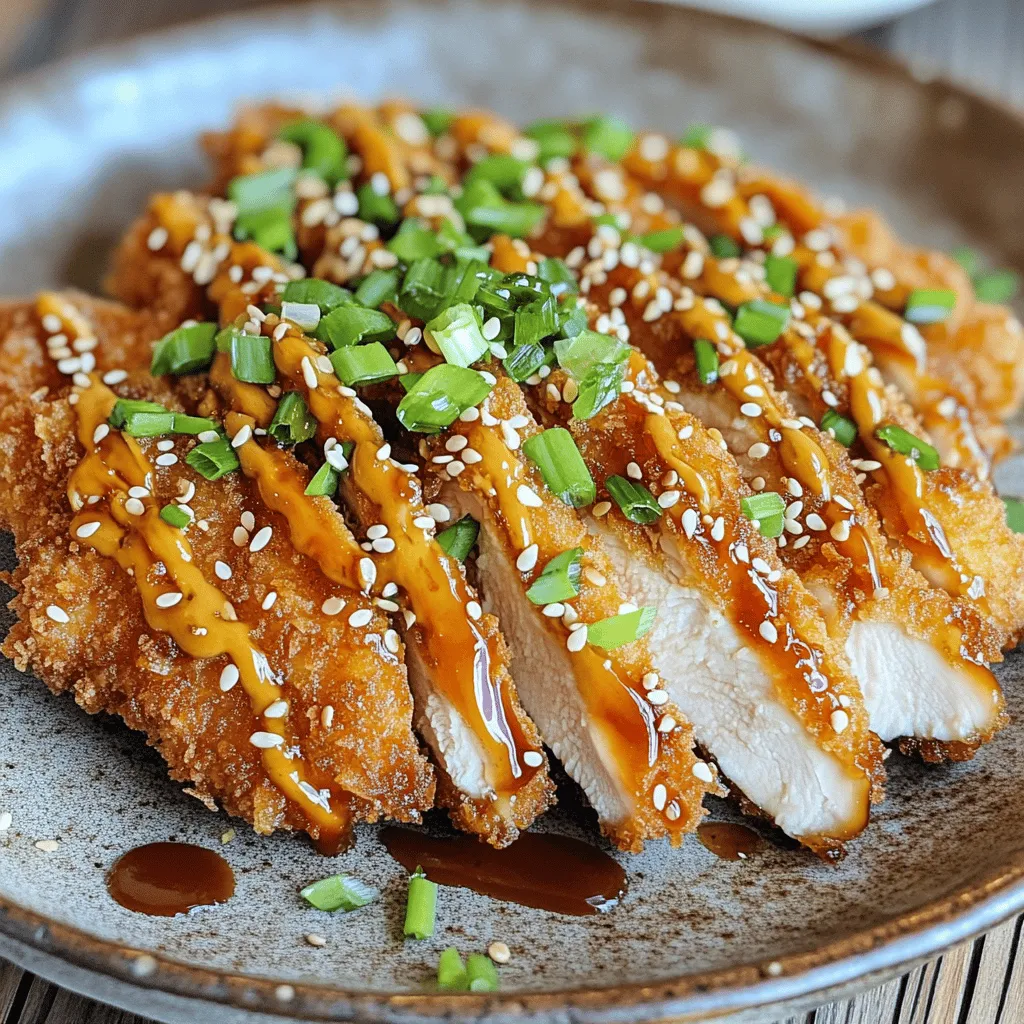
Are you ready to crunch into a world of flavor with Crispy Chicken Katsu? This dish is a true crowd-pleaser, featuring tender chicken coated in a crispy, golden crust. I’ll walk you through easy steps to make this savory delight at home. From choosing the best ingredients to tips for perfect crunchiness, get ready to impress your friends and family with a meal they’ll love! Let’s dive in!
Ingredients
Main Ingredients for Crispy Chicken Katsu
To make crispy chicken katsu, gather these key ingredients:
– 2 boneless, skinless chicken breasts
– Salt and pepper to taste
– 1 cup all-purpose flour
– 2 large eggs, beaten
– 1 cup panko breadcrumbs
– Vegetable oil for frying
– 1 tablespoon sesame oil
These ingredients create a solid base for your dish. The chicken needs to be tender and juicy. The panko breadcrumbs provide the crunch we all love.
Optional Ingredients for Enhanced Flavor
You can add these ingredients for extra flavor:
– 1 tablespoon soy sauce
– 1 tablespoon mirin (you can substitute with more soy sauce)
The soy sauce and mirin give a nice umami taste. They make your chicken katsu even more delicious and special.
Recommended Dipping Sauce Ingredients
To enjoy with your chicken katsu, consider this sauce:
– 1 cup tonkatsu sauce (store-bought or homemade)
– Chopped green onions for garnish
– Toasted sesame seeds for garnish
Tonkatsu sauce adds a tangy taste that pairs well with the crispy chicken. The green onions and sesame seeds make it look great, too. For the full recipe, check out the detailed cooking steps.
Step-by-Step Instructions
Preparation of the Chicken
Start with two boneless, skinless chicken breasts. Place each one between sheets of plastic wrap. Use a meat mallet or rolling pin to gently pound the chicken to about 1/2 inch thick. This helps it cook evenly. Season both sides with salt and pepper. This simple step boosts the chicken’s flavor.
Breading Process Explained
Next, set up your breading station. Line up three shallow dishes. Fill the first with all-purpose flour, the second with beaten eggs, and the third with panko breadcrumbs. Take one chicken breast and dredge it in flour. Make sure it’s evenly coated, then shake off the extra flour. Dip it in the eggs, letting any excess drip back. Finally, coat it with panko breadcrumbs. Press gently to help the crumbs stick. Repeat this for the second chicken breast.
Cooking and Frying Techniques
Now it’s time to fry! In a large skillet, pour enough vegetable oil to create a depth of about 1/2 inch. Add a tablespoon of sesame oil for extra flavor. Heat the oil over medium heat. To check if it’s ready, drop in a breadcrumb; it should sizzle right away. Carefully place the breaded chicken into the hot oil. Fry for about 4-5 minutes on one side until it’s golden brown. Flip and fry the other side for another 4-5 minutes. Avoid overcrowding; cook in batches if needed. Once done, move the chicken to a plate lined with paper towels to drain excess oil. Allow it to rest for a few minutes before slicing into strips. You can find the full recipe in the earlier section.
Tips & Tricks
Achieving the Perfect Crispy Texture
To get that perfect crunch, use panko breadcrumbs. They are light and airy, which helps to create a crispy layer. Don’t rush the frying. Let the chicken cook long enough on each side. This allows the crust to form properly. Use medium heat, so the outside gets crispy while the inside cooks through.
Common Mistakes to Avoid
Avoid pressing down on the chicken while it cooks. This can squeeze out juice and make it dry. Don’t skip seasoning the flour. It adds flavor to the chicken. Make sure to shake off excess flour before dipping in the egg. Too much flour can lead to a clumpy crust. Lastly, don’t overcrowd the pan. Fry in batches if needed.
Tools to Enhance Your Cooking Experience
A meat mallet helps pound the chicken evenly. Use shallow dishes for breading; they make the process easier. A large skillet is best for frying. A thermometer can help you check the oil temperature. Lastly, a slotted spoon lets you remove the chicken without making a mess.
For more details, check out the Full Recipe.
Variations
Alternative Protein Options
You can switch up chicken katsu by using different proteins. Pork is a classic choice. Pork loin or tenderloin works great. You can also try turkey or even tofu for a vegetarian option. Each protein brings its own flavor and texture, making the dish unique.
Flavorful Marinades and Seasonings
Marinades add depth to your chicken katsu. Try soaking the chicken in a mix of soy sauce, ginger, and garlic. This gives it a rich taste. You can also use citrus juices like lemon or lime for a fresh twist. Experimenting with spices like paprika or cayenne can add some heat.
Regional Variants of Chicken Katsu
Different regions have their own takes on chicken katsu. In Hawaii, you might find a local version called “katsu curry.” This dish features katsu served with a rich curry sauce. In Japan, people often enjoy katsu with a side of rice and shredded cabbage. Each variant offers a new experience, so don’t hesitate to explore!
Storage Info
Best Practices for Storing Leftover Katsu
After you enjoy your crispy chicken katsu, store leftovers right. Let the chicken cool to room temperature. Place it in an airtight container. This keeps it fresh and prevents it from drying out. Store it in the fridge for up to three days.
Reheating Tips for Optimal Crispiness
To reheat and keep that crunch, use the oven. Preheat it to 375°F (190°C). Place the katsu on a baking tray. Bake for about 10-15 minutes until hot. This method crisps up the coating again. Avoid microwaving, as it can make the chicken soggy.
Freezing Tips and How to Thaw
You can freeze your chicken katsu for longer storage. Wrap each piece tightly in plastic wrap, then place it in a freezer bag. It will stay fresh for about three months. When ready to eat, thaw it overnight in the fridge. Reheat in the oven to restore that crispy texture.
FAQs
What is Chicken Katsu?
Chicken katsu is a Japanese dish. It features breaded and fried chicken. You use boneless chicken breasts, panko breadcrumbs, and seasonings. The result is crispy, golden chicken with a tender inside. It’s often served with tonkatsu sauce, which adds a sweet and savory flavor. This dish is a favorite in many households and restaurants.
Can I bake chicken katsu instead of frying?
Yes, you can bake chicken katsu. Baking can be a healthier option. Preheat your oven to 400°F (200°C). After breading the chicken, place it on a baking sheet. Spray or brush the chicken lightly with oil. Bake for about 20-25 minutes, turning halfway. Keep an eye on it to ensure it gets crispy.
How do you make homemade tonkatsu sauce?
Making tonkatsu sauce is simple. You need a few basic ingredients. Combine the following in a bowl:
– 1/2 cup ketchup
– 1/4 cup Worcestershire sauce
– 2 tablespoons soy sauce
– 1 tablespoon sugar
– 1 teaspoon Dijon mustard
Mix these well until smooth. Adjust the taste to your liking. This sauce pairs perfectly with crispy chicken katsu.
What side dishes pair well with crispy chicken katsu?
Several side dishes complement chicken katsu nicely. Here are some great options:
– Steamed rice
– Cabbage salad
– Pickled vegetables
– Miso soup
– Japanese potato salad
These sides add flavor and balance to your meal.
Where can I find crispy chicken katsu at restaurants?
You can find chicken katsu at many Japanese restaurants. Look for izakayas or ramen shops. Many places offer it as a main dish or in a combo. You can also find it in specialized katsu restaurants. Try asking locals for their favorite spots. Enjoying it out can inspire your cooking at home. For the full recipe, check out the section above.
In this blog post, I shared how to make crispy chicken katsu. We covered key ingredients, step-by-step cooking instructions, and tips for the best results. I also explored variations and storage advice to keep your katsu fresh. Remember, achieving that perfect crispiness takes practice, so don’t rush. Experiment with flavors and enjoy this tasty dish at home. With these tips, you can create a meal that impresses all. Happy cooking!
Crispy Chicken Katsu
A deliciously crispy Japanese-style fried chicken served with tonkatsu sauce.
Ingredients
Instructions
- 1
Prepare the Chicken: Place each chicken breast between two sheets of plastic wrap. Gently pound the chicken to about 1/2 inch thickness using a meat mallet or a rolling pin. Season both sides generously with salt and pepper to enhance flavor.
- 2
Set Up the Breading Station: Arrange three shallow dishes in a line. Fill the first dish with the all-purpose flour, the second with the beaten eggs, and the third with the panko breadcrumbs.
- 3
Bread the Chicken: Take one chicken breast and dredge it in the flour, coating it evenly. Shake off any excess flour. Dip the floured chicken into the beaten eggs, allowing any excess to drip back into the bowl. Finally, coat the chicken in the panko breadcrumbs, pressing gently to ensure the breadcrumbs adhere well.
- 4
Repeat for Second Chicken Breast: Follow the same breading process for the second chicken breast, ensuring each piece is thoroughly coated.
- 5
Heat the Oil: In a large skillet, pour in enough vegetable oil to create a depth of about 1/2 inch. Add the sesame oil for flavor. Heat the oils over medium heat until hot.
- 6
Fry the Chicken: Carefully place the breaded chicken breasts into the hot oil. Fry each piece for approximately 4-5 minutes on one side until a golden brown crust forms. Flip and fry the other side for an additional 4-5 minutes.
- 7
Drain the Oil: Once cooked, transfer the crispy chicken katsu to a plate lined with paper towels to absorb excess oil. Allow the chicken to rest for a couple of minutes before slicing it into strips.
- 8
Prepare the Dipping Sauce: In a small bowl, combine the soy sauce and mirin (if using) to create a simple yet flavorful dipping sauce.
- 9
Serve: Arrange the sliced chicken katsu on a serving platter. Drizzle generously with tonkatsu sauce and garnish with chopped green onions and toasted sesame seeds.
Chef's Notes
For a lighter version, bake the breaded chicken instead of frying.

Recipe Creator
Remy
I’m Chef Remy, your recipe companion, here to bring warmth, bold taste, and simplicity to your kitchen.
View My Recipes