If you love chocolate and berries, you’re in for a treat! This Chocolate Raspberry Cake recipe is simple and packed with flavor. With just a few key ingredients like fresh raspberries and dark chocolate, you can create a delicious dessert that impresses everyone. Whether you’re baking for a party or a cozy night at home, this cake will be the star of the show. Ready to dive in? Let’s get baking!
Ingredients
List of Key Ingredients
– 1 ¾ cups all-purpose flour
– 1 ½ cups granulated sugar
– ¾ cup unsweetened cocoa powder
– 1 ½ teaspoons baking powder
– 1 ½ teaspoons baking soda
– 1 teaspoon salt
– 2 large eggs, at room temperature
– 1 cup whole milk, at room temperature
– ½ cup vegetable oil
– 2 teaspoons pure vanilla extract
– 1 cup boiling water
– 1 cup fresh raspberries (plus extra for decoration)
– ½ cup dark chocolate chips
Gathering the right ingredients is key for a great chocolate raspberry cake. The flour gives the cake structure, while sugar adds sweetness. Cocoa powder provides that rich chocolate flavor we all love. Baking powder and baking soda help the cake rise, making it light and fluffy.
You need eggs for moisture and to bind everything together. Milk adds creaminess, while vegetable oil keeps the cake moist. Pure vanilla extract enhances the flavor. Boiling water helps to dissolve the cocoa and gives the cake a tender crumb. Fresh raspberries add a burst of tartness, and dark chocolate chips bring extra richness and texture.
Recommended Tools and Equipment
– Mixing bowls and electric mixer
– 9-inch round cake pans
– Spatula and wire racks
Having the right tools makes baking easier and more fun. Use mixing bowls to combine your ingredients. An electric mixer is great for quickly blending the batter. Round cake pans help shape the cake perfectly. A spatula is useful for folding in raspberries and chocolate chips without breaking them. Lastly, wire racks allow the cakes to cool evenly, which prevents sogginess.
Dietary Modifications
– Gluten-free alternatives
– Vegan substitutions
If you want a gluten-free cake, use a gluten-free flour blend. This swap works well and keeps the texture light. For a vegan version, replace eggs with flaxseed meal mixed with water or applesauce. Use almond or soy milk in place of whole milk, and choose a vegetable oil that fits your diet. This way, everyone can enjoy a slice of this tasty cake!
Step-by-Step Instructions
Prepping the Oven and Pans
First, preheat your oven to 350°F (175°C). This step is key for even baking. Next, grab two 9-inch round cake pans. Grease them well with butter or cooking spray. This helps the cakes come out easily. After greasing, dust the pans lightly with flour. Tap out the excess flour. This step ensures no cake sticks to the pan.
Mixing the Batter
Now, let’s mix the batter. In a large bowl, sift together the dry ingredients. Combine 1 ¾ cups of flour, 1 ½ cups of sugar, ¾ cup of cocoa powder, 1 ½ teaspoons of baking powder, 1 ½ teaspoons of baking soda, and 1 teaspoon of salt. Mix these until they look airy.
Next, add the wet ingredients. Crack in 2 large eggs, pour in 1 cup of whole milk, and add ½ cup of vegetable oil. Don’t forget 2 teaspoons of vanilla extract. Beat these together with an electric mixer on medium speed for about 2 minutes. The batter should be smooth and well mixed.
Now, it’s time to add the boiling water. Carefully pour in 1 cup of boiling water. Stir gently until the batter is thin and mixed well. Trust me, the runny texture is just right. Finally, fold in 1 cup of fresh raspberries and ½ cup of dark chocolate chips with a spatula. Be gentle to keep the raspberries whole.
Baking the Cake
Next, divide your batter evenly between the two prepared pans. Give each pan a gentle tap on the counter to release air bubbles. Place the pans in your preheated oven. Bake for 30-35 minutes. Check for doneness by inserting a toothpick into the center. If it comes out clean, your cakes are ready.
After baking, remove the cakes from the oven. Let them cool in the pans for about 10 minutes. Then, move them to wire racks to cool completely. You can find the full recipe for more detailed steps.
Tips & Tricks
Achieving Moisture and Flavor
Using room temperature ingredients makes a big difference. It helps the batter mix well. Cold eggs or milk can lead to lumps. Always take them out early to warm up.
When adding raspberries and chocolate chips, do it gently. Use a spatula to fold them in. This keeps the raspberries whole and juicy. Overmixing can break them and make the cake dense.
Frosting and Decoration Suggestions
Chocolate frosting pairs perfectly with this cake. You might also try cream cheese frosting for a tangy twist. Both add rich flavors that complement the chocolate.
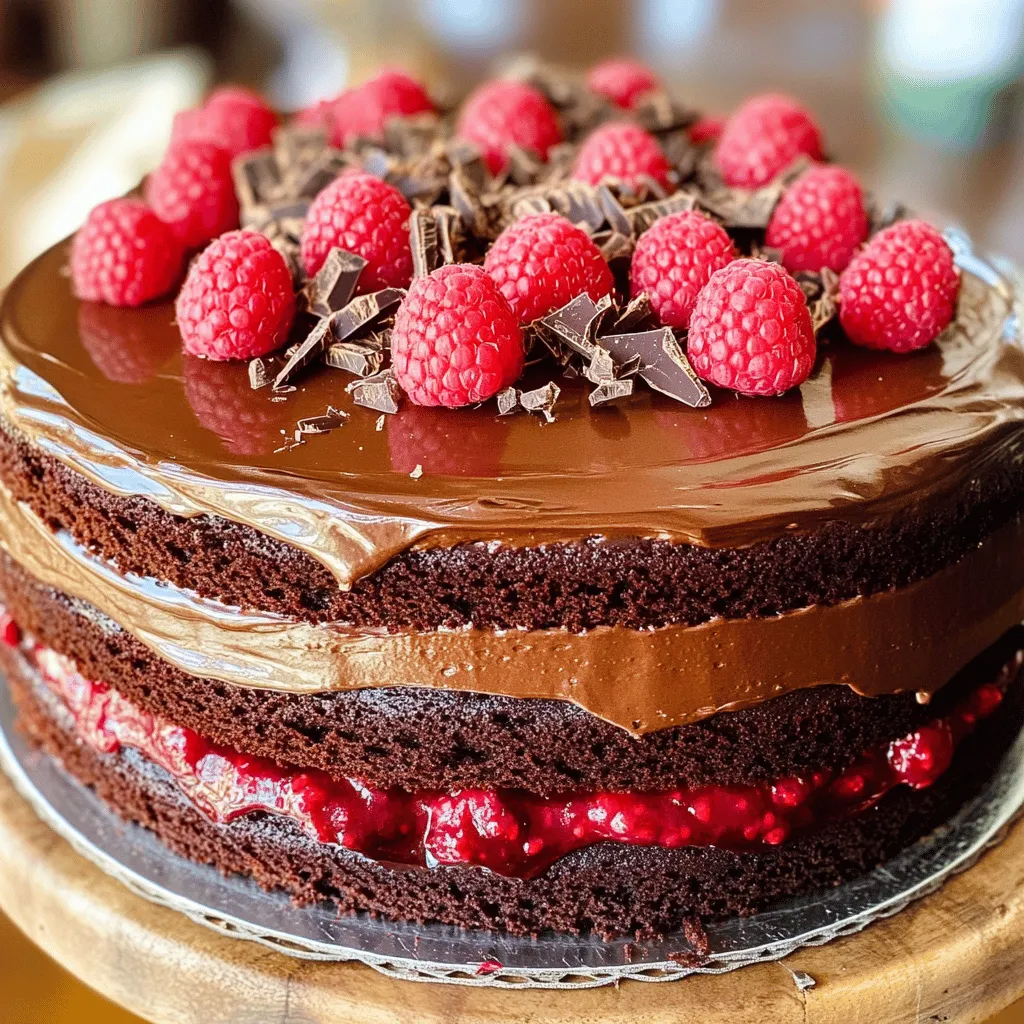
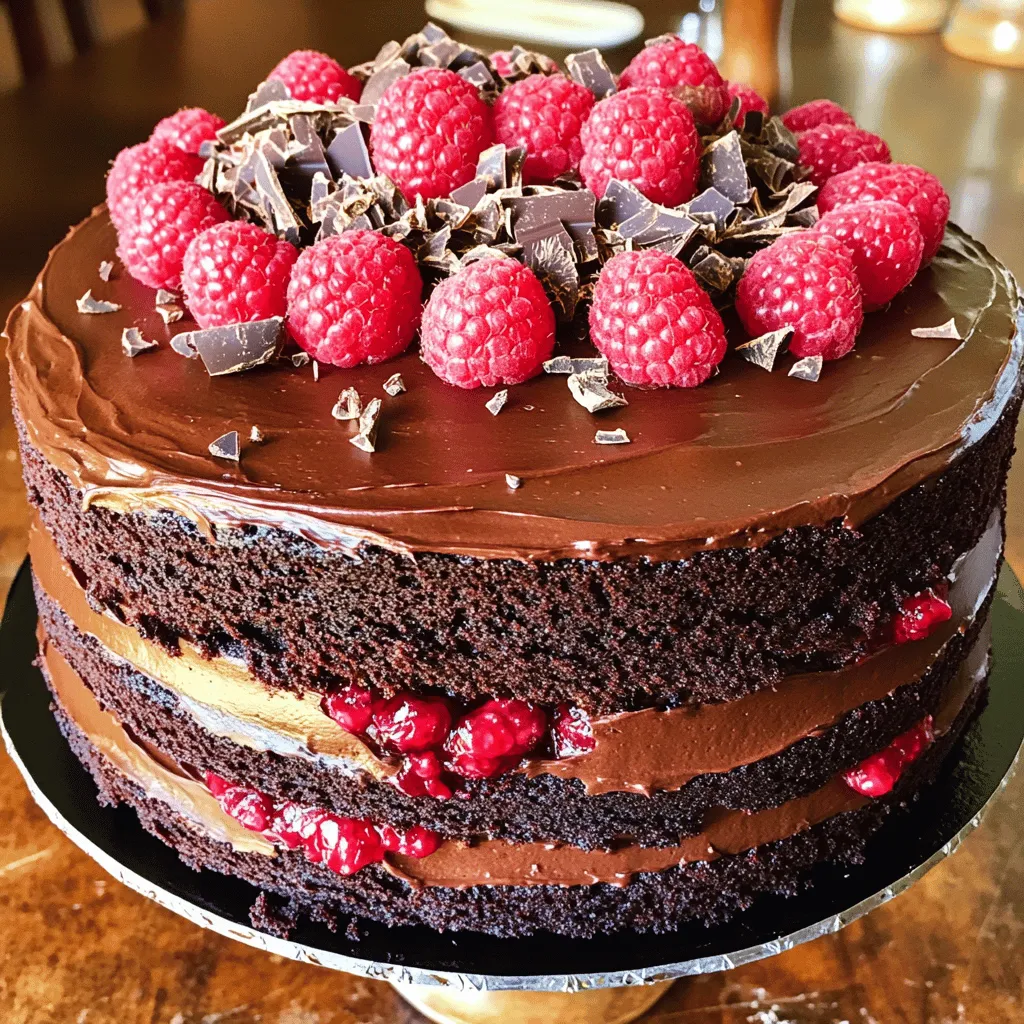
For decoration, use fresh raspberries on top. You can also sprinkle chocolate shavings for a fancy touch. Arrange the raspberries in a circle for a beautiful look.
Common Mistakes to Avoid
One common mistake is overmixing the batter. This can make your cake tough. Mix just until combined for a light texture.
Another mistake is not cooling the cakes properly. Let them cool in the pans for ten minutes. Then transfer them to wire racks to cool completely. This prevents sogginess and helps the layers stay intact.
For the [Full Recipe], dive into these tips for a perfect bake!
Variations
Flavor Customizations
You can add espresso powder to the batter for a mocha twist. Just one tablespoon will do. It gives a deep, rich flavor that pairs well with chocolate and raspberries. You can also swap in other fruits. Strawberries and blueberries work great in this cake. They add a fresh taste and look beautiful.
Alternative Frostings
If you want to change up the frosting, consider cream cheese frosting. It adds a tangy flavor that contrasts nicely with chocolate. Another option is whipped ganache. It’s rich and creamy, perfect for chocolate lovers. You can also try buttercream for a sweet and smooth finish.
Mini Chocolate Raspberry Cakes
To make mini cakes, use a cupcake pan or a 6-inch cake pan. Fill each cup or pan with batter, but don’t overfill. Bake the cupcakes for about 18-20 minutes. For a small cake, check it at 25-30 minutes. The cakes are ready when a toothpick comes out clean. These mini versions are perfect for parties or individual treats. For the full recipe, check out my detailed guide.
Storage Info
How to Store Leftover Cake
To keep your cake fresh, store it in the fridge. Use an airtight container to seal it well. This helps keep moisture in and prevents it from drying out. If you want to save it longer, freezing is a good option. Wrap the cake tightly in plastic wrap, then place it in a freezer bag. This keeps out air and prevents freezer burn. When you’re ready to enjoy it again, just thaw it in the fridge overnight.
How to Revive Leftovers
To reheat a slice of cake, place it in the microwave for 10-15 seconds. This warms it without drying it out. If you want a little extra flavor, top your slice with whipped cream or ice cream. You can also use leftover cake to make a trifle. Layer pieces of cake with pudding and fresh raspberries for a fun dessert.
Shelf Life
At room temperature, your cake lasts about 2-3 days. Make sure to keep it covered to prevent it from getting stale. If you store it in the fridge, it can last up to a week. Watch for signs of spoilage, like changes in smell or texture. If the cake starts to feel hard or has mold, it’s best to toss it out.
FAQs
What can I substitute for eggs in this recipe?
You can use several egg replacements to keep the cake moist. Here are some great options:
– Flaxseed meal: Mix 1 tablespoon of flaxseed meal with 3 tablespoons of water. Let it sit for 5 minutes. This works well for binding.
– Applesauce: Use ¼ cup of unsweetened applesauce for each egg. This adds moisture and a hint of sweetness.
– Yogurt: Substitute ¼ cup of yogurt for each egg. It adds creaminess and keeps the cake soft.
– Silken tofu: Blend ¼ cup of silken tofu until smooth. This works great for a dense cake texture.
These options keep your cake tasty and moist, just like the original recipe!
Can I use frozen raspberries instead of fresh?
Yes, you can use frozen raspberries in your cake. However, they may change the cake’s texture and flavor. Here are some points to consider:
– Frozen raspberries tend to be softer once thawed. This means they may break apart more in the batter.
– They release extra juice, which can make the batter wetter. You may need to adjust the flour a bit.
– If you want to use them, let them thaw first and drain any excess liquid.
Using frozen raspberries is fine, but fresh ones give a better texture and flavor.
How can I make the cake less sweet?
If you want a less sweet cake, here are some tips to adjust the sweetness:
– Reduce the sugar: Cut down the granulated sugar by ¼ to ½ cup. The cake will still be sweet enough with the raspberries.
– Use unsweetened cocoa powder: This will balance the sweetness from the sugar.
– Add more raspberries: Fresh raspberries bring a tart flavor that helps cut through the sweetness.
– Try a sugar substitute: Consider using stevia or erythritol as a sweetener.
These changes will give you a cake that fits your taste better!
Is this recipe suitable for special dietary needs?
Yes, you can adapt this recipe to fit many dietary needs. Here are some ideas:
– Gluten-free: Swap all-purpose flour with a gluten-free flour blend. Make sure it includes xanthum gum for structure.
– Vegan: Use plant-based milk and replace eggs as mentioned above. This makes the cake dairy-free and egg-free.
– Nut allergies: Check the labels of your ingredients. Use vegetable oil instead of any nut oils.
These simple swaps can make the cake suitable for different diets while still tasting great!
What is the history of the chocolate raspberry cake?
The chocolate raspberry cake is a modern classic. It combines rich chocolate with tart raspberries. This dessert has roots in French pastry traditions, where chocolate and fruit pair well.
Raspberry cakes have been popular since the late 19th century. Chocolate became famous in desserts in the 20th century. Combining the two flavors created a fresh twist that many enjoy today.
Today, this cake is a favorite for birthdays and special events. It’s loved for its beautiful look and delicious taste, making it a true crowd-pleaser.
You’ve learned how to make a delicious chocolate raspberry cake from scratch. We explored key ingredients, tools, and step-by-step instructions. I shared tips to avoid common mistakes and offered storage advice for leftovers. The variations allow you to customize the cake to your taste. Remember, baking is both science and art. Enjoy the process, share your creations, and have fun experimenting with flavors. This cake can bring joy to any occasion. Keep baking and enjoy every sweet bite!
Chocolate Raspberry Cake
A rich and moist chocolate cake layered with fresh raspberries and dark chocolate chips, perfect for any celebration.
Ingredients
Instructions
- 1
Begin by preheating your oven to 350°F (175°C). Prepare two 9-inch round cake pans by greasing them with butter or cooking spray and then dusting them lightly with flour to prevent sticking.
- 2
In a large mixing bowl, sift together the flour, granulated sugar, cocoa powder, baking powder, baking soda, and salt until thoroughly combined and airy.
- 3
Next, add the room-temperature eggs, whole milk, vegetable oil, and vanilla extract to the dry mixture. Using an electric mixer, beat on medium speed for about 2 minutes, or until the batter is smooth and homogenous.
- 4
Carefully pour in the boiling water, stirring the batter gently until it becomes thin and well mixed. The batter should be quite runny; trust this is intended!
- 5
Gently fold in the fresh raspberries and dark chocolate chips using a spatula, ensuring they are evenly dispersed throughout the batter without breaking the raspberries.
- 6
Evenly divide the batter between the two prepared cake pans, tapping them gently on the counter to remove any air bubbles.
- 7
Place the pans in the preheated oven and bake for 30-35 minutes. The cakes are done when a toothpick inserted into the center comes out clean, with no wet batter attached.
- 8
Once baked, carefully remove the cakes from the oven and let them cool in the pans for about 10 minutes. Then transfer the cakes to wire racks to cool completely.
- 9
Once completely cooled, you can frost each layer with your favorite chocolate frosting. For an extra burst of flavor, consider layering fresh raspberries between the cake layers.
- 10
To finish, beautifully decorate the top of the cake with additional fresh raspberries and elegantly sprinkle some chocolate shavings for a refined touch.
Chef's Notes
For added flavor, layer fresh raspberries between the cake layers.


Recipe Creator
Remy
I’m Chef Remy, your recipe companion, here to bring warmth, bold taste, and simplicity to your kitchen.
View My Recipes