Salads
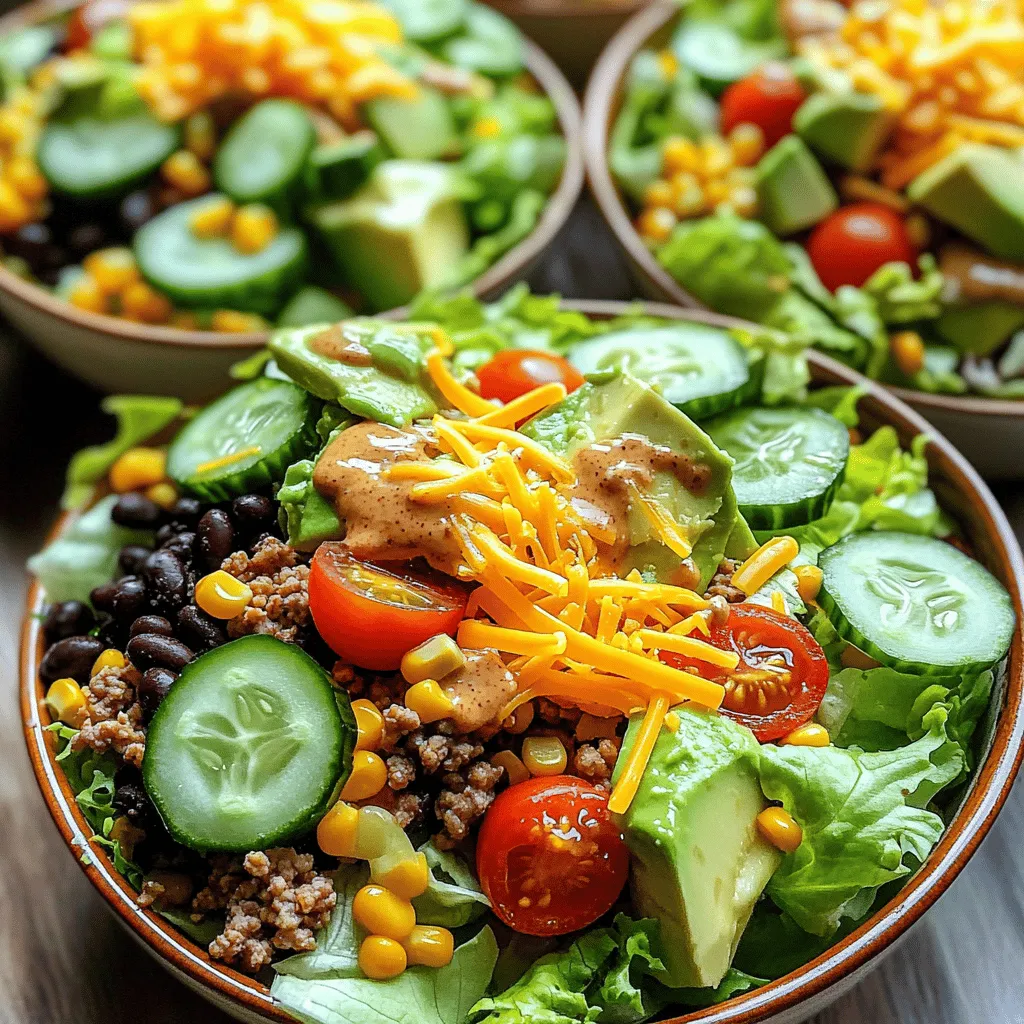
Taco Salad with Chipotle Ranch Dressing Delight
Are you ready to take your taco night to the next level? My Taco Salad with Chipotle Ranch Dressing is a game-changer! With fresh ingredients
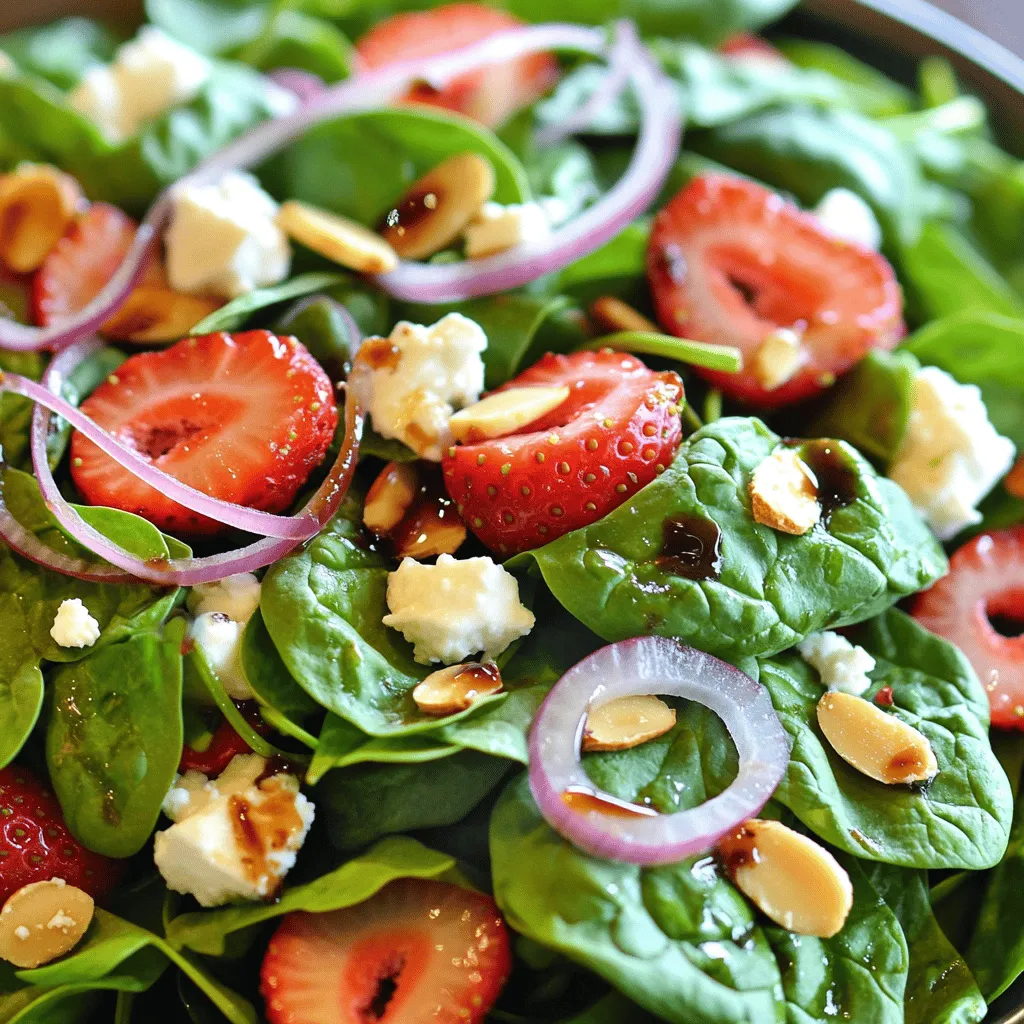
30-Minute Strawberry Spinach Salad Fresh Delight
Ready for a fresh and tasty treat? My 30-Minute Strawberry Spinach Salad is the perfect mix of flavors and vibrant colors. With juicy strawberries, crisp
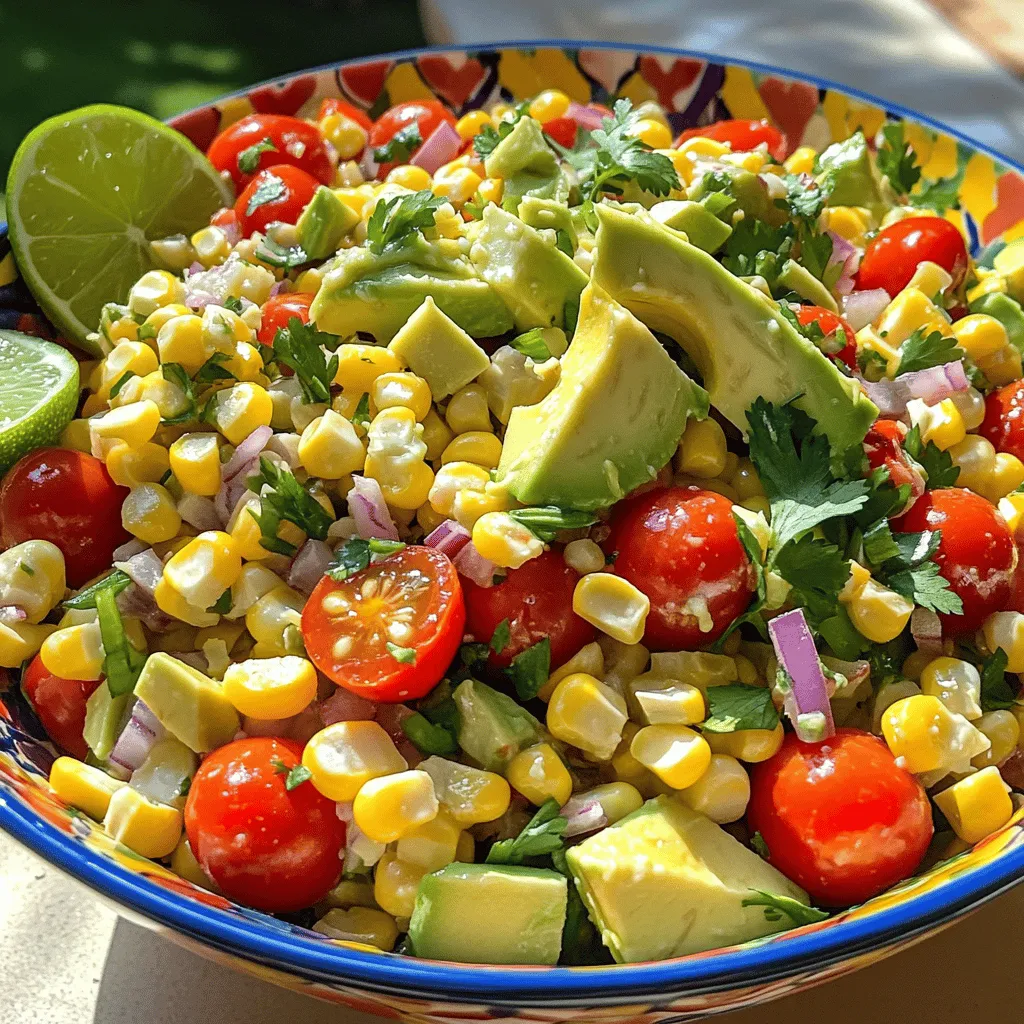
Summer Corn Salad Flavorful and Fresh Recipe Guide
Get ready for a burst of flavor with my Summer Corn Salad! This vibrant dish showcases fresh corn, peppers, and avocado, perfect for sunny days.
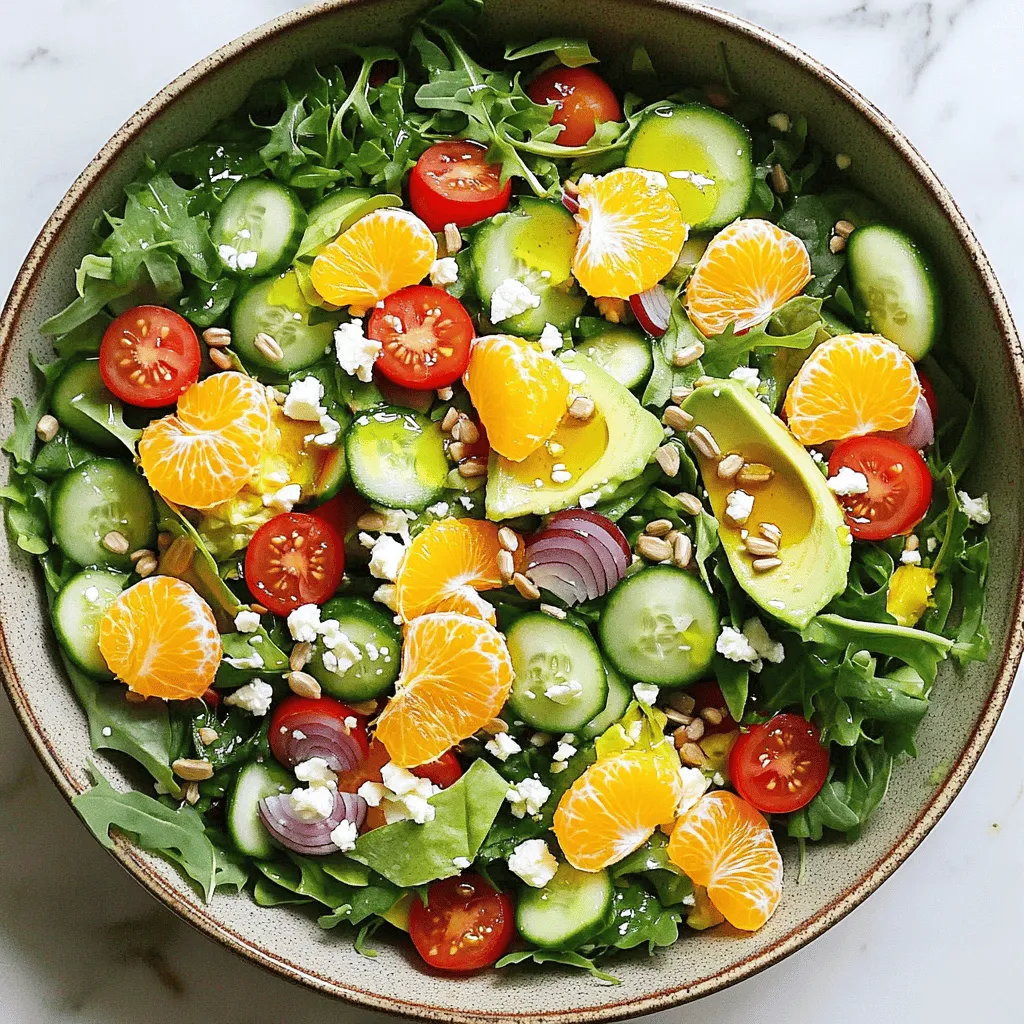
Sunshine Salad Vibrant and Fresh Flavor Boost
Looking for a salad that shines? Let me introduce you to the Sunshine Salad! This vibrant dish bursts with fresh flavors and great nutrition. I’ll
![- 2 cups fresh pineapple, diced into bite-sized pieces - 1 large cucumber, thinly sliced into half-moons - 1/2 red bell pepper, diced into small cubes - 1/4 red onion, finely chopped - 1/4 cup fresh cilantro, roughly chopped - 2 tablespoons fresh lime juice (about 1 lime) - 1 tablespoon honey or agave syrup for sweetness - 1/2 teaspoon fine salt - 1/4 teaspoon freshly ground black pepper - 1/4 teaspoon chili flakes (optional, for a hint of heat) This recipe serves four. You can easily adjust the amounts. For instance, if you need a smaller salad, use one cup of pineapple and half a cucumber. If you want more heat, add more chili flakes. For a sweeter taste, increase the honey or agave. You can also swap cucumber for zucchini. Each serving of Pineapple Cucumber Salad provides about: - Calories: 100 - Protein: 1g - Total Fat: 0.5g - Carbohydrates: 25g - Fiber: 2g - Sugar: 10g This salad is low in calories and high in vitamins. Pineapple offers vitamin C, while cucumber adds hydration. Enjoy this fresh and tasty dish guilt-free. For the full recipe, check the details above. Start by gathering your fresh ingredients. You will need pineapple, cucumber, red bell pepper, red onion, and cilantro. Dice the pineapple into small, bite-sized pieces. Thinly slice the cucumber into half-moons. Cut the red bell pepper into small cubes. Finely chop the red onion. Roughly chop the cilantro. Keep everything close to your mixing bowl for easy access. In a spacious mixing bowl, add the diced pineapple, sliced cucumber, bell pepper cubes, and chopped onion. Gently toss these ingredients together. Make sure to mix them well so that every piece is included. This blends the flavors and makes each bite tasty. Next, grab a small bowl to prepare the dressing. Whisk together the fresh lime juice, honey or agave syrup, fine salt, black pepper, and chili flakes if you like some heat. Mix until the honey dissolves fully. This dressing adds a sweet and zesty flavor that brightens the salad. Now, drizzle the dressing over the pineapple mixture in the large bowl. Use a large spoon to toss everything gently. Ensure all the ingredients are nicely coated with the dressing. After tossing, fold in the chopped cilantro. Give it another gentle toss to mix the herbs evenly. Let the salad rest for about 10 minutes at room temperature. This resting time allows the flavors to blend beautifully. Serve it chilled or at room temperature for the best taste. Enjoy this fresh and flavorful Pineapple Cucumber Salad! For the full recipe, check out the details above. To make your pineapple cucumber salad pop, focus on fresh ingredients. Use ripe pineapple for sweetness. A juicy cucumber adds crunch. Adding lime juice brightens the flavors. Honey or agave syrup gives a nice touch of sweetness. I often sprinkle a little chili for warmth, but you can skip it if you prefer mild flavors. Make your salad look great! Use a clear bowl to show off the colors. You can also serve it in small cups for a fun touch. Add extra cilantro leaves on top for a fresh look. A lime wedge on the side brightens the plate. These simple changes can make your dish look fancy and inviting. This salad is easy to change for different diets. For a vegan option, stick with agave syrup. If you want more protein, add grilled chicken, shrimp, or tofu. You can also swap the honey for maple syrup. For low-sodium needs, use less salt or a salt substitute. Everyone can enjoy this salad with a few tweaks! Feel free to try these tips when making your dish. Explore the [Full Recipe] for more ideas! {{image_4}} You can add protein to your pineapple cucumber salad for a heartier meal. Chicken works well, especially grilled or roasted. Shrimp adds a light touch and cooks quickly. Tofu is a great choice for a plant-based option. Simply cube your choice and mix it in when you combine the salad. This addition makes the salad filling and boosts its nutrition. While lime and honey create a bright dressing, you can explore other flavors. A sesame vinaigrette adds a nutty taste that pairs well with the salad. You might also try a spicy mango sauce for a fruity twist. Just mix your chosen dressing in the same way as the original. Don’t be afraid to experiment until you find your favorite! Changing the ingredients with the seasons can keep the salad fresh. In summer, add juicy tomatoes for extra color and flavor. In fall, consider diced apples or pears for a sweet crunch. Using seasonal produce not only enhances taste but also supports local farms. This approach keeps your salad exciting and full of variety throughout the year. For the full recipe, check out the Tropical Refreshment: Pineapple Cucumber Salad. To store leftover Pineapple Cucumber Salad, place it in an airtight container. Make sure to remove as much air as possible. This helps keep the salad fresh longer. You can keep it in the fridge for up to three days. If you see any discoloration or mushiness, it’s best to toss it out. For the best taste, eat the salad within the first 24 hours. The longer it sits, the more the ingredients lose their crunch. I recommend keeping the dressing separate. Add it just before serving. This keeps everything fresh and crisp. Use a clean spoon every time you serve to avoid bacteria. Freezing this salad isn't ideal. The texture of cucumber and pineapple changes when frozen. If you must freeze it, consider only freezing the pineapple. Cut the cucumber and store it fresh. When you thaw it, use it in smoothies or other dishes. If you freeze the salad, consume it within a month. Always thaw in the fridge, not at room temperature. This keeps bacteria at bay. You can keep Pineapple Cucumber Salad in the fridge for up to three days. Store it in an airtight container to keep it fresh. After a day, the cucumber may lose some crunch. This is normal but still tasty! Yes, you can make Pineapple Cucumber Salad ahead of time. I suggest preparing it a few hours before serving. It allows the flavors to mix well. Just remember to keep it in the fridge until you are ready to serve. You can serve this salad in many ways. Here are some ideas: - Serve it as a side dish with grilled meats. - Use it as a topping for tacos or burritos. - Pair it with chips for a fresh dip option. - Enjoy it alone for a light lunch. Absolutely! Pineapple Cucumber Salad is great for meal prep. It is easy to pack in lunch boxes. Just keep the dressing separate until you are ready to eat. This keeps the salad fresh and crisp. For the full recipe, check out the Tropical Refreshment: Pineapple Cucumber Salad section! You learned how to make a delicious Pineapple Cucumber Salad in this post. We covered all the ingredients, their measurements, and how to mix them properly. You now know tips for flavor and presentation. You can customize the salad to fit various diets and enjoy different variations. This salad is tasty, fresh, and easy to store. I hope you feel ready to try it. Enjoy this refreshing dish all year round!](https://roastedflavors.com/wp-content/uploads/2025/05/37dc3dd1-2da1-413a-ac9d-8841d373e8da.webp)
Pineapple Cucumber Salad Fresh and Flavorful Delight
Are you ready to enjoy a bright and refreshing dish? This Pineapple Cucumber Salad offers a perfect blend of sweet and crisp flavors. Whether you’re
![- 3 ripe peaches, diced - 1 cup fresh strawberries, hulled and sliced - 1 cup fresh blueberries, rinsed - 1 cup fresh raspberries, rinsed - 1 tablespoon freshly squeezed lemon juice - 1 tablespoon honey or maple syrup - 1 tablespoon fresh mint leaves, finely chopped - ½ cup Greek yogurt for creaminess - Crushed pistachios for garnish When I make this Peach Berry Fruit Salad, I focus on fresh and ripe fruits. The key is using peaches that are juicy and sweet. Strawberries should be bright red and fragrant. Blueberries and raspberries add a burst of flavor and color. For the dressing, I love freshly squeezed lemon juice. It adds a zesty kick. Honey or maple syrup gives a touch of sweetness. The mint leaves bring a refreshing note that ties everything together. You can add Greek yogurt for a creamy touch. It makes the salad richer and adds protein. Crushed pistachios are great for a crunchy topping. They also add a nice nutty flavor. Each ingredient plays a part in making this salad a fresh and tasty experience. You can find the full recipe above to create your own delightful dish. First, grab a large mixing bowl. Combine the diced peaches, sliced strawberries, blueberries, and raspberries in this bowl. Make sure you use fresh fruit for the best taste. Gently toss the fruits together using a spatula or wooden spoon. Be careful not to bruise the delicate berries. This step helps keep your salad looking beautiful and fresh. Next, take a small bowl for the dressing. Whisk together the freshly squeezed lemon juice and honey (or maple syrup) until the mixture is smooth. This dressing adds a sweet and tangy flavor to your salad. It’s easy to make and takes just a moment. Now, it’s time to bring it all together. Drizzle the lemon-honey dressing over the mixed fruit. Carefully toss the fruit again, ensuring every piece is lightly coated. This dressing gives each bite a burst of flavor. After that, sprinkle the finely chopped mint leaves over the salad. Gently fold them into the fruit mixture for a fresh, herbal touch. If you want a creamier texture, you can serve the salad with a dollop of Greek yogurt. This adds richness and protein to the dish. Finally, finish with a light sprinkle of crushed pistachios on top. This adds a nice crunch that pairs well with the sweet fruit. You can find the full recipe [here]. Layer your salad in clear glass bowls for a vibrant display. This shows off the bright colors of each fruit. Serve immediately for the freshest taste. The fruits shine best right after you make the salad. Consider adding cucumber for added crunch. It gives a nice contrast to the soft fruits. You can also use seasonal fruits for variation. Think of using cherries in summer or apples in fall. Serve with a dollop of Greek yogurt for creaminess. This adds a rich flavor that pairs well with the fruits. You can also enjoy it with a light afternoon tea or picnic foods. It makes a refreshing side dish for any meal. {{image_4}} You can change up the fruits based on the season. Swap peaches for nectarines or plums in summer. Their sweet and juicy flavors work great. In winter, try adding citrus segments, like orange or grapefruit. These fruits give a fresh twist to your salad. If you want to make this salad vegan, skip the Greek yogurt. Use maple syrup instead of honey for sweetness. You can also add nuts or seeds, like almonds or chia seeds. This makes your salad more filling and packed with nutrition. To boost the flavor, add a splash of vanilla extract to the dressing. It adds a warm, sweet note. You can also sprinkle a tiny pinch of salt. This simple trick enhances the sweetness of the fruits. For the full recipe, check out the detailed instructions above. To keep your Peach Berry Fruit Salad fresh, store it in an airtight container in the fridge. This helps protect the fruit from drying out or absorbing other odors. Enjoy your salad within 1-2 days for the best taste and texture. After that, the fruit may start to lose its juicy goodness. If you want to save some fruit for later, think about freezing the fruit before mixing. This method is great for when you want a taste of summer in winter. While the salad is best enjoyed fresh, you can freeze it for up to a month. Just remember that freezing may change the texture, so it’s best for smoothies or quick snacks later on. Yes, but for best flavor, prepare the dressing separately and combine right before serving. This keeps the fruit fresh and prevents sogginess. You can use any berries, apples, or melons for great results. Feel free to mix and match based on what you have. Add granola or nuts to increase texture and nutritional value. This adds crunch and makes the salad hearty. Yes, especially if ingredients are stored separately until ready to serve. This way, all the flavors stay bright and fresh. Modify the amount of honey or use a sugar substitute as desired. Taste as you go to find your perfect balance. For the Full Recipe, refer back to the earlier sections. Enjoy your Peach Berry Fruit Salad! This blog post shared a simple fruit salad recipe with fresh peaches, strawberries, blueberries, and raspberries. The delicious dressing adds a zesty touch with lemon and honey. You’ll love the tips for presentation and storage, like using Greek yogurt for creaminess. Remember, you can switch fruits to suit the season or your taste. Enjoy making this refreshing salad for your next meal or picnic. It’s a crowd-pleaser that’s easy and fun to customize!](https://roastedflavors.com/wp-content/uploads/2025/05/8a41ca65-9849-4edd-a09c-41f031129534.webp)
Peach Berry Fruit Salad Fresh and Flavorful Delight
Are you craving a refreshing and tasty treat? This Peach Berry Fruit Salad is just what you need! Packed with juicy peaches, sweet strawberries, and

Savory Hawaiian Chicken Salad Recipe to Savor
Are you ready to try a delicious Hawaiian Chicken Salad? This easy recipe brings together juicy chicken, fresh veggies, and a tasty dressing that will

Citrus Salad Vibrant and Refreshing Delight
Looking for a light, tasty dish that brightens your day? This Citrus Salad is your answer! Packed with juicy oranges, tangy grapefruit, and crisp spinach,
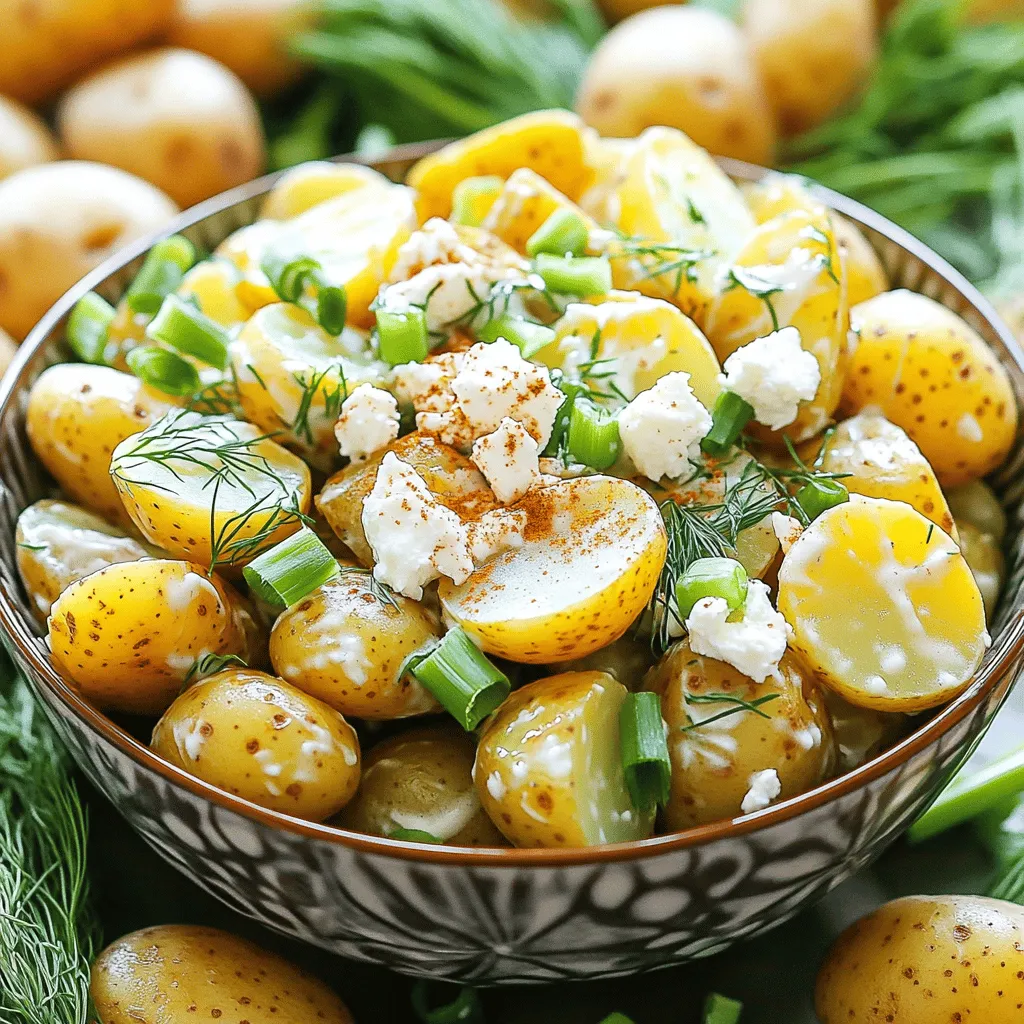
Not Your Grandma’s Potato Salad Flavorful and Fresh
If you think potato salad is just for summer picnics, think again! In Not Your Grandma’s Potato Salad: Flavorful and Fresh, I’ll show you how
![For this berry fruit salad, we need a mix of fresh berries. Here’s what I like to use: - 1 cup fresh strawberries, hulled and quartered - 1 cup plump blueberries - 1 cup juicy blackberries - 1 cup vibrant raspberries These berries bring color and flavor. Each berry adds its own taste and texture. Strawberries are sweet and juicy, while blueberries burst with flavor. Blackberries add a hint of tartness, and raspberries give a lovely balance. The dressing is simple yet tasty. You will need: - 2 tablespoons natural honey - 1 tablespoon freshly squeezed lime juice - Zest of 1 lime (about 1 teaspoon) This honey lime dressing ties the fruit together. The honey adds sweetness, while the lime juice and zest give a fresh zing. It’s all about harmony in flavors. To make the salad pop, consider these garnishes: - Fresh mint leaves Adding mint leaves gives a beautiful look and a refreshing aroma. They enhance the salad's appeal and make it more inviting. For the full recipe, you can check the details above. Start by gathering all your fresh berries. You will need strawberries, blueberries, blackberries, raspberries, a banana, and kiwi. 1. Wash the Berries: Rinse the strawberries, blueberries, blackberries, and raspberries under cold water. Gently pat them dry with a clean towel. 2. Cut the Strawberries: Remove the green tops from the strawberries. Cut them into quarters for bite-sized pieces. 3. Slice the Banana: Peel the banana and slice it into rounds. Aim for about half an inch thick. 4. Dice the Kiwi: Peel the kiwi and chop it into small, bite-sized pieces. In a large bowl, combine all your prepared fruit. Make sure the colors mix well for a bright salad. The dressing adds a sweet and tangy flavor. It’s easy to make. 1. Gather the Ingredients: You will need honey, lime juice, and lime zest. 2. Mix the Dressing: In a small bowl, combine 2 tablespoons of honey, 1 tablespoon of lime juice, and the zest of one lime. 3. Whisk Together: Stir the mixture with a whisk or fork until it is smooth and well-blended. This dressing will enhance the natural flavors of the fruit. Now it’s time to bring everything together. 1. Drizzle the Dressing: Pour the honey-lime dressing over your mixed fruit. 2. Toss Gently: Use a large spoon to gently toss the fruit. Be careful not to crush the berries. You want them to stay whole and pretty. 3. Chill the Salad: Cover the bowl with plastic wrap and place it in the fridge for about 15 minutes. This helps the flavors blend. Before serving, give the salad one last gentle toss. Transfer it to a beautiful serving bowl and garnish with fresh mint leaves. Now you have a lovely berry fruit salad ready to enjoy! For the complete recipe, check the [Full Recipe]. When you pick berries, look for bright colors and firmness. Fresh strawberries should have a shiny red hue. Blueberries should be plump and round. Blackberries need to be deep purple and juicy. Raspberries should feel soft but not mushy. For the best banana, choose one with a few brown spots. This means it is sweet and ripe. Choose kiwi that feels firm with no soft spots. To keep your bananas fresh, store them away from other fruits. Put them in a cool, dry place. If you cut a banana for your salad, sprinkle some lime juice on it. The acid in the juice slows down browning. If you want to save a whole banana, you can wrap it in plastic. This helps keep air away and slows browning. Chill your berry fruit salad for at least 15 minutes before serving. This short time in the fridge lets the flavors mix and taste better. The cool temperature makes the fruit refreshing. If you have more time, chill it for up to an hour. Just remember to toss it gently before serving. This keeps the dressing well-distributed and the fruit looking fresh. If you want to make it ahead, store it in the fridge for up to a day. {{image_4}} You can make this berry fruit salad even more fun by adding other fruits. Try using mango, pineapple, or grapes. These fruits add sweet and tropical flavors. You can also add orange segments for a juicy burst. Just make sure to cut the fruits into small pieces. This way, they mix well with the berries. If you want to change the taste of the salad, try different dressings. For a creamy touch, mix yogurt with honey and lime juice. This adds a rich flavor. You can also use balsamic vinegar for a tangy twist. It pairs well with berries. Experiment with flavors to find your favorite! Choosing seasonal berries can enhance your salad. In summer, look for fresh strawberries and blueberries. In fall, try blackberries and raspberries. These berries taste great when they are in season. They are often sweeter and juicier, making your salad even more delicious. You can find local farms that sell fresh berries, which is a fun way to support your community. To keep your berry fruit salad fresh, you must store it correctly. First, transfer any leftovers to a clean bowl. If you have tossed the salad with the dressing, it's best to store it in the fridge. Use a lid or plastic wrap to cover the bowl tightly. This will help keep the salad fresh and tasty. I recommend using clear, airtight containers for storage. Glass containers work well because they do not absorb smells or stains. If you prefer plastic, choose BPA-free options. Make sure the lid fits snugly to keep air out. This will help maintain the salad's flavor and texture. The berry fruit salad is best when eaten fresh. If stored correctly, it will stay good for about 2 to 3 days in the fridge. After that, the fruit may start to lose its texture and flavor. If you notice any browning or mushiness, it’s time to toss it out. Enjoy it while it's at its best! For the full recipe, check out the complete guide. Yes, you can use frozen berries. They are convenient and tasty. However, they may release more juice than fresh berries. This can make the salad watery. If you use frozen berries, let them thaw and drain excess liquid before mixing. This way, your salad stays fresh and colorful. If you want a honey substitute, try maple syrup or agave nectar. Both give a sweet taste. You can also use stevia or coconut sugar for a healthier option. Just make sure to adjust the amount to get the right sweetness. To make the dressing vegan, simply skip the honey. Use maple syrup instead. It adds a nice flavor that pairs well with lime. Mix maple syrup, lime juice, and lime zest just like you would with honey. This keeps the dressing tasty and vegan-friendly. For the full recipe, check out the Berry Bliss Fruit Salad. This blog post covers making a delicious fruit salad. We discussed fresh berries, dressings, and garnishes. I provided step-by-step instructions, tips for selection, and storage advice. Exploring variations adds fun to your salad. Use different fruits or dressings for new flavors. Remember, fresh ingredients and proper storage keep your salad tasty. Enjoy your creation, and don't be afraid to experiment!](https://roastedflavors.com/wp-content/uploads/2025/05/c19b7c4b-9946-4ed7-a450-1eeda7229c13.webp)
Berry Fruit Salad with Easy Honey Lime Dressing Delight
Bright, colorful, and bursting with flavor, this Berry Fruit Salad with Easy Honey Lime Dressing is a treat for your taste buds! You’ll learn how