Salads
![- 2 large cucumbers, thinly sliced - 1 cup carrots, julienned - 1 red bell pepper, thinly sliced - Rice vinegar, soy sauce, honey or maple syrup - Sesame oil, ginger, and garlic - Fresh cilantro, green onions, toasted sesame seeds To create a bright and refreshing Asian cucumber salad, you need fresh ingredients and a tasty dressing. The main ingredients bring crunch and color to the dish. The cucumbers provide a crisp base. Carrots add sweetness and extra crunch. Red bell peppers offer a pop of color and flavor. For the dressing, rice vinegar gives a tangy kick. Soy sauce adds a savory depth. Honey or maple syrup balances the tanginess with sweetness. Sesame oil brings a rich, nutty flavor. Fresh ginger and garlic add zing to the mix. Together, these ingredients create a dressing that enhances the salad. To finish, you sprinkle fresh cilantro and green onions on top. They add a burst of freshness. Toasted sesame seeds bring a delightful crunch. This salad is not only light but also full of flavor, making it a perfect side dish or snack. If you want the full recipe, check out the Crisp Asian Cucumber Delight. To get the crispiest cucumbers, start by slicing them thin. I like to sprinkle salt on the slices. This draws out moisture, making them crunchy. Let them sit in a colander for about 15 minutes. After that, rinse the cucumbers under cold water. This will remove excess salt. Finally, pat them dry with a paper towel. Next, let’s prep the other veggies. For carrots, use a sharp knife to cut them into thin strips. This method is called julienning. It gives nice texture and looks great. For the red bell pepper, cut off the top and bottom. Remove the seeds and slice it thinly. You want all the pieces to be about the same size. Now, let’s make the dressing. In a small bowl, combine rice vinegar, soy sauce, honey, sesame oil, ginger, and minced garlic. Use a whisk to mix everything well. This is key for a balanced flavor. Whisk until the mixture is smooth. A good dressing should slightly emulsify, meaning it blends well and doesn’t separate. With all the ingredients ready, it’s time to combine. In a large bowl, add the cucumbers, carrots, bell pepper, green onions, and cilantro. Drizzle the dressing over the salad. Gently toss everything together. Make sure every piece is coated in the dressing. Let the salad rest for at least 10 minutes. This helps all the flavors mix together. Just before serving, toss it again lightly. This ensures a fresh and vibrant dish. For the full recipe, check out [Full Recipe]. To make your Asian cucumber salad pop, add more spice or sweetness. For spice, include a pinch of red pepper flakes or a drizzle of sriracha. You can also add a dash of chili oil for a warm kick. If you like it sweeter, try adding more honey or maple syrup. Adjusting salt and acidity is key. Start with a small amount of salt. Taste as you mix. If it feels flat, add more vinegar. Rice vinegar gives a nice tang. You want a balance between sweet and sour. A beautiful salad is all about how you serve it. Use a clear glass bowl. This lets the colors shine through. Layer your ingredients for a more inviting look. Garnishes can elevate your dish. Fresh cilantro adds vibrant green. A sprinkle of sesame seeds brings a nice crunch. You may even add thinly sliced red chili for a splash of color. Chopping veggies can take time. Use a sharp knife for easy slicing. For cucumbers, try a mandoline. It helps you get thin, even slices quickly. To keep cucumbers fresh, store them in water. This helps maintain their crunch. If you salt them before mixing, let them sit for a bit. Rinse and dry before adding to your salad. For the full recipe, check out the Crisp Asian Cucumber Delight. {{image_4}} You can easily change up the ingredients in this salad. To keep it gluten-free, use tamari instead of soy sauce. This option provides the same rich flavor without the gluten. For added protein, consider adding shrimp or tofu. Both options make this salad more filling and satisfying. Shrimp brings a sweet flavor, while tofu offers a nice, soft texture. You can adapt this salad based on the seasons. In the summer, add fresh tomatoes or radishes for extra crunch. In fall, try roasted butternut squash. Each season brings unique flavors that can enhance your salad. You can also adjust the recipe based on your flavor likes. Adding fruits like mango or citrus can create a bright, fresh taste. The dressing is where you can really get creative. While the original recipe is tasty, try different dressings for a new twist. You can use peanut sauce or a spicy sesame dressing. Adding herbs like mint or basil gives the salad a fresh, bright flavor. Spices like chili flakes can bring heat if you like a kick. Each change adds a new layer of flavor to your dish. For the full recipe, check the link provided. To keep your Asian cucumber salad fresh, store it in the fridge. Use an airtight container. This prevents moisture loss and keeps the salad crisp. Avoid metal containers, as they can react with the vinegar. Instead, opt for glass or BPA-free plastic. Make sure to seal the lid tightly. This helps maintain the salad's bright flavors. Asian cucumber salad will stay fresh for about 3 days in the fridge. After that, it may lose its crunch. Look for signs of spoilage. If the cucumbers become slimy or the colors fade, it’s time to toss it. Always trust your senses. A sour smell also means it’s no longer good. You can prepare this salad ahead for quick meals. Chop the vegetables and store them separately in the fridge. Mix them with the dressing just before serving. This keeps everything fresh and crunchy. You may want to adjust the salt and acidity when you prepare it ahead. Taste the salad again after mixing. This allows the flavors to shine through. For this salad, I recommend using English cucumbers. They are long and thin, with a smooth skin. Their seeds are smaller, making them less bitter. Regular cucumbers, on the other hand, have a thicker skin and larger seeds. This can make them taste more bitter and watery. If you want a crisp bite, stick with English cucumbers. They add a nice crunch and freshness to your salad. Yes, you can make this salad in advance. Prepare it a few hours before serving for the best flavor. Store the salad in the fridge in an airtight container. If you want to keep it fresh, add the dressing just before serving. This prevents the salad from getting soggy. It tastes even better after the flavors mingle for a bit. This salad pairs well with many dishes. You can serve it with grilled chicken or shrimp for protein. It also goes nicely with rice or noodles. For a light meal, try it with tofu or vegetable stir-fry. You can create a full meal by adding some spring rolls on the side too. The salad adds a refreshing crunch to any meal. You can easily customize this recipe. Try adding sliced radishes for more crunch. If you like heat, add some chopped chili peppers. For a sweeter taste, include mango or pineapple chunks. You can also swap out the vegetables. Use bell peppers or snap peas for variety. Feel free to play with the dressing, too. Add lime juice for a zesty kick or swap honey for agave syrup. Yes, you can make the dressing vegan. Instead of honey, use maple syrup or agave nectar. Both options keep the sweetness without using animal products. You can also add a splash of lemon juice for extra freshness. This keeps the flavors bright and delicious. Your salad will still taste great with these changes. Enjoy your light and crunchy delight! This cucumber salad is simple and fresh. You learned about key ingredients, dressing, and enhancements. I covered preparation steps and tips for good results. You can try variations and customize it to your taste. Store it well and enjoy it for days. This salad is a healthy addition to any meal. With a bit of creativity, you can make it your own. Enjoy your cooking journey!](https://roastedflavors.com/wp-content/uploads/2025/06/57f3eb63-e052-47e7-9487-c095a6e655f6.webp)
Asian Cucumber Salad Light and Crunchy Delight
Looking for a light and refreshing dish that bursts with flavor? This Asian Cucumber Salad is your perfect solution! With crunchy cucumbers, colorful bell peppers,
. {{image_4}} To keep your salad low in carbs, focus on fresh veggies. You can swap out high-carb ingredients. For example, use zucchini noodles instead of pasta. Cauliflower rice can also add bulk without the carbs. This keeps your meal light and healthy. You can change the protein to suit your taste. Try diced chicken or shrimp for a twist. If you like fish, tuna can add a nice flavor. Each protein brings its own taste and texture. This makes the salad more fun to eat. If you're vegetarian or vegan, it's easy to adapt. Omit the turkey and cheese for a lighter dish. Instead, add chickpeas or lentils for protein. You can also include avocado for creaminess. This keeps the salad filling and delicious without meat or dairy. For the full recipe, check out the Low Carb Italian Grinder Salad. To keep your Low Carb Italian Grinder Salad fresh, store it in airtight containers. Glass containers work best, but you can also use plastic ones. Make sure to separate the dressing if you have leftover salad. This way, the veggies stay crisp and fresh. When stored correctly, your salad can last up to three days in the fridge. After this time, the veggies may lose their crunch. If you notice any wilting or off smells, it’s best to toss it out. Always trust your senses! This salad is best enjoyed cold. There’s no need to reheat it. If you do want a warm dish, consider using the cooked turkey breast in a different recipe. The salad’s flavors shine best when served chilled, so enjoy it fresh! The carb count for a Low Carb Italian Grinder Salad is about 8 grams per serving. This count can vary based on the ingredients you choose. Most of the carbs come from the veggies, like tomatoes and cucumbers. Using low carb dressing can help keep the count low. You can enjoy this salad without feeling guilty about your carb intake. Yes, you can make this salad ahead of time. However, I suggest you keep the dressing separate until you're ready to eat. This keeps the salad crisp and fresh. Prepare the veggies and turkey a day in advance. Just store them in an airtight container in the fridge. When you're ready to serve, add the dressing and toss. This way, every bite stays tasty and crunchy. There are many low carb dressing options you can use. Some great choices include olive oil and vinegar, ranch, or Caesar dressing. You can also make your own dressing. Mix olive oil, vinegar, herbs, and spices to create your perfect blend. Just be sure to check the labels on store-bought dressings. Some may have hidden sugars that can add carbs. Enjoy experimenting with flavors to find what you love! For the full recipe, check out the Low Carb Italian Grinder Salad. This blog post explored the key ingredients and their nutritional benefits. You learned how to prepare and combine your salad easily. We discussed tips for customizing and keeping your salad fresh. Variations allow you to enjoy low-carb and protein-packed options. Finally, we covered storage methods for leftovers and answered common questions. Eating healthy does not have to be hard. With these steps, you can enjoy tasty meals every time.](https://roastedflavors.com/wp-content/uploads/2025/06/2c1081e2-1350-4a44-a119-17356a28fd30.webp)
Low Carb Italian Grinder Salad Fresh and Flavorful Dish
Looking to enjoy a fresh and flavorful dish without the carbs? The Low Carb Italian Grinder Salad is the perfect answer! Packed with vibrant veggies
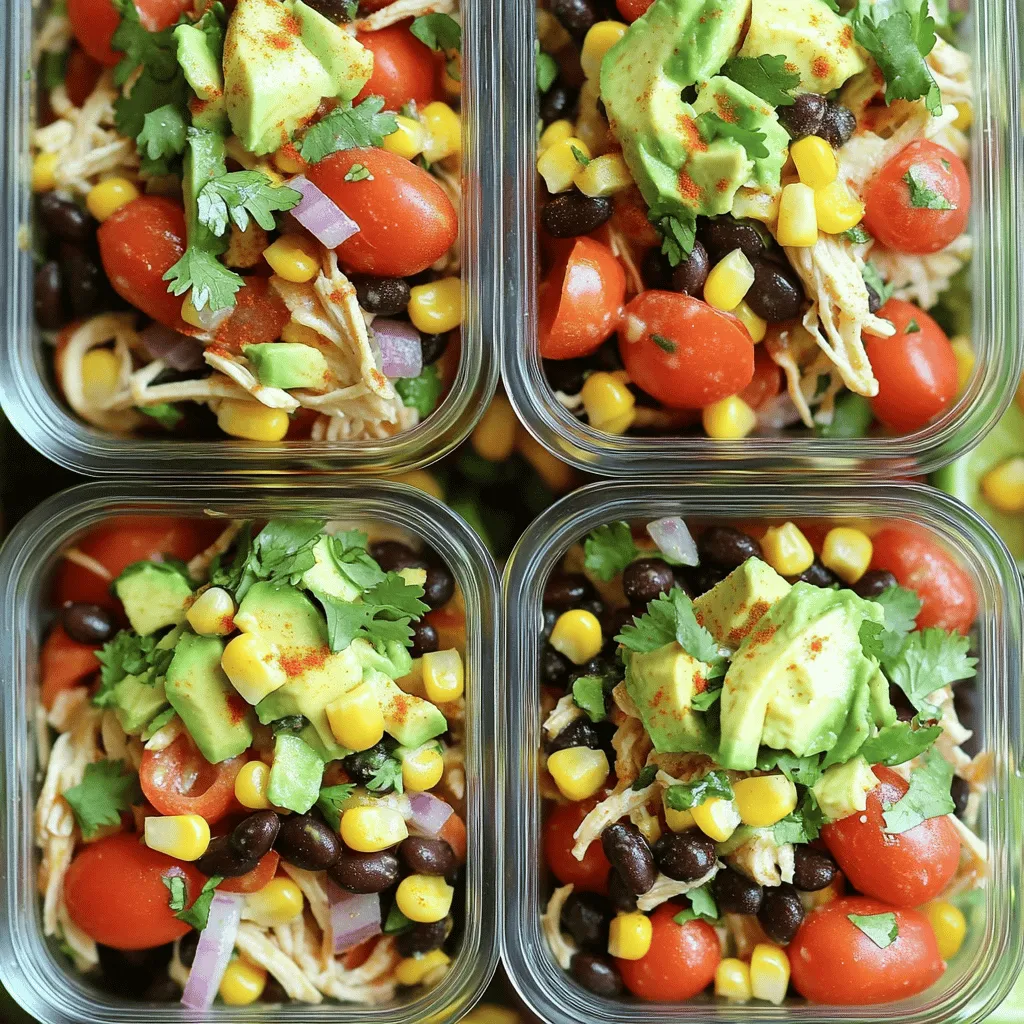
Mexican-Inspired Chicken Salad Meal Prep Delight
Are you ready to spice up your meal prep? My Mexican-Inspired Chicken Salad Meal Prep Delight brings fresh flavors and vibrant colors to your week.
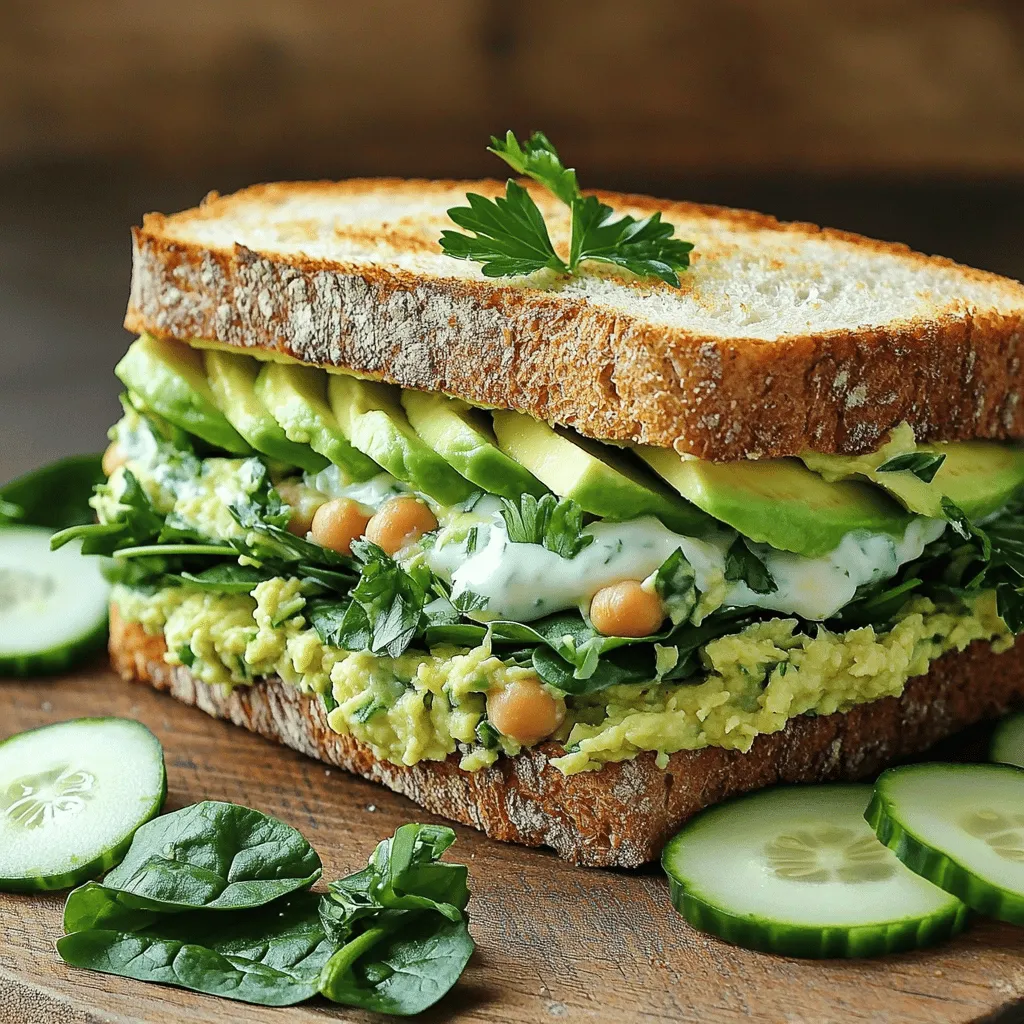
Green Goddess Salad Sandwich Fresh and Flavorful Meal
Looking for a fresh and tasty meal? The Green Goddess Salad Sandwich is perfect. It combines creamy ingredients and vibrant flavors. This sandwich is not
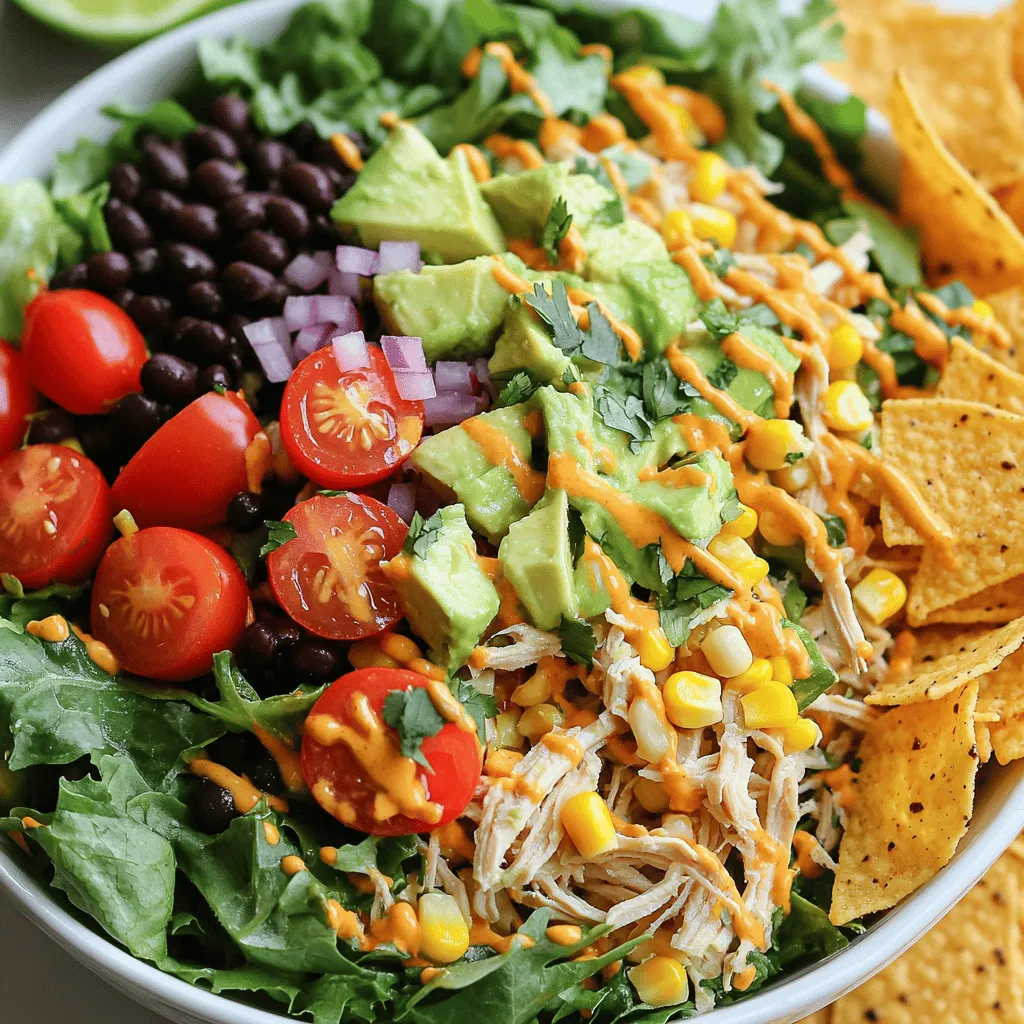
Easy Zesty Southwest Chicken Salad Bowl Healthy Dish
Looking for a fresh and healthy meal? Let me introduce you to my Easy Zesty Southwest Chicken Salad Bowl. Packed with lean protein, colorful veggies,
![To make a great ambrosia salad, gather these fresh ingredients: - 1 cup mini marshmallows - 1 cup shredded coconut - 1 cup pineapple chunks (fresh or canned, well-drained) - 1 cup mandarin oranges (canned, well-drained) - 1 medium apple, diced (your choice of variety) - 1/2 cup grapes, halved (red or green, to add color) - 1 cup whipped cream (or Cool Whip for a lighter alternative) - 1/2 teaspoon vanilla extract - 1 tablespoon honey (optional, for an extra touch of sweetness) - Chopped nuts (such as walnuts or pecans) for garnish Using fresh fruits is key to a tasty ambrosia salad. Fresh fruits add bright flavors, great texture, and vibrant colors. They make your salad pop. Choose ripe fruits for the best taste. Fresh pineapple and juicy grapes will bring joy to each bite. Canned fruits can work too, but drain them well. They should not make your salad watery. You can add extra flavors to your ambrosia salad. Try these fun options: - Diced strawberries or blueberries for more color - A squeeze of fresh lime juice for a tangy twist - Cream cheese for a richer texture - Chopped nuts mixed in for crunch Each add-in can change the taste and make the dish your own. Feel free to experiment and find what you love! For the full recipe, refer to the previous section. To make ambrosia salad, start by gathering all your ingredients. You need mini marshmallows, shredded coconut, pineapple chunks, mandarin oranges, diced apple, and halved grapes. In a large mixing bowl, combine the mini marshmallows, shredded coconut, pineapple chunks, mandarin oranges, diced apple, and halved grapes. Stir gently. This step is key to avoid crushing the fruits. In a separate bowl, whisk together whipped cream, vanilla extract, and honey until smooth. This creates a light and fluffy mixture. Carefully fold this whipped cream mixture into the fruit mixture using a spatula. Mix until all the fruit is coated. Be cautious to keep the fruit pieces intact. Once everything is mixed, cover the bowl with plastic wrap. Place it in the refrigerator for at least 1 hour. This helps the flavors blend well. To prevent crushing the fruit, use a gentle touch. Start by adding the lighter ingredients first, like marshmallows and coconut. Then, add heavier fruits like pineapple and apples last. When you mix, use a folding motion. This lifts the mixture instead of stirring, keeping the fruit intact. If you do this, your salad will look great and taste fresh. Refrigeration is crucial for flavor. It allows the fruits to release their juices and mix with the cream. One hour is the minimum time, but longer is better. You can chill it overnight for deeper flavor. When you are ready to serve, gently stir it again. This refreshes the ingredients and makes your salad inviting. Enjoy the delightful blend of textures and flavors! To make your ambrosia salad creamy, use fresh whipped cream. It gives a light, fluffy feel. If you want a lower-calorie option, try Cool Whip. Mixing whipped cream with vanilla extract adds flavor. Be gentle when folding it into the fruit. This keeps the fruit intact and avoids mushiness. Serve ambrosia salad in a clear bowl. This shows off the bright colors of the fruit. For a fun touch, add extra nuts on top. You can also place slices of fresh fruit around the dish. This makes it look even more inviting. Chill the salad for at least one hour before serving. It lets the flavors blend well. For a vegan version, use coconut whipped cream. You can skip the honey or use agave syrup. To make it nut-free, leave out the nuts or replace them with seeds. Sunflower seeds add crunch without allergens. Feel free to experiment with fruits based on your diet. You can swap in berries or pears for a fun twist. For the full recipe, check my earlier section! {{image_4}} You can change the fruits in Ambrosia Salad based on what you like. Instead of pineapple, try mango or kiwi for a sweet twist. Swap mandarin oranges with fresh berries for a pop of color. For nuts, walnuts or almonds work well, but pecans add a nice crunch too. These swaps let you create a salad that fits your taste. Want to make Ambrosia Salad unique? Add a splash of yogurt for tanginess. You can mix in a bit of citrus zest for extra flavor. For a tropical vibe, include shredded fresh coconut. You could even add mini chocolate chips for a sweet surprise. These twists keep the dish fun and exciting. Ambrosia Salad shines at holidays. For a winter version, add pomegranate seeds for color. In summer, toss in mint leaves for a refreshing touch. For Thanksgiving, consider adding diced pears and cranberries. These seasonal changes keep your Ambrosia Salad fresh and festive. If you want to try the classic version, check out the Full Recipe for more details on making this delightful dish. To keep your ambrosia salad fresh, always use a clean, airtight container. This will help lock in moisture and prevent it from drying out. I suggest using glass containers, as they do not absorb odors. Make sure to cover the container well with a lid. If you do not have one, plastic wrap works too. Ambrosia salad lasts about 3 to 5 days in the fridge. The fruits stay fresh for this time if stored properly. After a few days, the salad may become watery. This happens as the fruits release juice. If it looks too soggy, you can still eat it, but it may not taste as good. Freezing ambrosia salad is not recommended. The fruits will lose their texture and flavor when thawed. Cream and whipped toppings may also separate, leading to a less appealing dish. It's best to enjoy your ambrosia salad fresh or store it in the fridge for a few days. If you want to make it ahead of time, I suggest preparing the fruits and cream separately. Then mix them just before serving. For the full recipe, check out the Heavenly Ambrosia Salad section above. Ambrosia Salad comes from the southern United States. It dates back to the 19th century. This dish reflects the region's love for fresh fruits and sweets. People made it for special events and holidays. The name "ambrosia" means food for the gods in Greek mythology. This salad is a mix of fruits, cream, and sometimes nuts. Over the years, it has become a classic dish at potlucks and family gatherings. Yes, you can make Ambrosia Salad ahead of time. In fact, it tastes better when chilled. Make it a few hours or even a day before serving. Just store it in the fridge. Keep it covered with plastic wrap or a lid. This helps the flavors blend well. Before serving, stir it gently. This will refresh the ingredients and keep it looking nice. You can make Ambrosia Salad healthier with a few simple swaps. Use low-fat whipped cream or yogurt instead of regular cream. Fresh fruit is always a great choice. You can also skip the mini marshmallows or use a sugar-free version. Adding nuts boosts protein and healthy fats. If you want more fiber, add seeds like chia or flax. These swaps keep the salad tasty while making it better for you. Check the [Full Recipe] for more ideas! In this article, we explored how to make Ambrosia Salad, focusing on fresh ingredients, preparation steps, and serving tips. Quality fruits are key for taste, while optional add-ins can add fun twists. Remember to refrigerate for the best flavor and explore variations to suit all diets. You can enjoy this dish at any time. Whether for a party or a quick snack, Ambrosia Salad is versatile and easy to prepare. Use these tips to create your perfect version today.](https://roastedflavors.com/wp-content/uploads/2025/06/1504c54d-0515-4e67-919c-96efea30dc34.webp)
Ambrosia Salad Delightful and Refreshing Recipe
Welcome to my delightful world of Ambrosia Salad! This refreshing dish is not just a treat for the taste buds; it’s also full of colorful
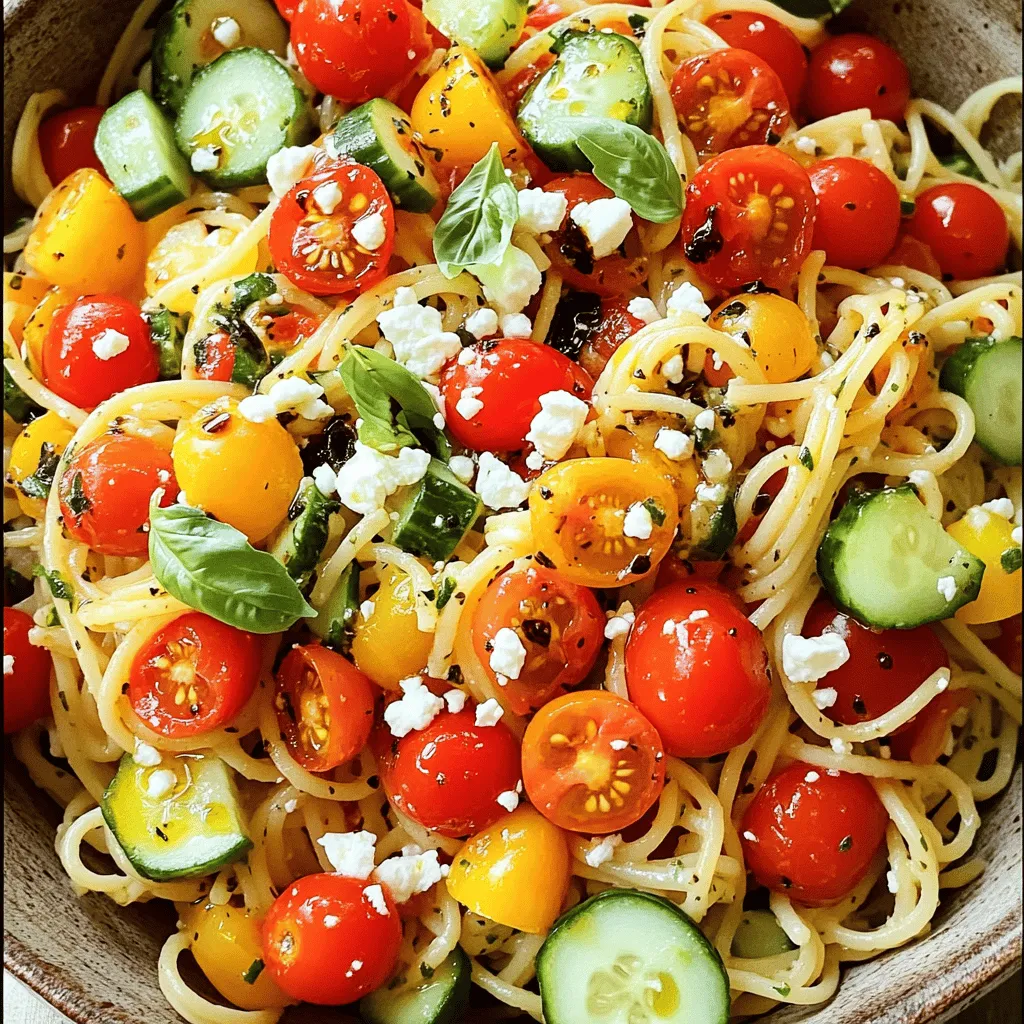
Quick & Delicious Spaghetti Salad Fresh and Easy Meal
Are you looking for a quick, tasty meal? My Quick & Delicious Spaghetti Salad fits the bill perfectly! In just a few simple steps, you’ll
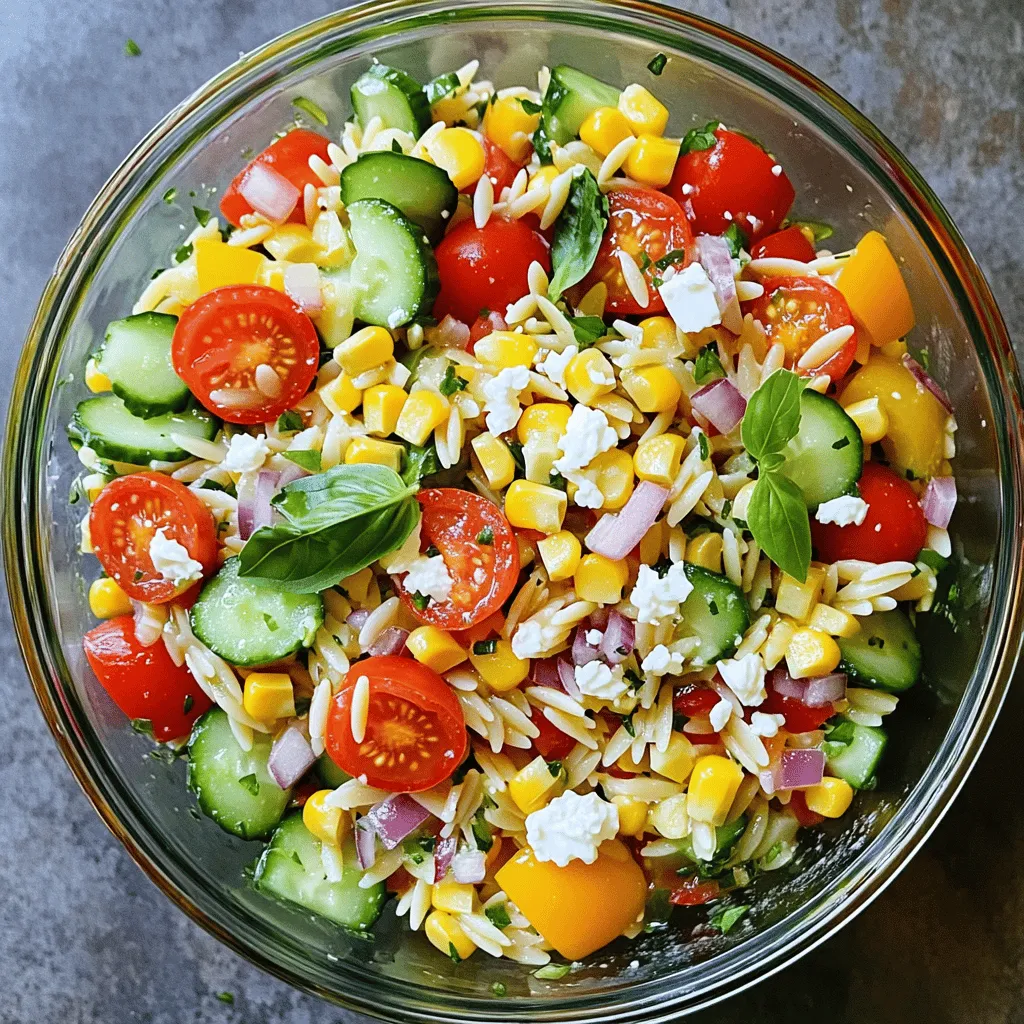
Rainbow Orzo Salad Flavorful and Colorful Dish
Looking to brighten up your meals? The Rainbow Orzo Salad is here to deliver! This dish combines colorful veggies, tender orzo, and zesty dressing for
![- Fresh baby spinach - Mixed berries - Pecans - Red onion - Feta cheese - Balsamic vinaigrette - Salt and pepper - If you can't find fresh spinach, try arugula or kale. - Use any berries you like, such as blackberries or cherries. - Swap pecans for walnuts or almonds for a different crunch. - Look for berries that are bright and firm. Avoid any with mushy spots. - Choose spinach that is vibrant and crisp. Wilting is a sign of age. - Select pecans that smell fresh and nutty. Avoid any that smell off or stale. - Washing and drying the spinach: Start with five cups of fresh baby spinach. Rinse it under cool water to remove dirt. Use a salad spinner or paper towels to dry the spinach well. Wet spinach can make your salad soggy. - Slicing and preparing the berries: Take one cup of mixed berries. Rinse them gently under cold water. Pat them dry with a paper towel. For strawberries, cut them in half or quarters. Keep the blueberries and raspberries whole. Add all the berries to the bowl with spinach. - Layering ingredients in the bowl: Next, sprinkle half a cup of lightly toasted pecans over the salad. Then, add a quarter of a medium red onion, thinly sliced. This adds a nice crunch and flavor. Crumble a quarter cup of feta cheese on top for creaminess. - How to distribute dressing evenly: Drizzle a quarter cup of balsamic vinaigrette over the salad. Pour it slowly to ensure even coverage. This will make each bite flavorful. - Techniques for tossing without damaging berries: Use two large serving spoons to toss the salad. Gently lift the ingredients and turn them over. Avoid squishing the berries as you mix everything together. - Serving suggestions with presentation tips: Serve the salad in individual bowls. For a beautiful touch, add a few extra berries and a sprinkle of feta on top. This makes your dish look inviting and delicious. For the full recipe, refer to the instructions above to create this nutritious delight! To enjoy this salad later, prep the ingredients ahead of time. You can wash and dry the spinach a day before. Store it in an airtight container with a paper towel. This helps absorb moisture and keeps the leaves crisp. For the berries, wash and slice them just before serving. If you prep them too early, they can become mushy. Keep the pecans in a dry place. Toast them right before adding to the salad for that fresh crunch. Making your own balsamic vinaigrette is easy. Combine: - 1/4 cup balsamic vinegar - 1/2 cup olive oil - 1 teaspoon honey - Salt and pepper to taste Shake it in a jar until mixed well. This dressing adds a sweet touch to your salad. You can also try honey mustard or a yogurt-based dressing for a creamy option. To boost the flavor, add fresh herbs. Chopped basil or mint gives a bright taste. You can also sprinkle a bit of fresh lemon juice for zest. If you like a sweeter dressing, add maple syrup or agave nectar. Just a little will elevate the taste of your salad. These small changes can make a big difference. Enjoy your Berry Spinach Salad with Pecans as a nutritious delight! {{image_4}} You can easily add protein by including grilled or rotisserie chicken. Just slice the chicken into bite-sized pieces and toss it right into the salad. This addition not only makes the salad heartier but also adds a savory flavor that pairs well with the sweet berries. Plus, it transforms this salad into a full meal that can satisfy your hunger. If you prefer a vegan option, simply omit the cheese. Replace the feta with avocado or extra nuts for creaminess. You can also use a vegan dressing, like a lemon-tahini mix or a balsamic vinaigrette made with only plant-based ingredients. This way, you keep the salad fresh and tasty while meeting your dietary needs. Feel free to switch up the fruits based on what’s in season. In spring, you might add fresh peaches or nectarines. In winter, try pomegranate seeds for a crunchy pop. Seasonal fruits not only enhance taste but also keep the salad exciting all year round. Mixing in different fruits makes each bite a new experience, keeping your taste buds happy. For the complete recipe, check out the [Full Recipe]. To keep your Berry Spinach Salad fresh, store it in the fridge. Place any leftover salad in a sealed container. This helps to prevent it from wilting or getting soggy. For best results, eat the salad within two days. If you wait too long, the berries may lose their flavor. You might wonder, can you freeze spinach-based salads? I do not recommend freezing this salad. Freezing can change the texture of spinach and berries. Instead, enjoy the salad fresh. If you have leftover dressing, you can freeze that for later use. Just remember to thaw it in the fridge before using it again. Choose airtight containers to store your salad. Glass or BPA-free plastic works well. If you want to keep the ingredients separate, use containers with compartments. This keeps your salad looking fresh and tasty. For the dressing, a small jar is perfect. This makes it easy to shake and pour when you're ready to serve. To make this salad, start with fresh baby spinach. Place it in a large bowl. Next, rinse your mixed berries and slice the strawberries. Add them to the bowl. Then, sprinkle in the toasted pecans and thinly sliced red onion. Crumble feta cheese over everything. Drizzle balsamic vinaigrette on top. Toss the salad gently to mix. Season with salt and pepper to taste. For the full recipe, check the section above. Spinach is very healthy. It is low in calories and high in nutrients. One cup of spinach has about 7 calories and is rich in vitamins A, C, and K. It also contains iron and calcium. Eating spinach can support eye health and help with blood pressure. Plus, it has antioxidants that protect your body. Adding spinach to your meals boosts your nutrition. Yes, you can use frozen berries. They work well in this salad. Just remember to thaw them first. Rinse and pat them dry to remove excess moisture. Frozen berries may be softer than fresh ones. They still add great flavor and nutrition. So feel free to use frozen if fresh ones are not available. You can store leftovers in the fridge for up to 2 days. Keep the salad in an airtight container. To keep it fresh, don’t add dressing until you’re ready to eat. If the salad sits too long, the spinach may wilt. Enjoy it within a couple of days for the best taste and texture. This salad pairs well with many dishes. You can serve it with grilled chicken or fish for protein. It also goes nicely with soups or sandwiches. For a vegetarian option, try it with quinoa or lentils. Serve it as a light lunch or a side dish at dinner. The flavors complement many meals beautifully. This post covered a delightful berry spinach salad recipe. You learned about fresh ingredients, how to prep them, and tasty variations. I shared tips for keeping your salad fresh and dressed perfectly. Remember, you can switch ingredients based on your taste or what’s in season. Enjoy exploring flavors and making this salad your own. Whether you eat it as a side or a meal, the possibilities are endless. Get creative and savor each bite!](https://roastedflavors.com/wp-content/uploads/2025/06/1269f5fb-c325-4a8d-8b51-7a9d4d1915d5.webp)
Berry Spinach Salad with Pecans Nutritious Delight
Looking for a fresh and tasty dish to brighten your day? My Berry Spinach Salad with Pecans is the perfect choice! Bursting with vibrant flavors,
![For this vibrant fruit salad, you will need: - 1 cup fresh strawberries, hulled and sliced - 1 cup ripe pineapple, diced into bite-sized pieces - 1 cup plump blueberries - 1 cup kiwi, peeled and cut into thin slices - 1 large banana, sliced into rounds - ¼ cup fresh mint leaves, finely chopped These fruits bring color, flavor, and texture. Each one adds a unique taste. Strawberries provide sweetness, while kiwi adds tang. Pineapple gives a tropical burst, and blueberries offer a juicy pop. Bananas add creaminess, and mint brings a fresh aroma. To make the honey lime dressing, you need: - 2 tablespoons honey - 2 tablespoons freshly squeezed lime juice - Grated zest of 1 lime - A small pinch of sea salt This dressing ties all the fruits together. Honey adds natural sweetness, while lime juice adds a zesty kick. The lime zest enhances the flavor, and sea salt balances the sweetness. For extra flair, consider these garnishes: - Additional mint leaves - Lime slices These garnishes not only look nice but also boost the flavor. Mint leaves add freshness, and lime slices offer a bright touch. You can serve the salad in a large, clear glass bowl to showcase the colorful fruits. For the full recipe, check out the instructions that follow! Start by washing all your fruits well. For strawberries, hull them and slice them into small pieces. Dice the pineapple into bite-sized cubes. Rinse the blueberries under cool water and set them aside. Peel the kiwi and cut it into thin slices. Slice the banana into rounds, making sure they are not too thick. Place all the fruit into a large mixing bowl. Use a spoon or spatula to gently mix them together. This keeps the fruits whole and colorful. In a small bowl, add two tablespoons of honey. Squeeze fresh lime juice into the bowl, about two tablespoons. Grate the zest of one lime and add it to the mix. Stir in a small pinch of sea salt. Whisk these ingredients together until the honey dissolves. This dressing should be smooth and well combined. The lime adds a nice tang to balance the sweetness of the honey. Now, pour the honey lime dressing over the mixed fruit. Drizzle it carefully to cover all the pieces. Use a gentle hand to toss the fruit with the dressing. Be careful not to mash the fruits; you want to keep them intact. After tossing, fold in the finely chopped mint leaves. This adds a fresh and aromatic touch. Let the salad sit for about ten minutes before serving. This resting time allows the flavors to blend beautifully. For the full recipe, refer to the earlier section. To make a vibrant fruit salad, choose ripe, fresh fruits. Look for strawberries that are bright red. Pineapples should smell sweet and feel firm. Blueberries need to be plump and shiny, while kiwis should feel slightly soft. Bananas should be yellow with a few brown spots for sweetness. Fresh mint adds a nice touch too. Aim for a mix of colors and textures for a stunning look. The honey lime dressing should be smooth and light. Start by whisking honey with lime juice in a small bowl. Make sure the honey dissolves completely. If the dressing is too thick, add a splash of water or more lime juice. This will help it coat the fruit evenly. A pinch of sea salt enhances the flavors, so don’t skip it! Presentation matters in a fruit salad. Use a clear glass bowl to show off the colorful fruits. Layer the fruits for a beautiful effect. Just before serving, garnish with more mint leaves and lime slices. This adds a fresh pop of color. You can also serve individual portions in small cups for a fun touch. For the full recipe, check the earlier sections for all the details! {{image_4}} You can easily swap fruits in this salad. Use fruits you love or have on hand. Apples, grapes, and peaches work well. They add crunch and sweetness. Each fruit brings its own flavor. Try using seasonal fruits for the best taste. You can even mix berries for a colorful twist. The options are endless! If you want a different flavor, try other dressings. A yogurt dressing adds creaminess. Just mix plain yogurt with honey and lime juice. You could also use a balsamic glaze for a tangy kick. Citrus vinaigrette is another fun option. Experiment with flavors to find what you enjoy most! To make your fruit salad more fun, add extras. Chopped nuts like almonds or walnuts add crunch. You can also try shredded coconut for a tropical vibe. A sprinkle of chia seeds boosts nutrition. For a unique twist, add small pieces of dark chocolate. These extras make your salad even more delicious and exciting. Check out the Full Recipe for more tips! Store leftover fruit salad in the fridge. Use an airtight container to keep it fresh. This helps prevent the fruits from drying out or absorbing odors. Before storage, ensure that the salad is at room temperature. This avoids condensation inside the container. Glass containers work best for storing fruit salad. They don’t retain smells and keep flavors intact. You can also use plastic containers with secure lids. Just ensure they are clean and dry before adding the salad. Fruit salad stays fresh for about 2-3 days in the fridge. To keep fruits vibrant, eat them sooner. Some fruits, like bananas, brown quickly. If you use bananas, plan to eat the salad within a day. If you notice any water pooling at the bottom, drain it before serving. This keeps your fruit salad looking great. For a full recipe, visit the [Full Recipe]. Yes, you can make the honey lime dressing ahead of time. Just mix honey, lime juice, lime zest, and salt in a bowl. Store it in a sealed jar in the fridge. This keeps it fresh for up to a week. When you're ready to use it, just give it a quick stir. It saves time on busy days. Many fruits pair well with honey lime dressing. Here are some great options: - Strawberries - Pineapple - Blueberries - Kiwi - Bananas - Mangoes - Apples - Grapes You can mix and match based on your taste. Each fruit adds its own flavor, making your salad unique and tasty. To make this fruit salad healthier, consider these tips: - Use only fresh, organic fruits when possible. - Reduce the honey to lower the sugar content. - Add seeds or nuts for extra protein and healthy fats. - Mix in some leafy greens like spinach or kale for added nutrients. These simple changes can boost nutrition without losing flavor. Enjoy your healthy fruit salad! You can find the Full Recipe for more details. This blog post covered how to make a tasty fruit salad with honey lime dressing. We discussed selecting fresh fruits and preparing the dressing. I shared tips for the best consistency and how to present your dish. Remember, you can switch up fruits or try new dressings. Store leftovers in the right containers for longer freshness. With these ideas, you can enjoy a healthy and delicious salad anytime. Happy fruit salad making!](https://roastedflavors.com/wp-content/uploads/2025/06/17ad068e-9dbe-411a-8bc0-aa254874417f.webp)
Fruit Salad with Honey Lime Dressing Fresh and Tasty
Looking for a fresh and tasty treat? This Fruit Salad with Honey Lime Dressing is the answer! Bursting with vibrant colors and flavors, it’s perfect