Salads
![To make this tasty dressing, gather these simple ingredients: - 1/2 cup balsamic vinegar - 1/2 cup extra virgin olive oil - 1 tablespoon Dijon mustard - 1 tablespoon honey (or maple syrup for a vegan option) - 1 teaspoon garlic powder - 1 teaspoon onion powder - 1/2 teaspoon sea salt - 1/4 teaspoon freshly ground black pepper - 1 tablespoon fresh herbs (like chopped basil or oregano) Choosing high-quality balsamic vinegar and olive oil makes a big difference. Look for balsamic vinegar that is thick and rich. This adds depth to your dressing. A good olive oil should be extra virgin for the best flavor. You want it to taste fresh and fruity. Check the label for quality, as this will enhance your dish. If you don't have honey, you can use maple syrup. This is a great vegan choice. If you want a different flavor, try agave syrup. For the herbs, fresh is best, but dried herbs work too. Just use less, as dried herbs are stronger. Start by gathering all your ingredients. You will need balsamic vinegar, olive oil, Dijon mustard, honey, garlic powder, onion powder, sea salt, black pepper, and fresh herbs. Measure out each one before you start. This will help you move quickly and avoid mistakes. I always find it easier to have everything ready. In a medium bowl or a sturdy jar, pour in 1/2 cup of balsamic vinegar. Then, add 1 tablespoon of Dijon mustard and 1 tablespoon of honey. Use a whisk or a fork to mix these until smooth. Next, slowly add 1/2 cup of extra virgin olive oil while whisking. This step is key to getting a nice, thick dressing. If you use a jar, just add the olive oil, seal it, and shake well. Now, it’s time to add the spices. Sprinkle in 1 teaspoon of garlic powder, 1 teaspoon of onion powder, 1/2 teaspoon of sea salt, and 1/4 teaspoon of black pepper. For a fresh twist, mix in 1 tablespoon of chopped herbs. Whisk or shake again until everything is well combined. Taste your dressing. If you want it sweeter, add a bit more honey. If you like it tangier, pour in a touch more balsamic vinegar. Adjust it until it feels just right for you. Store it in a jar, and remember to shake before serving. Enjoy your zesty balsamic bliss dressing! For the full recipe, check [Full Recipe]. To keep your dressing fresh, store it in an airtight jar. Make sure to seal it well. The dressing lasts up to one week in the fridge. Always label the jar with the date. This way, you know when to use it. Before each use, shake the jar to mix the ingredients again. Some parts may settle, so this step is key. Emulsifying is how you mix oil and vinegar. Start by whisking the vinegar with mustard and honey. This creates a base. Slowly add the olive oil while whisking. If you use a jar, add oil, then shake it. This helps blend the dressing. An emulsified dressing is creamy and smooth. If it separates, just shake it again before serving. Fresh herbs can make your dressing pop! Try basil or oregano for a burst of flavor. Chop them finely and add them in. Fresh herbs give a bright taste that dried herbs can't match. You can also experiment with different herbs. Chives or parsley can add a new twist. Just remember to adjust the amount based on your taste. {{image_4}} You can make this balsamic vinaigrette your own by adding new flavors. A splash of fresh citrus juice brightens the taste. Try lemon or orange juice for a zesty twist. Just add about one tablespoon to your dressing mix. You can also use fresh citrus zest for a stronger flavor. Garlic is another great option. Add one minced garlic clove for a bold taste. If you want a vegan version, it's easy! Just replace honey with maple syrup. This swap keeps the sweetness without using animal products. You can also omit the Dijon mustard if you need a mustard-free option. This vinaigrette isn’t just for salads. Use it as a marinade for chicken or tofu before grilling. The acidity helps tenderize the meat. You can also use it as a dipping sauce for bread or fresh veggies. Drizzle it on roasted vegetables for added flavor. This dressing is not just a side; it's a star in many dishes! For the full recipe, check out the Zesty Balsamic Bliss Dressing. Homemade balsamic vinaigrette lasts about one week in the fridge. After seven days, it may lose flavor. I always suggest tasting it before using. If it still tastes great, go ahead and enjoy! The best way to store this dressing is in an airtight jar. A glass jar works well since it does not absorb flavors. Ensure the lid is tight to keep air out. Store it in the fridge for the best taste. Avoid storing it at room temperature; heat can spoil the flavors. Look for changes in color or smell. If the dressing smells sour or off, it’s best to throw it out. Check for any mold or separation that seems unusual. If you notice any of these signs, do not use the dressing. Safety first! Yes, you can make this balsamic vinaigrette dressing ahead of time. In fact, it tastes better after sitting a bit. The flavors blend well together, making it even more delicious. Just store it in a clean jar in the fridge. It will stay fresh for up to one week. Before using, give it a good shake to mix everything back together. You can use this dressing on many foods. It’s great on salads, adding a fresh and bold flavor. You can also use it as a marinade for chicken, fish, or vegetables. Drizzle it over roasted veggies for an extra kick. You can even use it as a dipping sauce for bread or fresh veggies. The options are endless! If your dressing is too thick, just add a little water or extra balsamic vinegar. Mix it in slowly until it reaches the right consistency. If it’s too thin, adding more olive oil can help thicken it up. Whisk or shake again to blend everything well. Adjusting is easy, so don’t worry if it’s not perfect at first! Making homemade balsamic vinaigrette dressing is simple and fun. You learned the key ingredients, like balsamic vinegar and olive oil, and how to choose the best quality. The step-by-step guide helped you mix and adjust flavors to suit your taste. With tips for storage and fresh herbs, you now have everything to keep your dressing tasty. Remember, you can create variations with citrus or garlic to keep it exciting. This dressing lasts for weeks if stored right. Enjoy your culinary journey and elevate your meals with this easy-to-make dressing!](https://roastedflavors.com/wp-content/uploads/2025/07/0711ec85-199c-415a-b5d5-dd396a9a8750.webp)
Homemade Balsamic Vinaigrette Dressing Simple Recipe
Looking to elevate your salads and sandwiches? This Homemade Balsamic Vinaigrette Dressing is your answer! It’s quick, simple, and totally customizable. I’ll guide you through
. In this post, I shared how to make healthy asparagus with zucchini. We covered essential ingredients, cooking steps, and storage tips. You learned about adding flavors and protein options to enhance your dish. Remember, quality ingredients and the right methods make a big difference in taste. Explore new herbs and spices to keep the dish exciting. Enjoy experimenting with variations that suit your diet. Your meals can be both healthy and tasty! Keep these tips in mind for delicious and nutritious cooking.](https://roastedflavors.com/wp-content/uploads/2025/07/826d43aa-9b05-4520-8170-10611e110d21.webp)
Healthy Asparagus with Zucchini Simple Cooking Guide
Looking to whip up a tasty, healthy dish? Let’s dive into my simple cooking guide for healthy asparagus with zucchini. This recipe is packed with
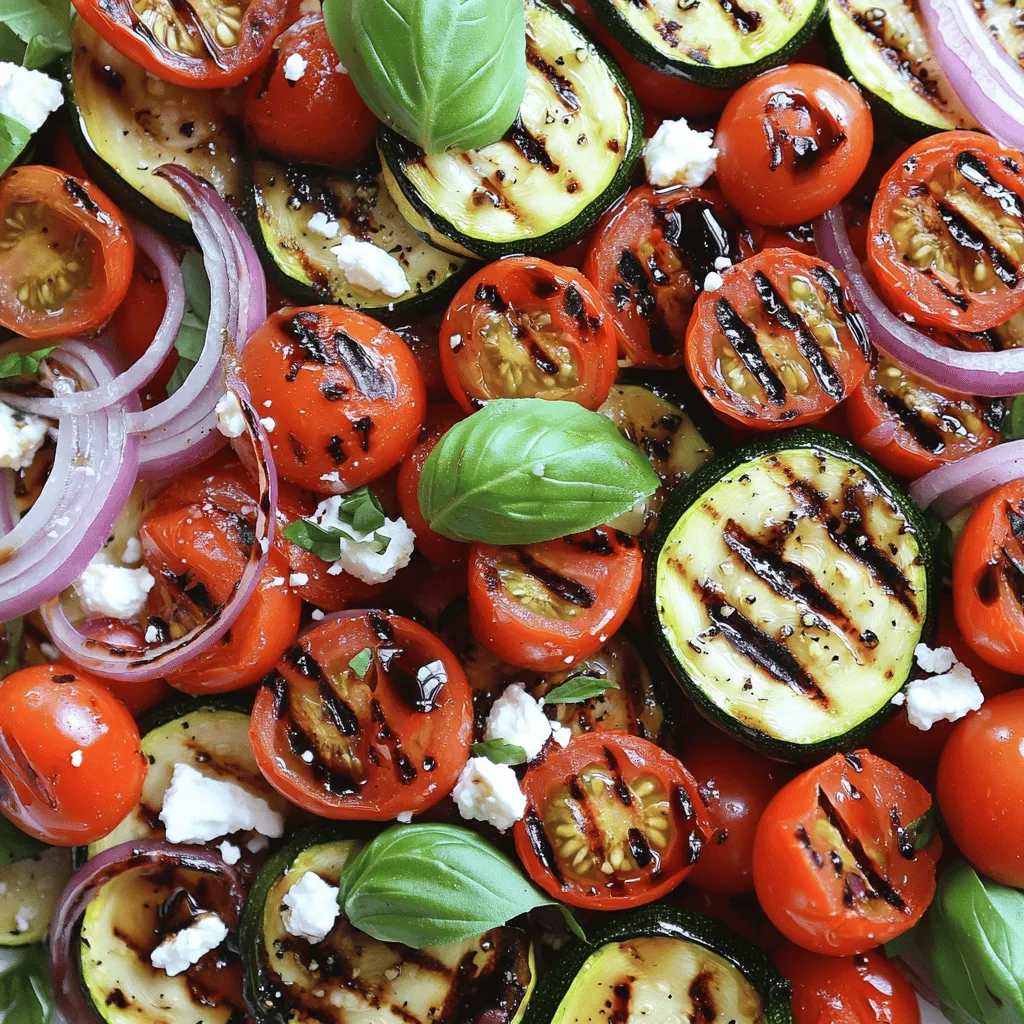
Grilled Zucchini Salad Fresh and Flavorful Delight
Looking for a fresh and tasty dish that’s easy to make? The Grilled Zucchini Salad is perfect for you! This salad bursts with flavor and
![To make this tasty Crack Corn Salad, you will need: - 4 cups fresh corn kernels (about 4 ears of corn) - 1 1/2 cups cherry tomatoes, halved - 1 cup crunchy cucumbers, diced - 1/2 cup red onion, finely chopped - 1/2 cup assorted bell peppers, diced (mix colors for fun) - 1 cup shredded sharp cheddar cheese - 1/2 cup creamy mayonnaise - 1 tablespoon apple cider vinegar - 1 tablespoon honey - 1 teaspoon garlic powder - Salt and pepper, to taste - 1/4 cup fresh cilantro, chopped (optional garnish) You can change some ingredients based on what you like. Try these swaps: - Use Greek yogurt instead of mayonnaise for a lighter taste. - Swap cherry tomatoes for diced regular tomatoes if you prefer. - Add black beans for extra protein and fiber. - Substitute avocado for cheese for a creamy texture. - Toss in corn chips for a crunchy bite. Fresh corn is best for this salad. It has a sweet taste and great crunch. To prepare fresh corn, cook it briefly in boiling water. If you use canned corn, rinse it well to cut down on salt. Canned corn works in a pinch but may not taste as fresh. Fresh corn gives your salad a bright flavor that makes it stand out. For the best results, I always recommend using fresh corn when you can. If you want the full recipe, check out [Full Recipe]. First, you need to cook the corn. Bring a pot of water to a boil. Add the ears of corn and cook for about 5-7 minutes. This step makes the corn tender and sweet. Once done, drain the corn and let it cool. Carefully cut the kernels off the cob. If you use canned corn, just drain and rinse it well. Grab a large mixing bowl. Add the corn kernels, halved cherry tomatoes, diced cucumbers, finely chopped red onion, and assorted bell peppers. Use different colors for a pretty dish. Gently toss everything together until all the veggies mix well. In a medium bowl, whisk together the mayonnaise, apple cider vinegar, honey, garlic powder, salt, and pepper. This dressing gives a sweet and tangy taste. Make sure there are no lumps, and it’s smooth. Pour the dressing over the vegetable mix. Stir gently to coat all the ingredients well. Then, fold in the shredded sharp cheddar cheese. This adds creaminess and flavor to your salad. Now it’s time to taste the salad. If it needs more flavor, add more salt or pepper. For some heat, sprinkle in cayenne pepper or finely chopped jalapeños. Adjust until it tastes just right. Cover the bowl with plastic wrap or a lid. Refrigerate the salad for at least 30 minutes. This chilling time helps all the flavors blend beautifully. When ready to serve, consider garnishing with fresh cilantro for a pop of color. You can serve the salad in a large bowl or in individual dishes. Enjoy this fresh and colorful Crack Corn Salad! For the complete recipe, check out the Full Recipe. To boost the flavor of your Crack Corn Salad, focus on fresh herbs and spices. Fresh cilantro adds brightness and a pop of green. You can also try other herbs like basil or parsley for a unique twist. For extra zest, add lime juice or zest to the dressing. A splash of hot sauce can kick it up a notch too. Remember, balance is key. You want sweet, salty, and tangy all in one bowl. When selecting corn, look for firm, bright kernels. The husk should be green and moist. For tomatoes, choose plump, shiny cherry tomatoes. They should smell sweet and earthy. Cucumbers should feel crisp and firm. Avoid any that feel soft or have blemishes. Bell peppers should be colorful and shiny, with no wrinkles. Freshness will make your Crack Corn Salad taste amazing. Garnishing can elevate your salad's look and taste. Fresh cilantro is a great choice. You can also sprinkle some crumbled queso fresco for a salty bite. Sliced radishes add a crunch and a pop of color. For a nutty flavor, try adding toasted pumpkin seeds or sunflower seeds. These little touches make your dish more appealing and fun to eat. {{image_4}} To add some heat to your Crack Corn Salad, try making a spicy version. You can add diced jalapeños or a dash of hot sauce. Start with one jalapeño for a mild kick. If you want more spice, feel free to add more! Mixing in a teaspoon of cayenne pepper also works well. This heat balances out the sweetness of the corn and dressing, creating a flavor explosion. For a heartier salad, consider adding more veggies. You can include black beans, diced avocados, or even corn chips for crunch. These additions enhance the texture and flavor. If you want to boost protein, add chickpeas or kidney beans. This way, you keep the salad fresh while making it more filling and nutritious. You can change the salad with the seasons. In summer, use fresh herbs like basil or parsley. In the fall, try adding diced apples or roasted pumpkin. These ingredients give a new twist to the classic salad. Each season brings unique flavors, so feel free to get creative. Enjoy the freshness of seasonal produce in your Crack Corn Salad. For more ideas, check out the Full Recipe. To store leftover Crack Corn Salad, place it in an airtight container. This keeps moisture in and prevents drying. Make sure the container is clean and dry before adding the salad. Storing it in the fridge is best. It stays fresh for up to three days. To keep your salad fresh, avoid mixing in the dressing until serving. This helps prevent sogginess. If you have extra vegetables, store them separately. You can also add a layer of paper towels on top of the salad. This absorbs excess moisture and keeps it crisp. Freezing Crack Corn Salad is not ideal due to the textures. The veggies and cheese may become watery when thawed. If you must freeze it, consider just freezing the corn. Cooked corn freezes well and can be added later to fresh salad. Just remember to thaw it completely before mixing. For the best taste, enjoy it fresh! Crack Corn Salad is a tasty mix of fresh corn, veggies, and cheese. It shines with bright colors and flavors. The main ingredients are corn, tomatoes, cucumbers, bell peppers, and cheddar cheese. You dress it with a creamy mix of mayonnaise, vinegar, and honey. This salad is crunchy, sweet, and savory, making it a crowd-pleaser. Yes, you can make Crack Corn Salad ahead of time. It tastes even better after chilling in the fridge. Prepare it a few hours or even a day before serving. Just keep it covered in the fridge to stay fresh. This way, you save time and enjoy more moments with friends or family. Crack Corn Salad lasts about 3 to 5 days in the fridge. Make sure to store it in a sealed container. If you notice any change in smell or color, it's best to discard it. Always check before eating leftovers to ensure it is still safe. Absolutely! Crack Corn Salad is perfect for potlucks. It's easy to make and share. The colorful look attracts attention, and the flavor keeps people coming back for more. Just remember to bring enough for everyone to enjoy. For the full recipe, check out the section above. Crack Corn Salad is a fun and tasty dish. We covered ingredients, instructions, and tips for making it your own. You can use fresh or canned corn and try new flavors for variety. Plus, I shared how to store leftovers and answers to common questions. Enjoy making this salad for any meal or gathering. You'll impress your guests and family with this simple recipe. It’s easy, delicious, and perfect for any occasion.](https://roastedflavors.com/wp-content/uploads/2025/06/1e158261-8438-4753-9e6d-50c2fbfa2f5c.webp)
Crack Corn Salad Fresh and Flavorful Recipe Guide
Are you ready to impress your friends with a vibrant, Crack Corn Salad? This fresh and flavorful recipe is perfect for any occasion. I’m excited

Mexican Street Corn Pasta Salad Flavorful and Fresh Mix
Looking for a dish that combines the bold flavors of Mexican street corn with the heartiness of pasta? You’ve found it! This Mexican Street Corn
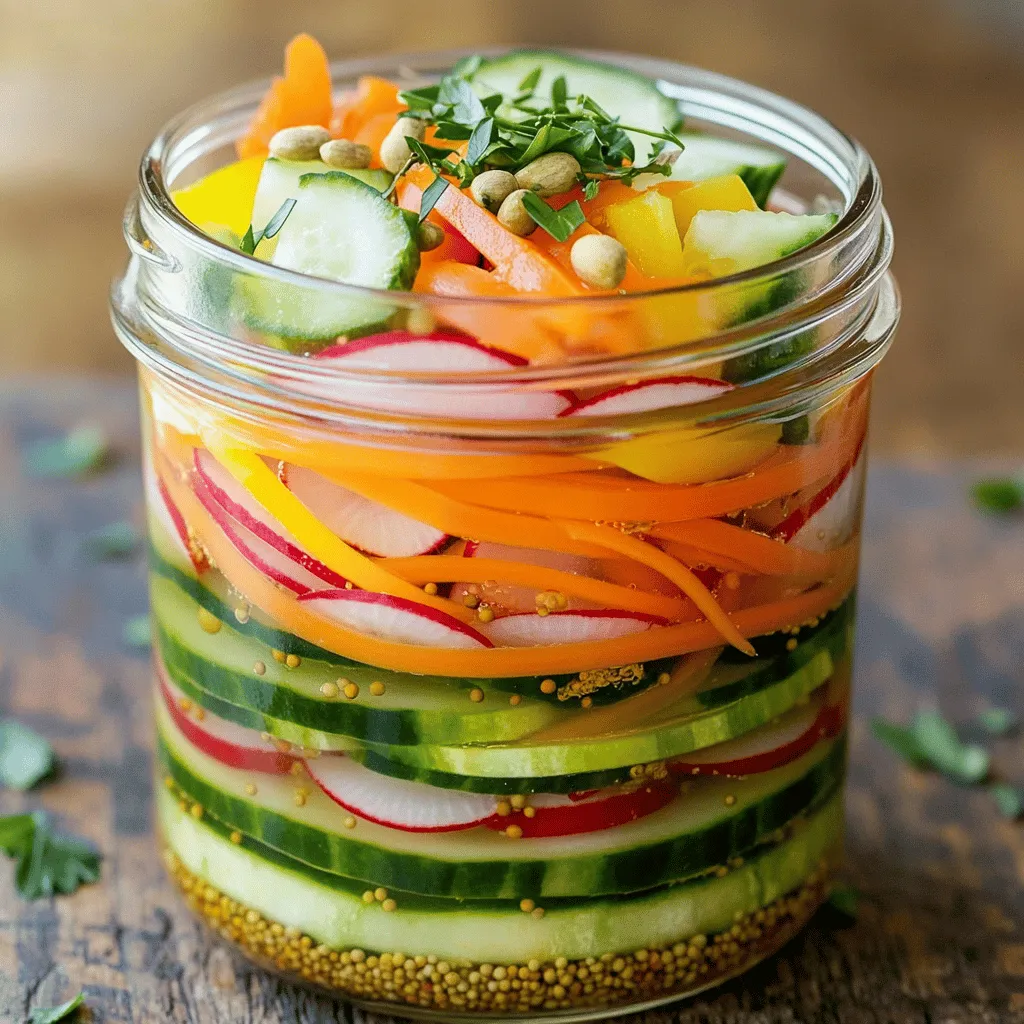
Quick Pickled Vegetables Crunchy and Tangy Delight
Looking for a quick and easy way to elevate your meals? Let’s dive into the vibrant world of quick pickled vegetables! In just a few
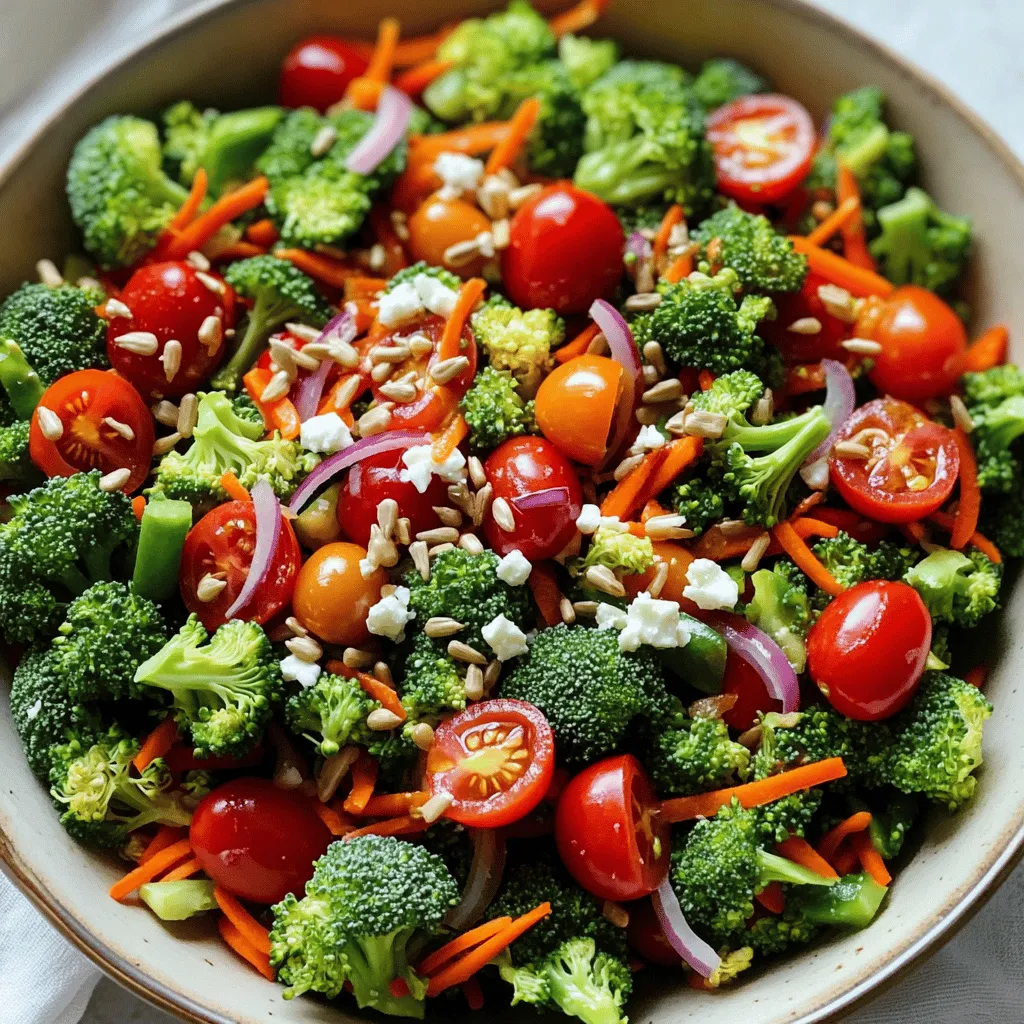
Broccoli Bliss Salad Vibrant and Flavorful Delight
Looking for a fresh, vibrant dish that brightens any meal? The Broccoli Bliss Salad is packed with crisp broccoli, sweet cherry tomatoes, and crunchy carrots.

Thai Chicken Salad Flavorful and Nutritious Meal
Looking for a meal that’s both delicious and nutritious? Thai Chicken Salad hits the mark! It pulls together fresh veggies, tender chicken, and zesty flavors
![- 1 can (15 oz) chickpeas, drained and rinsed - 1 large cucumber, diced - 1 cup cherry tomatoes, halved - 1/2 red onion, finely chopped - 1 red bell pepper, diced - 1/4 cup fresh parsley, chopped - 1/4 cup feta cheese (optional) Chickpeas are the star of this dish. They add protein and fiber. Cucumber brings a nice crunch and freshness. Cherry tomatoes give a sweet burst. The red onion adds a mild bite, while the bell pepper adds color and crunch. Fresh parsley gives a herb taste, and feta adds creaminess if you choose to use it. - 3 tablespoons extra virgin olive oil - 2 tablespoons freshly squeezed lemon juice - 1 teaspoon ground cumin - Salt and pepper to taste This dressing is simple yet full of flavor. Olive oil adds richness. Lemon juice gives a bright, zesty taste. Cumin adds warmth and a hint of earthiness. Adjust the salt and pepper to make it just right for you. - Whole-grain pita bread - Grilled chicken or seafood This salad goes well with whole-grain pita bread. It also pairs nicely with grilled chicken or seafood for a complete meal. You can serve it as a side or a main dish. Check out the full recipe to get all the steps! - In a large bowl, combine the chickpeas, cucumber, cherry tomatoes, onion, and bell pepper. - Use a spatula to mix them gently. - Next, add the chopped parsley and feta cheese, if you’re using it. - In a separate bowl, whisk together the olive oil, lemon juice, cumin, salt, and pepper. - Mix until the dressing is smooth and well combined. - Drizzle the dressing over the salad mixture. - Toss everything gently to coat all the ingredients. - Let the salad sit for 15 minutes before serving. - This helps the flavors blend and taste better. For the full recipe, check out the Chickpea Cucumber Fiesta Salad 🥗 section. - Adjust seasoning based on taste. Start with a little salt, then add more if needed. - Use fresh herbs for a vibrant flavor. Parsley, cilantro, or dill brighten the dish. - Serve in a clear glass bowl for a colorful display. It lets the colors pop! - Garnish with extra parsley and feta. This adds a nice touch and looks appetizing. - Prepare in advance for quick meals. This salad tastes better after flavors blend. - Store dressing separately until serving. This keeps the salad crisp and fresh. For the full recipe, check out the Chickpea Cucumber Fiesta Salad. {{image_4}} You can easily make this salad vegan by leaving out the feta cheese. This keeps it light and fresh. If you want more creaminess, add diced avocado. Its rich texture and flavor will enhance the dish. If you don't have chickpeas, you can use black beans instead. They add a nice twist and are full of protein. You can also mix in other vegetables like corn or carrots for added crunch and flavor. This keeps your salad exciting and fun. In summer, try adding zucchini for a fresh taste. Zucchini has a mild flavor that pairs well with the other ingredients. In winter, consider adding roasted vegetables, like sweet potatoes or Brussels sprouts, for a warm touch. These changes keep the salad vibrant and tailored to the seasons. For the full recipe, check out the Chickpea Cucumber Fiesta Salad. You can store leftover chickpea cucumber salad in the fridge. Use an airtight container to keep it fresh. It tastes best when eaten within 2-3 days. After that, the veggies may lose their crunch. If you have more salad than you can eat, freeze the salad mix. Just leave out the dressing. You can keep it in the freezer for up to a month. When you’re ready to enjoy it, thaw the salad in the fridge. This keeps it safe and tasty. Sometimes, leftovers need a little boost. Add fresh herbs like parsley or cilantro to bring back the flavors. A squeeze of citrus can also brighten the taste. You can even toss in extra vegetables like bell peppers or carrots for a new twist. These simple steps will make your salad feel fresh again. For the full recipe, you can refer back to the main sections. Typically, this salad lasts 2-3 days when stored properly. To keep it fresh, use an airtight container. The crispness of the cucumber and the flavors of the salad will stay better this way. If you see any signs of spoilage, it's best to toss it out. Yes, you can make this salad ahead of time. However, it's best to add the dressing right before serving for optimal freshness. This will help keep the vegetables crunchy and full of flavor. If you mix in the dressing too soon, it may make the salad soggy. Chickpea Cucumber Salad pairs well with grilled proteins. You can serve it alongside chicken, fish, or shrimp. It also goes great with pita bread or as a side dish for various meals. This salad adds a bright touch to any plate and will impress your guests. For the full recipe, check this out: [Full Recipe]. This blog post walked you through a simple and tasty Chickpea Cucumber Salad. You learned about the main ingredients and how to make a flavorful dressing. I shared tips to enhance taste and presentation, along with storage advice. Feel free to tweak this salad to fit your diet. Remember, it's a versatile recipe for any meal. Enjoy making it fresh or preparing it ahead for busy days. You now have everything you need to create and enjoy this bright, healthy salad!](https://roastedflavors.com/wp-content/uploads/2025/06/1e1fcfec-3716-42ed-9c4a-c293b27d31b6.webp)
Chickpea Cucumber Salad Fresh and Flavorful Delight
Looking for a fresh and tasty dish that’s easy to make? Let me introduce you to my Chickpea Cucumber Salad! Packed with crunchy veggies and

Quick Southwest Chicken Salad Tasty and Healthy Meal
Looking for a quick, healthy meal? This Quick Southwest Chicken Salad packs flavor and nutrition. With juicy chicken, fresh veggies, and zesty dressing, it’s a