Salads
![- 4 cups arugula - 1 large apple (Granny Smith or Honeycrisp) - 1/2 cup walnuts - 1/4 cup crumbled feta cheese (optional) - 1/4 cup dried cranberries - Salt and freshly cracked black pepper to taste - 3 tablespoons extra virgin olive oil - 2 tablespoons apple cider vinegar - 1 teaspoon honey To create this simple apple arugula salad, start with fresh produce. I love using arugula. It has a peppery taste that pairs well with sweet apples. I often choose Granny Smith for a tart kick or Honeycrisp for sweetness. Next, I add nuts for crunch. Walnuts add a nice earthy flavor. Feta cheese is optional but provides a creamy touch. Then, I consider dried ingredients. Dried cranberries bring sweetness and color. I finish with salt and fresh black pepper to balance all the flavors. For the dressing, I use extra virgin olive oil. It adds richness. Apple cider vinegar gives the salad a tangy bite. A bit of honey adds sweetness, making it perfect. Every bite of this salad is fresh and flavorful. You can find the full recipe below for detailed steps to make this delightful dish. - Step 1: Combine arugula and apple slices. In a large bowl, add 4 cups of fresh arugula. Then, add 1 large, thinly sliced apple. I love using Granny Smith for a nice tartness. Toss them gently to mix. - Step 2: Add walnuts, feta cheese, and cranberries. Next, fold in 1/2 cup of roughly chopped walnuts, 1/4 cup of optional crumbled feta cheese, and 1/4 cup of dried cranberries. This mix adds great flavor and crunch. - Step 3: Whisk together dressing ingredients. In a small bowl, combine 3 tablespoons of extra virgin olive oil, 2 tablespoons of apple cider vinegar, and 1 teaspoon of honey. Add a pinch of salt and pepper too. - Step 4: Emulsify until well mixed. Whisk the dressing vigorously. You want it to blend into a smooth, thick mix. This will coat the salad nicely. - Step 5: Drizzle dressing over salad mixture. Pour the dressing over the salad. Make sure you cover everything well for the best taste. - Step 6: Toss gently to coat. Use your hands to toss the salad. Be gentle so you don’t bruise the arugula or break the apple slices. - Step 7: Taste and adjust seasoning. Take a bite of your salad. If it needs more flavor, add a bit more salt and pepper to taste. - Step 8: Serve on chilled plates. Serve the salad right away on chilled plates. This keeps it fresh and crisp. Enjoy this fresh and flavorful dish! For the full recipe, check out the earlier section. - Use fresh, quality ingredients for the best taste. Fresh arugula and crisp apples shine in this dish. - Adjust vinegar and honey for personal preference. If you like it tangy, add more vinegar. For sweetness, increase the honey. - Serve in shallow bowls for elegance. A beautiful presentation makes the salad more inviting. - Garnish with whole walnuts and feta. This adds a nice touch and makes your salad look fancy. - Prepare ingredients in advance for quick assembly. Wash and slice your apples and arugula ahead of time. - Store dressing separately until serving. This keeps the salad fresh and prevents sogginess. For the full recipe, check out the recipe section. Enjoy making your Simple Apple Arugula Salad! {{image_4}} You can make this salad heartier by adding protein. Grilled chicken or shrimp works great. Just slice the protein and place it on top. This adds flavor and makes the salad filling. If you want to change the taste, swap the apple for pear. Other seasonal fruits like peaches or berries also taste great. This gives you different flavors and keeps the salad fresh. You can make this salad friendly for all diets. Use vegan feta for a dairy-free option. This keeps the creaminess without any dairy. If you need a nut-free option, substitute nuts with seeds. Pumpkin or sunflower seeds add crunch and taste, too. To keep your apple arugula salad fresh, store the salad and dressing separately. This helps keep the arugula crisp and the apples fresh. If you mix them together, the salad can become soggy. Use a container with a lid for the salad and a small jar for the dressing. You can store the salad in an airtight container in the fridge for up to three days. After that, the taste and texture may change. Make sure to check for any signs of spoilage before you eat it. Salad is best when it is fresh. Avoid reheating it, as that can make the greens wilt and lose their crunch. Enjoy it cold for the best taste! If you're looking for a fresh experience, you can always make a new batch using the [Full Recipe]. Yes, you can use balsamic or red wine vinegar instead. They add a nice flavor. Experiment with what you have at home. Both options work well in this salad. To make the salad vegan, just leave out the feta cheese. You can also use a plant-based dressing. This way, you keep all the great flavors without animal products. This salad pairs well with grilled meats. You can also serve it with crusty bread. Both options make for a tasty and balanced meal. To make the salad heartier, add grains like quinoa or farro. These grains give extra texture and nutrients. You can cook them ahead of time and mix them in for a satisfying meal. For the full recipe, check out the [Full Recipe]. This blog post walks you through a simple, tasty salad recipe. You learned what ingredients to use, from fresh arugula to walnuts and apple slices. I shared easy steps for preparation and tips to enhance flavors. You can try variations to suit your taste or dietary needs. Finally, proper storage can keep leftovers fresh. Enjoy this salad as a healthy side or light meal. It’s a great way to add nutrients and flavor to your diet. Happy cooking!](https://roastedflavors.com/wp-content/uploads/2025/07/3150baa1-5851-4aee-8d19-c8a5ecc1b42f.webp)
Simple Apple Arugula Salad Recipe Fresh and Flavorful
Are you ready to elevate your salad game? My Simple Apple Arugula Salad Recipe is fresh, vibrant, and incredibly easy to make. With just a
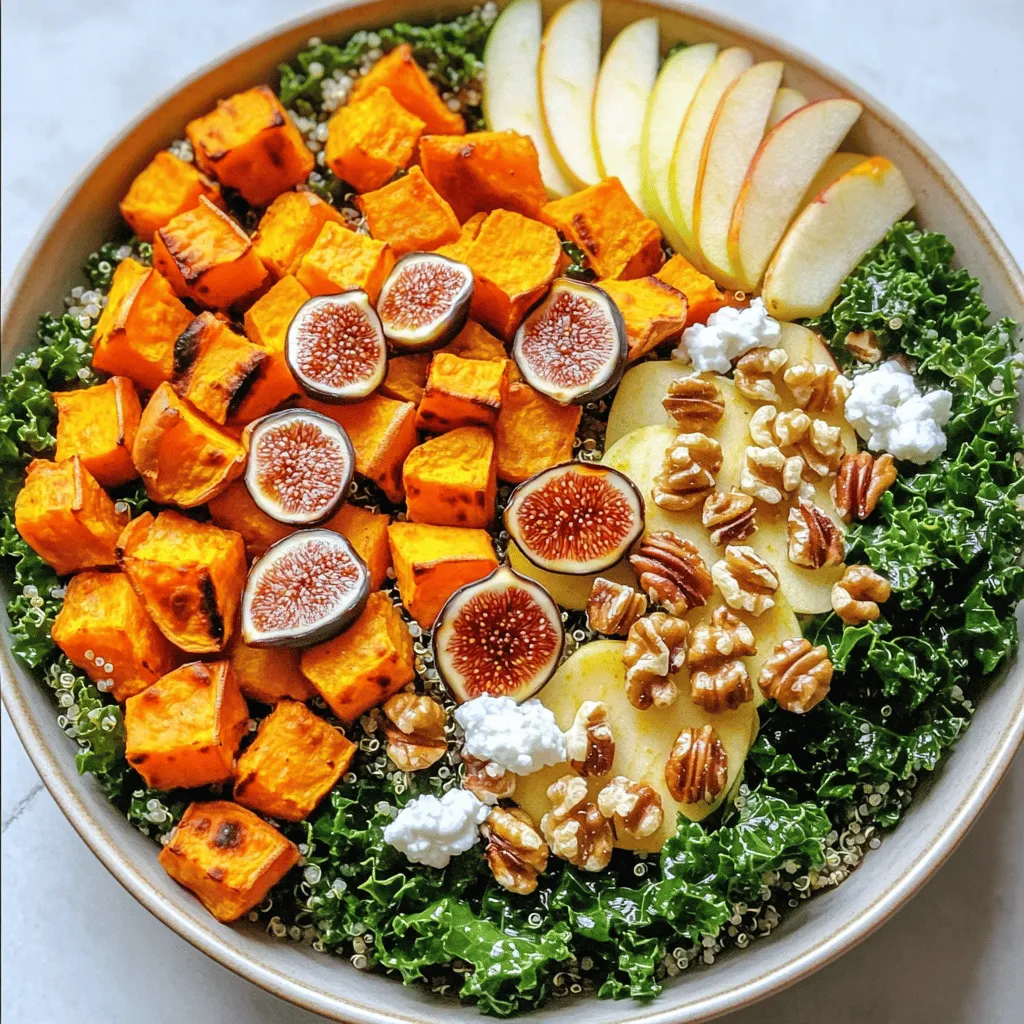
Harvest Bowls with Fig Balsamic Vinaigrette Delight
Ready to elevate your mealtime? These Harvest Bowls with Fig Balsamic Vinaigrette are a tasty treat! Packed with flavors from roasted sweet potatoes, fresh kale,
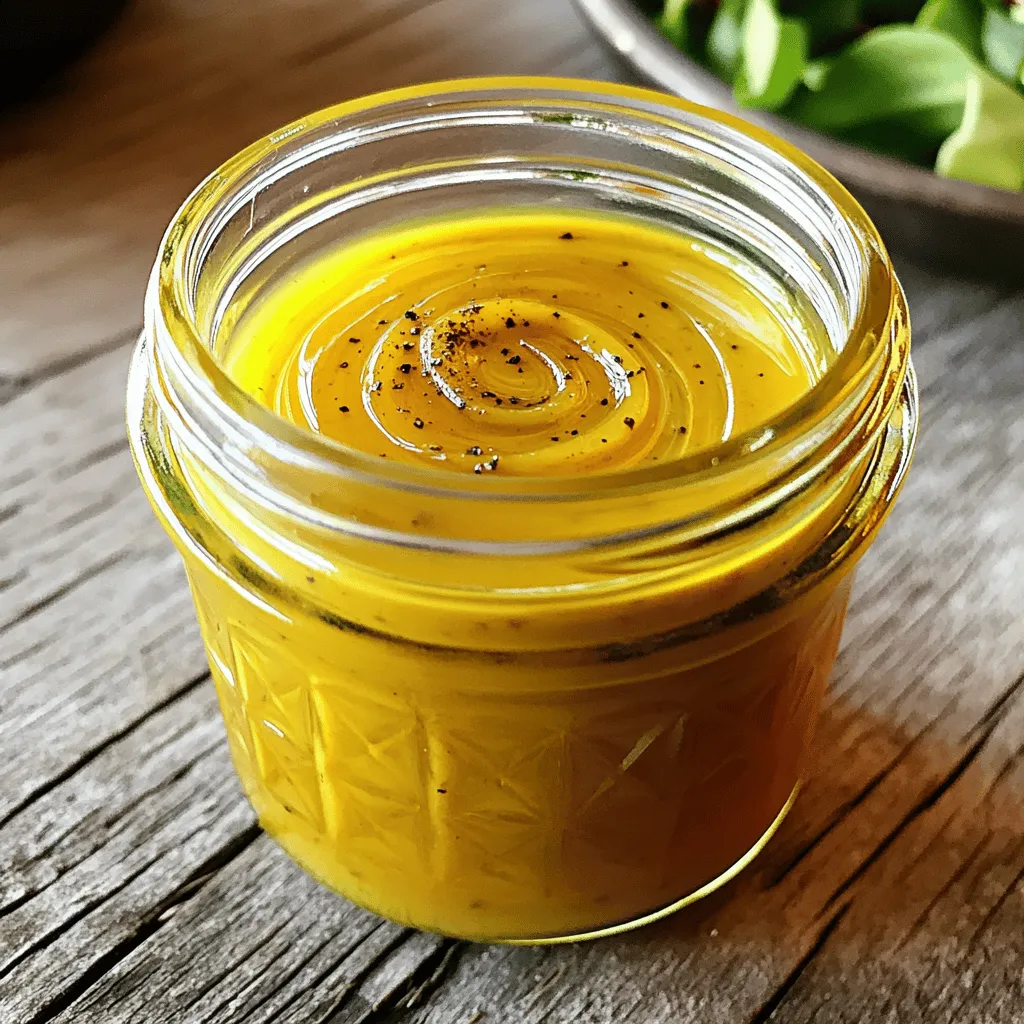
Easy Honey Dijon Vinaigrette Dressing Recipe Delight
Looking for a quick and tasty dressing? My Easy Honey Dijon Vinaigrette will elevate your meals in minutes! With just a few simple ingredients like

Healthy Balsamic Vinaigrette Simple and Flavorful Recipe
Want a simple way to add flavor to your meals? This Healthy Balsamic Vinaigrette recipe is a game changer! It’s packed with good-for-you ingredients and
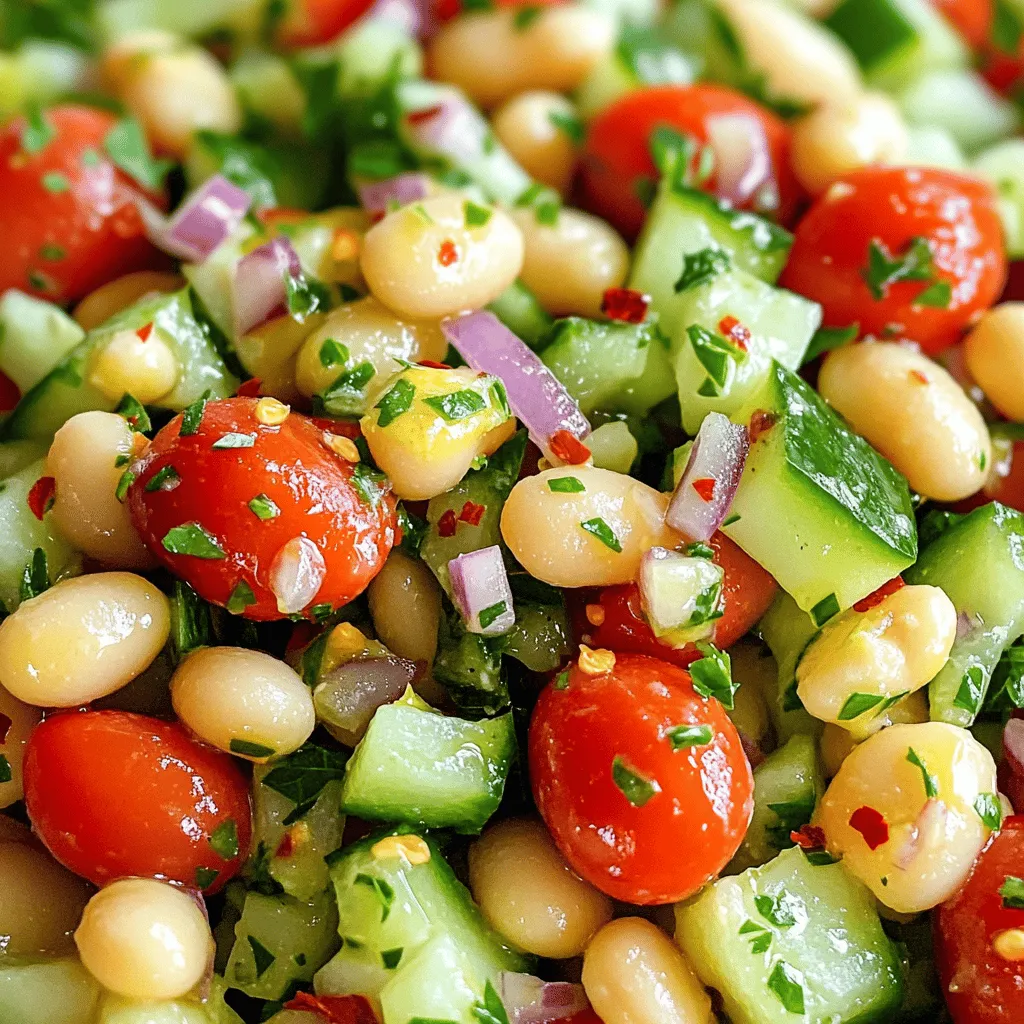
Cannellini Bean Salad Fresh and Flavorful Delight
Are you ready to whip up a fresh and flavorful Cannellini Bean Salad? This dish offers a great mix of taste and nutrition, making it
![Fresh basil is the star of this vinaigrette. It gives a bright, fresh taste. You need one cup of tightly packed basil leaves. Look for deep green leaves that smell fragrant. Avoid any yellow or wilted leaves. Rinse them well under cold water to remove dirt. Then, dry them gently with a towel. Extra virgin olive oil is key for a rich flavor. You’ll need half a cup for this recipe. The oil adds a smooth texture and balances the acidity of lemon. Choose a high-quality oil for the best results. Look for one with a fruity taste that complements the basil. You'll need some more simple ingredients to bring out the flavor: - 1/4 cup freshly squeezed lemon juice - 2 tablespoons honey or maple syrup (for a vegan option) - 1 teaspoon Dijon mustard - 1 clove garlic, finely minced - Salt and freshly ground black pepper, to taste The lemon juice adds a zesty kick. Honey or maple syrup sweetens the vinaigrette, balancing the tartness. Dijon mustard gives it a touch of creaminess and depth. Garlic adds a nice punch, making the flavor pop. Finally, season with salt and pepper to taste. For the complete recipe, you can check out the Full Recipe. First, rinse your fresh basil leaves under cold running water. This step helps remove dust and dirt. After rinsing, gently pat them dry using a clean paper towel. This keeps the leaves fresh and ready for blending. Now, grab your food processor or high-speed blender. Add the packed basil leaves, fresh lemon juice, honey or maple syrup, Dijon mustard, and the minced garlic clove. These ingredients work together to create a bright and zesty flavor. Pulse the mixture a few times until the basil is finely chopped. Then, while blending, slowly drizzle in the olive oil. This step forms a creamy and smooth vinaigrette. Pause to taste your dressing. Add salt and freshly ground black pepper as you like. Blend briefly again to mix in the seasoning. Now your vinaigrette is ready! For the best taste, chill it in the fridge for at least 30 minutes. Enjoy your fresh basil vinaigrette with salads or grilled veggies. For the full recipe, check the instructions above. To make your fresh basil vinaigrette truly shine, focus on the quality of your ingredients. Use fresh basil, as it brings a vibrant flavor. Look for bright green leaves without any brown spots. For the olive oil, choose high-quality extra virgin. It adds depth and richness. Freshly squeezed lemon juice is key. It gives a bright, zesty kick. If you want a hint of sweetness, try honey or maple syrup. You can also add a pinch of red pepper flakes for an exciting twist. Store your vinaigrette in a clean, airtight jar. This keeps it fresh and prevents strong odors from other foods. It’s best to chill it in the fridge. The flavors will meld beautifully. Just remember to shake or stir before use. The vinaigrette may separate, and that’s normal. Use it within one week for the best taste. You can also freeze small portions. Just pour it into ice cube trays. Once frozen, transfer the cubes to a zip-top bag. This way, you can enjoy it later. This vinaigrette pairs well with many dishes. Drizzle it over a garden salad for a refreshing touch. It’s also fantastic on grilled veggies. Try it on roasted potatoes or as a marinade for chicken. You can even use it as a dip for fresh bread. For a fun twist, add it to pasta salads for a burst of flavor. The options are endless! To see the full recipe, check out the [Full Recipe]. {{image_4}} You can change the sweetener in this vinaigrette to suit your taste. Honey adds a nice touch, but you can also use maple syrup. If you want a low-calorie option, try agave nectar or stevia. Each sweetener gives a different flavor, so feel free to experiment. You might find a new favorite! Fresh basil shines in this recipe, but other herbs work too. Try using cilantro for a fresh twist or parsley for a milder flavor. Mint adds a bright note, perfect for summer salads. Mix and match herbs to create your own unique vinaigrette. Each herb brings its own magic to the dish. If you love creamy dressings, I have a tasty option for you. Add a few tablespoons of Greek yogurt or sour cream to the mix. This will give your vinaigrette a rich texture. Blend it well with the other ingredients for a smooth finish. This creamy twist is great on salads or as a dip for veggies. It makes every bite more delightful! For the complete guide, check out the Full Recipe. After making your Fresh Basil Vinaigrette, store it in a clean jar. Seal it tightly to keep air out. Place the jar in the fridge right away. This helps keep the flavors fresh. Your vinaigrette stays good in the fridge for about 5 to 7 days. Over time, the vibrant flavor of the basil may fade. Always check for any off smells or changes in color before using. If it looks or smells odd, it’s best to toss it. You can freeze this vinaigrette if you want to keep it longer. Pour it into ice cube trays for easy use later. Once frozen, pop the cubes into a freezer bag. This way, you can grab a cube or two whenever you need a burst of flavor. Just remember to thaw it in the fridge before use. You can use dried basil, but fresh gives better flavor. Dried herbs lose some taste over time. If you use dried basil, use one-third the amount. So, for one cup of fresh basil, use one-third cup of dried. The taste will be different, but it can still work in a pinch. You can store Fresh Basil Vinaigrette in the fridge for up to one week. Keep it in a clean jar with a tight lid. The flavors meld together as it sits. Just give it a shake before using. If it separates, that’s normal. This vinaigrette adds a bright taste to many dishes. It works great on salads, especially those with mixed greens. Drizzle it over grilled vegetables for a fresh kick. You can also use it as a marinade for chicken or fish. It’s perfect for summer dishes! For the full recipe, check out the details above. In this post, we explored making a fresh basil vinaigrette. We looked at key ingredients, like fresh basil and olive oil. We covered preparation steps for mixing and blending. Useful tips helped enhance flavor and storage methods. Variations offered sweeteners and herb choices. Remember, fresh ingredients make a big difference. Enjoy your vinaigrette on salads, pasta, and more. It's a simple way to add flavor to your meals. Get creative and have fun in the kitchen!](https://roastedflavors.com/wp-content/uploads/2025/07/a11a5d63-9d24-4557-a242-14106c096858.webp)
Fresh Basil Vinaigrette Flavorful and Simple Recipe
If you love vibrant flavors, you’ll adore my Fresh Basil Vinaigrette recipe. It’s quick, easy, and brightens up any dish. With fresh basil and simple
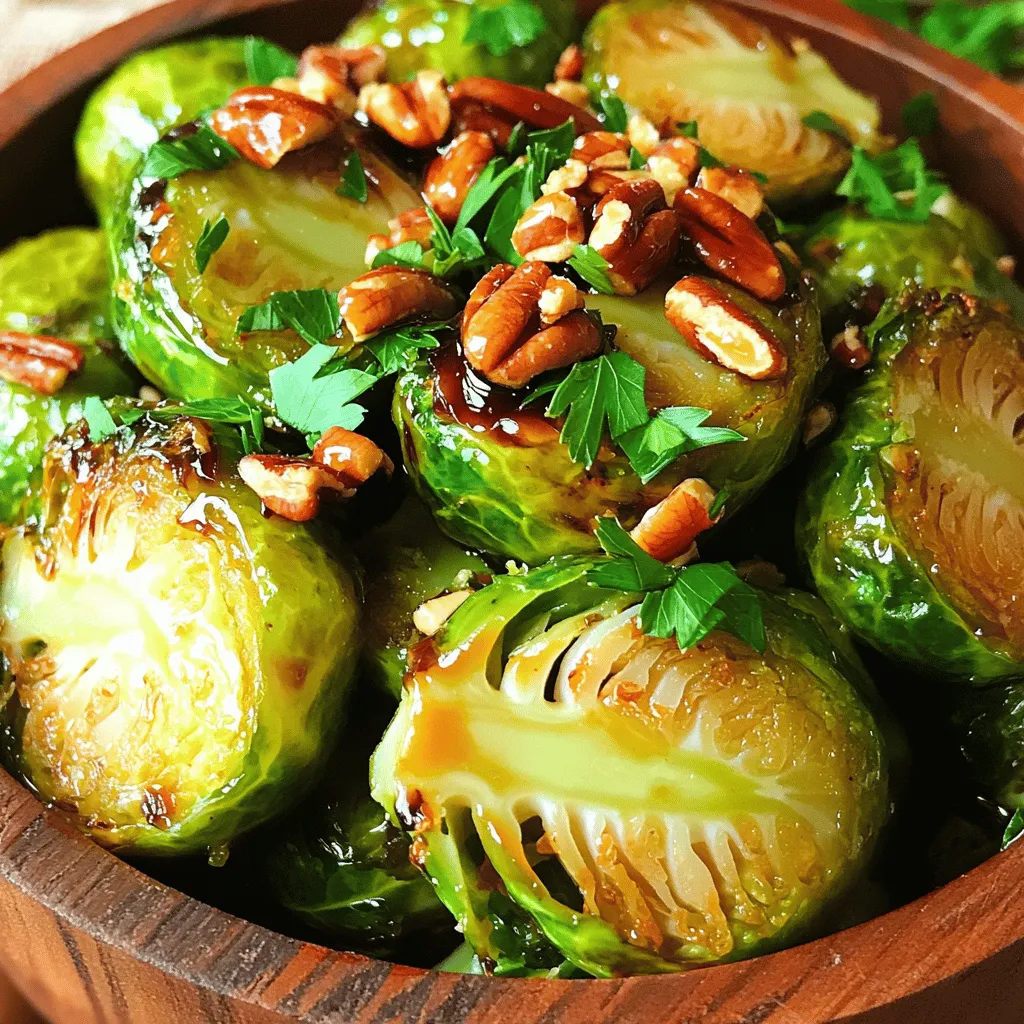
Roasted Maple Brussels Sprouts Flavorful and Simple Recipe
Are you ready to transform Brussels sprouts into a sweet and savory delight? In this simple recipe for Roasted Maple Brussels Sprouts, I’ll show you
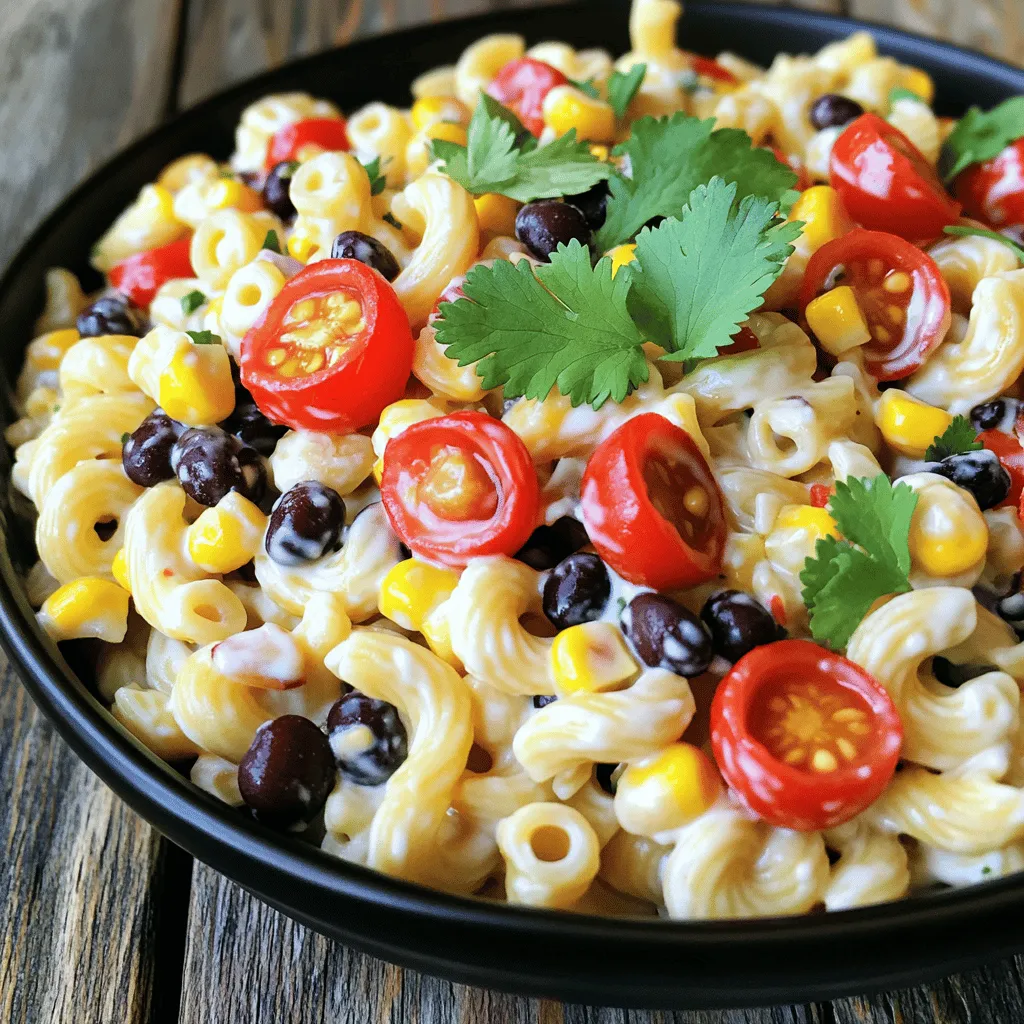
Southwest Chipotle Pasta Salad Flavorful Fresh Delight
Craving a dish that’s both tasty and easy to whip up? Look no further! My Southwest Chipotle Pasta Salad packs a punch with flavor and
. You can create a delicious dish using simple ingredients. Brussels sprouts roasted with balsamic and honey give you great flavor and health benefits. Each step, from prep to storage, helps you make the most of your meal. Don't forget to try different spices or nuts to make your dish unique. Store leftovers right, and enjoy them later. This dish is not only tasty but also good for you. Happy cooking!](https://roastedflavors.com/wp-content/uploads/2025/07/b06ba181-8208-4a7c-840c-405c877a6d92.webp)
Brussels Sprouts with Balsamic Honey Flavor Boost
Want to bring life to your dinner table? Discover how to make Brussels Sprouts with Balsamic Honey! This dish combines crisp Brussels sprouts with the
![To make a delicious lemon vinaigrette, you need a few key items. Here’s what you’ll need: - 1/4 cup freshly squeezed lemon juice - 1/2 cup high-quality extra virgin olive oil - 1 tablespoon Dijon mustard - 1 tablespoon honey or pure maple syrup (to taste) - 1 small garlic clove, finely minced - Sea salt and freshly ground black pepper, to taste - 1 teaspoon finely chopped fresh herbs (such as parsley, basil, or chives) for garnish These ingredients work together to create a bright and zesty flavor. High-quality olive oil is very important. It adds richness and depth to your vinaigrette. Look for extra virgin olive oil. It has the best taste and is less processed. The oil should smell fresh and have a green color. This type of oil enhances the overall flavor of the dressing. Fresh herbs can take your vinaigrette to the next level. They add color and flavor. You can use herbs like parsley, basil, or chives. Just chop them finely before adding. This small step makes a big difference. It adds a fresh touch that brightens up any salad or dish. For the full recipe, check out the complete instructions. To start, gather your ingredients. You need lemon juice, Dijon mustard, honey, and garlic. I like to use fresh lemon juice for the best taste. In a small bowl, pour in 1/4 cup of lemon juice. Add 1 tablespoon of Dijon mustard, 1 tablespoon of honey, and 1 small minced garlic clove. Whisk these together until smooth. This mix forms the base of your vinaigrette. Next, it’s time to emulsify. While you whisk, slowly pour in 1/2 cup of extra virgin olive oil. Drizzle it in little by little. This step helps blend the oil with the other ingredients. Keep whisking until your dressing looks creamy and well-mixed. You want it to be smooth and uniform, not separated. Now, it’s time to add flavor. Sprinkle in a pinch of sea salt and some freshly ground black pepper. Taste your vinaigrette. If it needs more sweetness, add a bit more honey. For extra zing, squeeze in a little more lemon juice. Finally, fold in 1 teaspoon of chopped fresh herbs like parsley or basil. This adds a burst of flavor and a pop of color. You can find the Full Recipe to make this delicious dressing easily! To make a great lemon vinaigrette, focus on balance. The bright lemon juice needs to mix well with the oil. Use a 1:2 ratio of lemon juice to oil for best results. This blend keeps the dressing fresh without being too sour. Taste your dressing often as you mix. Adjust the flavors until they sing together. Sweetness helps balance the sourness of lemon. You can add honey or maple syrup to suit your taste. Start with the recommended tablespoon and add more if you like it sweeter. For more acidity, squeeze in extra lemon juice. This way, your vinaigrette can fit your dish perfectly. Remember, small changes can make a big difference. One common error is not whisking enough while adding oil. This can lead to a broken vinaigrette. Always whisk vigorously as you drizzle in the oil. Another mistake is using low-quality oil or lemon juice. High-quality ingredients make your dressing shine. Lastly, don’t skip seasoning. Salt and pepper bring all the flavors together. Keep these tips in mind, and your lemon vinaigrette will impress everyone. For the complete recipe, check out the Full Recipe section. {{image_4}} Lemon vinaigrette is a simple base that you can change to fit your taste. Here are some fun ways to switch it up. You can add fruits to your lemon vinaigrette for a sweet twist. Try mixing in fresh berries, like strawberries or blueberries. They add color and a slight sweetness. You can also chop apples or pears for a crunchy bite. Nuts like walnuts or almonds can give your dressing a nice texture. Toasted nuts add a warm flavor. Just chop them small before mixing them in. Fresh herbs can change the flavor of your lemon vinaigrette. You can use basil for a sweet note or cilantro for a fresh taste. Try mint for a refreshing kick. If you like a bolder flavor, add dill or tarragon. Mix and match herbs to find your favorite blend. The more herbs you use, the more flavor you get! While olive oil is tasty, you can try other oils too. Avocado oil gives a smooth texture and a light flavor. If you want a nutty taste, use sesame oil. For sweeteners, honey is great, but you can try agave or even fruit purees. Each option gives a different flavor that can change your dressing. Experimenting will help you discover new favorites. For the full recipe, check out the [Full Recipe]. To store your lemon vinaigrette, pour it into a clean jar with a tight lid. This keeps air out and helps the flavors stay fresh. You can also use a small bowl covered with plastic wrap. Refrigeration is best for keeping it tasty. Homemade lemon vinaigrette lasts about one week in the fridge. Always check the date when you make it. If you notice any changes in smell or color, it’s best to toss it. For longer storage, consider freezing it in small portions. Just thaw it in the fridge before use. Look for these signs to know if your dressing is bad: - Unpleasant or sour smell - Change in color or texture - Visible mold or separation If you see any of these signs, it's safer to throw it away. Enjoy your zesty lemon vinaigrette with peace of mind! For the full recipe, check the earlier section. Yes, you can make lemon vinaigrette ahead of time. It tastes even better after resting. I suggest making it a day in advance. This will let the flavors blend nicely. Store it in a jar with a lid. Keep it in the fridge until you’re ready to use it. Lemon vinaigrette is very versatile. It works great on salads, especially green salads. Drizzle it over roasted vegetables for a fresh kick. You can also use it on grilled chicken or fish. It adds a zesty touch that brightens the dish. Try it on grain bowls or pasta salads too! Adjusting lemon vinaigrette is simple. If you're vegan, use maple syrup instead of honey. For gluten-free diets, ensure your mustard is gluten-free. You can also change the type of oil. Use avocado oil for a different flavor. If you need it to be lower in calories, reduce the oil and add more lemon juice. This keeps the taste fresh and light. Lemon vinaigrette dressing enhances many dishes with fresh flavors. We discussed essential ingredients, like high-quality olive oil and fresh herbs. I provided step-by-step instructions to help you create the perfect blend. You learned to achieve the right flavor balance and customize it to your tastes. Remember to store your dressing correctly for the best taste. Now, you can enjoy delicious lemon vinaigrette in your meals. Happy cooking!](https://roastedflavors.com/wp-content/uploads/2025/07/0f2771fb-ae94-4aed-92d8-927c7dfef188.webp)
Lemon Vinaigrette Dressing Simple and Fresh Recipe
Are you ready to add a burst of flavor to your meals? This simple Lemon Vinaigrette Dressing is fresh, zesty, and easy to make. With