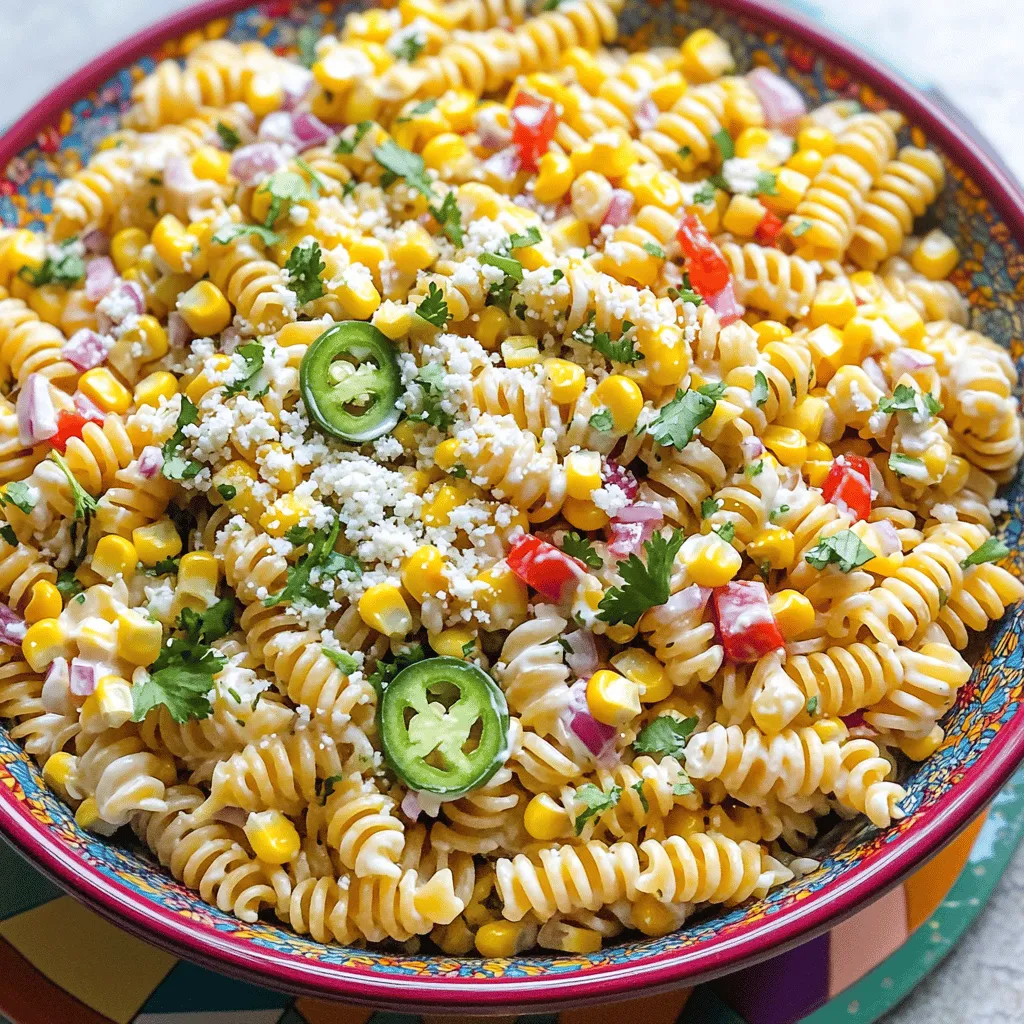
Salads

- 2 large cucumbers, thinly sliced - 1 ripe avocado, diced - 1 cup imitation crab meat, shredded - 1/4 cup cream cheese, softened - 2 tablespoons rice vinegar - 1 tablespoon soy sauce (or tamari for gluten-free) - 1 teaspoon sesame oil - 1 tablespoon toasted sesame seeds - 2 green onions, finely chopped - Sea salt and freshly ground black pepper, to taste The ingredients for this salad create a bright and fresh dish. Start with the cucumbers. Thinly slicing them helps them soak up flavor. A ripe avocado adds creaminess and healthy fats. I love using imitation crab meat for that classic California roll taste. Next, the cream cheese brings a rich texture. It blends well with the vinegar and soy sauce. This dressing adds a tangy kick to the salad. Don't forget the sesame oil; it gives a nutty flavor that ties it all together. For garnishes, I use toasted sesame seeds and green onions. They add crunch and color. The sea salt and black pepper balance all the flavors. This mix of ingredients makes the salad not only tasty but also visually appealing. - Begin salting cucumbers and letting them rest. - Sprinkle sea salt on thin slices of cucumber. - Let them sit in a colander for about 15 minutes. - This draws out moisture and makes them crunchy. - Rinse the cucumbers under cold water to remove salt. - Gently pat dry the cucumbers with a paper towel. - In a medium bowl, combine crab meat, avocado, and cream cheese. - Use a fork to mix until smooth and creamy. - In another bowl, whisk rice vinegar, soy sauce, and sesame oil together. - Drizzle the dressing over the crab mixture. - Toss the dressing with the crab mixture until coated. - Fold in the prepared cucumber slices gently. - Top with chopped green onions and toasted sesame seeds. - Taste and add more salt or pepper if needed. - Chill the salad for at least 30 minutes before serving. To get that perfect crunch, salting the cucumbers is key. Salting draws out extra water from the cucumbers. This makes them crispier. First, slice the cucumbers thinly. Then, sprinkle them with sea salt. Let them sit in a colander for about 15 minutes. After that, rinse them well under cold water. Pat them dry with paper towels. This helps keep your salad fresh and crunchy. Adjusting the seasoning can boost the taste of your salad. Start with the basic recipe. Taste it and see if it needs more salt or pepper. You can also try adding a splash of lime juice for a zesty twist. If you want to mix things up, consider different dressings. A light sesame dressing or spicy mayo can add depth. Experiment and find what you like! For a beautiful presentation, serve the salad in chilled bowls. This keeps it cool and refreshing. You can garnish with more sesame seeds or green onions. This adds color and a nice touch. For the best flavor, chill the salad for at least 30 minutes before serving. This time lets all the flavors blend together perfectly, making every bite a delight. {{image_4}} You can switch up the protein in this salad for fun. If you prefer real crab meat, go for it! It adds a sweet, fresh taste. Shrimp is another great choice. Just boil or sauté the shrimp until cooked and chop them up. For a vegetarian option, use avocado or chickpeas. These can replace imitation crab and still give you a great texture. Feel free to get creative with the veggies! Carrots add a nice crunch and sweetness. Thinly sliced radishes can add a peppery kick. You can also swap cream cheese for a dairy-free option. Try using cashew cream or a plant-based cream cheese for a similar texture and taste. The dressing can change the whole flavor of your salad. Experiment with different types of vinegar like apple cider or white wine vinegar. Each brings a unique flavor. If you like heat, add spicy mayo. Mixing it in gives a creamy, zesty kick that pairs well with all the ingredients. To keep your salad fresh, use an airtight container. This prevents moisture loss and keeps flavors intact. Store it in the fridge for up to two days. After that, the cucumbers may lose their crunch. Can you freeze the salad? I don't recommend it. The cucumbers will become mushy when thawed. If you must freeze it, pack it tightly in a freezer-safe container. Use it within one month for the best taste. Serve this salad cold or at room temperature. Cold enhances its refreshing taste. Freshness matters for flavor. Enjoy it straight from the fridge for the best experience. Yes, you can prepare this salad a day in advance. Just follow these tips: - Salt the cucumbers and let them rest to enhance crunch. - Mix the crab, avocado, and cream cheese as directed. - Store the cucumber separately to keep it fresh. - Combine everything just before serving for the best taste. Serve this salad chilled for a refreshing bite. Here are some ideas: - Use chilled bowls for an extra cool effect. - Garnish with sesame seeds and green onions for a pop of color. - Pair it with sushi or grilled chicken for a complete meal. Making the salad vegetarian is easy. Here are some options: - Replace imitation crab meat with diced tofu or chickpeas. - Use dairy-free cream cheese or avocado for creaminess. - Add more veggies like carrots or bell peppers for extra crunch. This California Roll Cucumber Salad combines fresh cucumbers, creamy avocado, and imitation crab meat. You learned how to prepare the salad with easy steps, seasoning tips, and presentation ideas. Remember, salting the cucumbers helps maintain their crunch. You can also swap ingredients to fit your taste. Whether you serve this salad cold or at room temperature, freshness boosts flavor. Enjoy experimenting with variations! This dish is versatile, tasty, and perfect for many occasions.
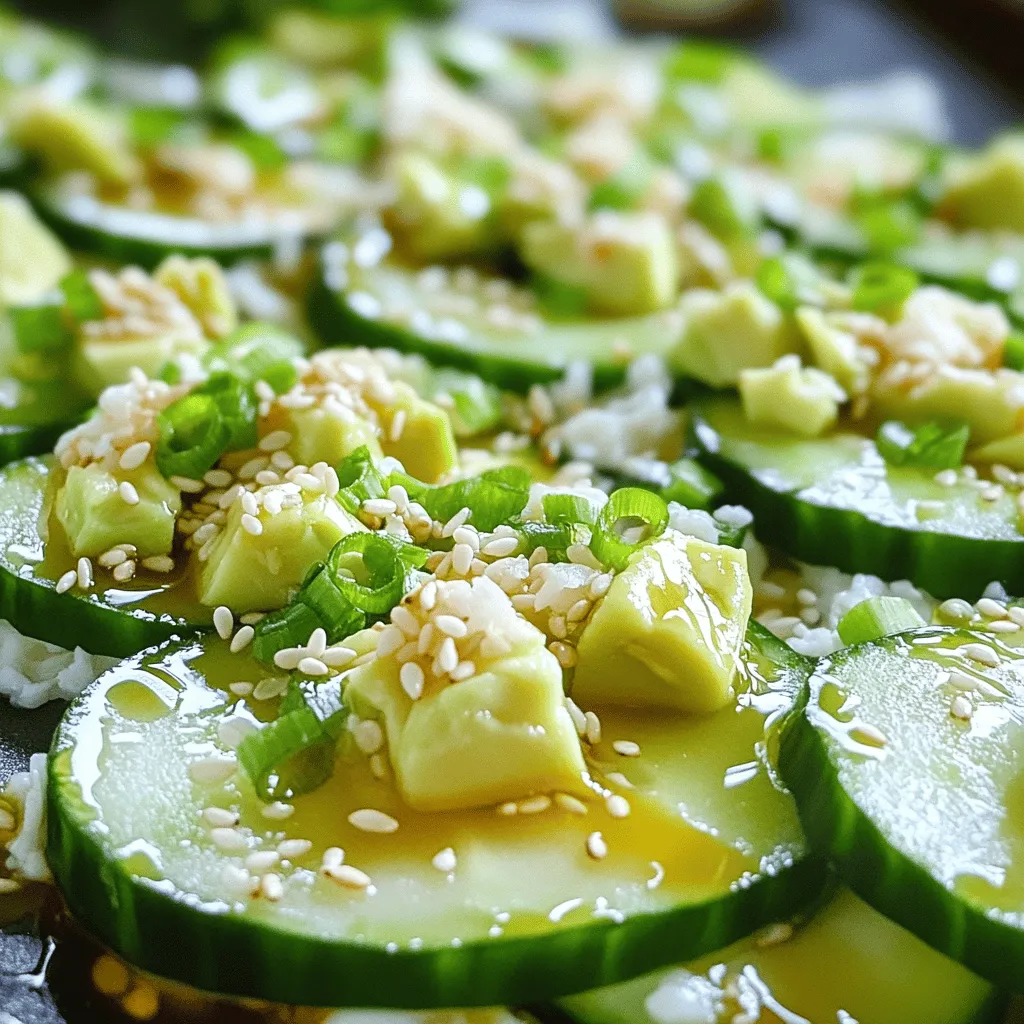
California Roll Cucumber Salad Refreshing Flavor Boost
Looking for a fresh twist on flavors? This California Roll Cucumber Salad combines crunchy cucumbers, creamy avocado, and savory crab meat for a taste that
- 2 large cucumbers, thinly sliced - 1 cup plain Greek yogurt - 1 tablespoon fresh lemon juice - 1 tablespoon fresh dill, finely chopped - 1/4 cup red onion, finely chopped - 1 tablespoon toasted sesame seeds (for garnish) - 1 clove garlic, minced - 1 tablespoon honey - 1/2 teaspoon sea salt - 1/4 teaspoon freshly ground black pepper The main ingredients create a fresh and crunchy base. You want crisp cucumbers and rich yogurt for creaminess. The lemon juice adds brightness, while fresh dill gives great flavor. If you like, add red onion for a little bite. Next, the seasoning and flavor enhancers are key. Minced garlic brings depth, while honey balances the tartness. Sea salt and black pepper round out the taste. Together, these ingredients make a salad that is both refreshing and healthy. For the full recipe, check out my earlier notes. Each component plays a vital role in making this creamy cucumber salad shine. - First, wash the cucumbers under cool water. - Slice them into thin rounds, about 1/8 inch thick. - Transfer the sliced cucumbers to a large mixing bowl. - In a separate bowl, combine the Greek yogurt, lemon juice, dill, garlic, honey, salt, and pepper. - Whisk the ingredients together until smooth and well mixed. - If you want more flavor, mix in the optional red onion with the cucumbers. - Drizzle the creamy dressing over the cucumbers and red onion. Toss everything gently to coat. - Cover the salad with plastic wrap or use a sealed container. - Refrigerate for at least 15-20 minutes to enhance the flavor. This refreshing cucumber salad is a great side dish. You can find the Full Recipe for a complete guide. To make your creamy cucumber salad even better, you can add more herbs and spices. Fresh mint or parsley works well with cucumbers. A pinch of cumin adds warmth too. Chilling the salad is key. It helps mix the flavors and makes each bite refreshing. Aim to chill it for at least 15-20 minutes. Serving your salad in chilled bowls makes it look fancy. You can also add sprigs of dill on top. This gives the dish a pop of color. A sprinkle of toasted sesame seeds adds a nice crunch. It also enhances the salad's flavor, making it even more delightful. For easy mixing and serving, use a large mixing bowl. A spatula helps combine the ingredients without breaking the cucumbers. Tongs are great for tossing the salad gently. A whisk is perfect for blending the dressing smoothly. Having these tools makes the whole process quicker and more fun. For the Full Recipe, check out the detailed instructions above. {{image_4}} You can switch up the dressing for your creamy cucumber salad. Instead of using Greek yogurt, try sour cream or cottage cheese. They add a nice tang without losing creaminess. For a lighter version, mix olive oil, vinegar, and a little mustard. This vinaigrette keeps it fresh and bright. Want more crunch? Add chopped bell peppers or juicy tomatoes. They bring color and flavor to your salad. You can also toss in nuts or seeds. Almonds, walnuts, or sunflower seeds add a delightful crunch. These ingredients make every bite more exciting. Herbs can change the whole dish! Try fresh mint or basil for a different taste. They add a refreshing twist. You can also experiment with flavored vinegars, like balsamic or apple cider. This can elevate the salad's taste, making it even more special. To store your creamy cucumber salad, keep it in the fridge. Use an airtight container. This helps keep your salad fresh and tasty. Make sure to cover it well. If you don’t have a lid, plastic wrap works great too. Your salad stays fresh for about three days in the fridge. After that, it begins to lose its crunch. Look for signs that it has gone bad. If the cucumbers are mushy or the dressing smells off, it’s time to toss it. I do not recommend freezing creamy cucumber salad. The cucumbers will become watery and mushy. If you want to freeze, store the dressing separately. You can freeze the dressing in small containers for up to a month. Just thaw it in the fridge when you are ready to use it. For best results, mix it with fresh cucumbers just before serving. You can use alternatives like sour cream or cashew cream. Both options create a rich texture. For vegan options, try silken tofu blended until smooth. This gives a creamy feel without dairy. You can also use coconut cream for a tropical twist. Just keep in mind that these swaps may change the flavor a bit. Yes, you can use various types of cucumbers. Persian cucumbers are smaller and sweeter. English cucumbers have a thin skin and fewer seeds. If you like crunch, try Kirby cucumbers. Their crispness adds a nice bite to the salad. Just pick any cucumber you enjoy. Each type brings a unique taste. Creamy cucumber salad is quite healthy. Cucumbers are low in calories and high in water. They help keep you hydrated. Greek yogurt adds protein and probiotics, promoting gut health. Fresh herbs like dill offer vitamins and minerals. However, watch the added sugar if you use honey. Overall, it’s a refreshing and nutritious dish when made with fresh ingredients. This creamy cucumber salad is simple and fresh. You primarily need cucumbers, yogurt, and herbs. We discussed how to prepare it, enhance its flavor, and present it beautifully. Remember to chill the salad before serving for the best taste. You can also try various dressings and add vegetables for texture. Proper storage ensures leftovers stay fresh and tasty. Enjoy making this easy, healthy dish that can please anyone. Dive into your next salad adventure with these tips!
Creamy Cucumber Salad Refreshing and Healthy Dish
Looking for a cool, refreshing dish that packs a healthy punch? Try my creamy cucumber salad! This easy recipe combines crisp cucumbers with tangy Greek
- 2 cups of cooked chicken breast, shredded into bite-sized pieces - 1 can (15 oz) of black beans, thoroughly rinsed and drained - 1 cup of corn kernels (either fresh, canned, or frozen) - 1 bell pepper (choose between vibrant red or golden yellow), diced into small cubes - 1 cup of cherry tomatoes, halved for sweetness - 1 small red onion, finely chopped for a delectable crunch - 1 ripe avocado, diced into creamy pieces - 1/4 cup of fresh cilantro, coarsely chopped for flavor - Juice of 2 juicy limes for zest - 3 tablespoons of extra-virgin olive oil for richness - 1 teaspoon of ground cumin for an earthy note - 1 teaspoon of chili powder for a hint of spice - Salt and pepper to taste, ensuring balance - Diced avocado - Fresh cilantro - Additional lime wedges This hearty salad bursts with flavor and color. You can easily make it your own by adding or swapping ingredients. For the full recipe, check out the detailed instructions provided. Start by gathering all your ingredients. In a big mixing bowl, combine the following main items: - 2 cups of cooked chicken breast, shredded into bite-sized pieces - 1 can (15 oz) of black beans, thoroughly rinsed and drained - 1 cup of corn kernels (either fresh, canned, or frozen) - 1 bell pepper, diced into small cubes - 1 cup of cherry tomatoes, halved for sweetness - 1 small red onion, finely chopped Mix everything gently. You want to keep the ingredients intact for that nice crunch. In a medium-sized bowl, whisk together these ingredients: - Juice of 2 juicy limes - 3 tablespoons of extra-virgin olive oil - 1 teaspoon of ground cumin - 1 teaspoon of chili powder - Salt and pepper to taste Blend until smooth. This dressing adds a zesty kick to your salad. Now, drizzle the dressing over your salad base. Use a large spoon to toss everything together. Make sure every bit of the salad gets coated well. Next, carefully add: - 1 ripe avocado, diced into creamy pieces - 1/4 cup of fresh cilantro, coarsely chopped Gently toss again, but be careful not to mash the avocado. Taste your salad and adjust the seasoning if needed. For the full recipe, check out [Full Recipe]. Enjoy your meal! To make your Quick Southwest Chicken Salad even better, adjust the seasoning. Taste it as you mix. If you want more zest, squeeze in more lime juice. This brightens the flavors and brings life to the dish. How you serve your salad matters. Arrange it in pretty bowls for a nice look. You can also use garnishes like lime wedges or extra cilantro. These add color and make the salad more inviting. Want to save time? Use pre-cooked or rotisserie chicken. It cuts down your prep time. You can also chop your vegetables ahead of time. Store them in the fridge until you are ready to make the salad. These small steps help you enjoy your meal faster. For the full recipe, check out the link above. {{image_4}} You can change the protein in your salad. Try using chickpeas or tofu for a plant-based option. They add great texture and protein. If you want something different, grilled shrimp or steak work well too. Both add a nice smoky flavor to the salad. You can add more veggies to boost nutrients. Avocado adds creaminess and healthy fats. Zucchini can give a nice crunch and is very mild. Chopped greens like spinach or kale add a lot of vitamins without changing the taste much. You might want to switch up the dressing. Try a different vinaigrette, like balsamic or honey mustard, for a new flavor. If you prefer creamy dressings, ranch or a yogurt-based dressing can add richness. Each option brings a unique twist to your salad. For the full recipe, check out the Zippy Southwest Chicken Salad. Enjoy experimenting with your own variations! To keep your Quick Southwest Chicken Salad fresh, store it in the fridge right away. Use an airtight container. This helps keep the salad crisp and tasty. You can enjoy it for up to three days. If you notice any sogginess, drain excess liquid before serving again. You cannot freeze the whole salad. Freezing will change the texture of fresh veggies and avocado. If you want to save some, freeze only the chicken. To thaw, place it in the fridge overnight. Once thawed, add fresh veggies and dressing to refresh the salad. If you need to reheat chicken, do so gently. Use the microwave on low power for one to two minutes. This keeps the chicken juicy. Avoid reheating the whole salad, as it may wilt. Always check the texture before serving. A quick toss helps bring back some freshness. This salad stays fresh in the fridge for about three days. To keep it tasty, store it in an airtight container. The longer it sits, the more the flavors mix, which can be nice. However, the avocado may brown, so add it just before serving. Yes, you can prepare this salad ahead of time! I suggest making the base a day before. Just mix the chicken, beans, corn, and veggies. Keep the dressing separate. When you're ready to eat, simply drizzle the dressing and toss everything together. This keeps it crunchy and fresh. This salad pairs well with many dishes. Here are some ideas: - Tortilla chips for a crunchy side - Grilled corn on the cob for sweetness - A slice of crusty bread for a filling option - A fresh fruit salad for a sweet contrast For the full recipe, check out the main sections of the article! This blog post covered how to make a quick Southwest chicken salad. You learned about the main ingredients, seasonings, and tips to enhance flavors. There are also ways to vary the recipe with different proteins and veggies. Proper storage helps keep leftovers fresh. Lastly, I shared answers to common questions about the salad. Enjoy making this salad your own! It's a tasty and healthy choice that's easy to prepare.
Quick Southwest Chicken Salad Easy and Healthy Recipe
Looking for a quick and healthy meal? You’ll love this Quick Southwest Chicken Salad! It’s packed with fresh ingredients, bold flavors, and easy to make.
For this salad, gather the following ingredients: - 2 cups cooked chicken breast, shredded - 1 can (15 oz) black beans, rinsed and drained - 1 cup corn kernels (fresh or frozen) - 1 cup cherry tomatoes, halved - 1 red bell pepper, diced - 1/2 red onion, finely chopped - 1 ripe avocado, diced - 1/4 cup fresh cilantro, chopped - Juice of 2 limes - 3 tablespoons extra virgin olive oil - 1 teaspoon ground cumin - 1 teaspoon chili powder - Sea salt and freshly ground black pepper to taste - Crispy tortilla strips for garnish When selecting your ingredients, look for bright colors and firm textures. Fresh vegetables should feel crisp, not wilted. Choose ripe avocados that yield slightly when pressed. For tomatoes, pick ones that smell fragrant and have smooth skin. For canned beans, check the label for low sodium options. Fresh herbs should look vibrant and smell strong. These choices will create a salad that bursts with flavor. This salad is packed with nutrients. It offers protein from chicken and black beans, fiber from the beans and vegetables, and healthy fats from the avocado. Each serving provides a good balance of vitamins and minerals. The lime juice adds vitamin C, while the olive oil provides healthy monounsaturated fats. Enjoy this salad as a great option for a light lunch or dinner. It’s healthy, filling, and delicious! To start, gather your ingredients. You need cooked chicken, black beans, corn, cherry tomatoes, red bell pepper, red onion, avocado, and cilantro. 1. In a large bowl, add 2 cups of shredded chicken. 2. Next, add 1 can of black beans that you rinsed and drained. 3. Toss in 1 cup of corn kernels, either fresh or frozen. 4. Now, add 1 cup of halved cherry tomatoes. 5. Dice 1 red bell pepper and add it to the mix. 6. Finely chop 1/2 of a red onion and add that too. 7. Dice 1 ripe avocado and mix it in gently. 8. Finally, sprinkle in 1/4 cup of chopped cilantro. 9. Use a spatula to gently combine everything. The dressing brings life to this salad. 1. In a small bowl, squeeze the juice of 2 limes. 2. Add 3 tablespoons of extra virgin olive oil. 3. Include 1 teaspoon of ground cumin and 1 teaspoon of chili powder. 4. Season with a pinch of sea salt and black pepper. 5. Whisk the mixture until it blends well. Now, let’s put it all together. 1. Drizzle the zesty dressing over the salad mix. 2. Use a folding motion to coat all the ingredients. 3. Taste and adjust seasoning if needed. 4. Let the salad rest for about 10 minutes. 5. Transfer to a large serving platter. 6. Garnish with crispy tortilla strips for a nice crunch. Try this recipe for a fresh and flavorful meal! You can find the Full Recipe for Zesty Southwest Chicken Salad above. Use fresh herbs like cilantro and lime juice. They brighten up the salad. Try adding a pinch of smoked paprika for a smoky twist. Ground cumin and chili powder bring warmth and depth. If you want more heat, add diced jalapeño. Spice blends can also work well. Experiment with your favorites. Prep ingredients ahead of time for easy assembly. Store each component separately in the fridge. This keeps the salad fresh and crisp. Mix the dressing just before serving. This way, the salad won't get soggy. For meal prep, use portioned containers. This makes it easy to grab and go. Presentation matters! Use crispy tortilla strips for texture. They add crunch and look great on top. You can also sprinkle extra cilantro for color. For a pop of color, add sliced radishes or cherry tomatoes. A lime wedge on the side adds a nice touch too. These simple garnishes make your salad more inviting. Enjoy creating your Zesty Southwest Chicken Salad with these tips! For the complete recipe, check out the [Full Recipe]. {{image_4}} You can change the chicken in this salad to fit your diet. Use grilled shrimp or tofu for a fun twist. If you want a vegetarian option, chickpeas or lentils work well. These choices keep the protein high while adding new flavors. While the lime dressing shines, you can swap it out for variety. A creamy avocado dressing adds richness. Mix yogurt with lime juice for a tangy twist. For a spicy kick, try a chipotle ranch dressing. Each dressing brings its own special taste to the salad. Feel free to make this salad your own. Add diced cucumber for a crunch or shredded carrots for sweetness. You can even toss in some spinach or arugula for extra greens. If you love heat, sliced jalapeños can bring a fiery flavor. The more colorful and varied your veggies, the better your salad will taste. Explore all these options to keep your Zesty Southwest Chicken Salad fresh and exciting. For the complete recipe, be sure to check out the Full Recipe. To keep your Zesty Southwest Chicken Salad fresh, store it in the fridge. Place the salad in an airtight container. Make sure to seal it tightly to lock in flavors. If you have leftover dressing, store it separately. This keeps the salad crisp and tasty. Use glass or BPA-free plastic containers for storage. Glass containers are great for keeping flavors intact. They are also easy to clean. Choose containers that are the right size for your salad. This will prevent excess air from getting in. The salad stays fresh in the fridge for about 3 days. If you see any changes in color or smell, it’s time to toss it. The avocado may brown faster, so eat it sooner. For the best taste, enjoy your salad within the first two days. The best way to cook chicken for this salad is to grill or bake it. Grilling gives a nice smoky flavor. Baking keeps it tender and juicy. Use boneless chicken breasts for ease. Cook the chicken until it reaches 165°F. Let it rest before shredding. This keeps the juices inside. You can also use leftover rotisserie chicken if you're in a hurry. Yes, you can make Zesty Southwest Chicken Salad ahead of time. This salad tastes even better after chilling. Prepare the salad and store it in the fridge. Just wait to add the avocado until serving. This helps it stay fresh and bright. The flavors meld well when it sits. Aim to eat it within 2 days for the best taste. Avoid adding too much dressing at once. You want to coat, not drown, the salad. Also, be careful with seasoning. Taste as you go to find the right balance. Don't skip resting the salad. This step is key for flavor development. Lastly, use fresh ingredients for the best taste. Check that your beans and corn are rinsed well. These tips will help you make a perfect salad every time. Zesty Southwest Chicken Salad is easy and fun to make. We went over the best ingredients and tips for freshness. I shared step-by-step instructions and ways to enhance flavor. You learned about substitutes and how to store your salad well. With these ideas, you can enjoy a tasty meal. Don't be afraid to try new flavors or variations. Enjoy crafting your salad!
Zesty Southwest Chicken Salad Fresh and Flavorful Dish
Are you ready to spice up your meal routine? This Zesty Southwest Chicken Salad is a vibrant mix of fresh ingredients that bursts with flavor.
- 2 large flour tortillas - 1 cup cooked, grilled chicken, sliced into strips - 1 cup romaine lettuce, chopped - 1/2 cup shredded carrots - 1/2 cup cherry tomatoes, halved - 1/2 cup shredded cheddar cheese - 1/4 cup creamy ranch dressing - 1/4 teaspoon garlic powder - Salt and pepper to taste - Fresh parsley, chopped When making the Chick-fil-A inspired Cool Wrap, the ingredients are key. The two large flour tortillas serve as your base, holding all the goodness inside. The grilled chicken adds a juicy, savory flavor. I like to slice it into strips for easy eating. Next, we have the crunchy romaine lettuce. It adds great texture and freshness. The shredded carrots and halved cherry tomatoes bring color and taste to your wrap. Don't forget the cheese! Shredded cheddar gives a creamy, rich taste that pairs well with the ranch dressing. I love to use creamy ranch dressing, but feel free to pick your favorite. A touch of garlic powder adds depth, while salt and pepper enhance all the flavors. If you want a pop of green, sprinkle some fresh parsley on top. With these ingredients, you can create a quick and tasty delight. For the full recipe, check the detailed section above. To start, you can either grill fresh chicken or use pre-cooked chicken. If grilling, season the chicken with salt, pepper, and garlic powder. Grill it over medium heat for about 6 to 7 minutes on each side. Make sure it cooks all the way through. Once done, let it rest for a few minutes. This helps keep it juicy. Then, slice the chicken into strips. If you're using pre-cooked chicken, just cut it into strips. Now, let’s set up your tortillas. Place the two large flour tortillas flat on a clean surface. Make sure they are ready to be filled. In a big bowl, mix the chopped romaine lettuce, shredded carrots, halved cherry tomatoes, and shredded cheddar cheese. Toss this mix gently so all the veggies get combined. Next, add your sliced grilled chicken to the veggie mix. Drizzle ranch dressing over everything. Toss it all gently to coat the chicken and veggies with the dressing. Time to fill your tortillas! Spoon a good amount of the chicken and veggie mix into the center of each tortilla. Be careful not to overfill. Now, let’s wrap it up. Fold in the sides of the tortilla to enclose the filling. Then, roll it tightly from the bottom up. This keeps everything snug inside. To serve, slice each wrap in half diagonally. Place them seam-side down on a plate. This way, they stay intact. Optionally, sprinkle some chopped parsley on top for a fresh touch. Choosing the right dressing Select a dressing that enhances the wrap's taste. A creamy ranch dressing works best. You can also try a zesty vinaigrette or a yogurt-based dressing for a lighter option. Each choice brings its own twist. Experiment to find your favorite. Seasoning the chicken effectively Season the chicken well for great flavor. Use salt, pepper, and garlic powder. These simple spices add depth. If you want more kick, try adding paprika or chili powder. Let the chicken rest after grilling to keep it juicy. Serving suggestions Serve the wraps on a colorful plate. This makes the meal inviting. You can cut them in half for easy eating. Place them seam-side down to hold the fillings inside. Pair with a side of crunchy chips or fresh fruit for a complete meal. Garnishing for visual appeal Garnish your wraps with chopped parsley. This adds a pop of color. You can also use thin slices of radish or a sprinkle of sesame seeds for extra flair. A nice garnish makes the dish look gourmet and appetizing. {{image_4}} You can easily change the protein in your wrap. Turkey is a great choice. It has a nice flavor and is leaner than chicken. Just slice it thinly and add it to your wrap. Tofu is another option. It works well if you want a vegan meal. Marinate the tofu in soy sauce and garlic for extra taste. You can also try different marinades for chicken. For a spicy kick, use buffalo sauce. For a tangy flavor, consider a lemon herb marinade. Adding more veggies makes your wrap even better! You can swap in bell peppers for a crunch. Red or yellow peppers add color and sweetness. Avocado is another great choice. It makes your wrap creamy and rich. Seasonal veggies like zucchini or spinach can also work well. Use what you have on hand. This recipe is flexible, so feel free to mix and match. Adding seasonal ingredients not only boosts flavor but also keeps your meals fresh. Enjoy making your wrap just the way you like it! To keep your wraps fresh, store them in an airtight container. This helps prevent them from drying out. If you have leftover wraps, place them in the fridge right away. They last for up to 2 days in the fridge. After that, the veggies may get soggy. To reheat, use a microwave or a skillet. If using a microwave, heat for 30 seconds to 1 minute. This keeps the wrap soft. If you prefer a crispier wrap, heat it in a skillet over low heat for a few minutes. For longer storage, you can freeze the wraps. Wrap them tightly in plastic wrap, then place them in a freezer bag. They can last up to 3 months in the freezer. Just thaw in the fridge before reheating. You can easily make the Chick-fil-a Cool Wrap healthier by using lighter options. Here are some ideas: - Choose Whole Wheat Tortillas: They add fiber and nutrients. - Use Grilled Chicken Breast: It has less fat than fried chicken. - Opt for Low-Fat Dressing: You can pick a yogurt-based ranch or vinaigrette. - Add More Veggies: Include spinach, bell peppers, or cucumbers for extra crunch. - Skip the Cheese: You can enjoy the wrap without cheese for fewer calories. Yes, you can prep the wraps ahead. Here’s how to do it: - Assemble the Wraps: Make the wraps the day before. - Wrap Them Well: Use plastic wrap or foil to keep them fresh. - Store in the Fridge: They last up to 24 hours without losing quality. When ready to eat, just unwrap and enjoy! Pair your wraps with great sides and drinks. Here are some tasty ideas: - Side Dishes: Serve with sweet potato fries or a fresh garden salad. - Drinks: A light lemonade or iced tea complements the meal well. These sides will make your wrap even more delicious! This blog post covered easy steps to make a tasty wrap. We explored the main ingredients, like grilled chicken and fresh veggies, and shared tips for great flavor. I gave you ideas for variations, such as using different proteins or veggies. Proper storage and reheating methods help keep your wraps fresh. In the end, creating delicious wraps at home is simple. You can enjoy them any time and make them your own!
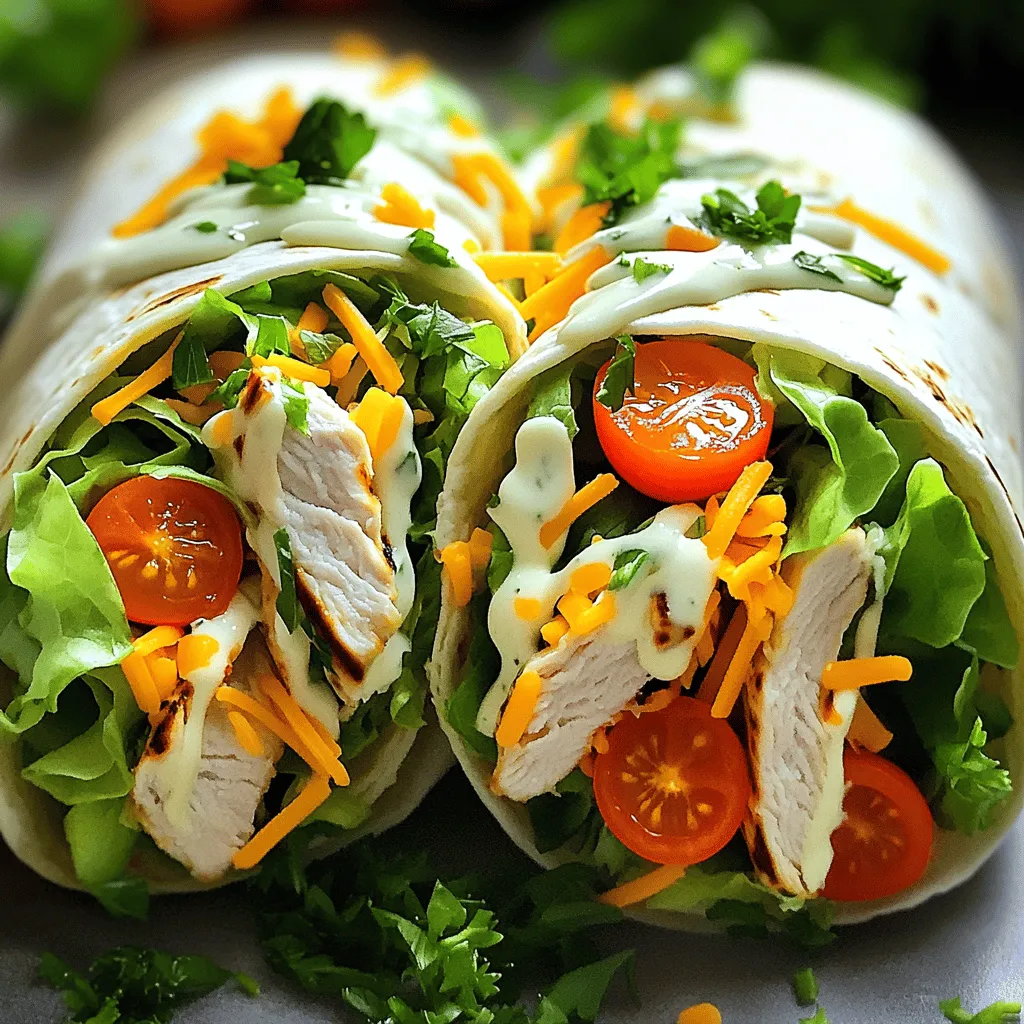
Chick-fil-a Cool Wrap Recipe Quick and Tasty Delight
Craving a tasty yet simple meal? Look no further! This Chick-fil-A Cool Wrap recipe combines tender chicken, fresh veggies, and creamy ranch dressing, all wrapped
- 1/2 cup creamy Greek yogurt - 1/4 cup rich balsamic vinegar - 2 tablespoons smooth Dijon mustard - 1 tablespoon natural honey - 1 garlic clove, finely minced - 1/4 cup premium extra-virgin olive oil - Salt and freshly cracked black pepper to taste - Fresh herbs (such as vibrant basil or fragrant parsley), finely chopped (optional) In this recipe, creamy Greek yogurt is the star. It adds a rich texture and tangy flavor. The balsamic vinegar brings a sweet and tart taste that balances well with the yogurt. Dijon mustard adds a touch of spice, while honey rounds it off with sweetness. Minced garlic gives the vinaigrette a nice kick. Extra-virgin olive oil helps blend everything smoothly. Salt and black pepper season the dressing, making it even tastier. You can add fresh herbs like basil or parsley for an extra burst of flavor. Each ingredient plays a key role in creating a delicious, creamy balsamic vinaigrette. This dressing is not only easy to make, but it also elevates any salad. For the full recipe, check out the steps provided. 1. Start by placing 1/2 cup creamy Greek yogurt in a mixing bowl. This yogurt gives a rich texture. 2. Add 1/4 cup rich balsamic vinegar, 2 tablespoons smooth Dijon mustard, 1 tablespoon natural honey, and 1 finely minced garlic clove. 3. Use a whisk to mix until smooth and creamy. Enjoy the fresh aroma! 4. While you whisk, slowly drizzle in 1/4 cup premium extra-virgin olive oil. This helps create a thick, creamy emulsion. Keep whisking until it’s fully combined. 5. Season with salt and freshly cracked black pepper to taste. 6. If you want, gently fold in finely chopped fresh herbs like basil or parsley. This adds freshness. 7. Taste your vinaigrette. If you want it sweeter, add more honey. For tang, add more balsamic vinegar. - Balancing sweetness and acidity: Adjust the honey and vinegar levels to find your perfect taste. - Recommended whisking techniques: Whisk vigorously to blend well and achieve a smooth texture. A steady hand helps! For the complete recipe and additional tips, check out the Full Recipe. To keep your creamy balsamic vinaigrette fresh, store it in an airtight container. A jar works great for this. It helps keep air out, which can spoil the flavor. Always make sure the lid is tight. In the fridge, this vinaigrette lasts about one week. If you notice any changes in smell or color, it’s best to toss it out. Always give it a good shake before using. This ensures the flavors mix well again. When serving your creamy balsamic vinaigrette, think about how it looks. Use a decorative bottle or a small jar for an appealing touch. This makes it feel special, even at home. Drizzle the vinaigrette over fresh salads. It pairs well with mixed greens, tomatoes, and cucumbers. For a pop of color, add some sliced red onions or bell peppers. Just before serving, add a little extra vinaigrette on top for flair. This makes the dish look even more inviting. For more details, check the Full Recipe. {{image_4}} You can make your creamy balsamic vinaigrette unique. Try adding different herbs or spices. Fresh thyme or dill can bring a new flavor. You can also add a pinch of red pepper flakes for some heat. Experimenting with sweeteners can change the taste too. If you want less sugar, try maple syrup or agave nectar. You can even use stevia for a sugar-free option. Each choice can change the flavor profile of your dressing. Creamy balsamic vinaigrette works well with many dishes. It’s perfect for salads with mixed greens, cherry tomatoes, and cucumbers. You can also drizzle it over roasted veggies for extra flavor. If you want a quick lunch, use it in wraps or sandwiches instead of mayonnaise. It adds creaminess and a tangy taste. Pair it with turkey, chicken, or fresh vegetables for a tasty meal. You can find the full recipe above to make this delicious dressing. In each serving of creamy balsamic vinaigrette, you get about 100 calories. Here’s the macro breakdown: - Fat: 9 grams - Carbohydrates: 5 grams - Protein: 3 grams This vinaigrette packs a healthy punch. The creamy Greek yogurt gives you protein and calcium. Balsamic vinegar adds flavor with very few calories. It also has antioxidants that help your body fight free radicals. Honey provides natural sweetness and energy. Garlic adds taste and has health benefits too, like boosting your immune system. This creamy balsamic vinaigrette is gluten-free and vegetarian. You can enjoy it without worry, whether you follow these diets. If you want to make it dairy-free, try using a plant-based yogurt. It will still taste great! To lower sugar, you can skip the honey or use a sugar substitute. Customizing this recipe makes it fit your needs while keeping it delicious. For more ideas, check out the Full Recipe and enjoy your tasty creation! How to make creamy balsamic vinaigrette thicker? To thicken your vinaigrette, add more Greek yogurt. Start with a tablespoon at a time. Whisk it in well and check the texture after each addition. Another option is to reduce the balsamic vinegar in a small pot until it thickens slightly. This adds flavor and richness. Can I substitute Greek yogurt with another ingredient? Yes, you can use sour cream or buttermilk. Both will give a creamy texture. For a dairy-free option, try silken tofu blended until smooth. This will keep the creaminess without dairy. How long can I keep creamy balsamic vinaigrette in the fridge? You can store this vinaigrette in the fridge for up to one week. Keep it in an airtight container or jar. Always shake or stir it before using, as ingredients may separate over time. What is the best way to use balsamic vinaigrette? Balsamic vinaigrette works well on salads, grilled vegetables, and roasted meats. Drizzle it over your favorite greens or use it as a dip for fresh bread. You can also add it to pasta dishes for a burst of flavor. Can I use this vinaigrette for marinating? Absolutely! This vinaigrette makes a great marinade for chicken, beef, or veggies. The yogurt helps to tenderize meat while adding flavor. Just coat your protein or veggies and let them marinate for at least 30 minutes before cooking. For the full recipe, check out the detailed instructions above. In this blog post, we explored how to make a creamy balsamic vinaigrette from scratch. We covered key ingredients, preparation steps, and tips for perfecting the flavor. You learned about storage, presentation ideas, and variations to suit your taste. Remember, this vinaigrette is not just for salads; it can enhance wraps and sandwiches too. With its simple ingredients and health benefits, you can enjoy a tasty and nutritious dressing. Try it out and make it your own!
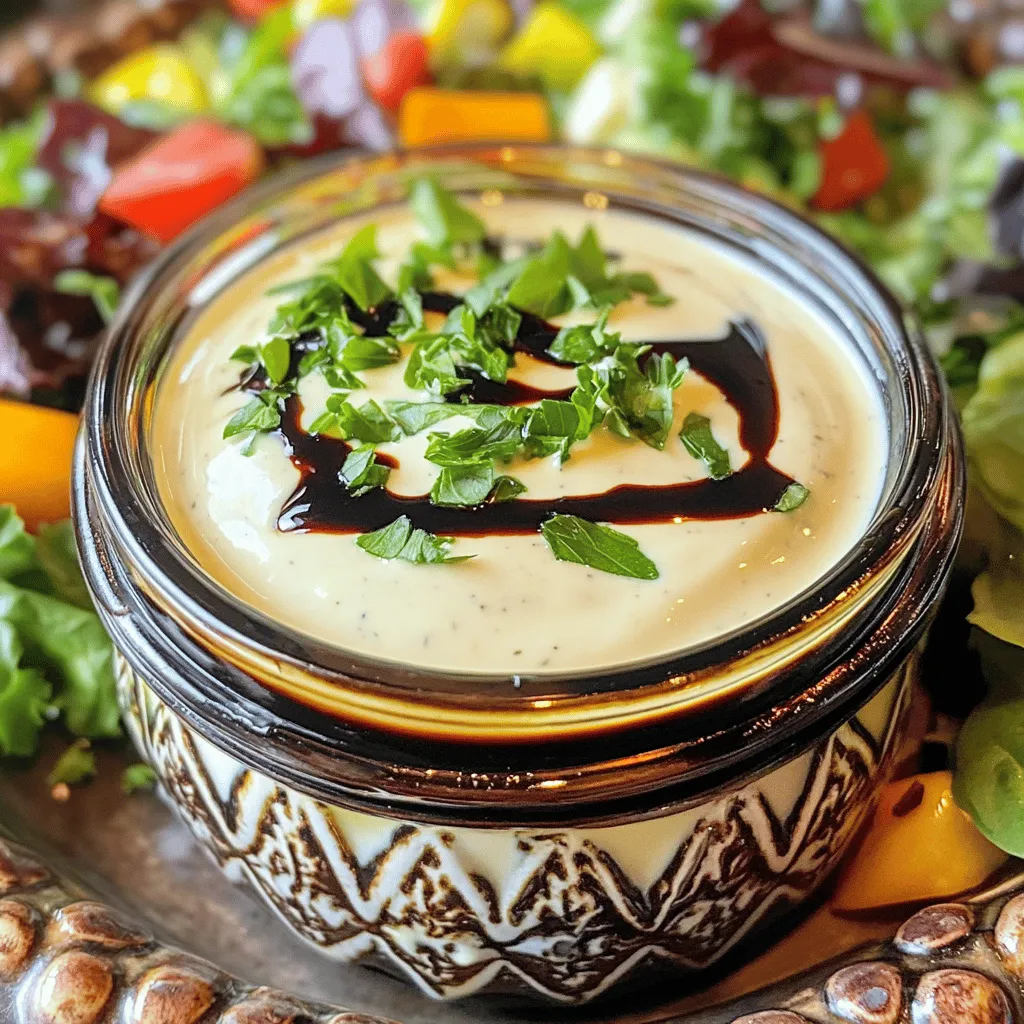
Creamy Balsamic Vinaigrette Flavorful and Easy Recipe
Do you want a quick and easy recipe that elevates your salads? Creamy balsamic vinaigrette is the answer! With rich balsamic vinegar, creamy Greek yogurt,
To make these tasty Rainbow Veggie Wraps, you will need: - 4 large whole grain tortillas - 1 cup hummus (any flavor of your choice) - 1/2 cup grated carrots - 1/2 cup sliced bell peppers (mix of red, yellow, and green for color) - 1/2 cup fresh baby spinach leaves - 1/2 cup sliced cucumbers - 1/4 cup crumbled feta cheese (optional for a creamy texture) - 1 tablespoon balsamic glaze (optional for a sweet tang) - Salt and freshly ground black pepper to taste Each ingredient in these wraps brings something special to the table. Here are the highlights: - Whole grain tortillas provide fiber and keep you full. - Hummus adds protein and healthy fats. It also gives a creamy texture. - Carrots are rich in vitamin A, which is good for your eyes. - Bell peppers are high in vitamin C, which helps your immune system. - Spinach offers iron and vitamins, supporting your energy. - Cucumbers are hydrating and low in calories, perfect for crunch. - Feta cheese adds calcium and a tasty bite, but skip it if you want. - Balsamic glaze gives a sweet taste and adds flavor depth. If you want to mix things up, here are some easy swaps: - Use spinach wraps instead of whole grain tortillas for a different flavor. - Swap hummus for avocado for a creamy and healthy fat source. - Try shredded zucchini or radishes if you can't find carrots. - Use any color bell pepper you like, or add roasted veggies for warmth. - Replace feta with goat cheese or skip cheese altogether. - If you prefer a different sauce, try ranch or tzatziki for a new twist. These wraps are fun to make and even better to eat! To start, you need to gather your ingredients. Grab 4 large whole grain tortillas. Lay one flat on a clean cutting board. This gives you a stable space to work. Next, take 1 cup of hummus. Use a spatula to spread about 1/4 cup of hummus evenly over the tortilla. Cover all corners for the best flavor. Now, it’s time for the fun part! In the center of the tortilla, create a colorful layer. Add 1/2 cup of grated carrots, 1/2 cup of sliced bell peppers, and 1/2 cup of fresh baby spinach. Mix red, yellow, and green bell peppers for a vibrant look. Add 1/2 cup of sliced cucumbers on top. If you want a creamy touch, sprinkle 1/4 cup of crumbled feta cheese. For a sweet tang, drizzle 1 tablespoon of balsamic glaze on top. Don’t forget to season with salt and freshly ground black pepper. This step adds extra flavor to your wrap. Now, let’s roll your wrap! Start by folding in the left and right sides of the tortilla. This helps keep all the fillings inside. Then, begin rolling from the bottom up. Roll it tightly to make a secure wrap. Repeat these steps for each tortilla. Make sure each wrap is packed full of yummy veggies. Presentation matters! To serve, cut each wrap in half diagonally. This shows off the colorful filling inside. Arrange the halved wraps on a platter with the cut side facing up. You can add a sprinkle of sesame seeds or extra baby spinach for a nice touch. Serve with more hummus on the side for dipping. This makes your lunch look fun and inviting! Enjoy your Rainbow Veggie Wraps! To save time, prep your veggies in advance. Wash and slice your carrots, cucumbers, and bell peppers. Store them in airtight containers in the fridge. This way, you grab them easily when making wraps. You can also make a big batch of hummus. Store it in small containers for quick use. Packing wraps for school is simple. First, wrap each one in parchment paper. This keeps them fresh and makes them easy to eat. Use a rubber band to hold the wrap together. Then, place the wrapped wraps in a lunchbox. Add a small container of dip, like extra hummus, on the side. Add fun flavors to your wraps. Try using different hummus flavors, like roasted red pepper or garlic. You can also spice things up with fresh herbs, such as basil or cilantro. For crunch, add sunflower seeds or nuts. For a creamy touch, sprinkle feta cheese or avocado slices. Experiment with different combinations to find your favorite. {{image_4}} You can change up your wraps easily. Try using different fillings to keep things fun. Here are some ideas: - Grilled chicken or turkey slices: These add protein and flavor. - Avocado slices: They make the wrap creamy and rich. - Roasted veggies: Zucchini, eggplant, or mushrooms bring a new taste. - Cheese alternatives: Use goat cheese or a dairy-free option if needed. - Tuna or chickpea salad: These make a filling and tasty option. Feel free to mix and match! You can create a new wrap each week. Dietary needs vary. Here are some ways to adjust the wraps: - Gluten-free tortillas: Use these if you need to avoid gluten. - Vegan options: Skip the feta cheese and use plant-based hummus. - Nut-free: Always check ingredients on labels for allergens. - Low-carb: Use lettuce leaves instead of tortillas for a lighter wrap. These options help everyone enjoy the meal. Want to boost nutrition? Add these healthy ingredients: - Chia seeds: They pack a punch of fiber. - Sunflower seeds: These add crunch and healthy fats. - Microgreens: They bring flavor and vitamins. - Spices: Consider adding cumin or paprika for an extra kick. These add-ins make your wraps not just tasty but also power-packed! For a full recipe, check out the Rainbow Veggie Wraps. To keep your wraps fresh, store them properly. Wrap each one in plastic wrap or parchment paper. This keeps them from drying out. Place the wrapped wraps in an airtight container. Label the container with the date. This way, you won't forget when you made them! When stored correctly, wraps can last about 3 to 4 days in the fridge. After that, they may lose flavor and texture. Always check for any signs of spoilage before eating. If the wraps look or smell off, it's best to toss them. You can freeze wraps for later use. To do this, wrap each one tightly in plastic wrap. Then place them in a freezer-safe bag. This helps prevent freezer burn. You can store them for up to 2 months. When ready, thaw them in the fridge overnight before eating. This keeps the taste fresh. For more details on making delicious wraps, check out the Full Recipe. Yes, you can make Rainbow Veggie Wraps ahead of time. Just prepare them one day in advance. Wrap them tightly in plastic wrap to keep them fresh. Store them in the fridge until you are ready to eat. This makes them great for busy mornings. Kids will love having a tasty lunch ready to go! There are many easy dips you can pair with these wraps. Here are a few ideas: - Hummus: This is a classic choice. You can use any flavor you like. - Ranch dressing: Kids love this creamy dip. It adds a nice flavor. - Guacamole: This is a fun twist that adds creaminess. - Tzatziki: This yogurt-based dip is refreshing and tangy. - Salsa: A bit of spice can make lunch exciting. These dips add flavor and make lunch even more fun! Getting kids involved in making wraps can be fun and easy. Here are some tips: - Let them choose the veggies. Ask them what colors they want. - Show them how to spread hummus on the tortilla. This helps them learn new skills. - They can help layer the veggies in a rainbow pattern. - Teach them to roll the wraps tightly. This can be a fun challenge! - Allow them to cut the wraps in half for serving. By getting kids involved, they will be more excited to eat healthy meals! Rainbow Veggie Wraps are a fun and healthy meal choice. We covered ingredients, prep steps, and tips for serving. Variations let you customize each wrap to fit your taste. Plus, knowing how to store and pack them can make life easier. These wraps are not just tasty; they’re full of vitamins. I hope you try them and explore all the options. Rainbow Veggie Wraps can be a go-to meal for everyone. Enjoy creating and sharing them with friends and family.
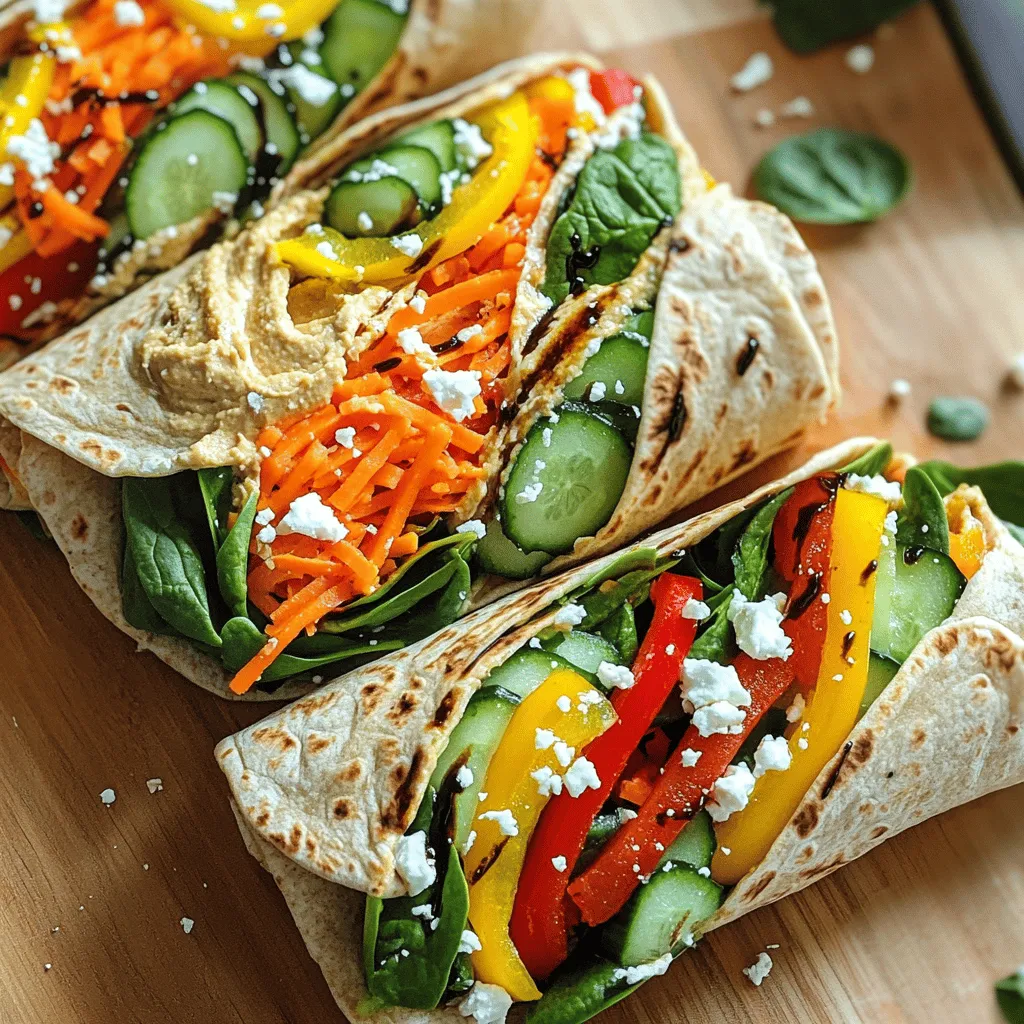
Back to School Lunch Ideas for Healthy Wraps
Get ready for a fresh take on school lunches! In this post, I’ll share delicious and healthy wrap ideas that your kids will love. We’ll
- Large hoagie roll or sub bread - Shredded iceberg lettuce - Cherry tomatoes - Cucumber - Red onion - Roasted red peppers - Provolone cheese - Salami and capicola - Pepperoncini - Olive oil, apple cider vinegar, and dried oregano - Salt, black pepper, and optional red pepper flakes To create the Italian Grinder Salad Sandwich, you need fresh and tasty ingredients. Start with a large hoagie roll or sub bread. This bread holds all the goodies inside. Next, grab a cup of shredded iceberg lettuce. It adds great crunch. Cherry tomatoes are a must. Use half a cup, and slice them in half. They add sweetness and color. For a cool crunch, thinly slice half a cup of cucumber. Red onion gives a nice bite, so slice a quarter cup of that too. Roasted red peppers add a smoky flavor. You will need a quarter cup of these, sliced. Provolone cheese is key for creaminess. Use half a cup of shredded provolone. For meats, get a quarter cup each of thinly sliced salami and capicola. These will give the sandwich its rich taste. Don’t forget the pepperoncini! A quarter cup of these sliced peppers adds a zesty kick. Finally, the dressing brings all the flavors together. You will need two tablespoons of olive oil, one tablespoon of apple cider vinegar, and one teaspoon of dried oregano. Season with salt and black pepper to taste. If you like heat, add some crushed red pepper flakes. This mix makes your sandwich truly special. {{ingredient_image_2}} Start by grabbing a large mixing bowl. Add 1 cup of shredded iceberg lettuce. Next, toss in 1/2 cup of halved cherry tomatoes. Add 1/2 cup of thinly sliced cucumber. Then, mix in 1/4 cup of thinly sliced red onion and 1/4 cup of sliced roasted red peppers. Finally, add 1/4 cup of sliced pepperoncini. Toss everything well to combine. This ensures an even distribution of flavors. For the dressing, you need a few simple ingredients. Measure out 2 tablespoons of olive oil. Then, add 1 tablespoon of apple cider vinegar. Sprinkle in 1 teaspoon of dried oregano. Add a pinch of salt and some freshly cracked black pepper. You can also include crushed red pepper flakes for heat. Mix or shake everything in a jar until well blended. Once your dressing is ready, pour it over the mixed vegetables. Gently toss the veggies until they are all coated with the dressing. This step is key for flavor melding. Allow the salad to sit for a bit. This lets the flavors blend and deepen. Now it’s time to assemble your sandwich. Carefully slice the hoagie roll in half lengthwise. Take the bottom half and layer a generous handful of the dressed salad mixture on it. Make sure it covers the entire base for a balanced bite. Next, add a layer of shredded provolone cheese on top of the salad. After that, place the thin slices of salami and capicola on the cheese. If you like, add another small handful of the salad mix on top. This extra layer helps with balance. Finally, place the top half of the hoagie roll back over the fillings. For the best flavor integration, wrap the assembled sandwich tightly in parchment paper. Let it rest for about 10 minutes. This waiting time helps all the ingredients meld beautifully. When it’s time to eat, slice the sandwich diagonally for easy handling. Serve it with extra cherry tomatoes or pepperoncini on the side. This adds a nice touch and makes your plate look great. For the Italian Grinder Salad Sandwich, I recommend using a large hoagie roll or sub bread. Both options have a soft, chewy texture that holds the filling well. Freshness is key here. Look for bread that is crusty on the outside and soft on the inside. If possible, visit a local bakery. Freshly baked bread makes a big difference in taste. If you're using pre-packaged bread, check the expiration date. When it comes to meats, salami and capicola are classic choices, but you can swap them out. Try turkey or ham for a lighter option. For veggies, feel free to get creative. Bell peppers or arugula can add a nice crunch. If you need a vegetarian version, skip the meats altogether. You can add more cheese or chickpeas for protein. If you're avoiding dairy, use a nut-based cheese instead. To boost flavor, consider adding extra seasonings. Garlic powder or Italian herbs work well. A sprinkle of crushed red pepper flakes gives a nice kick. Fresh herbs like basil or parsley can elevate the taste even more. Chop them finely and mix them into your salad. They add a burst of freshness that pairs beautifully with the other ingredients. Pro Tips Use Fresh Ingredients: Opt for the freshest vegetables and meats to enhance the flavor and texture of your sandwich. Let It Rest: Allowing the sandwich to rest for 10 minutes after assembling helps the flavors meld together beautifully. Customize the Heat: Adjust the amount of crushed red pepper flakes in the dressing to suit your spice preference. Choose the Right Bread: A sturdy hoagie roll or sub bread is essential for holding all the ingredients without falling apart. {{image_4}} For a meatless option, use these ingredients: - Large hoagie roll or sub bread - 1 cup shredded iceberg lettuce - 1/2 cup cherry tomatoes, halved - 1/2 cup cucumber, thinly sliced - 1/4 cup red onion, thinly sliced - 1/4 cup roasted red peppers, sliced - 1/2 cup provolone cheese, shredded - 1/4 cup pepperoncini, sliced - 2 tablespoons olive oil - 1 tablespoon apple cider vinegar - 1 teaspoon dried oregano - Salt and black pepper to taste To keep the flavor strong, add more veggies like bell peppers or olives. You can also mix in fresh herbs, like basil or parsley, for an extra kick. To add heat, try these tips: - Add sliced jalapeños or spicy meats like capicola. - For the dressing, include crushed red pepper flakes for extra spice. This twist makes your sandwich lively and fun. Just be careful with the heat level to make sure everyone enjoys it. For a gluten-free choice, select: - Gluten-free hoagie rolls or sub bread You can use lettuce leaves instead of bread for a low-carb option. Adjust your recipe by ensuring all ingredients are gluten-free. Read labels on all products to ensure they fit your diet. To keep your Italian grinder salad sandwich fresh, use an airtight container. This helps prevent sogginess. If you have leftover salad, store it in a separate container. This keeps the bread crisp. You can store the sandwich in the fridge for about 1 to 2 days. After that, the bread can get stale. The salad will still taste good, but the texture may change. You can freeze your sandwich for longer storage. To do this, wrap it tightly in plastic wrap. Then, place it in a freezer-safe bag or container. This helps avoid freezer burn. When you're ready to eat it, thaw the sandwich in the fridge overnight. For the best quality, reheat it in the oven or toaster oven at 350°F for about 10 minutes. This method warms the sandwich without making it soggy. Enjoy your tasty treat! An Italian Grinder Salad Sandwich is a tasty mix of fresh veggies, meats, and cheese. This sandwich features a hoagie roll filled with ingredients like lettuce, tomatoes, cucumbers, onions, and peppers. The meats, such as salami and capicola, add flavor and richness. Provolone cheese gives it a creamy touch. The sandwich often includes a dressing made from olive oil, vinegar, and oregano, adding a zesty kick. Yes, you can make this sandwich ahead of time. To keep it fresh, prepare the salad and dressing separately. Store them in the fridge. When ready to eat, assemble the sandwich. This way, the bread stays crisp, and the veggies retain their crunch. You can easily make this sandwich your own. Try different meats like turkey or ham. Add more veggies like bell peppers or avocados. You can even switch up the cheese, using mozzarella or feta. For a spicy kick, add jalapeños or more pepperoncini. The options are endless, so use what you love! To find an authentic Italian Grinder Salad Sandwich, look for Italian delis or sandwich shops. Places in cities with strong Italian communities often serve this sandwich. You might also find it at local farmers' markets or food festivals, where vendors showcase regional specialties. This blog post detailed how to make an Italian Grinder Salad Sandwich. You learned about the key ingredients, from fresh veggies to meats and cheese. I shared step-by-step instructions for preparation, dressing, and assembly. You also discovered tips for choosing the best bread and variations like vegetarian or gluten-free options. In the end, this sandwich blends fresh flavors and textures to delight your taste buds. Enjoy creating your perfect sandwich!
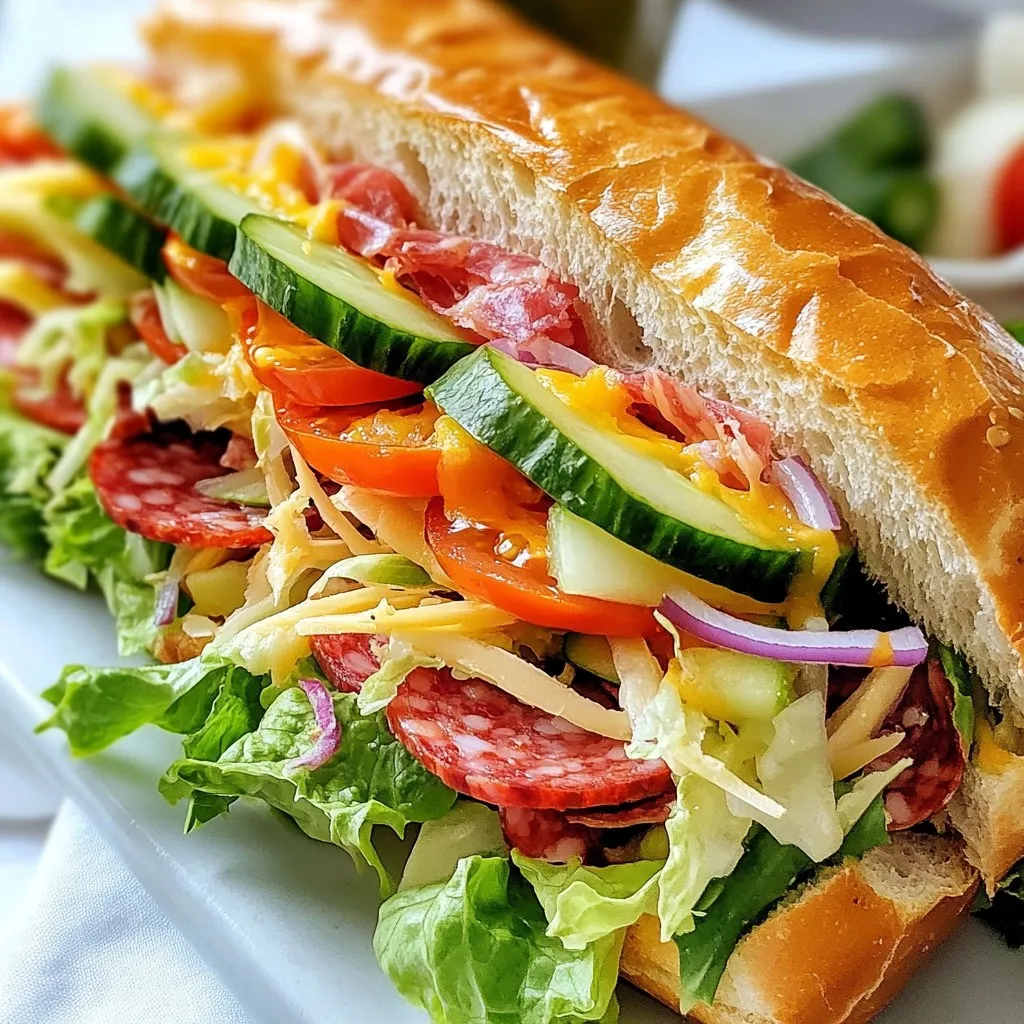
Italian Grinder Salad Sandwich Flavorful Layered Delight
Are you ready to create a sandwich that bursts with flavor? The Italian Grinder Salad Sandwich is a layered delight that combines fresh veggies, savory
To create a vibrant bento lunch, you need fresh ingredients that are easy to prepare. Here’s a list of the main ingredients I recommend: - 1 cup cooked quinoa - 1/2 cup cherry tomatoes, halved - 1/2 cup cucumber, diced - 1/2 cup shredded carrots - 1/4 cup shelled edamame - 1/4 cup bell pepper, diced - 1/4 cup creamy hummus - 2 tablespoons sesame seeds - 2 tablespoons low-sodium soy sauce - 1 tablespoon olive oil - Salt and pepper to taste - Fresh cilantro or parsley for garnish These ingredients offer a colorful and tasty meal. Quinoa serves as a great base. It is high in protein and gluten-free. When considering dietary needs, this recipe suits many diets. It’s vegan, gluten-free, and full of nutrients. You can swap any vegetables based on your preferences. Fresh ingredients always win over frozen ones. Fresh veggies keep their crunch and flavor. Frozen ingredients can work in a pinch, but they may lose texture when thawed. Always choose what feels best for you and your lunch. For more details, check out the Full Recipe. Start by cooking your quinoa. Use a pot with water and bring it to a boil. Add one part quinoa and two parts water. Cover and simmer for about 15 minutes. Once done, let it cool. Next, mix your veggies. In a large bowl, add the cooked quinoa. Toss in the cherry tomatoes, cucumber, carrots, edamame, and bell pepper. Now, let’s make it tasty. Drizzle olive oil and soy sauce over the mixture. Add salt and black pepper to taste. Stir gently until everything is well mixed. For a nice bento look, arrange the salad in your box. Use one large compartment for the quinoa salad. This keeps it fresh and colorful. Portion your bento for two servings. Fill one compartment with the quinoa salad. In the other, add a generous scoop of hummus. This gives a creamy dip for the salad. Sprinkle sesame seeds over your bento. This adds a nice crunch. For garnish, add fresh cilantro or parsley on top. For the best look, place the quinoa salad first, then the hummus. This order makes your bento box inviting. Want to try the full recipe? Check out the vibrant quinoa bento box details above! To create a healthy bento, include balanced food groups. Aim for: - Whole grains like quinoa or brown rice - Lean proteins such as chicken or tofu - Colorful vegetables like carrots, bell peppers, and spinach For portion sizes, think about filling half your box with veggies. Use a quarter for grains and protein. This keeps your meal balanced and filling. Choose colorful vegetables for appeal. Bright colors often mean more nutrients. Add red cherry tomatoes, green cucumbers, and orange carrots. This not only makes your bento look good but helps you eat healthier. Get creative with how you arrange your ingredients. Use sections in your bento box. Place each food type in its own space. This keeps flavors separate and looks nice. Garnishes can enhance visuals. Fresh herbs like cilantro or parsley add a pop of green. You can also use sesame seeds for crunch and style. Just a sprinkle makes your meal look gourmet. To prevent sogginess, pack wet ingredients separately. Keep hummus or dressings in small containers. This way, your bento stays fresh and tasty until you eat it. You can find the full recipe for a vibrant quinoa bento box that’s easy and nutritious. {{image_4}} You can make your bento box fun and unique. Start by swapping out ingredients. If you're vegan, use chickpeas or avocado. For gluten-free options, choose brown rice instead of quinoa. This keeps it tasty for everyone. Seasonal ingredients also boost flavor. In summer, add fresh corn or zucchini. In fall, think about roasted sweet potatoes or pumpkin. These changes keep your meals fresh and exciting. You can add sauces or dressings to enhance flavors. A splash of teriyaki sauce adds sweetness. A drizzle of lemon juice brings brightness. Experiment with flavors to find what you enjoy most. Mixing ideas from different bento boxes can be fun. Try combining sushi rolls and grain salads. Blend flavors from different cuisines for a tasty twist. Use these best practices: Keep flavors simple. Pair savory with sweet. For example, add sliced apples to a savory dish. This balance creates a rich taste experience. When it comes to leftovers, store them in airtight containers. Use glass containers for easy reheating. Keep sauces separate to avoid sogginess. Enjoy your meal prep with these helpful tips. For a full recipe, check out the vibrant quinoa bento box. It’s a perfect start to your healthy lunch journey! To keep your bento box fresh, choose the right containers. Look for airtight, BPA-free plastic or glass containers. They help keep moisture in and air out, which is key. For meal prep, store the bento box in the fridge. This keeps the food cool and safe. If you plan to eat later in the week, use separate containers for each item. Keep sauces in small containers to avoid sogginess. When reheating, make sure to heat cooked ingredients safely. Remove any cold items like salad or hummus before heating. You can use the microwave or a pan. Heat until warm but not hot to keep flavors intact. Different foods have various safe keep times. Here are some guidelines: - Cooked grains (like quinoa): 3 to 5 days in the fridge. - Fresh veggies: 3 to 7 days, depending on the type. - Hummus: 4 to 7 days in the fridge. Always follow safe food handling practices. Wash your hands and clean surfaces before preparing food. Use separate cutting boards for raw meats and veggies. Watch for signs of spoilage. If food smells off or looks discolored, it's best to throw it away. Soft or mushy veggies indicate they are past their prime. For a delightful bento experience, follow these storage tips closely. You’ll enjoy fresh, tasty meals every time. For more ideas, check the Full Recipe for a vibrant quinoa bento box! For a tasty bento box, choose vegetables that add crunch and flavor. Here are some great options: - Carrots - Cucumbers - Bell peppers - Broccoli - Snap peas These veggies stay fresh and crisp. In spring, go for asparagus and radishes. In fall, try roasted sweet potatoes or Brussels sprouts. Always mix colors for a fun look! You can easily add more filling options to your bento box. Here are some tips: - Add protein like chicken, tofu, or hard-boiled eggs. - Include healthy fats such as nuts or avocado. - Use grains like brown rice or quinoa for extra bulk. - Add legumes like chickpeas or lentils for fiber. These ingredients will keep you satisfied longer. Yes, making bento boxes ahead of time is smart and easy! Here are some tips for meal prep: - Prep your ingredients on the weekend. - Store them in separate containers to keep them fresh. - When ready, assemble the bento box. For safe storage, use airtight containers. Keep them in the fridge for up to three days. Enjoy the convenience of a quick meal anytime! To wrap up, we've explored the key ingredients for a healthy bento lunch, from fresh vegetables to gluten-free options. I shared step-by-step instructions to prepare a tasty quinoa salad and assemble your bento box effectively. We discussed ways to maximize nutrition and presented tips to make your bento visually appealing. Lastly, we covered storage practices to keep your meals fresh. Remember, a well-prepped bento can make lunchtime enjoyable and nutritious. Dive in and create your own delicious bento box!
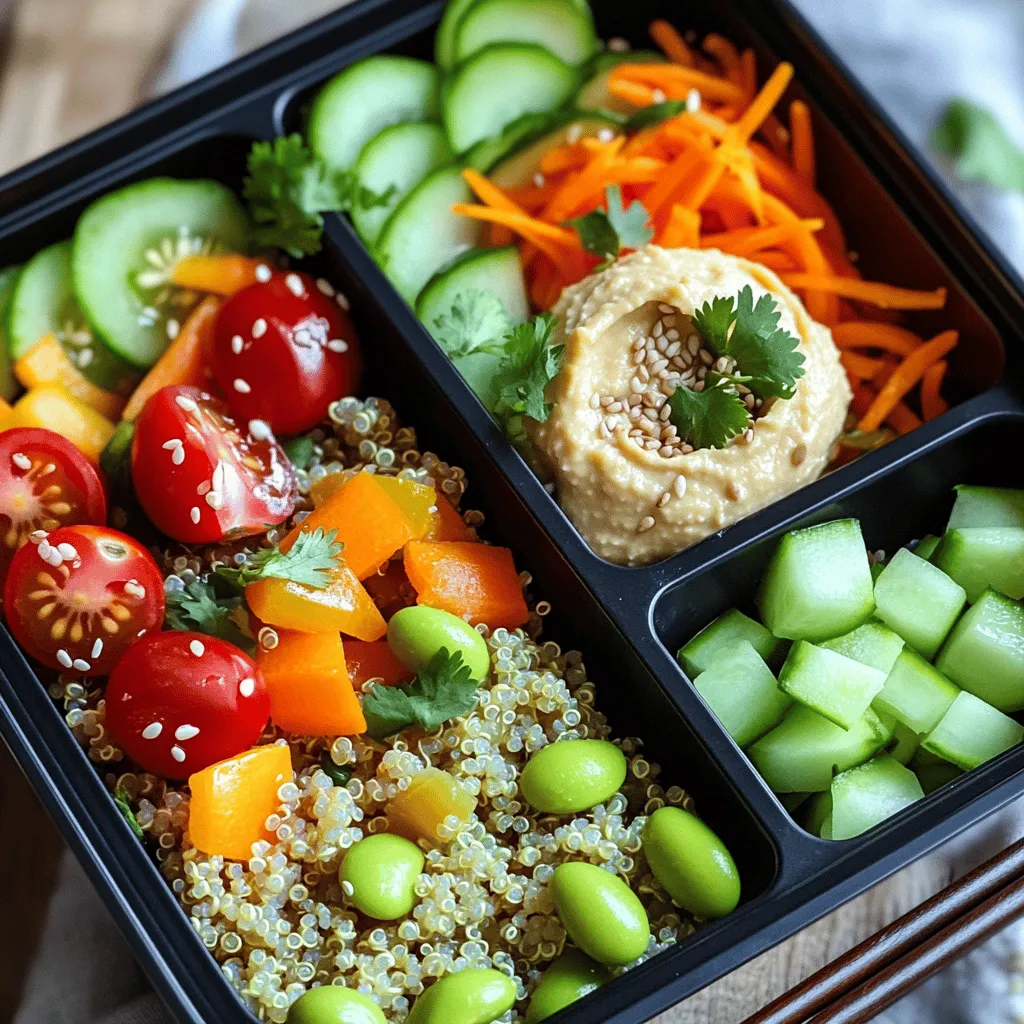
Healthy Bento Lunch Made Easy and Nutritious
Are you tired of boring lunches? A healthy bento box can be your answer! This guide shows you how to create a fun and nutritious
- 4 cups arugula - 1 large apple (Granny Smith or Honeycrisp) - 1/2 cup walnuts - 1/4 cup crumbled feta cheese (optional) - 1/4 cup dried cranberries - Salt and freshly cracked black pepper to taste - 3 tablespoons extra virgin olive oil - 2 tablespoons apple cider vinegar - 1 teaspoon honey To create this simple apple arugula salad, start with fresh produce. I love using arugula. It has a peppery taste that pairs well with sweet apples. I often choose Granny Smith for a tart kick or Honeycrisp for sweetness. Next, I add nuts for crunch. Walnuts add a nice earthy flavor. Feta cheese is optional but provides a creamy touch. Then, I consider dried ingredients. Dried cranberries bring sweetness and color. I finish with salt and fresh black pepper to balance all the flavors. For the dressing, I use extra virgin olive oil. It adds richness. Apple cider vinegar gives the salad a tangy bite. A bit of honey adds sweetness, making it perfect. Every bite of this salad is fresh and flavorful. You can find the full recipe below for detailed steps to make this delightful dish. - Step 1: Combine arugula and apple slices. In a large bowl, add 4 cups of fresh arugula. Then, add 1 large, thinly sliced apple. I love using Granny Smith for a nice tartness. Toss them gently to mix. - Step 2: Add walnuts, feta cheese, and cranberries. Next, fold in 1/2 cup of roughly chopped walnuts, 1/4 cup of optional crumbled feta cheese, and 1/4 cup of dried cranberries. This mix adds great flavor and crunch. - Step 3: Whisk together dressing ingredients. In a small bowl, combine 3 tablespoons of extra virgin olive oil, 2 tablespoons of apple cider vinegar, and 1 teaspoon of honey. Add a pinch of salt and pepper too. - Step 4: Emulsify until well mixed. Whisk the dressing vigorously. You want it to blend into a smooth, thick mix. This will coat the salad nicely. - Step 5: Drizzle dressing over salad mixture. Pour the dressing over the salad. Make sure you cover everything well for the best taste. - Step 6: Toss gently to coat. Use your hands to toss the salad. Be gentle so you don’t bruise the arugula or break the apple slices. - Step 7: Taste and adjust seasoning. Take a bite of your salad. If it needs more flavor, add a bit more salt and pepper to taste. - Step 8: Serve on chilled plates. Serve the salad right away on chilled plates. This keeps it fresh and crisp. Enjoy this fresh and flavorful dish! For the full recipe, check out the earlier section. - Use fresh, quality ingredients for the best taste. Fresh arugula and crisp apples shine in this dish. - Adjust vinegar and honey for personal preference. If you like it tangy, add more vinegar. For sweetness, increase the honey. - Serve in shallow bowls for elegance. A beautiful presentation makes the salad more inviting. - Garnish with whole walnuts and feta. This adds a nice touch and makes your salad look fancy. - Prepare ingredients in advance for quick assembly. Wash and slice your apples and arugula ahead of time. - Store dressing separately until serving. This keeps the salad fresh and prevents sogginess. For the full recipe, check out the recipe section. Enjoy making your Simple Apple Arugula Salad! {{image_4}} You can make this salad heartier by adding protein. Grilled chicken or shrimp works great. Just slice the protein and place it on top. This adds flavor and makes the salad filling. If you want to change the taste, swap the apple for pear. Other seasonal fruits like peaches or berries also taste great. This gives you different flavors and keeps the salad fresh. You can make this salad friendly for all diets. Use vegan feta for a dairy-free option. This keeps the creaminess without any dairy. If you need a nut-free option, substitute nuts with seeds. Pumpkin or sunflower seeds add crunch and taste, too. To keep your apple arugula salad fresh, store the salad and dressing separately. This helps keep the arugula crisp and the apples fresh. If you mix them together, the salad can become soggy. Use a container with a lid for the salad and a small jar for the dressing. You can store the salad in an airtight container in the fridge for up to three days. After that, the taste and texture may change. Make sure to check for any signs of spoilage before you eat it. Salad is best when it is fresh. Avoid reheating it, as that can make the greens wilt and lose their crunch. Enjoy it cold for the best taste! If you're looking for a fresh experience, you can always make a new batch using the [Full Recipe]. Yes, you can use balsamic or red wine vinegar instead. They add a nice flavor. Experiment with what you have at home. Both options work well in this salad. To make the salad vegan, just leave out the feta cheese. You can also use a plant-based dressing. This way, you keep all the great flavors without animal products. This salad pairs well with grilled meats. You can also serve it with crusty bread. Both options make for a tasty and balanced meal. To make the salad heartier, add grains like quinoa or farro. These grains give extra texture and nutrients. You can cook them ahead of time and mix them in for a satisfying meal. For the full recipe, check out the [Full Recipe]. This blog post walks you through a simple, tasty salad recipe. You learned what ingredients to use, from fresh arugula to walnuts and apple slices. I shared easy steps for preparation and tips to enhance flavors. You can try variations to suit your taste or dietary needs. Finally, proper storage can keep leftovers fresh. Enjoy this salad as a healthy side or light meal. It’s a great way to add nutrients and flavor to your diet. Happy cooking!
Simple Apple Arugula Salad Recipe Fresh and Flavorful
Are you ready to elevate your salad game? My Simple Apple Arugula Salad Recipe is fresh, vibrant, and incredibly easy to make. With just a