Salads

- 8 oz rice noodles - 1/4 cup creamy peanut butter - 3 tablespoons soy sauce - 2 tablespoons freshly squeezed lime juice - 1 tablespoon honey or maple syrup - 1 scotch bonnet pepper, finely chopped - 1 bell pepper (red or yellow), thinly sliced - 1 cup shredded carrots - 1 cucumber, julienned - 1/4 cup chopped fresh cilantro - 1/4 cup chopped green onions - 1/4 cup crushed peanuts - Sesame seeds (optional) These ingredients create a balance of flavors and textures. The rice noodles provide a soft base. The peanut butter adds creaminess. The soy sauce brings saltiness, while lime juice adds brightness. Fresh veggies like carrots and cucumbers offer crunch and color. Consider adding more veggies like snap peas, radishes, or broccoli. You can also add proteins like grilled chicken, shrimp, or tofu for a heartier meal. If you want more flavor, include garlic or ginger in the dressing. For a kick, use different hot peppers. These options let you make the salad your own. This salad is vegetarian-friendly, as it contains no meat. To make it gluten-free, use tamari instead of soy sauce. Double-check all labels for hidden gluten in sauces. With these simple swaps, you can enjoy this vibrant dish without worry. First, bring a large pot of water to a rolling boil. Add 8 oz of rice noodles. Cook them according to the package instructions. This usually takes about 4 to 7 minutes. You want them just right, so they are al dente. Once done, drain the noodles. Rinse them under cold running water. This stops the cooking and keeps them firm. Set the noodles aside for later. Next, grab a medium-sized mixing bowl. In it, combine 1/4 cup of creamy peanut butter, 3 tablespoons of soy sauce, and 2 tablespoons of freshly squeezed lime juice. Add 1 tablespoon of honey or maple syrup for a hint of sweetness. If you like spice, chop 1 scotch bonnet pepper finely and add it too. Whisk all these ingredients together until smooth. If the dressing feels too thick, add an extra tablespoon of water. This helps to get your desired consistency. Now, take a large mixing bowl. Add the cooked rice noodles, sliced bell pepper, shredded carrots, and julienned cucumber. Pour the peanut dressing over the noodles and veggies. Using tongs or forks, gently toss everything together. You want to coat each piece well in the dressing. Next, fold in 1/4 cup of chopped fresh cilantro and 1/4 cup of chopped green onions. This adds fresh flavor. Finally, transfer the salad to serving bowls. Top with 1/4 cup of crushed peanuts for crunch. If you like, sprinkle some sesame seeds on top for garnish. Enjoy this fresh and vibrant dish! For the full recipe, check the section above. To cook the rice noodles just right, start with a big pot of boiling water. Place the noodles in the water and stir gently. Follow the package directions for timing. You want them to be al dente, which means they should be firm but not hard. After cooking, drain the noodles well. Rinse them under cold water to stop cooking. This keeps them from getting mushy. If you like heat, the scotch bonnet pepper adds a kick. Start with a small amount and taste as you go. If it’s too spicy, add more peanut butter or honey to balance the heat. You can also use less pepper or choose a milder one, like a jalapeño. Adjusting the spice lets you control the flavor just right for your taste. Fresh herbs make this salad pop! Cilantro and green onions add a bright taste. When you chop the herbs, add them last to keep their flavor fresh. Fold them into the salad gently. You can also try adding mint or basil for a twist. Fresh herbs bring the dish to life and make it even more enjoyable. For the full recipe, check out the details above! {{image_4}} You can add protein to make the salad heartier. Chicken, shrimp, or tofu are great choices. If you use chicken, grill or poach it first. For shrimp, sauté them until pink. Tofu should be firm and cubed. Toss your choice of protein right into the salad. Each option adds flavor and makes it more filling. Feel free to swap or add veggies. Snap peas, radishes, or broccoli work well. You can also use red cabbage for a crunch. If you like greens, add spinach or kale for more color. Just remember to slice them thinly. This keeps the salad light and fresh. Want a different taste? Change up the dressing! For a spicy kick, add more scotch bonnet pepper. You can also mix in sriracha or chili paste. If you prefer a creamier dressing, add more peanut butter or even a bit of coconut milk. These small changes can transform your dish. Use the full recipe to guide your adjustments. To keep your Thai Peanut Noodle Salad fresh, store it in an airtight container. This helps prevent it from drying out or absorbing other flavors. The salad will stay good in the fridge for about three days. If you notice any moisture build-up, drain it before serving. When you want to enjoy leftovers, reheating is simple. Microwaving is quick and easy. Use a microwave-safe bowl and cover it with a damp paper towel. Heat for about 30 seconds, stirring halfway through. This keeps the noodles from getting too dry. You can also serve it cold, as the fresh flavors shine at any temperature. Freezing this salad is not the best choice. The texture of the noodles and veggies changes when thawed. If you must freeze, make sure to store only the noodles and dressing separately. They can last in the freezer for up to one month. When ready to eat, thaw in the fridge overnight and mix with fresh veggies before serving. For the best taste, follow the full recipe for fresh ingredients. Yes, you can make Thai Peanut Noodle Salad ahead of time. This dish holds well in the fridge. I suggest preparing the salad a few hours before serving. Just keep the dressing separate until you are ready to enjoy it. This helps keep the noodles and veggies fresh and crunchy. If you cannot use peanut butter, try almond butter or sunflower seed butter. Both options work well in the dressing. They offer a nice creaminess and flavor. You can also leave out the nut butter entirely and use tahini. This will change the taste but still create a tasty dressing. Yes, you can make this dish vegan easily. Use maple syrup instead of honey for sweetness. Ensure that the soy sauce you choose is vegan-friendly. With these small swaps, you can enjoy a delicious vegan Thai Peanut Noodle Salad. For the full recipe, check the details above. This blog post covered how to make a delicious Thai peanut noodle salad. We explored key ingredients, cooking steps, and tips for the best results. You can customize it with different proteins and veggies. Remember to store leftovers properly for later enjoyment. This dish is easy to adapt for various diets. Try each variation to find your favorite! Enjoy making this simple meal that brings fresh flavors to your table.
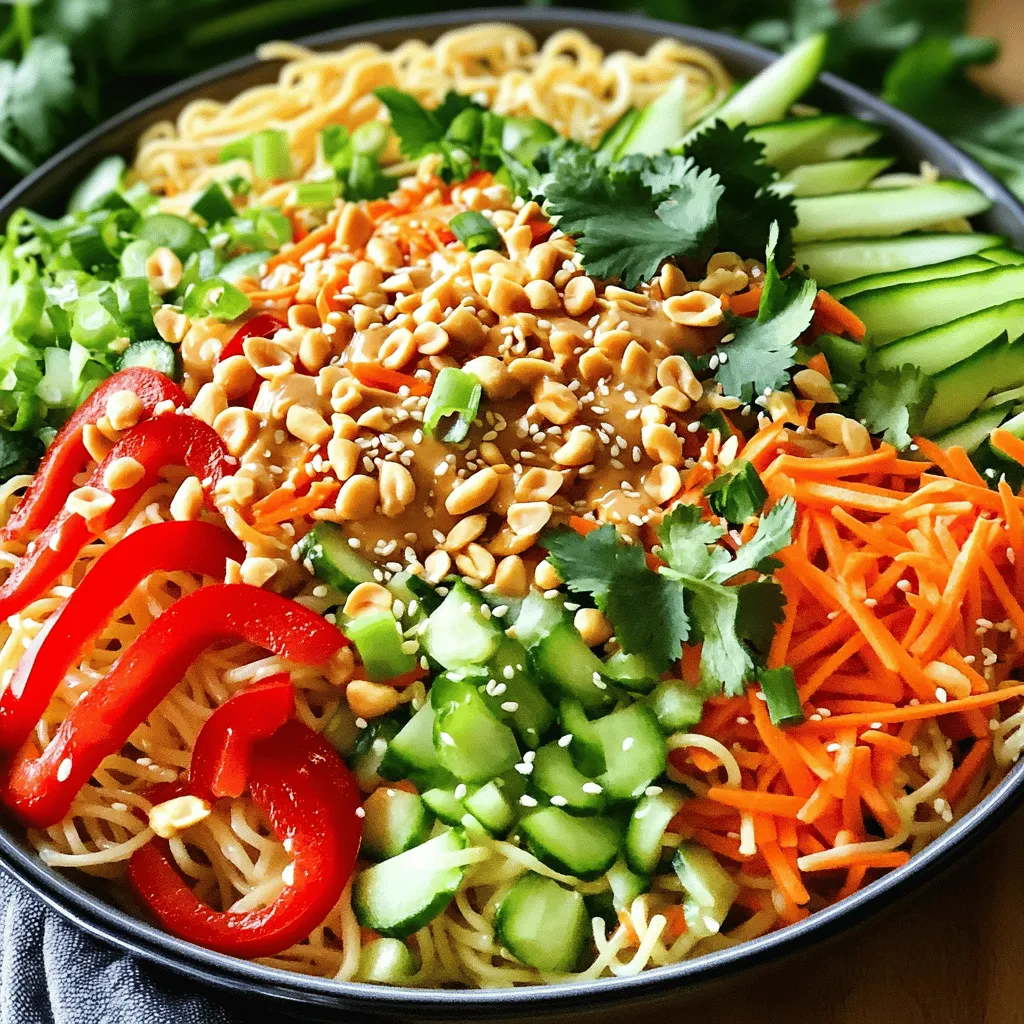
Thai Peanut Noodle Salad Vibrant and Fresh Delight
If you’re craving something fresh and exciting, the Thai Peanut Noodle Salad is a must-try! Packed with vibrant flavors and creamy peanut dressing, this dish
When making Italian tortellini pasta salad, you need some key ingredients to create a fresh and vibrant dish. Here’s what you’ll need: - 12 oz cheese tortellini - 1 cup cherry tomatoes, halved - 1 cup cucumber, diced - 1/2 cup bell pepper (red or yellow), diced - 1/4 cup red onion, finely chopped - 1/2 cup black olives, sliced - 1/3 cup Italian dressing - 1/4 cup fresh basil, finely chopped - Salt and freshly cracked pepper to taste - Grated Parmesan cheese for garnish First, the cheese tortellini is the star of this dish. It adds a rich and delicious flavor. You can find it in most grocery stores, fresh or frozen. Next, fresh vegetables bring color and crunch. The cherry tomatoes add sweetness, while the cucumber offers a cool bite. The diced bell pepper and finely chopped red onion add a nice zing. Don’t forget the black olives for that briny touch. For the dressing, Italian dressing ties everything together. It adds a zesty flavor that brightens the salad. Fresh basil gives a nice aroma and taste. Finally, a sprinkle of grated Parmesan cheese on top adds creaminess and flavor. With these ingredients, you create a salad that is fresh, flavorful, and perfect for any meal. {{ingredient_image_2}} First, boil salted water in a large pot. Once it reaches a rolling boil, add 12 oz of cheese tortellini. Cook the tortellini until they are al dente, which means they should be tender but still firm. This usually takes about 3 to 5 minutes, depending on the brand. Be sure to follow the package instructions for the best results. After cooking, drain the tortellini in a colander. Rinse them under cold water right away. This stops the cooking process and cools them down. You want to keep them from getting mushy. Next, grab a spacious mixing bowl. Add in your fresh vegetables: 1 cup of halved cherry tomatoes, 1 cup of diced cucumber, 1/2 cup of diced bell pepper (you can use red or yellow), 1/4 cup of finely chopped red onion, and 1/2 cup of sliced black olives. Stir these gently to mix them well. Now it's time to add the cooled tortellini. Carefully place them in the bowl with the veggies. Use a spatula to toss everything together gently. This way, you won’t break the tortellini while mixing. Drizzle 1/3 cup of Italian dressing over the salad. Add 1/4 cup of finely chopped fresh basil, along with salt and freshly cracked pepper to taste. Toss everything together carefully to ensure the dressing coats the tortellini and vegetables evenly. Cover the bowl with plastic wrap or a lid. Place the salad in the refrigerator to chill for at least 30 minutes. This helps all the flavors blend and enhance. Before serving, give it one last gentle toss. Transfer the salad to a serving dish and sprinkle with grated Parmesan cheese for that extra burst of flavor. Enjoy! To make the best tortellini salad, you need to focus on two main things: pasta texture and flavor balance. - Ensuring the right pasta texture: Cook the cheese tortellini until it is al dente. This means it should be firm but tender. If you overcook it, the tortellini will turn mushy. Rinse it under cold water right after cooking. This stops the cooking process and helps keep the texture just right. - Ingredients for a balanced flavor profile: Use fresh vegetables like cherry tomatoes, cucumber, bell peppers, and red onion. These add crunch and freshness. Black olives gives a nice salty touch. Don't forget the Italian dressing, fresh basil, and a sprinkle of Parmesan cheese. These ingredients work together to create a bright and tasty salad. Now, let’s talk about how to serve this lovely salad. - Presentation tips for gatherings: When you serve the salad, use a large, colorful bowl. Arrange the tortellini and veggies in a way that looks inviting. A sprinkle of Parmesan cheese on top adds a nice finishing touch. - Pairing with additional dishes: This salad pairs well with grilled chicken or fish. You can also serve it alongside crusty bread for a complete meal. If you want something lighter, serve it with a simple green salad. Pro Tips Cook Tortellini Al Dente: Be sure to follow the package instructions for cooking time to achieve perfect al dente tortellini, which will hold their shape and texture in the salad. Use Fresh Ingredients: For the best flavor, opt for fresh vegetables and herbs. Fresh basil adds a vibrant taste that dried herbs cannot replicate. Chill for Flavor: Allowing the salad to chill for at least 30 minutes in the refrigerator lets the flavors meld beautifully, enhancing the overall taste. Customize Your Dressing: Feel free to adjust the amount of Italian dressing to your preference, or try making your own for a personal touch! {{image_4}} Gluten-free substitutes for tortellini are easy to find. You can use rice or corn-based tortellini. These options taste great and work well in the salad. Check local stores or online for these pasta types. You can also make your own gluten-free dough at home. For vegan modifications, you can skip the cheese tortellini. Instead, use a plant-based tortellini filled with veggies or tofu. This keeps the dish fresh and healthy. Also, choose a vegan Italian dressing made from olive oil and vinegar. This way, you enjoy all the flavors without any animal products. Adding proteins like chicken or shrimp can boost this salad's taste. Cook the chicken or shrimp separately and add it to the mix. This step makes the meal more filling and rich in flavor. You can also use grilled chicken for a smoky touch. Incorporating other herbs or spices can lift the salad's taste. Try adding oregano or parsley for a fresh twist. A sprinkle of red pepper flakes adds a bit of heat. These simple changes make each bite exciting and delicious. Enjoy experimenting with flavors! To keep your Italian tortellini pasta salad fresh, store it in the fridge. It lasts up to three days. Use an airtight container to keep it tasting great. If you have leftovers, make sure to seal the container tightly. This helps prevent any unwanted odors from other foods. This salad is best served cold, so reheating is not needed. If you want to warm it up, do so gently in the microwave. Heat only a portion, as the salad tastes best cold. Always check for freshness before serving leftovers. If the smell or look seems off, it's safer to toss it. Can I make this salad ahead of time? Yes, you can make this salad ahead of time. It tastes even better after resting. Chill it in the fridge for at least 30 minutes. You can prepare it up to a day in advance. Just remember to toss it again before serving. What other vegetables can I add? You can add many vegetables to this salad. Try adding spinach, arugula, or zucchini. Broccoli or carrots also work well. Feel free to mix and match based on what you have. Fresh herbs like parsley or dill can also add flavor. How do I adjust the recipe for larger servings? To adjust for more servings, simply double or triple the ingredients. Use 24 oz of tortellini for 12 servings. You can increase the vegetables and dressing in the same ratio. Just make sure your bowl is big enough to mix everything well. In this article, I covered the key ingredients for Italian tortellini pasta salad, how to prepare it, and tips for enhancing the flavor. Remember to cook the tortellini just right and mix in fresh veggies for a tasty dish. You can customize your salad with dietary choices and store it properly for the best taste. With these simple steps and tips, you can create a dish that is perfect for any gathering. Enjoy making your own tortellini salad and impress your family and friends!
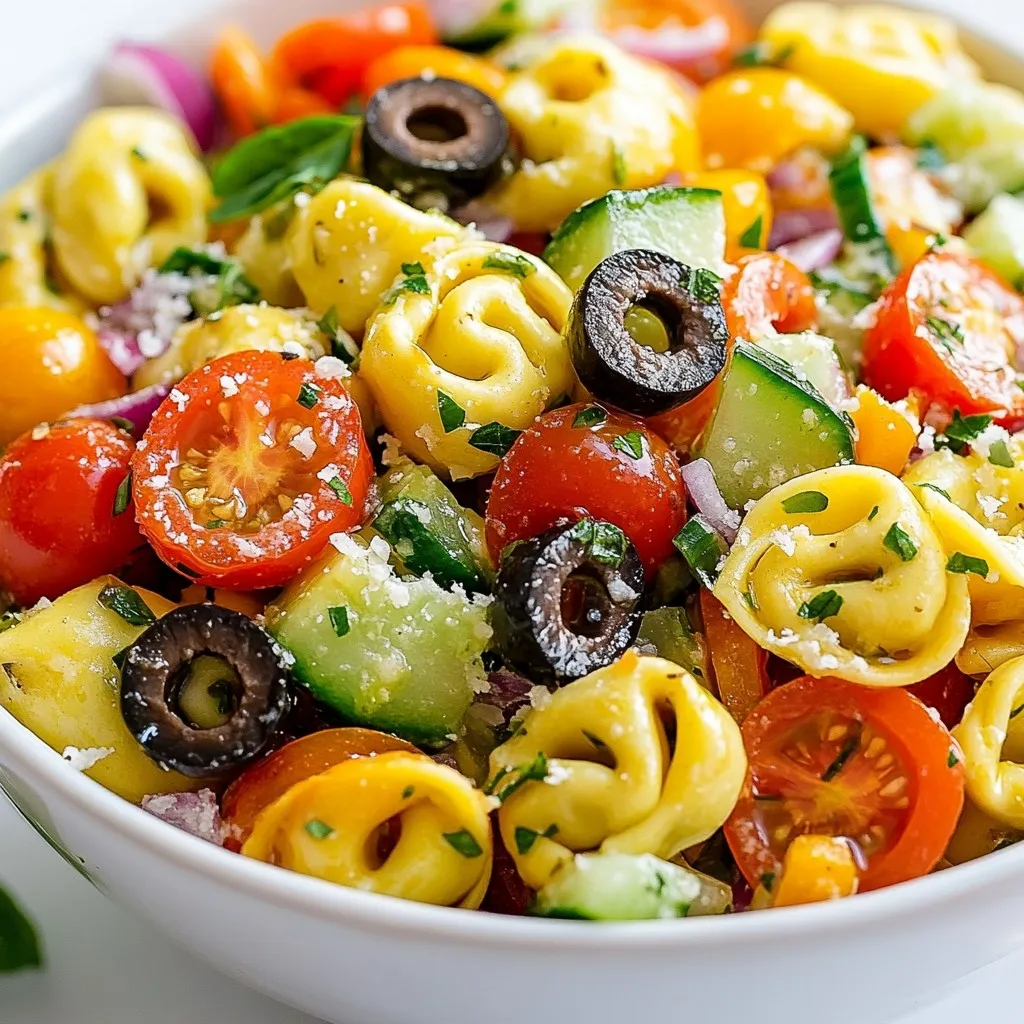
Italian Tortellini Pasta Salad Fresh and Flavorful Dish
Looking for a dish that bursts with flavor and freshness? My Italian Tortellini Pasta Salad is just what you need. This simple recipe combines cheese
- 1 can (15 oz) chickpeas, thoroughly rinsed and drained - 1 large ripe avocado, diced into bite-sized pieces - 1 cup cherry tomatoes, halved for a burst of sweetness - 1 small cucumber, peeled and diced for crunch - 1/2 red onion, finely chopped for a zesty kick - 1/2 cup crumbled feta cheese for creaminess - 1/4 cup fresh parsley, finely chopped for a herbal note - 3 tablespoons extra virgin olive oil for richness - 2 tablespoons freshly squeezed lemon juice for brightness - Salt and freshly cracked black pepper to taste - 1/2 teaspoon red pepper flakes (optional, for a hint of heat) This salad is not just tasty; it is also good for you. Each serving is packed with protein, fiber, and healthy fats. Here’s a quick look at what you get per serving: - Calories: About 250 - Protein: 8g - Fiber: 10g - Healthy Fats: 15g - Carbs: 20g Chickpeas provide protein and fiber. Avocado adds healthy fats. Feta gives a creamy touch. Tomatoes, cucumber, and parsley boost vitamins and minerals. You can change things up based on what you have. Here are some options: - Use black beans instead of chickpeas for a different flavor. - Swap feta with vegan cheese for a dairy-free option. - Try lime juice in place of lemon for a new twist. - Replace red onion with green onion if you prefer a milder taste. - Use spinach instead of parsley for a different herb taste. These swaps keep the dish fresh and fun while still being healthy! {{ingredient_image_2}} Start by rinsing and draining one can of chickpeas. This helps remove extra salt and liquid. Next, grab a large bowl and add the chickpeas. Now, dice one large avocado into bite-sized pieces. Add the avocado to the bowl. Halve one cup of cherry tomatoes and add them for sweetness. Peel and dice one small cucumber for a nice crunch. Chop half a red onion finely and add it for a zesty kick. With a gentle touch, stir all the ingredients in the bowl. Be careful not to mash the avocado. You want it to stay chunky. This adds a creamy texture to the salad. Once mixed, it should look colorful and fresh. In a small bowl, whisk together three tablespoons of extra virgin olive oil and two tablespoons of freshly squeezed lemon juice. Add salt and black pepper to taste. If you like heat, toss in half a teaspoon of red pepper flakes. Whisk until everything blends together smoothly. Drizzle the dressing over the salad mixture. Gently toss the salad to coat all the ingredients without breaking the avocado. Now, fold in a quarter cup of finely chopped fresh parsley for extra freshness. Taste the salad and adjust the seasoning if needed. Let it sit at room temperature for about ten minutes. This time lets the flavors meld together nicely. Enjoy your vibrant and tasty Chickpea Feta Avocado Salad! Keeping your avocado fresh is easy. First, use lemon juice. Squeeze some over the cut avocado. The acid slows browning. If you have leftover avocado, store it in an airtight container. Place it with the pit still inside. This helps keep it green longer. Wrap it in plastic wrap if you want extra protection. Balancing flavors makes your salad shine. You want a mix of salty, sweet, and tangy. The feta adds saltiness, while the cherry tomatoes bring sweetness. The lemon juice gives a bright, tangy kick. Always taste as you go. Add a pinch of salt or a dash of pepper if needed. If you like heat, sprinkle in some red pepper flakes. This adds a nice zing! Want to save time? Prep your ingredients ahead. Chop the veggies and store them in the fridge. You can also drain your chickpeas a day early. When it’s time to make the salad, just mix everything. Another trick is to use pre-crumbled feta. This cuts down on prep time too. Enjoy your quick and tasty salad! Pro Tips Choose Ripe Avocados: Make sure your avocados are perfectly ripe for the best creamy texture. They should yield slightly to gentle pressure when squeezed. Season Gradually: Start with a little salt and pepper, then adjust to taste. You can always add more, but it's hard to fix an overly salty dish. Experiment with Herbs: Feel free to swap parsley for other fresh herbs like cilantro or basil for a different flavor profile. Perfect for Meal Prep: This salad keeps well for a day in the fridge, making it a great option for meal prepping. Just keep the dressing separate until ready to serve! {{image_4}} You can easily boost the protein in your Chickpea Feta Avocado Salad. Here are some great choices: - Grilled Chicken: Dice cooked chicken for a hearty touch. - Shrimp: Add cooked shrimp for a seafood twist. - Tofu: Use firm tofu for a plant-based option. - Quinoa: Mix in cooked quinoa for extra fiber and protein. Each of these options adds a new flavor and texture. Try them out to fit your taste! Seasonal swaps can keep this salad fresh and exciting. Use what's in season: - Spring: Add fresh peas for a sweet crunch. - Summer: Toss in diced bell peppers for color and sweetness. - Fall: Include diced apples or pears for a sweet contrast. - Winter: Use roasted butternut squash for warmth and richness. These ingredients make the salad more fun and keep it vibrant all year round! You can make this salad vegan or dairy-free without losing flavor. Here are some swaps: - Vegan Feta: Use a plant-based feta for creaminess. - Nutritional Yeast: Sprinkle this for a cheesy flavor. - Avocado: If you want more creaminess, add more avocado. These swaps keep the essence of the dish while catering to different diets. You won't miss the dairy at all! To keep your Chickpea Feta Avocado Salad fresh, store it in an airtight container. Make sure to cover it tightly. This way, the salad lasts up to three days in the fridge. If the avocado starts to brown, you can add a splash of lemon juice. This helps keep it green and bright. I don't recommend freezing this salad. The texture of the avocado and feta changes when frozen. They become mushy and lose their charm. Instead, enjoy the salad fresh. If you have extra chickpeas, you can freeze those separately. They can easily be added to future meals. If you happen to have a small portion left, simply let it sit at room temperature for about 10 minutes. This helps it warm up slightly. Avoid using a microwave; it can ruin the creamy texture of the avocado. Always serve the salad fresh for the best taste! Yes, you can make this salad ahead of time. Prepare it and store it in the fridge. However, I suggest adding avocado just before serving. This keeps the avocado fresh and green. If the salad sits too long, the avocado can turn brown. This salad pairs well with many dishes. You can serve it with grilled chicken or fish for protein. It also goes well with pita bread or crackers for added crunch. You can use it as a side for a light lunch or dinner. To add some heat, mix in red pepper flakes. You can also use fresh jalapeños or a dash of hot sauce. Start with a little, then taste it. Adjust the spice level to fit your taste. Enjoy the kick it adds! In this blog post, we explored how to make a Chickpea Feta Avocado Salad. We discussed the complete ingredients and their nutrition. You learned how to prepare the salad step-by-step, from making the dressing to mixing it all together. Tips on keeping avocados fresh and balancing flavors help you enhance your dish. We also covered healthy variations and storage options for leftovers. With these insights, you can easily create a delicious and fresh salad any time. Enjoy your cooking!
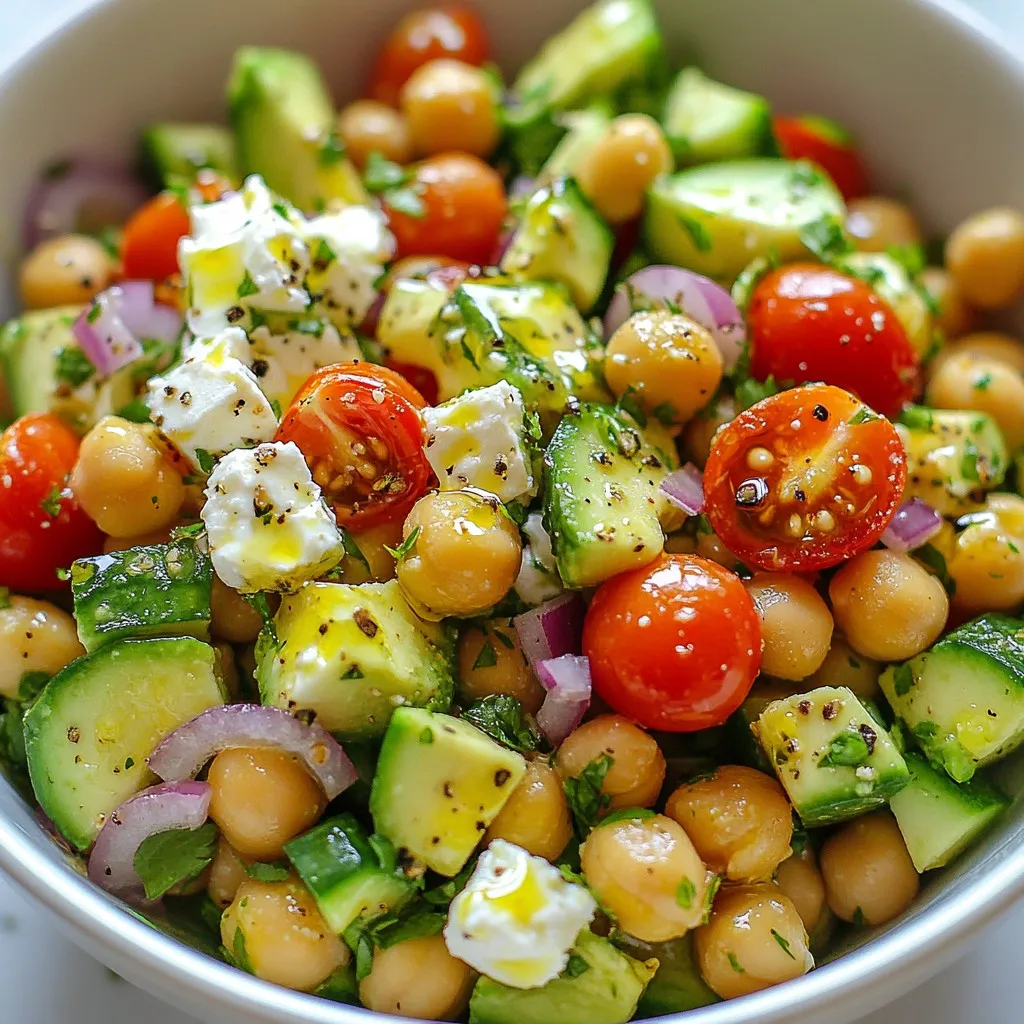
Chickpea Feta Avocado Salad Flavorful and Fresh Mix
Are you ready to enjoy a fresh and tasty dish? My Chickpea Feta Avocado Salad is the perfect mix of flavors and textures. Packed with
To make this tasty Mediterranean quinoa salad, you will need: - 1 cup quinoa, thoroughly rinsed - 2 cups vegetable broth or water - 1 cup cherry tomatoes, halved - 1 cucumber, diced into bite-sized pieces - 1/2 red onion, finely chopped - 1/2 cup Kalamata olives, pitted and halved - 1/2 cup crumbled feta cheese - 1/4 cup fresh parsley, chopped - 1/4 cup fresh mint, chopped - 3 tablespoons extra virgin olive oil - 2 tablespoons fresh lemon juice - 1 teaspoon dried oregano - Salt and freshly ground black pepper to taste You can swap some ingredients if needed: - Quinoa: You can use farro or couscous for a different texture. - Feta Cheese: Try goat cheese or a vegan cheese for a dairy-free option. - Kalamata Olives: Black olives or green olives also work well. - Fresh Herbs: Use basil or dill if parsley and mint aren’t available. This salad is not only tasty but also healthy. Here’s what you get per serving (based on 4 servings): - Calories: About 250 - Protein: 8g - Carbohydrates: 30g - Fiber: 5g - Fat: 12g This dish gives you good energy, fiber, and healthy fats. Enjoy the freshness and flavor while knowing you're eating well! {{ingredient_image_2}} To cook quinoa, start with 1 cup of rinsed quinoa. Rinsing removes the bitter coating. In a medium saucepan, add 2 cups of vegetable broth or water. Bring it to a boil over medium-high heat. Once boiling, add the quinoa. Reduce the heat to low and cover it with a lid. Let it simmer for about 15 minutes. You want all the liquid absorbed. After that, take it off the heat and let it rest for 5 minutes. This helps the quinoa finish cooking. Fluff the quinoa gently with a fork. Set it aside to cool completely. In a large mixing bowl, combine the cooled quinoa with the following ingredients: - 1 cup cherry tomatoes, halved - 1 cucumber, diced into bite-sized pieces - 1/2 red onion, finely chopped - 1/2 cup Kalamata olives, pitted and halved - 1/2 cup crumbled feta cheese - 1/4 cup fresh parsley, chopped - 1/4 cup fresh mint, chopped Gently fold the ingredients together. Make sure everything is evenly mixed. You want all those bright colors and fresh flavors to blend. For the dressing, take a small bowl. Whisk together these ingredients: - 3 tablespoons extra virgin olive oil - 2 tablespoons fresh lemon juice - 1 teaspoon dried oregano - Salt and freshly ground black pepper to taste This dressing adds a zesty kick. Drizzle it over the quinoa salad mixture. Use a spatula to toss the salad gently. Ensure all ingredients are well-coated with the dressing. Taste the salad. If needed, add more salt and pepper. Allow it to sit at room temperature for about 15 minutes. This resting time helps the flavors meld beautifully. To fluff quinoa, follow these simple steps. First, rinse the quinoa well. This removes the bitter coating. After cooking, let it sit covered for five minutes. This step helps the quinoa absorb steam. Then, use a fork to gently stir the grains. This separates them and makes them light and fluffy. You can serve this salad in many ways. Try placing it in a glass bowl or on a large platter. Add some extra herbs on top for color. A sprinkle of feta cheese adds a nice touch. This salad pairs well with grilled meats or fish. You can also serve it as a light lunch. To boost the flavors, use fresh herbs like parsley and mint. Their brightness lifts the dish. A splash of lemon juice adds zest. You can also add more spices like cumin or paprika. For a spicy kick, consider red pepper flakes. Always taste and adjust the seasoning. This ensures the dish meets your flavor preference. Pro Tips Choose the Right Quinoa: For a nuttier flavor and better texture, opt for tri-color quinoa. It adds visual appeal and a delightful crunch. Chill Before Serving: Allow the salad to chill in the refrigerator for at least 30 minutes before serving. This enhances the flavor and makes it more refreshing. Customize Your Veggies: Feel free to add or substitute other vegetables like bell peppers or radishes for extra color and crunch. Use Fresh Herbs: Always use fresh herbs instead of dried for a more vibrant flavor. Fresh parsley and mint make a significant difference in taste. {{image_4}} To make a vegan version, leave out the feta cheese. Replace it with avocado or a vegan cheese. You can add more beans too. Chickpeas work great for added protein. This keeps the salad hearty and filling. You can also mix in some sunflower seeds for crunch. Toss in a handful of arugula for a peppery bite. If you want extra protein, add grilled chicken. Use about one cup of sliced chicken breast. Season the chicken with lemon juice, salt, and pepper before grilling. Slice it thin and layer it over the salad. This adds a nice depth of flavor and makes it a full meal. You can also marinate the chicken in olive oil and herbs for extra taste. Feel free to get creative with your veggies! Add bell peppers, zucchini, or even artichoke hearts. Try roasting the vegetables for added flavor. You can also use frozen peas or corn for a sweet pop. Just make sure to chop them into similar sizes for even mixing. This variation keeps the salad fresh and colorful. After enjoying your Mediterranean quinoa salad, store leftovers in an airtight container. This helps keep the salad fresh. Place it in the fridge. It will stay good for about 3 to 5 days. When you’re ready to eat, check for any signs of spoilage before serving. You can freeze quinoa salad, but it may change texture. To freeze, place it in a freezer-safe container. Be sure to leave some space at the top for expansion. It can last up to 3 months in the freezer. When ready to eat, thaw in the fridge overnight before serving. To reheat, gently warm the salad in a pan over low heat. Stir often to avoid burning. You can also use the microwave. Heat in short bursts at medium power. Avoid overheating, as it can make the salad mushy. For best results, serve at room temperature. Yes, you can make this salad ahead of time. It tastes even better after the flavors mix. I recommend making it a few hours before serving. Just keep it in the fridge. This way, it stays fresh and cool. If you don't like feta, try using goat cheese. It has a creamy texture and tangy taste. You can also use a dairy-free cheese if you want a vegan option. Tofu can work too if you season it right. Yes, quinoa salad is very healthy! Quinoa is a great source of protein and fiber. It helps you feel full longer. The veggies add vitamins and minerals. The olive oil provides healthy fats. This dish is light and nourishing. Enjoy it as a meal or a side! This post covered how to make a delicious Mediterranean quinoa salad. We explored the ingredients, step-by-step cooking, and helpful tips. You learned about variations, storage, and answered common questions. Overall, quinoa salad is easy to make and very tasty. With the right ingredients and a few tricks, you can create a dish that impresses everyone. Enjoy experimenting with your own flavors and make it your own!
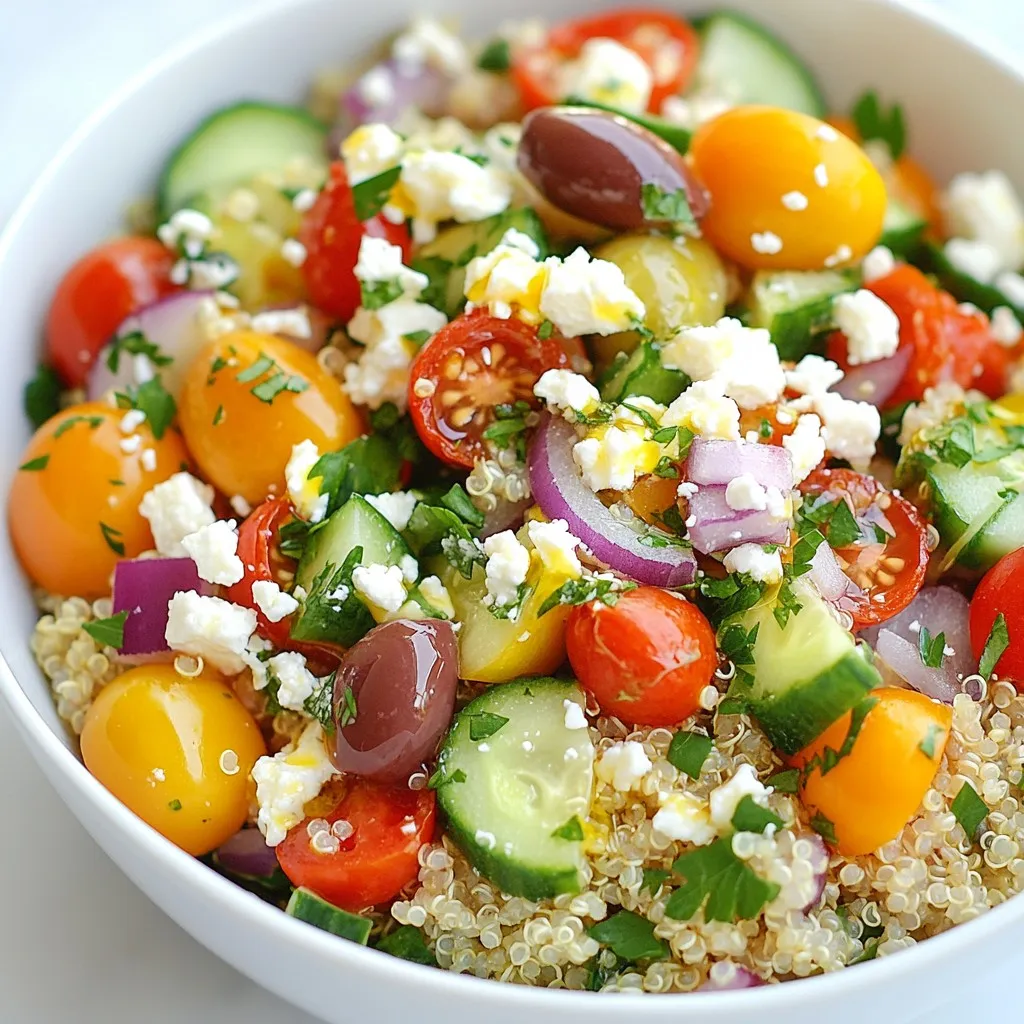
Mediterranean Quinoa Salad Fresh and Flavorful Dish
If you’re looking for a fresh and healthy dish, try my Mediterranean Quinoa Salad! This vibrant recipe bursts with flavors and is easy to make.
- 2 cups cooked chicken breast, shredded - 1 cup plain Greek yogurt - 1/2 cup celery, finely chopped - 1/2 cup red grapes, halved - 1/4 cup almonds, slivered or chopped - 1/4 cup green onion, thinly sliced - 2 tablespoons Dijon mustard - 1 tablespoon honey - 1 tablespoon fresh lemon juice - Salt and pepper to taste - Fresh dill or parsley leaves for garnish In this Greek yogurt chicken salad, each ingredient plays a key role in flavor and texture. The cooked chicken breast provides a solid protein base. Greek yogurt is a star here, adding creaminess while keeping the dish healthy. I love using finely chopped celery for a nice crunch, and halved red grapes bring a sweet burst. You can customize this salad with optional add-ins. Almonds add a nice crunch, while green onions bring a fresh flavor. The dressing is simple yet flavorful. Mixing Dijon mustard, honey, lemon juice, salt, and pepper with Greek yogurt gives it a tangy taste. Fresh herbs like dill or parsley make it even better. They add color and a fresh aroma, making your dish look as good as it tastes. {{ingredient_image_2}} - Start with a large mixing bowl. - Add 2 cups of shredded chicken. - Next, include 1/2 cup of finely chopped celery. - Toss in 1/2 cup of halved red grapes. - Sprinkle 1/4 cup of slivered or chopped almonds. - Mix gently to combine all these tasty ingredients. - In another bowl, whisk 1 cup of plain Greek yogurt. - Add 2 tablespoons of Dijon mustard for a nice kick. - Include 1 tablespoon of honey for sweetness. - Squeeze in 1 tablespoon of fresh lemon juice. - Season with salt and pepper to taste. - Mix until your dressing is smooth and well blended. - Drizzle the yogurt dressing over the chicken mixture. - Use a spatula to fold the dressing in gently. - Make sure every piece gets coated without over-mixing. - Taste your salad and adjust the seasoning if needed. - You can serve it right away or chill for 30 minutes. - Chilling helps the flavors blend even better! To make your Greek yogurt chicken salad shine, adjust the seasoning. Start with salt and pepper. Mix in a little more if needed. Taste as you go! You can add a pinch of garlic powder or onion powder for more depth. Fresh herbs also boost flavor. Try adding dill or parsley to brighten it up. Presentation makes a big difference. Serve the salad in a chilled bowl. It keeps the salad fresh and cool. For a pop of color, garnish with fresh dill or parsley leaves. You can also serve it on a bed of crisp lettuce. Whole-grain crackers on the side add a nice crunch. Refrigerating your chicken salad before serving enhances the taste. Letting it sit for about 30 minutes allows the flavors to blend. This makes each bite more delicious. The yogurt dressing soaks into the chicken and veggies, making it even better. Trust me, you’ll notice the difference! Pro Tips Use Fresh Ingredients: Opt for fresh herbs and vegetables to enhance the flavor and texture of your chicken salad. Adjust the Sweetness: Feel free to modify the amount of honey based on your taste preference or substitute it with maple syrup for a different flavor. Make it Ahead: Prepare your chicken salad a day in advance to allow the flavors to meld together, making it even more delicious. Experiment with Add-ins: Try adding diced apples, cranberries, or even a hint of curry powder for a unique twist on the classic chicken salad. {{image_4}} You can easily change some ingredients in this salad. If you want a dairy-free option, try using a plant-based yogurt. For the chicken, rotisserie chicken is a great time-saver. You can also use canned chicken if you’re in a hurry. If nuts aren’t your thing, sunflower seeds work well too. Adding herbs or spices can bring new life to your salad. Try mixing in fresh dill or parsley for brightness. If you love a little heat, add a dash of cayenne pepper. For a sweet twist, consider adding chopped apples or dried cranberries. These additions can transform the taste and make it exciting. If you want a lighter version, use low-fat Greek yogurt instead of regular. You can also skip the nuts for a nut-free option. If you’re watching your sugar, reduce the honey or use a sugar substitute. These changes keep the salad healthy while still tasting great. To store Greek Yogurt Chicken Salad, place it in a clean, airtight container. This helps keep it fresh. Make sure to seal it tightly to avoid any air getting in. Store it in the fridge right after you make it. This keeps the salad cold and safe to eat. Greek Yogurt Chicken Salad lasts about 3 to 5 days in the fridge. After that, it may lose its taste and texture. Always check for any off smell or changes in color. If you see or smell anything strange, it’s best to throw it away. I do not recommend freezing Greek Yogurt Chicken Salad. The yogurt can separate when thawed, which affects the texture. If you have leftovers, it’s best to enjoy them fresh within a few days. If you want to prepare it ahead, make the chicken salad and store the dressing separately. Then mix them right before serving for the best results. Yes, you can use rotisserie chicken. It makes prep super easy. Just shred the chicken from the rotisserie and add it to your bowl. This saves time and effort. Plus, rotisserie chicken is juicy and full of flavor. It’s a great shortcut for busy days when you want a quick meal. Greek yogurt is often healthier than mayonnaise. It has less fat and fewer calories. Greek yogurt is high in protein, which helps keep you full. It also contains probiotics, which are good for your gut. Using Greek yogurt adds creaminess without the heaviness of mayo. It’s a tasty swap that boosts nutrition. You can keep the chicken salad in the fridge for about 3 to 4 days. Make sure to store it in an airtight container. This will help keep it fresh and safe to eat. If you see any changes in color or smell, it’s best to toss it. Always practice food safety for a healthy meal. This blog post shared a simple and tasty Greek yogurt chicken salad recipe. You learned about the main ingredients, how to mix them, and how to make your own dressing. I also covered tips for great flavor and ways to store your salad. Remember, you can customize the recipe to your taste or dietary needs. Enjoy your delicious chicken salad, made just how you like it!
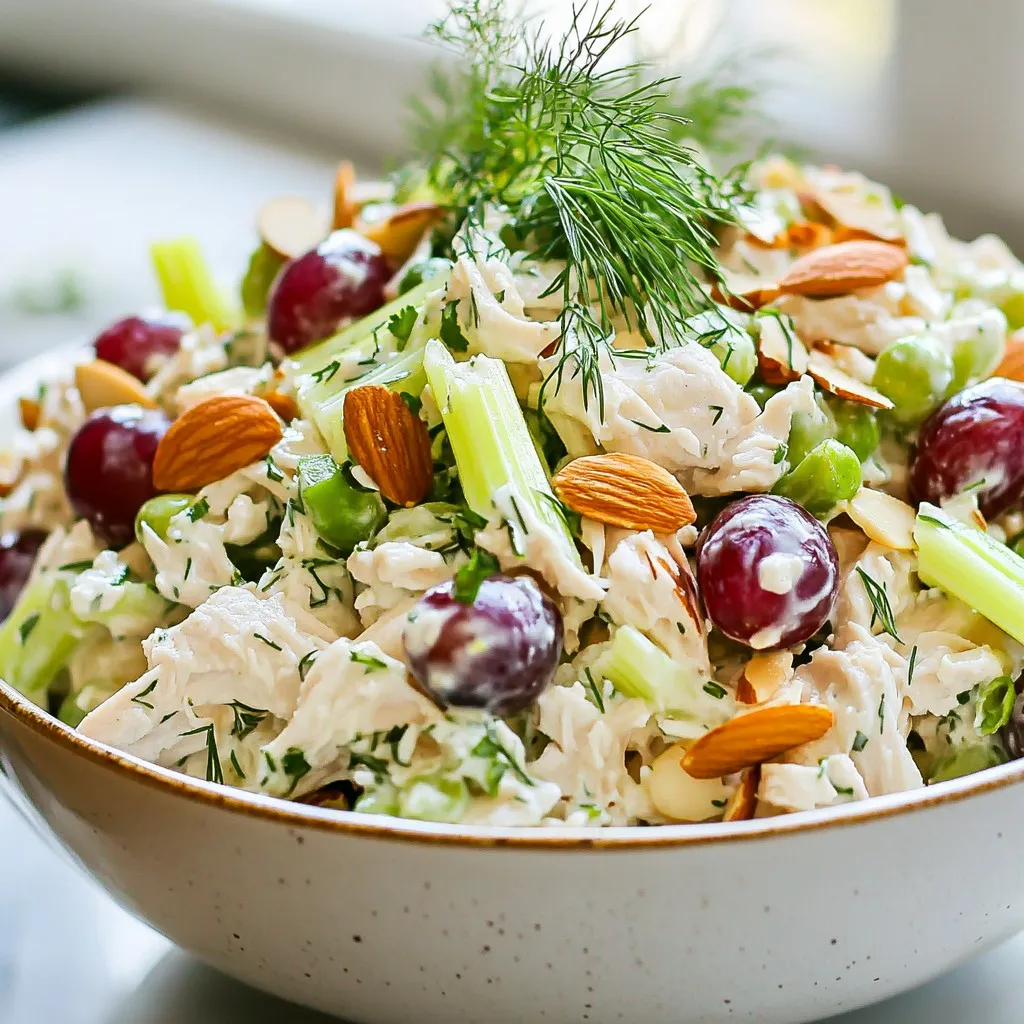
Greek Yogurt Chicken Salad Healthy and Tasty Option
Looking for a quick, healthy meal? Greek yogurt chicken salad is your answer! This tasty dish is easy to make and packed with flavor. I’ll