Dinner

To make a delicious creamy spinach mushroom lasagna, you'll need the following ingredients: - 9 lasagna noodles - 2 cups fresh spinach, roughly chopped - 2 cups mushrooms, sliced (preferably cremini or button) - 1 medium onion, finely diced - 3 cloves garlic, minced - 2 cups ricotta cheese - 1 cup cottage cheese - 1 cup mozzarella cheese, grated - 1/2 cup Parmesan cheese, finely grated - 2 cups marinara sauce (store-bought or homemade) - 1 tablespoon olive oil - 1 teaspoon dried oregano - 1 teaspoon dried basil - Salt and freshly cracked black pepper, to taste These ingredients create layers of flavor. The noodles hold everything together. The spinach and mushrooms add great taste. The cheeses give that creamy texture we love. You can mix and match these ingredients based on your taste. If you want more veggies, add zucchini or bell peppers. If you prefer a meaty lasagna, ground meat works well too. {{ingredient_image_2}} - Preheat the oven to 375°F (190°C). - Cook the lasagna noodles al dente according to the package instructions. I start by preheating my oven. This step gets the oven ready for baking. While it heats up, I cook the lasagna noodles. I make sure they are al dente. This means they are firm but not hard. I drain them and set them aside. I also keep them from sticking together. - Heat olive oil in a skillet. - Sauté onion until translucent. - Add garlic and mushrooms, cooking until tender. Next, I heat olive oil in a skillet over medium heat. Once hot, I add the finely diced onion. I cook it until it turns translucent. This takes about five minutes. Then, I toss in minced garlic and sliced mushrooms. I keep stirring until the mushrooms are tender. This usually takes around five to seven minutes. Any liquid from the mushrooms will evaporate, leaving behind great flavor. - Stir in spinach and seasonings. - Mix together cheese mixtures. After cooking the veggies, I add the chopped spinach. I also include dried oregano and dried basil. I season everything with salt and black pepper. I cook this for another two to three minutes. The spinach wilts and brightens in color. In a separate bowl, I mix ricotta cheese, cottage cheese, and half of the mozzarella cheese. I stir until smooth and well mixed. - Layering process with sauce and noodles. - Final layer and cheese topping. Now it’s time to assemble the lasagna! I spread a thin layer of marinara sauce at the bottom of a 9x13 inch baking dish. This layer keeps the noodles from sticking. I lay three lasagna noodles side by side over the sauce. Then, I spread half of the ricotta mixture over the noodles. Next, I add half of the mushroom-spinach mixture. I drizzle a third of the marinara sauce over this layer. I repeat the process one more time. For the final layer, I place the last three noodles on top. I spread the remaining marinara sauce over them. Then, I sprinkle the rest of the mozzarella cheese and all of the Parmesan cheese on top. - Covering and baking instructions. - Finishing baking for a golden top. To bake, I cover the dish with aluminum foil. I use cooking spray on the foil to stop sticking. I bake the lasagna for 25 minutes. This lets the flavors meld together. After that, I carefully remove the foil. I continue baking for another 15 minutes. This step gives the top a golden brown and bubbly finish. Once done, I let the lasagna cool for about 10 minutes before slicing and serving. To avoid sticky noodles, cook them just until they are al dente. Rinse them in cold water to stop the cooking. You can also add a bit of olive oil to the water. This will keep them from sticking together. When layering your lasagna, start with a thin layer of marinara sauce at the bottom. This helps prevent the noodles from sticking to the dish. Use three noodles for each layer. Spread your cheese and veggie mix evenly. Make sure to drizzle sauce each time before adding the next layer. This keeps everything moist and tasty. For a twist on flavor, try adding different cheeses. You can swap in goat cheese for a tangy taste. You might also use feta cheese for a salty kick. If you prefer a lighter dish, consider using low-fat cheese options. Using homemade marinara sauce can elevate your dish. It allows you to control the flavor and ingredients. However, store-bought sauce works well too. Look for a brand that is low in sugar and high in flavor. Garnish your lasagna with fresh basil or parsley. This adds a nice pop of color and flavor. You can also sprinkle extra Parmesan on top just before serving. For side dishes, pair your lasagna with a crisp salad. A simple green salad with lemon vinaigrette complements the rich flavors. Garlic bread is another great choice. It adds crunch and pairs well with the creamy sauce. Pro Tips Fresh Ingredients: Using fresh spinach and mushrooms will enhance the flavor and nutrition of your lasagna. Opt for organic produce when possible for the best taste. Layering Technique: Ensure an even distribution of ingredients in each layer to prevent dry spots. This will help maintain moisture throughout the lasagna. Make-Ahead Option: Assemble the lasagna a day in advance and refrigerate it, covered. Just bake it for a few extra minutes when you’re ready to serve! Serving Suggestions: For a complete meal, pair your lasagna with a side salad and garlic bread. This adds freshness and crunch to your dinner. {{image_4}} You can easily add meat to your creamy spinach mushroom lasagna. Ground beef or sausage works well. Start by browning the meat in your skillet before adding the onions. This step adds great flavor to your dish. Layer the cooked meat with the other fillings for a heartier meal. If you want a vegan version, swap out the dairy. Use tofu instead of ricotta. Blend the tofu with some lemon juice and nutritional yeast for a creamy texture. You can also use a plant-based cheese for the mozzarella. This way, you keep the creaminess without using any animal products. Feel free to mix in other vegetables. Zucchini slices or bell peppers add color and flavor. Just sauté them with the mushrooms and onions. You can even add roasted red peppers for a sweet twist. These veggies boost nutrition and make the dish even more vibrant. Store any leftover lasagna in a tight container. It helps to cool the dish first. Place it in the fridge within two hours after cooking. This keeps it safe to eat. Lasagna can last in the fridge for about three to five days. If you want to keep it longer, consider freezing it. To freeze lasagna, let it cool completely. Then, cut it into serving sizes. Wrap each piece in plastic wrap. Place the wrapped pieces in a freezer-safe bag or container. Label it with the date. You can freeze lasagna for up to three months. When it’s time to eat, thaw it in the fridge overnight. Reheat lasagna in the oven for the best results. Preheat your oven to 350°F (175°C). Place the lasagna in a baking dish. Cover it with aluminum foil to keep it moist. Bake for about 20-30 minutes. You can also use a microwave. Heat individual pieces for about 2-3 minutes. Make sure it’s hot all the way through. Enjoy your tasty lasagna! To make this dish gluten-free, swap out the regular lasagna noodles for gluten-free ones. Many brands offer gluten-free pasta that works well. Just cook them according to the package instructions. You can also check for gluten-free marinara sauce to keep the entire dish safe for gluten-sensitive folks. If you don't have ricotta cheese, you can use cottage cheese. Just blend it to make it smoother. Cream cheese also works well as a substitute. Mix it with a bit of milk for a creamier texture. You can try Greek yogurt as a lighter option, too. Yes, you can prepare the lasagna ahead of time. Assemble it fully in your baking dish. Cover it tightly with plastic wrap or foil. Store it in the fridge for up to 24 hours before baking. When ready to cook, remove the cover and bake as directed. You might need to add a few more minutes to the baking time. Creamy spinach mushroom lasagna lasts about 3 to 5 days in the fridge. Make sure to cover it well to keep it fresh. Check for any signs of spoilage before eating. If you want to keep it longer, consider freezing it. This creamy spinach mushroom lasagna brings together rich flavors and textures. You learned the best ingredients, step-by-step instructions, and helpful tips. Variations let you customize it for any diet. Remember, it's all about layering and baking to perfection. Enjoy your tasty creation with family and friends. Keep experimenting with ingredients to make this dish your own. Your kitchen is ready for delicious meals ahead!
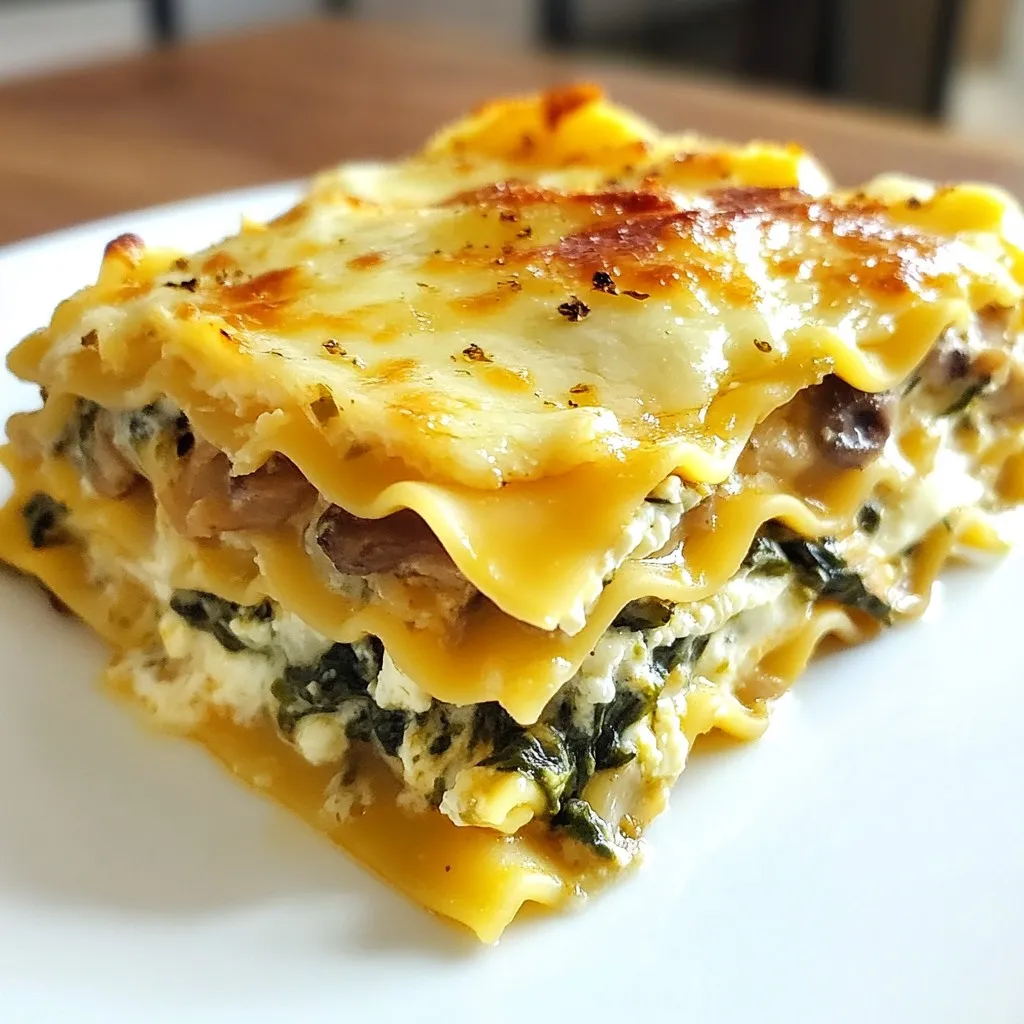
Creamy Spinach Mushroom Lasagna Flavorful and Easy Dish
Are you ready to dive into a dish that’s creamy, hearty, and packed with flavor? My Creamy Spinach Mushroom Lasagna is the ultimate comfort food
- 4 boneless, skinless chicken breasts - 1 packet ranch seasoning mix - 1 can cream of chicken soup - 1 cup chicken broth - 1 cup cream cheese - 1 cup frozen corn kernels - 1 cup chopped broccoli - Salt and black pepper to taste - Fresh parsley for garnish The main ingredients are simple but powerful. The chicken breasts form the base. The ranch seasoning mix adds a burst of flavor. Cream of chicken soup brings creaminess and richness to the dish. For the additional ingredients, chicken broth ensures the chicken stays moist. Cream cheese makes it super creamy and delicious. Frozen corn and chopped broccoli add color and nutrients. You can adjust salt and pepper for your taste. Finally, fresh parsley gives a nice touch on top! This dish is easy to make. You get great taste with just a few items. The ingredients work well together to create a warm meal. Enjoy cooking this delightful dish! {{ingredient_image_2}} Start by placing the four boneless, skinless chicken breasts flat at the bottom of your crockpot. Make sure they are arranged evenly. This helps the chicken cook uniformly. If they stack, some pieces may cook faster than others. In a mixing bowl, combine one packet of ranch seasoning mix, one can of cream of chicken soup, and one cup of chicken broth. Whisk these together until smooth. Once mixed, carefully pour this creamy blend over the chicken in the crockpot. This adds rich flavor and moisture. Next, take one cup of softened cream cheese. Scoop it in small dollops across the top of the mixture in the crockpot. This helps the cream cheese melt evenly. Then, layer one cup of frozen corn and one cup of chopped broccoli on top. Avoid stirring now to allow flavors to blend while cooking. Cover the crockpot with its lid. Choose your cooking setting. You can cook on low for 6-7 hours or on high for 3-4 hours. Check for doneness; the chicken should be tender and no longer pink inside. When cooking is done, use two forks to shred the chicken right in the crockpot. Mix everything together until creamy. This ensures all ingredients are well combined. Taste the dish and add salt and black pepper to your liking. To achieve the right creaminess, use softened cream cheese. This helps it melt smoothly into the sauce. Add it in small dollops over the chicken and other ingredients. This way, it blends well during cooking. For shredding chicken, let it cool a bit first. This makes it easier to handle. Use two forks to pull apart the chicken. Shred it right in the crockpot for less mess. Mix everything together so all flavors combine well. You can add extra spices to boost the flavor. Try garlic powder, onion powder, or paprika for a kick. Fresh herbs like thyme or dill also work great. You can adjust the richness by adding more chicken broth or less cream cheese. This change can make the dish lighter or creamier, depending on your taste. For this recipe, a 6-quart crockpot is best. It gives enough space for all the ingredients. A crockpot with a locking lid will help prevent spills during cooking. When preparing, use a large mixing bowl for the sauce. A whisk is great for mixing. Use measuring cups for accuracy. For serving, a large spoon or ladle is ideal. This way, you can scoop up all the creamy goodness easily. Pro Tips Use Fresh Ingredients: Whenever possible, opt for fresh broccoli and high-quality chicken for the best flavor and texture in your dish. Customize the Vegetables: Feel free to add or substitute other vegetables such as bell peppers or carrots to suit your taste. Adjust Creaminess: If you prefer a creamier texture, consider adding an extra dollop of cream cheese or even a splash of heavy cream before serving. Perfect Pairing: This dish pairs wonderfully with crusty bread or a fresh garden salad, adding a nice contrast to the creamy chicken. {{image_4}} You can switch up the chicken for other meats. Try using turkey or pork. You can also go for tofu if you want a plant-based option. For vegetables, you can use green beans or bell peppers. They add color and crunch. To make this dish gluten-free, choose a gluten-free ranch mix and cream soup. This way, everyone can enjoy it. If you want low-carb options, skip the corn. You can use cauliflower instead for a tasty twist. Get creative with seasonings! You can add garlic powder or onion powder for extra zest. If you're feeling bold, try different cream soups. Cream of mushroom or cream of celery can change the taste a lot. This keeps your meals exciting and fresh. To store leftovers, wait for the dish to cool. Then, transfer it to an airtight container. This helps keep it fresh for longer. Make sure to remove as much air as possible. You can use glass or plastic containers. Both are great for keeping your food safe. For reheating, use the microwave or the stove. If using a microwave, cover the dish to keep moisture. Heat in short bursts, stirring in between. This helps it warm evenly. On the stove, reheat over low heat while stirring often. Serve your leftovers over rice or potatoes for a quick meal. You can also add a fresh salad on the side. Enjoy the creamy goodness again! Cooking chicken in a crockpot is easy. If you set it on low, it takes 6 to 7 hours. On high, it cooks in 3 to 4 hours. Make sure the chicken is no longer pink inside for safe eating. It should be tender and juicy when done. Yes, you can use frozen chicken breasts. Just remember, if using frozen chicken, increase the cooking time. It will take about 1 to 2 hours longer on low. Always check if the chicken is fully cooked. The center should reach 165°F. This meal pairs well with many sides. You can serve it over fluffy rice or buttery mashed potatoes. Steamed vegetables or a fresh salad also work great. Try adding some bread for dipping in the creamy sauce too! You can prepare this dish ahead of time. Just layer all the ingredients in the crockpot and cover it. Store it in the fridge for up to 24 hours before cooking. When you're ready, just plug in the crockpot and let it cook. This blog post covered all you need for a tasty Crockpot Creamy Ranch Chicken. We explored ingredients, cooking steps, tips for success, and tasty variations. Remember, using fresh herbs or trying different veggies can change the dish. You can also store leftovers easily for later meals. Enjoy experimenting with this recipe to make it your own!
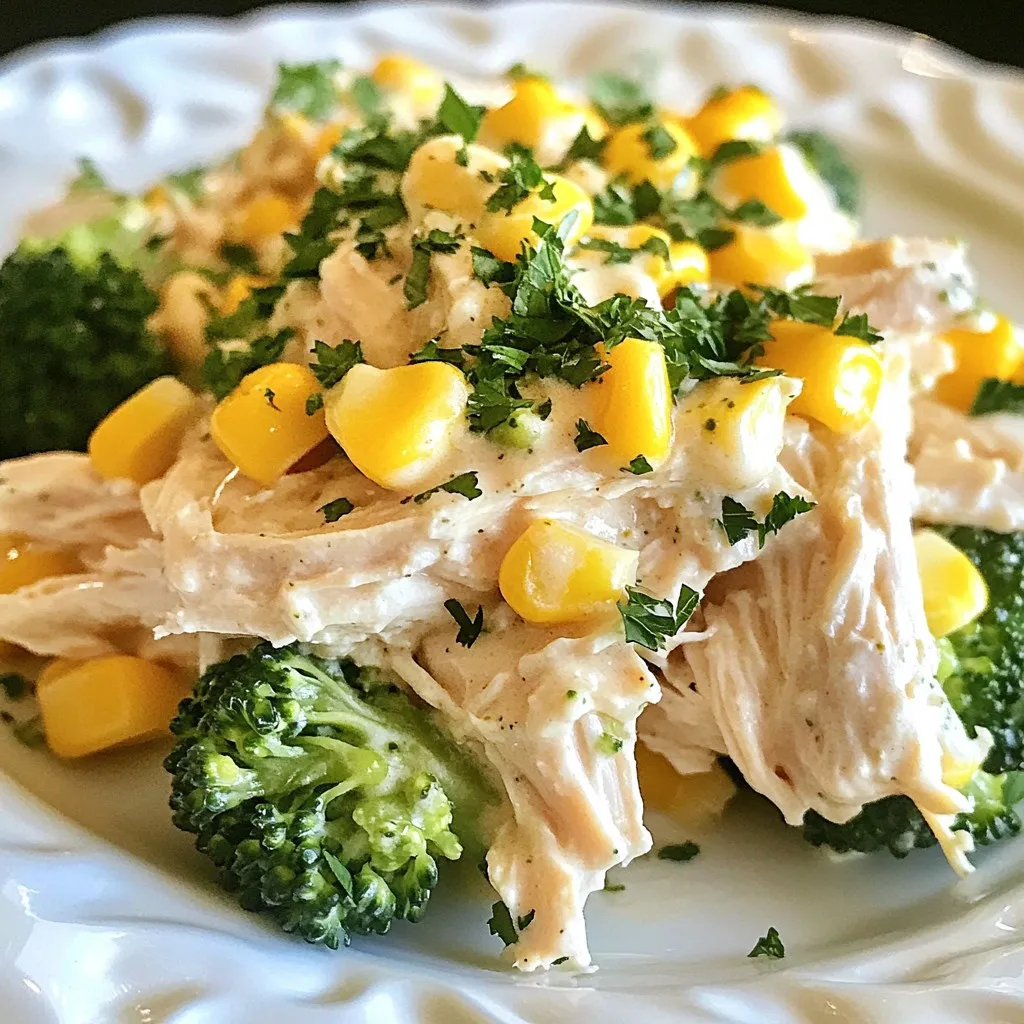
Crockpot Creamy Ranch Chicken Delightful Easy Meal
If you’re craving a hearty meal that’s easy to make, you’re in the right spot! My Crockpot Creamy Ranch Chicken brings together tender chicken, rich
- 4 cups cooked chicken, shredded - 1 cup Swiss cheese, shredded (reserve some for topping) - 1 cup ham, diced - 1 cup breadcrumbs - 1 cup heavy cream - 1 cup chicken broth - 1 tablespoon Dijon mustard - 1 teaspoon garlic powder - 1 teaspoon onion powder - Salt and pepper to taste - 1 tablespoon fresh parsley, chopped (for garnish) You can switch out Swiss cheese for mozzarella if you prefer a milder taste. If you want to skip the ham, use turkey or leave it out for a lighter dish. You can also use low-fat cream or broth if you want to cut calories. For breadcrumbs, crushed crackers or panko work well too. When picking chicken, look for meat that is pink and firm. Avoid any pieces that look dull or feel slimy. For cheese, choose blocks over pre-shredded for better flavor. The ham should smell fresh, and avoid any packages that are close to their expiration date. Always check the cream for any signs of spoilage like an off smell or separation. Fresh parsley should be bright green with no brown spots. These small details help ensure your casserole tastes great! {{ingredient_image_2}} Start by preheating your oven to 350°F (175°C). This step is key. A hot oven cooks your casserole evenly. It also helps the top become golden and crispy. While the oven heats, you can prepare the other ingredients. In a large mixing bowl, add 4 cups of shredded cooked chicken and 1 cup of diced ham. This mix gives your casserole its hearty base. Next, sprinkle in 1 teaspoon of garlic powder and 1 teaspoon of onion powder. These add great flavor. Fold in 1 cup of shredded Swiss cheese but save a little for the top. Season your mix with salt and pepper. Stir well to combine all the flavors. In another bowl, whisk together 1 cup of heavy cream, 1 cup of chicken broth, and 1 tablespoon of Dijon mustard. This creamy blend ties everything together. Once mixed, pour it over your chicken and ham blend. Stir again to coat everything evenly. Lightly grease a 9x13 inch casserole dish. This will keep your casserole from sticking. Pour the filled mixture into the dish and spread it evenly. Next, sprinkle 1 cup of breadcrumbs over the top. This adds crunch and texture. Finally, sprinkle your reserved Swiss cheese on top for a cheesy finish. Place your casserole in the preheated oven. Bake it for 30 to 35 minutes. The top should be golden brown, and the casserole should bubble. When it's done, take it out and let it cool for about 5 minutes. This helps the flavors settle. Before serving, add a touch of color with some chopped parsley on top. Enjoy this simple and flavorful meal! To boost flavor in your Chicken Cordon Bleu Casserole, use fresh herbs. Fresh parsley adds a nice touch. You can also try thyme or rosemary for a different twist. Adding a splash of lemon juice brings brightness to the dish. This small step makes a big difference. When mixing your chicken and ham, be sure to season well. Taste as you go! This ensures every bite is flavorful. To get that perfect cheese crust on top, don’t skip the breadcrumbs. They add crunch and texture. Mix the breadcrumbs with a bit of melted butter for extra flavor. Make sure to reserve some Swiss cheese for the top. This creates a gooey, cheesy layer that melts beautifully. Bake the casserole until it turns golden brown. This indicates that your cheese crust is ready. One common mistake is not preheating the oven. This can lead to uneven cooking. Always preheat your oven to 350°F (175°C) before baking. Another mistake is overmixing the casserole. Gently fold the ingredients to keep the chicken tender. Lastly, don’t forget to let your casserole cool before serving. This helps the flavors settle and makes it easier to cut. Pro Tips Use Rotisserie Chicken: For a quicker preparation, consider using store-bought rotisserie chicken. It adds flavor and saves time on cooking and shredding the chicken. Customize Your Cheese: Feel free to mix and match cheeses! Gruyère or cheddar can be delightful alternatives to Swiss cheese, adding different flavors to the dish. Add Vegetables: Incorporate some sautéed spinach, mushrooms, or broccoli into the casserole for extra nutrition and a pop of color. Make Ahead: This casserole can be assembled a day in advance. Just cover it and store it in the refrigerator. Bake it when you're ready to serve! {{image_4}} You can easily change ingredients based on your needs. If you want a lighter dish, use turkey instead of chicken. For a gluten-free option, swap regular breadcrumbs for gluten-free ones. You can also use almond milk in place of heavy cream. This swap will keep it creamy and help cut calories. While Swiss cheese is classic, you can try different types. Mozzarella gives a mild flavor and melts well. Cheddar adds a sharp taste that many love. If you want a stronger flavor, go for Gruyère. Each cheese brings a unique twist to your casserole. You can boost nutrition by adding veggies. Spinach or broccoli works great in this dish. Just chop them small and mix them in with the chicken and ham. This adds color and crunch while keeping the meal balanced. You can even throw in some bell peppers for a pop of sweetness. To keep your chicken cordon bleu casserole fresh, let it cool first. Then, cover it tightly with plastic wrap or foil. You can also use an airtight container. Store it in the fridge for up to three days. This helps maintain its flavor and texture. If you have a large amount, consider dividing it into smaller portions. This makes it easier to reheat later. When it's time to eat your leftovers, you want them warm and tasty. The best way to reheat the casserole is in the oven. Preheat your oven to 350°F (175°C). Place the casserole in an oven-safe dish, cover it with foil, and heat for about 20-25 minutes. This method keeps the topping crispy. If you’re short on time, you can use the microwave. Heat in short bursts of 1-2 minutes. Stir in between to heat evenly. Freezing is a great way to save leftovers for later. If you plan to freeze your casserole, do it right after it cools. Cut it into portions and wrap each piece in plastic wrap. Then place them in a freezer-safe bag. Be sure to label the bags with the date. This way, you can enjoy it for up to three months. When you're ready to eat, thaw it in the fridge overnight. Then, reheat it in the oven or microwave as before. Chicken Cordon Bleu Casserole is a tasty twist on a classic dish. It combines shredded chicken, diced ham, and Swiss cheese. The creamy sauce adds richness, while breadcrumbs give a nice crunch. This meal is simple, flavorful, and perfect for any family dinner. Yes, you can make this casserole ahead of time. Just prepare it up to the point of baking. Cover it well and store it in the fridge. When you’re ready, bake it straight from the fridge. It may take a few extra minutes to cook. To boost nutrition, consider adding vegetables. Spinach, broccoli, or bell peppers work well. You can also use whole grain breadcrumbs for added fiber. Opt for low-fat cheese and cream to cut calories while keeping flavor. These changes make the meal healthier without losing taste. In this post, we explored key ingredients for Chicken Cordon Bleu Casserole, including fresh options and substitutions. We detailed the step-by-step process, from preheating the oven to perfecting the cheese crust. We also shared tips to enhance flavor and avoid mistakes. Variations allow you to tailor the recipe to dietary needs. Lastly, proper storage ensures your leftovers stay fresh. By following these guidelines, you can create a delicious casserole that suits your needs and tastes. Enjoy making this dish your own!
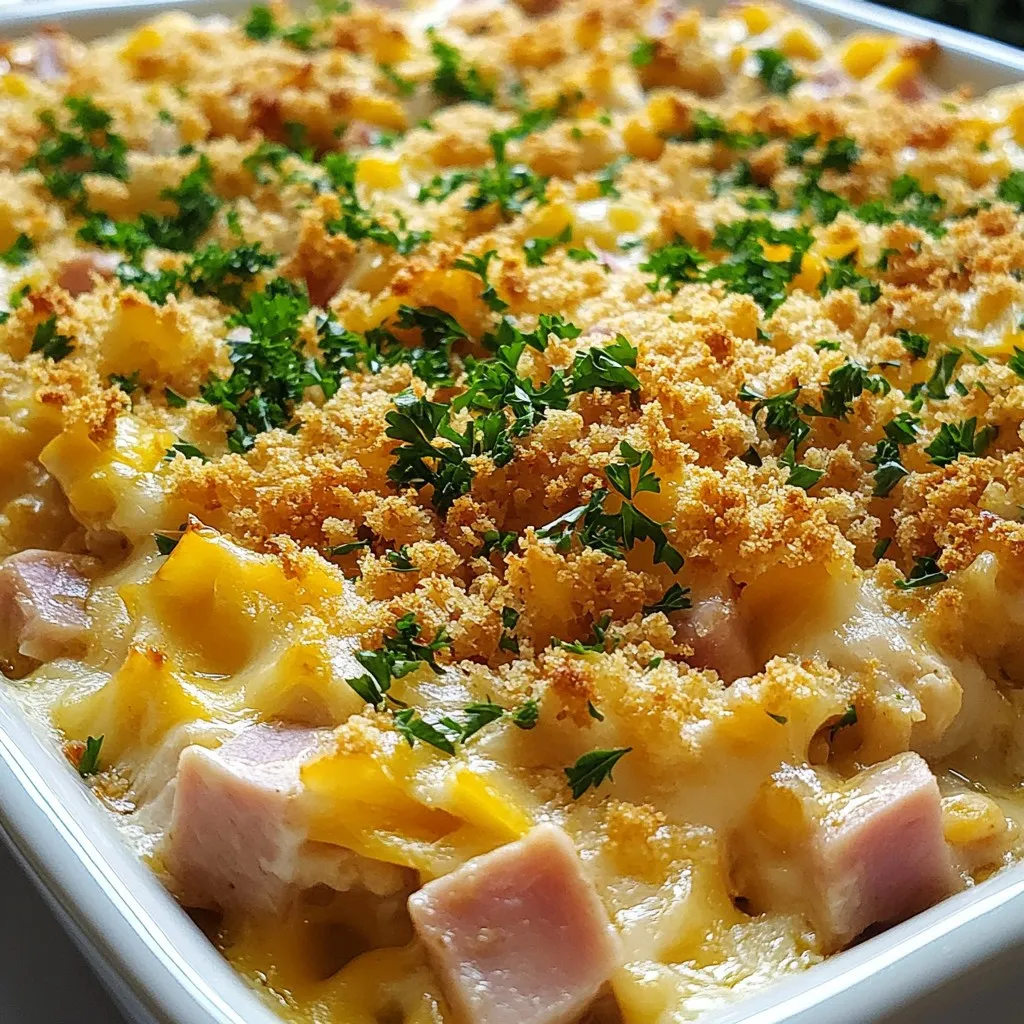
Chicken Cordon Bleu Casserole Simple and Flavorful Meal
If you love creamy chicken casseroles packed with flavor, you’re in for a treat! My Chicken Cordon Bleu Casserole is the perfect blend of tender