Dinner

To make Thai peanut chicken, you need some key items. Here’s what you should gather: - 500g chicken breast, cut into bite-sized pieces - 2 tablespoons vegetable oil - 1 bell pepper, sliced (red or yellow) - 1 medium onion, sliced thinly - 2 cloves garlic, minced - 1 tablespoon ginger, minced - 1 cup broccoli florets - 1 carrot, julienned - 1 cup snap peas - ½ cup creamy peanut butter - 3 tablespoons soy sauce - 2 tablespoons honey - 1 tablespoon fresh lime juice - 1 teaspoon chili paste - Fresh cilantro (for garnish) - Chopped peanuts (to sprinkle on top) You can add some extra flavors or textures to your dish. Consider these options: - Extra vegetables like zucchini or bell peppers - Chopped green onions for garnish - Sesame seeds for added crunch - A splash of coconut milk for creaminess If you don’t have some ingredients, don’t worry! Here are some easy swaps: - Chicken breast can be replaced with chicken thighs for extra flavor. - Use almond butter or sunflower seed butter instead of peanut butter if needed. - Tamari or coconut aminos work well as a soy sauce alternative for gluten-free dishes. - Maple syrup can replace honey for a vegan option. - Lime juice can be swapped for rice vinegar for a different tang. These tips will help you create a delicious meal. Enjoy the cooking process! {{ingredient_image_2}} First, grab a large skillet or wok. Heat 2 tablespoons of vegetable oil over medium-high heat. Once hot, add 500 grams of chicken breast cut into bite-sized pieces. Stir-fry the chicken for about 5-7 minutes. Look for a golden brown color and make sure it’s cooked through. When done, take the chicken out and set it aside on a plate. In the same skillet, add the sliced onion and bell pepper. You can choose red or yellow bell pepper for color. Add 2 cloves of minced garlic and 1 tablespoon of minced ginger. Sauté these for about 2-3 minutes. You want them softened and fragrant. Next, toss in 1 cup of broccoli florets, 1 julienned carrot, and 1 cup of snap peas. Stir-fry these for 3-4 minutes. Keep them bright in color and a bit crunchy. This adds great texture to your dish. While the veggies cook, take a medium bowl. Whisk together ½ cup of creamy peanut butter, 3 tablespoons of soy sauce, 2 tablespoons of honey, 1 tablespoon of fresh lime juice, and 1 teaspoon of chili paste. Mix until it’s smooth and well blended. This sauce brings the real Thai flavor to your chicken. Now, return the cooked chicken to the skillet with the sautéed vegetables. Pour the peanut sauce over everything. Stir well to coat the chicken and veggies. Heat the mix for about 2-3 minutes. Make sure everything is hot and ready to serve. Plate your Thai peanut chicken right away. Garnish it with fresh cilantro leaves and a sprinkle of chopped peanuts for a nice crunch. You can serve it over steamed jasmine rice or enjoy it as a standalone dish. The vibrant colors will make it look great on your table! To cook perfect chicken, start with fresh breast pieces. Cut them into bite-sized chunks. This helps them cook evenly. Heat the vegetable oil in your skillet until hot. Add the chicken and stir-fry until golden brown. This usually takes about 5 to 7 minutes. Make sure there is no pink in the middle. This way, your chicken will be juicy and tender. To make the peanut sauce even better, use smooth peanut butter. This gives a creamy texture. When mixing the sauce, whisk the peanut butter with soy sauce, honey, lime juice, and chili paste. Adjust the honey based on your taste. For extra flavor, add a pinch of garlic powder or a splash of sesame oil. This makes the sauce rich and delicious. Serve your Thai peanut chicken over jasmine rice. The rice soaks up the sauce well. You can also serve it in lettuce wraps for a fun twist. Top with fresh cilantro and chopped peanuts for crunch. Pair it with a simple cucumber salad for a refreshing side. Enjoy your meal with a cold drink, like iced tea or coconut water. Pro Tips Cut Uniformly: Ensure all chicken pieces and vegetables are cut into similar sizes for even cooking and a more appealing presentation. Fresh Ingredients: Use fresh garlic, ginger, and vegetables to enhance the flavors and nutritional value of the dish. Adjust Spice Level: Tailor the amount of chili paste according to your spice preference; start with less and add more if desired. Garnish Generously: Don't skimp on the fresh cilantro and chopped peanuts; they not only add flavor but also texture and visual appeal. {{image_4}} You can switch the chicken for other proteins. Shrimp works great in this dish. Just cook it for 3-4 minutes until it turns pink. Tofu is a good choice for vegans. Use firm tofu, cut it into cubes, and pan-fry until golden. Beef slices can also add a rich flavor. Just make sure to cook it until well done. For a vegetarian twist, skip the meat. Use only vegetables and tofu. You can add more veggies like mushrooms, zucchini, or eggplant. The peanut sauce will still taste amazing with these changes. It keeps the dish rich and satisfying. Serve it over rice or noodles for a hearty meal. You can change the flavor of your sauce too. Add coconut milk for a creamier texture. If you want it spicier, add more chili paste or fresh chili peppers. For a tangy kick, try adding more lime juice. Experiment with different nuts like cashews or almonds for extra crunch. You can also mix in a bit of sesame oil for a unique taste. After making Thai peanut chicken, let it cool down. Once cool, place it in an airtight container. Store it in the fridge for up to three days. When ready to eat, make sure to check for any off smells or changes in texture. This ensures you enjoy a safe meal. If you want to keep it longer, freezing is an option. Use a freezer-safe container or a heavy-duty freezer bag. Squeeze out as much air as you can before sealing. Thai peanut chicken can last in the freezer for up to three months. Label the container with the date, so you know when to use it. To reheat, thaw the chicken overnight in the fridge if frozen. You can heat it on the stove or in the microwave. For the stove, add a splash of water or broth in a pan to prevent sticking. Heat over medium until warmed through. In the microwave, use a microwave-safe dish and cover it to keep moisture in. Heat in short bursts, stirring in between to ensure even warming. Enjoy your delicious meal again! Thai Peanut Chicken is a tasty dish made with chicken and veggies, all coated in a creamy peanut sauce. The sauce combines peanut butter, soy sauce, honey, lime juice, and some chili paste. This mix creates a sweet and savory flavor that is hard to resist. You will love the crunch of fresh vegetables, like bell peppers and snap peas, in every bite. Yes, you can prepare this dish ahead of time. Cook the chicken and veggies, then store them in the fridge. Keep the peanut sauce separate until you are ready to serve. When you want to eat, just heat everything together. This makes for a quick meal on busy days. Thai Peanut Chicken goes well with many sides. Here are some great choices: - Steamed jasmine rice - Quinoa for a healthier twist - Fresh cucumber salad for crunch - Stir-fried veggies for extra color These sides will balance the rich flavors of the chicken. To adjust the spice level, you can add more or less chili paste in the sauce. For a spicier kick, add extra paste. If you prefer it milder, use less or skip it altogether. You can also serve sliced fresh chilies on the side for those who want more heat. Thai Peanut Chicken can be gluten-free if you choose the right ingredients. Use gluten-free soy sauce instead of regular soy sauce. Check all labels to make sure other ingredients are also gluten-free. This way, you can enjoy a delicious meal without worry. This article shared how to make Thai Peanut Chicken. We explored the key ingredients, cooking steps, and helpful tips. You learned how to customize your dish with various proteins and flavors. Storing and reheating the meal will keep it fresh longer. Now, you can impress your friends with this tasty recipe. Enjoy each delicious bite and feel free to make it your own!
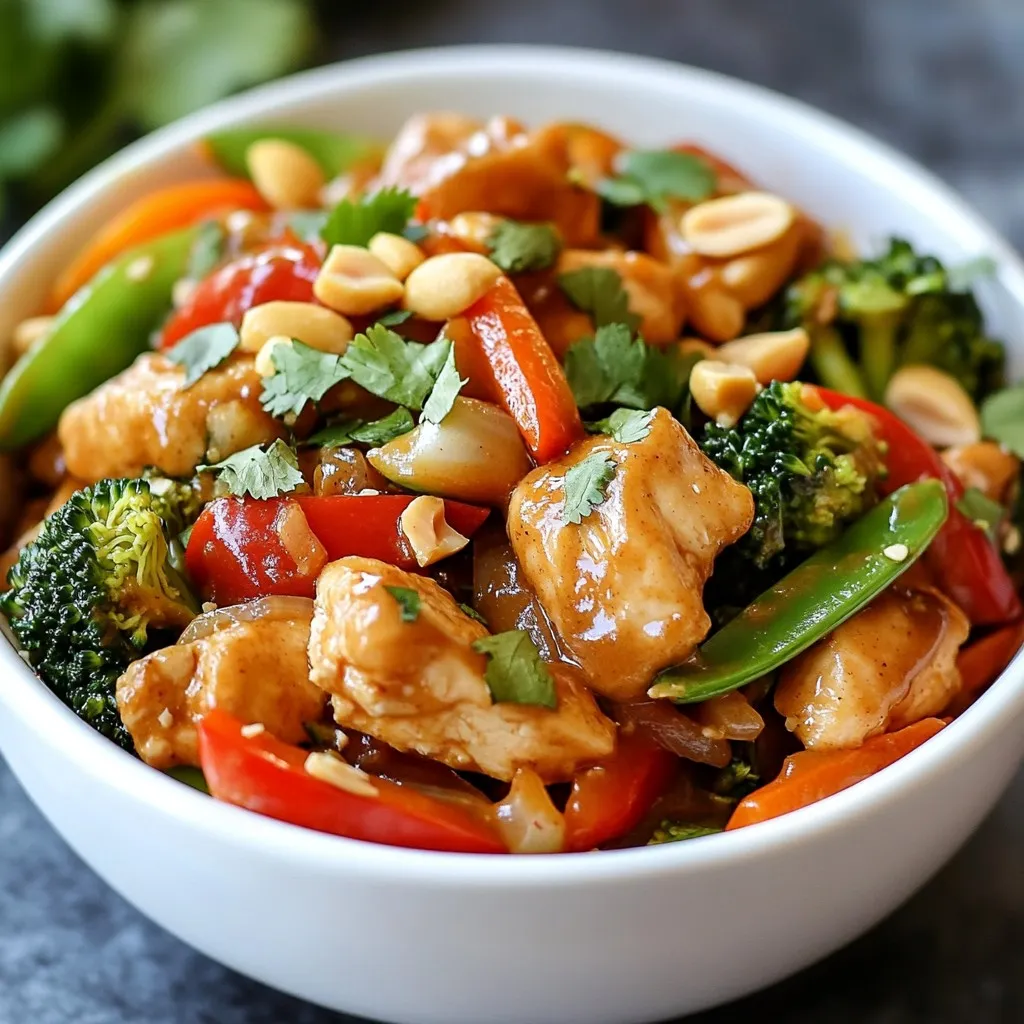
Thai Peanut Chicken Flavorful and Simple Recipe Guide
Looking for a tasty meal that’s easy to make? Look no further! Thai peanut chicken blends juicy chicken with a rich, creamy peanut sauce. It’s
- 4 medium sweet potatoes - 2 cups shredded cooked chicken - ½ cup buffalo sauce - ½ cup cream cheese, softened - ½ cup shredded cheddar cheese - 3 green onions, finely chopped - Salt and pepper to taste - 2 tablespoons olive oil - Optional toppings: blue cheese crumbles, additional chopped green onions, ranch dressing If you want to change things up, try these ideas: - Use rotisserie chicken for quick prep. - Swap cream cheese with Greek yogurt for a lighter touch. - Replace cheddar cheese with mozzarella for a milder flavor. - Try different hot sauces if you want a unique kick. Here are some handy conversions: - ½ cup = 120 milliliters - 2 tablespoons = 30 milliliters - 4 medium sweet potatoes = about 1.5 pounds - 1 cup shredded chicken = about 150 grams These ingredients will help you create a tasty dish. Feel free to experiment with alternatives to match your taste. Enjoy cooking! {{ingredient_image_2}} Start by preheating your oven to 400°F (200°C). This step warms the oven for baking. Rinse each sweet potato under cold water. This removes dirt and grit. Use a fork to poke holes in the potatoes. Doing this lets steam escape while they cook. Next, coat the sweet potatoes with olive oil. Sprinkle them with salt. This adds flavor. Place them on a baking sheet and put them in the oven. Bake for about 45-60 minutes. They are ready when a fork easily pierces them. While the sweet potatoes bake, it's time to make the filling. In a mixing bowl, combine the shredded cooked chicken and buffalo sauce. Stir them together until the chicken is well coated. This gives your filling a spicy kick. Now, add the softened cream cheese. Mix it in well to create a creamy texture. If you want more heat, add extra buffalo sauce. It’s all about your taste. Once the sweet potatoes are tender, take them out of the oven. Let them cool for 5-10 minutes. Slice each potato in half lengthwise. Carefully scoop some flesh out to create a well for the filling. You can mix this scooped flesh into the chicken filling for added creaminess. Next, fill each sweet potato half with the buffalo chicken mixture. Pack it in well to ensure every bite is flavorful. Top each potato with shredded cheddar cheese. Now, return the stuffed sweet potatoes to the oven. Bake them for another 10-15 minutes. You want the cheese to melt and bubble. After baking, let them sit for a minute. Garnish with chopped green onions. You can also add optional toppings like blue cheese or ranch dressing. These give an extra burst of flavor. Enjoy your delicious Buffalo Chicken Stuffed Sweet Potatoes! To get sweet potatoes just right, choose medium-sized ones. They cook evenly and hold their shape. Always rinse them well to remove dirt. Poking holes with a fork lets steam escape. Coat them with olive oil and salt for flavor. Bake until tender, around 45-60 minutes. Test by poking them with a fork. If they are soft all the way through, they are ready! Buffalo sauce has varying heat levels. You can adjust the spiciness to fit your taste. Start with a half cup of buffalo sauce. Mix it into the chicken well. If you like more heat, add an extra tablespoon or two. You can also add some cayenne pepper for a kick. Don't forget to taste the mixture as you go! When serving, presentation matters. Place the stuffed sweet potatoes on a large platter. Drizzle some extra buffalo sauce around the edge for flair. A sprinkle of fresh green onions on top adds color. You can also add blue cheese crumbles for a rich taste. This makes the dish look amazing and appetizing! Pro Tips Adjust the Spice Level: If you prefer a milder flavor, reduce the amount of buffalo sauce or use a milder variety. Always taste as you go to find your perfect balance. Enhance Creaminess: For an even creamier filling, consider adding a dollop of sour cream or Greek yogurt along with the cream cheese. This will add a tangy flavor and smooth texture. Perfectly Baked Sweet Potatoes: To ensure even cooking, choose sweet potatoes that are similar in size. This will help them bake uniformly in the oven. Fun Toppings: Get creative with toppings! Besides green onions and blue cheese, try adding jalapeños, diced tomatoes, or avocado for an extra burst of flavor and texture. {{image_4}} You can make a tasty vegetarian version of buffalo chicken stuffed sweet potatoes. Instead of chicken, use shredded cauliflower or chickpeas. Both options provide a hearty base. Mix them with buffalo sauce and cream cheese for a creamy filling. You can also add black beans for extra protein. Top with shredded cheese and bake just like the original recipe. This version keeps the bold flavors while being meat-free. For a low-carb twist, swap out the sweet potatoes for zucchini boats or bell peppers. Cut them in half and scoop out the insides. Then, fill them with the buffalo chicken mix. Bake until tender. You still get that delicious buffalo flavor, but with fewer carbs. This way, you can enjoy a lighter meal without missing out on taste. Feel free to experiment with different sauces. Try barbecue sauce for a sweeter taste or garlic sauce for a zing. You can also switch up the cheese. Use mozzarella for a milder flavor or pepper jack for extra spice. Mix and match until you find your perfect combo. These changes keep the dish fresh and fun with every bite. After enjoying your Buffalo Chicken Stuffed Sweet Potatoes, you may have some leftovers. To store them, let the sweet potatoes cool to room temperature. Then, wrap each one tightly in plastic wrap or place them in an airtight container. These can last in the fridge for up to three days. Keeping them sealed will help preserve their flavor and moisture. When you're ready to enjoy your leftovers, reheating is simple. Preheat your oven to 350°F (175°C). Place the stuffed sweet potatoes on a baking sheet. Cover them with foil to keep them moist. Heat for about 15-20 minutes or until warmed through. If you're in a hurry, you can use the microwave. Place a potato on a microwave-safe plate and heat for 2-3 minutes, checking for warmth. If you want to save your stuffed sweet potatoes for later, you can freeze them. First, let them cool completely. Then, wrap each potato tightly in plastic wrap and place them in a freezer-safe bag. Make sure to remove as much air as possible. Frozen, they can last up to three months. When you're ready to eat, thaw them in the fridge overnight before reheating. Yes, you can use regular potatoes. They will change the taste and texture. Sweet potatoes add a sweet flavor and soft texture. Regular potatoes are more starchy and firmer. If you prefer a milder flavor, go for regular potatoes. Just remember to adjust the cooking time. Regular potatoes may need a few more minutes to cook through. The best buffalo sauce depends on your taste. I love using a classic brand with a good balance of heat and flavor. Look for sauces that have a rich, buttery taste. If you prefer less spice, choose a milder sauce. You can also make your own by mixing hot sauce with butter. This way, you control the heat and flavor. Making buffalo chicken stuffed sweet potatoes ahead is easy! Prepare the sweet potatoes and filling separately. Bake the sweet potatoes and let them cool. Mix the chicken with buffalo sauce and cream cheese. Store them in the fridge. When you're ready to eat, fill the sweet potatoes and bake them. This method saves time and keeps flavors fresh. You’ve learned about making stuffed sweet potatoes. We covered ingredients, prepping, and cooking steps. I shared tips for great texture and spice control. You can try variations like vegetarian or low-carb options. Remember to store leftovers properly for fresh meals later. With all this, you can enjoy a fun and tasty dish. So gather your ingredients and get cooking!
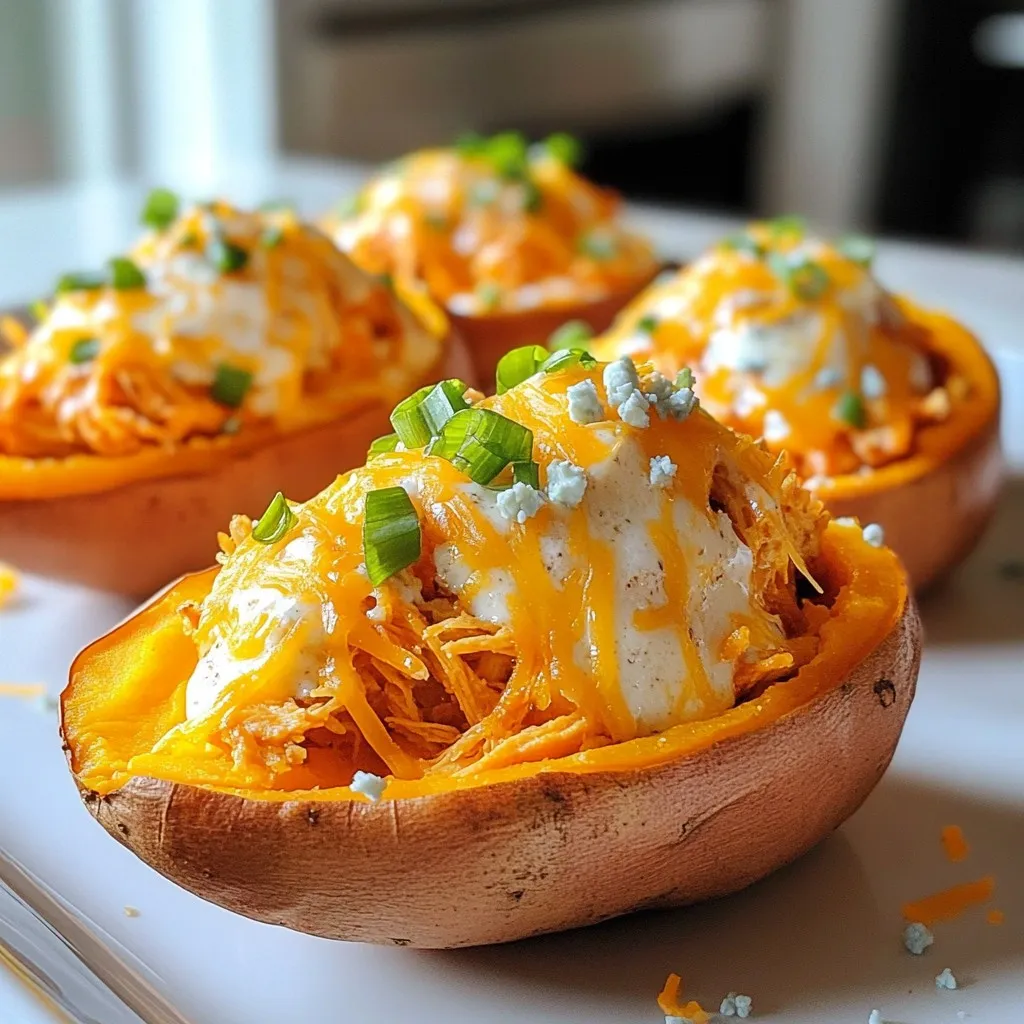
Buffalo Chicken Stuffed Sweet Potatoes Flavorful Dish
Looking for a tasty and fun dinner idea? You’ll love Buffalo Chicken Stuffed Sweet Potatoes! This dish brings spicy flavor and healthy ingredients together. I’ll
- 2 large chicken breasts - 1 cup cherry tomatoes, halved - 1 cup fresh mozzarella balls, halved - ½ cup fresh basil leaves, chopped - 2 cloves garlic, minced - 2 tablespoons balsamic glaze, plus extra for drizzling - 2 tablespoons olive oil, plus a little more for drizzling - Salt and pepper, to taste - 1 teaspoon dried oregano - Toothpicks or kitchen twine for securing For this Caprese stuffed chicken recipe, you need two large chicken breasts. They should be thick enough to hold a good amount of filling. The Caprese filling requires fresh and vibrant ingredients. Cherry tomatoes add sweetness and color. Fresh mozzarella provides creaminess and melts beautifully. The basil brings in a fragrant touch. Minced garlic adds depth to the flavor. Don’t forget the seasoning! Olive oil helps the filling stick together and keeps the chicken moist. Balsamic glaze gives a tangy sweetness that brightens the dish. Dried oregano adds an earthy note. Finally, salt and pepper enhance all the flavors. Make sure you have toothpicks or kitchen twine ready. You’ll need these to secure the chicken after stuffing it. Each ingredient plays a key role in creating a delicious and flavorful dinner. {{ingredient_image_2}} 1. Preheat your oven to 375°F (190°C). This makes sure your chicken cooks evenly. 2. In a medium bowl, mix cherry tomatoes, mozzarella, basil, and minced garlic. 3. Drizzle 2 tablespoons of olive oil and balsamic glaze into the bowl. 4. Sprinkle with dried oregano, salt, and pepper. Mix well to blend all flavors. 5. Now, take each chicken breast and place it on a cutting board. 6. Carefully slice a pocket into each breast. Don’t cut all the way through. 1. Stuff each chicken breast with the Caprese mixture. Make sure to fill both evenly. 2. Use toothpicks or kitchen twine to secure the openings. This keeps the filling inside. 1. Season the outside of the stuffed chicken with salt and pepper. 2. Drizzle a bit more olive oil over the surface for added flavor. 3. Place the stuffed chicken breasts in a baking dish. 4. Drizzle a little balsamic glaze over the tops for extra taste and presentation. 5. Bake the chicken in your preheated oven for 25-30 minutes. Cook until golden brown. 6. Check that the chicken reaches an internal temperature of 165°F (74°C). 7. Once cooked, take the chicken out and let it rest for about 5 minutes. 8. This resting time helps keep the chicken moist when you slice it. 9. Slice each stuffed chicken breast and serve warm. Drizzle more balsamic glaze if you like. To keep your chicken moist, start with good quality breasts. Look for plump, fresh chicken. When you cook, always use a meat thermometer. Aim for 165°F (74°C) inside. This ensures juicy meat. Let the chicken rest after baking. It helps the juices settle. Different ovens heat differently. If yours runs hot, check the chicken at 20 minutes. If it’s cooler, you might need more time. Keep an eye on it. Adjust as needed for perfect results. For serving, use a nice plate or a rustic wooden board. It makes a big difference. Place the chicken in the center. Drizzle with balsamic glaze to add shine. Garnish with fresh basil leaves. They add color and a pop of flavor. You can also sprinkle some extra mozzarella on top. It makes the dish look even more inviting. Pro Tips Use Fresh Ingredients: For the best flavor, use the freshest mozzarella, basil, and tomatoes you can find. Fresh ingredients elevate the dish and enhance its overall taste. Secure the Stuffing: Make sure to tightly secure the openings with toothpicks or kitchen twine to prevent the delicious filling from leaking out while cooking. Let it Rest: Allow the chicken to rest for a few minutes after baking. This step is crucial as it helps retain the juices, resulting in a juicier and more flavorful chicken. Drizzle for Presentation: A drizzle of balsamic glaze right before serving not only adds a burst of flavor but also enhances the visual appeal of your dish, making it look restaurant-quality. {{image_4}} You can switch up the cheese in this dish. Use goat cheese for a tangy twist. Feta cheese also works well and adds a salty flavor. If you want a milder taste, try ricotta. You can also change the herbs. Instead of basil, use parsley or thyme. These choices give new layers of taste. Feel free to add more veggies to the stuffing. Spinach adds a nice color and nutrition. Zucchini or bell peppers can bring extra crunch. If you love a bit of heat, add some chopped jalapeños. These small changes keep the dish fresh and exciting. You can grill or bake the chicken. Grilling gives a smoky flavor and nice grill marks. Just be sure to keep the heat medium to avoid burning. Baking is easy and keeps the chicken juicy. Preheat the oven to 375°F (190°C) for best results. If you want to save time, try an Instant Pot or slow cooker. In the Instant Pot, cook on high for about 10 minutes. For the slow cooker, cook on low for 6 hours. Both methods keep the chicken moist and full of flavor. These options are great for busy days when you need a meal ready to go. To keep your Caprese stuffed chicken fresh, wrap each piece tightly in plastic wrap or foil. This keeps moisture in and prevents drying out. Place the wrapped chicken in an airtight container. Store it in the fridge for up to three days. After that, the chicken may lose flavor and texture. When reheating, I recommend using the oven. Preheat it to 350°F (175°C). Place the chicken in a baking dish and cover it with foil. Heat for 15-20 minutes, or until warm. This method keeps the chicken juicy. You can also use a microwave, but be careful. Heat in short bursts to avoid drying it out. For leftover chicken, get creative! Add it to salads for a fresh meal. Chop it up and mix it with pasta or make a hearty sandwich. You can also dice it and stir it into a creamy soup for a quick dinner. How to tell if chicken is fully cooked? You can check if chicken is done by using a meat thermometer. The internal temperature should reach 165°F (74°C). If you don’t have a thermometer, cut into the thickest part. The meat should be white, and the juices should run clear, not pink. Can I prepare the chicken ahead of time? Yes, you can prepare the chicken up to a day in advance. Stuff the chicken breasts and cover them tightly. Store in the fridge until you are ready to bake. This saves time for a busy weeknight dinner. What to serve with Caprese stuffed chicken? Caprese stuffed chicken pairs well with a green salad or roasted vegetables. You can also serve it with pasta or crusty bread. For a fresh touch, drizzle more balsamic glaze on the side. This post covered how to prepare a tasty Caprese stuffed chicken. We explored the key ingredients, step-by-step instructions, and helpful tips. I shared variations to keep meals fresh and exciting. Don't forget about storing and reheating tips for leftovers. With these ideas, you can enjoy this dish any time. You’ll impress your friends and family with ease. Happy cooking!
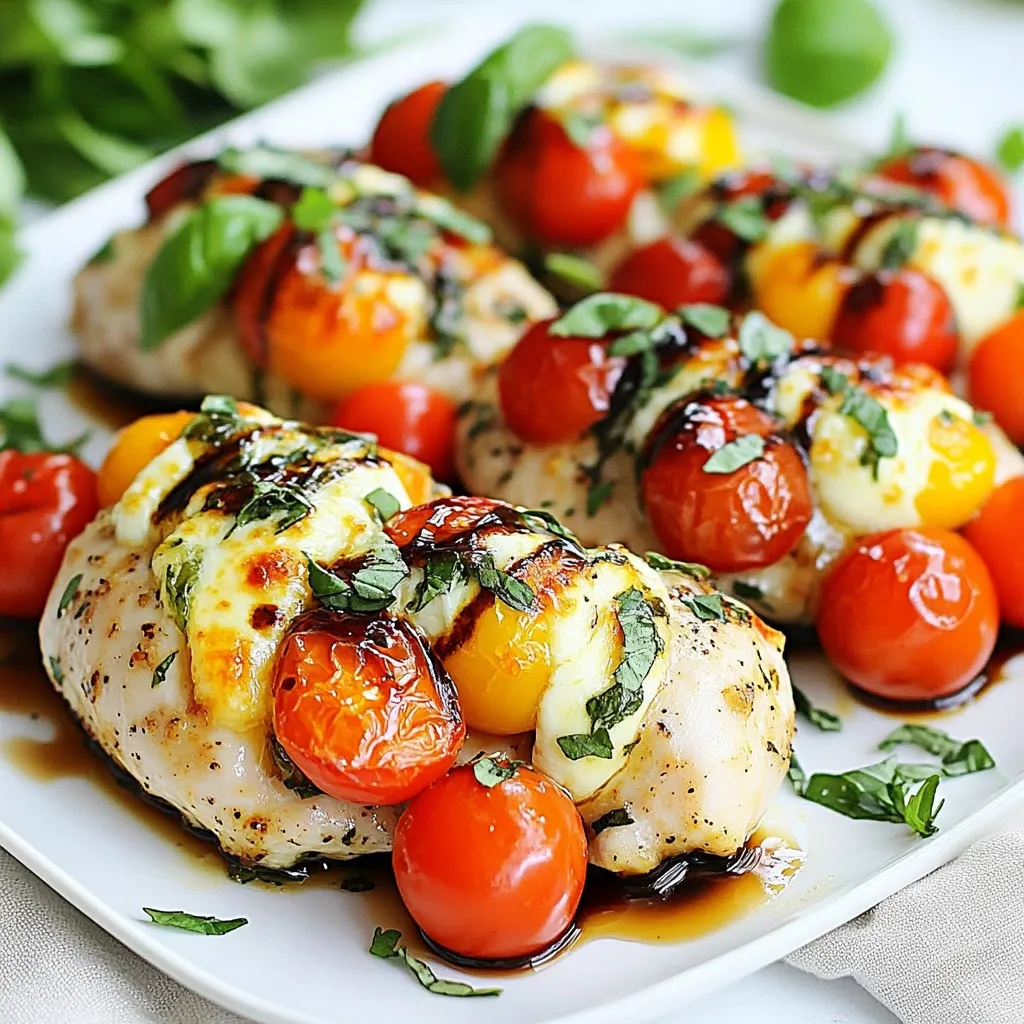
Caprese Stuffed Chicken Breast Flavorful Dinner Option
Looking for a dinner option that’s easy, flavorful, and impressive? You’re in the right place! Caprese stuffed chicken breast is a delightful dish that combines
- 1 lb ground beef or turkey - 1 medium onion, finely diced - 3 cloves garlic, minced - 1 can (28 oz) crushed tomatoes - 8 oz lasagna noodles, broken into bite-sized pieces - 1 cup ricotta cheese - 1 cup shredded mozzarella cheese, divided - 1/2 cup grated Parmesan cheese Lasagna soup has some key ingredients that make it hearty and tasty. You can use either ground beef or turkey. Both add great flavor. Onions and garlic give the soup depth. Crushed tomatoes form the soup base, while lasagna noodles make it filling. The cheeses create a creamy topping that melts beautifully. - 2 teaspoons Italian seasoning blend - 4 cups chicken or vegetable broth - 1/2 teaspoon red pepper flakes (optional, for a spicy kick) For flavor, I use an Italian seasoning blend. It gives the soup that classic taste. Chicken or vegetable broth adds richness. If you like spice, add red pepper flakes for a kick. This combination of seasonings makes the soup warm and inviting. - Fresh basil leaves - Salt and freshly ground black pepper Fresh basil leaves add a pop of color and flavor. It makes each bowl look fresh and appealing. Don't forget to season with salt and freshly ground black pepper. These simple touches make all the difference in taste. {{ingredient_image_2}} First, I heat a large pot over medium heat. I add one pound of ground beef or turkey. Cook the meat, breaking it up, for about five to seven minutes. The meat should be brown and fully cooked. Drain any fat to keep the soup light. Next, I add one finely diced onion to the pot. I sauté it for about three minutes. The onion should become soft and translucent. Then, I add three cloves of minced garlic. I cook it for one more minute. This step releases the garlic's lovely aroma. Once the onions and garlic are ready, I pour in one can of crushed tomatoes and four cups of chicken or vegetable broth. I stir well to mix everything. Then I sprinkle in two teaspoons of Italian seasoning and half a teaspoon of red pepper flakes if I want some heat. I also add a good pinch of salt and freshly cracked black pepper. I let this mixture simmer gently for a few minutes. Now it's time for the noodles. I break eight ounces of lasagna noodles into bite-sized pieces. I add them to the pot. I cook the noodles according to the package instructions, which usually takes about eight to ten minutes. I stir occasionally to stop them from sticking together. I aim for the noodles to be al dente, as they will soften more when served. While the noodles cook, I make the cheese mix. In a bowl, I combine one cup of ricotta cheese, half of the shredded mozzarella (which is one cup), and half a cup of grated Parmesan. I stir these together until they are creamy and smooth. This adds a rich texture to the soup. When the noodles are just right, I ladle the hearty soup into deep bowls. I top each bowl with a generous dollop of the cheese mixture. Then, I add the remaining mozzarella on top. Finally, I garnish each bowl with fresh basil leaves for a pop of color and flavor. - Adjusting cooking times for noodles: Lasagna noodles need to cook just right. Follow the package instructions, usually around 8-10 minutes is best. Check for al dente texture. This means they should be firm but not hard. They will soften a little more once you serve them, so don't overcook them in the pot. - Preventing a watery soup: To keep your soup thick, use less broth if you want a richer dish. You can also add more cheese to help with consistency. If you find your soup too thin, let it simmer longer to evaporate excess liquid. - Best types of bowls for presentation: Use deep, rustic bowls for serving. They hold heat well and look inviting. The shape also allows for a good mix of soup and toppings. - Adding olive oil or extra cheese: Drizzle a little high-quality olive oil on top before serving. It adds flavor and a nice sheen. You can also sprinkle more grated Parmesan cheese for a delicious finish. This extra touch makes your dish feel gourmet and special. Pro Tips Cook Noodles Separately: To keep the lasagna noodles from becoming too soft and mushy, consider cooking them separately and adding them to the soup just before serving. Use Fresh Herbs: Fresh basil not only adds flavor but also a vibrant color. Feel free to experiment with other fresh herbs like oregano or thyme for added depth. Make It Vegetarian: Substitute the ground meat with sautéed mushrooms or lentils for a hearty vegetarian version of this lasagna soup. Storage Tips: This soup can be stored in the refrigerator for up to 3 days. However, the noodles may absorb too much broth; consider adding extra broth when reheating. {{image_4}} You can swap ground beef or turkey for ground chicken. This change makes the soup lighter. You can also use plant-based options like lentils or crumbled tofu. Both choices add protein and keep the dish hearty. Adding veggies makes this soup even better. Try incorporating spinach or mushrooms into the pot. These add flavor and nutrition. If you want, substitute with other vegetables like zucchini or bell peppers. Just chop them up small so they cook evenly. Cheese is key to making lasagna soup tasty. You can mix different cheeses for a unique flavor. Try using provolone or gouda with mozzarella. If you're avoiding dairy, opt for vegan cheese. It melts well and keeps the soup creamy. To store your lasagna soup, let it cool first. Place it in a container with a tight lid. Glass or plastic containers work well for this. Make sure to store it in the fridge. Enjoy your leftovers within three to four days. This will keep the soup fresh and tasty. For long-term storage, you can freeze lasagna soup. First, let it cool completely. Then, pour it into freezer-safe bags or containers. Make sure to leave some space for expansion. Label the bags with the date before sealing. When you are ready to eat, thaw it overnight in the fridge. To reheat, pour the soup into a pot over low heat. Stir often to keep it from sticking. You can also use the microwave. Heat in short bursts, stirring in between. This helps keep the texture nice and creamy. Enjoy your cozy meal! To make lasagna soup vegetarian, simply skip the meat. Use mushrooms for a hearty texture. You can also add lentils for protein. Increase the amount of veggies like bell peppers or zucchini. These will add flavor and nutrition. Use vegetable broth instead of chicken broth for a richer taste. Yes, you can prepare lasagna soup in advance. Cook the soup, then let it cool. Store it in an airtight container in the fridge. It stays fresh for up to three days. For best results, add noodles just before serving. This keeps them from getting too soft. You can also freeze the soup for up to three months. Just reheat it slowly on the stove. If you don’t have ricotta cheese, try cottage cheese. It gives a similar creamy texture. You can also use cream cheese for a richer flavor. Blending silken tofu can make a great dairy-free option. Add some herbs to mimic the ricotta taste. In this post, we explored how to make a delicious lasagna soup. We covered essential ingredients like ground meat, veggies, and cheese, along with seasonings and garnishes. The step-by-step instructions guided you through cooking and serving the dish. I shared tips for storage, variations, and answered common questions. This soup is easy to customize to fit your taste. Don't hesitate to experiment with ingredients and make it your own. Enjoy this cozy meal with friends and family!
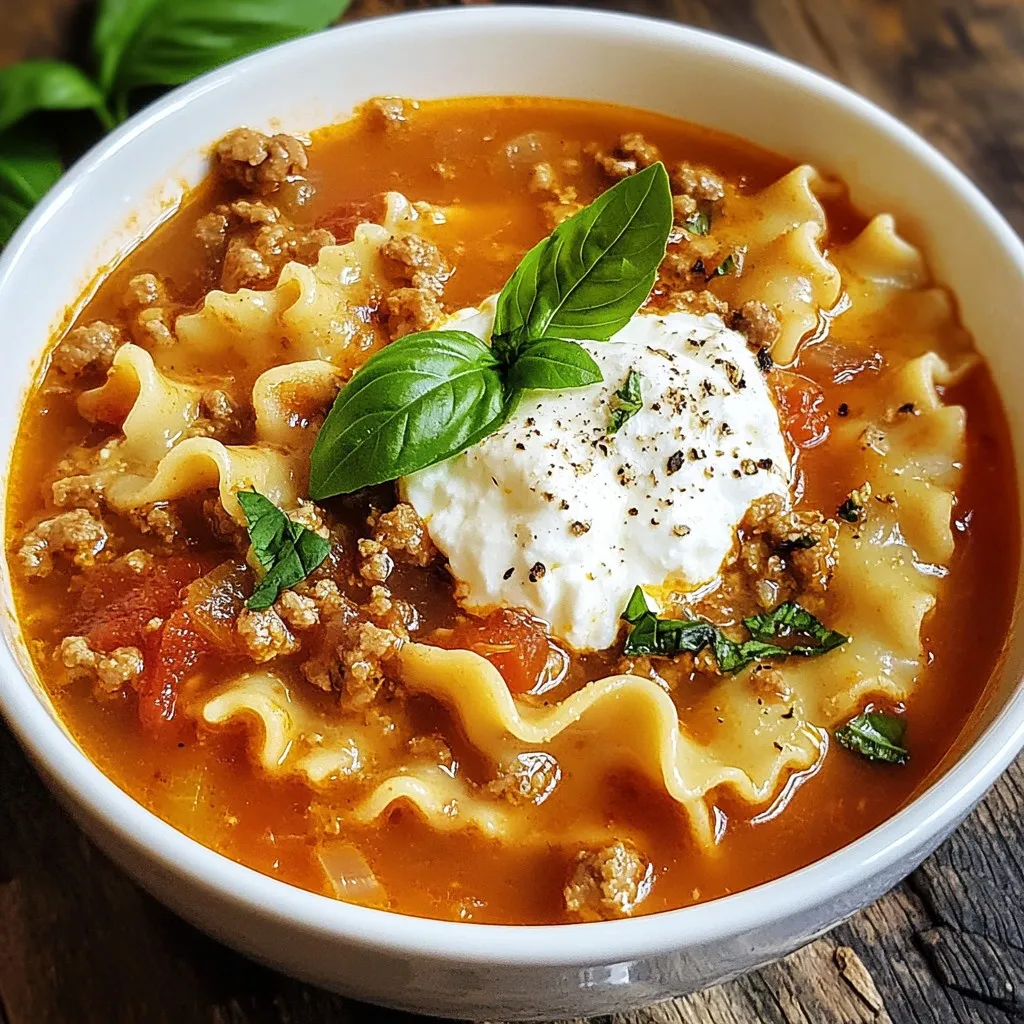
Lasagna Soup Hearty Meal for Cozy Nights
As the chill of evening settles in, nothing warms the soul quite like a bowl of Lasagna Soup. This hearty meal combines all the rich
- Chicken and Vegetables - 2 boneless, skinless chicken breasts, cut into bite-sized pieces - 2 cups fresh spinach, roughly chopped - 1 cup mushrooms, sliced (button or cremini) - 1 medium onion, diced - 2 cloves garlic, finely minced - Seasonings and Oils - 1 tablespoon extra virgin olive oil - 1 teaspoon dried oregano - 1 teaspoon smoked paprika - Salt and freshly ground black pepper to taste - ½ cup low-sodium chicken broth - Optional Add-Ins - ¼ cup freshly grated Parmesan cheese (optional) - Fresh parsley, chopped, for garnish You need simple, fresh ingredients to make this dish shine. The chicken and vegetables form the base. Fresh spinach and mushrooms give it color and nutrition. The onion and garlic add depth and flavor. For seasonings, olive oil is key for cooking. Oregano and smoked paprika bring warmth and earthiness to the dish. Use salt and pepper to enhance all the flavors. If you want a cheesy finish, add grated Parmesan cheese. It melts beautifully into the warm skillet. Lastly, garnish with fresh parsley for a pop of color and freshness. This one-pan meal is easy to make and packed with flavor. {{ingredient_image_2}} Heating the Olive Oil Start by heating the olive oil in a large skillet. Set the heat to medium-high. Wait until the oil shimmers. This step is key for great flavor. Sautéing Onions and Garlic Next, add the diced onion. Stir it for about three minutes. You want it soft and clear. Then, mix in the minced garlic. Keep stirring for one more minute. The aroma will fill your kitchen. Seasoning and Browning Tips Now it’s time to cook the chicken. Add the bite-sized chicken pieces. Sprinkle in the dried oregano, smoked paprika, salt, and black pepper. Stir often until the chicken turns brown. Make sure it is no longer pink inside. This should take about five to seven minutes. Incorporating Spinach Once the chicken is cooked, add the sliced mushrooms. Cook them for three to four minutes. You want them soft and juicy. Then, pour in the low-sodium chicken broth. Stir it well and let it simmer for two minutes. This helps all the flavors blend. Adding Parmesan Cheese Finally, stir in the roughly chopped spinach. Cook for one to two minutes. The spinach should look bright green and wilted. If you like cheese, sprinkle the grated Parmesan on top. Gently fold it in so it melts slightly. Now you have a tasty, one-pan meal! When selecting chicken, you have two main options: boneless and bone-in. - Boneless: This is quick to cook. It stays juicy and is easy to cut. - Bone-In: This adds more flavor but takes longer to cook. It can be less tender. I prefer boneless chicken for this recipe. It cooks fast and works well with the other flavors. Mushrooms can change the taste of your dish. Here are two great options: - Button Mushrooms: They have a mild taste. They soak up flavors well. - Cremini Mushrooms: These are richer and earthier. They add depth to the dish. In my skillet, I often mix both for a balanced flavor. It brings variety to each bite. Herbs can really boost the taste of your meal. Here are a few ideas: - Oregano: This is in the recipe already. It adds warmth and touch of spice. - Basil: Swap oregano for basil if you like a sweeter taste. - Thyme: This herb pairs well with chicken and adds an earthy note. Feel free to experiment! Fresh herbs work great too. Just remember to chop them finely to release their full flavor. Pro Tips Perfectly Seasoned Chicken: Ensure your chicken is well-seasoned before cooking. A good sprinkle of salt and pepper enhances the flavor and makes for a deliciously savory dish. Fresh Spinach Matters: Use fresh spinach for the best flavor and texture. Frozen spinach can turn the dish soggy and watery, so opt for fresh whenever possible. Customize Your Veggies: Feel free to add other vegetables like bell peppers or zucchini to the skillet for extra color and nutrition. Just make sure to adjust cooking times accordingly. Make It a Meal: Serve this dish over rice, quinoa, or pasta to make it more filling. Adding a side salad can also complement the meal beautifully. {{image_4}} You can easily change this dish by adding more veggies. Bell peppers add a sweet crunch. Just slice them and toss them in with the chicken. Zucchini is another great choice. Slice it into half-moons and add it when you add the mushrooms. Carrots can also work well. They add color and a little sweetness. Don't be afraid to mix and match! If you want to switch up the protein, turkey is a great option. Use ground turkey or cut turkey breast into pieces. It cooks quickly and tastes great with the same spices. Tofu is a perfect choice for a meatless meal. Press it to remove moisture, then cube it. Cook it until golden brown for the best flavor. Both options keep the dish light and healthy. For a creamy twist, you can add cream or yogurt. Heavy cream will make it rich and smooth. Stir in about ½ cup at the end. Greek yogurt is a healthier choice. Mix in a few tablespoons just before serving. It will give a tangy flavor and creaminess without extra fat. Both options make the dish even more delicious! After cooking, let the Chicken Spinach Mushroom Skillet cool. Store it in an airtight container. It lasts in the fridge for up to three days. Make sure to check for any signs of spoilage before eating. If you want to freeze the dish, let it cool completely first. Place it in a freezer-safe container or bag. Remove as much air as possible. This meal stays good in the freezer for about three months. When you’re ready to eat, thaw it in the fridge overnight. To reheat, you can use the stove or microwave. On the stove, heat it gently over low heat. Add a splash of chicken broth if it seems dry. Stir often to keep it from burning. In the microwave, heat in short intervals, stirring in between. This keeps the chicken and veggies tender. Enjoy your meal just like the first time! Yes, you can prepare this dish ahead of time. Cook it fully, then cool it down. Store it in an airtight container in the fridge. It stays good for about three days. When ready to eat, just reheat it on the stove or in the microwave. This saves time on busy days. Several side dishes go well with this skillet meal. Here are a few ideas: - Crusty artisan bread for dipping - Fluffy quinoa for added texture - Steamed rice for a filling option - A fresh garden salad for crispness These sides balance the flavors and add more nutrition to your meal. Yes, you can make this recipe dairy-free. Simply skip the Parmesan cheese. You can also use nutritional yeast for a cheesy flavor without dairy. This keeps the dish creamy and flavorful without any dairy. Yes, you can use frozen spinach instead of fresh. Just make sure to thaw and drain it well. This removes extra moisture. Add it to the skillet at the same time as you would fresh spinach. The flavors will still be great. If you don’t have chicken broth, there are good substitutes. You can use vegetable broth for a lighter flavor. Water with a bit of salt works too. For more depth, add a splash of soy sauce or Worcestershire sauce. These options keep the dish tasty and satisfying. This blog post covered the key elements of making a Chicken Spinach Mushroom Skillet. We explored the main ingredients and step-by-step instructions that lead to a tasty dish. I shared tips on choosing the right chicken and enhancing flavors with herbs. You can also try different vegetables and proteins, or make it creamy. Remember, proper storage keeps your meal fresh for longer. With these insights, you can now create a delicious, versatile meal that suits your taste. Enjoy cooking and experimenting with this easy recipe!
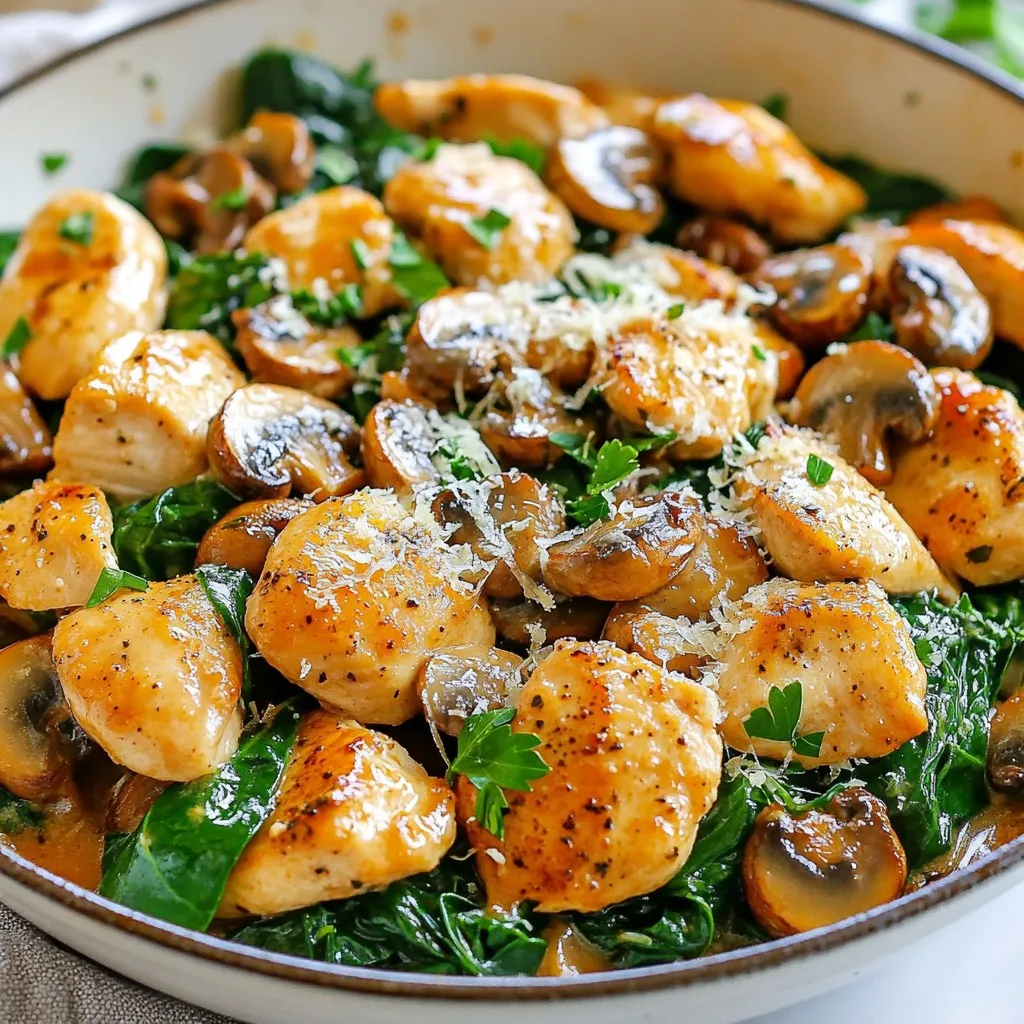
Chicken Spinach Mushroom Skillet Flavorful One-Pan Meal
Looking for a quick and tasty meal? The Chicken Spinach Mushroom Skillet is your answer! This one-pan dish combines tender chicken, fresh spinach, and savory
To make this tasty dish, you need just a few key items: - 12 oz fettuccine or spaghetti pasta - 4 tablespoons unsalted butter - 6 cloves garlic, minced - 1 cup heavy cream - 1 cup grated Parmesan cheese - Salt and black pepper, to taste These ingredients create a rich and creamy sauce that pairs perfectly with your pasta. If you want to kick up the flavor, consider adding: - 1/2 teaspoon red pepper flakes (for heat) - Fresh parsley, chopped (for garnish) - Zest of 1 lemon These additions bring brightness and a bit of spice to the dish. You can easily swap some ingredients for different flavors or dietary needs: - Use whole wheat pasta for added fiber. - Try olive oil instead of butter for a lighter sauce. - Replace heavy cream with coconut milk for a dairy-free option. - Use nutritional yeast in place of Parmesan for a vegan twist. These substitutions can help you tailor the dish to your taste or dietary needs. {{ingredient_image_2}} Start by filling a large pot with water. Add a good amount of salt to it. Bring the water to a boil. Once it bubbles, add 12 ounces of fettuccine or spaghetti. Cook it for about 8 to 10 minutes. You want it to be al dente, which means it'll have a little bite. Before draining, save one cup of the pasta water. Then, drain the rest and set the pasta aside. In a large skillet, melt 4 tablespoons of unsalted butter over medium heat. Once it melts, add 6 minced cloves of garlic. Stir it for 1 to 2 minutes. You want the garlic to smell good and turn light golden. Be careful not to let it burn; burnt garlic can taste bitter. Next, slowly pour in 1 cup of heavy cream. Stir it while you pour. Let the mix come to a gentle simmer. Cook it for 3 to 5 minutes until it thickens a bit. Stir it now and then to keep it smooth. Add 1 cup of grated Parmesan cheese to the skillet. Whisk it while it melts. If the sauce is too thick, mix in a bit of the reserved pasta water. Then, add 1/2 teaspoon of red pepper flakes if you want heat, along with salt and black pepper to taste. Lastly, stir in the zest of 1 lemon for a bright flavor. Now, add the drained pasta into the skillet. Gently toss it in the creamy sauce until it's fully coated. Heat it for another minute to blend all the flavors well. Remove the skillet from the heat when done. Serve the pasta in bowls. Top with chopped fresh parsley and extra Parmesan cheese if you like. For a nice touch, serve it with lemon wedges on the side. This will add color and enhance the flavor. Enjoy your delicious dish! To make great pasta, start with plenty of water. This helps the pasta cook evenly. Use a large pot and add a lot of salt. The salt adds flavor. Bring the water to a rolling boil before adding your pasta. For fettuccine or spaghetti, cook for 8 to 10 minutes. Check for al dente by tasting a piece. It should be firm but not hard. Reserve one cup of the cooking water; it’s great for adjusting your sauce later. For a richer taste, use fresh garlic. Mince six cloves and sauté them in butter. This gives a nice, aromatic base. Adding red pepper flakes can bring heat, but it’s optional. Lemon zest brightens the dish, adding a fresh note. Always taste your sauce before serving. Adjust salt and pepper to your liking. Fresh parsley also adds a pop of color and flavor when you sprinkle it on top. One common mistake is overcooking the pasta. Always aim for al dente. Another issue is burning the garlic. Sauté it only until it’s fragrant and lightly golden. If it turns brown, it will taste bitter. Avoid adding too much cheese at once; it can clump. Gradually whisk it in for a smooth sauce. Lastly, don’t skip reserving pasta water. It helps to create the perfect sauce consistency. Pro Tips Use Fresh Garlic: Freshly minced garlic will provide a more robust flavor compared to pre-minced garlic. Always opt for fresh for the best taste. Reserve Pasta Water: Always reserve some pasta cooking water before draining. This starchy water can help adjust the sauce's consistency and enhance its creaminess. Grate Your Own Cheese: Pre-grated Parmesan often contains anti-caking agents that can affect melting. Grating your own cheese will yield a smoother, creamier sauce. Let It Rest: Allowing the pasta to sit for a minute after mixing with the sauce will help the flavors meld together, resulting in a more delicious dish. {{image_4}} You can easily make this pasta dish heartier by adding protein. Chicken is a great choice. Simply cook diced chicken in the skillet before adding garlic. Shrimp works well too. Sauté the shrimp until pink, then add garlic. Both options give the dish more flavor and nutrition. Adding veggies can make this meal healthier. Spinach is a fantastic option. Toss in fresh spinach right after adding the pasta. It wilts down nicely. You can also add cherry tomatoes or broccoli. Cook them briefly in the garlic butter before adding the cream for extra taste. For a dairy-free version, replace heavy cream with coconut milk. It adds a nice richness. Nutritional yeast can replace Parmesan cheese for a cheesy flavor. Use vegan butter instead of regular butter. This way, everyone can enjoy this creamy pasta dish, no matter their diet. Store your leftover Garlic Parmesan Pasta in a sealed container. Let the pasta cool first. It stays fresh for about three days in the fridge. If you want to keep it longer, freezing is a great option. To reheat, place the pasta in a skillet over medium heat. Add a splash of water or cream to help it get creamy again. Stir often until it is warmed through. You can also use the microwave. Just heat in short bursts, stirring in between. If you want to freeze the pasta, do this before adding any fresh parsley. Place it in an airtight container or freezer bag. It can last for up to three months in the freezer. When you’re ready to eat, thaw it in the fridge overnight before reheating. You can use whole milk or half-and-half. For a lighter option, use Greek yogurt. Both will still create a creamy sauce. If you want a dairy-free swap, try coconut milk or cashew cream. They add richness and flavor. Add red pepper flakes for heat. Start with 1/2 teaspoon and adjust to your taste. You can also add diced jalapeños or hot sauce for an extra kick. Mix them in with the garlic for the best flavor. Yes! Fettuccine and spaghetti work well, but you can use any pasta. Penne, rigatoni, or even gluten-free pasta are great choices. Just adjust cooking times according to the package instructions. Serve this pasta with a fresh salad or garlic bread. A side of steamed vegetables like broccoli or asparagus pairs nicely too. For protein, grilled chicken or shrimp make excellent additions. If your sauce is thick, add pasta cooking water. Start with a tablespoon and stir well. Keep adding until you reach your desired consistency. You can also mix in more heavy cream or milk if needed. This blog post covered how to make Garlic Parmesan Pasta. You learned about key ingredients, like garlic and cheese. You also found tips to avoid mistakes and make it your own. Remember, cooking is all about experimenting. Feel free to change the recipe using your favorite flavors. Whether you add protein, veggies, or go dairy-free, the options are endless. Enjoy creating and sharing this easy dish!
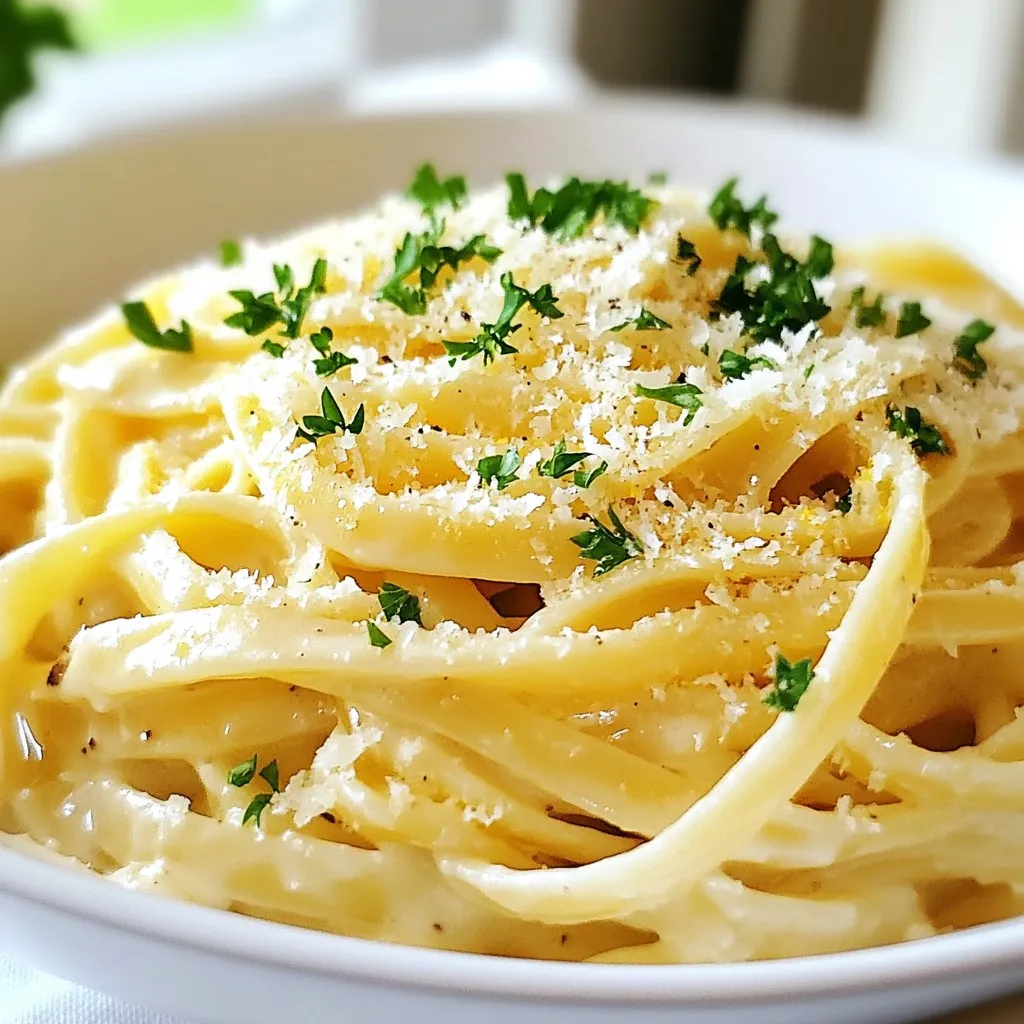
Garlic Parmesan Pasta Savory and Simple Recipe
Are you craving a quick and tasty meal? Garlic Parmesan Pasta is your answer! This dish is savory, creamy, and simple. With just a few
- 8 oz pasta (penne or fusilli are great choices) - 3 cups fresh broccoli florets - 1 tablespoon extra-virgin olive oil - 2 cloves garlic, minced - 1 cup vegetable broth (low-sodium is best) - 1 cup heavy cream or coconut cream - 1/2 cup grated Parmesan cheese or nutritional yeast - 1 teaspoon lemon zest - 1 teaspoon sea salt - 1/2 teaspoon black pepper - 1/4 teaspoon red pepper flakes (optional) - Fresh parsley, chopped for garnish You need a large pot or deep skillet for this dish. A wooden spoon helps mix everything well. A sharp knife makes cutting the garlic and broccoli easier. A measuring cup is key for the broth and cream. You can swap the pasta for gluten-free options if needed. Use almond milk if you want a lighter cream. For a vegan option, try nutritional yeast instead of cheese. If you don’t have fresh broccoli, frozen works too. Just add it in with the pasta. {{ingredient_image_2}} Start by heating 1 tablespoon of extra-virgin olive oil in a large pot. Use medium heat. Once the oil is hot, add 2 cloves of finely minced garlic. Sauté the garlic for 1-2 minutes. Stir it often until it smells good and turns golden. Be careful not to burn the garlic, as it can taste bitter. Next, add 8 ounces of your favorite pasta to the pot. I like penne or fusilli. Toss in 3 cups of fresh broccoli florets. Mix them well with the garlic and oil. Pour in 1 cup of low-sodium vegetable broth, so the pasta and broccoli are under the liquid. Season with 1 teaspoon of sea salt, 1/2 teaspoon of black pepper, and 1/4 teaspoon of red pepper flakes if you want heat. Bring this to a boil. When it boils, reduce the heat. Cover the pot and let it simmer for about 10-12 minutes. Stir it occasionally until the pasta is al dente and most of the broth is gone. Now, lower the heat again. Add 1 cup of heavy cream or coconut cream if you prefer dairy-free. Also, add 1/2 cup of freshly grated Parmesan cheese and 1 teaspoon of lemon zest. Stir this mixture until the cheese melts and the sauce becomes creamy. Make sure to taste it. Adjust the salt and pepper if needed. Serve the pasta hot, topped with fresh parsley for extra flavor. Enjoy your delicious, one-pot meal! To get the best pasta, start with the right amount of water. Use enough broth to cover the pasta and broccoli. This helps them cook evenly. Stir often while it cooks. This keeps the pasta from sticking together. Check the pasta a minute or two before the time is up. It should be firm but not hard. This is called al dente. If you overcook it, the pasta can become mushy and lose its bite. Seasoning makes a big difference in taste. Start with sea salt in the broth. This adds depth to the dish. Add freshly cracked black pepper for a mild kick. If you want more heat, sprinkle in red pepper flakes. Don’t forget the lemon zest! It brightens the flavors and adds a fresh twist. Always taste your dish as you go. Adjust the salt and spice to fit your taste. To get a rich and creamy sauce, add the heavy cream slowly. Stir it in gently so it mixes well. Freshly grated Parmesan cheese melts better than pre-grated cheese. It gives a smooth texture. If you want a dairy-free option, use coconut cream. It works great and adds a unique flavor. Make sure to stir continuously until everything is well combined. This will help your sauce stay creamy and delicious. Pro Tips Perfect Pasta Timing: To achieve the best texture, cook the pasta until it's just al dente, as it will continue to cook slightly in the sauce. Broccoli Brightness: To maintain the vibrant green color of the broccoli, consider blanching it in boiling water for a minute before adding it to the pasta. Creamy Consistency: If the sauce gets too thick, you can thin it out with a splash of additional vegetable broth or water. Flavor Boost: For an extra layer of flavor, add a tablespoon of Dijon mustard or a squeeze of fresh lemon juice before serving. {{image_4}} You can easily make this dish vegan. Just swap the heavy cream for coconut cream. It adds a rich, creamy taste without dairy. Plus, it pairs well with the broccoli and garlic. Use the same amount as the heavy cream in the recipe. You can also replace Parmesan with nutritional yeast for a cheesy flavor. This keeps the dish plant-based while still being full of taste. If you want extra protein, chicken or tofu works great. For chicken, use diced pieces and add them after cooking the garlic. Sauté until they’re browned. Then add the pasta and broccoli. If you prefer tofu, use firm tofu. Cube it and sauté it with garlic. Both options make your meal heartier and more filling. If you need gluten-free pasta, don’t worry! There are many good options. Look for gluten-free penne or fusilli. Most brands cook well and taste great. Just check the package for cooking times. Follow the same steps in the recipe, and you will have a delicious dish that everyone can enjoy. After you make this dish, let it cool down first. Then, transfer it to an airtight container. Store it in the fridge for up to three days. The creamy sauce may thicken as it sits. You can add a splash of broth or cream when reheating to loosen it up. If you want to save some for later, freezing is a good option. Make sure the dish is completely cool before freezing. Use a freezer-safe container or bag. This dish can last for up to three months in the freezer. To reheat, thaw it overnight in the fridge. When you're ready to enjoy your pasta again, heat it gently. Use a pot on low heat. Add a little broth or cream to help the sauce return to its creamy state. Stir often to avoid burning. You can also microwave it in short bursts, stirring in between. Enjoy it just like you did the first time! Yes, you can use frozen broccoli. It cooks well in this dish. Just add it when you add the pasta. Frozen broccoli is often pre-cooked, so it will blend nicely. Just keep an eye on the cooking time. You want it tender but not mushy. To lower calories, try these tips: - Use whole grain pasta instead of regular pasta. - Swap heavy cream for low-fat milk or unsweetened almond milk. - Cut back on cheese or use a smaller amount of nutritional yeast. - Add more vegetables like spinach or zucchini for bulk without extra calories. These changes keep the dish tasty while making it lighter. This dish pairs well with many sides, such as: - A fresh green salad with lemon vinaigrette. - Garlic bread for a comforting touch. - Grilled chicken or shrimp for added protein. - Roasted veggies to add more flavor and nutrients. Feel free to mix and match based on your mood and guests! This blog covered everything you need for One Pot Creamy Broccoli Pasta. We looked at key ingredients, cooking steps, and helpful tips. You learned how to switch ingredients and make it vegan or gluten-free. We also discussed how to store and reheat leftovers. In the end, you can make a tasty dish that suits your taste. Enjoy trying it out!
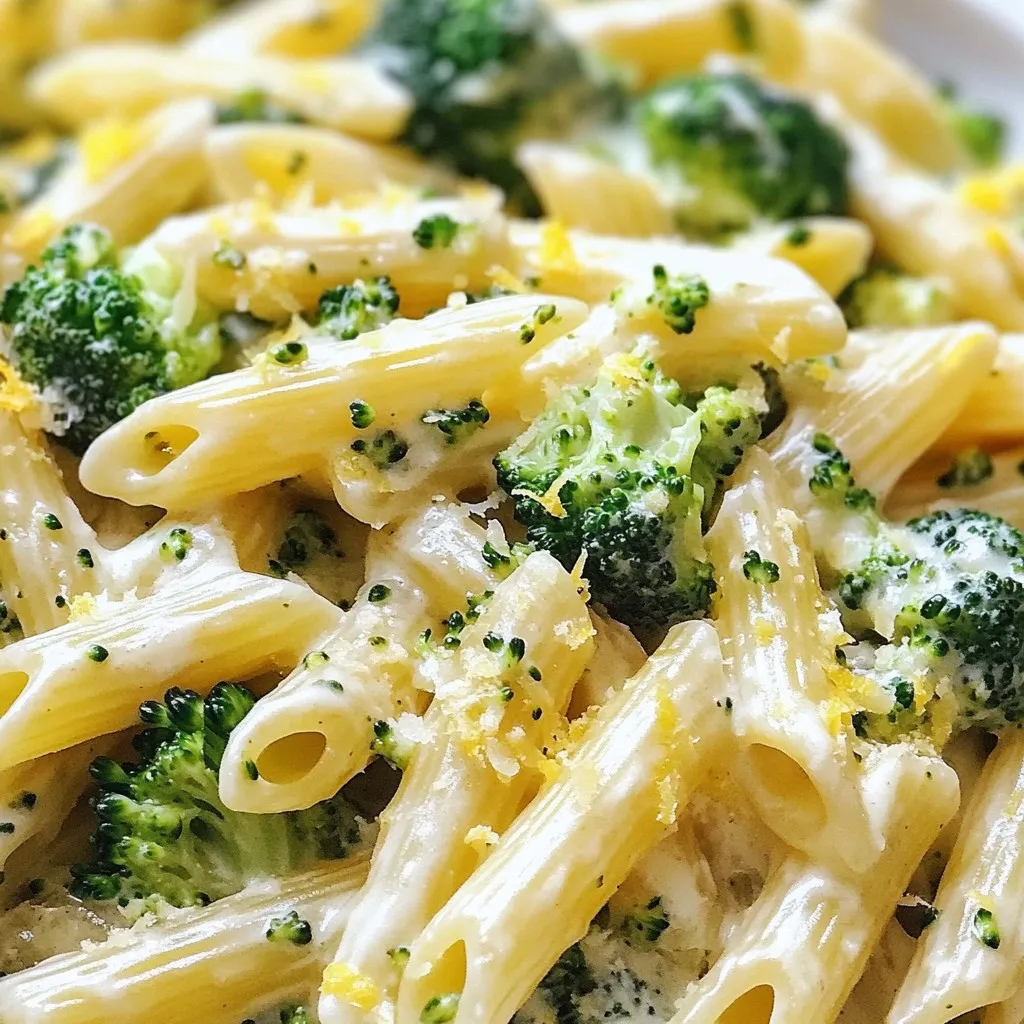
One Pot Creamy Broccoli Pasta Simple Yet Flavorful Dish
Looking for a quick meal that’s rich in flavor? Try this One Pot Creamy Broccoli Pasta! I’ll show you how to make this easy dish
To make Chicken with Buttered Noodles, gather these simple yet tasty ingredients. Each one plays a role in creating a delicious meal. - 2 boneless, skinless chicken breasts - 200g egg noodles - 3 tablespoons unsalted butter - 3 cloves garlic, finely minced - 1 cup chicken broth - 1 cup heavy cream - 1 tablespoon olive oil - 1/2 teaspoon dried thyme - 1/2 teaspoon paprika - Salt and freshly cracked pepper to taste - Fresh parsley, chopped (for garnish) - Grated Parmesan cheese (optional) These ingredients bring out rich flavors and textures. The chicken is the star, while the noodles soak up the creamy sauce. Minced garlic adds a nice touch, and seasonings like thyme and paprika enhance the taste. Don't forget the butter; it makes everything better! When you have these ingredients ready, you're set for a fun cooking adventure. {{ingredient_image_2}} Start by filling a large pot with salted water. Bring it to a rolling boil. Once boiling, add the egg noodles. Cook them as per the package instructions until they are al dente. This usually takes about 5 to 7 minutes. After they are done, drain the noodles. Let them rest in the colander while you prepare the chicken. While the noodles cook, take your chicken breasts. Season both sides with salt, freshly cracked pepper, paprika, and dried thyme. Make sure the chicken is well-coated. This will give it great flavor. Heat a large skillet over medium-high heat. Add olive oil when the skillet is hot. Place the seasoned chicken breasts into the skillet. Cook them for about 6 to 7 minutes on each side. You want the chicken to turn a rich golden brown. Check that the internal temperature reaches 165°F. Once done, take the chicken out and let it rest for a few minutes. In the same skillet, add unsalted butter. Let it melt completely over medium heat. Once melted, add minced garlic. Sauté the garlic for about 1 minute. Stir it often until it gets fragrant and lightly golden. Next, carefully pour in the chicken broth. Use a wooden spoon to scrape the bottom of the pan. This helps to deglaze the pan and mix in the tasty browned bits. Bring the mixture to a gentle simmer. Then, stir in the heavy cream. Let it cook for 3 to 5 minutes until the sauce thickens a bit. Stir occasionally to avoid sticking. Slice the rested chicken into strips or small pieces. Add it back to the skillet with the creamy sauce. Gently fold in the drained egg noodles. Toss everything together until the noodles are well-coated with the sauce. Give your dish a taste. Adjust the seasoning, adding more salt and pepper if you need it. For serving, plate big portions of the creamy garlic chicken with the buttered noodles. Garnish with fresh chopped parsley. If you enjoy cheese, sprinkle some grated Parmesan cheese on top. To make your chicken with buttered noodles taste even better, try adding a few extra spices. You can sprinkle in garlic powder or onion powder for depth. A squeeze of fresh lemon juice will brighten up the dish. For a kick, consider red pepper flakes. To keep your chicken juicy, make sure to sear it well. Use medium-high heat and don't rush the cooking. Let each side cook for about 6-7 minutes. This helps lock in moisture. Always check that the chicken reaches 165°F (75°C) for safety. Let it rest after cooking to keep those juices intact. Here are some useful tools for this recipe: - Large pot for boiling noodles - Skillet for searing chicken - Wooden spoon for stirring - Measuring cups for liquids - Knife for slicing chicken These tools make cooking easier and help you get the best results. After cooking, cleanup can be simple. Soak pots and pans in warm, soapy water right away. This helps loosen any stuck food. Use a non-stick skillet to reduce scrubbing time. Wipe down surfaces as you cook to keep things neat. If you have any leftovers, store them in a container quickly to avoid mess. Pro Tips Use Fresh Ingredients: Always opt for fresh garlic and herbs for the best flavor. Fresh ingredients can elevate the dish and provide a more vibrant taste. Rest the Chicken: Allowing the chicken to rest after cooking helps retain its juices, making it more tender and flavorful when sliced. Deglaze Properly: When adding the chicken broth, make sure to scrape up all the browned bits from the skillet. These bits add depth and richness to your sauce. Adjust Consistency: If your sauce is too thick, you can thin it out with a splash of additional chicken broth or a bit of pasta water to achieve your desired consistency. {{image_4}} You can switch up the chicken for other meats or tofu. For a beef option, try thinly sliced steak. It adds a great flavor and cooks quickly. Pork tenderloin also works well; just make sure to cook it until it’s tender. Tofu is a fantastic choice too. Use firm tofu for the best texture. Press it to remove excess moisture, then cube it before cooking. Each of these options gives the dish a unique twist. If you need gluten-free options, consider rice noodles or zucchini noodles. Rice noodles cook quickly and have a light texture. They absorb the sauce nicely too. Zucchini noodles, or zoodles, are a healthy and fun choice. They offer a fresh taste and are low in carbs. Just sauté them briefly to keep them crisp. You can jazz up the cream sauce by adding vegetables. Spinach, mushrooms, or broccoli work great. Just toss them in while sautéing the garlic. For a different flavor, try using flavored creams like garlic or herb-infused cream. You can even mix in a splash of white wine for depth. These changes will keep the dish exciting every time you make it! To store leftovers, let the dish cool down. Place it in an airtight container. Make sure to seal it well. Store it in the fridge for up to three days. This keeps the chicken and noodles fresh and tasty. To reheat, use the stovetop or microwave. If using the stovetop, add a splash of chicken broth. Heat over low to medium heat, stirring gently. This keeps the noodles creamy and the chicken juicy. In the microwave, cover the dish with a damp paper towel. Heat it in short bursts, stopping to stir. This prevents drying out. If you want to freeze your leftovers, use freezer-safe containers. Cool the dish completely before packing. Seal tightly to avoid freezer burn. The dish can last up to three months in the freezer. When ready to eat, thaw it in the fridge overnight. Reheat as described above, adding broth if needed. Yes, you can make Chicken with Buttered Noodles ahead of time. Cook the noodles and chicken as planned. After cooking, let everything cool. Store the noodles and chicken in separate containers. You can keep it in the fridge for up to three days. When you're ready to eat, reheat the chicken and noodles together. Add a splash of cream if the sauce is too thick. This meal prep method saves time on busy nights. You can serve many sides with Chicken with Buttered Noodles. Here are some ideas: - Steamed broccoli: This adds color and nutrients. - Garlic bread: It complements the creamy sauce well. - Side salad: A fresh salad balances the meal. - Roasted vegetables: Seasonal veggies add flavor and crunch. These choices make your meal more complete and enjoyable. To check if the chicken is cooked, use a meat thermometer. The internal temperature should reach 165°F (75°C). If you don’t have a thermometer, cut into the thickest part of the chicken. The meat should be opaque and juices should run clear. Avoid undercooking, as this can lead to foodborne illness. Properly cooked chicken is safe and delicious. Yes, this dish is very family-friendly. Children often love the creamy sauce and tender chicken. The noodles are easy to eat and fun for kids. You can even let them help mix the noodles and sauce. This dish is not only tasty but also a great way to gather around the table. It encourages family time while enjoying a comforting meal together. This blog post guides you through making Chicken with Buttered Noodles. We covered key ingredients, cooking steps, and tips to enhance flavor. I shared variations for different diets and storage advice for leftovers. Remember, this dish is simple and great for families. You can adjust it to fit your taste. Enjoy your cooking and savor every bite!
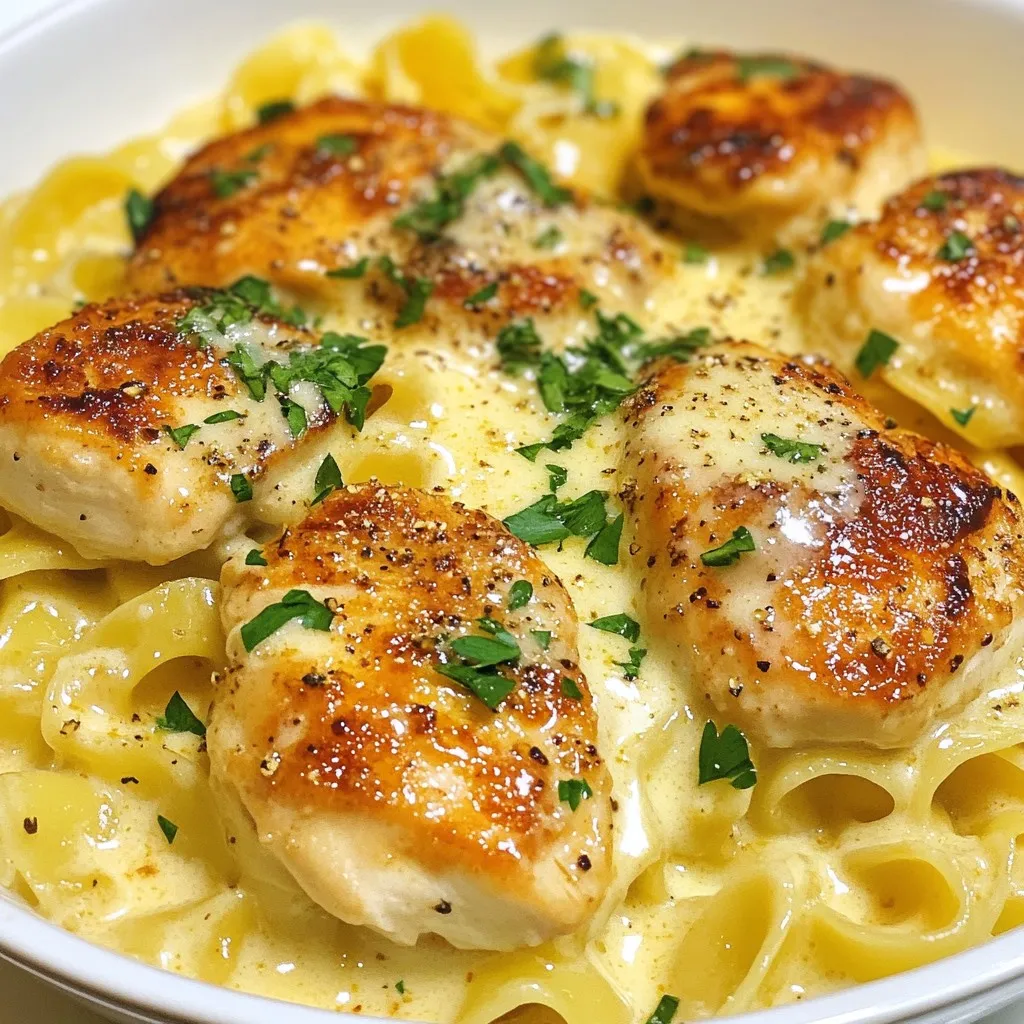
Chicken with Buttered Noodles Flavorful Dinner Recipe
Looking for a quick and tasty dinner? This Chicken with Buttered Noodles recipe checks all the boxes! It’s easy to make and packed with flavor.
- 1 lb sirloin steak - 4 tablespoons unsalted butter - 4 cloves garlic - 1 tablespoon fresh parsley - 1 teaspoon smoked paprika - Salt and freshly ground black pepper - 1 tablespoon olive oil The main stars of this dish are simple yet powerful. The sirloin steak brings a rich taste that is hard to beat. Butter adds a creamy texture, while garlic gives it a strong flavor. Fresh parsley brightens each bite, making it feel fresh. Smoked paprika adds a hint of warmth and depth. For seasoning, I use salt and black pepper. These help to enhance all the flavors. Olive oil is crucial for getting a nice sear on the steak. It helps create that delicious crust we all love. When you gather these ingredients, you're ready for a meal that is quick, tasty, and satisfying. I always keep these items on hand for busy nights when I crave something special. {{ingredient_image_2}} First, pat the sirloin steak cubes dry with paper towels. This step removes excess moisture, helping to get that perfect sear. Once they are dry, season the steak pieces well. Use salt, freshly ground black pepper, and smoked paprika. This mix adds great flavor and depth to the bites. Next, heat olive oil in a large skillet over medium-high heat. Wait until the oil shimmers slightly. Then, carefully add the seasoned steak cubes in a single layer, avoiding overcrowding. Let them sear undisturbed for 2-3 minutes. This helps form a golden-brown crust. Flip the steak bites with tongs and cook for another 2-3 minutes. Check for doneness; aim for medium rare to medium for the best texture. After cooking the steak, reduce the heat to medium. Move the steak bites to one side of the skillet. On the other side, add the butter and minced garlic. Allow the butter to melt and the garlic to sauté for about 30 seconds. Stir often to keep the garlic from burning. Finally, toss the steak bites in the melted garlic butter. Ensure each bite is well coated with that rich flavor. To get a nice sear on your steak bites, start with dry meat. Pat the sirloin steak cubes with paper towels to remove any moisture. This helps the meat brown well. Season the cubes with salt, pepper, and smoked paprika. This adds great flavor. When searing, heat the olive oil in a hot skillet. Wait until it shimmers before adding the steak. Place the cubes in a single layer. Let them cook without moving for 2-3 minutes. Flip them and cook for another 2-3 minutes. Aim for medium rare to medium for the best taste. You can boost the flavor by adding herbs or spices. Fresh thyme or rosemary works well with garlic. They add depth to the dish. You might also try some chili flakes for a bit of heat. Just a pinch can make a big difference. Balancing saltiness is key. Taste your steak bites before serving. If they need more flavor, sprinkle a bit more salt or pepper. This small step can make your dish pop. When serving garlic butter steak bites, think about presentation. A side of crusty bread is great to soak up the garlic butter. You can also add a simple mixed greens salad for a fresh touch. This makes for a complete meal. For a colorful finish, garnish with extra chopped parsley. It not only looks nice but also adds a burst of freshness. Arrange the steak bites on a nice plate to impress your guests. Pro Tips Pat the Steak Dry: Ensuring the steak cubes are dry before seasoning helps achieve a perfect sear, locking in juices for a tender bite. Don’t Overcrowd the Pan: Searing the steak in batches if necessary allows each piece to brown properly, enhancing flavor and texture. Control the Heat: Adjusting the heat as needed while cooking prevents the garlic from burning, ensuring a rich, flavorful butter sauce. Garnish for Flavor: Adding fresh parsley at the end not only enhances the dish's appearance but also adds a fresh flavor contrast to the rich garlic butter. {{image_4}} You can switch up the steak for this dish. While sirloin is great, try ribeye or tenderloin. Ribeye offers a rich flavor and nice marbling. Tenderloin is super tender and lean. Both cuts can make your steak bites even better. Don’t be afraid to play with flavors. Fresh herbs like thyme or rosemary add depth. You can add chili flakes for a spicy kick. This adds a different layer to the dish. Mix and match spices to find what you love. Think about what to serve with your steak bites. A rich sauce like chimichurri adds brightness. You can also pair them with simple sides. A fresh salad or some crusty bread works well. Adding a side of veggies can make it a complete meal. To keep your garlic butter steak bites fresh, store them in the fridge. Place them in an airtight container. This helps prevent moisture loss and keeps flavors intact. Make sure to let them cool to room temperature before sealing the container. They will last up to 3 days. When you're ready to enjoy leftovers, reheating is key. Use a skillet on low heat. Add a splash of olive oil to prevent sticking. Stir gently until heated through. This method keeps the steak tender and juicy. Avoid using the microwave, as it may overcook the meat and make it tough. If you don’t have sirloin steak, try these options: - Ribeye steak: This cut is very tender and has great flavor. - Tenderloin: Known for being lean, this is a great choice too. - Flat iron steak: A budget-friendly option with good taste and texture. - Flank steak: It works well, but slice it against the grain for tenderness. Each of these cuts keeps the rich flavor and texture you want. To check doneness without cutting, use a meat thermometer. Here’s a quick guide: - 125°F: Rare - 135°F: Medium rare - 145°F: Medium - 160°F: Well done If you don’t have a thermometer, gently press the steak. A soft feel means rare, while a firmer touch means more cooked. Practice makes perfect! Yes, you can easily double this recipe. Just make sure to: - Use a larger skillet or cook in batches to avoid crowding. - Increase the garlic and butter as needed for flavor. - Adjust the cooking time slightly if you have more steak bites. This way, you can serve larger groups without losing taste! You’ve learned how to make delicious garlic butter steak bites from scratch. We covered every step, from selecting the best ingredients to cooking and storing leftovers. Remember, seasoning and cooking time are key to perfect steak bites. Experiment with different cuts and flavors to find your favorite version. Serve these bites hot with sides for an impressive dish. Enjoy the process, and let your creativity shine in the kitchen!
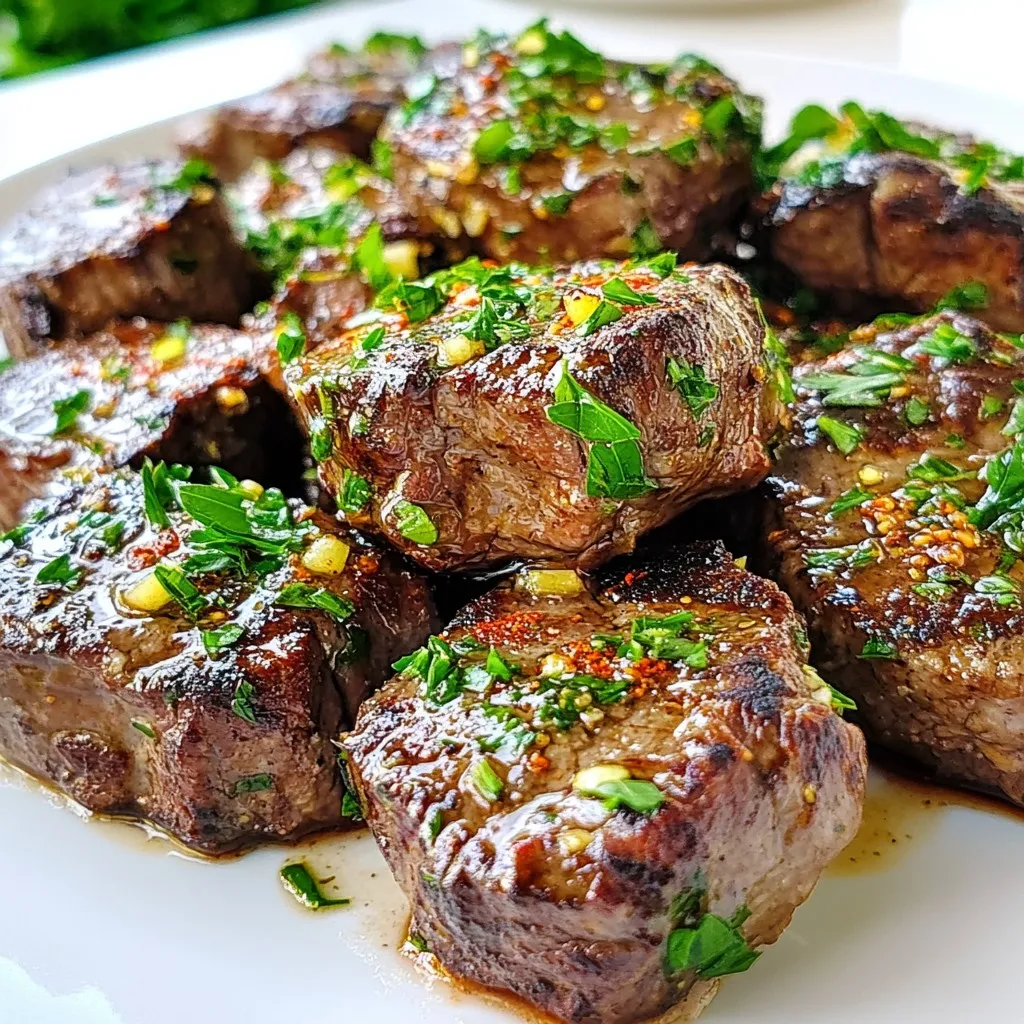
Garlic Butter Steak Bites Savory and Quick Meal
Are you ready for a meal that’s both quick and full of flavor? Garlic Butter Steak Bites offer a savory delight that you can whip
- 2 white fish fillets (tilapia or cod) - 1 tablespoon olive oil - 1 teaspoon smoked paprika - 1 teaspoon ground cumin - Salt and freshly ground black pepper, to taste - 8 small corn or flour tortillas - 1 ripe mango, diced into small pieces - 1/2 medium red onion, finely chopped - 1 jalapeño pepper, seeded and minced - 1/4 cup fresh cilantro leaves, chopped - Juice of 1 fresh lime - 1 ripe avocado, sliced thinly - 1/2 cup sour cream or Greek yogurt {{ingredient_image_2}} To start, preheat your grill or skillet to medium-high heat. This step is key for cooking the fish evenly. Brush both sides of your white fish fillets with olive oil. Next, season the fillets with smoked paprika, ground cumin, salt, and pepper. Make sure each fillet is well coated with the spices. Now, place the seasoned fish on the hot grill or skillet. Cook for about 3-4 minutes on each side. You want the fish to be fully cooked and flaky. Once done, remove the fish from heat and let it rest for a minute. This helps keep the fish moist and tender. Grab a medium-sized bowl and combine the diced mango, chopped red onion, minced jalapeño, and cilantro. The mix of these ingredients creates a vibrant and fresh salsa. Squeeze the juice of one lime over the mixture and stir well. This adds zing to the salsa. Taste your creation and adjust the seasoning with salt if needed. A little extra salt can really boost the flavors. Take another skillet and warm the tortillas over low heat. Heat them for about 30 seconds on each side. This makes them soft and easier to fold. Once warmed, use a fork to flake the rested fish into bite-sized pieces. Now, assemble your tacos. Place a generous amount of flaked fish in the center of each tortilla. Top with a hearty spoonful of mango salsa. Don’t forget to add a slice of avocado on top for a creamy touch. Finish off with a drizzle of sour cream or Greek yogurt. You can also sprinkle more cilantro for added flavor and color. Enjoy your colorful and tasty tacos! To cook fish perfectly, start with fresh fillets. I prefer tilapia or cod. Heat your grill or skillet to medium-high. Brush the fish with olive oil for moisture. Season it generously with smoked paprika and cumin. These spices give the fish a warm, smoky flavor. Cook the fillets for about 3-4 minutes on each side. Look for the fish to flake easily with a fork. This means it is ready. Let it rest to keep it juicy. For the mango salsa, you can play with the ingredients. Try adding diced pineapple or cucumber for a twist. Want more spice? Increase the jalapeño or add a dash of cayenne. For a milder version, skip the jalapeño. You could also mix in diced bell peppers for color and crunch. Always taste your salsa before serving, adjusting salt as needed. Serve your tacos with a side of lime wedges. They add a bright flavor when squeezed over the top. A simple side of black beans or corn salad pairs well too. For presentation, use a colorful platter. Arrange the tacos neatly and sprinkle with extra cilantro. This adds a nice pop of green. Enjoy the vibrant colors and fresh flavors! Pro Tips Fresh Ingredients: Always opt for ripe mangoes and fresh cilantro to enhance the flavor of your salsa. The freshness makes a significant difference! Cooking Fish: To prevent overcooking, keep an eye on the fish while it cooks. It should be opaque and flake easily when done. Tortilla Warmer: For the best texture, use a tortilla warmer or a clean kitchen towel to keep the tortillas warm and pliable until serving. Flavor Adjustments: Feel free to customize the salsa by adding diced bell peppers or swapping lime juice for lemon for a different tangy twist. {{image_4}} You can swap the white fish for other types. Salmon, mahi-mahi, or halibut work great. Each fish gives a unique taste. Using different fish keeps meals exciting. These options may offer more healthy fats too. For a veggie twist, try using portobello mushrooms or jackfruit. They both have a nice texture and absorb flavors well. You can also use grilled zucchini or eggplant. For a vegan salsa, replace sour cream with a cashew cream or tahini. Want to boost flavors? Add spices like cayenne or chili powder. Fresh herbs like basil or mint can give your tacos a new feel. You can also try adding diced pineapple or papaya to the salsa. These fruits add a sweet touch that pairs well with fish. To keep your fish tacos fresh, wrap them tightly in plastic wrap or foil. You can also use an airtight container. This helps to prevent air from drying them out. Store them in the fridge for up to two days. For best taste, eat them soon. When you store the salsa, place it in a sealed container. It can last in the fridge for about three days. If you see any changes in color or smell, throw it away. You can freeze the fish, but it's best to do it before cooking. Wrap the fish fillets in plastic wrap, then aluminum foil. This way, they can last for up to three months. When you want to cook them, thaw them in the fridge overnight. Salsa is not great for freezing. It can lose its fresh taste. If you do freeze it, use it within a month. Thaw it in the fridge to keep it cool. - White fish fillets: Fresh fish lasts one to two days in the fridge. If cooked, it lasts up to three days. - Tortillas: Store unopened tortillas for up to one month. Once opened, use them within a week. - Mango: A ripe mango can last three to five days in the fridge. Cut mango lasts only one to two days. - Avocado: Whole avocados last about three to four days. Once cut, they turn brown quickly, so use them within a day. - Sour cream: Unopened sour cream lasts one to three weeks. Once opened, use it within a week. Always check for spoilage signs, like bad smell or change in texture. Yes, you can use frozen fish fillets. Just follow these best practices: - Thaw the fish in the fridge overnight. - Pat it dry to remove excess moisture. - Season well with spices before cooking. Using frozen fish works great, but make sure it’s fully thawed. This helps it cook evenly. You can use either corn or flour tortillas. Here’s a quick comparison: - Corn Tortillas: They are gluten-free and have a nice, earthy taste. They hold up well with juicy toppings. - Flour Tortillas: Soft and chewy, they are great for wrapping. They tend to be thicker. Both types work, so choose what you like best! Corn adds a crunch, while flour gives a softer bite. To add heat to your mango salsa, try these suggestions: - Use more jalapeño peppers. Leave some seeds for extra kick. - Add a dash of hot sauce, like Tabasco or Sriracha. - Mix in some diced serrano peppers for a different flavor. These tips will elevate the spice level while keeping the fresh mango taste. Enjoy your zesty mango salsa! In this article, we covered the essential ingredients and steps for making delicious fish tacos. We explored the flavors of white fish and bright mango salsa, plus the crunch of fresh toppings. Remember, you can always customize your tacos by trying different fish or making them vegetarian. With the right techniques, your tacos will impress everyone. Don't forget to store leftovers properly to enjoy later! Get ready to enjoy a tasty meal that celebrates fresh ingredients and bold flavors. Happy cooking!
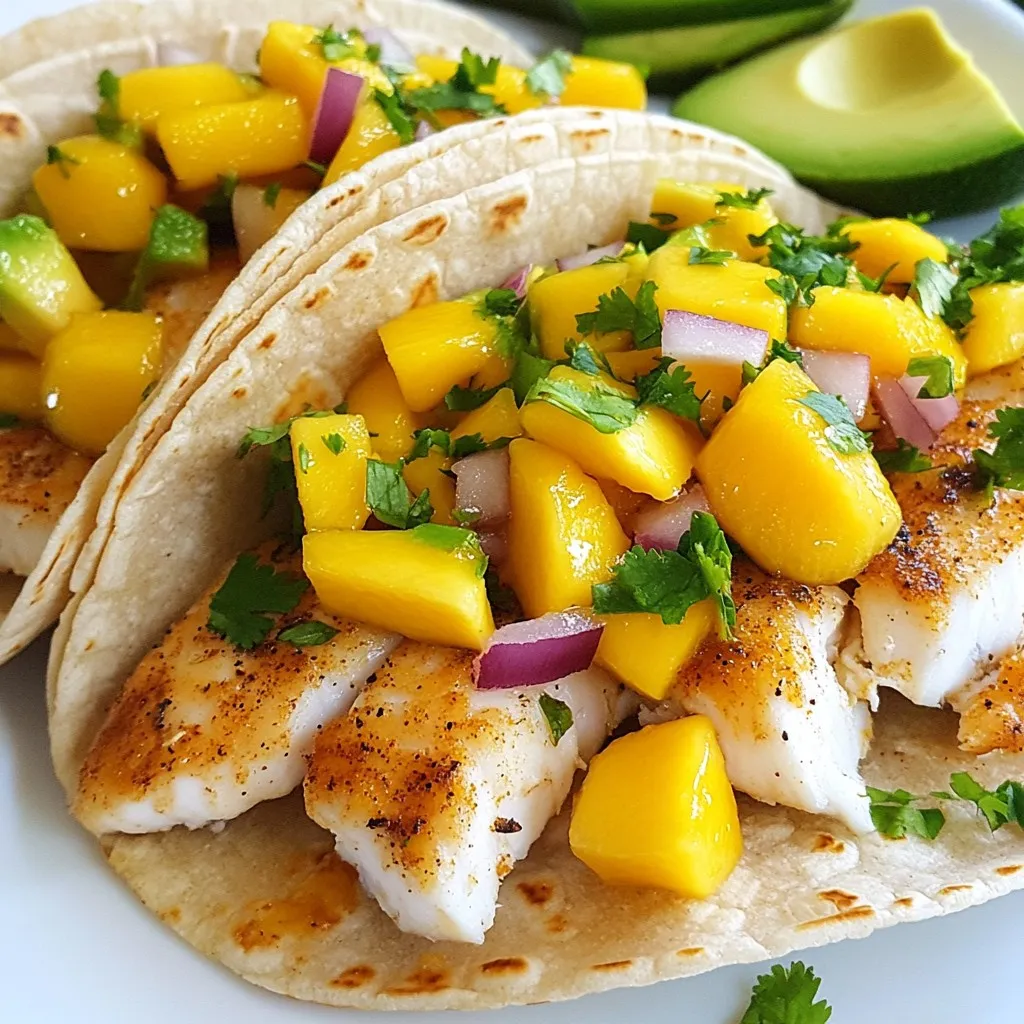
Mango Salsa Fish Tacos Flavorful and Fresh Delight
Looking for a fresh and tasty recipe? Mango Salsa Fish Tacos are your answer! These tacos combine flaky white fish with a sweet and spicy