Dinner
![To make these wraps, gather the following items: - 1 lb ground beef - 1 tablespoon onion powder - 1 tablespoon garlic powder - 1 tablespoon Worcestershire sauce - Salt and pepper, to taste - 4 large flour tortillas - 1 cup shredded lettuce - 1 cup diced tomatoes - 1 cup shredded cheddar cheese - ½ cup pickles, sliced - ½ cup Big Mac sauce (store-bought or homemade) These ingredients create the classic Big Mac flavor you love. You can add extra ingredients for more taste. Consider these: - Sliced jalapeños for heat - Avocado slices for creaminess - Sriracha or hot sauce for a kick These ingredients can make your wraps even more exciting. Adding fresh items can enhance the wraps. Try these options: - Fresh cilantro for a pop of flavor - Red onion slices for crunch - Spinach leaves for added nutrition These fresh additions keep your wraps vibrant and tasty. Don't forget to check the Full Recipe for more details! To start, heat a large skillet over medium heat. Add 1 pound of ground beef to the skillet. Cook it until it is browned and cooked through. This should take about 5 to 7 minutes. Use a spatula to break the beef apart as it cooks. Once browned, stir in 1 tablespoon each of onion powder and garlic powder. Add 1 tablespoon of Worcestershire sauce, along with salt and pepper to taste. Mix well and let it cook for another 2 to 3 minutes. This will blend the flavors nicely. After that, remove the skillet from heat and let the mixture cool slightly. Now, grab a large flour tortilla. Lay it flat on a clean surface. Spoon about ¼ cup of the beef mixture into the center of the tortilla. Spread it out evenly so you get flavor in every bite. Next, add a handful of shredded lettuce, a sprinkle of diced tomatoes, and a good amount of shredded cheddar cheese. Don’t forget the pickles! Place a few slices on top for that classic crunch. Finally, drizzle about 1 tablespoon of Big Mac sauce over the toppings. This adds that special Big Mac taste. To make the wraps crispy, place them seam-side down in a preheated skillet over medium heat. Cook for about 1 to 2 minutes on each side. You want them to be golden brown and slightly toasted. Once done, take them out and slice each wrap in half diagonally. Serve them right away with a small bowl of extra Big Mac sauce for dipping. This extra touch makes the meal even more enjoyable! To make the best wraps, start with a large tortilla. Place it flat on your surface. Use about ¼ cup of beef in the center. Spread it out evenly. This helps the flavors mix well in every bite. Add a handful of lettuce, some diced tomatoes, and cheese on top. Lay pickles on for extra crunch. When you fold, tuck the sides in first. Then, roll it from the bottom up. Press gently to keep the filling in. This step makes a big difference in keeping everything together. You can change up the ingredients to fit your taste. Want more spice? Add jalapeños or hot sauce. If you prefer a milder flavor, skip the pickles. You can even switch the cheese to pepper jack for a kick. Try using turkey or chicken if you want a lighter option. The options are endless! Just remember to keep the main flavors of the Big Mac in mind. Big Mac sauce is the heart of this dish. You can use store-bought sauce for ease. If you want to make it yourself, mix mayo, ketchup, and mustard. Add a splash of vinegar and a few pickles. Don’t forget a pinch of onion powder and garlic powder. This combo gives it that classic taste. Adjust the amounts based on your taste. A good sauce can elevate your wrap. It ties all the flavors together beautifully. For the full recipe, check the complete instructions. {{image_4}} For a tasty vegetarian option, swap the ground beef for black beans or lentils. Cook them with onion powder and garlic powder to add flavor. You can also use a plant-based meat substitute. This change keeps the wrap hearty without meat. Add your favorite veggies for crunch, like bell peppers or cucumbers. While Big Mac sauce is a classic, feel free to get creative. Try ranch dressing, spicy mayo, or barbecue sauce. Each option gives a new twist to the wrap. You can mix sauces too. A blend of ranch and hot sauce adds a nice kick. If you want a low-carb version, use lettuce leaves instead of tortillas. Butter lettuce or romaine works best. Just fill the leaves with your beef mixture and toppings. Skip the Big Mac sauce or use a low-carb version to keep it keto-friendly. This way, you enjoy all the flavors without the extra carbs. For the complete Homemade Big Mac Wraps recipe, check out the [Full Recipe]. To keep your leftover wraps fresh, place them in an airtight container. You can also wrap each one in plastic wrap or aluminum foil. This method helps prevent them from drying out. Store them in the fridge for up to three days. When you want to eat them, just pull out as many as you need. If you want to save some wraps for later, freezing works great. Wrap each Big Mac wrap tightly in plastic wrap or foil. Then, place them in a freezer-safe bag. You can freeze them for up to three months. Just remember to label the bag with the date. This way, you know how long they’ve been in the freezer. When it’s time to reheat, you want your wraps to stay crispy. Heat a skillet over medium heat and place the wrap seam-side down. Cook for about 2-3 minutes on each side until they are warm and golden. Avoid using the microwave, as it can make your wraps soggy. For best results, enjoy them fresh or reheated in a skillet. The main ingredients are simple and tasty. You need: - 1 lb ground beef - 1 tablespoon onion powder - 1 tablespoon garlic powder - 1 tablespoon Worcestershire sauce - Salt and pepper, to taste - 4 large flour tortillas - 1 cup shredded lettuce - 1 cup diced tomatoes - 1 cup shredded cheddar cheese - ½ cup pickles, sliced - ½ cup Big Mac sauce (store-bought or homemade) These ingredients create that classic Big Mac flavor wrapped up in a fun tortilla. The ground beef forms the base, while the spices add depth. Fresh veggies give it crunch, and the sauce ties it all together. To make a healthier Big Mac Wrap, swap the ground beef for lean turkey or chicken. You can also use whole wheat tortillas for added fiber. Load up on fresh veggies like spinach and cucumbers. Use Greek yogurt instead of Big Mac sauce for a creamy, lower-fat option. This way, you keep the taste but cut down on calories. Yes, you can make Big Mac sauce at home! Combine: - ½ cup mayo - 2 tablespoons ketchup - 1 tablespoon yellow mustard - 1 tablespoon sweet pickle relish - 1 teaspoon onion powder - 1 teaspoon garlic powder - Salt and pepper to taste Mix everything in a bowl. This homemade sauce will taste just like the original and can enhance your wrap’s flavor. This guide lays out how to make homemade Big Mac Wraps. You learned the key ingredients and optional flavors to enhance taste. I shared step-by-step instructions for easy preparation and cooking. With useful tips and fun variations, you can customize your wraps to fit your diet. Remember, whether it’s freezing leftovers or making a healthier sauce, you have many options. Now, get in the kitchen and enjoy your delicious Big Mac Wraps!](https://roastedflavors.com/wp-content/uploads/2025/06/f8c63e87-80a1-4ce4-a98b-d3753d35da68.webp)
Homemade Big Mac Wraps Tasty and Simple Recipe
Craving the taste of a classic Big Mac but want a twist? Homemade Big Mac Wraps are the perfect solution! In this simple recipe, I’ll
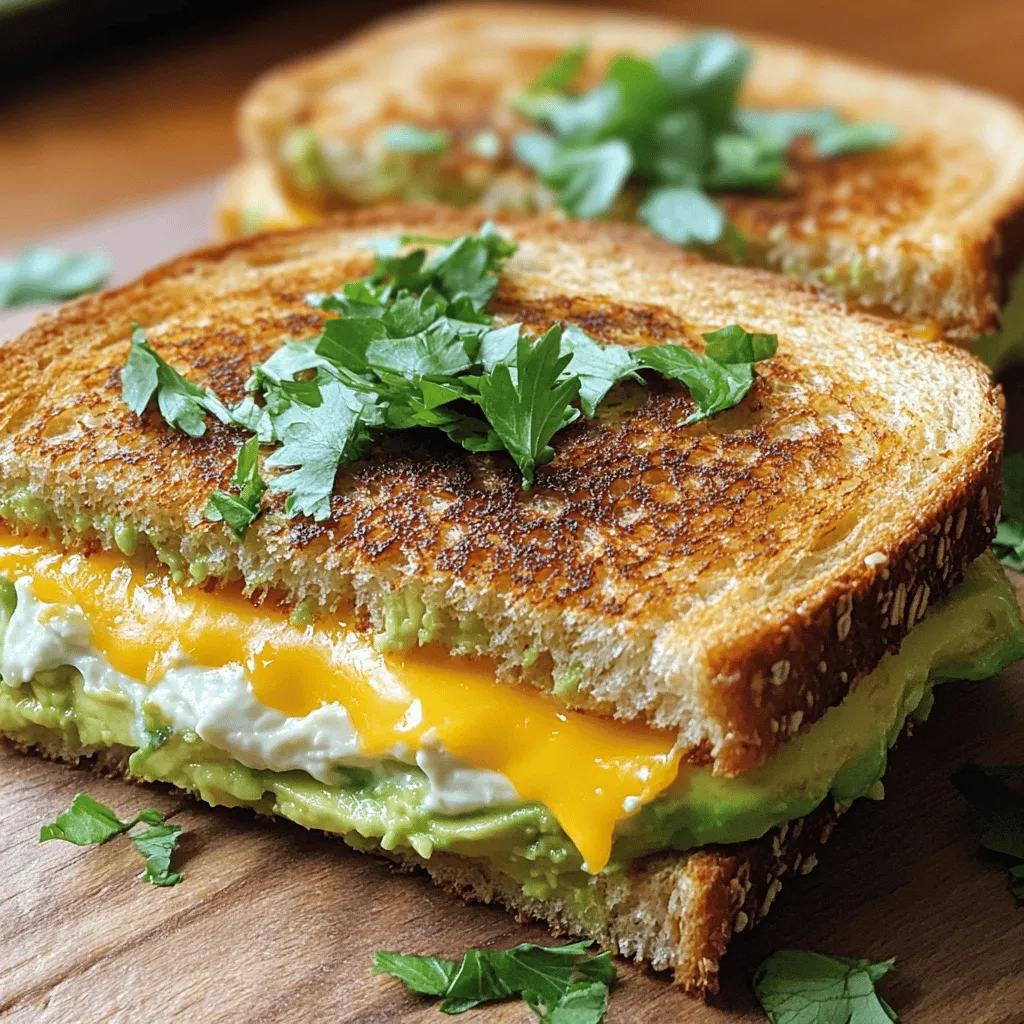
Creamy Avocado Grilled Cheese Irresistible Delight
Get ready to elevate your grilled cheese game with a creamy avocado twist! This Creamy Avocado Grilled Cheese is a quick, delicious meal you can

Cheesy Potato Burritos Flavorful and Satisfying Meal
Are you ready to enjoy a comforting, cheesy meal that’s packed with flavor? Cheesy potato burritos are not only delicious but also simple to make.
. {{image_4}} You can swap the chicken for many proteins. Try shredded turkey for a lighter option. Cooked shrimp can add a fun twist. Ground beef or pork works well too. Each protein brings its own unique taste. You can also use rotisserie chicken for an easy shortcut. This change keeps your meal exciting and fresh. If you want a vegetarian option, use beans or lentils. They provide great protein and texture. For a vegan choice, replace cheese with cashew cream or tofu. You can add grilled veggies like bell peppers and zucchini. These options are tasty and satisfying. You can still enjoy that cheesy goodness without the dairy. Adding spices can take your wraps to the next level. Try cumin or chili powder for a kick. Fresh herbs like basil or cilantro can brighten the flavors. A squeeze of lemon adds a fresh zing. You can also play with smoked paprika for a deeper taste. Mixing spices gives you a chance to create your own signature wrap. To keep your cheesy garlic chicken wraps fresh, store them in an airtight container. This keeps moisture out and avoids sogginess. Let the wraps cool down before sealing them. If you use foil or plastic wrap, make sure it is tight. Refrigerate the wraps and eat them within 3 days for the best taste. Reheating your wraps is easy! You can use a skillet or microwave. For a skillet, heat it on low. Place the wraps in the skillet for about 2-3 minutes on each side. This helps them stay crispy. If you use a microwave, wrap them in a damp paper towel. Heat them for 30 seconds at a time until they are warm. Check often to avoid making them too soft. If you want to freeze your wraps, first wrap them tightly in foil or plastic wrap. Then place them in a freezer bag. Be sure to remove as much air as possible. These wraps can last up to 2 months in the freezer. When you're ready to eat, thaw them overnight in the fridge. Reheat as mentioned above for best results. This makes meal prep easy and tasty! For the full recipe, check out the details above. You can make these wraps healthier by using whole grain or low-carb tortillas. Swap out cream cheese for Greek yogurt. Add more fresh veggies, like bell peppers or cucumbers, for crunch and nutrition. You can also use grilled chicken instead of fried for a leaner option. Yes, you can prepare the wraps in advance. Wrap them tightly in plastic wrap or foil. Store them in the fridge for up to a day. When you're ready to eat, just heat them in a skillet or microwave. This makes for a quick and easy meal. These wraps taste great with a range of dips. Ranch dressing adds a nice, creamy touch. You can also try garlic aioli for a bold flavor. Salsa or guacamole brings a fresh twist, too. Each dip complements the cheesy, garlicky goodness of the wraps. For the full recipe, check the section above. We covered all the key elements for making Cheesy Garlic Chicken Wraps. First, we looked at the important ingredients and their roles. Next, I shared step-by-step instructions for perfect cooking. I provided tips and tricks to avoid common mistakes. We also explored tasty variations for everyone. Lastly, I offered useful storage info and answers to common questions. With this guide, you can create amazing wraps. Enjoy trying new flavors, and don’t hesitate to get creative!](https://roastedflavors.com/wp-content/uploads/2025/06/54b73624-1deb-4e24-8215-5f0156b597ba.webp)
Cheesy Garlic Chicken Wraps Flavorful and Easy Meal
If you’re looking for a tasty and quick meal, you’ve come to the right place! Cheesy Garlic Chicken Wraps offer a burst of flavor and
![- 2 chicken breasts, diced into bite-sized pieces - 1 cup cooked jasmine rice - 1 red bell pepper, sliced thinly - 1 cup broccoli florets, roughly chopped - 1 medium carrot, julienned - 1/4 cup sweet chili sauce - 2 tablespoons soy sauce - 1 tablespoon sesame oil - 1 tablespoon vegetable oil - Salt and black pepper to taste - 3 green onions, finely chopped - Sesame seeds, for garnish The Sweet Chili Chicken Bowl is a simple dish with great taste. The chicken brings protein, while the colorful veggies add crunch and nutrients. The jasmine rice serves as a perfect base. The marinade makes the chicken shine with sweet and savory flavors. The sweet chili sauce is the star here. It gives a mild heat and sweetness that kids and adults love. The soy sauce adds a salty touch, while sesame oil gives a nutty flavor. Together, they create a tasty mix that keeps you coming back. For garnishes, green onions and sesame seeds add a pop of color and texture. The green onions give freshness, and the sesame seeds offer a nice crunch. They make your bowl look and taste even better. Check the [Full Recipe] for details on how to bring this meal to life. You will enjoy making this dish as much as eating it! - Time needed: 15 minutes - Combining ingredients: Start by taking a medium bowl. Add the diced chicken. Pour in the sweet chili sauce, soy sauce, and sesame oil. Sprinkle in a pinch of salt and black pepper. Stir until the chicken pieces are fully coated. Cover the bowl and let the chicken marinate for at least 15 minutes. This step helps the chicken absorb all the great flavors. For the jasmine rice, follow the package instructions. Rinse the rice first to remove extra starch. This helps keep the rice fluffy. Bring water to a boil, add the rice, and cook until tender. Once cooked, fluff it with a fork. Set it aside to keep warm until serving. Heat vegetable oil in a large skillet or wok over medium heat. Add the sliced red bell pepper, broccoli florets, and julienned carrot. Stir-fry for about 5-7 minutes. The goal is to keep the veggies tender-crisp and bright in color. This adds a nice pop to your bowl. Once cooked, transfer them to a plate. In the same skillet, add the marinated chicken. Do not add the leftover marinade. Spread the chicken into a single layer. Cook for about 8-10 minutes, stirring occasionally. You want the chicken to be fully cooked with a golden-brown color. Return the sautéed vegetables to the skillet with the cooked chicken. Gently toss everything for about 2 minutes. This step lets all the flavors blend together nicely. Make sure the vegetables are heated through. For a great presentation, serve the dish in deep bowls. Create a base of jasmine rice. Top it with the sweet chili chicken and sautéed vegetables. For that final touch, garnish with chopped green onions and a sprinkle of sesame seeds. You can drizzle a bit of extra sweet chili sauce on top for color. Adding lime wedges on the side can give a nice fresh burst. - Marinate the chicken: This step is key. It adds depth to the flavor. Let it sit for at least 15 minutes. - Prep your veggies: Chop and slice all your vegetables first. This saves time later. - Use leftover rice: If you have some cooked rice, it speeds up the process. - Add garlic: Mince two garlic cloves and sauté them with your veggies. This adds a nice punch. - Try ginger: Grate fresh ginger for a warm, spicy flavor. It pairs well with sweet chili. - Citrus zest: Grate lime or lemon zest into the dish. It brightens the flavors nicely. - Stir-frying: Use high heat and a non-stick skillet. This helps to cook the chicken quickly. - Don’t overcrowd: Cook in batches if needed. Overcrowding leads to steaming instead of frying. - Keep it moving: Stir constantly while cooking. This ensures even cooking and prevents burning. For the full recipe, check out the Sweet Chili Chicken Bowl . {{image_4}} You can switch the chicken for different proteins. Here are some great options: - Tofu: Firm tofu works well. Press it to remove water, then cube it. - Shrimp: Use peeled shrimp for a tasty seafood twist. Cook quickly for best results. - Beef: Thinly sliced beef adds a rich flavor. Cook it until just done. - Tempeh: This fermented soy product offers a nutty taste and great protein. If you want a different grain, you have options: - Quinoa: This grain is high in protein. It’s also gluten-free and fluffy. - Brown rice: It adds more fiber and a nutty flavor. - Cauliflower rice: A low-carb option that absorbs flavors well. - Barley: A chewy grain that adds heartiness to your bowl. Feel free to mix in other vegetables for variety: - Snap peas: They add a nice crunch and sweetness. - Zucchini: Slice it thin for quick cooking and a mild taste. - Mushrooms: Use shiitake or button mushrooms for depth of flavor. - Spinach: Add fresh spinach at the end for a pop of color and nutrition. These variations let you customize your Sweet Chili Chicken Bowl to suit your taste. For the complete recipe, check out the Full Recipe section. Enjoy experimenting! Store your Sweet Chili Chicken Bowl in an airtight container. This keeps it fresh. Place the bowl in the fridge within two hours of cooking. The leftovers stay good for about three to four days. Make sure to cool the meal to room temperature before sealing it up. This helps prevent moisture buildup. When reheating, use the microwave or a skillet. If using a microwave, heat it on medium power. Stir it every minute to keep the texture nice. If using a skillet, add a splash of water or broth. Heat it gently on low. This keeps the chicken juicy and the veggies crisp. To freeze, let the dish cool completely. Then, place it in a freezer-safe container. Seal it tightly to avoid freezer burn. Your Sweet Chili Chicken Bowl can last up to three months in the freezer. When you’re ready to eat, thaw it in the fridge overnight before reheating. This keeps the flavors bright and tasty. For the full recipe, you can always refer back! To make a vegetarian version, swap chicken for tofu or tempeh. Both options work well. Use firm tofu for a good texture. Cut it into cubes and marinate like the chicken. You can also add chickpeas for protein. For veggies, feel free to mix in snap peas or mushrooms. Yes, you can use frozen vegetables! They save time and are often just as healthy. The pros include quick cooking and longer shelf life. However, they may have more water. This can make your dish a bit soggy. To avoid this, cook them briefly before adding them to the skillet. Sweet chili sauce has a mild heat. It balances sweetness with a hint of spice. This makes it great for all ages. If you want more heat, add red pepper flakes. You can adjust the spice level to fit your taste. Jasmine rice is the best choice. It has a nice aroma and fluffy texture. Other options include brown rice or basmati. Brown rice is healthier but takes longer to cook. Choose what fits your meal best. For a quick meal, stick with jasmine rice. You can find the full recipe above for more details. In this post, we explored how to make a delicious Sweet Chili Chicken Bowl. We started with the main ingredients like chicken, rice, and colorful veggies. I shared steps for marinating, cooking, and combining everything perfectly. I also provided tips to save time and enhance flavor. You learned different variations like protein swaps and storage info to keep leftovers fresh. This dish is simple and tasty, perfect for many occasions. Try it and enjoy each bite!](https://roastedflavors.com/wp-content/uploads/2025/06/9f442435-1f82-427c-a262-6e966479bbfa.webp)
Sweet Chili Chicken Bowl Flavorful and Easy Meal
Are you ready for a meal that’s both flavorful and easy to make? The Sweet Chili Chicken Bowl is your answer. With tender chicken, crisp
![- 4 boneless, skinless chicken thighs - 1 cup long-grain white rice - 2 cups low-sodium chicken broth - 1 medium onion, diced - 3 cloves garlic, minced - 1 cup heavy cream - 1 cup frozen peas - 1 teaspoon dried thyme - 1 teaspoon paprika - 2 tablespoons olive oil - Salt and pepper to taste - Fresh parsley for garnish Gathering fresh ingredients is key to making this creamy smothered chicken and rice. The chicken thighs are juicy and tender. I prefer long-grain rice for its nice texture. Low-sodium chicken broth keeps the dish light and tasty. Diced onion adds great flavor, while minced garlic gives a warm aroma. The heavy cream is what makes this dish creamy and rich. Frozen peas add color and sweetness. Thyme and paprika boost the flavor with their herbs and spices. Olive oil is essential for cooking the chicken. Finally, don’t forget to season with salt and pepper. Fresh parsley gives a lovely touch to the dish. For the full recipe, check the detailed instructions and cooking methods. Enjoy this savory comfort meal! - Heat olive oil in a large skillet over medium heat. - Season chicken thighs with salt, pepper, paprika, and thyme. - Once the oil is hot, sear the chicken for about 5 minutes on each side until golden brown. - Remove the chicken and set it aside on a plate. - In the same skillet, add the diced onion and sauté for around 3 minutes. - Once the onion is translucent, stir in minced garlic and cook for 1 more minute. - Add the rice to the skillet, stirring to coat each grain with the onion and garlic. - Pour in the chicken broth, bringing the mixture to a gentle simmer. - Return the seared chicken to the skillet, placing it into the rice mixture. - Cover the skillet and reduce the heat to low. - Cook for 20 minutes, or until the rice is tender and absorbs the broth. - Uncover the skillet and stir in heavy cream and frozen peas. - Let it simmer for 5 more minutes, stirring occasionally. - Adjust the seasoning as needed before serving. You can find the full recipe for Creamy Smothered Chicken and Rice in the previous sections. - How to perfectly sear chicken To sear chicken well, heat your skillet first. Use medium-high heat and add olive oil. Once the oil shimmers, add the chicken. Do not move it for five minutes. This helps form a nice crust. - Ensuring rice is fluffy and not sticky Rinse the rice under cold water before cooking. This removes excess starch. When cooking, use the right amount of broth. Follow a 1:2 ratio of rice to broth. Stir once, then cover and let it steam. - Adjusting creaminess to your preference To change the creaminess, adjust the heavy cream amount. Start with half a cup for a milder taste. Add more for a richer flavor. You can also blend in some low-fat options, like Greek yogurt. - Suggested spices and herbs Besides thyme and paprika, consider adding garlic powder or onion powder. They give extra depth. Fresh herbs like parsley or basil can also brighten the dish. - Add-ons for extra nutrition (like vegetables) Frozen peas are great, but you can add chopped carrots or bell peppers. These not only add color but also boost nutrition. Broccoli florets work well too. - Must-try sauces to complement the dish A drizzle of lemon juice can brighten the flavors. For a spicy kick, try a sriracha or hot sauce blend. For a touch of sweetness, consider a honey mustard sauce. For the full recipe, check out the [Full Recipe] section. {{image_4}} You can easily swap ingredients to fit your tastes or needs. Here are some ideas: - Using chicken breasts instead of thighs: Chicken breasts are leaner and cook faster. Just remember to adjust cooking time for tenderness. - Alternative grains: You can substitute long-grain white rice with quinoa or brown rice. Each adds a different texture and flavor. - Dairy-free options: If you prefer not to use heavy cream, try coconut milk or a nut-based cream. These options keep the dish rich and creamy. Changing up the flavors can make this dish exciting. Here are some fun twists: - Spicy version with chili flakes: Add red pepper flakes for a kick. Start with a pinch and increase to your liking. - Herb-infused variations: Fresh herbs like thyme, rosemary, or basil can brighten the dish. Add them at the end for the best flavor. - Adding different vegetables: You can mix in bell peppers or spinach for extra color and nutrition. Just sauté them with the onions for a tasty addition. These variations keep Creamy Smothered Chicken and Rice fresh and fun. You can experiment with what you have at home or try new ideas. For the full recipe, check out the details above. To keep your creamy smothered chicken and rice fresh, store it in the fridge. Place it in an airtight container. This helps prevent the food from drying out. It can last up to three days in the refrigerator. If you want to keep it longer, freezing is a great option. Allow the dish to cool completely before freezing. Use a freezer-safe container or bag for best results. You can freeze it for up to three months. Make sure to label the container with the date. When it's time to enjoy your leftovers, reheating properly is key. The best way to reheat chicken and rice is on the stove. Place the dish in a skillet over low heat. Add a splash of chicken broth or cream to keep it moist. Stir frequently to ensure even warming. This method helps maintain the creamy texture. You can also use a microwave. Place the dish in a microwave-safe bowl. Cover it with a damp paper towel to trap steam. Heat in short bursts, stirring in between. This prevents the dish from drying out. Enjoy your meal just like it was fresh! For the full recipe, check out the original version. How long does Creamy Smothered Chicken and Rice last in the fridge? This dish lasts about 3 to 4 days in the fridge. Store it in an airtight container. Can I use brown rice instead of white rice? Yes, you can use brown rice. Just remember, it takes longer to cook. You’ll need to adjust the liquid and cooking time. What can I serve with Creamy Smothered Chicken and Rice? This dish pairs well with a fresh salad or steamed veggies. A light, crispy side adds great balance. Can I make this dish ahead of time? You can prepare the chicken and rice ahead. Keep them separate until you’re ready to serve. This will keep everything fresh. How to thicken the sauce if it's too thin? If the sauce is too thin, mix a bit of cornstarch with cold water. Stir it into the sauce, then simmer until thick. What is the best way to cut chicken thighs for this recipe? Cut chicken thighs into bite-sized pieces. This helps them cook evenly and soak up the sauce flavor. For the full recipe, check out the detailed instructions. This recipe for Creamy Smothered Chicken and Rice brings together simple ingredients for a wonderful meal. You learned how to prepare, cook, and add your own spin to this dish. I shared tips for perfect chicken and fluffy rice. You can also store and reheat leftovers with ease. Enjoy exploring the many variations to match your taste. I hope you try this dish and make it your own. It’s sure to be a hit at your table.](https://roastedflavors.com/wp-content/uploads/2025/06/144d29fb-7b48-42d8-9ace-dd7358d9727a.webp)
Creamy Smothered Chicken and Rice Savory Comfort Meal
Are you ready to dive into a dish that warms your soul and satisfies your cravings? Creamy Smothered Chicken and Rice is the ultimate comfort
![- 1 pound chicken breast, diced into bite-sized pieces - 8 ounces pasta (fettuccine or penne work beautifully) - 4 tablespoons unsalted butter, divided - 4 cloves garlic, finely minced - 1 teaspoon dried oregano - 1 teaspoon dried basil - 1/2 teaspoon red pepper flakes (optional for a touch of heat) - Salt and freshly cracked black pepper, to taste - 1/4 cup freshly grated Parmesan cheese - Fresh parsley, chopped, for garnish When I make Garlic Butter Chicken Bites with Pasta, I love to gather my ingredients first. This helps me see what I have and what I need. Fresh chicken and pasta are key for this dish. The chicken gives protein, while the pasta adds a nice base. For flavor, I always use unsalted butter. This allows me to control the salt. Garlic is a must. It adds depth to the dish. Oregano and basil help bring out the best in the chicken. If you like a kick, add red pepper flakes. Just a little will do! Lastly, don’t forget the garnishes. Fresh parsley brings a bright color and taste. Grated Parmesan cheese adds a creamy finish that ties everything together. All these ingredients create a delightful meal you will enjoy. For the full recipe, check out the details provided. How to Boil and Prepare Pasta To cook pasta, fill a large pot with water and add a pinch of salt. Bring the water to a boil. Once boiling, add the pasta. Stir it gently to prevent sticking. Cook according to the package directions until it is al dente. Tips for Perfectly Cooked Pasta - Always use a large pot for boiling. This helps the pasta move freely. - Stir the pasta occasionally. This keeps it from clumping together. - Taste the pasta a minute before the time is up. This ensures it’s just right. Reserving Pasta Water for Sauce Before draining the pasta, save about 1/4 cup of the cooking water. This starchy water is great for making the sauce creamy and helps it stick to the pasta. Best Practices for Searing Chicken Use a large skillet for searing chicken. Heat 2 tablespoons of butter over medium heat until melted. Then, add the diced chicken, spreading it out evenly. Season with salt and pepper. Achieving the Perfect Golden Brown Cook the chicken without stirring too much. This helps it develop a nice golden color. After about 5-7 minutes, it should be cooked through and beautifully browned. Importance of Garlic in the Recipe Garlic adds a rich, savory flavor that makes this dish shine. It turns fragrant when sautéed, enhancing the overall taste of your meal. Combining Flavors for Optimal Taste After the chicken is golden, add in the minced garlic. Cook it for about one minute. Then, add the herbs and red pepper flakes. This step brings all the flavors together. The dish will smell amazing! For the complete details, check the [Full Recipe]. To make chicken bites tasty, use fresh herbs. I like oregano and basil. They add a nice touch. Red pepper flakes are great for heat, too. Season your chicken well with salt and pepper. This boosts the flavor. Cook the chicken at medium heat for 5-7 minutes. This time lets it brown nicely. If you cook it too fast, the inside may stay raw. If it cooks too slow, it can dry out. After cooking pasta, save some pasta water. This water helps make your sauce creamy. If your sauce is thick, add a splash of water. Stir it in and see how it changes. Avoid adding too much water at once. It’s easy to make the sauce watery. Start with a little, then adjust as needed. For a complete meal, serve the chicken bites with a side salad. A fresh green salad adds crunch and color. You can also pair it with garlic bread for extra flavor. To make your dish look nice, sprinkle some fresh parsley on top. This adds color and freshness. You can also add extra cheese for a richer taste. This dish is versatile, so feel free to play around with sides. You can visit the [Full Recipe] for more ideas. {{image_4}} You can switch the chicken for shrimp or tofu. Shrimp cooks quickly and adds a nice flavor. It takes about 3-5 minutes to cook shrimp. Tofu absorbs flavors well and is a great option for a plant-based meal. If you use tofu, make sure to sauté it until golden brown for a better texture. You can choose gluten-free pasta if you have dietary needs. Many brands now make great gluten-free options that taste good. Whole wheat pasta is another choice. It adds fiber and has a nuttier flavor. You can also try vegetable pasta, which is made from spinach or zucchini. This adds color and extra nutrients. Adding vegetables boosts nutrition and flavor. Good choices are spinach, cherry tomatoes, or bell peppers. You can sauté these with the chicken for a tasty mix. Cook them until they are tender but still bright. This keeps the meal colorful and healthy. Adding veggies makes the dish more filling and fun to eat. For the full recipe, check out the [Full Recipe] link. To keep your garlic butter chicken bites fresh, follow these best practices for refrigeration: - Cool Down: Let the dish cool to room temperature before storing. - Use Airtight Containers: Place leftovers in airtight containers to avoid moisture loss. - Label and Date: Write the date on the container for easy tracking. With proper storage, your dish will last up to three days in the fridge. For the best texture when reheating, consider these tips: - Avoid Microwaving: This can make your pasta mushy. - Use a Skillet: Heat in a skillet over low heat. Add a splash of water or broth to keep it moist. To properly freeze garlic butter chicken bites with pasta, follow these steps: - Cool Completely: Ensure the dish is fully cooled before freezing. - Portion It Out: Divide the dish into single-serving portions for easy thawing. - Use Freezer Bags: Place portions in freezer bags, removing as much air as possible. You can freeze the dish for up to three months. For thawing and reheating, use these instructions: - Thaw Overnight: Place the frozen bag in the fridge overnight. - Reheat in a Skillet: Warm it up slowly in a skillet as mentioned before, adding a splash of water if needed. This method keeps your meal tasty and enjoyable! For the full recipe, check out the detailed instructions. Yes, you can make garlic butter chicken bites with pasta ahead of time. Store leftovers in the fridge for up to three days. To prepare in advance, cook the chicken and sauce. Keep the pasta separate until just before serving. This way, the pasta stays fresh and does not get soggy. When ready to eat, reheat the chicken and mix in the pasta. If you are allergic to garlic, try using shallots or leeks for a milder flavor. They add sweetness and depth without the garlic taste. You can also use garlic-infused oil for a hint of flavor without actual garlic pieces. Adjust other spices like oregano and basil to balance the dish. To make garlic butter chicken bites with pasta healthier, use whole wheat or veggie pasta. This adds fiber and nutrients. Substitute olive oil for butter to reduce saturated fat. You can also use skinless chicken breast for leaner protein. Adding vegetables like spinach or broccoli boosts nutrition and color. This blog post guided you through a tasty chicken and pasta recipe. We covered ingredients, step-by-step cooking methods, and helpful tips for the best results. You learned about different variations and how to store leftovers properly. Remember, flavor comes from choosing the right seasonings and cooking techniques. With this knowledge, you can enjoy a delicious dish at any time. Happy cooking!](https://roastedflavors.com/wp-content/uploads/2025/06/3b015f28-64db-4b97-a956-be931959f26c.webp)
Garlic Butter Chicken Bites with Pasta Delightful Meal
Looking for a quick and tasty meal? Garlic Butter Chicken Bites with Pasta is a dish that can delight anyone’s taste buds. It combines juicy
![- 400g linguine pasta - 2 boneless, skinless chicken breasts, diced into bite-sized pieces - 4 tablespoons cowboy butter - 1 teaspoon smoked paprika - ½ teaspoon cayenne pepper (adjust to spice preference) - 1 tablespoon fresh lemon juice - 1 cup cherry tomatoes, halved - 1 cup fresh baby spinach - Fresh parsley, chopped (for garnish) - Grated Parmesan cheese, for serving Cowboy Butter Chicken Linguine is a fantastic dish. The main ingredients create a tasty base. I love using fresh linguine pasta. It gives a nice texture and flavor. Next, we need chicken breasts. Dicing them into small pieces helps them cook quickly. Finally, cowboy butter adds a rich taste. Now, let’s talk about spices. Smoked paprika brings a warm, smoky flavor. Cayenne pepper adds a kick. You can adjust the amount to match your taste. Fresh lemon juice brightens the dish. It balances the richness of the butter and chicken. For vegetables, cherry tomatoes add sweetness. They burst with flavor when cooked. Baby spinach adds a pop of color and nutrition. Fresh parsley gives a fresh taste and a nice finish. Lastly, Parmesan cheese is a must for serving. It melts beautifully and enhances the dish. You can find the Full Recipe for making this delicious meal. Enjoy creating this cowboy-inspired pasta dish! Start by boiling a large pot of water. Add a generous pinch of salt. This helps flavor the pasta. Once the water boils, add 400g of linguine. Cook it until it is al dente, following the package instructions. Do not forget to reserve about ½ cup of the pasta water before draining. This starchy water is crucial for making your sauce creamy later. For the cowboy butter, you need a few ingredients. In a small bowl, mix 4 tablespoons of softened butter. Add 1 teaspoon of garlic powder, 1 teaspoon of chopped herbs, and a pinch of salt. Stir well until blended. This cowboy butter adds a rich flavor to your dish. To make it even better, use fresh herbs like parsley or chives. Grab a large skillet and heat it over medium heat. Add 2 tablespoons of your cowboy butter. Let it melt and bubble. Next, add 2 diced chicken breasts. Season them with salt, black pepper, smoked paprika, and cayenne pepper. Cook the chicken for about 5-7 minutes. Stir often until the chicken is golden brown. Once cooked, remove the chicken from the skillet and set it aside. In the same skillet, add the rest of the cowboy butter. Toss in 4 minced garlic cloves and sauté for about 1 minute. When the garlic smells good, add 1 cup of halved cherry tomatoes. Cook them for 2-3 minutes until they are soft. Now, return the cooked chicken to the skillet. Add 1 cup of fresh baby spinach to the mix. Toss everything together for 2 minutes until the spinach wilts. If it looks too dry, add the reserved pasta water a little at a time. This helps create the perfect sauce. Finally, gently fold the drained linguine into the skillet. Add 1 tablespoon of fresh lemon juice to brighten the flavors. Mix well until everything is combined. Taste and adjust with more salt and black pepper if needed. For the full recipe, check out the complete instructions that guide you step-by-step through this delicious dish! Adjusting spice levels You can control the heat in this dish. If you like it spicy, add more cayenne pepper. For a milder version, reduce the cayenne to a pinch. This way, you make it just right for your taste. Optimal cooking times for chicken Cook the chicken for about 5 to 7 minutes. It should be golden brown and fully cooked. Use a meat thermometer to check that it reaches 165°F. This ensures it is safe to eat and perfectly juicy. Best ways to plate the dish When serving, use shallow bowls for a nice look. Twirl the linguine into nests for a fun presentation. Add the chicken and veggies on top, making it colorful and inviting. Optional garnishes for added flavor Sprinkle fresh parsley and grated Parmesan cheese on top. A squeeze of lemon juice brightens the dish even more. You can also serve lemon wedges on the side. This adds a fresh kick to every bite. For the complete recipe, check out the [Full Recipe]. {{image_4}} For those needing gluten-free options, you can swap the linguine with gluten-free pasta. Many brands offer great alternatives made from rice or corn. Just follow the cooking times on the package. This way, you can enjoy Cowboy Butter Chicken Linguine without worry. If you prefer a vegetarian dish, try using tempeh or chickpeas instead of chicken. Both options provide protein and absorb flavors well. Sauté them just like you would the chicken. This keeps the dish hearty and satisfying. To make your Cowboy Butter Chicken Linguine even tastier, consider adding different herbs or spices. Fresh basil or oregano can bring a burst of flavor. Just chop them finely and mix them in with the garlic. You can also add extra vegetables to the mix. Zucchini, bell peppers, or even mushrooms fit well in this dish. Just sauté them alongside the garlic and tomatoes. This not only adds color but also boosts the nutrition. Try out these variations and make it your own. For the full recipe, check out the Cowboy Butter Chicken Linguine recipe. To keep your Cowboy Butter Chicken Linguine fresh, follow these tips: - Use airtight containers: Place leftovers in airtight containers. This helps seal in moisture. - Refrigerate promptly: Store the dish in the fridge within two hours of cooking. This keeps bacteria from growing. - Consume within three days: For the best taste and safety, eat leftovers within three days. After that, the flavor may fade. To keep the dish fresh longer, consider freezing it. Portion the linguine into freezer-safe bags. Remove as much air as possible before sealing. This can last up to three months in the freezer. When it’s time to enjoy your leftovers, use these reheating methods: - Stovetop method: Place the linguine in a skillet over medium heat. Add a splash of water or broth to keep it moist. Stir often until warmed through. - Microwave method: Place the linguine in a microwave-safe bowl. Cover it with a damp paper towel. Heat in 30-second intervals until hot, stirring in between. Avoid common mistakes like reheating on high heat. This can dry out the pasta and chicken. Instead, use low to medium heat to keep the flavors intact. For the full recipe, check out Cowboy Butter Chicken Linguine. Cowboy butter is a tasty blend of butter, herbs, and spices. It adds flavor to dishes like our Cowboy Butter Chicken Linguine. To make it, you need: - 4 tablespoons softened butter - 1 teaspoon garlic powder - Fresh herbs (like parsley and chives) - A pinch of salt Mix these ingredients in a bowl until smooth. This buttery mix gives your meal a rich taste and makes cooking fun! Yes, you can! If you don’t have linguine, try these options: - Spaghetti - Fettuccine - Penne - Farfalle These pastas will work well with the chicken and cowboy butter sauce. You can pick your favorite! To add heat, adjust the cayenne pepper. Start with less than half a teaspoon. Taste the dish, then add more if you want a kick. Here are some other ideas: - Add crushed red pepper flakes. - Use spicy sausage instead of chicken. - Serve with hot sauce on the side. These options let you control the spice level just the way you like it. Complete your meal with tasty sides. Here are a few ideas: - Garlic bread for a crunchy bite. - A fresh green salad to balance the meal. - Roasted vegetables for extra flavor. These sides will make your meal feel special and satisfying! If you want the full recipe, check out the Cowboy Butter Chicken Linguine. Cowboy Butter Chicken Linguine combines simple ingredients for a flavorful dish. We learned about the key components like chicken, pasta, and cowboy butter, as well as spices and fresh veggies. Each step showed how to cook and mix everything perfectly. Remember, you can adjust spices and make variations to suit your taste. Store leftovers wisely to enjoy later. Embrace this dish in your kitchen and savor the unique flavors it offers. Cooking can be fun and tasty with the right guide!](https://roastedflavors.com/wp-content/uploads/2025/06/080146d7-6f6c-4090-ac4d-03440f8b5754.webp)
Cowboy Butter Chicken Linguine Tasty and Simple Meal
Craving a quick and tasty meal? Look no further than Cowboy Butter Chicken Linguine! This simple dish packs a punch with its savory flavors and
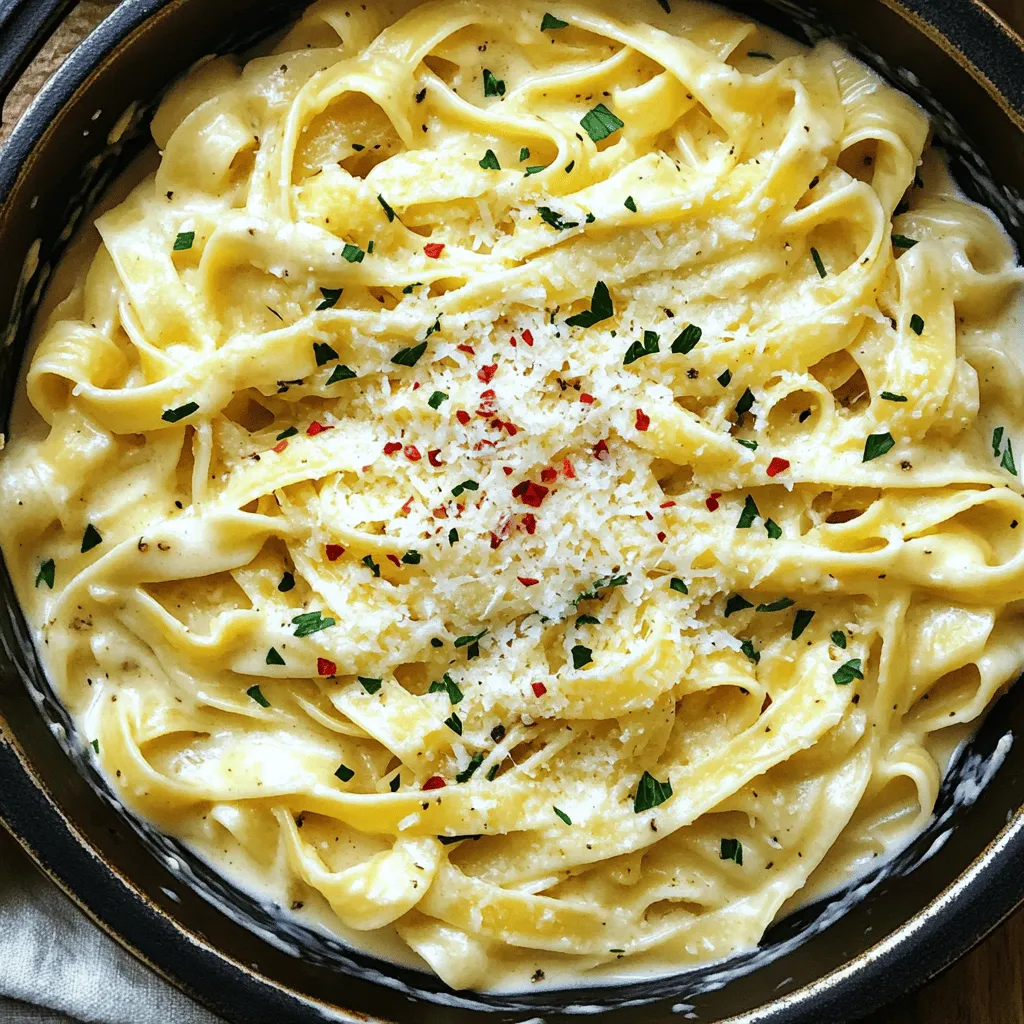
One-Pot Garlic Parmesan Pasta Simple and Quick Meal
Looking for a quick and delicious dinner? Try my One-Pot Garlic Parmesan Pasta! This dish brings together simple ingredients for a meal that’s rich in
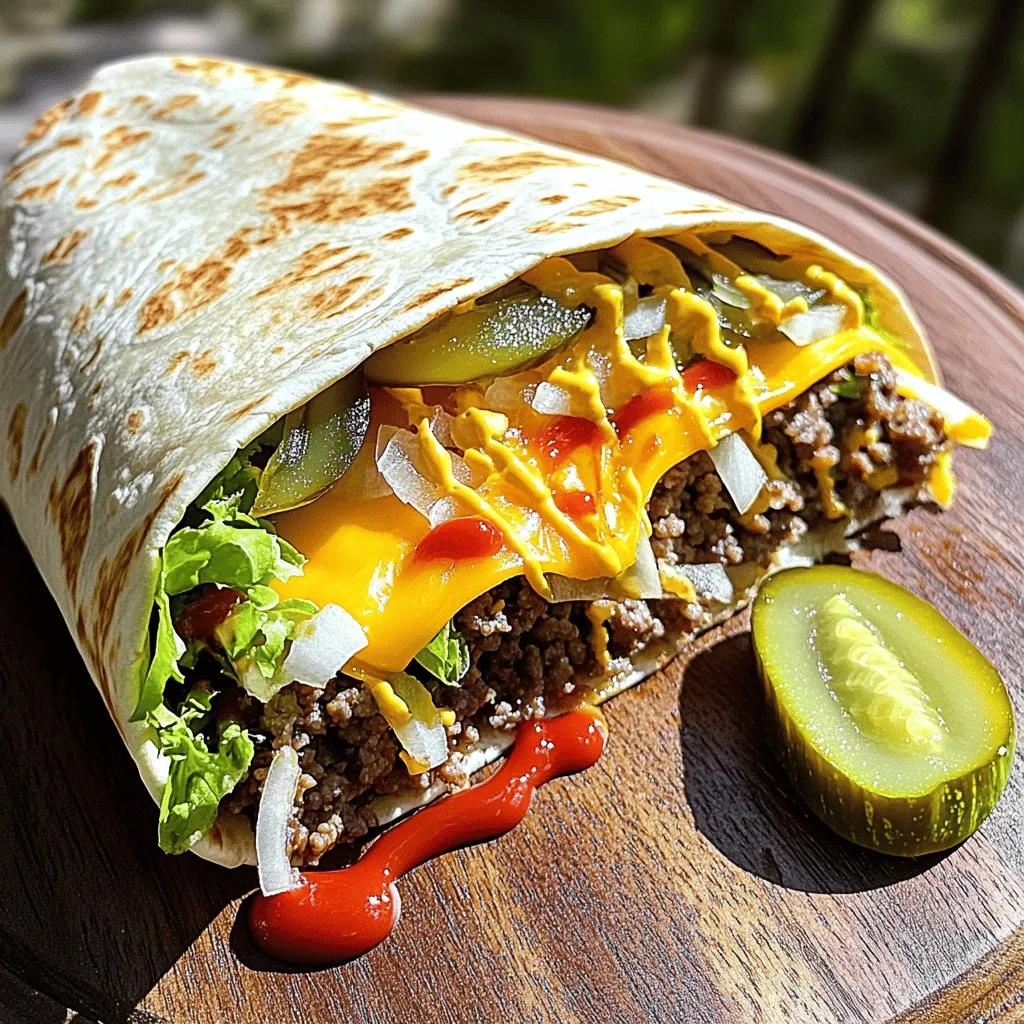
Cheeseburger Wrap Recipe Quick and Flavorful Meal
Craving a quick, tasty meal? The Cheeseburger Wrap checks all the boxes! You can enjoy all the classic cheeseburger flavors, wrapped in a soft tortilla