Dinner

Crispy Fried Chicken Irresistible Crunch Every Time
Crispy fried chicken is a timeless favorite that never disappoints. It offers an incredible crunch that simply calls your name. In this post, I will
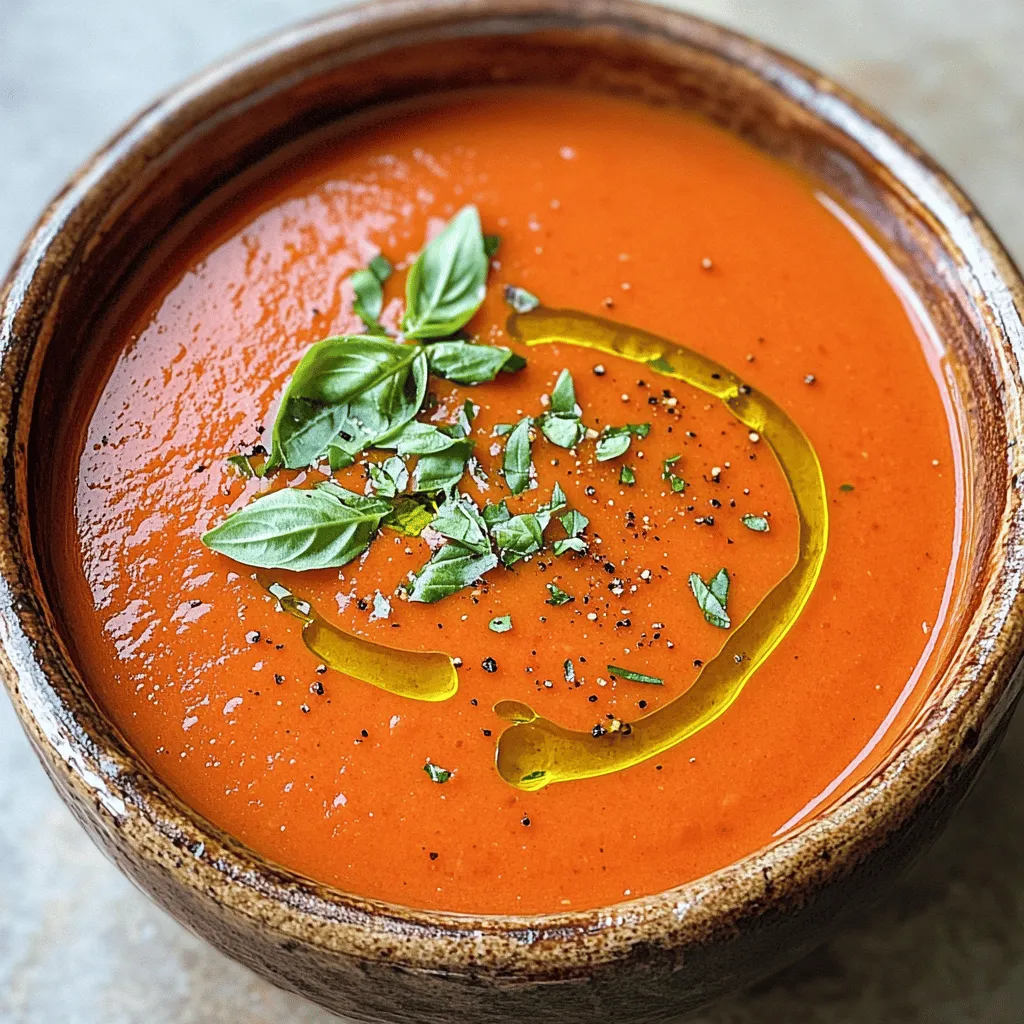
Creamy Roasted Garlic Tomato Soup Savory and Smooth
Craving a bowl of comfort? Try my Creamy Roasted Garlic Tomato Soup! This savory and smooth delight blends fresh tomatoes, sweet roasted garlic, and creamy

Hearty Creamy Basil Chicken Flavorful Dinner Delight
Looking for a dish that warms your heart and pleases your taste buds? You’re in the right place! This Hearty Creamy Basil Chicken is a
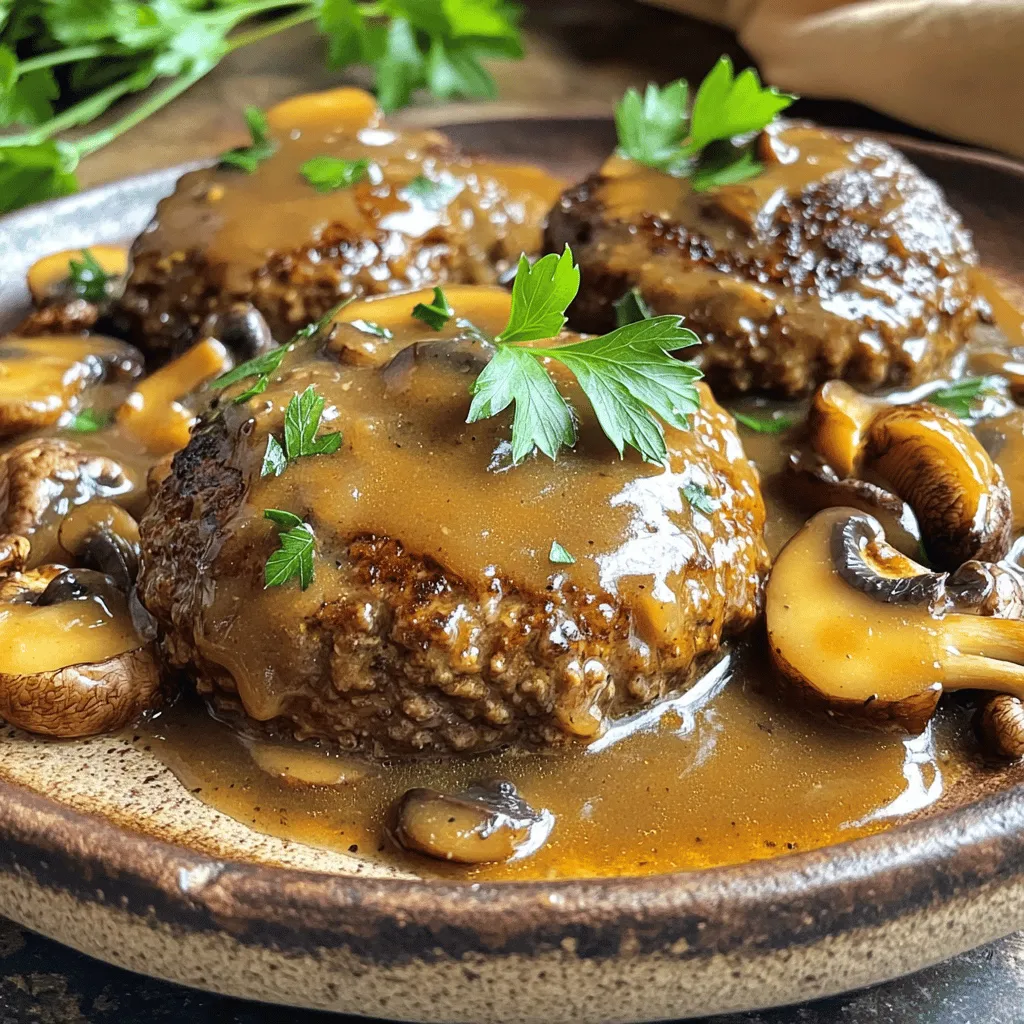
Classic Salisbury Steak Recipe Easy and Flavorful Meal
Are you ready to make a meal that’s both easy and full of flavor? My classic Salisbury steak recipe delivers! Picture juicy beef patties topped
![- 1 lb flank steak - 1 cup long-grain white rice - 2 cups beef broth - 1 cup queso blanco cheese, shredded - 1 medium onion, diced - 1 green bell pepper, diced - 2 cloves garlic, minced - 1 teaspoon cumin - 1 teaspoon smoked paprika - 1 tablespoon olive oil - Salt and pepper to taste - Fresh cilantro, for garnish - Lime wedges, for serving For this dish, the flank steak is key. It has great beefy flavor and tender texture. The long-grain white rice serves as a perfect base, soaking up all the tasty juices. Beef broth adds depth and richness, making every bite satisfying. Queso blanco cheese brings the creamy touch. It melts wonderfully, giving that gooey texture we all love. Onions and green bell peppers add crunch and sweetness, making each forkful a joy. Seasonings like garlic, cumin, and smoked paprika elevate the taste. They create a warm and inviting aroma while cooking. Olive oil helps bring it all together, adding a nice finish. Don’t forget the salt and pepper! They are essential for boosting all the flavors. Fresh cilantro gives a pop of color and fresh taste, while lime wedges add a zesty kick. This recipe is all about balance. Each ingredient plays its role in creating a perfect dish. You can find the [Full Recipe] to help you bring this flavorful comfort food to life. - Generously season flank steak with cumin, smoked paprika, salt, and pepper. - Marinate for a minimum of 15 minutes. This step boosts the steak's flavor. - Heat olive oil in a skillet over medium-high heat. - Cook steak for 4-5 minutes on each side. This will yield a nice medium-rare. - Sauté onion and bell pepper in the same skillet for 3-4 minutes. - Add garlic and sauté for another minute. This enhances the dish's aroma. - Toast rice in the skillet for about 2 minutes. Then, add beef broth and bring to a boil. - Stir in shredded queso until it melts and becomes creamy. - Adjust seasoning as needed for taste. - Serve with fresh cilantro and lime wedges for a zesty finish. You can find the complete recipe [Full Recipe]. To get the best steak, choose your cooking method wisely. Grilling, pan-searing, or broiling all work well. Each method gives a unique flavor. For medium-rare, aim for an internal temp of 135°F. Use a meat thermometer for accuracy. Resting your steak is key. Let it sit for at least five minutes after cooking. This helps juices redistribute, making each bite juicy and tender. Fluffy rice is all about technique. Rinse the rice under cold water before cooking. This removes excess starch and keeps your rice light. Use two parts water for every one part rice. A rice cooker makes this task even simpler. Just add rice and water, and let it do the work. The rice will come out perfectly cooked and fluffy every time. Melting cheese can be tricky. To ensure smooth queso, use low heat. High heat can cause it to clump. Stir constantly for even melting. If you see clumps, add a splash of warm milk to loosen it up. This keeps your cheese creamy and delicious. Enjoy your smooth and cheesy Steak & Queso Rice with these easy tips! {{image_4}} You can switch up the meat. If you want a leaner option, try chicken breast or turkey. These cuts work well with the spices and flavors of the dish. If you prefer pork, use pork tenderloin for a different taste. For rice, consider using gluten-free options. Quinoa or cauliflower rice can be great substitutes. Both options add unique textures and flavors. Cauliflower rice is lower in carbs, while quinoa is packed with protein. To amp up the flavor, add spices. A pinch of cayenne or chili powder can bring heat. You can also toss in diced jalapeños for a spicy kick. Mix and match spices to find what you love. Cheese is another fun area to explore. Try using cheddar or pepper jack instead of queso blanco. Each cheese will give a distinct taste and texture. You might even blend different cheeses for a creamy finish. Pair your dish with simple side dishes. A fresh salad or corn on the cob can balance the rich flavors. You can also serve it alongside black beans for a hearty meal. Get creative with how you serve it! Consider making burrito bowls. Layer the steak and queso rice with fresh toppings like avocado, salsa, or sour cream. This adds fun and color to your meal. For the full details, check out the Full Recipe. Enjoy making this meal your own! To store leftovers, cool the steak and queso rice to room temperature. Place it in airtight containers. This keeps it fresh for up to three days. Use glass or plastic containers that seal well. They help prevent air from getting in and drying out your food. Yes, you can freeze steak and queso rice. This makes meal prep easy! First, let it cool completely. Then, portion it into freezer-safe bags or containers. Squeeze out as much air as possible before sealing. To reheat, thaw it in the fridge overnight. You can also use a microwave for quick thawing. For the best taste, reheat on the stove. Add a splash of beef broth or water. This keeps it moist and flavorful. If using a microwave, cover the dish and heat in short bursts. Stir often to avoid hot spots. This way, you won’t dry out your delicious meal. You can simplify the process by prepping ahead. Chop all your veggies and season the steak in advance. You can also use a rice cooker for the rice. This way, you won't have to watch it closely. Another tip is to buy pre-shredded queso cheese. It saves time and effort. Yes, you can. Chicken broth or vegetable broth works well. If you want a richer flavor, use water with added seasoning. You can also try using a mix of salsa and water. This adds a nice twist to the dish. Many sides pair well with steak and queso rice. Consider a fresh salad with lime dressing. Grilled veggies also complement this dish nicely. Another great option is corn on the cob. You can even serve tortilla chips on the side for a fun crunch. In this article, we explored how to make delicious steak and queso rice. We covered essential ingredients, simple cooking steps, and expert tips to enhance your dish. Remember, marinate your steak and choose the right cheese for a creamy finish. Experiment with flavors and make it your own. Whether you stick to the classic recipe or try variations, your meal will impress. Enjoy cooking and sharing this treat with family and friends!](https://roastedflavors.com/wp-content/uploads/2025/06/4092db5b-f061-412f-a59b-fdea4b19d252.webp)
Steak & Queso Rice Flavorful Comfort Food Dish
Are you ready to dive into a bowl of cozy goodness? My Steak & Queso Rice combines tender flank steak, creamy queso, and fluffy rice
![To make a hearty Cajun potato soup, gather these simple ingredients: - 4 large russet potatoes, peeled and diced - 1 large onion, finely chopped - 3 cloves garlic, minced - 1 green bell pepper, diced - 1 celery stalk, finely chopped - 4 cups vegetable broth - 1 cup heavy cream or coconut cream - 2 teaspoons Cajun seasoning - 1/2 teaspoon smoked paprika - Sea salt and freshly cracked black pepper - 2 tablespoons olive oil - Fresh parsley for garnish - Crumbled cornbread or crunchy croutons These ingredients work together to create a soup that warms you from the inside. The potatoes give it a creamy base, while the Cajun seasoning adds a kick. You can modify the heat by adjusting the seasoning to your taste. I love using fresh vegetables, as they add more flavor and richness. This recipe is adaptable, so feel free to play with the ingredients based on your pantry items. For the full recipe, check out the details above and enjoy crafting this delicious soup. 1. Heat 2 tablespoons of olive oil in a large pot over medium heat. 2. Add 1 large, finely chopped onion, 1 diced green bell pepper, and 1 finely chopped celery stalk. 3. Sauté the vegetables for about 5 minutes. They should soften, and the onion will turn clear. 4. Next, add 3 cloves of minced garlic to the pot. Cook for 1-2 minutes. Stir often to keep the garlic from burning. 1. Now, add 4 large russet potatoes, diced into 1-inch cubes, to the pot. 2. Pour in 4 cups of vegetable broth, along with 2 teaspoons of Cajun seasoning and 1/2 teaspoon of smoked paprika. 3. Turn up the heat to bring the mix to a boil. Once it boils, lower the heat to a gentle simmer. 4. Cover the pot and let it cook for about 20 minutes, until the potatoes are soft when poked with a fork. 1. After the potatoes are cooked, use an immersion blender to blend the soup right in the pot. 2. If you don’t have an immersion blender, transfer portions to a regular blender. Blend until smooth, then return to the pot. 3. Stir in 1 cup of heavy cream or coconut cream for richness. Season with sea salt and freshly cracked black pepper to taste. 4. Let the soup simmer for another 5-10 minutes to heat through and blend the flavors well. For the full recipe, you can refer to the detailed instructions above. To make your Cajun potato soup shine, you can tweak the Cajun seasoning. Start with two teaspoons, then taste. If you want more heat, add a little more. This lets you control the spice level. For a twist, consider add-ins like cooked sausage or shrimp. These will deepen the flavor and add protein. You can also throw in some corn for a sweet crunch. When blending your soup, an immersion blender is handy. It lets you mix right in the pot. If you don’t have one, use a standard blender. Just be careful with hot soup. Blend in small batches, and return the soup to the pot afterward. If you're short on time, you can cook the potatoes in a pressure cooker. This speeds up the cooking process and keeps the flavors locked in. For serving, use rustic bowls for a cozy feel. Ladle the soup and sprinkle fresh parsley on top. This adds a pop of color. To make it even better, serve with warm, buttery bread or crumbled cornbread. It gives a nice crunch and complements the soup well. You can also add a drizzle of cream on top for flair. For the full recipe, check out the complete guide to Cajun Potato Soup. {{image_4}} You can boost your Cajun potato soup by adding protein. Sausage is a great choice. Just slice and brown it before adding it to the pot. This gives the soup a rich, meaty flavor. Chicken also works well. Cook it until it's tender, then shred it and mix it in. If you prefer a vegetarian option, skip the meat and add beans. Black beans or chickpeas add protein and fiber while keeping the dish filling. Cream makes the soup rich and smooth. You can use heavy cream for a classic taste. For a dairy-free option, try coconut cream. It adds a hint of sweetness and pairs well with Cajun spices. If you want a lighter soup, use half-and-half or cashew cream. These options maintain the creaminess while being kinder to your waistline. The spice level in your soup can change based on your taste. If you want a milder flavor, use less Cajun seasoning. Start with one teaspoon and adjust to your liking. You can also add a splash of lemon juice to brighten the flavors. For those who love heat, add a few dashes of hot sauce. This can really kick up the flavor and make each bite exciting. To keep your Cajun potato soup fresh, store it in the fridge. Use an airtight container. This helps prevent any strong smells from mixing with other foods. You can store it for up to three days. Make sure it cools down before sealing it. For longer storage, freeze the soup. Use freezer-safe containers or bags. Leave some space at the top, as the soup expands when it freezes. It can last for about three months in the freezer. When you're ready to enjoy it again, thaw it in the fridge overnight. Reheat your soup on the stove for best results. Pour it into a pot and heat on low. Stir often to ensure even heating. You can also use a microwave. Place the soup in a microwave-safe bowl. Heat it in short bursts, stirring in between. This helps warm it without overcooking. Avoid letting the soup boil again. Boiling can change the soup's texture and make it less creamy. If you notice the soup thickening, add a splash of broth or water. This keeps it just right. You can get creative with your leftover Cajun potato soup. Use it as a sauce over rice or pasta for a tasty meal. Mix it into a casserole for added flavor. You could also use it as a base for a stew. Just add more veggies or some protein like chicken or shrimp. Another fun idea is to make potato soup quesadillas. Spread some soup on a tortilla, add cheese, and grill until crispy. Enjoy the warmth in every bite! Cajun potato soup lasts about 3 to 5 days in the fridge. Check for signs of spoilage like off smells, mold, or changes in color. Yes, you can make Cajun potato soup ahead of time. Prepare the soup, then cool it down before storing. Keep it in an airtight container in the fridge for up to 5 days. Cajun potato soup pairs well with crusty bread or cornbread. Try serving it with a fresh salad or roasted veggies too. A slice of warm, buttery bread completes the meal nicely. For the complete recipe, check out the [Full Recipe]. This blog explored the key ingredients and steps to make Cajun potato soup. You learned to prepare a rich base, blend flavors, and enhance your dish with tips. I shared variations for different diets and flavors, and provided storage insights for leftovers. Remember, the right seasoning and presentation can elevate your soup. Enjoying this dish is easy with the right approach. It's a warm hug in a bowl, perfect for sharing or savoring alone. Try it out, and let your taste buds shine!](https://roastedflavors.com/wp-content/uploads/2025/06/a41426e6-5a07-4571-827f-83b71d821142.webp)
Cajun Potato Soup Flavorful Warmth in Every Bite
Welcome to a delicious journey of warmth and flavors with my Cajun Potato Soup! This hearty bowl is packed with creamy goodness, spicy heat, and
![To make these Easy Hot Honey Chicken Biscuits, gather the following ingredients: - 2 cups all-purpose flour - 1 tablespoon baking powder - 1 teaspoon salt - 1/2 teaspoon baking soda - 1/4 cup unsalted butter, cold and cubed - 3/4 cup buttermilk - 1 pound chicken tenders - 1 cup buttermilk (for marinating) - 1 cup hot honey - High-smoke point oil for frying - Fresh chives or parsley for garnish These ingredients come together to create a tasty dish. The chicken stays juicy from the buttermilk marinade. The hot honey brings a sweet and spicy kick. The biscuits add a flaky texture. When you combine these elements, you create a perfect blend of flavors. Each bite will make your taste buds dance! Enjoy the process of gathering these items. It sets the stage for your cooking adventure. For the complete recipe, check the [Full Recipe]. To start, marinate the chicken tenders in buttermilk. Use a medium bowl and make sure each piece is well-coated. Cover the bowl with plastic wrap and place it in the fridge. The best marinating time is at least 30 minutes. For even more flavor, go for two hours. Next, we will make the biscuits. In a large mixing bowl, whisk together the dry ingredients: flour, baking powder, salt, and baking soda. Now, let's add the cold butter. You can use a pastry cutter or your fingers. Mix until you see coarse crumbs. You want pieces of butter about the size of peas. For frying, heat oil in a deep skillet over medium-high heat. You want enough oil to cover the bottom. After marinating, take the chicken out and let the excess buttermilk drip off. Fry the chicken tenders in batches. This will take about 5 to 7 minutes. They should be golden brown and fully cooked. Place them on a plate lined with paper towels to catch extra oil. Now, it's time to bake the biscuits! Preheat your oven to 425°F (220°C). Arrange your cut biscuits on a baking sheet lined with parchment paper. Bake for 12 to 15 minutes. You want them to turn a lovely golden-brown color. Once the biscuits cool a bit, slice each one in half. On the bottom half, add a crispy chicken tender. Drizzle with hot honey for that sweet and spicy kick. Top it off with the other half of the biscuit. This layering really brings the dish together. For the full recipe, check out the earlier sections! For the best biscuits, use cold butter. Cold butter helps create flaky layers. When you mix it with flour, it should stay in small pieces. This gives the biscuit a nice rise. Avoid overworking the dough. Too much mixing makes the biscuits tough. Mix just until you can see small lumps of butter. You can make your own hot honey blend. Just mix honey with a pinch of cayenne pepper. This lets you control the heat. Start with a small amount. You can always add more heat later. Adjust the heat level based on your taste. Some like it mild, while others enjoy a fiery kick. Display your dish on a rustic platter for a warm look. Drizzle extra hot honey on top for shine. It adds flavor and looks great. You can also garnish with fresh chives or parsley. This adds color to your plates. Serve with pickles or coleslaw to give a nice crunch. {{image_4}} You can switch up the flour for a gluten-free option. Almond flour or rice flour works well. Just remember to adjust the liquid in your recipe. If you want to go plant-based, you can swap chicken for tofu. Use firm tofu, press it to remove excess moisture, and marinate it like the chicken. This will give you a great texture and flavor. Adding herbs to your biscuits can lift their taste. Try some fresh rosemary or thyme for a nice twist. You can even mix in cheese like cheddar or parmesan for extra richness. Also, don't be afraid to experiment with different types of honey. Try clover honey for a milder taste or spicy honey for an extra kick. Each type adds its own unique flavor profile. These hot honey chicken biscuits pair well with sides. Coleslaw adds a crunchy, refreshing element. Pickles can bring a nice tang that balances the sweetness of the honey. For drinks, sweet tea or lemonade works great. They both complement the dish and keep the meal light and fun. For the full recipe, check out the complete guide to making these tasty treats! To keep your hot honey chicken biscuits fresh, store them in an airtight container. Place the biscuits and chicken in separate containers to maintain their texture. Refrigerate them within two hours of cooking to avoid spoilage. This method helps keep the biscuits soft and the chicken juicy. - Best practices: - Use an airtight container. - Separate biscuits and chicken. To keep the biscuits from getting soggy, avoid stacking them. It’s best to lay them flat. You can also place a paper towel in the container. This will absorb excess moisture and keep the biscuits from getting too soft. When you’re ready to enjoy your leftovers, reheating is key. For the best results, use the oven or air fryer. Both methods help keep the chicken crispy and biscuits warm. - Recommended methods: - Oven: Preheat to 350°F (175°C). Place biscuits and chicken on a baking sheet. Heat for about 10-15 minutes. - Air fryer: Set to 350°F (175°C). Heat for about 5-8 minutes. Avoid microwaving your biscuits, as this can make them soggy. Always check that the chicken is heated through. The internal temperature should reach 165°F (74°C). This ensures safety and keeps the dish tasty. For tips on the full recipe, explore how to prepare these delicious treats from scratch! Yes, you can prepare the biscuits in advance. Make the biscuit dough and cut out the shapes. Place them on a baking sheet and freeze until firm. Then, transfer them to a freezer bag. When ready to bake, you can bake them straight from the freezer. Just add a few extra minutes to the baking time for perfect results. If you don’t have buttermilk, you can use milk with a splash of vinegar or lemon juice. Mix one cup of milk with one tablespoon of either vinegar or lemon juice. Let it sit for about five minutes. This trick makes a good substitute that works well for marinating chicken. To check if the chicken is done, look for a few signs. The chicken should be golden brown. The juices should run clear when pierced. Use a meat thermometer if you have one. The internal temperature should reach 165°F (75°C) for safe eating. Yes, you can freeze the assembled biscuits. After frying the chicken and making the biscuits, let them cool. Wrap them tightly in plastic wrap or foil. Store them in a freezer bag. When you want to eat them, thaw in the fridge overnight. Reheat them in the oven to keep them crispy. This blog post detailed a delicious recipe for hot honey chicken biscuits. You learned how to marinate chicken, make flaky biscuits, and fry them perfectly. I shared tips to enhance flavor and presentation, plus variations for personal tastes. Remember, cooking can be simple and fun. Don't hesitate to experiment with ingredients and flavors. Enjoy your cooking journey while making this tasty dish!](https://roastedflavors.com/wp-content/uploads/2025/06/63fe983e-9a66-4df3-9ec9-7f46e56775ba.webp)
Easy Hot Honey Chicken Biscuits Flavored and Quick
Are you ready to spice up your meal routine? These Easy Hot Honey Chicken Biscuits are a game changer. Juicy chicken drenched in hot honey,

Crispy Parmesan Chicken Flavorful and Easy Recipe
Are you ready to savor a dish that’s both crispy and savory? My Crispy Parmesan Chicken recipe is not just easy to make but also
![To make Tortellini Carbonara, gather these key ingredients. Each one plays a vital role in creating the creamy, comforting flavor of this dish. - 1 package (9 oz) cheese tortellini - 4 large eggs - 1 cup grated Parmesan cheese - 1 teaspoon freshly cracked black pepper - 1 cup frozen peas - 3 tablespoons extra virgin olive oil - 2 cloves garlic, minced - Fresh parsley, finely chopped (for garnish) - Sea salt, to taste These ingredients form the base of your Tortellini Carbonara. The cheese tortellini is rich and fills you up. The eggs and cheese create a creamy sauce that coats each piece perfectly. Peas add a pop of color and a touch of sweetness. Each bite brings comfort and joy. For the full recipe, you can check [Full Recipe]. This recipe is simple, yet it offers a warm, satisfying meal perfect for any day. First, bring a large pot of salted water to a boil. Add the cheese tortellini and cook it according to the package instructions. Once the tortellini is al dente, drain it carefully. Remember to reserve ½ cup of the pasta water for later. In a medium mixing bowl, whisk together the eggs and grated Parmesan cheese. Add freshly cracked black pepper to taste. Make sure this mixture is well combined, then set it aside for now. Heat three tablespoons of extra virgin olive oil in a large skillet over medium heat. Once the oil is warm, add two cloves of minced garlic. Sauté for about 1-2 minutes. Stir often to keep the garlic from browning, as this can make it bitter. Next, add one cup of frozen peas to the skillet. Stir and cook them for about 2-3 minutes. You want them to be heated through and bright in color. Lower the heat to medium-low. Gently add the drained tortellini to the skillet. Carefully toss the tortellini with the sautéed garlic and peas, making sure everything is mixed well. Remove the skillet from heat. Quickly pour the egg and cheese mixture over the warm tortellini. Stir vigorously to create a creamy sauce. If the sauce is too thick, add the reserved pasta water a little at a time until you reach your desired creaminess. Finally, add sea salt to taste. Continue to stir until the dish is well combined and creamy. Serve the Tortellini Carbonara hot, garnished with finely chopped fresh parsley and more Parmesan cheese if you like. Enjoy every bite of this comforting dish! For the full recipe, check the detailed instructions above. To get a creamy sauce for your tortellini carbonara, I suggest using fresh eggs and quality cheese. The heat from the pasta helps cook the eggs gently. Mix the egg and cheese fast to create a smooth blend. Keep stirring to avoid lumps. You’ll know the sauce is ready when it clings to the tortellini and looks glossy. If your sauce becomes too thick, don’t worry! Just add a splash of the reserved pasta water. Stir until you reach your desired creaminess. If your pasta clumps together, try gently tossing the tortellini with a bit of olive oil. This will help separate the pieces and keep them smooth. You can easily boost the flavor of your dish. Adding fresh herbs, like basil or thyme, brings brightness. A pinch of red pepper flakes adds warmth. For more depth, consider folding in sautéed mushrooms or spinach. These choices not only taste great but also make the dish more colorful. Check the [Full Recipe] for more ideas! {{image_4}} You can boost the nutrition of your tortellini carbonara with fresh veggies. I love adding spinach, broccoli, or bell peppers. These vegetables bring color and flavor. You can also swap them based on the season. In spring, use asparagus; in fall, try butternut squash. If you want more protein, you can add bacon or pancetta. Their salty taste enhances the dish. You can also consider grilled chicken or shrimp for a heartier meal. They add a nice texture and flavor to the creamy sauce. For a vegan twist, you can substitute eggs and cheese. Use silken tofu blended with nutritional yeast for creaminess. You can find plant-based tortellini in many stores. They taste great and fit perfectly in this recipe. Check out the Full Recipe for more details. To keep your Tortellini Carbonara fresh, store it in the fridge. Use an airtight container to keep it safe from air and moisture. This method helps the flavors stay vibrant. Make sure it cools down to room temperature before sealing it. This prevents condensation, which can make the dish soggy. When it’s time to enjoy your leftovers, reheating is key to keeping the taste and texture. For best results, use the stovetop. Heat a pan over low heat and add a splash of water or olive oil. Stir the tortellini gently until it warms through. This method helps maintain creaminess. If you're in a hurry, the microwave works too. Use a microwave-safe dish, cover it, and heat in short bursts. Stir between intervals to avoid hot spots. Freezing is a great option if you want to save some for later. First, let the dish cool completely. Then, portion it into freezer-safe bags or containers. Remove as much air as possible to avoid freezer burn. Label the bags with the date for easy tracking. When you’re ready to eat, the best way to thaw is in the fridge overnight. This keeps it from turning mushy. If you’re pressed for time, you can thaw it in the microwave, but this might change the texture a bit. Yes, you can use fresh tortellini. Fresh tortellini cooks faster than frozen. Typically, it takes about 3–5 minutes to cook fresh tortellini. Frozen tortellini usually needs 7–10 minutes. Using fresh may give you a softer texture. The flavor can also be more vibrant, enhancing your dish. If you need a substitute for Parmesan, try Pecorino Romano. It has a similar salty taste. Grana Padano is another good choice. For a dairy-free option, use nutritional yeast. It adds a cheesy flavor without dairy. To make Tortellini Carbonara vegetarian, skip the meat. Use sautéed mushrooms for a savory flavor. You can add more peas or spinach for depth. For the cheese and eggs, try using cashew cream and nutritional yeast. This keeps the dish creamy and tasty. Tortellini Carbonara is a modern twist on classic carbonara. Traditional carbonara uses pasta like spaghetti and bacon or guanciale. This dish combines the comfort of tortellini with creamy sauce. It brings a new flair to a beloved classic. In this blog post, we explored how to make Tortellini Carbonara. We covered the ingredients needed, step-by-step cooking instructions, and tips for the best results. We also shared ways to store leftovers and variations to try. Remember, cooking is fun and allows you to be creative. Don't hesitate to experiment with flavors and ingredients. With practice, you will master this dish and impress others with your skills. Enjoy making and sharing this delicious meal!](https://roastedflavors.com/wp-content/uploads/2025/06/8d8363b9-96c2-479a-9e26-fc9610f9f6d0.webp)
Tortellini Carbonara Comforting and Creamy Dish
Craving a dish that combines comfort and creamy goodness? Look no further than Tortellini Carbonara! This easy recipe blends cheesy tortellini with rich eggs and
![- 1 cup cooked jasmine rice - 2 grilled chicken breasts, sliced into strips - 1 cup sweet corn kernels (either fresh off the cob or canned) - 1/2 cup feta cheese, crumbled - 1/4 cup mayonnaise - 1 tablespoon freshly squeezed lime juice - 1 teaspoon chili powder - 1/2 teaspoon garlic powder - 2 tablespoons fresh cilantro, finely chopped - Salt and pepper to taste - Lime wedges, for garnish To create the Street Corn Chicken Rice Bowl, you need simple yet fresh ingredients. Start with jasmine rice. It has a soft texture and sweet flavor. Next, grab some grilled chicken breasts. They should be juicy and flavorful. If using fresh corn, you can grill it for a smoky taste. If not, canned corn works great too. Feta cheese adds a salty creaminess. Mayonnaise, lime juice, chili powder, and garlic powder create a zesty sauce. Cilantro gives a fresh kick. Lastly, salt and pepper balance the flavors. Each ingredient plays a key role in making this dish tasty. When combined, they create a colorful and satisfying meal. Check out the Full Recipe for all the steps to make your bowl shine! To get perfect corn, start by grilling fresh corn. Grill the ears over medium-high heat for about 5-7 minutes. Turn them often until the kernels turn dark and soft. Let the corn cool, then slice off the kernels. If you prefer canned corn, just drain it and set it aside for later. Now, let's make a creamy sauce. Grab a small bowl and mix mayonnaise, lime juice, chili powder, garlic powder, and a pinch of salt and pepper. Stir it well until everything blends together. Taste it! Adjust the seasoning as needed. This sauce adds a rich flavor to your bowl. Start building your rice bowl. Add a good layer of jasmine rice to the bottom. Next, place sliced grilled chicken on top of the rice. Then, sprinkle sweet corn kernels evenly over the chicken. This makes your bowl colorful and inviting. Drizzle the creamy sauce over the chicken and corn. For extra flavor, sprinkle crumbled feta cheese and chopped cilantro on top. These ingredients balance the flavors and make the dish pop visually. Finish off your bowl by adding a lime wedge on the side. When you're ready to eat, squeeze the lime over the top. This boosts the dish's freshness and makes it even tastier. For the full recipe, refer to the earlier sections for detailed ingredient lists and instructions. Enjoy your cooking experience! Grilling chicken can be simple. Use a medium-high heat on your grill. Marinate your chicken for at least 30 minutes. This adds flavor and keeps it juicy. Cook until it reaches 165°F. Let it rest before slicing. This helps keep the juices inside. To keep rice fluffy, rinse jasmine rice before cooking. This removes excess starch. Use a ratio of 1 cup rice to 1.5 cups water. Bring it to a boil, then cover and reduce to low heat. Cook for 15 minutes, then let it sit. Fluff it with a fork before serving. Adjusting spice levels is easy. Start with a small amount of chili powder. Taste as you go. Add more only if you want heat. You can also mix in fresh lime juice for a zesty kick. Fresh herbs can greatly improve taste. I love using cilantro in this dish. It adds brightness and freshness. You can also try fresh parsley or green onions for a different flavor. For a visually appealing serving, layer your rice, chicken, and corn neatly. Use a large bowl to give it space. This makes it look more inviting. Use colorful ingredients to create a feast for the eyes. The bright yellow corn and green cilantro contrast well. Crumbled feta adds a nice white touch. A lime wedge on the side adds a pop of color and freshness. Explore the [Full Recipe] for a complete guide and enjoy your meal! {{image_4}} You can easily switch chicken for tofu or tempeh. Tofu is soft and absorbs flavors well. Tempeh has a nutty taste and adds texture. Cut either into bite-sized pieces and grill or sauté until golden. For the sauce, replace mayonnaise with vegan mayo. This keeps it creamy and plant-based. Want to add some heat? Toss in jalapeños or a splash of hot sauce. You can mix diced jalapeños into the corn or sprinkle them on top. For the dressing, increase the chili powder to kick up the flavor. This adds a zesty punch that many will love. If jasmine rice isn’t your thing, try brown rice or quinoa. Brown rice has a chewy texture and more fiber. Quinoa is light and packed with protein. Cook brown rice as per package instructions. For quinoa, use a 2:1 water-to-quinoa ratio and simmer until fluffy. Each grain brings a unique taste, making your bowl special. You can find the full recipe here to guide you in making a delicious Street Corn Chicken Rice Bowl. Store leftovers in the fridge right away. Use airtight containers to keep them fresh. Glass or plastic containers work well. Make sure to cool the rice bowl before sealing it. This helps prevent moisture buildup. To freeze the rice bowl, pack it tightly in a freezer-safe container. Leave some space at the top for expansion. Label it with the date, so you know when to use it. When ready to eat, move it to the fridge to defrost overnight. For faster results, you can use the microwave. Heat it gently to maintain texture. In the fridge, the Street Corn Chicken Rice Bowl lasts about 3 days. In the freezer, it can last up to 3 months. Always check for signs of spoilage. Look for off smells or changes in color. If you see any of these signs, it’s best to throw it away. A Street Corn Chicken Rice Bowl is a fun and tasty dish. It blends grilled chicken, sweet corn, and creamy sauce over jasmine rice. The bright flavors come from fresh ingredients like lime, cilantro, and feta cheese. Main Ingredients: - Cooked jasmine rice - Grilled chicken breasts - Sweet corn kernels - Feta cheese - Mayonnaise - Lime juice - Chili powder - Garlic powder - Fresh cilantro - Salt and pepper This dish is colorful and easy to make. You can serve it warm or cold, making it perfect for any meal. To make this dish gluten-free, focus on your ingredients. Use gluten-free mayonnaise. Most spices are gluten-free, but check the labels. Jasmine rice is naturally gluten-free, so you can use it without worry. Yes, you can meal prep the Street Corn Chicken Rice Bowl! Cook the rice and chicken in advance. Store them in separate containers. You can add corn and sauce when ready to eat. This keeps everything fresh and tasty. You can serve simple sides with this dish. Try tortilla chips for crunch. A light salad pairs well too. You might enjoy guacamole or salsa for added flavor. To make this bowl healthier, swap out the mayo for Greek yogurt. You can also use less cheese or choose a low-fat version. Add more veggies like bell peppers or spinach for extra nutrients. These swaps keep the dish delicious while boosting its health benefits. For the full recipe, check the main article! This blog post covered a tasty Street Corn Chicken Rice Bowl. You learned about the key ingredients, the step-by-step method, and some helpful tips to enhance flavor. We also explored variations for different diets and how to store leftovers properly. In closing, this dish is easy to customize and fun to make. Try it out for a meal that brings joy to your table. Enjoy your cooking adventure!](https://roastedflavors.com/wp-content/uploads/2025/06/61bb5721-cd50-4579-b140-d34d16e3c239.webp)
Street Corn Chicken Rice Bowl Flavorful and Simple Dish
Craving a dish that bursts with flavor and is easy to make? The Street Corn Chicken Rice Bowl is just what you need! Packed with