Dinner

- 2 medium acorn squashes - 2 tablespoons extra-virgin olive oil - 1 teaspoon smoked paprika - 1 teaspoon garlic powder - ½ teaspoon ground cumin - ½ teaspoon ground cinnamon - Salt and black pepper - Fresh parsley for garnish - Optional: cayenne pepper If you can’t find acorn squash, use butternut or delicata squash instead. These squashes also roast well and have a lovely flavor. For oils, you can use avocado oil or grapeseed oil. Both will work great for roasting. Spice it up with different seasonings. Try curry powder or Italian herbs for a twist. When selecting acorn squashes, look for ones that feel heavy and firm. The skin should have a rich green color with some orange streaks. Fresh spices make a big difference in flavor. Use whole spices when you can and grind them for better taste. Always choose high-quality olive oil. It adds richness and depth to your dish. Start by preheating your oven to 425°F (220°C). This high temperature helps achieve a crispy finish. Next, take your acorn squashes and place them on a cutting board. Carefully halve the squashes and scoop out the seeds with a spoon or melon baller. Make sure to remove any stringy fibers inside. This step creates a smoother texture for your dish. In a small bowl, combine the following ingredients for the spice mixture: - 2 tablespoons extra-virgin olive oil - 1 teaspoon smoked paprika - 1 teaspoon garlic powder - ½ teaspoon ground cumin - ½ teaspoon ground cinnamon - Salt and freshly ground black pepper to taste - Optional: A pinch of cayenne pepper for some heat Stir the mixture well to create a cohesive blend. For even coating, generously brush the cut side of each squash half with this spice mixture. Ensure every surface absorbs the flavors. Place the squash halves, cut side down, on a baking sheet lined with parchment paper. This prevents sticking and makes cleanup easier. Roast the squashes in your preheated oven for about 25-30 minutes. You want them tender with beautifully caramelized skin. After that, use tongs to flip the squash halves so the cut sides face up. Return them to the oven for an additional 10-15 minutes. This step boosts crispiness around the edges and enhances the natural sweetness. To get that perfect crispy texture, you must use a high temperature. Preheat your oven to 425°F (220°C). This heat helps the squash caramelize and become golden. Flipping the squashes halfway through cooking is key. It ensures they cook evenly and get crispy on all sides. Adding a splash of acidity really boosts the flavor. A squeeze of lemon juice can brighten each bite. Creaminess also adds depth. Try topping with Greek yogurt or a drizzle of tahini for a rich twist. For a touch of flair, garnish with fresh herbs. Chopped parsley or cilantro looks great and adds freshness. One big mistake is overcrowding the baking sheet. Leave space between each squash half. This allows hot air to circulate and helps achieve that crispy finish. Another misstep is not letting the squash cool before serving. If you serve them too hot, they can lose their crispness. Allow them to rest for a few minutes after roasting for the best experience. {{image_4}} You can use different squashes for variety. Butternut squash is sweet and smooth. It roasts well and gets golden brown. Spaghetti squash has a unique texture. It shreds into strands, making it fun. You can even mix different squashes for a colorful dish. Just remember to adjust cooking times if needed. You can change the flavor easily. For a sweet taste, try cinnamon and brown sugar. This mix brings out the natural sugars in the squash. For a savory option, use garlic powder and herbs. You can also explore international spice blends. Try curry powder for a warm twist. Or use za'atar for a Middle Eastern flair. Each spice can make the squash shine in a new way. Roasted squash pairs well with dips and sauces. Try it with a creamy yogurt dip. A sprinkle of feta cheese adds a nice touch too. For sides, serve it with a fresh salad. A crisp green salad with lemon dressing works great. You can also add roasted veggies for a hearty meal. These pairings make the squash a delightful main or side dish. For more tips, check the Full Recipe for creative ideas. To store leftover crispy roasted squash, place it in the fridge. Use an airtight container to keep it fresh. Make sure the squash is cool before sealing it. This helps avoid moisture buildup, which can make it soggy. Keep the leftovers for up to four days. If you want to keep it longer, consider freezing it. For the best results, reheat the squash in the oven. Preheat your oven to 350°F (175°C). Place the squash on a baking sheet and cover it loosely with foil. This keeps it from drying out. Heat for about 10-15 minutes. For crispiness, remove the foil for the last few minutes. You can also reheat in a skillet over medium heat. Just add a little oil to help restore the crunch. Yes, you can freeze roasted squash! Cut the squash into smaller pieces for easier storage. Allow it to cool completely before you freeze it. Place the pieces in a freezer bag, pressing out as much air as possible. Frozen roasted squash can last up to three months. When you’re ready to use it, thaw the squash in the fridge overnight. To reheat, follow the same instructions as above for the best flavor and texture. For the complete recipe, check the Full Recipe section. You can tell roasted squash is done when it is tender and has a nice golden color. The skin should look slightly crispy, and a fork should easily pierce the flesh. If you notice a caramelized edge, that’s a good sign too. This adds flavor and texture, making your dish even more enjoyable. Yes, you can prepare roasted squash ahead of time. Roast the squash and let it cool completely. Store it in an airtight container in the fridge for up to three days. When ready to serve, reheat it in a hot oven for about 10 minutes to regain crispiness. This makes meal prep easy and saves you time. Roasted squash pairs well with many sides. Here are some tasty options: - Quinoa salad with herbs and lemon - Maple-glazed Brussels sprouts - Creamy mashed potatoes - Spinach and feta salad These dishes complement the sweet and savory notes of the squash, creating a balanced meal. For a lovely presentation, place each half of the squash on a platter. Drizzle with olive oil and sprinkle with fresh parsley. You can also add toppings like feta or yogurt to enhance the flavors. This makes your dish not just tasty, but also visually appealing for gatherings. To make roasted squash healthier, you can use less oil. Try using a spray bottle to lightly coat the squash. You can also skip the salt or use a low-sodium option. Adding more herbs, like rosemary or thyme, boosts flavor without extra calories. These simple changes keep the dish delicious and light. For the full recipe, visit [Full Recipe]. In this post, we explored how to make delicious roasted acorn squash. You learned about the key ingredients, preparation steps, and tricks for optimal crispiness. We also discussed variations and storage tips to keep your squash fresh. Roasting acorn squash is easy and tasty. With a few simple steps, you can create a dish that impresses. Enjoy being creative with flavors and serve it as a side or main dish! Happy cooking!
Best Crispy Roasted Squash Tasty Flavorful Delight
Are you ready to transform your meals with the ultimate crispy roasted squash? This tasty and flavorful delight will elevate your kitchen game and wow
- 8 oz elbow macaroni - 2 cups shredded sharp cheddar cheese - 1 cup shredded mozzarella cheese - 1 cup cream cheese, softened - 1 cup whole milk - 1/4 cup unsalted butter - 1 teaspoon garlic powder - 1 teaspoon onion powder - 1 tablespoon Dijon mustard - Salt and black pepper to taste - 1/2 cup breadcrumbs (for topping) - Fresh parsley, chopped (for garnish) Gather these ingredients to make the TikTok viral mac and cheese. The elbow macaroni serves as the base for a creamy and cheesy dish. Sharp cheddar gives it that classic flavor. The mozzarella adds a stretchy texture, and cream cheese makes it extra rich. You will also need whole milk and unsalted butter for the cheese sauce. Garlic powder and onion powder bring depth to the flavor. Dijon mustard adds a slight tang that balances the cheese. Finally, breadcrumbs on top create a crunchy layer, while fresh parsley gives a splash of color. This combination of ingredients makes a dish that is both simple and delightful. Get ready to impress your friends and family with your cooking skills! {{ingredient_image_2}} - Bring salted water to a boil. - Cook macaroni until al dente, typically 7-8 minutes. Start by filling a large pot with water and adding about a tablespoon of salt. This helps flavor the pasta. Once the water boils, add the elbow macaroni. Stir it a little to keep it from sticking. When the time is up, drain the macaroni in a colander. Rinse it with cold water to stop the cooking process and set it aside. - Melt butter and mix in cream cheese. - Gradually add whole milk and seasonings. In the same pot, melt unsalted butter over medium heat. Be careful not to let it brown. Once melted, add the softened cream cheese. Stir until smooth. Now, slowly add the whole milk, mixing as you go. This keeps your sauce creamy. Then, add garlic powder, onion powder, and Dijon mustard. Stir well. Allow this to heat for about 3-5 minutes until it thickens. - Add shredded cheeses and mix until melted. - Stir in cooked macaroni until fully coated. Turn the heat to low. Gradually add the shredded sharp cheddar and mozzarella cheese, one handful at a time. Keep stirring until each bit melts. Season with salt and black pepper to taste. Next, add the cooked macaroni back to the pot. Stir gently until every piece is coated in that creamy cheese sauce. - Preheat oven to 350°F (175°C). - Transfer mac and cheese to a baking dish. While mixing the macaroni and cheese, preheat your oven to 350°F (175°C). Lightly grease a 9x13 inch baking dish. Then, pour the delicious mac and cheese into the dish, spreading it out evenly. - Mix breadcrumbs with melted butter. - Sprinkle topping and bake until golden brown. In a small bowl, mix breadcrumbs with a little melted butter. This adds flavor and helps it crisp up. Sprinkle the breadcrumb mixture evenly over the top of the mac and cheese. Place the dish in the oven and bake for 20-25 minutes. You want the top to be golden brown and crispy. To get the best cheese sauce, you need to soften the cream cheese first. This helps it blend easily with the butter. Make sure to stir consistently to avoid any lumps. A smooth sauce creates a better texture for your mac and cheese. For a crispy top finish, I recommend using a broiler during the last few minutes of baking. This gives you that golden crust we all love. You can also cover the dish with foil to prevent over-browning while it bakes. This keeps the mac and cheese creamy inside. I love serving this mac and cheese in cute individual bowls. It makes each serving feel special. You can also pair it with a light salad for a balanced meal. The freshness of the salad complements the richness of the cheese perfectly. Pro Tips Use High-Quality Cheese: For the best flavor and creaminess, opt for high-quality cheeses. Sharp cheddar and fresh mozzarella deliver a rich taste that elevates your mac and cheese. Don’t Overcook the Pasta: Cook the macaroni until just al dente. It will continue to cook in the oven, preventing a mushy texture in your final dish. Experiment with Cheeses: Feel free to mix in different cheeses like Gruyère or Fontina for a unique flavor profile. Combining cheeses can create a more complex taste. Add Extra Flavor: Incorporate additional spices like smoked paprika or cayenne pepper for a kick, or stir in sautéed vegetables like spinach or mushrooms for added nutrition. {{image_4}} You can make your mac and cheese even better! Here are some tasty ideas: - Add cooked bacon or ham for a protein punch. This adds flavor and a nice crunch. - Include sautéed vegetables like spinach or bell peppers. This makes the dish colorful and adds nutrients. Switching up the cheese is fun! Here are some suggestions: - Experiment with different cheese blends. Try gouda or fontina for a creamier taste. - Add pepper jack for a spicy kick. This will wake up your taste buds! If you need to change things for diets, no problem! Here’s how: - Use gluten-free pasta if you are gluten-sensitive. Many brands offer great options today. - Swap dairy for non-dairy cream cheese and milk. This works well for vegan diets. Feel free to mix and match these ideas. Your mac and cheese will be a hit every time! Cool the mac and cheese completely before you store it. This step helps keep the texture nice. Use an airtight container to keep it fresh. You can store it in the fridge for 3-4 days. If you want to enjoy it later, make sure to check for any off smells before eating. For longer storage, transfer the mac and cheese to freezer-safe containers. This will keep it safe and tasty for up to three months. When you want to eat it again, thaw it in the fridge overnight. This slow thaw helps maintain the flavor and texture. Reheat the mac and cheese in the oven for the best texture. Preheat to 350°F (175°C) and bake until warmed through. If the macaroni seems dry, add a splash of milk before reheating. This little trick brings back the creaminess. Enjoy your cheesy delight again! This mac and cheese became viral due to TikTok. Users share their unique spins on the recipe. The creamy texture and cheesy flavor make it irresistible. People love how easy it is to make. Watching others enjoy it makes you want to try it too. Yes, you can make this recipe ahead of time. Cook the pasta and cheese sauce, then combine them. Place the mixture in a baking dish and cover it. Store it in the fridge until you are ready to bake. Just pop it in the oven before serving, and you are good to go. To make mac and cheese creamier, add more cheese. You can also add a splash of heavy cream. Mixing in either of these ingredients before baking will help. This will give your dish a smooth and rich texture that everyone will love. If you want to switch things up, use pasta shapes like shells or cavatappi. These alternatives work well with the cheese sauce. You can also use gluten-free pasta if needed. Each option will give you a delicious mac and cheese. This recipe for mac and cheese blends classic ingredients into a creamy dish. From the elbow macaroni and cheeses to the tasty seasonings, each step adds flavor. Baking gives it a crispy top. You can make it your own by adding proteins or veggies. Store leftovers in the fridge or freezer for later. Enjoy this comforting meal any time. It’s sure to become a favorite.
TikTok Viral Mac & Cheese Easy Cheesy Delight
Craving a cheesy delight that took TikTok by storm? This TikTok Viral Mac & Cheese is your answer! With gooey cheese, creamy texture, and easy
- 1 lb large shrimp, peeled and deveined - 2 tablespoons extra virgin olive oil - 3 cloves garlic, finely minced - 1 cup cherry tomatoes, halved - 1 cup fresh spinach, roughly chopped - 1 cup heavy cream - 1 cup grated Parmesan cheese - 1 teaspoon Italian seasoning blend - Salt and freshly ground black pepper to taste - Fresh basil leaves for garnish - Cooked pasta (optional, for serving) When making One Pot Creamy Tuscan Shrimp, I love to start with fresh ingredients. The shrimp should be large and juicy. I choose extra virgin olive oil for its rich flavor. Garlic adds a nice kick. Halved cherry tomatoes bring sweetness and color. Fresh spinach gives the dish a healthy touch. I use heavy cream to create a silky sauce. Grated Parmesan cheese adds depth and richness. For seasoning, I stick with Italian seasoning, salt, and pepper. It’s simple but full of flavor. For serving, I recommend fresh basil leaves on top. They add a pop of color and a fresh taste. If you like, serve the shrimp over cooked pasta. This makes it even more filling and satisfying. {{ingredient_image_2}} - Step 1: Heat 2 tablespoons of extra virgin olive oil in a large skillet over medium heat. When the oil is shimmering, add 3 finely minced cloves of garlic. Sauté for about 1 minute until it smells great and turns light golden. - Step 2: Add 1 pound of peeled and deveined shrimp to the skillet. Season with a pinch of salt and some freshly ground black pepper. Cook the shrimp for 2-3 minutes until they are pink and opaque. Once they are done, transfer them to a plate and set aside. - Step 3: Make sure to keep the garlic oil in the skillet. This oil adds great flavor to your dish. - Step 4: In the same skillet, add 1 cup of halved cherry tomatoes. Sauté them for 2-3 minutes until they soften and their juices start to flow. - Step 5: Stir in 1 cup of roughly chopped fresh spinach. Cook until it wilts, which should take about 1 minute. - Step 6: Next, pour in 1 cup of heavy cream. Gently bring this to a light simmer while stirring. Once it simmers, reduce the heat and mix in 1 cup of grated Parmesan cheese along with 1 teaspoon of Italian seasoning. Stir until the sauce is smooth and creamy. - Step 7: Return the cooked shrimp to the skillet. Gently stir to coat the shrimp in the sauce. Heat everything through for about 2 minutes. - Step 8: Taste the dish and adjust seasoning as needed. You may want to add more salt or pepper. - Step 9: If you like, serve the creamy shrimp over cooked pasta like linguine or fettuccine. Garnish with fresh basil leaves for a nice touch and a pop of color. Choosing the right shrimp size is key. I recommend using large shrimp, around 16-20 count per pound. This size cooks evenly and has a nice bite. For cooking time, aim for about 2-3 minutes per side. The shrimp should turn pink and opaque. If you overcook them, they become rubbery, which we want to avoid. To make this dish even tastier, consider adding more herbs or spices. Fresh herbs like parsley or dill work well. You can also use red pepper flakes for some heat. For added texture and flavor, try including sliced mushrooms or bell peppers. These veggies bring extra color and taste to your creamy sauce. Plating can elevate your dish. Twirl cooked pasta on the plate using a fork. Then, spoon the creamy shrimp mixture over it. This creates a beautiful, layered look. For garnish, sprinkle extra Parmesan cheese and add fresh basil leaves. This not only adds visual appeal but also enhances the aroma of your dish. Pro Tips Fresh Shrimp is Key: Always choose fresh, high-quality shrimp for the best flavor and texture. If using frozen shrimp, ensure they are thoroughly thawed before cooking. Customize Your Cream: Feel free to experiment with different types of cream or add a splash of white wine for a unique flavor twist in the sauce. Herb Variations: Enhance the dish by adding fresh herbs like dill or parsley along with the basil for a more complex flavor profile. Leftover Sauce Uses: If you have leftover sauce, it can be used as a delicious dip for crusty bread or as a sauce for other proteins like chicken or fish. {{image_4}} You can switch up the cream base for fun. If you want a dairy-free option, try using coconut milk. It adds a lovely sweetness and works well with the other flavors. For a lighter touch, you can use half-and-half instead of heavy cream. Cream cheese is another great alternative. It gives the sauce a nice thickness and a rich flavor. Shrimp are great, but you can swap them out if you like. Chicken is a tasty option. Just cook it until it’s fully done. Tofu also works well for a vegetarian choice. For a seafood twist, mix in different kinds of seafood. Scallops or mussels can add variety and make the dish even more exciting. Adding more veggies can make this dish even better. Think of seasonal vegetables, like zucchini or bell peppers. They bring fresh flavors and colors to your plate. You can also toss in more greens, like kale or arugula. These will add a nice crunch and boost the nutrients. Don’t be afraid to get creative with what you have on hand! To store your leftover creamy Tuscan shrimp, place it in an airtight container. Let it cool to room temperature first. This will help keep it fresh. You can store it in the fridge for up to three days. When you want to reheat it, warm it gently in a skillet over low heat. Stir often to prevent sticking. You can also use a microwave, but do it in short bursts. Stir between bursts to heat evenly. If you want to keep the dish longer, you can freeze it. Use a freezer-safe container or a zip-top bag. Make sure to remove as much air as possible before sealing. This dish can last up to three months in the freezer. When you're ready to eat it, thaw it overnight in the fridge. To reheat, use the stove or microwave. Add a splash of cream to help restore its creamy texture. Eat the leftovers within three days for the best taste. After that, it may lose flavor and freshness. Look for signs of spoilage like off smells, discoloration, or a change in texture. If you see any of these, it's best to toss it out. Keeping an eye on your food helps you enjoy it at its best! To keep shrimp tender, avoid cooking them too long. Cook shrimp for about 2-3 minutes on each side. When they turn pink and opaque, they are done. Remove them from heat quickly to prevent overcooking. If you cook them too long, they can become tough and chewy. You want to enjoy a nice, juicy bite. Yes, you can use frozen shrimp! Just thaw them first. You can do this by leaving them in the fridge overnight or using cold water. To thaw quickly, place the shrimp in a bowl of cold water for about 15-20 minutes. After thawing, rinse them and pat dry before cooking. This helps them cook evenly and keeps the texture nice. If you want a dairy-free option, coconut milk works well. It adds a nice creaminess but changes the flavor a bit. You can also use half-and-half or cream cheese for a lighter version. Each alternative will change the texture a bit, so choose based on your taste. To add spice, you can use red pepper flakes or a dash of hot sauce. Start with a small amount, then taste and adjust. Fresh chopped chili peppers can also add heat. If you like a stronger flavor, try adding some black pepper to enhance the taste. Enjoy experimenting until it’s just right for you! This blog post covers how to make a creamy shrimp dish. We explored key ingredients, from shrimp to Parmesan cheese. I shared clear instructions to create a rich sauce and combine it all perfectly. You learned tips for enhancing flavor and presentation, plus ways to swap ingredients. Finally, I provided storage advice to keep your leftovers fresh. Cooking can be fun and simple, so get creative with variations and enjoy your meal!
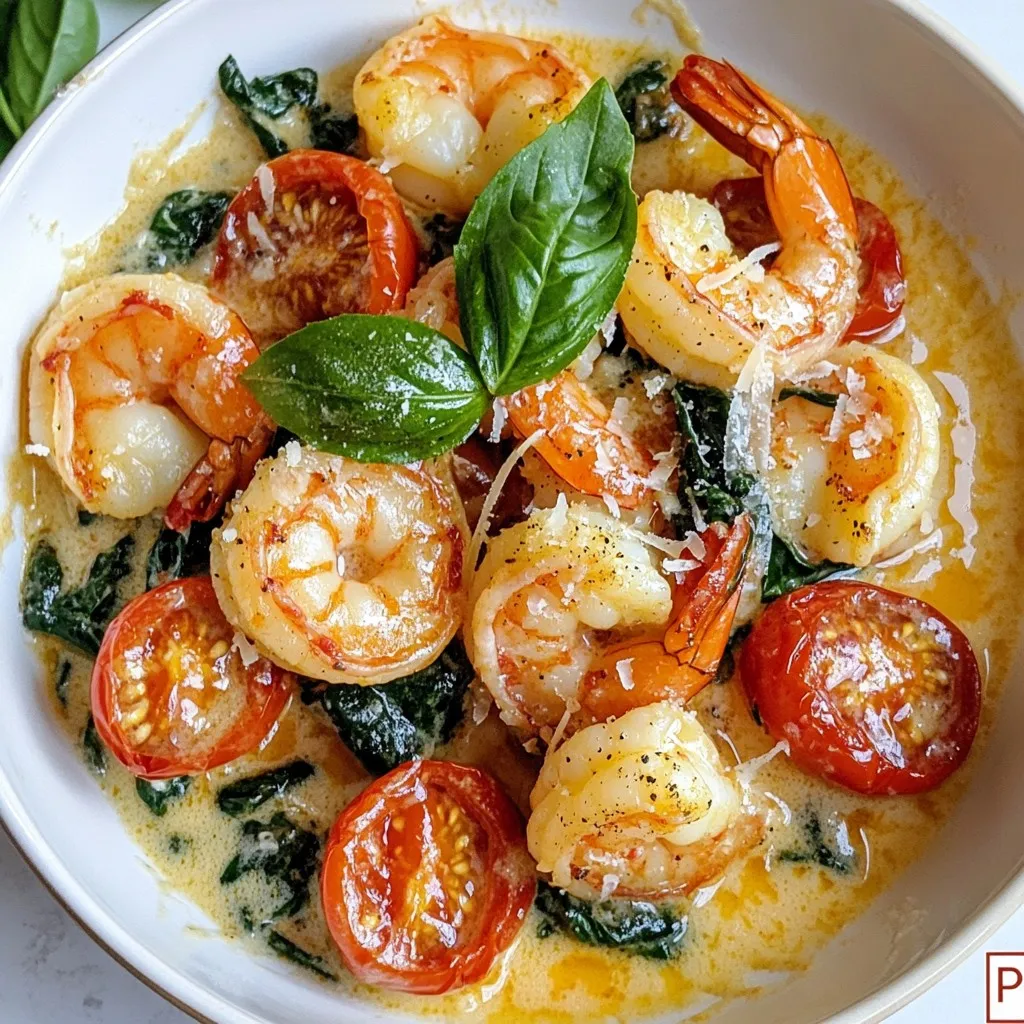
One Pot Creamy Tuscan Shrimp Simple and Tasty Dish
If you crave a quick and delightful meal, you’ll love this One Pot Creamy Tuscan Shrimp recipe. With juicy shrimp, fresh spinach, and a rich
- Ground beef: Use 1 pound of lean ground beef for a healthier option. Lean beef has less fat and works well in this dish. - Zucchini: You need 2 medium zucchinis. Dice them into bite-sized pieces for even cooking. - Sweet potato: One large sweet potato works best. Peel it and cut into 1-inch cubes. This size helps it cook evenly. - Onion: A small onion, finely chopped, adds savory depth to the skillet. - Garlic: Use 3 cloves of minced garlic. Garlic gives a strong flavor that pairs well with beef. - Olive oil: One tablespoon of olive oil is enough to sauté the onion and garlic. - Spices: - 1 teaspoon smoked paprika for a warm, smoky flavor. - 1 teaspoon dried oregano for a hint of earthiness. - 1/2 teaspoon ground cumin adds a warm, nutty taste. - Salt and pepper: Season to taste for the best flavor. - Broth: 1/4 cup of beef broth helps cook the sweet potatoes and adds moisture. - Garnishes: Fresh parsley chopped on top adds color and freshness. - Extra vegetables: You can add bell peppers or spinach for more nutrition and flavor. - Proteins: For a twist, try swapping ground beef for turkey or chicken. 1. Heating the Oil: Start by pouring one tablespoon of olive oil into a large skillet. Heat it over medium heat until it shimmers. This step helps create a tasty base for your dish. 2. Sautéing the Onion: Once the oil is hot, add one small onion, finely chopped. Sauté it for about 3 to 4 minutes until it becomes soft and translucent. This will bring a nice sweetness to the dish. 3. Garlic Incorporation: Next, add three cloves of minced garlic to the skillet. Cook for one more minute. Stir often so the garlic does not burn. The garlic will bring a wonderful aroma and flavor. 1. Browning the Ground Beef: Now, it’s time to add one pound of ground beef to the skillet. Use a spatula to break it into smaller pieces. Cook it for about 5 to 7 minutes, until the beef turns brown. If there’s any extra fat, drain it carefully. 2. Cooking Sweet Potatoes: Sprinkle in the smoked paprika, dried oregano, ground cumin, salt, and pepper over the beef. Mix to combine the spices. Then, add one large sweet potato, peeled and cut into 1-inch cubes. Pour in 1/4 cup of beef broth. Cover the skillet with a lid. 3. Adding Zucchini: Let the sweet potatoes cook for 10 to 12 minutes. Stir occasionally until they’re tender. Once they are soft, fold in two medium zucchinis, diced into bite-sized pieces. Cover the skillet again and cook for an additional 5 to 7 minutes until the zucchini is tender but still bright green. 1. Adjusting Seasonings: After cooking, taste the mixture. Adjust the seasoning with salt and pepper if needed. This step ensures that every bite is flavorful. 2. Presentation Tips: To serve, you can ladle the skillet meal into individual bowls or serve it directly from the pan. For an extra touch, garnish with freshly chopped parsley. Drizzle a bit of olive oil over the top for added flavor before serving. This process creates a delicious and colorful dish that's sure to impress. For the full recipe, check the details above. How to properly brown ground beef: To brown ground beef well, start with a hot skillet. Add the beef in one layer, and do not stir right away. Let it sear for a few minutes. This helps create a nice crust. Use a spatula to break it apart after it turns brown. This method adds great flavor to your dish. Ensuring sweet potatoes are cooked perfectly: Cut sweet potatoes into even 1-inch cubes. This helps them cook at the same rate. Add them to the skillet first and cover with broth. Covering keeps moisture in and helps them cook through without burning. Stir occasionally to check for tenderness. They should be soft but not mushy. Spices that pair well with the dish: To boost flavor, use smoked paprika and ground cumin. These spices add warmth and depth. Dried oregano also works well and gives a nice herbal note. Feel free to experiment with other spices like thyme or rosemary for a twist. Adding a kick with hot sauce or chili powder: For those who enjoy heat, add hot sauce or chili powder. Start with a small amount and adjust to taste. This adds a nice kick and balances the sweetness of the sweet potatoes. You can also use red pepper flakes for a different flavor profile. For the complete cooking flow, refer to the [Full Recipe]. {{image_4}} You can easily change this recipe to fit your taste. If you want to swap proteins, try turkey or chicken instead of ground beef. For a plant-based option, use lentils or chickpeas. Each protein has its own flavor and texture, adding variety to the dish. You can also mix in different vegetables. Bell peppers add a sweet crunch. Spinach gives a nice green color and extra nutrients. Feel free to get creative! Just remember to cut the vegetables into similar sizes for even cooking. If you need a gluten-free option, this recipe is already a winner. Just check your broth for gluten-free labeling. For a dairy-free version, skip any cheese toppings. You can still enjoy the dish without losing flavor. For those on low-carb or keto diets, swap sweet potatoes for cauliflower. Cauliflower has fewer carbs and works great in this dish. You can also reduce the amount of oil used, if desired. These small changes help fit your diet while keeping the meal tasty. You can find the full recipe above to get started with these variations! To keep your Ground Beef Zucchini Sweet Potato Skillet fresh, store it in an airtight container. Make sure it cools down before sealing it. This dish stays fresh in the fridge for up to four days. If you want to eat it later, proper storage helps maintain its flavor and texture. When reheating, you want to keep it tender. The best method is to use a skillet. Heat it over medium-low heat, stirring often. This way, you prevent the dish from drying out. You can also use the microwave for quick reheating, but cover it to maintain moisture. For long-term storage, freezing works well. Place the cooled skillet in a freezer-safe container. It lasts for up to three months in the freezer. When ready to eat, let it thaw in the fridge overnight. Then, reheat using the skillet method to restore its taste and texture. Enjoy your meal anytime! How do I know when the beef is fully cooked? You can tell the beef is done when it turns a rich brown color. Use a meat thermometer; aim for 160°F (71°C) to ensure safety. The beef should crumble easily with your spatula. If it looks pink or mushy, give it more time. Cooking ground beef until it is fully browned adds flavor and texture. Can I use frozen vegetables instead of fresh? Yes, you can use frozen vegetables. They are often pre-washed and chopped, making them a quick option. Just add them to the skillet a bit earlier. Frozen veggies can release water, so cook a little longer to avoid a watery dish. Fresh veggies taste great, but frozen is a good alternative. Overview of calories and macros per serving Each serving of the Ground Beef Zucchini Sweet Potato Skillet has about 400 calories. You get around 25 grams of protein, 20 grams of carbs, and 25 grams of fat. This dish packs nutrients and energy without weighing you down. It's a balanced meal that keeps you full. Health benefits of the key ingredients - Ground Beef: Offers high-quality protein and iron, which help build muscle. - Zucchini: Low in calories and rich in vitamins A and C, good for skin health. - Sweet Potato: Packed with fiber and beta-carotene, which supports vision and gut health. - Onion and Garlic: Both have anti-inflammatory properties and boost the immune system. Ideal side dishes to complement the skillet meal Pair the skillet dish with a side salad for freshness. A simple green salad with vinaigrette works well. For a heartier option, serve it with crusty bread or rice. Both add texture and soak up the flavors. Drink pairings that enhance the flavor A light red wine, like Pinot Noir, complements the beef well. If you prefer non-alcoholic drinks, try sparkling water with a splash of lemon. Both options balance the dish's richness while refreshing your palate. This blog post covered a simple skillet meal from start to finish. You learned about key ingredients like ground beef, zucchini, and sweet potatoes. I shared helpful tips for cooking and seasoning, as well as variations to fit your diet. Don't forget the importance of proper storage for leftovers and reheating. I hope you feel ready to make a tasty meal that fits your needs. Enjoy cooking and experimenting with flavors to make this dish your own!
Ground Beef Zucchini Sweet Potato Skillet Delight
Craving a quick and tasty dinner? My Ground Beef Zucchini Sweet Potato Skillet is the answer! This one-pan meal is packed with flavor and nutrients,
- Zucchini: 4 medium zucchinis - Spinach: 2 cups fresh, finely chopped - Mushrooms: 1 cup diced (button or cremini) - Ricotta Cheese: 1 cup creamy - Parmesan Cheese: 1/2 cup freshly grated - Garlic: 1 clove, minced - Seasonings: oregano, salt, black pepper, red pepper flakes - Olive Oil: 1 tablespoon extra virgin - Fresh Basil Leaves for garnishing When you make spinach, mushroom, and ricotta stuffed zucchini, you’ll want fresh, high-quality ingredients. Start with medium zucchinis, which are perfect for stuffing. Look for firm ones to hold their shape. Fresh spinach adds great color and flavor; it wilts down nicely in the pan. Choose button or cremini mushrooms for a rich taste. Creamy ricotta cheese binds the filling and gives it a lovely texture. For the extra kick, include grated Parmesan cheese. It adds depth and a savory touch. Don’t skip the garlic! Minced garlic gives a nice aroma and flavor. Seasonings like oregano, salt, black pepper, and red pepper flakes bring the dish to life. Finally, use high-quality extra virgin olive oil for cooking. It improves the taste and makes everything better. For a beautiful finish, add fresh basil leaves as a garnish. They not only look great but also add a fresh taste. You can find the full recipe in the article above. Enjoy your cooking adventure with these delicious ingredients! - Preheat the oven to 375°F (190°C). - Prepare the zucchinis by cutting and scooping. First, set your oven to 375°F (190°C). This helps cook the zucchini just right. Next, grab your zucchinis. Cut each one in half lengthwise. Using a small spoon, scoop out the inside. Be careful! You want to create boats. Save the scooped zucchini flesh; we will use it later. - Sauté garlic and cook the mushrooms. - Combine spinach and reserved zucchini flesh. In a large skillet, add olive oil and heat it on medium. Toss in the minced garlic. Sauté it for about 30 seconds until it smells great. Don't burn it! Now, add the diced mushrooms. Cook them for about 5 to 7 minutes until they turn golden brown. Next, stir in the reserved zucchini flesh and chopped spinach. Cook this mix for another 2 to 3 minutes. The spinach should wilt and turn bright green. - Mix cheese filling and fill zucchini boats. - Arrange in dish and bake for 25-30 minutes. Once your mix cools a bit, move it to a bowl. Add the ricotta cheese, grated Parmesan cheese, oregano, salt, black pepper, and red pepper flakes if you like some heat. Stir until it’s creamy and well-mixed. Now, fill each zucchini boat with this tasty mix. Pack it down a little to keep it together. Place the stuffed boats in a baking dish. Cover them loosely with foil to keep them moist while baking. Put the dish in the oven and bake for 25 to 30 minutes. In the last 10 minutes, remove the foil. This helps the tops get golden and crispy. Enjoy your Spinach, Mushroom, and Ricotta Stuffed Zucchini Delight! Check out the Full Recipe for more details. - How to ensure zucchini boats remain intact: When cutting the zucchinis, make clean, straight cuts. Scoop out the middle gently, leaving about a quarter-inch of flesh. This helps keep the shape strong. - Tips for achieving golden, crispy tops: For crispy tops, sprinkle some extra Parmesan cheese on top before baking. Remove the foil in the last 10 minutes of baking. This lets the heat brown the cheese nicely. - Suggested spices and herbs for added flavor: Fresh herbs like thyme or parsley can brighten the taste. Try adding a pinch of nutmeg for warmth. You can also use smoked paprika for a different twist. - Alternatives to ricotta cheese: If you want a lighter option, use cottage cheese instead. For a dairy-free choice, try silken tofu blended with a bit of lemon juice. - Presentation ideas for stuffed zucchini: Serve the stuffed zucchini on a bright platter. Add a drizzle of balsamic glaze on top for a nice look. Sprinkle with fresh herbs for added color. - Pairing options with side dishes or salads: This dish goes well with a crisp green salad or roasted vegetables. A light lemon vinaigrette can enhance the meal. For a heartier option, consider serving with quinoa or couscous. For the full recipe, please refer to the Spinach, Mushroom, and Ricotta Stuffed Zucchini Boats. {{image_4}} For those who need gluten-free options, you can simply ensure your cheese and spices are certified gluten-free. You can also use cornmeal as a binding agent if desired. This recipe is naturally gluten-free, as it focuses on fresh veggies and cheese. If you want to make it vegan, a great substitution for ricotta is blended tofu mixed with nutritional yeast. This gives you a creamy texture and cheesy flavor without dairy. You can also add a splash of lemon juice for brightness. You can switch out the zucchini for other veggies like eggplant or bell peppers. Eggplant offers a rich flavor, while bell peppers add a sweet crunch. Just make sure to adjust cooking times, as different vegetables will cook at different rates. If you're feeling adventurous, you can include additional fillings like roasted peppers or quinoa. Roasted peppers add a smoky taste, and quinoa boosts protein. Combine them into your filling for a fun twist. Adding spices can really change the dish's vibe. Italian herbs like basil and oregano bring warmth, while Mediterranean spices like cumin and paprika add a different flair. Consider what flavors you enjoy most. Incorporating nuts or seeds can give your dish a nice crunch. Pine nuts or sunflower seeds can add texture and depth. Just toast them lightly before adding for the best flavor. For the full recipe, check out the [Full Recipe] provided. You can store leftover stuffed zucchini in an airtight container. This keeps them fresh. Place them in the fridge right after they cool. They stay good for about three days. If you want to enjoy them later, make sure they are sealed tight. To freeze stuffed zucchini, start by wrapping each boat in plastic wrap. Place them in a freezer-safe bag or container. This method helps prevent freezer burn. When you want to eat them, take them out and let them thaw in the fridge overnight. For reheating, bake them in a preheated oven at 375°F (190°C) for 20-25 minutes. This way, you keep the flavor and texture. For busy weeknights, you can prepare the filling in advance. Store it in the fridge for up to two days. When you are ready, just fill the zucchini and bake. You can also batch cook stuffed zucchini. Make a large batch and freeze extras. This way, you have a quick meal ready whenever you need it. For the full recipe, check the section above. How long to bake stuffed zucchini for optimal texture? Bake the stuffed zucchini for 25 to 30 minutes. This time allows the flavors to meld and the zucchini to soften. For a perfect finish, uncover the dish in the last 10 minutes. This step helps the tops become golden and slightly crisp. Can I prepare the filling ahead of time? Yes, you can prepare the filling in advance. Store it in the fridge for up to 24 hours. Just make sure to fill the zucchini boats right before baking. This keeps them fresh and tasty. What can I use instead of ricotta? You can use cottage cheese or cream cheese as a substitute. Both will offer a creamy texture. If you want a vegan option, try silken tofu blended with a little lemon juice. It works well and tastes great. Alternatives for fresh spinach? If you don’t have fresh spinach, you can use frozen spinach. Just thaw and drain it well. Chopped kale is another good option. It adds a different flavor and holds up well in cooking. How many calories per serving? Each serving of stuffed zucchini has about 200 calories. This is a rough estimate and can vary based on the exact ingredients you use. Adjustments in cheese or oil will change the count. Is this dish healthy or low-carb? This dish is quite healthy! It has plenty of veggies and protein from the cheese. It is low in carbs, making it a good choice for many diets. The zucchini serves as a great low-carb base for the filling. Enjoy this dish as part of a balanced meal. For the full recipe, visit the section above. Stuffed zucchini is a simple, healthy dish with fresh ingredients. We explored the main ingredients like zucchini, spinach, and ricotta cheese. Then, I gave step-by-step cooking instructions and shared tips to boost flavor. You learned variations for dietary needs and creative serving ideas. This dish is not only tasty but also adaptable. Enjoy your cooking and share your creations. Remember, you can make it your own!
Spinach, Mushroom, And Ricotta Stuffed Zucchini Delight
Are you ready for a new weeknight favorite? This Spinach, Mushroom, And Ricotta Stuffed Zucchini Delight combines fresh flavors and healthy ingredients for a meal
To make this tasty casserole, you will need: - 2 medium yellow squash, sliced thinly - 2 medium zucchini, sliced thinly - 1 cup shredded cheddar cheese - 1 cup shredded mozzarella cheese - 1 medium onion, finely chopped - 3 cloves garlic, minced - 1 cup heavy cream - 2 large eggs, whisked - 1 teaspoon dried oregano - 1/2 teaspoon salt - 1/2 teaspoon freshly ground black pepper - 1/4 teaspoon red pepper flakes (optional for an extra kick) - 1/4 cup grated Parmesan cheese (for a flavorful topping) - 2 tablespoons olive oil This casserole is not just delicious; it is also friendly to low-carb diets. Each serving (1/6 of the casserole) offers: - Calories: 350 - Fat: 28g - Carbohydrates: 7g - Fiber: 2g - Protein: 15g This dish packs flavor without piling on carbs or gluten. To create this mouthwatering casserole, gather the following: - A large skillet for sautéing - A mixing bowl for combining ingredients - A whisk for blending eggs and cream - A greased baking dish for the casserole - An oven to bake the dish With these tools, you can easily whip up this delightful recipe. For the complete recipe, check out the full recipe link. Start by preheating your oven to 375°F (190°C). This ensures even cooking. While your oven heats up, grab a baking dish and grease it lightly. This helps prevent sticking and makes serving easier later. Next, heat two tablespoons of olive oil in a large skillet over medium heat. Once the oil is warm, add one finely chopped onion and three minced garlic cloves. Sauté for about 3-4 minutes until the onion turns translucent. Then, add two medium yellow squash and two medium zucchini, sliced thinly. Stir and sauté for another 5-7 minutes. You want the squash tender but still a bit crisp. Remove the skillet from heat and let the mixture cool slightly. In a large mixing bowl, combine one cup of heavy cream, two large whisked eggs, one teaspoon of dried oregano, and ½ teaspoon each of salt and black pepper. If you like a little heat, add ¼ teaspoon of red pepper flakes. Whisk all these ingredients together until smooth. Now, gently fold in the cooled sautéed squash mix. Add half a cup each of shredded cheddar and mozzarella cheese, then stir until everything is well mixed. Now, transfer your mixture into the greased baking dish. Spread it evenly. Top it with the remaining shredded cheddar and mozzarella cheeses. Don't forget to sprinkle ¼ cup of grated Parmesan cheese on top for extra flavor. Place the dish in your preheated oven and bake for 25-30 minutes. The casserole is ready when the cheese is melted and bubbly. Let it cool for about 5 minutes before serving. Enjoy this cheesy low carb delight! For the full recipe, check out the detailed instructions and ingredient list. For the best texture, choose squash that is firm and fresh. Slice the squash thinly, around 1/4 inch. This helps them cook evenly. When sautéing, don't rush. Cook the squash until tender but not mushy. This keeps the casserole from getting watery. Another key tip is to let the sautéed vegetables cool a bit before mixing them with the cream and eggs. This prevents the heat from scrambling the eggs. If you prefer a creamier texture, add more heavy cream. You can also mix in a bit of cream cheese for richness. One common mistake is overcooking the squash. This makes it too soft and watery. Always sauté until it's just tender. Avoid using too much salt, as cheese can add saltiness. Don’t skip the step of cooling the sautéed mixture. If you mix it hot, it changes the texture of the eggs. Lastly, remember to let the casserole cool for five minutes after baking. This helps it set and makes serving easier. When choosing cheese, opt for brands labeled gluten-free. Most natural cheeses are gluten-free, but always check the label. For a rich flavor, use sharp cheddar and mozzarella. You can also try goat cheese or cream cheese for a unique twist. Nutritional yeast is a great dairy-free option that adds a cheesy taste without gluten. For the full recipe, visit the [Full Recipe] link to start cooking your delicious low carb gluten free squash casserole with cheese. {{image_4}} You can easily boost this dish's flavor and nutrition by adding protein. Cooked chicken or bacon works great. For chicken, use shredded rotisserie or grilled pieces. Mix it in with the squash before baking. If you prefer bacon, crisp it up first. Chop it and fold it in for a smoky touch. Either option makes your casserole more filling and satisfying. If you want a meatless version, consider adding more veggies. Spinach, mushrooms, or bell peppers add great taste and color. You can also use eggplant instead of squash for a different texture. Just remember to sauté these veggies first. This helps them soften and blend well with the cheese. Herbs and spices can transform your casserole. Try fresh basil or thyme for a fragrant twist. If you want heat, add jalapeños or more red pepper flakes. Experimentation is key! You can even change the cheese to feta or goat cheese for a tangy flavor. Each variation adds a unique touch to your dish. For more details, check out the Full Recipe. After enjoying your low carb gluten free squash casserole, you can store leftovers easily. Let the casserole cool down to room temperature. Then, place it in an airtight container. It will stay fresh in the fridge for up to four days. Always label the container with the date. This way, you know when to use it. To reheat your casserole, preheat your oven to 350°F (175°C). Cover the casserole with foil to keep it moist. Bake for about 15-20 minutes or until heated through. You can also microwave portions for quick reheating. Just use a microwave-safe dish and heat in short intervals until warm. You can freeze this casserole for later meals. First, let it cool completely. Then, cut it into portions. Wrap each piece tightly in plastic wrap, then place them in a freezer-safe bag. It will stay good for up to three months. When you want to enjoy it, thaw it overnight in the fridge before reheating. For a full recipe, check out the full recipe above. Yes, you can make this casserole ahead of time. Prepare the dish up to the baking step. Cover it and store it in your fridge. When ready to bake, simply preheat your oven and pop it in. You may need to add a few minutes to the cooking time. You can use alternatives like coconut cream or almond milk. For a thicker texture, try using Greek yogurt. Just keep in mind that the flavor will change slightly. This recipe is great for a low-carb diet. The main ingredients, squash and zucchini, are low in carbs. The cheese adds flavor and richness without adding too many carbs. Each serving provides a satisfying meal while keeping your carb count low. Absolutely! You can use butternut squash, acorn squash, or even spaghetti squash. Each type brings its own flavor. Just slice them thinly to ensure even cooking. Yes, you can make this casserole dairy-free. Use dairy-free cheeses and substitute heavy cream with coconut cream or almond milk. This will keep the texture creamy and delicious without dairy. For the complete recipe, check out the full recipe! This blog post covered a delicious low-carb gluten-free squash casserole. We talked about its ingredients, nutritional info, and the cooking equipment you'll need. You learned step-by-step instructions, tips for perfecting the texture, and variations to suit your taste. We also discussed how to store leftovers and answered some common questions. I hope you feel ready to try this tasty recipe. With these skills, you’ll create a nourishing meal that everyone can enjoy!
Low Carb Gluten Free Squash Casserole with Cheese Delight
Are you ready to enjoy a warm, cheesy dish that’s both low-carb and gluten-free? Our Low Carb Gluten Free Squash Casserole with Cheese Delight gives
- 2 cups grated zucchini - 1 cup all-purpose flour - 1 cup whole wheat flour - 1 tablespoon baking powder - 1/2 teaspoon baking soda - 1 teaspoon salt - 1/2 teaspoon black pepper - 1 cup sharp cheddar cheese, shredded - 1/4 cup fresh chives, finely chopped - 1/2 cup buttermilk - 1/4 cup vegetable oil - 2 large eggs - 1 tablespoon honey (optional) I love using fresh ingredients for this quick bread. The zucchini gives it a moist texture, while the cheddar adds a rich flavor. Chives bring a nice hint of onion, making this bread perfect for any meal. If you don’t have buttermilk, you can make your own. Mix 1/2 cup milk with 1/2 tablespoon vinegar or lemon juice. Let it sit for 5 minutes. For a gluten-free option, you can use a gluten-free all-purpose flour blend. Just make sure it has xanthan gum for texture. If you want to change the cheese, try mozzarella for a milder taste or gouda for a smoky flavor. Each choice brings something special to the bread. I find that experimenting with ingredients keeps cooking fun! Feel free to try different herbs, spices, or cheeses to make this recipe your own. For the full recipe, check the details above. - Preheat your oven to 350°F (175°C). - Grease a 9x5-inch loaf pan or line it with parchment paper. - In a medium bowl, mix the wet ingredients: grated zucchini, buttermilk, vegetable oil, eggs, and honey (if using). Stir until well blended. - In a large bowl, whisk together the all-purpose flour, whole wheat flour, baking powder, baking soda, salt, and black pepper. Ensure there are no lumps. - Carefully add the zucchini mixture to the dry ingredients. - Use a spatula to gently fold the mixture until it is just combined. Do not overmix to keep the loaf light. - Now, fold in the sharp cheddar cheese and chopped chives. Mix until evenly distributed. - Pour the batter into the prepared loaf pan. Use a spatula to smooth the top. - Place the loaf pan in the oven and bake for 50 to 60 minutes. - To test for doneness, insert a toothpick into the center. It should come out clean. - Once baked, let the loaf cool in the pan for 10 minutes. Transfer it to a wire rack to cool completely before slicing. Follow these steps, and you'll create a delightful Zucchini, Cheddar Cheese & Chive Buttermilk Quick Bread. For the full recipe, refer to the detailed instructions above. Enjoy your baking! Squeezing excess moisture from zucchini is key. If you skip this step, your bread may become soggy. I recommend using a clean cloth or paper towel. Wrap the grated zucchini in the cloth and twist. This will help you get rid of the extra water. This step ensures a better texture in your bread. Next, avoid overmixing your batter. Gently fold the ingredients together until you see no dry flour. Overmixing can lead to a dense loaf. You want your bread to be light and fluffy. Trust me, the texture will be worth the effort. To boost flavor, you can add spices or herbs. A pinch of garlic powder can give it a nice kick. Fresh herbs like thyme or basil also work well. They can add a lovely aroma and taste to your bread. For serving, I recommend enjoying your quick bread warm. A pat of butter melts beautifully on top. You can also drizzle honey for a sweet touch. Serve with a fresh garden salad to create a balanced meal. If your bread turns out too dense, check your mixing. Overmixing often causes this issue. Next time, be sure to fold gently. To prevent a gummy texture, ensure you squeeze the zucchini well. If the batter feels thick, add a bit more buttermilk. This can help achieve a better consistency. Remember, the right texture is vital for a great bread experience. For the complete recipe, check the Full Recipe section. {{image_4}} You can make this bread even more fun with add-ins. Try adding nuts or seeds for a nice crunch. Walnuts or sunflower seeds work great. You can also use sun-dried tomatoes for a Mediterranean twist. They add a burst of flavor that pairs well with zucchini. Change up the herbs to give the bread a new taste. Dill or parsley can add fresh notes. You can also switch the cheese. Using mozzarella or gouda creates a different flavor profile. Each cheese brings its own charm to the bread. If you want a vegan option, swap the buttermilk and eggs. Use plant-based milk and a flaxseed mix instead. For low-carb needs, try using almond or coconut flour. These changes keep the bread tasty while fitting your diet. You can find the full recipe for Zucchini, Cheddar Cheese & Chive Buttermilk Quick Bread above. Enjoy creating your own delicious variations! To keep your Zucchini, Cheddar Cheese & Chive Buttermilk Bread fresh, store it correctly. The best method is to wrap it tightly in plastic wrap. This helps keep moisture in and air out. You can also place it in an airtight container. If you plan to eat it within a few days, room temperature storage works well. If you want it to last longer, refrigeration is the better choice, but it can dry out. Freezing this quick bread is easy and keeps its great taste. First, let the bread cool completely. Then, wrap it tightly in plastic wrap. Place it in a freezer bag or container to prevent freezer burn. When you're ready to enjoy it, thaw the bread in the fridge overnight. For faster thawing, leave it out on the counter for a few hours. This quick bread can stay fresh for about 4-5 days at room temperature. If you store it in the fridge, it can last up to a week. Always check for signs of spoilage, like mold or an off smell. If you see any signs, it’s best to throw it out. Keeping an eye on your bread helps you enjoy it at its best. Can I use frozen zucchini? Yes, you can use frozen zucchini. Just thaw it first and squeeze out the extra water. This step keeps your bread from getting soggy. Frozen zucchini works well when fresh is not available, and it still holds flavor. How do I make my quick bread rise more? To help your quick bread rise, make sure your baking powder is fresh. Also, do not overmix the batter. Mixing too much can make the bread dense. Fold gently and quickly to keep it light and airy. What goes well with Zucchini, Cheddar Cheese & Chive Buttermilk Quick Bread? This quick bread pairs well with a fresh salad or a bowl of soup. The cheese and chives add nice flavors. You can also serve it warm with butter or honey for a tasty treat. Can this quick bread be served at brunch? Absolutely! This quick bread makes a great addition to any brunch table. Its savory flavor and moist texture will impress your guests. It’s easy to slice and serve, making it perfect for gatherings. Calories and macros per serving Each slice has about 180 calories. It contains around 8 grams of protein and 6 grams of fat. The quick bread is filling and satisfying without being heavy. Health benefits of the main ingredients Zucchini is low in calories and high in vitamins. It adds moisture and fiber to the bread. Cheddar cheese offers protein and calcium, while chives bring vitamins A and C. Buttermilk adds probiotics for gut health. Each ingredient boosts the bread's nutrition! This blog post shared a simple recipe for zucchini, cheddar cheese, and chive buttermilk quick bread. You learned about ingredient choices, preparation steps, and the baking process. I also provided tips to enhance flavor and avoid common issues. Remember, you can customize this recipe with different cheeses or herbs. It’s a great dish for any meal. Enjoy making this delicious bread and experimenting with your own variations. Happy baking!
Zucchini, Cheddar Cheese & Chive Buttermilk Bread Delight
If you crave a savory treat that combines the goodness of zucchini with rich cheddar and fresh chives, you’re in for a real delight! This
- 4 boneless, skinless chicken breasts - 1 packet (1 oz) ranch seasoning mix - 1 cup buttermilk - 1 cup panko breadcrumbs - 1 teaspoon garlic powder - 1 teaspoon paprika - Salt and black pepper to taste - 2 tablespoons olive oil - Fresh parsley for garnish When choosing chicken breasts, look for ones that are firm and pink. Avoid any that feel slimy or look discolored. If you don’t have buttermilk, you can make your own by mixing milk with lemon juice or vinegar. This gives a similar tangy flavor. For ranch seasoning, you can use a mix of dried herbs like dill, parsley, and garlic powder if you want a homemade touch. This allows you to control the flavors more closely. If you want to try something different, consider adding spices like cayenne pepper or paprika for a kick! 1. In a medium bowl, pour 1 cup of buttermilk. 2. Add 1 packet of ranch seasoning mix to the buttermilk. 3. Whisk the two together until fully mixed. 4. Submerge the 4 chicken breasts in the buttermilk mixture. 5. Make sure each piece is well coated. 6. Let the chicken marinate for at least 15 minutes. For deeper flavor, marinate up to 2 hours. 1. Preheat your oven to 425°F (220°C). 2. Line a baking sheet with parchment paper. 3. In a separate bowl, mix 1 cup of panko breadcrumbs, 1 teaspoon garlic powder, and 1 teaspoon paprika. 4. Add salt and pepper to taste, then stir until mixed. 5. After marinating, take each chicken breast out of the buttermilk. 6. Allow any excess liquid to drip off. 7. Dredge each chicken piece in the breadcrumb mixture. 8. Press lightly to make sure the crumbs stick well. 1. Arrange the coated chicken on the prepared baking sheet. 2. Drizzle 2 tablespoons of olive oil over the chicken. 3. Bake in the preheated oven for 20-25 minutes. 4. Cook until the chicken is golden brown and reaches 165°F (74°C). 5. Remove the chicken from the oven and let it rest for a few minutes. 6. This helps the juices stay inside. 7. Garnish with finely chopped fresh parsley for a fresh look and flavor. To get that perfect crunch on your chicken, use panko breadcrumbs. They are light and airy, which helps create a crisp outer layer. Regular breadcrumbs won’t give you the same texture. When you drizzle olive oil, do it evenly across the chicken. This helps the breadcrumbs crisp up while baking. Too little oil can lead to soggy chicken. You can easily boost the flavor of your ranch chicken. Try adding extra spices like cayenne pepper or smoked paprika to the breadcrumb mix. These will give your dish a little kick. For a different taste, think about using a marinade. You could mix some lemon juice or honey into the buttermilk. This can add a nice tang or sweetness to the chicken. One mistake is over-marinating the chicken. If you let it sit too long, it can become mushy. Aim for 15 minutes to 2 hours for the best results. Another issue is not preheating your oven. If the oven isn’t hot enough, the chicken may not cook right. Always preheat to 425°F before baking your ranch chicken for that golden, crispy finish. For the full recipe, check out the details above. {{image_4}} To make this recipe fit your needs, try these changes. For gluten-free options, swap regular breadcrumbs for gluten-free ones. Look for brands that use rice flour or cornmeal. You can easily find these at most grocery stores. For a dairy-free choice, use unsweetened almond milk instead of buttermilk. Add a splash of vinegar or lemon juice to mimic the tangy flavor of buttermilk. Want to spice things up? Try adding cayenne pepper or hot sauce to the buttermilk mix. This gives your ranch chicken a kick that many will love. If you prefer a more herbal taste, mix fresh or dried herbs into your breadcrumb mix. Good choices are thyme, oregano, or rosemary. These herbs add depth and freshness to your dish. Pair your ranch chicken with tasty sides. Roasted vegetables like carrots, zucchini, or broccoli work well. They not only taste great but also add color to your plate. You can also serve the chicken over a hearty salad. Mix greens, cherry tomatoes, and cucumber for a fresh crunch. Drizzle some ranch dressing on top for a fun twist. Each bite will be bursting with flavor! To keep your ranch chicken fresh, store it in an airtight container. Place it in the fridge. It will stay good for about 3 to 4 days. If you want to keep it longer, freezing is a great option. Wrap each piece in plastic wrap, then place in a freezer bag. This way, you can enjoy it for up to 3 months. To reheat the chicken, the best method is using the oven. Preheat your oven to 350°F (175°C). Place the chicken on a baking sheet and cover it with foil. This keeps it moist. Heat for about 15 to 20 minutes. If you want the coating crispy, remove the foil for the last 5 minutes. You can also use an air fryer for a quick and crispy result. Leftover ranch chicken is safe to eat for 3 to 4 days when stored in the fridge. If you freeze it, it will last for about 3 months. Always check for signs of spoilage before eating. If it looks or smells off, it’s best to throw it away. Enjoy your meals safely! It takes about 15 minutes to prep and 25 minutes to cook. You can enjoy your meal in just 40 minutes. This makes it perfect for busy weeknights. Yes, you can use frozen chicken, but make sure to thaw it first. Thawing helps the chicken cook evenly. You can thaw chicken in the fridge overnight or in cold water if you're short on time. Ranch chicken pairs well with many sides. Here are a few ideas: - Fresh garden salad - Roasted vegetables - Mashed potatoes - Steamed rice These sides will add color and nutrients to your meal. Absolutely! Ranch chicken is great for meal prep. You can cook a batch and store it for later. Just follow these tips: - Store cooked chicken in airtight containers. - Keep it in the fridge for up to four days. - You can also freeze it for up to three months. This makes it easy to grab a quick meal anytime. For the full details on how to make this dish, check out the Full Recipe. In this blog post, we covered how to make Quick Weeknight Ranch Chicken using simple ingredients and easy steps. I shared tips for ensuring crispiness, variations for dietary needs, and how to store leftovers. You can create a meal that is both tasty and quick. With these easy methods, you’ll impress everyone at your table. Enjoy your cooking and have fun experimenting with flavors!
Quick Weeknight Ranch Chicken Recipe for Dinner Delight
Looking for a quick and tasty dinner? This Quick Weeknight Ranch Chicken Recipe is your answer! You’ll whip up flavorful, crispy chicken breasts in no
- 1 lb (450g) store-bought gnocchi - 1 cup cherry tomatoes, halved - 1 medium zucchini, diced into small cubes - 1 cup fresh spinach leaves - 1/2 cup fresh basil leaves, chopped Store-bought gnocchi saves time and works well in this dish. I love using fresh cherry tomatoes and zucchini for their bright flavors. They add color and nutrition too! Spinach and basil bring freshness that perfectly complements the dish. - 3 tablespoons extra-virgin olive oil - 2 cloves of garlic, finely minced - 1 teaspoon red pepper flakes (optional) Olive oil adds richness and helps cook the veggies. Garlic gives a lovely aroma and taste. If you like spice, add red pepper flakes for a little kick! - 1/4 cup grated Parmesan cheese (optional) - Salt and pepper to taste Parmesan cheese is great for adding depth. You can adjust salt and pepper to make the dish just right for you. This recipe is flexible, so feel free to make it your own! If you want to see the full recipe, just look at the section above. Start by bringing a large pot of salted water to a rolling boil. Add the gnocchi according to the package instructions, usually about 2-3 minutes. You know they are done when they float to the top. Drain them in a colander and set them aside. Next, heat 3 tablespoons of olive oil in a large skillet over medium heat. Add 2 cloves of finely minced garlic. Sauté for about 30 seconds. Be careful not to brown the garlic. If it browns, it can taste bitter. Now, add 1 medium diced zucchini to the skillet along with a generous pinch of salt and freshly cracked pepper. Cook for about 3-4 minutes until the zucchini is slightly tender yet bright in color. Then, toss in 1 cup of halved cherry tomatoes. Sauté for another 3-4 minutes until they soften and release their juices. If you like some heat, add 1 teaspoon of red pepper flakes now. Next, gently fold in the drained gnocchi and 1 cup of fresh spinach. Use a spatula to mix everything for 1-2 minutes. The spinach should wilt, and everything should be heated evenly. Finally, remove the skillet from the heat and fold in 1/2 cup of chopped fresh basil. Taste it and add more salt and pepper if needed. Serve warm, and if you want, add a sprinkle of grated Parmesan cheese for extra flavor. For the full recipe, check out the details provided earlier. To get the right texture for gnocchi, timing is key. Follow the cooking times closely. When you add the gnocchi to boiling water, keep an eye on them. They only need 2-3 minutes to cook. They float when they are done. This shows they are ready. Using fresh ingredients also helps. Fresh vegetables taste better and have more nutrients. Choose ripe cherry tomatoes and firm zucchini. Fresh spinach adds color and flavor. These choices make your dish shine. For plating, I suggest shallow bowls. This style lets the vibrant colors stand out. The red from tomatoes and green from spinach create a lovely contrast. Garnish your dish with fresh basil on top. It adds a pop of color and a fresh taste. A sprinkle of grated Parmesan cheese is a nice touch, too. It makes every bite richer and more enjoyable. One common mistake is overcooking the vegetables. Keep them bright and slightly firm. This keeps their flavor and nutrition intact. Also, don’t forget to season properly. Adding salt and pepper enhances the taste. Taste your dish before serving. Adjust the seasoning if needed. A little extra salt can make a big difference. For the complete recipe, check out the Full Recipe. Enjoy your cooking! {{image_4}} You can swap out vegetables based on what’s fresh. Instead of zucchini, try bell peppers or green beans. Both add a nice crunch and flavor. If you want more color, use yellow squash or cherry tomatoes. For protein, consider adding chicken or shrimp. Cook the chicken cubes until golden before adding them to the mix. If you use shrimp, add them during the last few minutes of cooking. They’ll cook quickly and stay tender. Spices can change the taste of your dish. For a zing, add a pinch of smoked paprika or oregano. These spices bring warmth and depth. Cheese is another way to enhance flavor. While Parmesan is nice, you can also use feta or goat cheese. They add creaminess and a tangy taste that works well with summer veggies. To make your gnocchi lighter, use less oil or skip the cheese. This way, you keep the flavor but cut calories. You can also add more veggies like spinach or broccoli to fill you up. If you need gluten-free options, look for gluten-free gnocchi at the store. They are easy to find and taste great. You can enjoy this dish without worrying about gluten. Feel free to explore these variations to make your easy summer gnocchi even more delightful! If you want the full recipe, check it out [here](#). To keep your gnocchi fresh, store leftovers in an airtight container. Place the container in the fridge. This method helps to seal in flavors and keep everything fresh. Make sure to consume leftovers within three days for the best taste. If you want to save some for later, freezing is a great option. Just spread the gnocchi in a single layer on a baking sheet. Freeze them for about an hour before transferring to a freezer bag. This prevents them from sticking together. When you are ready to enjoy your gnocchi again, reheating is key. The best way to reheat is in a skillet. Heat a bit of olive oil over medium heat. Add the gnocchi and stir gently for about 5-7 minutes. This method keeps the gnocchi's texture nice and soft. You can also use the microwave if you're in a hurry. Place the gnocchi in a bowl with a splash of water. Cover it and heat for 1-2 minutes, stirring halfway through. For unused fresh produce, like tomatoes and zucchini, store them in the fridge. They usually last about 3-5 days. Fresh spinach and basil should be used within a week for the best flavor. As for gnocchi, if stored correctly in the fridge, they will last about 2-3 days after cooking. If frozen, they can last up to three months. Just remember to label your bags with the date! You can tell gnocchi is done when they float. When you cook gnocchi, they sink to the bottom at first. Once they rise to the surface, they are ready. This usually takes about 2-3 minutes. Floating means they have cooked through. After draining, they are ready for the next step in your dish. Yes, you can make gnocchi from scratch! Here are some basic steps: - Use 2 cups of mashed potatoes. - Mix in 1 cup of all-purpose flour. - Add 1 egg and a pinch of salt. - Knead the dough until smooth. - Roll and cut into small pieces. - Boil them until they float, just like store-bought gnocchi. This is a fun way to enjoy homemade pasta. Gnocchi pairs well with many side dishes. Here are some ideas: - A fresh garden salad with a light vinaigrette. - Grilled or roasted vegetables like asparagus or bell peppers. - Crusty bread to soak up any extra sauce. - A simple caprese salad with tomatoes and mozzarella. These sides balance the meal and add more flavor. In this post, we explored easy summer gnocchi, focusing on key ingredients like store-bought gnocchi, fresh vegetables, and herbs. I shared step-by-step cooking tips, from boiling gnocchi to sautéing garlic. We discussed how to perfect the texture and avoid common mistakes. Remember, using fresh ingredients makes a big difference. You can also customize the dish with seasonal veggies and spices. Keep these tips in mind, and enjoy your delicious gnocchi. Happy cooking!
Easy Summer Gnocchi Fresh and Flavorful Delight
If you crave a quick, fresh meal this summer, you’ll love this Easy Summer Gnocchi recipe. Made with store-bought gnocchi and seasonal veggies like cherry
- 4 boneless, skinless chicken breasts - Salt and black pepper, to taste - 2 tablespoons extra virgin olive oil - 2 tablespoons unsalted butter - 4 cloves garlic, finely minced - 1 tablespoon Dijon mustard - 1 tablespoon whole grain mustard - ⅓ cup low-sodium chicken broth - ¼ cup fresh lemon juice - Zest of 1 lemon - 2 tablespoons fresh parsley, finely chopped The main ingredients make this dish shine. The chicken breasts provide a great base. I like to season them with salt and black pepper. This helps to enhance their natural flavor. The olive oil gives the chicken a nice crisp. It also adds a rich taste. Butter adds more flavor and makes the chicken juicy. Now, let’s talk about the sauce. Garlic brings a wonderful aroma. The Dijon and whole grain mustards give the sauce a nice tang. Combining them creates a balance that works well with chicken. The low-sodium chicken broth keeps the sauce light. Fresh lemon juice and zest add brightness. They make the sauce zesty and refreshing. Finally, parsley adds color and a hint of freshness. You can find the full recipe with all details on how to make this dish. Enjoy the blend of flavors that come together in each bite! - Season chicken breasts with salt and pepper. - Let chicken sit at room temperature for 15 minutes. To begin, I always season the chicken breasts well. I use salt and pepper on both sides. This step is key for flavor. Letting the chicken rest for 15 minutes is also important. It helps the chicken cook evenly and stay juicy. - Heat olive oil in a skillet and sear chicken for 6-7 minutes on one side. - Flip chicken, add butter, and cook until internal temperature reaches 165°F. Next, I heat olive oil in a skillet over medium-high heat. When the oil shimmers, I add the chicken breasts. I let them sear for 6 to 7 minutes on one side. This creates a nice golden-brown crust. After that, I flip the chicken with tongs. I add butter to the skillet at this point. I continue cooking until the chicken reaches 165°F inside. This ensures it's safe to eat. - Sauté garlic in the skillet after removing chicken. - Stir in mustards, chicken broth, and lemon juice. Simmer for 3-4 minutes. - Incorporate lemon zest and adjust seasoning. Once the chicken is done, I remove it from the skillet. In the same skillet, I add minced garlic to sauté. I cook it for about 30 seconds until it smells great. Then, I stir in the Dijon and whole grain mustards. Next, I add chicken broth and lemon juice. I let the sauce simmer for 3 to 4 minutes. This helps all the flavors mix well. Finally, I add lemon zest and taste the sauce. I adjust the seasoning as needed. For the full recipe, check out the entire process. Enjoy making this dish! - Use a meat thermometer for accurate chicken doneness. This ensures safe and tasty chicken. - Allow chicken to rest after cooking for juiciness. Resting helps keep the meat moist. - Serve pan-seared chicken with bright green beans or a fresh salad. These sides add color and crunch. - Pair the dish with a crisp white wine. A Pinot Grigio or Sauvignon Blanc works well with the sauce. - Add fresh herbs like thyme or rosemary for extra flavor. These herbs bring a lovely aroma. - To adjust the sauce, try adding honey for sweetness or chili flakes for heat. This change offers a nice twist. For more detailed instructions, check the Full Recipe. {{image_4}} For a twist on this recipe, try using chicken thighs instead of breasts. Thighs stay juicy and tender. If you're looking for a vegetarian option, tofu works well too. Just press it to remove excess moisture, then cut it into cubes. Another fun swap is to change the mustard. You can use spicy brown mustard for heat or honey mustard for sweetness. Each variation gives the sauce a unique flavor. You can also cook this dish in the oven. Preheat your oven to 400°F (200°C). Sear the chicken in a skillet first, then transfer it to the oven to finish cooking. This method keeps your chicken juicy and perfectly cooked. If you prefer grilling, season the chicken and grill until golden brown. This adds a nice smoky flavor. For slow cooker fans, sear the chicken first, then place it in the slow cooker. Pour the sauce over it and cook on low for 3-4 hours. If you need gluten-free options, use gluten-free mustard and chicken broth. They taste just as good. For low-carb diets, skip the chicken broth and reduce the lemon juice. This keeps the sauce light but still flavorful. You can enjoy this dish while sticking to your diet. Try these variations for a fresh take on pan-seared chicken with lemon mustard sauce. Each option makes the dish your own while keeping it delicious. For the complete recipe, refer to the Full Recipe section. To store leftovers, let the chicken cool to room temperature first. Place the chicken and sauce in an airtight container. Make sure to seal it tightly. You can keep it in the fridge for up to three days. If you want to enjoy this dish later, proper storage helps maintain the flavor. To freeze, wrap the cooked chicken in plastic wrap, then place it in a freezer bag. Pour the sauce into a separate airtight container. You can freeze both items for up to three months. When you are ready to eat, take them out of the freezer. Thaw the chicken and sauce in the fridge overnight. For the best taste and texture, reheat chicken in the oven. Preheat it to 350°F (175°C). Place the chicken in a dish, cover with foil, and heat for about 20 minutes. For the sauce, warm it gently in a saucepan over low heat. Stir often to avoid burning. This way, your chicken will stay juicy and the sauce will be fresh. For the full recipe, check the earlier sections. What is the best way to season chicken for pan searing? To season chicken, use salt and black pepper. Rub them on both sides. This boosts flavor and helps create a nice crust. You can also add garlic powder or paprika for extra taste. How do I know when chicken is fully cooked? The best way to check chicken doneness is with a meat thermometer. Insert it into the thickest part of the chicken. It should read 165°F (75°C). If you don’t have one, cut into the chicken. The meat should be white, not pink. Can I make the sauce ahead of time? Yes, you can make the sauce ahead. Just store it in an airtight container. When you are ready to use it, heat it gently. Adding a bit of extra lemon juice can refresh the flavor. How can I make the dish spicier? To add heat, mix in some red pepper flakes. You could also use spicy mustard instead of Dijon. Adjust the amount based on your taste. What sides go well with pan-seared chicken? Some great sides include steamed green beans, mashed potatoes, or a fresh salad. These balance the rich sauce and add color to your plate. Can I use different citrus in the sauce? Yes, you can switch lemon for other citrus fruits. Try lime or orange for a different flavor. Each will add its own twist to the sauce. This blog post covered how to make a delicious pan-seared chicken with lemon mustard sauce. You learned about the key ingredients, step-by-step cooking instructions, and helpful tips. Variations and storage advice were also included to fit your needs. In conclusion, this recipe offers a simple way to enjoy tasty chicken. Feel free to adapt ingredients or methods to suit your taste. Enjoy your meal!
Pan Seared Chicken with Lemon Mustard Sauce Delight
If you’re looking for a simple yet impressive dish, look no further. Pan Seared Chicken with Lemon Mustard Sauce is both easy to make and