Dinner
![For this dish, you will need: - 4 boneless, skinless chicken breasts - 2 cups cherry tomatoes, halved - 8 oz fresh mozzarella, sliced - 1/4 cup fresh basil leaves, chopped - 2 tablespoons balsamic vinegar - 2 tablespoons extra virgin olive oil - 1 teaspoon garlic powder - 1 teaspoon onion powder - Salt and freshly cracked black pepper to taste These simple ingredients come together to create a bright and flavorful meal. The chicken is tender, the tomatoes burst with juice, and the mozzarella is creamy. Using fresh basil adds a nice touch. You can enhance the flavor with optional items: - Italian seasoning - Crushed red pepper flakes - Spinach or arugula - Lemon zest These add-ins can give your dish a unique twist. If you like heat, crushed red pepper flakes work well. For a touch of citrus, lemon zest brightens the flavors. Pair your Easy Baked Caprese Chicken with: - Garlic bread - Steamed broccoli - Quinoa salad - Mixed greens with vinaigrette These sides complement the main dish nicely. Garlic bread adds crunch, while steamed broccoli brings color and nutrients. A fresh salad rounds out the meal perfectly. For the full recipe, check the details above. First, gather all your ingredients. You will need chicken breasts, cherry tomatoes, mozzarella, and basil. Also, get balsamic vinegar, olive oil, garlic powder, onion powder, salt, and pepper ready. Preheat your oven to 400°F (200°C). This step is key to cooking your chicken evenly. In a small bowl, mix olive oil, balsamic vinegar, garlic powder, onion powder, salt, and pepper. Whisk it well until all the flavors blend. This marinade adds great taste to the chicken. Next, place the chicken breasts in a baking dish. Make sure they fit snugly but not crowded. Pour the marinade over the chicken. Use a spoon or brush to cover every piece. This ensures each bite is packed with flavor. Now, cut the cherry tomatoes in half and scatter them around the chicken. They bring sweetness and color to the dish. Place your baking dish in the preheated oven. Bake for 20 minutes. This helps the chicken cook through and soak up the marinade. After 20 minutes, take the dish out carefully. Layer mozzarella slices on top of each chicken breast. The cheese will melt and create a delicious topping. Return the dish to the oven for another 10 minutes. You want the cheese to melt and bubble. Ensure the chicken's internal temperature reaches 165°F (75°C) for safe eating. Once cooked, take the dish out of the oven. Sprinkle fresh basil over the top. This adds a nice pop of color and freshness. Let the dish rest for a few minutes before serving. This helps the flavors mix well. For a beautiful presentation, place each chicken breast on a bed of roasted cherry tomatoes. Drizzle with extra balsamic vinegar for an elegant touch. For the complete recipe, check out the [Full Recipe]. Enjoy your Easy Baked Caprese Chicken! To bake chicken breasts just right, start with even thickness. If needed, pound them to a uniform size. This helps them cook evenly. Always preheat your oven to 400°F (200°C) before placing the chicken inside. This ensures a nice sear on the outside and keeps the juices locked in. Use a meat thermometer to check for doneness. The chicken should reach an internal temperature of 165°F (75°C). This way, you avoid dry chicken and get a juicy result. Fresh ingredients make your dish pop with flavor. Choose ripe cherry tomatoes for sweetness. Look for mozzarella that is soft and creamy. Fresh basil adds a vibrant taste. When using herbs, chop them just before serving. This keeps their flavor strong. Make sure your olive oil is high-quality. It should have a fruity flavor that enhances the dish. Always wash your produce before use to ensure it’s clean and healthy. One common mistake is crowding the baking dish. If chicken is too close, it will steam instead of bake. Make sure there’s space around each piece. Another mistake is not seasoning enough. Season the chicken well with salt and pepper for great flavor. Avoid opening the oven door too often. This lets heat escape and can affect cooking time. Lastly, don’t skip the resting time after baking. Letting the chicken rest helps keep it moist and tender. For the full recipe, check out the Baked Caprese Chicken Delight. {{image_4}} You can switch up the cheese in this dish. While fresh mozzarella is great, try using provolone or goat cheese. Both add a unique twist. Provolone gives a sharp flavor, while goat cheese adds creaminess. Each option brings a different layer of taste to your chicken. You can add more veggies to boost flavor and nutrition. Consider bell peppers, zucchini, or spinach. Just chop them up and scatter them around the chicken. As they roast, they will soak up the marinade’s goodness. This adds color and makes your meal more filling. Feel free to make the marinade your own. You can add herbs like oregano or thyme for extra depth. A pinch of red pepper flakes can bring heat. If you like sweetness, a drizzle of honey works well. Each change makes the dish unique, allowing you to explore new tastes. For the full recipe, check out the details listed earlier. After you enjoy your Easy Baked Caprese Chicken, store leftovers in an airtight container. This keeps the chicken moist and tasty. Let the chicken cool down to room temperature before sealing it. Keep the leftovers in the fridge for up to three days. If you want, separate the chicken from the tomatoes and cheese to keep them fresh longer. To reheat your baked chicken, preheat your oven to 350°F (175°C). Place the chicken on a baking sheet. Cover it with foil to keep it moist. Heat for about 15 to 20 minutes, or until warm. You can also use a microwave. Place the chicken on a microwave-safe plate. Heat it in short bursts of 30 seconds, checking often so it doesn’t dry out. You can freeze this dish if you want to save it for later. Wrap each piece of chicken tightly in plastic wrap and then place it in a freezer bag. This helps prevent freezer burn. It can stay in the freezer for up to three months. To thaw, move it to the fridge overnight. After thawing, reheat as mentioned above. Enjoy your Easy Baked Caprese Chicken even after a few months! Yes, you can use frozen chicken. Just make sure to thaw it first. Frozen chicken takes longer to cook. Always check the internal temperature. It should be 165°F (75°C) before you eat it. This ensures the chicken is safe and juicy. To make this dish low-carb, skip the balsamic vinegar. You can replace it with lemon juice. Use fewer tomatoes, as they add natural sugars. Also, add more leafy greens like spinach or kale. These choices keep the flavors high while cutting carbs. I love serving this dish with a fresh salad. A simple mix of greens, cucumbers, and a light vinaigrette works great. You can also try garlic bread for a crunchy side. For a healthy option, serve it with steamed broccoli or zucchini noodles. This adds color and nutrients to your meal. For the full recipe, check out the complete details above. This post covered how to make Easy Baked Caprese Chicken. We discussed the key ingredients, baking steps, and tips for perfect chicken. Remember to choose fresh ingredients and avoid common mistakes. You can customize this dish with different cheeses or veggies. Store leftovers properly to keep them fresh. Whether you make it low-carb or serve with side dishes, this meal can be yours. Enjoy cooking and exploring new flavors!](https://roastedflavors.com/wp-content/uploads/2025/07/6a1aa439-d8a8-4155-9eb0-497be375f296.webp)
Easy Baked Caprese Chicken Flavorful and Simple Meal
If you’re looking for a quick and tasty dinner, Easy Baked Caprese Chicken is for you! With juicy chicken breasts topped with fresh basil, tomatoes,
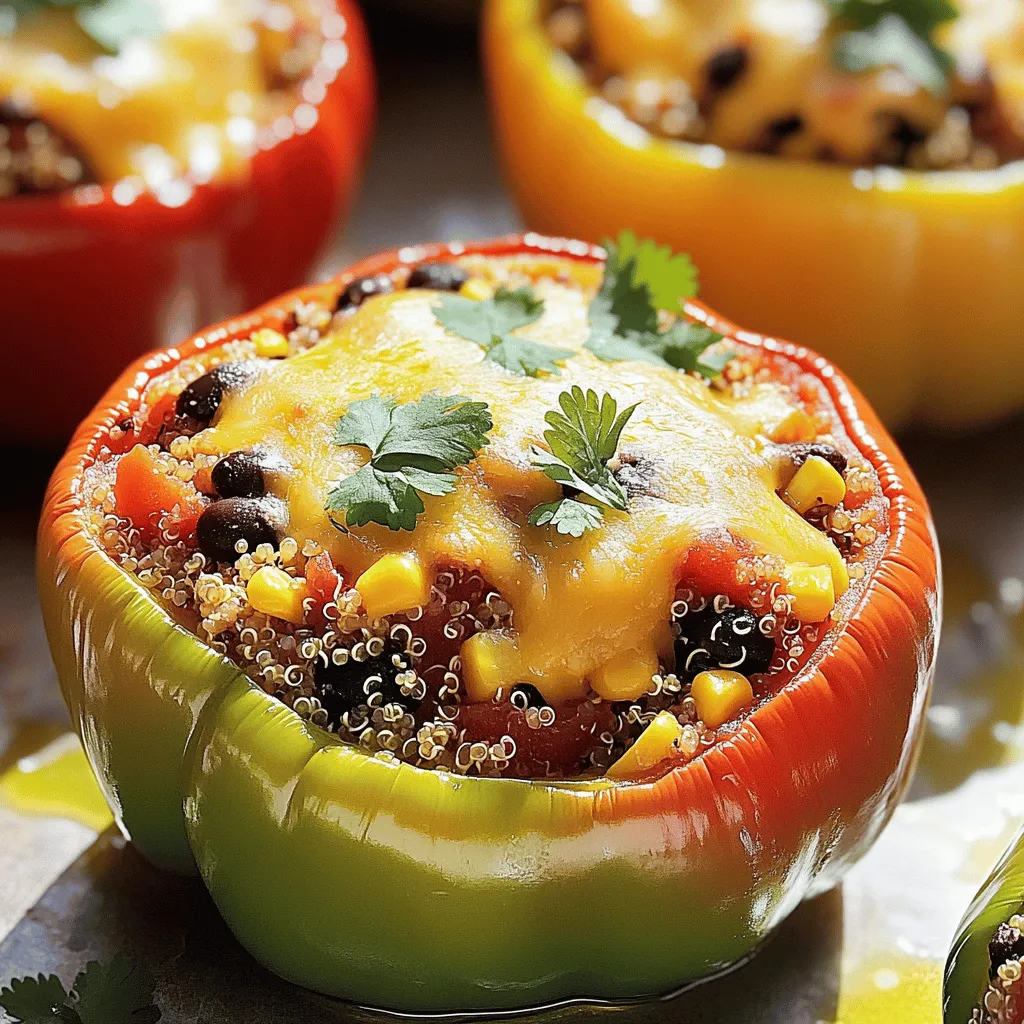
Easy Stuffed Bell Peppers Flavorful and Healthy Meal
Looking for a healthy and tasty meal? Try these Easy Stuffed Bell Peppers! They are colorful, flavorful, and packed with nutrients. In this post, I’ll
![- Chicken and Vegetables - 1 pound boneless, skinless chicken breast, diced into bite-sized pieces - 1 medium head of cauliflower, separated into florets - 1 medium onion, finely chopped - 2 cloves garlic, minced - 1 cup carrots, diced - 1 cup celery, diced - Spices and Seasonings - 1 teaspoon dried thyme - 1 teaspoon smoked paprika - Salt and pepper to taste - Liquids and Garnishes - 4 cups low-sodium chicken broth - 1 cup milk (or a plant-based alternative, like almond or oat milk) - 2 tablespoons olive oil - Fresh parsley, chopped (for garnish) When I create this soup, I focus on fresh ingredients. The chicken provides protein and flavor. Cauliflower adds creaminess and nutrition. Onions and garlic give a solid base for taste. Carrots and celery add color and texture. For spices, thyme and smoked paprika really make the soup sing. They bring warmth and depth. Salt and pepper help balance all the flavors. Don't forget the liquids! Chicken broth is key for a rich soup. Milk (or a plant-based milk) adds creaminess. Finally, fresh parsley on top makes it look lovely and bright. If you want the full recipe, check the [Full Recipe]. It has all the details you need to make this meal. To make this soup, you need to follow some simple steps. First, gather all your ingredients. This makes cooking easier. Here’s a quick list for you: - 1 pound boneless, skinless chicken breast, diced into bite-sized pieces - 1 medium head of cauliflower, separated into florets - 1 medium onion, finely chopped - 2 cloves garlic, minced - 4 cups low-sodium chicken broth - 1 cup carrots, diced - 1 cup celery, diced - 1 cup milk (or a plant-based alternative, like almond or oat milk) - 2 tablespoons olive oil - 1 teaspoon dried thyme - 1 teaspoon smoked paprika - Salt and pepper to taste - Fresh parsley, chopped (for garnish) For best results, chop all your veggies and chicken before you start cooking. This saves time. Cooking the Chicken and Vegetables Start by heating the olive oil in a large pot over medium heat. Once hot, add the onion and garlic. Cook these until the onion is soft and fragrant, about 3-4 minutes. Now, add the diced chicken. Cook it for 5-7 minutes until it’s brown and cooked through. Next, add the carrots and celery. Cook these for another 3-4 minutes. They should begin to soften. Now, it’s time to add the cauliflower, thyme, smoked paprika, salt, and pepper. Stir well to mix all the flavors together. Blending the Soup to Perfection Pour in the chicken broth, bring the soup to a boil, and then lower the heat. Let it simmer for about 15 minutes, or until the cauliflower is soft. I love using an immersion blender for this next step. Blend the soup until it’s smooth. If you like some texture, blend just half of it. Adding Creaminess with Milk Once blended, stir in the milk and heat for an extra 2-3 minutes. This makes the soup creamy and rich. Taste the soup and adjust the seasoning with more salt and pepper if needed. Serve it hot, garnished with fresh parsley. For the full recipe, check out the Cooking Instructions section. Seasoning Adjustments Start with salt and pepper. They are key for bringing out the soup's taste. Adjust the seasoning after blending. If you want more flavor, add a pinch of cayenne pepper or garlic powder. These spices can give your soup a nice kick. Adding Fresh Herbs Fresh herbs can change everything. Try adding chopped parsley or dill. They add a bright touch. You can stir them in right before serving. This keeps their taste fresh and lively. Best Sautéing Methods Sauté the onion and garlic until they soften. This step builds a base of flavor. Use medium heat for best results. Stir often to avoid burning. A good sauté makes your soup rich and tasty. Blending Options for Texture You can blend the soup fully for a smooth finish. If you like some chunks, blend half the soup. This gives a nice mix of creamy and chunky textures. Use an immersion blender for easy blending right in the pot. Perfect Pairings to Serve with Soup Serve this soup with a slice of crusty bread. It’s perfect for dipping. A side salad with light dressing also works well. The crisp greens contrast nicely with the creamy soup. Creative Toppings for Added Flavor Get creative with toppings! Add a swirl of olive oil for richness. For a bit of crunch, sprinkle toasted nuts or seeds on top. A dollop of yogurt or sour cream can add creaminess. Each topping brings its own flavor twist. For the complete recipe, check out the Full Recipe section. Enjoy your flavorful journey with this soup! {{image_4}} Substituting Different Vegetables You can easily switch up the veggies in this soup. Try using broccoli instead of cauliflower. Zucchini or spinach can work well too. Each vegetable brings its own taste and texture. This lets you personalize the soup to your liking. Using Alternative Proteins If you want to change the protein, consider using turkey or tofu. These options still give you protein while changing the flavor. Shredded rotisserie chicken is also a quick and easy swap. It saves you time and keeps the soup tasty. Making it Dairy-Free To make this soup dairy-free, simply swap out regular milk for a plant-based milk. Almond or oat milk are great choices. They add creaminess without the dairy. You can still enjoy the same comforting taste. Low-Carb or Keto-Friendly Options For a low-carb version, skip the carrots and use more cauliflower. This keeps the soup light and healthy. You can also add in some heavy cream for richness without the carbs. This way, you still get a delicious meal that fits your diet. Check out the Full Recipe for even more tips and ideas! Refrigeration Tips Store any leftover soup in an airtight container. Let it cool to room temperature first. Place it in the fridge for up to three days. Label the container with the date. This helps you keep track of freshness. Freezing Instructions If you want to save it longer, freezing works great. Pour the cooled soup into freezer-safe bags or containers. Leave some space at the top for expansion. It can last for up to three months in the freezer. Thaw it in the fridge overnight before reheating. Best Methods for Reheating The best way to reheat this soup is on the stove. Pour it into a pot over medium heat. Stir often to ensure even warming. You can also use a microwave. Heat in a microwave-safe bowl, stirring every minute. This prevents hot spots. Tips to Maintain Creaminess To keep the soup creamy, add a splash of milk when reheating. Stir well to combine. If it seems too thick, add some broth or water. This helps restore its smooth texture. Enjoy your warm, comforting bowl of soup! How can I thicken the soup? You can thicken the soup by blending more cauliflower until smooth. Adding a bit of cornstarch mixed with cold water can also work wonders. Just stir it in and let it cook for a few minutes. Can I make this soup in a slow cooker? Yes, you can use a slow cooker. Start by sautéing the onions and garlic in a pan. Then, add all the ingredients to the slow cooker. Cook on low for 6-8 hours or high for 3-4 hours. What can I do if I don’t have chicken broth? If you lack chicken broth, use vegetable broth or water with added spices. You can also use bouillon cubes to give it flavor. How long does the soup last in the fridge? The soup stays fresh in the fridge for about 3-4 days. Store it in an airtight container to keep it safe. Can I add different spices for an extra kick? Absolutely! You can add chili powder, cumin, or even curry powder for a unique taste. Just adjust the amount to suit your spice level. What if I want to cook it longer for more flavor? If you want more flavor, cook it longer on low heat. Just keep an eye on the cauliflower to avoid overcooking. Is prep time included in the total cooking time? No, the prep time is separate. The total cooking time of 30 minutes does not include the 10 minutes needed to prepare the ingredients. For the complete recipe, check out the Full Recipe! Before you dive into making this tasty soup, check the Full Recipe for all the details. This ensures you have everything on hand. With easy steps, you can whip it up in just 30 minutes. Gather your ingredients first, so you're ready to go. This makes cooking smooth and fun. Once you have everything, you can focus on blending flavors. Enjoy the cooking process! This blog post covered how to make a delicious soup. We went over the key ingredients, cooking steps, and pro tips to boost flavor. You learned about different variations, storage tips, and common questions. Now, it's time to get cooking! With these insights, you can create your perfect soup at home. Enjoy the process and share your tasty results with others. Your kitchen adventures await!](https://roastedflavors.com/wp-content/uploads/2025/07/8c29da38-c3cd-46a1-b338-09dd1feebec9.webp)
30-Minute Cauliflower Chicken Soup Savory Comfort Meal
Looking for a warm and quick meal? This 30-Minute Cauliflower Chicken Soup is your answer! Packed with flavor and nutrients, it’s perfect for busy weeknights

Honey Glazed Salmon Savory and Simple Recipe Guide
Are you ready to impress your family or friends with a delicious Honey Glazed Salmon? This savory dish is simple to make and bursting with
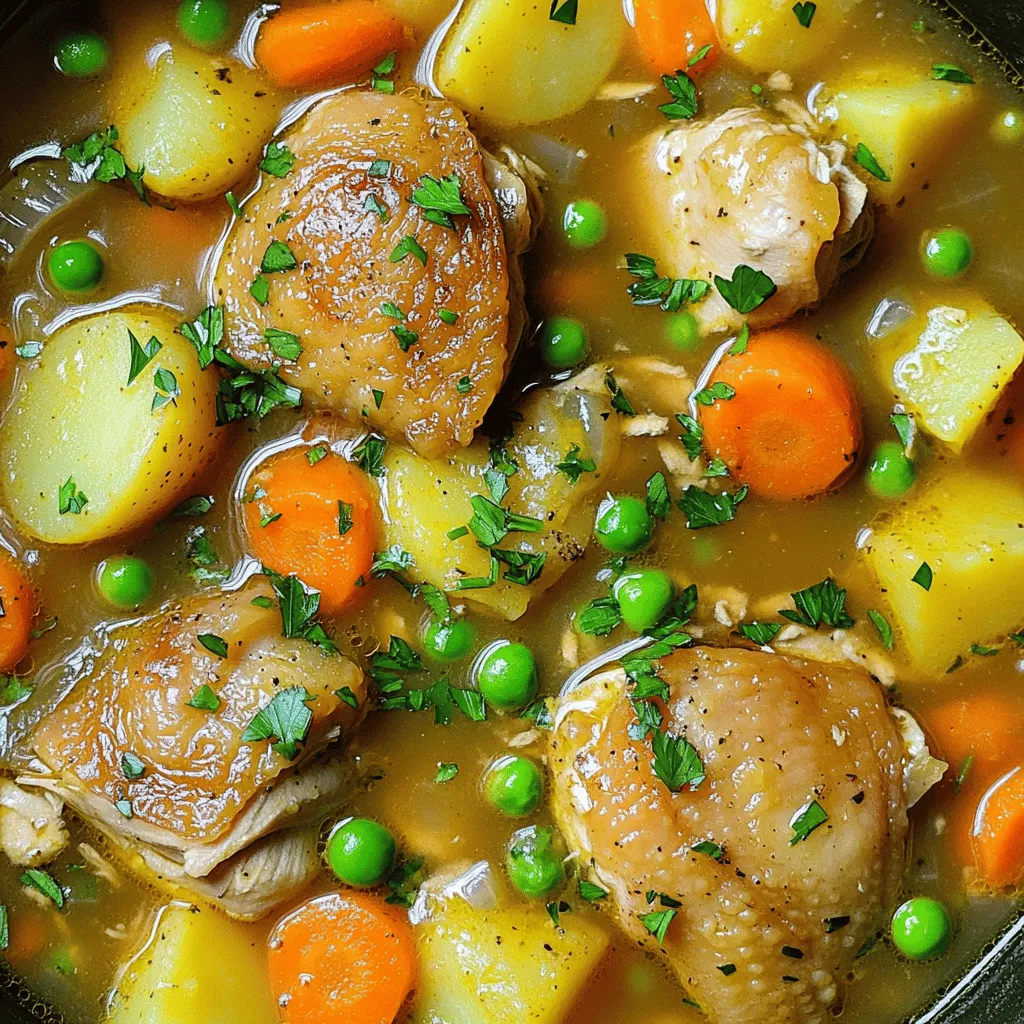
Slow Cooker Chicken Stew Hearty and Flavorful Meal
If you want a warm, hearty meal, you need to try this Slow Cooker Chicken Stew. With just a few simple steps, you’ll create a
![- 4 boneless, skinless chicken breasts - 1 pound baby yellow potatoes, halved - 4 cloves garlic, finely minced - 1 medium onion, finely chopped - 1 teaspoon dried thyme - 1 teaspoon dried rosemary - 1 teaspoon dried parsley - 1 teaspoon smoked paprika - Salt and freshly ground black pepper to taste - 2 tablespoons extra virgin olive oil - 1 cup low-sodium chicken broth - Fresh parsley leaves, chopped for garnish When I make this dish, I love using fresh ingredients. Each one adds its own magic. The chicken breasts are the star, soaking up all the flavors. The baby yellow potatoes are like little sponges, soaking up the broth and spices. This dish is healthy and filling. Each serving has about 350 calories. You get around 30 grams of protein, 20 grams of carbs, and 15 grams of fat. It’s a balanced meal that keeps you full. Plus, it offers fiber from the potatoes and vitamins from the garlic and herbs. I recommend pairing this meal with a simple green salad. A side of steamed broccoli or green beans also works well. This dish shines at family dinners or cozy nights in. It’s perfect for any occasion where you want comfort food that feels special. If you want the full experience, try the Full Recipe for all the details! - Mix together: - 4 cloves garlic, finely minced - 1 medium onion, finely chopped - 1 teaspoon dried thyme - 1 teaspoon dried rosemary - 1 teaspoon dried parsley - 1 teaspoon smoked paprika - Salt and freshly ground black pepper to taste This mix brings a burst of flavor. It smells amazing! - Coat the chicken: Rub the herb mix evenly on both sides of the 4 boneless, skinless chicken breasts. This step is key for taste. - Layer the halved baby yellow potatoes at the bottom of the crockpot. This creates a nice base for the chicken. - Place the seasoned chicken on top of the potatoes. Make sure they are spaced evenly. This helps them cook well. - Set your crockpot to: - Low for 6-8 hours - High for 3-4 hours Both settings work well, but low gives a richer flavor. - To check for readiness, use a meat thermometer. The chicken should reach 165°F. It should look juicy and tender, ready to eat! Enjoy this easy and tasty meal! For the full recipe, don’t forget to check the details. To make your dish even tastier, add spices like oregano or basil. These herbs boost the flavor profile. You can also use fresh herbs if you have them. Marinate the chicken for a few hours or overnight to soak in more flavor. Just mix the herbs and oil, and let the chicken sit in it. To avoid dry chicken, cook it on low heat. High heat can dry it out quickly. Using a digital thermometer helps too. Aim for an internal temperature of 165°F. This ensures the chicken is safe and juicy. For a beautiful dish, arrange the chicken and potatoes on a large platter. Sprinkle extra parsley on top for color. A pop of green makes the dish look fresh and inviting. You can also serve it with lemon wedges for a bright touch. {{image_4}} You can change the vegetables in this dish. Try using carrots, green beans, or bell peppers. These will give you new flavors and colors. You can also swap proteins. Chicken thighs are a great option. They stay juicy and tender. Pork chops or tofu work well too. Each choice brings a unique taste. To make this dish gluten-free, check your broth. Use a gluten-free chicken broth. This ensures everyone at your table can enjoy it. For a keto-friendly version, reduce the potatoes. You can use cauliflower instead. This keeps the dish low in carbs while still being filling. If you want more zing, add lemon or lime. Just squeeze some juice before serving. It brightens the flavors and adds freshness. Want some heat? Sprinkle in chili flakes. They bring a nice kick without being overwhelming. Adjust these flavors to suit your taste and impress your guests. For the [Full Recipe], please refer back to the original recipe section. Crockpot Garlic Herb Chicken & Potatoes can stay fresh in your fridge for up to four days. Store it in an airtight container to keep it moist. When you're ready to enjoy it again, reheat in a microwave or on the stovetop. Heat until it's warm all the way through. You can also add a splash of broth to keep the chicken juicy. If you have leftovers, freezing is a great option. First, let the dish cool completely. Then, place it in freezer-safe containers. Seal tightly to avoid freezer burn. This dish can last for about three months in the freezer. For defrosting, take it out the night before and place it in the fridge. When ready, reheat it in a pot on low heat or in the microwave until warm. This dish works well for meal prep. You can make a big batch and portion it out for the week. Use clear, stackable containers for easy storage. Label each container with the date. It's a smart way to have healthy meals ready when you need them. Pair it with a fresh salad or steamed veggies to round out your meals. To check if the chicken is done, use a meat thermometer. The thickest part should reach 165°F (75°C). If you don’t have a thermometer, look for clear juices when you cut into the chicken. The meat should not be pink. Yes, you can add veggies! Carrots, green beans, or bell peppers work well. Just cut them into even pieces. If you add more veggies, reduce the cooking time by about 30 minutes. This helps ensure everything cooks evenly. Great side dishes are salad, bread, or steamed veggies. These pair well with the chicken's flavors. Consider a light vinaigrette or garlic bread for a nice touch. A side of green beans adds color and crunch. Enjoy the meal with family or friends for a delightful dinner. In this post, we explored a simple and tasty recipe for Crockpot Garlic Herb Chicken and Potatoes. You learned about the key ingredients, nutritional information, and various serving tips. I shared cooking steps, flavor enhancements, and storage advice to help you succeed. Remember, you can easily mix in other veggies or change proteins for a fresh twist. With these tips in hand, you can enjoy delightful meals anytime. Enjoy your cooking adventure and share your delicious results!](https://roastedflavors.com/wp-content/uploads/2025/07/b7b26da8-14ca-4149-aefe-9e3f01295af8.webp)
Crockpot Garlic Herb Chicken & Potatoes Simple Dish
Looking for a tasty, hassle-free meal? My Crockpot Garlic Herb Chicken & Potatoes recipe is just what you need. This dish puts an exciting twist
![- 4 boneless, skinless chicken breasts - 1 bunch of fresh asparagus, trimmed (about 1 pound) - 1/4 cup balsamic vinegar - 2 tablespoons honey - 2 tablespoons extra virgin olive oil - 4 cloves garlic, minced (about 2 teaspoons) - 1 teaspoon dried oregano - Salt to taste - Freshly ground black pepper to taste - Fresh basil leaves for garnish (optional) Using fresh ingredients makes a big difference in taste. Choose chicken breasts that feel firm and have no discoloration. Look for bright green asparagus with tight tips. The balsamic vinegar should have a rich color and a strong, sweet aroma. Quality honey adds depth to the dish, so get one that is pure and natural. Fresh garlic packs a punch, while dried oregano gives a nice earthy flavor. You can swap chicken breasts for thighs if you like dark meat. For a lighter option, use turkey cutlets. If asparagus is not in season, green beans or broccoli work well too. Honey can be replaced with maple syrup or agave nectar. If you want a different flavor, use lemon juice instead of balsamic vinegar. This dish is flexible, so feel free to experiment! For the full recipe, visit [Full Recipe]. First, set your oven to 400°F (200°C). This high heat helps the chicken cook fast. While the oven warms, grab a medium bowl. In it, mix together the balsamic vinegar, honey, olive oil, minced garlic, dried oregano, salt, and black pepper. Whisk these ingredients until they blend well. This marinade adds a sweet and tangy flavor to your chicken. Next, take a large baking dish and place the chicken breasts inside. Pour the balsamic marinade over the chicken. Make sure each piece gets coated. If you want, use a brush for even coverage. Now, take the trimmed asparagus and arrange it around the chicken. Drizzle any leftover marinade over the asparagus to enhance its taste. Put your baking dish in the preheated oven. Bake for 20 to 25 minutes. The chicken should reach an internal temperature of 165°F (75°C). You want the asparagus to be tender but still bright green. After baking, let the dish rest for about 5 minutes. This step helps the chicken stay juicy. If you like, sprinkle fresh basil leaves on top for a nice touch. Serve the chicken and asparagus warm for a delicious meal. For the full recipe, check the detailed instructions above. Cooking time can change based on chicken thickness. If you use thick chicken breasts, add 5 to 10 minutes. Always check the internal temperature. It should reach 165°F (75°C). For thinner cuts, reduce the time. Keep an eye on the asparagus too; it should stay bright green and tender. To boost flavor, marinate the chicken longer. A few hours or overnight works best. You can also add herbs like thyme or rosemary. Fresh herbs add depth. Consider using lemon juice for a bright taste. If you like a bit of heat, throw in some red pepper flakes. To keep chicken juicy, do not overcook it. The resting time helps too. Letting it rest lets the juices stay inside. For asparagus, cook until just tender. Overcooking makes it mushy. A quick drizzle of olive oil before serving adds shine and flavor. Enjoy your One Pan Balsamic Chicken and Asparagus with its delightful taste and easy cleanup. For the full recipe, check out the steps earlier in this article. {{image_4}} You can switch the chicken for many proteins. Try turkey breasts for a leaner option. Pork tenderloin also works well. Just adjust the cooking time. Fish, like salmon, tastes great too. It cooks faster, so watch it closely. Each protein brings its unique flavor to the dish. Feel free to add more veggies based on the season. In spring, add peas or baby carrots. Summer brings zucchini or bell peppers, while fall is perfect for Brussels sprouts or sweet potatoes. These veggies add color and crunch. They also boost the dish's nutrition. Toss them in the same balsamic marinade for a great flavor mix. Changing the marinade can create new tastes. For a tangy twist, use lemon juice and zest. Add fresh herbs like rosemary or thyme for a herby note. Try soy sauce for an Asian flair. A dash of mustard can bring some heat and depth. Mix and match to find your favorite flavor combo. To keep your One Pan Balsamic Chicken and Asparagus fresh, store leftovers in an airtight container. Place the chicken and asparagus together to maintain flavor. Ensure the dish cools down before sealing it. This helps prevent moisture buildup, which can make your meal soggy. When you want to enjoy your leftovers, preheat your oven to 350°F (175°C). Place the chicken and asparagus in an oven-safe dish. Cover it with foil to keep it moist. Heat for about 15 to 20 minutes or until warmed through. You can also use a microwave, but the oven keeps the chicken juicy and the asparagus crisp. If you want to save your dish for later, you can freeze it. First, let the chicken and asparagus cool completely. Then, place them in a freezer bag or an airtight container. Be sure to remove as much air as possible. This helps prevent freezer burn. You can freeze it for up to three months for best taste. When you're ready to eat, thaw it in the fridge overnight before reheating. Enjoy your savory meal anytime! It usually takes 20 to 25 minutes to cook chicken breasts at 400°F (200°C). You want the chicken to reach an internal temperature of 165°F (75°C). Use a meat thermometer to check this for safety. Cooking time can vary based on the size of the chicken pieces. Thinner pieces cook faster, while thicker cuts take longer. To ensure juicy chicken, let it rest for about 5 minutes after baking. This helps the juices redistribute. Yes, you can use frozen chicken, but it is best to thaw it first. Cooking frozen chicken takes longer and may not cook evenly. If you add frozen chicken directly to the oven, it could take 1.5 times longer to cook. To safely thaw chicken, place it in the fridge overnight or use the microwave. Once thawed, follow the recipe as usual to get that tasty balsamic flavor. You can serve a light salad, rice, or quinoa as sides. A fresh green salad with a vinaigrette complements the dish well. Herbed rice or fluffy quinoa can soak up the extra balsamic sauce. For a more filling meal, add crusty bread to soak up the juices. Feel free to mix and match sides based on your taste. For the full recipe, check the earlier sections! You learned about the key ingredients for a tasty dish and how to use them. I shared steps for prepping, cooking, and serving chicken and asparagus. You also gained tips for cooking times and flavor boosts. Variations let you switch proteins and add veggies for a twist. Lastly, I covered storage and reheating to keep your meal fresh. Cooking is fun and easy. Enjoy your dish and make it your own!](https://roastedflavors.com/wp-content/uploads/2025/07/3c9422d3-8c69-47e8-b6ff-645f8e43a1c6.webp)
One Pan Balsamic Chicken And Asparagus Simple Dish
Are you ready for a quick and tasty dinner? One Pan Balsamic Chicken and Asparagus is here to make your meal planning easier! This simple

Zucchini Chowder Creamy Comforting Delight Easy Recipe
If you love cozy meals, you’ll adore my Zucchini Chowder! This creamy, comforting dish is not only simple to make but also full of fresh
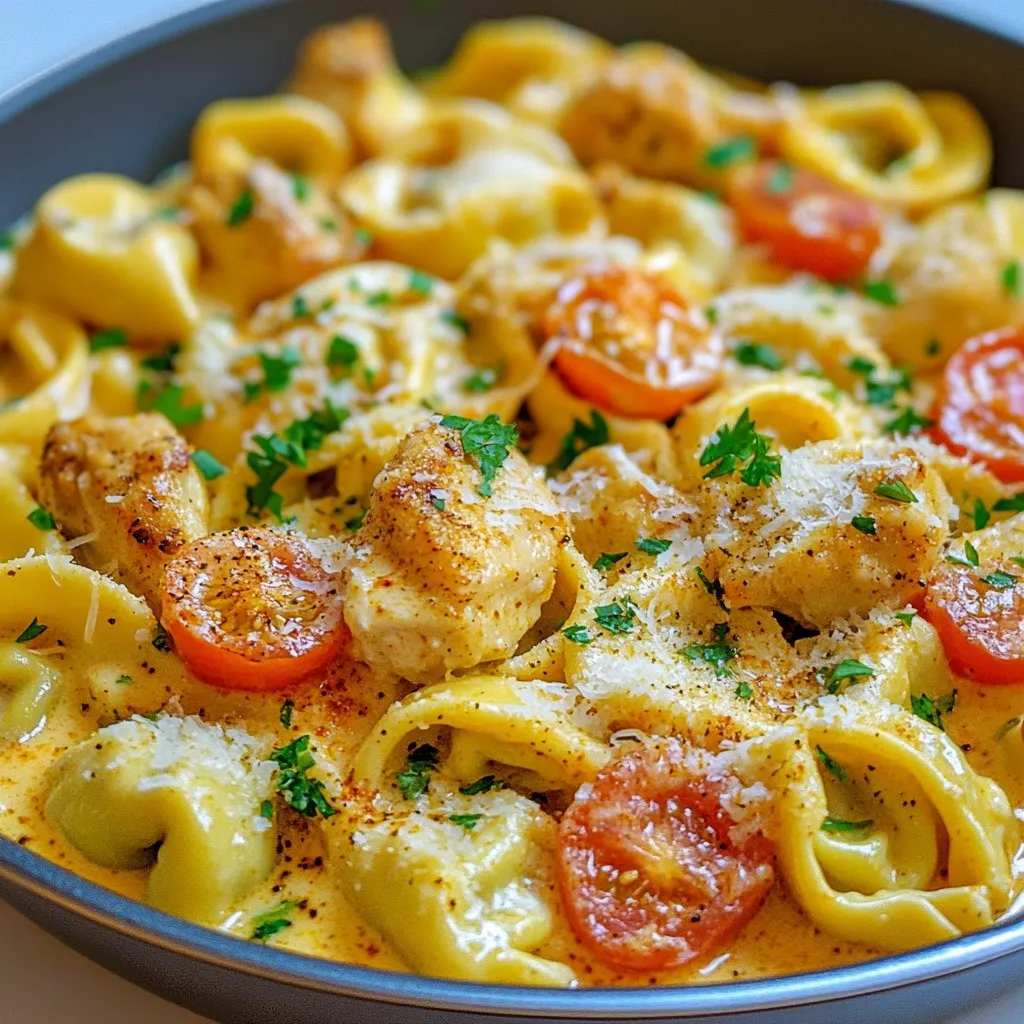
Cowboy Butter Chicken Tortellini Simple and Tasty Meal
Get ready to spice up your dinner routine with my Cowboy Butter Chicken Tortellini! This dish mixes tender tortellini and juicy chicken with a creamy,
![- 2 cups cheese tortellini (fresh or frozen) - 1 tablespoon olive oil - 1 small onion, finely diced - 3 cloves garlic, minced - 2 medium carrots, peeled and diced - 2 celery stalks, diced The heart of this creamy tortellini soup lies in its fresh and flavorful ingredients. I love choosing cheese tortellini, as its rich filling adds a nice touch. You can use fresh or frozen tortellini, depending on what you have. Olive oil gives the soup a smooth base, while the onion, garlic, carrots, and celery create a tasty aroma that fills the kitchen. - 4 cups vegetable broth (low-sodium recommended) - 1 cup heavy cream or coconut milk (for a lighter option) For the broth, I suggest low-sodium vegetable broth. It keeps the soup light yet flavorful. If you want a creamy texture, use heavy cream. For a lighter option, coconut milk works well too. Both will add a rich and velvety finish. - 1 cup fresh spinach, roughly chopped - 1 teaspoon dried oregano - 1 teaspoon dried basil - Salt and black pepper to taste - Freshly grated parmesan cheese, for serving - Fresh basil leaves, for garnish Seasonings are key to making this soup shine. I love adding fresh spinach for color and nutrients. Dried oregano and basil bring warmth and depth to every bite. Finally, finish your soup with salt and pepper to taste. A sprinkle of grated parmesan cheese on top is a must. The fresh basil leaves add a lovely touch and a burst of flavor. For the full recipe, check out the detailed instructions. This creamy tortellini soup is a warm hug in a bowl, perfect for any day! First, heat the olive oil in a large pot over medium heat. Once the oil shimmers, add the diced onion, diced carrots, and diced celery. Sauté these vegetables for about 5 to 7 minutes. You want them to be tender and the onion to turn translucent. Next, add the minced garlic and cook for another 1 to 2 minutes. The garlic should smell great but not brown. Now it's time to build the soup base. Carefully pour in 4 cups of vegetable broth. Stir it well and bring the mixture to a gentle boil. Once you see bubbles forming, add the cheese tortellini. Cook them according to the package instructions. Fresh tortellini usually takes 3 to 5 minutes, while frozen takes about 7 to 10 minutes. They are done when they float and are al dente. After the tortellini is cooked, lower the heat. Slowly stir in 1 cup of heavy cream or coconut milk until it blends smoothly. Then, mix in 1 cup of chopped spinach. Add 1 teaspoon of dried oregano and 1 teaspoon of dried basil. Season with salt and black pepper to taste. Allow the soup to simmer for about 2 to 3 minutes. You want the spinach to wilt and everything to heat through. For a full recipe, check out the [Full Recipe]. To make your creamy tortellini soup even better, think about adding more herbs. Thyme and parsley can boost the taste. You can also change how creamy the soup is. If you like it rich, use more cream. If you want it lighter, add less cream or try coconut milk. How you serve the soup matters. Use shallow bowls to show off the bright spinach. A sprinkle of extra parmesan on top makes it look tasty. Fresh basil leaves add color and flavor. Don’t forget to pair it with crusty bread for a great meal. To cook your soup well, choose a pot with a heavy bottom. This helps stop burning. When you add cream, stir constantly. This keeps the texture smooth and creamy. Following these tips makes your soup even more delightful. You can find the full recipe for creamy tortellini soup in the article. {{image_4}} You can add more vegetables to your creamy tortellini soup for extra flavor. Try mushrooms, zucchini, or bell peppers. They bring a nice texture and taste. You can also mix in legumes like beans or lentils. This adds protein and fiber, making your soup heartier. For a filling meal, include proteins like cooked chicken, sausage, or tofu. These options boost the soup's flavor and nutrition. You can also switch up the tortellini type. Try mushroom or spinach tortellini for a fun twist. If you need a gluten-free option, use gluten-free tortellini. This keeps the soup tasty while meeting dietary needs. For a dairy-free version, swap heavy cream for almond milk. This change keeps the soup creamy without dairy. Explore these variations to make the creamy tortellini soup your own! For the full recipe, check out the entire guide. Store any leftover creamy tortellini soup in an airtight container. It keeps well in the fridge for up to 3 days. When you are ready to enjoy it again, reheat the soup gently on the stove over low heat. Stir it often to ensure it warms evenly. This way, you keep that creamy texture and yummy flavor intact. To freeze creamy tortellini soup, let it cool completely first. Then, transfer it to a freezer-safe container. Make sure to leave some space at the top, as the soup will expand when it freezes. When you want to eat it, take it out and thaw it in the fridge overnight. For reheating, pour the soup in a pot and warm it over low heat. Stir it often for the best taste. Look for a few signs to know if your soup has gone bad. If it smells off or has a strange color, it’s best to throw it away. Another sign is if you see any mold on the surface. For food safety, always check before you eat. If you are unsure, it’s safer to discard it. Cooking tortellini in soup takes about 3 to 10 minutes. Fresh tortellini cooks faster, around 3 to 5 minutes. Frozen tortellini needs more time, about 7 to 10 minutes. Always check the package for the best guidance. Factors like heat and pot size can also change cooking time. Stir gently to help them cook evenly. Yes, you can use frozen tortellini! They work great in this soup. Just add them directly to the pot without thawing. Cook them for about 7 to 10 minutes. They will soften and float when done. This makes it a quick and easy option for busy days. This soup pairs well with many sides. A slice of crusty bread is perfect for dipping. You can also serve a simple salad, like a mixed greens salad with vinaigrette. Garlic bread adds a nice touch too. For a hearty meal, consider a side of roasted vegetables. These options complement the soup's creamy texture well. Creamy tortellini soup can be healthy with a few tweaks. The soup has protein from tortellini and nutrients from veggies. To make it lighter, use coconut milk instead of heavy cream. You can add more spinach or other veggies for fiber. Always watch your salt and cheese portions to keep it balanced. Yes, you can make this soup ahead of time! Prepare it and let it cool, then store it in the fridge. It stays good for up to 3 days. When reheating, use low heat to avoid overcooking the tortellini. You can also freeze it for up to 3 months. Just remember to let it thaw in the fridge before reheating. For the best taste, add fresh spinach just before serving. For the full recipe, check out the link above. Creamy tortellini soup combines rich flavors and easy steps. You learned about the key ingredients, cooking methods, and variations to personalize your dish. Adding herbs and fresh veggies boosts flavor, while adjustments cater to dietary needs. Store leftovers properly for future meals. This soup is not only comforting, but also versatile and enjoyable. Dive in, try these tips, and make this dish your own!](https://roastedflavors.com/wp-content/uploads/2025/07/572e6cf0-2fe6-4ae3-b2a4-ce6a2bf89ec4.webp)
Creamy Tortellini Soup Velvety and Comforting Recipe
Are you ready to indulge in a bowl of warmth? My Creamy Tortellini Soup is the perfect way to cozy up on a chilly day.