Dinner

For chicken and pasta, you need simple ingredients. Grab 2 boneless, skinless chicken breasts. You will also need 8 ounces of pasta. Fusilli or penne works best. This will be the hearty base of your meal. Fresh produce adds flavor and color. Use 2 cups of cherry tomatoes. Halve them for easy cooking. You’ll also need 1 cup of fresh basil leaves, chopped. This gives the dish a fresh, vibrant taste. Don’t forget 4 cloves of garlic, minced. Garlic brings a rich flavor that brightens every bite. Seasoning is key to taste. Keep it simple with salt and pepper to taste. For oils, you need 2 tablespoons of extra virgin olive oil. This adds richness. Lastly, use 1 tablespoon of balsamic vinegar. The vinegar gives a tangy kick that balances the dish. For an extra treat, consider grated Parmesan cheese for serving. {{ingredient_image_2}} Start by boiling a large pot of salted water. When the water bubbles, add 8 ounces of pasta. Fusilli or penne works best. Cook the pasta according to the package instructions until it's al dente. This usually takes about 8 to 10 minutes. Once cooked, drain the pasta but keep 1/2 cup of the cooking water. Set the pasta aside for later. While the pasta cooks, heat 1 tablespoon of olive oil in a large skillet over medium heat. Season 2 boneless chicken breasts with salt and pepper. Place the chicken in the skillet and cook for 6 to 7 minutes on each side. You want it golden brown and cooked through. After cooking, remove it from the skillet and let it rest on a cutting board for 5 minutes. Then, slice the chicken into thin pieces. In the same skillet, add another tablespoon of olive oil. Next, add 4 minced garlic cloves. Sauté the garlic for about 1 minute. Stir it often to keep it from browning. After that, add 2 cups of halved cherry tomatoes and 1 tablespoon of balsamic vinegar. Cook for 3 to 4 minutes. Stir occasionally until the tomatoes soften and their juices flow. Return the sliced chicken to the skillet. Add the cooked pasta and 1 cup of chopped basil. Gently toss everything together. If needed, add some reserved pasta water to help create a smooth sauce. Finally, mix in 1 cup of shredded mozzarella cheese. Stir until the cheese melts and mixes throughout the dish. Taste and add more salt and pepper, if needed. Serve hot, garnished with fresh basil and grated Parmesan cheese on the side. To cook chicken perfectly, start with thin chicken breasts. This helps them cook faster and more evenly. Use a meat thermometer to check the internal temperature. Aim for 165°F for safe eating. Let the chicken rest after cooking. This keeps it juicy. Slice it thin for easy mixing with pasta. Seasoning is key for great flavor. Use salt and pepper to taste. I like to add garlic powder for extra taste. A splash of balsamic vinegar adds a nice tang. Fresh basil gives a bright note. Experiment with different herbs like oregano or thyme. These will elevate the dish. Mozzarella cheese melts beautifully in this dish. If you want a twist, try using provolone or fontina. These cheeses add a rich flavor. You can mix different cheeses for more depth. For an extra kick, sprinkle some grated Parmesan on top before serving. This adds a savory finish to the meal. Pro Tips Perfectly Cooked Pasta: Always cook your pasta until al dente for the best texture; it will continue to cook slightly when mixed with the sauce. Rest the Chicken: Letting the cooked chicken rest for a few minutes before slicing helps retain its juices, making it more flavorful and tender. Fresh Basil Flavor: Add the chopped basil at the end to preserve its vibrant color and fresh flavor, enhancing the overall dish. Cheese Melting Tips: For a creamier texture, allow the cheese to sit at room temperature for a few minutes before adding it to the hot pasta; this helps it melt evenly. {{image_4}} You can easily make a vegetarian version of bruschetta chicken pasta. Just skip the chicken. Instead, use more cherry tomatoes and add some roasted red peppers. You can also toss in some artichoke hearts for extra flavor. This dish stays bright and fresh without meat. For a gluten-free meal, swap out regular pasta for gluten-free pasta. Many brands offer tasty alternatives made from rice or corn. Just follow the cooking time on the package. The rest of the recipe stays the same, giving you a delicious gluten-free delight. Adding more veggies to your pasta makes it even better. Try adding spinach or zucchini. You can also include bell peppers or broccoli. Just sauté them with the garlic for a few minutes. This adds color and nutrition to your dish, making it a wholesome meal. To keep leftovers fresh, place your bruschetta chicken pasta in an airtight container. Make sure to cool the dish to room temperature before sealing it. This helps prevent moisture buildup. Store it in the fridge for up to three days. For best taste, eat the leftovers within this time. When you’re ready to enjoy your leftovers, reheat them gently. You can use the microwave or stovetop. If using the microwave, place the pasta in a bowl and cover it with a damp paper towel. Heat in short bursts, stirring in between. This keeps the pasta moist. On the stovetop, add a splash of water or broth in a pan. Heat over low until warm, stirring often. If you want to save some pasta for later, freezing is an option. Let the dish cool completely before freezing. Use a freezer-safe container or bag to store it. Make sure to remove as much air as possible. This helps prevent freezer burn. You can freeze bruschetta chicken pasta for up to three months. To reheat, thaw it in the fridge overnight. Then, use the stovetop or microwave to warm it up. Yes, you can use different types of pasta. Fusilli and penne work great. You can try spaghetti, rotini, or even farfalle. Just ensure the pasta cooks to al dente. This gives the best texture in the dish. If you need a substitute for mozzarella, try using provolone or fontina cheese. Both melt well and add flavor. You can also use ricotta for a creamy twist. Vegan cheese is another option if you want a dairy-free choice. To make this dish ahead, prepare the pasta and chicken first. You can store them separately in the fridge. Mix the pasta, chicken, cherry tomatoes, and garlic just before serving. Reheat gently on the stove. This keeps the flavors fresh and vibrant. This blog post guides you through a delicious pasta dish. We covered key ingredients like chicken, fresh produce, and seasonings. You learned step-by-step instructions for cooking and combining everything. Tips for perfect chicken and flavor enhancement were discussed too. We also explored fun variations and provided storage advice. Now, you can easily make this dish your own and impress others. Try new ingredients or methods. Enjoy your cooking journey and share what you create!
Bruschetta Chicken Pasta Delightfully Simple Meal
If you’re craving a quick and tasty meal, look no further! Bruschetta Chicken Pasta is a delightful dish that combines juicy chicken, fresh tomatoes, and
- 2 lbs boneless, skinless chicken thighs - 1 cup teriyaki sauce (store-bought or homemade) - 1 cup coconut milk - 1 red bell pepper, sliced - 1 cup pineapple chunks (fresh or canned) - 2 cloves garlic, minced - 1 tablespoon ginger, minced - 1 teaspoon sesame oil - 1 teaspoon black pepper - 2 green onions, sliced (for garnish) - Sesame seeds (for garnish) - Cooked rice or quinoa (for serving) For the chicken, I love boneless, skinless thighs. They stay juicy and tender. You can use breasts, but they may dry out. If you need a veggie option, try tofu or tempeh. The teriyaki sauce can be store-bought for quick prep. You can also make it at home with soy sauce, honey, and vinegar. Coconut milk adds creaminess. If you want a lighter dish, use chicken broth instead. For the bell pepper, red is sweet and colorful. You can swap it for yellow or green bell peppers. Pineapple adds a sweet touch. Fresh is best, but canned works fine too. When buying chicken, look for a pink color and no foul smell. Fresh chicken should feel firm and moist. For produce, choose bright, crisp peppers and ripe pineapples. If using canned pineapple, select ones in juice, not syrup. This keeps the flavor fresh. For sauces, read labels for high-quality ingredients. Avoid those with additives or too much sugar. Using quality ingredients makes a big difference. You get a better taste and a healthier meal. Trust me, your taste buds will thank you! First, gather your ingredients. You will need: - 2 lbs boneless, skinless chicken thighs - 1 cup teriyaki sauce - 1 cup coconut milk - 1 red bell pepper, sliced - 1 cup pineapple chunks - 2 cloves garlic, minced - 1 tablespoon ginger, minced - 1 teaspoon sesame oil - 1 teaspoon black pepper - 2 green onions, sliced - Sesame seeds Next, place the chicken thighs in the bottom of your crockpot. Make sure they are in a single layer. This helps them cook evenly. In a bowl, mix the teriyaki sauce, coconut milk, garlic, ginger, sesame oil, and black pepper. Whisk until smooth. Pour this sauce over the chicken. Make sure each piece is covered well. Now, layer the sliced bell pepper and pineapple on top. This adds color and taste to your dish. Cover the crockpot with its lid. Set it to low heat for 6-7 hours or high heat for 3-4 hours. The chicken is ready when it is tender and can be shredded easily. During the last 30 minutes, you can check if the chicken is cooked through. This way, you can adjust the time if needed. Once the cooking time is up, shred the chicken right in the crockpot. Use two forks to pull it apart. Mix the chicken with the sauce and veggies to combine the flavors. For serving, place the chicken mixture over cooked rice or fluffy quinoa. Garnish with sliced green onions and sesame seeds. This adds a nice crunch and flavor. Enjoy your flavorful teriyaki chicken! To get juicy, tender chicken, use boneless, skinless thighs. They cook well in a crockpot. Make sure to layer the chicken evenly at the bottom. This lets the heat spread evenly. You can cook it on low for 6 to 7 hours. If you're short on time, use high heat for 3 to 4 hours. Check the chicken at the end. It should shred easily with a fork. Want to boost flavors? Try adding fresh herbs like cilantro or basil. You can also switch up the sauce. For a spicy kick, add a splash of sriracha. If you love sweetness, mix in brown sugar or honey. Adding more garlic or ginger can bring a nice punch too. Experiment with what you like best. Each tweak can lead to a new favorite. Serving matters! For a pretty dish, use a wide bowl. Place rice or quinoa at the bottom. Then, spoon the chicken and veggies over the top. Finish with sliced green onions and a sprinkle of sesame seeds. Add a lime wedge on the side for a pop of color. This adds freshness and makes your meal look gourmet. Enjoy the compliments! {{image_4}} You can make your teriyaki chicken even better by adding vegetables. Bell peppers are a great start, but you can also try broccoli, carrots, or snap peas. Just chop them into bite-sized pieces. Add them to the crockpot with the chicken. They will soak up the sauce and add color and crunch. You can also use frozen veggies if you’re short on time. Just toss them in frozen; they'll cook perfectly in the sauce. While teriyaki sauce is a classic choice, feel free to mix it up! You can use soy sauce for a saltier taste. Hoisin sauce adds a sweet and tangy flavor. If you like it spicy, try adding sriracha or chili paste. Mixing different sauces can bring new flavors to your dish. Just keep the base of coconut milk for creaminess. Want to change the main protein? You can use chicken breasts if you prefer leaner meat. Pork or beef also works great in the crockpot. If you like seafood, shrimp or salmon can be added too. Just reduce the cooking time for seafood. Always ensure the protein is cooked through before serving. This way, you can enjoy a new twist on a familiar dish. Store leftover teriyaki chicken in an airtight container. Keep it in the fridge. It stays fresh for about 3-4 days. If you want to enjoy it later, portion it out for easy meals. This method helps you avoid waste and helps with meal prep. You can freeze teriyaki chicken for longer storage. First, let it cool to room temperature. Then, put it in a freezer-safe bag or container. Remove as much air as possible to prevent freezer burn. It will keep well for up to 3 months. Just remember to label the bag with the date! When you’re ready to eat, thaw the chicken in the fridge overnight. You can reheat it in the microwave. Heat it on medium power for 2-3 minutes, stirring halfway through. Alternatively, you can reheat it on the stove. Just add a bit of water or sauce to prevent sticking. Heat until warm, and enjoy! Yes, you can use frozen chicken in the crockpot. Just remember that it will take longer to cook. Set your crockpot on high for about 4-5 hours. Always check the chicken for doneness. Use a meat thermometer to ensure it reaches 165°F. To spice up your teriyaki chicken, add some red pepper flakes or sriracha. You can mix these into the sauce before cooking. Another option is to add fresh sliced jalapeños on top before serving. This will give a nice kick and balance the sweetness of the teriyaki sauce. Teriyaki chicken pairs well with rice or quinoa. You can also add steamed broccoli or snap peas for extra crunch. A side of pickled veggies adds a nice tang too. For a refreshing touch, serve with lime wedges or a simple salad. In this blog post, we explored the key ingredients and steps for making teriyaki chicken. You learned about choosing quality ingredients and helpful substitutions. I offered clear cooking steps, shredding tips, and ways to enhance flavors. We also discussed variations, like adding veggies and sauces, plus storage and reheating advice. Remember, cooking is about creativity and experimentation. Try new things to make this dish yours! Enjoy your cooking journey.
Dump and Go Teriyaki Chicken Crockpot Flavor Boost
If you want a simple and tasty meal, try my Dump and Go Teriyaki Chicken Crockpot recipe. You just add everything to the pot and
- 1.5 lbs flank steak, thinly sliced - 4 cups broccoli florets (fresh or frozen) - 1/4 cup low sodium soy sauce - 2 tablespoons oyster sauce - 1 tablespoon cornstarch - 1 tablespoon minced garlic - 1 tablespoon minced ginger - 3 tablespoons brown sugar - 1 tablespoon sesame oil - 1 cup low sodium beef broth - 2 green onions (for garnish) - Cooked rice (for serving) Gathering the right ingredients is key to making this beef and broccoli dish shine. I love using flank steak for its tenderness and flavor. Make sure it’s thinly sliced against the grain. This helps it cook evenly and stay juicy. Broccoli is next on the list. You can use fresh or frozen florets. Fresh broccoli gives a nice crunch, but frozen works well for convenience. The soy sauce adds a salty depth to the dish. Now, let’s add some extra flavor! Oyster sauce gives a lovely umami taste. Cornstarch helps thicken the sauce, making it cling to the beef perfectly. Garlic and ginger bring a warm, aromatic touch. Sweetness comes from brown sugar. It balances the salty flavors nicely. Sesame oil is a must for that nutty hint. Don’t forget the beef broth! It keeps everything moist and flavorful. Finally, green onions add a pop of color and freshness. Serve your dish over warm cooked rice for a complete meal. Each ingredient plays a part in making this dish fantastic! Whisk together these ingredients in a medium bowl: - 1/4 cup low sodium soy sauce - 2 tablespoons oyster sauce - 1 tablespoon cornstarch - 1 tablespoon minced garlic - 1 tablespoon minced ginger - 3 tablespoons brown sugar - 1 tablespoon sesame oil - 1 cup low sodium beef broth Mix until smooth. This sauce packs a punch and gives great flavor. Place 1.5 lbs of thinly sliced flank steak in the slow cooker. Pour the sauce over the beef. Toss it gently to coat every piece evenly. This step is key for flavor. Set the slow cooker to low heat for 5 hours. About 30 minutes before it's done, add 4 cups of broccoli florets. Stir them in gently. This keeps the broccoli bright and tender. Once done, stir everything again so the sauce is well mixed. Serve it hot over rice. - Use fresh ingredients for enhanced taste. Fresh beef and broccoli make a big difference. - Adjust soy sauce and brown sugar for desired sweetness. Taste as you mix for the best balance. - Ensure beef is sliced against the grain for tenderness. This keeps the meat juicy and easy to chew. - Avoid overcooking broccoli for optimal texture. Add it 30 minutes before serving to keep it bright and crisp. - Serve in shallow bowls for a visually appealing dish. This allows the colors to shine and invites diners to dig in. - Drizzle sesame oil over the top before serving. It adds a lovely finish and extra flavor. {{image_4}} You can easily change the protein in this dish. Substitute flank steak with chicken or tofu for a lighter option. Chicken thighs work well here, offering a juicy bite. If you choose tofu, press it first to remove extra moisture. This helps it absorb the sauce better. You can also try different cuts of beef, like sirloin or chuck. Each cut brings its own flavor and texture. Adding more veggies can make this dish even better. Bell peppers add a nice crunch and sweetness. Snap peas also work well for a fresh bite. If you want to save time, use frozen mixed vegetables. They cook quickly and still taste great. Just ensure you add them in the last 30 minutes of cooking. You can switch up the sauce for new flavors. Try adding hoisin sauce for a touch of sweetness. It pairs nicely with the savory soy sauce. If you like heat, add red pepper flakes. Just a pinch can make a big difference. Adjust the amounts to fit your taste. These simple changes keep the dish exciting every time! You can store leftovers in an airtight container. This keeps the food fresh. Refrigerate for up to 3 days. Make sure to seal the container well. This helps keep the flavor intact. If you want to save some for later, freeze it in portions. Use freezer-safe bags or containers. You can freeze beef and broccoli for up to 2 months. Just remember to label the bags with the date. This way, you know when to use them. When it's time to eat again, reheat gently. Use low heat in the microwave or on the stovetop. Stir occasionally to heat evenly. Do not rush this step. Slow heating keeps the beef tender and the broccoli bright. Enjoy your meal just like fresh! Yes, but thawing will yield better texture. Frozen beef can lose some juiciness. When you thaw it, the meat can absorb flavors better. This way, you get a more tender bite. Yes, if you use gluten-free soy sauce and oyster sauce. Many brands offer gluten-free options. This makes it easy to enjoy a tasty meal without gluten. Always check labels to ensure safety. It pairs well with rice, noodles, or steamed vegetables. Rice soaks up the sauce nicely. Noodles add a fun texture. Steamed veggies boost nutrition and color. You can mix and match based on your preferences. This blog post covers a tasty slow cooker beef and broccoli recipe. You learned the main ingredients and how to prepare them. I shared useful tips to enhance flavor and cooking techniques. You can personalize this dish with different proteins and veggies. Don’t forget the storage info for leftovers. With these steps and tips, you can make a dish that's easy and fun. Enjoy creating this meal that’s sure to impress!
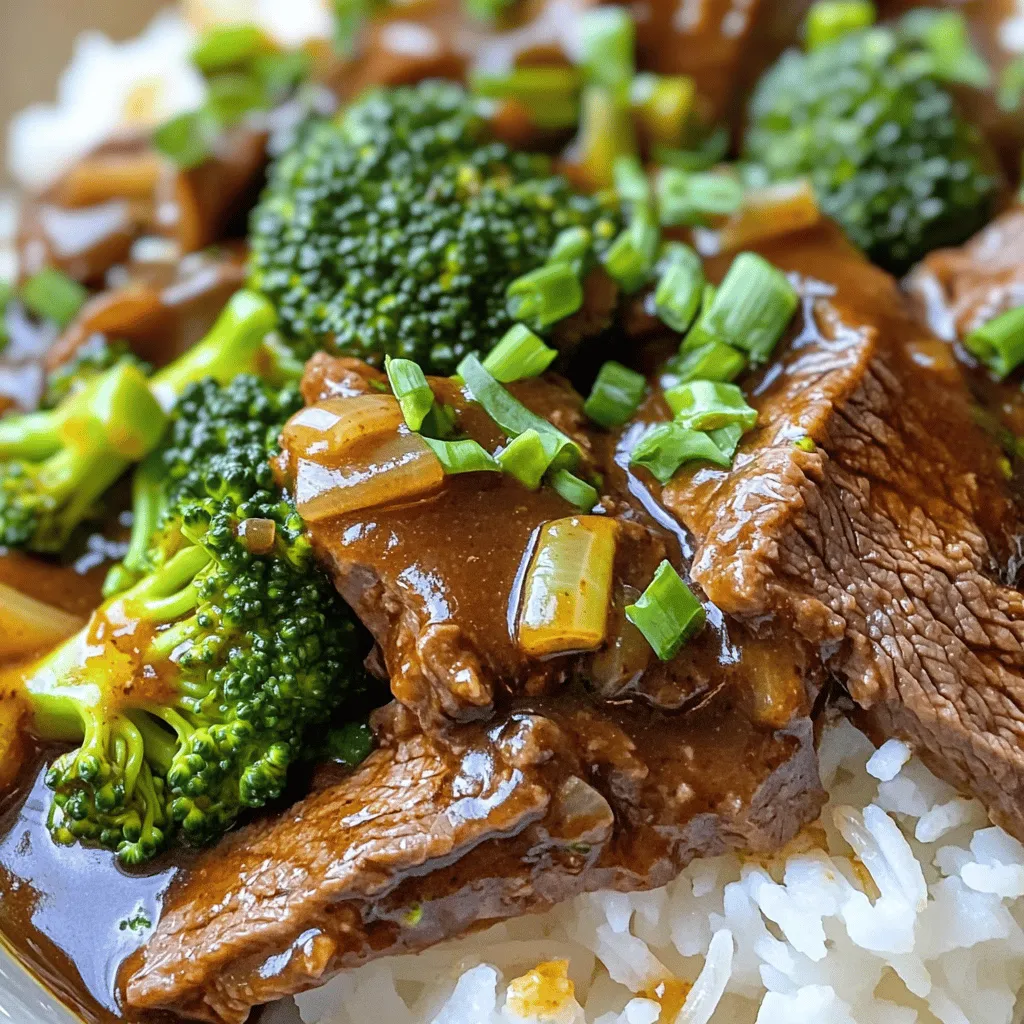
Savory Slow Cooker Beef & Broccoli Easy Dinner Recipe
Looking for a quick, tasty dinner idea? This Savory Slow Cooker Beef & Broccoli recipe is just what you need! With tender beef and crisp
To make Minute Creamy Turkey Stroganoff, you need the following ingredients: - 1 pound ground turkey - 1 medium onion, finely diced - 2 cloves garlic, minced - 8 ounces mushrooms, thinly sliced - 1 cup chicken broth - 1 cup sour cream - 2 tablespoons all-purpose flour - 1 tablespoon Worcestershire sauce - 1 teaspoon Dijon mustard (or yellow mustard) - 1 teaspoon dried thyme - Salt and freshly ground black pepper, to taste - 8 ounces egg noodles - Fresh parsley, chopped, for garnish You can add more flavor with these options: - A splash of white wine for depth - Fresh herbs like basil or chives - A pinch of red pepper flakes for heat - Crumbled bacon for a smoky touch If you need to swap some ingredients, consider these substitutes: - Use ground chicken or beef in place of turkey. - Replace sour cream with Greek yogurt for a tangy twist. - If you don’t have egg noodles, use any pasta type you like. - Swap chicken broth for vegetable broth to make it meat-free. Using these ingredients, your Minute Creamy Turkey Stroganoff will be rich and tasty! Start by boiling a large pot of salted water. When the water boils, add 8 ounces of egg noodles. Cook them until they are al dente, following the package instructions. This usually takes about 7-9 minutes. Once cooked, drain the noodles in a colander. Set them aside while you prepare the turkey and sauce. In a large skillet, heat it over medium heat. Add 1 pound of ground turkey to the skillet. Use a spatula to break the turkey apart as it cooks. Brown the turkey for about 5-7 minutes until it's fully cooked and no longer pink. This gives the dish a rich flavor base. Next, add 1 medium onion, finely diced, and 2 cloves of minced garlic to the turkey. Sauté these for 3-4 minutes. The onion should soften and become clear. This step adds depth to your stroganoff. Then, add 8 ounces of thinly sliced mushrooms. Stir them into the turkey mixture. Sauté for another 5 minutes until the mushrooms brown and release their moisture. This makes the filling even more flavorful. Sprinkle 2 tablespoons of all-purpose flour evenly over the turkey and mushroom mix. Stir well to combine. Gradually pour in 1 cup of chicken broth while stirring. This helps avoid lumps. Bring the mixture to a gentle simmer for about 2 minutes. It will thicken slightly, creating a nice base for the sauce. Now, lower the heat and stir in 1 cup of sour cream. Also add 1 tablespoon of Worcestershire sauce, 1 teaspoon of Dijon mustard, and 1 teaspoon of dried thyme. Mix everything well and let it simmer gently for 3-5 minutes. Taste and add salt and freshly ground black pepper as needed. This is where the dish gets its creamy texture and rich taste. Gently fold the cooked egg noodles into the creamy turkey mixture. Make sure each noodle gets coated with the sauce. Heat the combined dish through for about 1 minute. Finally, ladle the creamy turkey stroganoff into bowls. For a nice touch, sprinkle freshly chopped parsley on top for color and freshness. Serve it warm and enjoy this easy family meal. To make your stroganoff creamy, use full-fat sour cream. It blends better and adds richness. Stir the sour cream in on low heat to prevent it from curdling. You can also mix in a bit of cream cheese for a thicker texture. If you like a tangy kick, add a little more mustard. This enhances the flavor and keeps it interesting. Prep your ingredients before cooking. Dice the onion and mince the garlic ahead of time. You can also slice the mushrooms and measure out the broth. This step cuts down cooking time. Use pre-cooked egg noodles or even microwaveable options to save more time. Keep everything on hand so you can cook the dish in about 25 minutes. Presentation makes the meal feel special. Serve the stroganoff in wide, shallow bowls. This lets the creamy sauce shine. Top each serving with fresh parsley for color. A drizzle of olive oil around the plate adds a nice touch too. To impress, add a sprinkle of paprika or a few mushroom slices on top for flair. {{image_4}} You can boost the nutrition of your turkey stroganoff easily. Add vegetables like spinach, bell peppers, or peas. Simply sauté them with the onion and garlic. This adds color and vitamins. You can also use zucchini or carrots, sliced thin. They cook quickly and blend well with the turkey and sauce. If you want to switch things up, try different proteins. Chicken or beef works great in this dish. For a vegetarian option, use mushrooms or lentils. Cook them in the same way as the turkey. This keeps the flavor rich and hearty, while still being quick to make. You can make this stroganoff gluten-free with a few easy swaps. Use gluten-free noodles and cornstarch instead of flour. For a dairy-free version, replace sour cream with coconut cream or cashew cream. These options keep the dish creamy while meeting dietary needs. Adjust seasonings to match your taste, and enjoy a tasty meal! To keep your creamy turkey stroganoff fresh, let it cool first. Once cool, place it in an airtight container. This helps keep moisture in and air out. Store it in the fridge for up to three days. Make sure to label the container with the date. This way, you know when to use it. When it's time to enjoy your leftovers, you can reheat them easily. Use a skillet on low heat for the best results. Stir often to avoid burning. You can also use a microwave. Place it in a microwave-safe bowl and cover it. Heat in short intervals, stirring in between. This keeps the sauce creamy and avoids drying out the dish. If you want to save some for later, freezing is a great option. Place cooled stroganoff in a freezer-safe container. Leave some space at the top for expansion. You can freeze it for up to three months. When ready to eat, thaw it in the fridge overnight. Reheat it on the stove, stirring well to bring back that creamy texture. Yes, you can use leftover turkey. It makes this dish easy and quick. Just shred or chop your turkey into small pieces. Add it to the skillet after cooking the onions and garlic. This way, the turkey heats through and soaks up the flavors. To make this recipe healthier, you can swap the ground turkey for lean ground chicken or even a plant-based meat. Use low-fat sour cream or Greek yogurt instead of regular sour cream. You can also add more vegetables, like spinach or bell peppers, to boost nutrients without adding many calories. You can serve creamy turkey stroganoff with a fresh green salad or steamed vegetables. Garlic bread or crusty bread works well to soak up the sauce too. For a fun twist, serve it over rice or quinoa instead of egg noodles. This blog post gave you all the key steps to make creamy turkey stroganoff. We covered required and optional ingredients to enhance flavors. You learned detailed cooking steps and helpful tips for the best results. Consider adding veggies or trying new proteins for variety. Storage tips keep your leftovers fresh. Now you can create a dish that tastes great and feels comforting. Enjoy your cooking adventure!
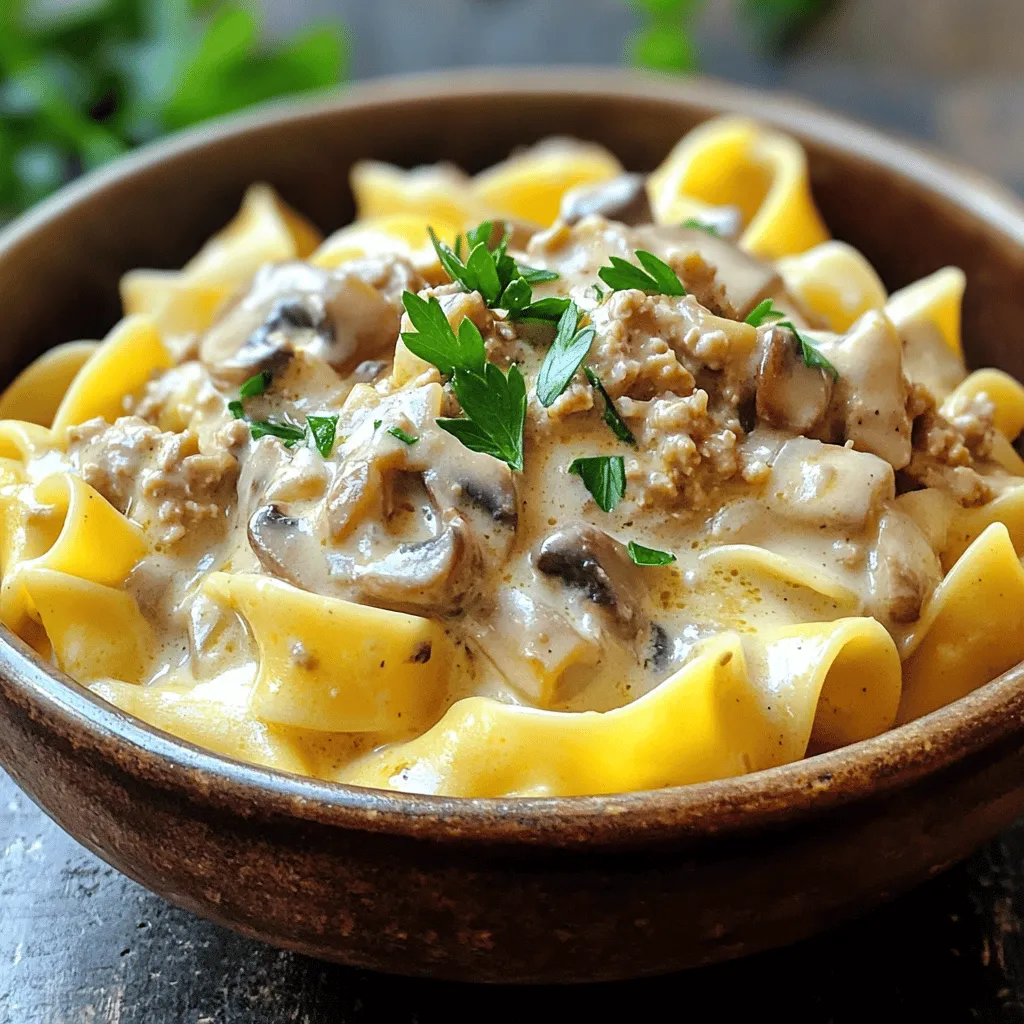
Minute Creamy Turkey Stroganoff Easy Family Meal
If you’re searching for a quick, tasty meal, look no further! This Minute Creamy Turkey Stroganoff is the answer to your busy weeknight dinners. In
- 6 medium russet potatoes, peeled and diced into 1-inch cubes - 1 large onion, finely chopped - 3 cloves garlic, minced - 4 cups chicken or vegetable broth - 1 cup cream cheese, softened - 1 cup sharp cheddar cheese, shredded - 1/2 cup sour cream I love using russet potatoes for this soup. They are starchy and creamy, making the soup rich. The onion and garlic add a depth of flavor that really shines through. Cream cheese and sharp cheddar make it indulgent. The sour cream adds a nice tang and creaminess too. - 1 teaspoon garlic powder - 1 teaspoon onion powder - 1/2 teaspoon smoked paprika - Salt and freshly cracked pepper The spices are simple but effective. Garlic and onion powder boost the flavors of fresh garlic and onion. Smoked paprika adds a hint of smokiness that takes the soup up a notch. Always taste and adjust the salt and pepper for your perfect blend. - 4 green onions, sliced thinly - 4 strips of crispy cooked turkey bacon Toppings can make your soup even better. Green onions add a fresh crunch. Turkey bacon gives a nice salty bite. You can mix and match toppings to suit your taste and impress your guests. - Prepare the crockpot with cooking spray or liner. - Dice 6 medium russet potatoes into 1-inch cubes. - Chop 1 large onion finely. - Mince 3 cloves of garlic. Start by getting your crockpot ready. A quick spray with cooking oil or a liner makes cleanup easy. Then, focus on the veggies. Dice your potatoes, chop the onion, and mince the garlic. This sets a great base for the soup. - Combine the diced potatoes, chopped onion, and minced garlic in the crockpot. - Pour in 4 cups of chicken broth (or vegetable broth). - Add 1 teaspoon of garlic powder, 1 teaspoon of onion powder, and 1/2 teaspoon of smoked paprika. - Season with salt and pepper to taste. - Stir gently to mix everything. Now, combine all your prepared ingredients in the crockpot. Make sure the potatoes, onion, and garlic are well mixed. Pour in the broth, covering the veggies fully. Sprinkle in your spices, then stir gently. This will help all the flavors blend nicely. Cover the crockpot and set it to cook. You can choose to cook on low for 6 to 8 hours or high for 4 to 5 hours. The potatoes should be fork-tender when done. - Mash the potatoes with a potato masher or fork for the desired consistency. - Incorporate 1 cup of softened cream cheese and 1 cup of shredded sharp cheddar cheese. - Add 1/2 cup of sour cream and mix until smooth. - Taste and adjust seasoning with salt and pepper. - If too thick, stir in more broth or water. When the cooking time is up, it’s time to finish the soup. Use a masher to mash some of the potatoes. This gives the soup a creamy texture while keeping some chunks. Next, fold in the cream cheese and cheddar until they melt. Add the sour cream, mixing until everything is smooth. Taste your soup and adjust the seasoning if needed. If it’s too thick, add a bit more broth or water. Let it warm for another 10 to 15 minutes. Now, you are ready to serve this creamy delight! To get a creamy mouthfeel, mash the cooked potatoes well. I like to leave some chunks intact. This gives the soup a nice texture. If the soup feels too thick, you can add broth or water. Just stir a little in at a time until you reach the perfect consistency. To boost the flavor, try adding spices like thyme or basil. You can even mix in a dash of cayenne for some heat. If you want a different taste, swap cream cheese for Greek yogurt. For cheddar, consider using gouda or mozzarella. This soup pairs well with crusty bread or garlic rolls. They are perfect for dipping. For a nice touch, garnish your soup with extra green onions and some crumbled turkey bacon. A sprinkle of cheese on top looks nice too. Serve in warm bowls for a cozy meal. {{image_4}} You can make this soup vegetarian by using vegetable broth instead of chicken broth. Just skip the bacon too. You still get a rich and creamy taste without the meat. To add more flavor, think about mixing in other veggies. Carrots and celery work great! They add nice texture and taste. You can also try different types of cheese. Gouda or Monterey Jack can give a new twist to the classic cheddar. If you like heat, add jalapeños or hot sauce. Start with a little, then taste. You can always add more! The spice will make the soup exciting and keep you warm on cold days. To store leftover soup, let it cool first. Pour the soup into an airtight container. Make sure to leave some space at the top. Seal it well to keep out air. Place the container in the fridge. Your soup will stay fresh for about 3 to 4 days. When you're ready to eat, just pull it out. If you want to freeze the soup, use a freezer-safe container. Leave some room at the top for expansion. You can also use freezer bags. Just make sure to remove as much air as possible. Label the bags with the date. The soup can last in the freezer for up to 3 months. When you're ready to enjoy it, thaw it overnight in the fridge. To reheat the soup, you have a few good choices. You can use the stovetop or microwave. If using the stovetop, heat it on low. Stir often to keep it from sticking. If using the microwave, place it in a microwave-safe bowl. Heat in short bursts, stirring in between. This helps to keep the texture nice and creamy. Avoid boiling the soup, as this can change its taste. Enjoy it warm, just like the first time! Yes, you can make this soup ahead of time. It stores well in the fridge. After cooking, let the soup cool down. Transfer it to an airtight container. It will stay fresh for about three days. When you are ready to enjoy it, reheat on the stove or in the microwave. Stir it well to mix the flavors. You might want to add a splash of broth if it thickens too much. If you need a swap for cream cheese, try using Greek yogurt. It gives a nice tang and creamy texture. Another option is cottage cheese, which is lighter but still blends well. You can also use sour cream for a similar flavor. Each option may slightly change the taste but will keep the soup creamy. To thicken the soup, you can mash more potatoes. This adds creaminess without changing the flavor. If you prefer a smoother texture, blend some of the soup using an immersion blender. You can also stir in a cornstarch slurry. Just mix one tablespoon of cornstarch with two tablespoons of cold water. Add it to the soup and stir well. Cook for a few more minutes to thicken. Yes, this soup can easily be made gluten-free. Use gluten-free chicken or vegetable broth. Always check the labels to ensure no gluten is present. You can also swap out any ingredients that may have gluten. For example, make sure your cream cheese is gluten-free. This way, everyone can enjoy this creamy soup! This blog post covered how to make a tasty potato soup. You learned about the main ingredients, spices, and optional toppings that elevate the dish. We shared step-by-step instructions for preparation and included helpful tips for the best texture and flavor. You can explore variations to fit your taste and find ways to properly store leftovers. Try this recipe, and enjoy a warm bowl of comforting soup that you made!
Creamy Crockpot Crack Potato Soup Simple and Satisfying
Craving a warm and hearty meal? My Creamy Crockpot Crack Potato Soup is just what you need! Packed with tender potatoes, rich cheeses, and spices,
- 2 lbs beef chuck, cut into 1-inch cubes - 4 cups beef broth - 3 medium carrots, sliced into rounds - 3 medium potatoes, diced into bite-sized pieces - 1 large onion, finely chopped - 3 cloves garlic, minced - 1 cup green peas (fresh or frozen) - 2 tablespoons tomato paste - 1 tablespoon Worcestershire sauce - 1 teaspoon dried thyme - 1 teaspoon smoked paprika - 1 bay leaf - Salt and pepper to taste - 2 tablespoons olive oil - Fresh parsley, chopped (for garnish) For a hearty and flavorful meal, the ingredients are key. The beef chuck gives a rich taste and tender texture. The beef broth adds depth and warmth. Flavorful vegetables like carrots, potatoes, onion, and garlic make the stew vibrant and filling. Green peas add a pop of color and sweetness. For seasonings, tomato paste and Worcestershire sauce build a savory base. Dried thyme and smoked paprika bring warmth and earthiness. The bay leaf adds a hint of herbal flavor. Olive oil helps brown the beef and sauté the aromatics. Salt and pepper are vital for enhancing all the flavors. Finally, fresh parsley makes a lovely garnish, adding brightness to the dish. Using quality ingredients is important. Choose fresh vegetables and high-quality beef for the best results. This dish not only warms the body but also the soul, especially on chilly nights. Heat 2 tablespoons of olive oil in a large pot over medium-high heat. Once the oil is hot, add 2 lbs of beef chuck cut into 1-inch cubes. Sear the beef until it turns brown on all sides. This step takes about 5 to 7 minutes. Once done, set the browned beef aside on a plate. In the same pot, add 1 large onion, finely chopped. Cook it for about 4 minutes until it is translucent and fragrant. Then, add 3 cloves of minced garlic and stir for another minute. Be careful not to let the garlic burn, as this can change the flavor. Now it’s time to add depth to the stew. Mix in 2 tablespoons of tomato paste, 1 tablespoon of Worcestershire sauce, 1 teaspoon of dried thyme, and 1 teaspoon of smoked paprika. Stir well to coat the onion and garlic with these rich flavors. Return the browned beef to the pot along with any juices. Pour in 4 cups of beef broth and add 1 bay leaf. Season with salt and pepper to taste. Increase the heat to bring the mixture to a boil. Once it boils, reduce the heat to low and cover the pot with a lid. Let it simmer gently for about 1 hour. This allows all the flavors to meld together, creating a rich and hearty stew. After an hour, carefully add 3 medium carrots, sliced into rounds, and 3 medium potatoes, diced into bite-sized pieces. Cover the pot again and let it simmer for another 30 minutes. This will make the vegetables tender and add to the stew’s heartiness. In the last step, stir in 1 cup of green peas, whether fresh or frozen. Cook for an additional 5 minutes, just to warm them through. Before serving, don’t forget to remove the bay leaf. Taste the stew and adjust the seasoning if needed, adding more salt and pepper for the best flavor. - Best way to sear beef for flavor: Searing beef adds rich flavors. Start by heating olive oil in a large pot over medium-high heat. Once the oil is hot, add the beef cubes. Make sure to space them out so they don't steam. Sear the beef for 5-7 minutes until it's browned on all sides. This step builds a deep, savory flavor that enhances your stew. - How to avoid burning garlic: Garlic can burn quickly and turn bitter. After cooking the onions until they are soft, add the minced garlic. Stir it for only about a minute. Keep the heat at medium to avoid burning the garlic. This way, you keep its sweet and aromatic flavor. - Suggestions for additional spices: You can add more depth to your stew. Try adding a pinch of cayenne pepper for a slight kick. Or, add some fresh rosemary for an earthy note. You could also sprinkle in some crushed red pepper flakes to make it spicy. - Choosing the right beef cuts: Using beef chuck is perfect for stews. It has a good amount of fat and collagen, which makes it tender when cooked low and slow. You can also use brisket or round, but chuck is the best choice for a rich flavor. - Pairing with bread and garnishes: Serve the stew hot in deep bowls. A sprinkle of fresh parsley on top adds brightness. Pair it with warm, crusty bread for dipping. This makes each bite even better! - Theme enhancements for Halloween: To make it spooky, use black bowls or serve with a side of “witch's fingers” (vegetable sticks). You can also add a few plastic spiders or bats around the dish for fun. This adds a playful touch to your Halloween feast! {{image_4}} You can easily make this stew gluten-free. Use gluten-free beef broth and check the Worcestershire sauce for gluten. Many brands offer gluten-free options. If you want a vegetarian or vegan version, replace beef with hearty mushrooms or lentils. Use vegetable broth instead of beef broth. This keeps the stew full of flavor without meat. Feel free to swap in different veggies. Sweet potatoes, parsnips, and even butternut squash work well in this dish. If you want to change the meat, use chicken or turkey. You can also try a mix of meats for a unique flavor. Just be sure to adjust cooking times based on the meat you choose. For a fun twist, add green food coloring to the stew. This gives it a spooky look, perfect for Halloween. When serving at a party, use cauldron-shaped bowls for a fun theme. You can also add plastic spiders or witches hats on the side. These small touches make your meal both tasty and festive. To store leftovers properly, let the stew cool first. Place it in an airtight container. You can keep it in the fridge for up to 3 days. This way, the flavors stay rich and tasty. For freezing beef stew, let it cool completely. Pour the stew into freezer-safe bags or containers. Make sure to label them with the date. It can last up to 3 months in the freezer. When you’re ready to eat, thaw it in the fridge overnight. To reheat, warm it on the stove over low heat until hot. You can make the stew ahead of time for busy days. Cook a big batch and portion it out. Store each portion in individual containers. This makes it easy to grab a meal for lunch or dinner during the week. Witch’s Cauldron Beef Stew is a hearty dish perfect for Halloween. It combines beef, vegetables, and rich broth. The stew has a warm, comforting feel, making it ideal for chilly nights. Its name adds a fun twist for spooky season. The colorful ingredients can even look like a witch's potion in a cauldron! You can store beef stew in the fridge for up to four days. Make sure to put it in an airtight container. This keeps the stew fresh and safe to eat. If you want it to last longer, consider freezing it. Yes, you can make this stew in a slow cooker! First, sear the beef on the stove. Then, add all the ingredients to the slow cooker. Set it on low for six to eight hours or high for three to four hours. This method makes it easy and lets the flavors develop beautifully. This stew pairs well with crusty bread for dipping. A fresh salad can offer a nice crunch, too. Mashed potatoes add creaminess and comfort. For a spooky touch, serve with ghost-shaped bread or pumpkin rolls. You can use other meats like chicken or pork. Just remember to adjust cooking times. Chicken cooks faster, so you might want to add it later. Pork needs a similar time as beef, making it a great substitute. Each meat will change the flavor a bit, so have fun experimenting! Witch’s Cauldron Beef Stew combines hearty beef, fresh veggies, and rich flavors. We explored each step, from searing beef to simmering the perfect blend. You also learned how to customize this dish for various diets and occasions. Remember, cooking is fun! Try new spices or veggies to make it yours. Enjoy each pot of stew with family and friends, especially during Halloween. Keep these tips handy for your next comforting meal. Your journey into flavor-filled cooking starts now.
Witch’s Cauldron Beef Stew Hearty and Flavorful Meal
Welcome to a spellbinding kitchen adventure! Today, I’ll guide you through making the Witch’s Cauldron Beef Stew—a hearty and flavorful meal perfect for chilly nights.
For the perfect crispy fish taco bowls, gather these key ingredients: - 4 white fish fillets (such as cod or tilapia) - 1 cup panko breadcrumbs - 1/2 cup all-purpose flour - 2 large eggs, beaten - 1 teaspoon garlic powder - 1 teaspoon smoked paprika - 1/2 teaspoon ground cumin - Salt and freshly ground black pepper to taste - 2 cups cooked brown rice (or quinoa) - 1 cup black beans, rinsed and drained - 1 cup corn (fresh, frozen, or canned) - 1 ripe avocado, sliced - 1 cup cherry tomatoes, halved - 1/2 cup shredded lettuce - Fresh cilantro leaves, for garnishing - Lime wedges, for serving - Spicy yogurt sauce (1/2 cup plain yogurt mixed with 1 tablespoon lime juice and 1 teaspoon hot sauce) When choosing fish for your taco bowls, I suggest using white fish. Cod and tilapia are great choices. They cook well and have a mild taste. Other options include haddock or flounder. These fish will soak up the flavors from the spices and toppings nicely. The seasonings make your fish tasty. I use garlic powder, smoked paprika, and ground cumin. These spices give a deep flavor and a hint of smokiness. For toppings, you can’t go wrong with fresh ingredients. I love adding sliced avocado, halved cherry tomatoes, and shredded lettuce. They brighten the dish and add crunch. Fresh cilantro ties everything together, while lime wedges add a zesty kick. Don't forget the spicy yogurt sauce! It adds creaminess and heat. To start, gather your ingredients. You need four white fish fillets, like cod or tilapia. I love these fish for their mild taste. Next, prepare three shallow dishes. In the first dish, mix together flour, garlic powder, smoked paprika, ground cumin, salt, and pepper. This will be your seasoned flour. In the second dish, pour in the beaten eggs. Finally, in the third dish, place panko breadcrumbs. These will give your fish that desired crunch. Take each fish fillet. First, coat it in the seasoned flour. Then, dip it in the egg mixture. Lastly, press it into the panko breadcrumbs. This three-step process ensures a nice, even coating on the fish. Preheat your oven to 400°F (200°C). This step is key for crispiness. Line a baking sheet with parchment paper to help prevent sticking. Place the breaded fish fillets on the prepared sheet. Bake them for 12 to 15 minutes. Flip the fillets halfway through baking. This helps them cook evenly. You want the fish to be golden brown and crispy. While the fish bakes, prepare your taco bowls. Start by dividing cooked brown rice or quinoa among four bowls. Next, add black beans and corn. Then, layer in avocado slices, halved cherry tomatoes, and shredded lettuce. This colorful mix makes the bowls look great. Once the fish is ready, cut each fillet into bite-sized pieces. Place these pieces on top of the layered ingredients in each bowl. Don’t forget to drizzle the spicy yogurt sauce over the fish. Finish with fresh cilantro for a pop of flavor. Serve lime wedges on the side. Squeezing lime juice adds extra zest to your dish. Enjoy your crispy fish taco bowls! To get that perfect crispy fish, follow some simple steps. First, use panko breadcrumbs. They give a light and crunchy texture. You can also double-coat the fish. Start with flour, then eggs, and finally panko. This method locks in moisture and adds crunch. Make sure your oven is preheated to 400°F (200°C). This high heat helps the fish crisp up fast. Don't overcrowd the baking sheet. Give each piece space to breathe. Flip the fish halfway through for even cooking. When you build your taco bowl, start with a base. Use cooked brown rice or quinoa. This adds texture and makes it filling. Next, layer the black beans and corn evenly. They add color and flavor. Add the avocado slices and cherry tomatoes next. These fresh ingredients brighten up the dish. Finally, top with shredded lettuce. This adds a nice crunch. Make sure to display the colors well. A bright bowl looks more appetizing. To serve, cut the crispy fish into bite-sized pieces. Distribute them evenly over each bowl. Drizzle the spicy yogurt sauce on top. This adds a tangy kick. Finish with a sprinkle of fresh cilantro. It adds a lovely green touch. Serve lime wedges on the side. This allows everyone to squeeze fresh juice over their bowls. A burst of citrus enhances the flavors. For a fun twist, you can use colorful bowls to make the meal inviting. {{image_4}} If you want to switch up your fish, try using salmon or haddock. Both add a rich flavor. You can also use shrimp or scallops for a different twist. These seafood options cook quickly and still taste great. Just remember to adjust the cooking time as needed. For a vegetarian or vegan version, replace the fish with roasted vegetables or tofu. You can use sweet potatoes, bell peppers, or zucchini. Season them with spices like cumin and paprika for flavor. You can also add chickpeas or lentils for protein. They will create a tasty and filling meal. While the spicy yogurt sauce is delicious, feel free to get creative with sauces. A zesty avocado dressing works well. Simply blend ripe avocado with lime juice, garlic, and a bit of water. You can also try a mango salsa for a fruity kick. This adds freshness and pairs nicely with the crispy fish. After enjoying your crispy fish taco bowls, store any leftovers in an airtight container. This will keep the flavors fresh. Place the fish and other ingredients in separate containers. This way, the fish stays crispy, and the rice does not get soggy. Use the leftovers within three days for the best taste. To reheat, preheat your oven to 350°F (175°C). Place the fish on a baking sheet. Heat for about 10 minutes, or until warm and crispy again. You can also microwave the rice and beans separately. This method is quick but may not keep the fish crispy. If you prefer, reheat everything in a skillet over medium heat. This adds a nice touch! If you want to save some bowls for later, freezing is a great option. First, let the fish cool completely. Wrap each piece tightly in plastic wrap, then place them in a freezer bag. You can freeze the rice and beans together in another bag. Use within three months for the best quality. When ready to eat, thaw overnight in the fridge and reheat as mentioned above. The best fish for tacos is white fish. I often use cod or tilapia. They have a mild flavor and cook well. You can also try mahi-mahi or halibut for a richer taste. The key is to choose fish that will stay flaky and tender when cooked. Yes, you can make the taco bowls in advance. Prepare the rice, beans, and toppings ahead of time. Store them in separate containers. When you’re ready to serve, just bake the fish and assemble the bowls quickly. This saves time on busy nights and keeps everything fresh. To get crispy fish, coat each fillet well. Start with seasoned flour, then dip in eggs, and finish with panko breadcrumbs. Bake at 400°F for 12-15 minutes. Flip them halfway for even cooking. This method ensures a crunchy outside and a soft inside. Enjoy every bite! Crispy fish taco bowls are simple and fun to make. We covered key ingredients like fish, seasonings, and toppings. Next, I shared how to prepare and bake the fish for that perfect crunch. You learned tips for layering and serving for the best presentation. We also explored tasty variations for fish, vegetarian options, and sauces. Lastly, I provided storage and reheating tips for leftovers. Enjoy making these bowls, and remember, the best meals come from your kitchen!
Crispy Fish Taco Bowls Quick and Tasty Delight
Get ready to savor a dish that bursts with flavor! My Crispy Fish Taco Bowls are quick to make and packed with crunch. Perfect for
- 2 boneless, skinless chicken breasts - 1 red bell pepper, sliced - 1 yellow bell pepper, sliced - 1 cup cherry tomatoes, halved - 1 small red onion, thinly sliced - 2 cloves garlic, minced - 1 teaspoon dried oregano - 1 teaspoon dried basil - Salt and freshly ground black pepper to taste - 1/2 cup black olives, sliced - 1/4 cup feta cheese, crumbled - Fresh parsley, finely chopped for garnish In this dish, I use boneless, skinless chicken breasts. They cook fast and stay juicy. I slice them into thin strips for even cooking. Fresh vegetables create a burst of flavor. I love using red and yellow bell peppers. They add sweetness and color. Cherry tomatoes give a juicy pop. Red onion adds a nice sharp bite. For flavor, I use garlic, oregano, and basil. These herbs give the dish a Mediterranean touch. I season with salt and black pepper to enhance the taste. I finish with black olives, feta cheese, and parsley. The olives add briny depth. Feta brings creaminess. Parsley adds freshness and color. Each ingredient plays a role in making this stir fry tasty. I recommend using extra virgin olive oil for this recipe. It has a rich flavor that enhances the dish. Extra virgin olive oil also offers health benefits. - It contains healthy fats that are good for your heart. - It is rich in antioxidants that help your body. When cooking, use good quality olive oil. It makes a big difference in taste and health. {{ingredient_image_2}} To start, you need to heat a large skillet or wok over medium-high heat. Add two tablespoons of extra virgin olive oil. It should take about 1-2 minutes for the oil to heat up until it shimmers. This shimmering stage means the oil is ready. If your oil is not hot enough, the chicken will stick and not cook well. Next, add the sliced chicken breasts to the hot skillet. Season them well with salt, freshly ground black pepper, dried oregano, and dried basil. Cook the chicken for about 5-7 minutes. Stir often to ensure even cooking. You want the chicken to turn a light golden color and be fully cooked through. Use a meat thermometer if needed; it should read 165°F. Once the chicken is cooked, move it to one side of the skillet. In the open space, add the thinly sliced red onion and minced garlic. Sauté these for 1-2 minutes. Stir frequently to keep them from burning. You’ll know they are ready when the onions turn translucent and the garlic smells fragrant. This step adds deep layers of flavor to your dish. Now, it's time to add the sliced red and yellow bell peppers, along with the halved cherry tomatoes. Stir everything together and cook for 3-5 minutes. Make sure to keep stirring gently. This helps the vegetables cook but still stay crispy. Overcooking them can lead to a mushy stir-fry. Finally, gently stir in the sliced black olives. Cook them for about 1 more minute to warm them through. This step allows their rich flavor to blend with the rest of the dish. Once done, remove the skillet from the heat. Sprinkle crumbled feta cheese on top, along with finely chopped fresh parsley. This adds both flavor and visual appeal. Serve your Mediterranean Chicken Stir Fry while it's warm for the best taste! To make a great stir fry, use high heat. This keeps your chicken juicy and your veggies crisp. Start with a hot skillet. Wait until the oil shimmers before adding the chicken. Stir often, so it cooks evenly. To avoid overcooking the veggies, add them later. Cook the chicken first, then add onions and garlic. After that, toss in your bell peppers and tomatoes. Cook just until they soften a bit. This way, they stay colorful and crunchy. Want to add extra flavor? Try spices like smoked paprika or crushed red pepper. They give a warm kick to your dish. You can also add a splash of lemon juice for brightness. Fresh herbs bring out the best taste. Chopped parsley or basil can elevate your stir fry. If you use dried herbs, add them early. They need time to release their flavor. Fresh herbs should go in at the end for the best aroma. For a nice presentation, serve your stir fry in a big bowl. This makes it look inviting. Garnish with extra parsley. You can also add a lime wedge on the side. This adds color and a zesty flavor. Consider pairing it with rice or a refreshing salad. This adds variety to the meal. Your guests will love the look and taste! Pro Tips Marinating Chicken: For enhanced flavor, marinate the chicken strips in olive oil, oregano, and basil for at least 30 minutes before cooking. Colorful Veggies: Use a mix of colorful vegetables to make the dish visually appealing and to benefit from a variety of nutrients. Fresh Herbs: Add fresh herbs like basil or mint as a final garnish for an extra layer of flavor and freshness. Serving Suggestions: This stir fry pairs beautifully with quinoa or brown rice for a complete meal. {{image_4}} You can switch chicken for other proteins. Tofu is a great choice for a plant-based meal. It soaks up flavors well. Shrimp also works nicely and cooks fast. If using shrimp, just reduce cooking time. For tofu, press it to remove extra water. Cut it into cubes before adding to the pan. Feel free to add more veggies to your stir fry. Zucchini, broccoli, or spinach can enhance the dish. Seasonal veggies like asparagus or snap peas also add a fresh twist. Just adjust cooking times to keep them crisp. Mix and match based on what you love or have on hand. You can make this dish gluten-free easily. Just use gluten-free soy sauce or tamari. For a low-carb option, skip the olives or feta. Instead, add more greens like kale or Swiss chard. This way, you keep the dish light and healthy without losing flavor. To keep your Mediterranean chicken stir fry fresh, follow these steps: - Cool down: Allow the dish to cool for about 30 minutes at room temperature. - Containers: Use airtight containers to store leftovers. Glass or plastic containers work well. - Refrigeration: Place the containers in the fridge. Consume leftovers within 3 to 4 days for the best taste. To enjoy your stir fry again without losing flavor, try these methods: - Stovetop: Place the leftovers in a skillet over medium-low heat. Stir gently until heated through, about 5 to 7 minutes. - Microwave: Use a microwave-safe bowl. Cover with a damp paper towel. Heat in 1-minute intervals, stirring in between until warm. - Freezing: If you want to save some for later, freeze it in airtight containers. It stays fresh for up to 3 months. To reheat, thaw in the fridge overnight before using one of the above methods. This dish takes about 25 minutes. Here’s how it breaks down: - Prep time: 15 minutes - Cook time: 10 minutes You can slice the chicken and veggies while the pan heats. This makes the process quick and smooth. Yes, you can meal prep this stir fry! Here are some tips: - Cook and cool: Make the stir fry ahead of time. - Store: Place it in airtight containers. - Refrigerate: It can last up to three days. When you're ready to eat, just reheat it in a pan. This keeps the flavors fresh. There are many great sides for this dish! Here are some ideas: - Rice or quinoa: These add a nice base. - Pita bread: Perfect for scooping up the stir fry. - Greek salad: A fresh side that complements the flavors. Feel free to mix and match your favorites! Yes, this recipe is packed with nutrition! Here are some benefits of the key ingredients: - Chicken: A great source of lean protein. - Vegetables: Bell peppers and tomatoes are full of vitamins. - Olive oil: Rich in healthy fats. - Feta cheese: Adds flavor and some calcium. This dish is not just tasty; it's also good for you! This Mediterranean Chicken Stir Fry blends simple ingredients for a tasty meal. You learned about fresh vegetables, cooking techniques, and tips for enhancing flavors. Remember to use good olive oil for health benefits. Don't hesitate to try variations with different proteins or veggies to keep it exciting. With proper storage, you can enjoy leftovers later. This dish is healthy, easy to make, and fun to serve. Dive into this recipe, and you’ll impress everyone at your table with your cooking skills.
Mediterranean Chicken Stir Fry Flavorful and Fresh Meal
If you crave a fresh, flavorful dish that’s easy to prepare, look no further! My Mediterranean Chicken Stir Fry blends juicy chicken with vibrant vegetables
- 1 lb large shrimp, peeled and deveined - 2 tablespoons olive oil - 1 teaspoon smoked paprika - 1 teaspoon ground cumin - 1 teaspoon chili powder - 1/2 teaspoon salt - 1/4 teaspoon cayenne pepper (adjust according to spice preference) - 8 small corn tortillas Large shrimp form the base of these tacos. They bring a sweet, juicy taste. Olive oil helps the spices stick and adds richness. The spices—smoked paprika, cumin, and chili powder—bring heat and depth to the dish. Adjust the cayenne pepper for your desired spice level. Corn tortillas wrap around the shrimp, adding a nice texture. - 1 ripe mango, diced into small cubes - 1/2 red onion, finely chopped - 1 jalapeño, seeded and minced - 1/4 cup fresh cilantro, chopped - Juice of 1 lime - Additional salt to taste The mango salsa complements the shrimp. Ripe mango adds a sweet and fruity note. Red onion gives crunch and bite. Jalapeño adds a fresh heat, while cilantro offers a burst of flavor. Lime juice brightens the mix and adds zest. This salsa balances the spicy shrimp perfectly. - Avocado slices - Lime wedges Adding avocado slices brings creaminess to the tacos. Lime wedges offer an extra citrus kick. Both make each bite even more delightful. Feel free to customize your tacos with these options for added texture and flavor! First, take 1 pound of large shrimp. Peel and devein them if needed. In a medium bowl, add the shrimp with 2 tablespoons of olive oil. Then, sprinkle in 1 teaspoon of smoked paprika, 1 teaspoon of ground cumin, and 1 teaspoon of chili powder. Add 1/2 teaspoon of salt and 1/4 teaspoon of cayenne pepper. Mix well to coat all shrimp. Let them marinate for 15 minutes. This time helps the shrimp soak up the flavors. While the shrimp marinates, let's make mango salsa. Dice 1 ripe mango into small cubes. Chop 1/2 red onion finely. Seed and mince 1 jalapeño. In a bowl, combine the mango, onion, and jalapeño. Add 1/4 cup of chopped cilantro. Squeeze in the juice of 1 lime and a pinch of salt. Mix gently and set aside for the flavors to blend. This salsa adds a fresh, sweet touch to your tacos. Next, heat a non-stick skillet over medium-high heat. Once hot, add the marinated shrimp in a single layer. Cook for about 2-3 minutes on each side. You'll know they are ready when they turn pink and opaque. Be careful not to overcook them. Perfectly cooked shrimp should be tender and juicy. Now, let’s warm the corn tortillas. Use a dry skillet and heat each tortilla for about 30 seconds on both sides. They should be pliable and slightly toasted. Warm tortillas make it easy to fold your tacos without breaking. It’s time to build your tacos! Take a warm tortilla and add a few shrimp on top. Generously spoon the mango salsa over the shrimp. If you like, add sliced avocado for a creamy finish. The combination of flavors and textures is delightful. For a beautiful presentation, arrange your tacos on a colorful platter. Sprinkle some extra cilantro on top for a fresh look. Serve with lime wedges on the side for an extra burst of flavor. Enjoy your tasty creation with friends and family! How do I adjust the spice level? You can easily change the heat by adjusting the cayenne pepper. Start with a little and add more if you like it spicier. Remember, you can always add heat, but you cannot take it away! What other spices can I use? You can try adding crushed red pepper or even chipotle powder for a smoky twist. Both options can enhance the flavor without overpowering the dish. What size shrimp should I use? I recommend large shrimp for tacos. They hold up well and are easy to eat. Look for shrimp that are fresh and firm to the touch. Should I use fresh or frozen shrimp? Fresh shrimp tastes great, but frozen shrimp is also good. Just make sure to thaw frozen shrimp in the fridge before cooking. This keeps them juicy and tender. What herbs can I use? Fresh cilantro adds a bright flavor. You can also use parsley or mint for a different taste. Experiment until you find your favorite! What toppings can I add? Slices of creamy avocado bring a nice texture. You can also try crumbled feta cheese or pickled onions for extra flavor. {{image_4}} If you want a change from shrimp, try chicken or fish. For chicken, use boneless, skinless thighs. Marinate them in the same spices as the shrimp. Grill or sauté until fully cooked. For fish, select white fish like tilapia or cod. Cook it with the same method. If you prefer a vegetarian option, consider using grilled portobello mushrooms. Slice them and marinate in olive oil and spices. They add a great texture and flavor. You can switch up the mango salsa for a pineapple salsa. Dice fresh pineapple, red onion, and jalapeño. Add cilantro and lime juice for zing. This gives a sweeter taste that pairs nicely with spicy proteins. Another fun idea is avocado salsa. Mash ripe avocados with lime juice, diced onions, and chopped cilantro. This creamy salsa adds richness to your tacos. For tortillas, you can use flour or corn. Corn tortillas are classic for tacos. They have a nice flavor and texture. Flour tortillas are softer and can hold more filling. If you need a gluten-free option, look for corn tortillas. They work well and keep the taco true to its roots. Check labels to ensure they are gluten-free. To keep your spicy shrimp and mango salsa fresh, follow these steps: - Place leftover shrimp in an airtight container. - Store the salsa in a separate container. - Refrigerate both items within two hours of cooking. Your shrimp should last for up to three days in the fridge. The salsa will stay fresh for about two days. When it’s time to enjoy your leftovers, you can reheat the shrimp and tortillas easily: - Shrimp: Heat a skillet over medium heat. Add a bit of oil and cook for 1-2 minutes until warmed. - Tortillas: Warm tortillas in a dry skillet for about 20 seconds on each side. Avoid overcooking the shrimp. It’s best when it’s just heated through. You can freeze shrimp tacos if you want to save them for later: - Yes, you can freeze them! - Wrap each taco tightly in plastic wrap. Then place them in a freezer bag. To thaw, place the tacos in the fridge overnight. Reheat on the stove as directed above. This keeps the shrimp tasty and the tortillas soft. You can tell shrimp are cooked by their color and texture. Cooked shrimp turn pink and opaque. Their shape also curls slightly. If the shrimp are firm to the touch, they are ready. Usually, this takes about 2-3 minutes per side. Avoid overcooking; it makes shrimp tough. Yes, you can make mango salsa ahead of time. It tastes even better after sitting. Just mix the diced mango, onion, jalapeño, cilantro, lime juice, and salt. Store it in the fridge for up to one day. This allows the flavors to blend nicely. Remember to stir it before serving. You can enjoy shrimp tacos with many side dishes. Some good options are: - Black beans - Mexican rice - Grilled corn - Chips and guacamole - Fresh salad For drinks, try: - A cold beer - Fresh lemonade - A fruity margarita Yes, shrimp tacos are a healthy choice. Shrimp are low in calories and high in protein. They also provide important nutrients like selenium and vitamin B12. The mango salsa adds vitamins and fiber from mangoes and vegetables. Overall, these tacos are a tasty and nutritious meal. Spicy shrimp tacos are a fun and tasty dish. You learned about key ingredients, like large shrimp and ripe mango. I shared easy steps to marinate shrimp, prepare salsa, and cook it all. Don’t forget garnishes like avocado. You can also swap in chicken or fish if you prefer. For a delightful meal, always pick fresh ingredients. Enjoy your cooking adventure with these shrimp tacos and make them your own.
Spicy Shrimp Tacos with Mango Salsa Tasty Delight
Looking to spice up your dinner? These Spicy Shrimp Tacos with Mango Salsa will hit the spot! Bursting with bold flavors and a refreshing twist,
To make a warm and tasty Kielbasa Potato Soup, you need simple ingredients. The key flavors come from the kielbasa and potatoes, while the broth and seasonings add depth. Let’s break down what you'll need. - Kielbasa and Potatoes - 1 pound kielbasa, sliced into half-moons - 4 medium potatoes, peeled and diced into bite-sized pieces - Broth and Seasonings - 1 medium onion, finely chopped - 3 cloves garlic, minced - 4 cups chicken or vegetable broth - 1 cup heavy cream - 2 tablespoons olive oil - 1 teaspoon smoked paprika - 1 teaspoon dried thyme - Salt and pepper to taste - Garnish and Optional Add-ins - Fresh parsley, chopped (for garnish) Each ingredient plays a big role in the final taste. The kielbasa gives a nice smoky flavor, while the potatoes add heartiness. The broth forms a rich base for the soup. Don't forget the cream to make it creamy and smooth! Adding chopped parsley at the end brings a fresh touch to your bowl. Enjoy every bite with these simple ingredients in hand! 1. Sautéing the Onions and Garlic Start by pouring olive oil into a large pot. Heat it over medium heat until it shimmers. Add the finely chopped onion. Sauté for about five minutes. You want the onion to soften and turn translucent. Next, add the minced garlic. Stir it in and let it cook for one minute more. The garlic should smell amazing! 2. Browning the Kielbasa Now, it’s time to add the sliced kielbasa. Stir it into the pot with the onions and garlic. Cook for about four to five minutes. The kielbasa should brown nicely and start to release its flavor. This step adds a rich taste to your soup. 3. Cooking the Potatoes and Broth Next, stir in the diced potatoes. Pour in the chicken or vegetable broth. Sprinkle in the smoked paprika and dried thyme. Increase the heat to bring the mix to a gentle boil. Once it bubbles, reduce the heat to low. Cover the pot and let it simmer for 15 to 20 minutes. You want the potatoes to be fork-tender. 1. Mashing the Potatoes for Texture After cooking, grab a potato masher. Mash some of the potatoes right in the soup. This gives it a thicker texture. You can leave some chunks for a nice bite. This step is key for that creamy feel! 2. Adding Heavy Cream and Seasoning Pour in the heavy cream and stir it all together. This adds richness. Now, season the soup with salt and pepper to your liking. Taste it! Adjust the seasoning as needed for the best flavor. 3. Final Heating Steps Heat the soup through for an extra five minutes. You want everything warm and well mixed. Once done, ladle the hot soup into bowls. Garnish with fresh parsley for color. This little touch makes it look beautiful too! Achieving the Best Flavor Start with good quality kielbasa. This adds a rich, savory taste. Sauté the onions until soft. It enhances the soup base. Don't rush this step; it builds flavor. Use smoked paprika for depth. It gives a hint of spice without being hot. Temperature and Cooking Time Keep the heat at medium when cooking the onions. This prevents burning. Bring the soup to a gentle boil for best results. Reduce the heat to low and cover it. Let it simmer for 15 to 20 minutes. This helps the potatoes cook evenly. Ideal Accompaniments and Toppings Serve the soup with crusty bread. It soaks up the creamy broth well. A sprinkle of fresh parsley adds color and flavor. You can also add a dollop of sour cream for extra creaminess. Storing Leftovers Cool the soup before storing. Use airtight containers for best results. It will last in the fridge for up to four days. You can also freeze it for about three months. Just thaw it in the fridge before reheating. {{image_4}} Using Different Types of Sausage You can try other sausages if you want to mix things up. Polish sausage works well, but you can also use turkey or chicken sausage for a leaner meal. Each type brings a unique taste, so feel free to explore. Alternatives for Creamy Texture If you want a lighter option, substitute heavy cream with half-and-half or coconut milk. For a non-dairy choice, cashew cream works wonderfully. These swaps give you creamy soup without the extra calories. Vegetables to Enhance Nutritional Value To boost nutrition, add veggies like carrots, celery, or spinach. These ingredients add color and taste. They also provide vitamins and minerals, making your soup healthier. Spicing it Up with Hot Sauce For a kick, add your favorite hot sauce. Just a few drops can elevate the flavor. You could also use red pepper flakes for a subtle heat that complements the soup's creaminess. To keep your kielbasa potato soup fresh, store it properly. First, let the soup cool to room temperature. Then, pour it into an airtight container. Label it with the date and place it in the fridge. This soup stays good for about three to four days. If you want to keep it longer, consider freezing it. Use a freezer-safe container. Make sure to leave some space at the top, as the soup will expand when frozen. Kielbasa potato soup can last up to three months in the freezer. When it's time to enjoy the soup again, there are great ways to reheat it. The best method is on the stove. Pour the soup into a pot over medium heat. Stir it often to ensure even heating. This helps keep the texture and flavor intact. You can also use the microwave. Pour the soup into a microwave-safe bowl. Heat it in short bursts, stirring in between. This method works too, but it may not keep the texture as nice as the stove. Always check that it’s hot throughout before serving. You can use any smoked sausage. Polish sausage or turkey sausage works well too. If you prefer a vegetarian option, try using tempeh or a plant-based sausage. Just make sure the alternative has a rich flavor to keep the soup tasty. Yes, you can! Start by sautéing the onions and garlic in a pan. Then, add all the ingredients to your slow cooker. Cook on low for 6-8 hours or on high for 3-4 hours. This method allows flavors to blend beautifully. If your soup is too thin, try mashing more potatoes. You can also add a cornstarch slurry. Mix equal parts cornstarch and water, then stir it into the soup. Let it cook for a few minutes to thicken. Absolutely! Kielbasa potato soup stores well. You can make a big batch and keep it in the fridge for up to 4 days. It also freezes nicely. Just portion it out and freeze for future meals. Reheat and enjoy whenever you’re ready! In this post, I covered how to make hearty Kielbasa Potato Soup. We explored key ingredients like kielbasa, potatoes, and rich broth. I gave you step-by-step guidance on cooking and thickening your soup. You now have tips for flavor and serving. Remember, you can swap ingredients or add extras to make it your own. This recipe is flexible for your kitchen needs. With these skills, your soup will be a hit every time. Enjoy every warm bowl you share!
Kielbasa Potato Soup Hearty and Comforting Recipe
Looking for a warm, filling dish that brings comfort to any meal? My Kielbasa Potato Soup recipe is your solution! This hearty soup features savory