Dinner

- 4 boneless, skinless chicken breasts - 4 medium Yukon Gold potatoes, cut into 1-inch chunks - 1 cup chicken broth (low sodium recommended) - 1/2 cup freshly grated Parmesan cheese - 1/4 cup unsalted butter, melted - 4 cloves garlic, finely minced - 1 teaspoon dried Italian herbs (blend of oregano, basil, and thyme) - Salt to taste - Freshly ground black pepper to taste - Fresh parsley, chopped This dish shines with its simple yet hearty ingredients. The chicken breasts stay juicy and tender while cooking. Yukon Gold potatoes add a creamy texture. The garlic and Parmesan give each bite rich flavor. For the best taste, use fresh garlic and quality Parmesan. Fresh parsley makes a perfect garnish. It adds a pop of color and a fresh taste. Enjoy the burst of flavors in every bite! First, we need to prepare the chicken. Take four boneless, skinless chicken breasts. Season both sides generously with salt and black pepper. This step adds flavor and helps the chicken cook well. Place these chicken breasts at the bottom of your slow cooker. Lay them flat to ensure even cooking. Next, it’s time to layer the potatoes. Cut four medium Yukon Gold potatoes into 1-inch chunks. Scatter these potato chunks evenly over the chicken. This creates a nice bed for the chicken to rest on as it cooks. The potatoes will soak up all the tasty juices, making them delicious. Now, let’s make the garlic butter sauce. In a medium bowl, whisk together 1/4 cup of melted unsalted butter and four cloves of finely minced garlic. Add 1 cup of low-sodium chicken broth and 1 teaspoon of dried Italian herbs. Finish by mixing in half a cup of freshly grated Parmesan cheese. Stir it all together until well combined. Pour the garlic butter sauce over the chicken and potatoes. Make sure every piece gets a nice coat. Cover the slow cooker with its lid. Cook on low heat for 6 to 7 hours or on high heat for 3 to 4 hours. The chicken should reach an internal temperature of 165°F. It should be fork-tender and easy to shred. In the last 30 minutes of cooking, sprinkle the remaining Parmesan cheese on top. Cover the slow cooker again. This allows the cheese to melt and flavor the dish. Once done, shred the chicken right in the slow cooker with two forks. Mix everything together until well combined. Serve in deep bowls and garnish with fresh chopped parsley. Enjoy your meal! To make the most of your slow cooker, follow a few key rules. First, always season your chicken well. This step adds flavor from the start. Next, keep the lid on while cooking. Each time you lift the lid, heat escapes. This can make your dish take longer to cook. Also, choose the right setting. Cooking on low for longer usually gives better results. If you need it fast, high heat works too, but watch the time. To boost flavor, think about what you add. Fresh herbs add a pop of taste. Try adding rosemary or thyme. You can also mix in a splash of lemon juice for brightness. This works well if you like a tangy flavor. Lastly, add some red pepper flakes if you want heat. It gives a nice kick without overpowering the dish. Avoid overcooking your chicken. It should be tender, not dry. Use a meat thermometer to check for doneness. Make sure it reaches 165°F (75°C). Another mistake is not cutting the potatoes evenly. If they are all different sizes, some may cook faster than others. Lastly, don’t forget to stir your dish before serving. This mixes the flavors and makes each bite delicious. {{image_4}} You can switch up the chicken for other proteins. Try using turkey breast for a leaner choice. Pork chops also work well and add a different flavor. If you prefer plant-based options, use firm tofu. Just remember to adjust cooking times for different proteins. Feel free to add more veggies to the pot! Carrots, green beans, or bell peppers can bring more color and nutrition. Just chop them into similar sizes as the potatoes. This helps everything cook evenly and makes your dish more fun. This recipe is easy to adapt for gluten-free diets. The ingredients used are naturally gluten-free. Just make sure your chicken broth is labeled gluten-free. This way, everyone can enjoy this tasty meal without worry. To store leftovers, let the dish cool down first. Place the chicken and potatoes in an airtight container. This helps keep them fresh. You can store them in the fridge for up to three days. Make sure to label the container with the date. When you’re ready to eat, take the leftovers out. You can reheat them in the microwave or on the stove. If using the microwave, heat on medium power for about two minutes. Stir halfway through to heat evenly. If on the stove, warm in a pan over low heat until hot. Add a splash of chicken broth if it seems dry. To freeze, pack the leftovers in a freezer-safe container. You can also use resealable bags. Make sure to remove as much air as possible. The dish can stay frozen for up to three months. When ready to eat, thaw it in the fridge overnight. Then reheat as mentioned above. Yes, you can cook this dish on high heat. It will take about 3 to 4 hours. Just remember, cooking on low heat for 6 to 7 hours gives richer flavors. If you need a substitute for Parmesan cheese, try Pecorino Romano or nutritional yeast. Both add a nice, cheesy flavor. Remember, each will change the taste a bit. The chicken is done when it reaches an internal temperature of 165°F (75°C). You can check this with a meat thermometer. The chicken should also be fork-tender and easy to shred. Yes, you can make this recipe in advance. Simply prepare it, then store it in the fridge for up to 24 hours before cooking. Just remember to add the cheese during the last 30 minutes of cooking. This dish goes well with many sides. You can serve it with a fresh green salad or steamed broccoli. Garlic bread is also a great choice to soak up the tasty sauce. Enjoy! This blog post covered the key ingredients, step-by-step methods, and helpful tips for a great dish. I shared how to prepare chicken, layer potatoes, and make a tasty garlic butter sauce. You learned about cooking times and techniques to avoid common mistakes. I also provided variations for proteins and vegetables, plus storage tips. Use this knowledge to create your best meal yet! Enjoy experimenting in your kitchen and delighting your family with delicious meals.
Slow Cooker Parmesan Garlic Chicken & Potatoes Delight
Are you ready to transform your dinner routine? With my Slow Cooker Parmesan Garlic Chicken & Potatoes Delight, you can create a warm, savory meal
- 1 lb hot dogs, sliced - 1 can (15 oz) chili (no beans) - 1 cup riced cauliflower - 1 cup shredded sharp cheddar cheese - 1/2 cup finely diced onion - 1 teaspoon garlic powder - 1 teaspoon smoked paprika - Salt and black pepper to taste - 1 tablespoon olive oil - 2 green onions for garnish Gathering the right ingredients is key for a rich and flavorful Keto Chili Dog Casserole. The main ingredients include hot dogs, chili, and riced cauliflower. I always use quality hot dogs for a better taste. The chili should be a no-bean variety to keep it low-carb. Riced cauliflower acts as a great substitute for traditional grains, giving the dish a nice texture. Next, we have flavor enhancers. Sharp cheddar cheese adds depth and creaminess. Finely diced onions bring a sweet crunch, while garlic powder boosts the overall flavor. For seasoning, smoked paprika adds a hint of smokiness. Do not forget salt and black pepper to taste. Olive oil plays a vital role in sautéing the onions for that perfect base. Finally, thinly sliced green onions give a fresh pop of color and flavor when serving. This combination of ingredients creates a deliciously satisfying dish that you will want to make again. - Preheat the oven to 350°F (175°C). - Sauté the onions until translucent. Start by setting your oven to 350°F. This way, it is hot when you bake the casserole. In a medium skillet, heat a tablespoon of olive oil over medium heat. Add the finely diced onion and cook for about 3-4 minutes. You want the onion to turn soft and clear. This step adds a sweet flavor to the dish. - Brown the sliced hot dogs with sautéed onions. Add the sliced hot dogs to the skillet with the onions. Cook them for 5-7 minutes. Stir often to ensure they brown evenly. The hot dogs should have a light golden color by the end. This step enhances the flavor of the dish and gives it a nice texture. - Mix hot dog and cauliflower, adding seasoning. - Layer in a baking dish and add chili. Lower the heat and mix in the riced cauliflower. Sprinkle in garlic powder, smoked paprika, salt, and black pepper. Stir everything well and cook for about 3-4 minutes until the cauliflower is heated through. Now, take a baking dish and spread the hot dog mixture evenly across the bottom. Pour the canned chili over this layer. Make sure the chili covers the hot dogs and cauliflower well. - Top with cheddar cheese. - Bake for 20-25 minutes until bubbly. Sprinkle the shredded sharp cheddar cheese generously on top of the chili. This cheese will melt beautifully as it bakes. Place the dish in your preheated oven. Bake for 20-25 minutes. Watch for the cheese to get bubbly and turn a lovely golden brown. This marks the perfect moment to take it out and enjoy! To make sure the hot dogs cook evenly, cut them into similar sizes. This helps them brown at the same rate. When cooking riced cauliflower, don't skip the sauté step. Lightly cooking it before mixing adds flavor and helps it blend well. For the best melt, use sharp cheddar cheese. It has great flavor and melts nicely. If you want a twist, try pepper jack for some heat or mozzarella for a milder taste. Garnish your casserole with fresh green onions for a pop of color and taste. You can also serve it with sour cream for creaminess or sliced jalapeños for a spicy kick. Enjoy this dish with a side salad for a complete meal. {{image_4}} You can change the meat in this dish. Try turkey or chicken hot dogs for a lighter option. They both work well and add unique flavors. If you want a vegetarian meal, use plant-based hot dogs. These are tasty and fit well in the casserole. Want to spice things up? Add cayenne or chili flakes to the mix. They can give your casserole a nice kick. You can also mix in veggies like bell peppers or zucchini. These add color and extra nutrients. Plus, they keep the dish fresh and vibrant. If you want to reduce carbs, swap in low-carb bean options. They can add fiber without adding too many carbs. You can also use alternative sauces or toppings. Look for low-sugar or keto-friendly sauces. These small changes keep the dish delicious while sticking to your diet. To keep your Keto Chili Dog Casserole fresh, store any leftovers in airtight containers. This helps keep moisture in and prevents odors. Glass or plastic containers work well. Let the casserole cool completely before sealing it up. It will stay good in the fridge for three to four days. For the best results, reheat your casserole in the oven. Preheat it to 350°F (175°C). Place the casserole in an oven-safe dish and cover it with foil. Heat for about 15-20 minutes until warm. If you prefer, use a microwave. Heat in 30-second intervals, stirring in between, until heated through. After reheating, serve with a sprinkle of fresh green onions or a dollop of sour cream for added flavor. You can freeze leftovers for later. First, let the casserole cool completely. Then, cut it into individual portions. Wrap each piece in plastic wrap and place them in a freezer-safe bag. This way, you can grab just what you need. When ready to eat, thaw in the fridge overnight. To re-bake, preheat the oven to 350°F (175°C) and bake for 25-30 minutes, or until hot and bubbly. Enjoy your meal anytime! Yes, you can use turkey or chicken hot dogs. They fit well in this dish. The flavor may change a bit. Turkey hot dogs are often leaner. Chicken hot dogs can be a bit milder. Both options keep it keto-friendly. Just make sure they fit your taste. This casserole is great for meal prep. You can make it ahead and store it. Once cooked, let it cool before storing. Use airtight containers to keep it fresh. It stays good in the fridge for 3-4 days. You can also freeze it for up to a month. Reheat in the oven or microwave when ready to eat. Meal prep makes enjoying this dish easy! To add spice, try a few methods. Mix in diced jalapeños or chili peppers. You can also sprinkle in cayenne pepper or chili flakes. Another option is to use spicy chili. Adjust the amount to match your heat level. Adding these elements gives your casserole a nice kick! This blog covered a simple hot dog casserole recipe with key ingredients and steps. You learned how to cook hot dogs, mix them with riced cauliflower, and layer with chili and cheese. I shared tips for perfecting the dish and variations to try. With this recipe, you can easily impress at dinner. Enjoy experimenting with flavors and find what you love best. Happy cooking!
Keto Chili Dog Casserole Rich and Flavorful Dish
Are you ready to indulge in a rich and flavorful Keto Chili Dog Casserole? This dish combines hot dogs, hearty chili, and cheesy goodness—all while
- 3-4 lbs beef chuck roast - 1/2 cup soy sauce - 1/4 cup brown sugar - 1/4 cup sesame oil - 1 tablespoon fresh ginger, minced - 4 cloves garlic, minced - 1 tablespoon gochugaru (Korean red pepper flakes) - 1 tablespoon rice vinegar - 1 teaspoon black pepper - 2 cups beef broth - 2 cups carrots, chopped - 1 cup onion, thinly sliced - 1 cup mushrooms, sliced - 4 green onions, chopped (for garnish) - Sesame seeds (for garnish) Gather these ingredients before you start cooking. Each one plays a key role in making the pot roast flavorful and hearty. The beef chuck roast is the star of the show. It becomes tender and juicy as it cooks. The soy sauce adds saltiness and deep flavor. Brown sugar gives a hint of sweetness. Sesame oil adds a lovely nutty taste. Fresh ginger and garlic bring warmth and zest. Gochugaru gives a mild heat and color. Rice vinegar brightens the dish. Vegetables like carrots, onions, and mushrooms add texture and nutrition. Green onions and sesame seeds make beautiful garnishes. They also add a fresh crunch. With these ingredients, you will create a meal that warms the heart. Enjoy the process of cooking and the delicious results! First, gather your ingredients. In a mixing bowl, whisk together the following: - 1/2 cup soy sauce - 1/4 cup brown sugar - 1/4 cup sesame oil - 1 tablespoon minced fresh ginger - 4 cloves minced garlic - 1 tablespoon gochugaru - 1 tablespoon rice vinegar - 1 teaspoon black pepper Mix until smooth. This marinade gives the roast a sweet and spicy kick. Next, take your beef chuck roast. Place it in a large resealable bag or a deep dish. Pour the marinade over the roast. Make sure it is fully coated. Seal the bag or cover the dish. Refrigerate for at least 4 hours, but overnight is best. This step helps the flavors soak in deeply. Now, preheat your oven to 300°F (150°C). In a heavy pot, heat a little oil over medium-high heat. Remove the roast from the marinade, letting the excess drip off. Carefully place it in the hot pot. Sear each side for about 4-5 minutes. Look for a deep golden-brown crust. This step adds rich flavor to the beef. After searing, take the roast out of the pot. Next, add chopped carrots, sliced onions, and mushrooms to the pot. Stir them for about a minute. This softens them slightly. Now, place the roast back on top of the vegetables. Pour in 2 cups of beef broth. Add the rest of the marinade. Stir to combine everything well. Cover the pot with a lid. Move it into the preheated oven. Cook for 3-4 hours. The meat should become tender and pull apart easily with a fork. This long cooking time makes the beef juicy and flavorful. When the roast is done, taste the sauce. Adjust the seasoning if needed. You can add more soy sauce or a pinch of salt. Remove the roast from the oven and let it rest for about 10 minutes. This helps the juices stay inside when you slice it. Slice the pot roast into thick pieces. Arrange them on a serving platter with the vegetables. Drizzle some cooking liquid over the top. Garnish with chopped green onions and a sprinkle of sesame seeds. This adds a nice crunch and makes it look pretty. Enjoy your flavorful Korean pot roast! Marinating is key for flavor. I suggest marinating your beef chuck roast for at least four hours. If you have time, let it sit overnight. This longer time allows the flavors to soak in deeply. You will taste the ginger, garlic, and soy sauce in every bite. Searing enhances flavor by creating a crust. Heat your pot over medium-high heat. Add a small amount of oil before placing the roast in the pot. Sear each side for four to five minutes until it turns a deep golden-brown. This step builds a rich taste that makes your pot roast even better. If you want a milder dish, use less gochugaru. Start with one teaspoon. You can add more later if you like it spicier. Taste the sauce before serving. If it needs more heat, sprinkle in some extra gochugaru. This way, you control the spice level to fit your taste. {{image_4}} You can easily make a vegetarian version of this dish. Use a hearty vegetable like jackfruit or mushrooms. These options soak up flavors well. Replace beef broth with vegetable broth. This keeps the dish rich and savory. Add more veggies, like zucchini or bell peppers, to boost nutrition. This way, you enjoy the same great taste without meat. You don’t have to stick with beef chuck. Other cuts work great, too. Try brisket for a tender, juicy result. Short ribs are another option; they add a rich flavor. If you prefer pork, use a pork shoulder. Each cut brings its unique taste while keeping the dish delicious. Feel free to mix your favorite vegetables into the pot roast. Potatoes are a classic choice; they add heartiness. Sweet potatoes can offer a nice twist with their sweetness. Try adding parsnips or turnips for a unique flavor. Toss in fresh herbs like thyme or rosemary for an aromatic kick. This flexibility can make your meal even more special. After enjoying your Korean pot roast, cool it down to room temperature. Place the leftover meat and veggies in an airtight container. Make sure to include some of the sauce for extra flavor. Store it in the fridge for up to 3 days. This helps keep the roast moist and tasty. When you are ready to enjoy the leftovers, heat them gently. You can use a microwave or stove. If using a microwave, place the roast and veggies in a safe dish. Cover it to keep the moisture in. Heat in short bursts, stirring in between until hot. If using a stove, warm it in a pot over low heat. Stir occasionally to prevent sticking. If you want to save the pot roast for later, freezing is a great option. First, let the roast cool completely. Then, cut it into portions. Wrap each portion in plastic wrap, then place them in a freezer bag. Be sure to squeeze out as much air as possible. You can freeze it for up to 3 months. When ready to eat, thaw it overnight in the fridge before reheating. Korean pot roast is a tender beef dish cooked with rich flavors. It uses beef chuck roast, soy sauce, and spices like gochugaru. The cooking method makes the meat juicy and easy to pull apart. This dish also has veggies like carrots and onions for added taste. Yes, you can use a slow cooker. After marinating the beef, you can sear it in a pan. Then, place it in the slow cooker with the veggies and broth. Cook on low for 6-8 hours. This method makes the beef very tender. You know the pot roast is done when it is very tender. Use a fork to check; it should pull apart easily. You can also use a meat thermometer. The internal temperature should reach 190°F (88°C) for perfect tenderness. You can serve Korean pot roast with rice or noodles. A simple side salad adds freshness. Steamed vegetables also work well. For a traditional touch, serve with kimchi or pickled radishes for extra flavor. To make the dish spicier, add more gochugaru. You can also use fresh chili peppers or chili paste. Adjust the spice to your taste. Remember to taste as you go, so it doesn't become too hot. Leftovers will last 3-4 days in the fridge. Store them in an airtight container. If you want to keep them longer, consider freezing them. Properly frozen, the pot roast can last for up to 3 months. This guide walked you through making a flavorful Korean pot roast. We covered key ingredients and detailed steps to ensure success. Tips for marinating and serving enhance the dish further. Variations let you customize based on your taste. Lastly, proper storage keeps leftovers fresh. Embrace this recipe to create a tasty meal that impresses everyone! Enjoy cooking and sharing this delightful feast.
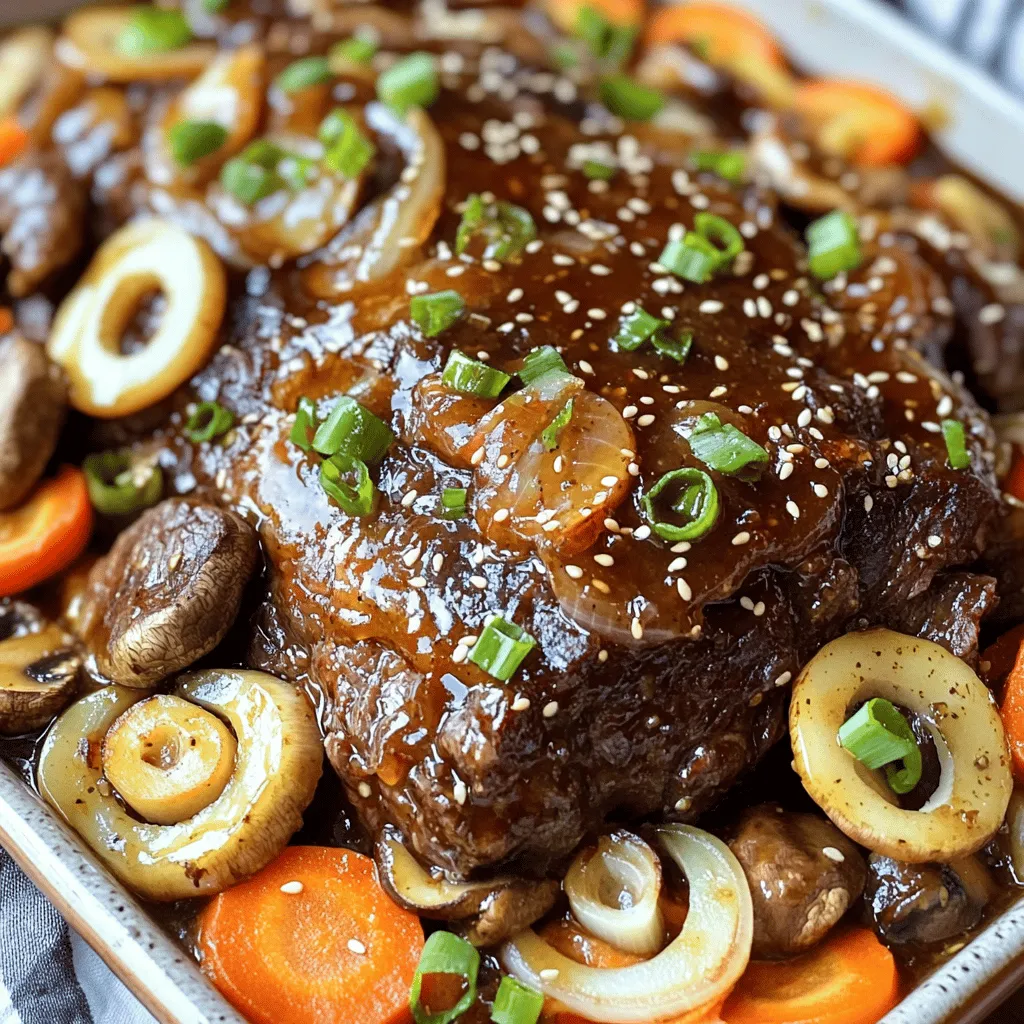
Korean Pot Roast Flavorful and Hearty Dinner Recipe
Looking for a warm, hearty dinner that packs a punch? Korean pot roast is just what you need! This dish combines tender beef with rich
To make creamy roasted garlic tomato soup, gather these fresh and simple ingredients: - 2 lbs ripe tomatoes, halved - 1 whole bulb of garlic - 1 tablespoon olive oil - 1 medium onion, finely chopped - 2 cups vegetable broth - 1 teaspoon dried basil - ½ teaspoon dried oregano - ½ cup heavy cream (or coconut cream for a vegan option) - Salt and freshly ground black pepper to taste - Fresh basil leaves for garnish Each ingredient plays a key role in this cozy dish. Ripe tomatoes bring sweetness and acidity. The garlic bulb adds a rich, roasted flavor. Olive oil helps with roasting and adds depth. The onion gives a sweet base when sautéed. Vegetable broth adds warmth and body to the soup. Dried basil and oregano enhance the Italian flavor profile. Heavy cream or coconut cream adds smoothness and richness. Finally, salt and pepper balance all the flavors, while fresh basil leaves make a beautiful garnish. Using fresh ingredients makes a big difference in taste. The ripe tomatoes should be juicy and fragrant. When you roast the garlic, it turns sweet and soft. This step brings out its best flavor, creating a warm, inviting soup. 1. Preheating the oven Start by preheating your oven to 400°F (200°C). This temperature helps caramelize the tomatoes and garlic. 2. Arranging tomatoes and garlic for roasting Take your ripe tomatoes and cut them in half. Place them cut-side up on a baking sheet. Grab a whole bulb of garlic and cut off the top to expose the cloves. Put the garlic on the same tray. Drizzle everything with olive oil and sprinkle with salt and pepper. This will enhance the flavors. 3. Roasting times and techniques Roast the tomatoes and garlic in the oven for about 30-35 minutes. Look for caramelized tomatoes that feel soft and tender garlic that smells amazing. 1. Sautéing onions While the tomatoes and garlic roast, heat a large pot over medium heat. Add the chopped onion and sauté for about 5-7 minutes. You want them to turn translucent and a light golden color. 2. Combining roasted ingredients with broth Once your tomatoes and garlic are done, take them out of the oven. Carefully transfer them to the pot with the onions. Squeeze the roasted garlic from its skins into the pot for a rich flavor. Pour in 2 cups of vegetable broth and add 1 teaspoon of dried basil and ½ teaspoon of dried oregano. Stir it well, then bring it to a boil. 3. Blending the soup After boiling, reduce the heat and let the soup simmer for about 15 minutes. This helps all the flavors blend. Remove the pot from heat and use an immersion blender to puree the soup until it’s smooth. If you don’t have an immersion blender, transfer the soup to a regular blender in batches. Just let it cool slightly to avoid splattering. 1. Adding cream Once blended, put the soup back in the pot. Stir in ½ cup of heavy cream or coconut cream for a vegan option. This makes the soup creamy and rich. 2. Adjusting seasonings Taste the soup and add more salt and black pepper as needed. Gently warm the soup over low heat until it’s just heated through. Avoid boiling to keep that lovely creaminess intact. Now, you’re ready to serve your delicious creamy roasted garlic tomato soup! To make this soup truly tasty, roasting is key. Roasting brings out deep flavors. Here are the best steps for roasting: - Use ripe tomatoes: Choose tomatoes that are deep red and firm. They add sweetness. - Cut garlic properly: Slice off the top of the garlic bulb. This helps the cloves caramelize. - Drizzle with oil: Olive oil adds richness and helps with browning. - Season well: Use salt and pepper generously. They enhance the natural flavors. - Roast at high heat: A temperature of 400°F (200°C) works best. Roast for 30-35 minutes until soft. If you want a vegan version, you can swap heavy cream for coconut cream. Coconut cream gives a nice, rich taste. Other options include: - Cashew cream: Soak cashews and blend with water for smoothness. - Silken tofu: Blend until smooth for a creamy texture. - Plant-based milks: Almond or oat milk can work, but they are lighter. Presentation makes your soup look even more inviting. Here are my top tips for garnishing: - Fresh basil: Add a handful of fresh basil leaves on top. They add color and flavor. - Olive oil drizzle: A light drizzle of olive oil gives a nice shine. - Cream swirl: If using coconut cream, swirl it on top for a lovely design. - Serve in deep bowls: This keeps the soup warm and looks elegant. These tips will help you create a creamy roasted garlic tomato soup that tastes amazing and looks great! {{image_4}} You can boost the soup's nutrition by adding vegetables. Try adding: - Carrots, chopped small - Celery, diced - Bell peppers, any color These veggies add flavor and healthy nutrients. Cook them with the onions until soft. This step makes the soup richer and more filling. Spices can take your soup to the next level. Here are some ideas: - A pinch of red pepper flakes for heat - A teaspoon of smoked paprika for depth - A splash of balsamic vinegar for tang Mix these spices in while the soup simmers. They help create a warm and inviting taste. You can easily make this soup gluten-free or dairy-free. To go gluten-free, ensure your broth has no gluten. For a dairy-free option: - Use coconut cream instead of heavy cream - Adjust seasonings to balance the coconut flavor These swaps keep the soup creamy and delicious, fitting various diets. To keep your creamy roasted garlic tomato soup fresh, use airtight containers. Glass jars or plastic containers work well. Make sure to let the soup cool down first. This avoids steam build-up, which can spoil the soup faster. Store it in the fridge for up to five days. When reheating, I recommend using the stove for the best results. Pour the soup into a pot and heat it over low heat. Stir often to keep it smooth and creamy. If the soup thickens, add a splash of broth or water. Avoid boiling to keep that lovely creaminess intact. If you want to freeze the soup, use freezer-safe containers. Leave about an inch of space at the top for expansion. It will stay good for up to three months. When ready to eat, thaw it in the fridge overnight. Reheat gently on the stove, adding cream as needed for richness. What can I use instead of heavy cream? You can use coconut cream for a vegan option. It gives the soup a nice, creamy texture. Other options include whole milk or a mix of milk and yogurt for a lighter feel. How do I make the soup spicier? Add crushed red pepper flakes or a dash of hot sauce. You can also include diced jalapeños when cooking the onions to kick up the heat. Can I use canned tomatoes? Yes, you can use canned tomatoes. Choose whole or crushed tomatoes for the best flavor. Drain excess liquid to avoid a watery soup. What to serve with creamy tomato soup? Pair the soup with grilled cheese sandwiches or crusty bread. A fresh salad also works well to balance the meal. Calories and dietary details per serving One serving of creamy roasted garlic tomato soup has about 250 calories. It contains healthy fats, vitamins, and minerals from the tomatoes and garlic. This blog post covered how to make a creamy tomato soup. We discussed the key ingredients like ripe tomatoes, garlic, and onion, along with step-by-step instructions. We explored tips for flavor and variations for different diets. Storing leftovers and reheating correctly helps keep the soup tasty. To sum up, this soup is easy to make and will warm your heart. You can adjust it to fit your needs, making it a versatile dish. Try it out and enjoy each delicious bowl!
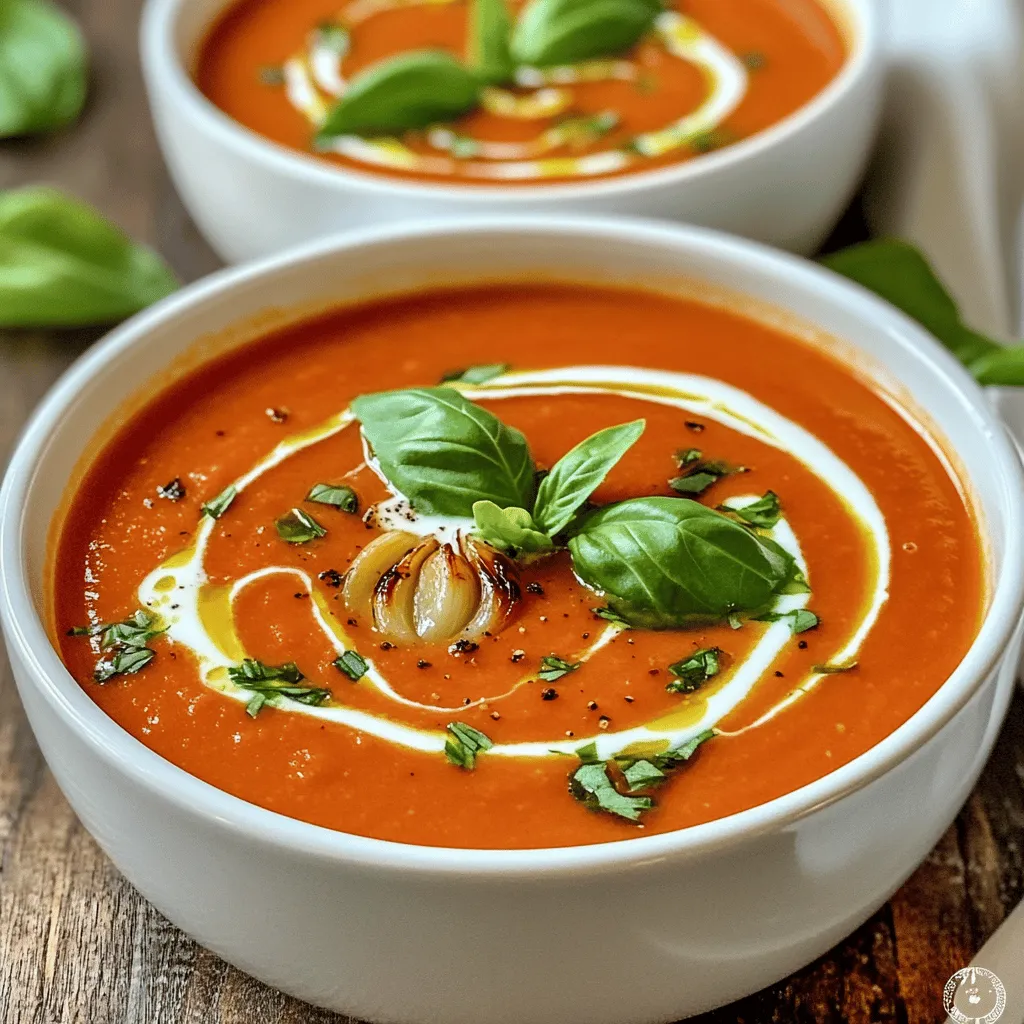
Creamy Roasted Garlic Tomato Soup Flavorful and Cozy
Cozy up with a bowl of my Creamy Roasted Garlic Tomato Soup! This delicious recipe combines ripe tomatoes and roasted garlic for the perfect comforting
- 1 cup pumpkin puree - 1/2 cup active sourdough starter - 1 1/2 cups warm water - 4 cups bread flour - 1 teaspoon sea salt - 1 teaspoon ground cinnamon - 1/2 teaspoon ground nutmeg - 1/4 teaspoon ground ginger - 1 tablespoon honey or maple syrup (optional) - 2 tablespoons extra virgin olive oil To make pumpkin sourdough bread, you need these key ingredients. The pumpkin puree gives a rich flavor and moist texture. The active sourdough starter helps the bread rise and adds depth to the taste. Warm water activates the starter, while bread flour gives structure. Sea salt enhances all the flavors, and ground spices like cinnamon, nutmeg, and ginger add warmth. You can add honey or maple syrup if you like a hint of sweetness, and olive oil keeps the bread soft. - Alternatives for pumpkin puree: You can use butternut squash puree or sweet potato puree. Both give a similar taste and texture. - Sourdough starter substitutes: If you don’t have a starter, you can use store-bought yeast. Mix 1 teaspoon of dry yeast with sugar and warm water to activate it. - Gluten-free flour options: For gluten-free bread, you can try almond flour or a gluten-free blend. Adjust the liquid as needed since these flours absorb moisture differently. These substitutions allow you to customize the recipe based on what you have at home. Enjoy experimenting with flavors and textures! Start by blending the pumpkin puree, sourdough starter, and warm water. Use a large mixing bowl for this. Make sure the mixture is smooth and well combined. In a separate bowl, whisk together the dry ingredients. Combine 4 cups of bread flour, 1 teaspoon of sea salt, 1 teaspoon of ground cinnamon, 1/2 teaspoon of ground nutmeg, and 1/4 teaspoon of ground ginger. Mix them well to ensure even flavor throughout the bread. Transfer the mixture from the wet bowl to a lightly floured surface. Knead the dough for about 10 minutes. You want it to become smooth and elastic. If the dough sticks to your hands, add more flour as needed. A properly kneaded dough should feel slightly tacky but not sticky. This is key for a good rise and texture. Place your kneaded dough into a lightly oiled bowl. Cover it with a damp cloth or food wrap. Let it rise in a warm area for 4 to 6 hours. You want the dough to double in size. Factors like room temperature can affect rising time. After the first rise, gently punch down the dough. This helps release trapped air bubbles. Shape it into a round loaf and place it into a proofing basket or onto a parchment-lined baking sheet. Cover it again and allow it to proof for another 2 hours. This second rise builds flavor and improves the loaf's texture. To get the best rise from your sourdough, keep the dough warm. Yeast loves warmth. Aim for 75°F to 80°F (24°C to 27°C). This helps the yeast work well. You can use a warm oven or a sunny spot in your kitchen. Managing sticky dough can seem hard, but it’s simple. Use a bench scraper to lift and fold the dough instead of your hands. This keeps your hands clean and helps you control the stickiness. If it sticks too much, sprinkle a little flour on the surface. To boost the flavor of your pumpkin sourdough, think about adding spices. You can try cardamom or allspice. These spices add warmth and depth. Nuts and seeds can also enhance your bread. Walnuts or pumpkin seeds add great texture and taste. Just mix them in during the kneading phase. This way, they spread evenly throughout the dough. One common mistake is over-proofing your dough. This makes the bread flat. If it rises too long, check it before baking. It should be puffy but not collapsing. Under-proofing is another issue. If your dough is too firm, it may not rise. Make sure it doubles in size during the first rise. Watch your baking temperature. If your oven is too hot, the crust may burn. Use an oven thermometer to check the heat. A good temperature is around 450°F (230°C) for a nice crust. {{image_4}} You can make your pumpkin sourdough even more tasty. Try adding: - Nuts: Walnuts or pecans give a nice crunch. They also add healthy fats and protein. Chop them into small pieces before mixing them in. - Dried fruits: Raisins or cranberries bring sweetness and chewiness. Soak them in warm water for a few minutes. This helps them stay moist in the bread. Adding these ingredients can change the flavor and texture. Feel free to experiment! You can shape your pumpkin sourdough in fun ways. Instead of a loaf, you can make: - Rolls: Divide your dough into smaller pieces. Shape them into balls and let them rise. These are perfect for sharing at dinner or for lunchboxes. - Boule: This round shape looks great and is easy to handle. Just shape the dough into a round ball and let it rise. It will have a nice crust when baked. These variations keep your baking exciting. You can enjoy the same great taste in different forms! To keep your pumpkin sourdough bread fresh, follow these tips: - Let the bread cool completely on a wire rack. - Wrap it in a clean cloth or paper bag. - Store it at room temperature for up to three days. - For longer storage, place it in a plastic bag or airtight container. For long-term storage, freeze your bread: - Slice the bread before freezing. - Wrap each slice in plastic wrap. - Place the wrapped slices in a freezer bag. - Store in the freezer for up to three months. When you're ready to enjoy your bread again, reheating is key. Here are some methods: - For slices, toast them in a toaster or oven. - For whole loaves, wrap in foil and warm in an oven at 350°F (175°C) for 10-15 minutes. To keep the texture just right, avoid microwaving. It can make the bread chewy. Instead, use these tips: - Let the bread cool after reheating. - Serve warm with butter or cream cheese for added flavor. Yes, you can use canned pumpkin! Canned pumpkin is easy and quick. It saves time and ensures you have a smooth texture. Homemade pumpkin can be fresh and tasty, but it requires more effort. If you use fresh, make sure to cook and puree it well. Both options work well, but I prefer canned for speed. Sourdough bread lasts about 3 to 5 days at room temperature. Store it in a paper bag to keep it fresh. Avoid plastic bags, as they make the bread soggy. For longer storage, keep it in the fridge for up to two weeks. Always check for mold before eating leftover bread. Yes, you can freeze pumpkin sourdough bread! To freeze, slice the bread first. Wrap each slice in plastic wrap, then place them in a freezer bag. This keeps the bread fresh for up to three months. To thaw, take out what you need and leave it at room temperature. You can also warm slices in the oven for a tasty treat. This blog post covered all you need to know about making pumpkin sourdough bread. We explored essential ingredients, substitutions, and step-by-step instructions to guide you. I also shared tips for perfecting your loaf, avoiding common mistakes, and adding unique flavors. Finally, we discussed storage methods for freshness and how to reheat your bread. Try making this recipe to enjoy warm, delicious bread. Happy baking!
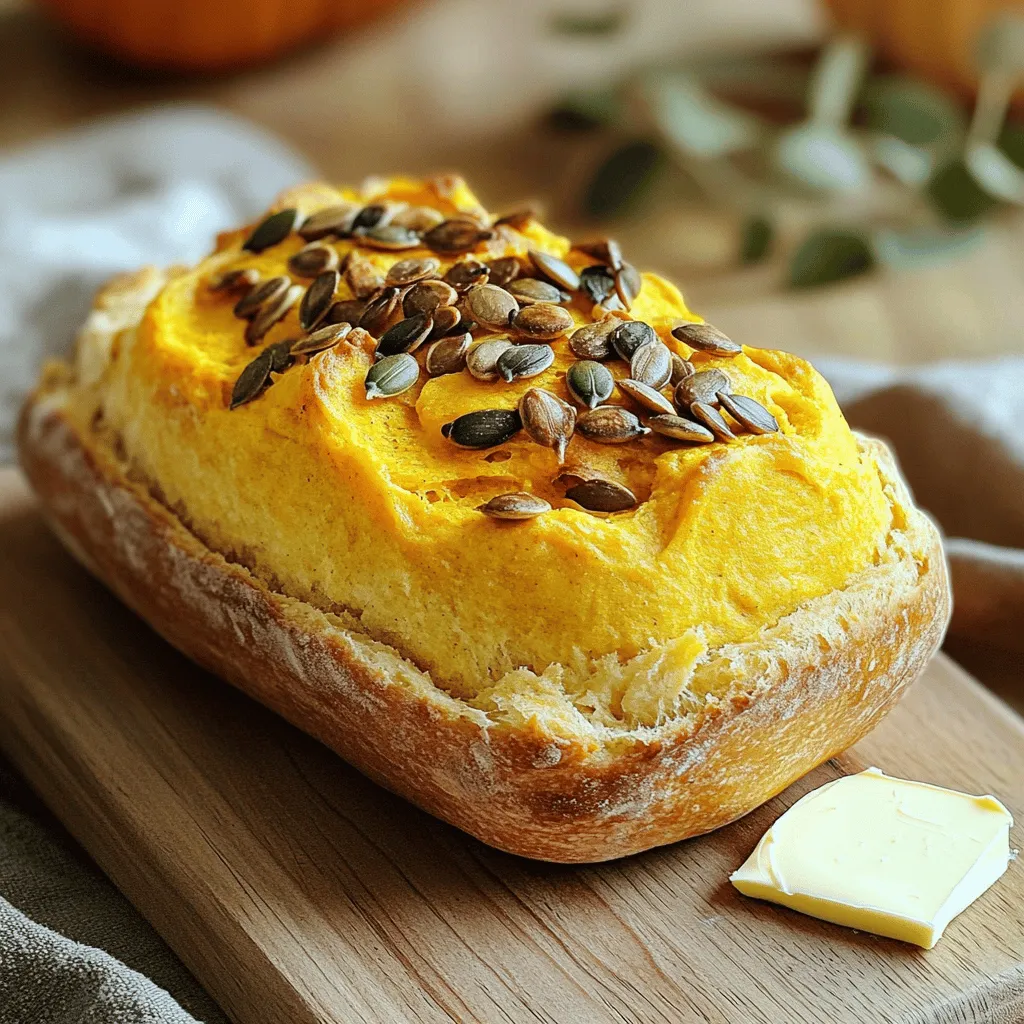
Pumpkin Sourdough Bread Flavorful and Simple Recipe
Are you ready to elevate your baking game? This Pumpkin Sourdough Bread recipe is flavorful, simple, and perfect for any season! Imagine the warm, rich
To make this tasty West Virginia hot dog chili sauce, gather these key ingredients: - 1 pound ground beef - 1 medium onion, finely chopped - 2 cloves garlic, minced - 1 can (15 oz) kidney beans, drained and rinsed - 1 can (15 oz) tomato sauce These ingredients form the base of the sauce. The ground beef gives it richness. The onion and garlic add depth and sweetness. Kidney beans provide texture while tomato sauce brings everything together. Spices are the heart of this dish. You will need: - 2 tablespoons chili powder - 1 teaspoon cumin - 1 teaspoon paprika - 1 tablespoon brown sugar - 1 tablespoon apple cider vinegar Chili powder gives it that classic chili taste. Cumin and paprika add warmth and a slight smokiness. Brown sugar balances the flavors with a hint of sweetness, while apple cider vinegar adds brightness. For a little extra flair, consider these garnishes: - Grated cheddar cheese - Diced green onions - Soft sandwich buns These toppings can elevate your hot dog experience. Cheese adds creaminess, green onions give freshness, and soft buns hold everything together. Feel free to get creative with your presentation! Start by heating a large skillet over medium heat. Add 1 pound of ground beef. Use a spatula to break it apart as it cooks. Brown the beef for about 5 to 7 minutes. You want it to be fully browned for the best flavor. Once the beef is ready, it's time to add the flavor. Stir in 1 medium onion, finely chopped, and 2 cloves of minced garlic. Sauté them for about 5 minutes. You will know they are done when the onion is soft and looks clear. Now, let’s kick it up a notch with spices. Add 2 tablespoons of chili powder, 1 teaspoon of cumin, and 1 teaspoon of paprika. Mix in 1 tablespoon of brown sugar too. Stir everything together well. Cook for another minute. This step makes your kitchen smell amazing! Next, pour in 1 can of tomato sauce and add 1 can of kidney beans that you rinsed and drained. Use a wooden spoon to mix everything together until it is well combined. Add 1 tablespoon of apple cider vinegar to the pot. Season everything with salt and pepper to taste. Bring the mixture to a gentle simmer, then lower the heat. Let it cook uncovered for about 20 minutes. Stir occasionally to prevent sticking. This simmering time helps all the flavors blend nicely. While the chili sauce is simmering, it’s time for the hot dogs! You can grill, boil, or pan-fry them according to your preference. Make sure they are heated through before serving. To serve, place a hot dog in a bun if you like. Ladle the rich chili sauce generously over the hot dog. For the final touch, sprinkle some grated cheddar cheese and diced green onions on top. This adds both flavor and a pop of color to your dish. Enjoy your delicious creation! To make your chili sauce great, avoid overcooking the meat. Brown the ground beef until it is just cooked, about 5-7 minutes. This keeps the meat juicy. Stir often to prevent sticking. If you notice it getting too dry, add a splash of water or more tomato sauce. This will help the sauce remain rich and smooth. Want to boost the flavor? Add a pinch of cayenne pepper for heat. A dash of Worcestershire sauce adds depth. You can also mix in some chopped bell peppers for crunch and sweetness. Fresh herbs like cilantro or parsley can brighten the dish. Feel free to play with these suggestions! Presentation can make meals more fun! Arrange the hot dogs on a big, colorful platter. Pour extra chili sauce into a bowl beside the hot dogs. This lets guests add more as they like. Top the hot dogs with grated cheese and diced green onions. This adds color and makes each bite even tastier! {{image_4}} You can make a tasty vegetarian version of this chili sauce. Start by swapping the ground beef for plant-based crumbles. These crumbles mimic meat well. You can also use lentils or chopped mushrooms for a hearty texture. Adding kidney beans enhances the protein and fiber. Use the same spices for flavor. This way, you still enjoy that rich taste without any meat. Want it spicier? Add more chili powder or a diced jalapeño. You can also include crushed red pepper flakes for extra heat. If you prefer milder flavors, reduce the chili powder. You can balance heat with a bit of sugar or vinegar. This helps tone down the spice while keeping the dish flavorful. Get creative with your chili sauce by adding unique ingredients. Try a splash of Worcestershire sauce for depth. You can also mix in diced bell peppers for sweetness. Some people love to add a teaspoon of cocoa powder for a subtle richness. Don’t shy away from using local ingredients, like Appalachian spices, to give it your personal touch. To keep your West Virginia hot dog chili sauce fresh, follow these steps: - Let the sauce cool completely. - Transfer it to an airtight container. - Store it in the fridge for up to four days. This method helps maintain the flavor and texture. Avoid leaving it at room temperature for too long. When you're ready to enjoy leftovers, follow these steps: - Place the chili sauce in a pot over low heat. - Stir often to prevent sticking. - Heat until it reaches your desired temperature. You can also use the microwave. Just heat it in short bursts, stirring in between. To freeze the chili sauce: - Let it cool completely. - Use a freezer-safe container or freezer bag. - Label the container with the date. When you want to thaw it, place it in the fridge overnight. Reheat as mentioned earlier. This method works great for meal prep! West Virginia Hot Dog Chili Sauce stands out due to its rich, savory flavor. Unlike other chili sauces, it has a smooth texture and a slight sweetness. The use of spices like chili powder, cumin, and paprika creates a warm taste. The addition of brown sugar adds a unique twist. You will find kidney beans mixed in, which is not common in many other chili sauces. This blend makes it a perfect topping for hot dogs. You can store this chili sauce in the fridge for about 4 to 5 days. Make sure to keep it in an airtight container. For longer storage, you can freeze it. In the freezer, it lasts up to 3 months. Just thaw it overnight in the fridge before reheating. Yes, this sauce is very versatile! You can use it on nachos, baked potatoes, or even as a dip. It also works well in chili cheese fries. The flavors blend nicely with many dishes, so feel free to get creative. To find authentic West Virginia Hot Dog Chili Sauce, check local markets or specialty stores. Some online shops also sell it. If you’re in West Virginia, many diners and food trucks offer this sauce on their hot dogs. It's a great way to taste the real deal! This blog post covered how to make West Virginia Hot Dog Chili Sauce. We discussed the key ingredients, essential spices, and optional garnishes. You learned step-by-step instructions for preparation, cooking tips, variations, and storage methods. In summary, whether you stick with the original recipe or tweak it, this dish brings comfort. Enjoy serving it hot, topped with your favorite garnishes. Your guests will love it! Make it part of your cooking repertoire for a crowd-pleasing meal.
West Virginia Hot Dog Chili Sauce Flavorful Delight
Are you ready to elevate your hot dog game? West Virginia Hot Dog Chili Sauce is a flavorful delight that will leave your taste buds
- 4 large bread bowls (store-bought or homemade) - 400g (14 oz) spaghetti - 2 cups marinara sauce - 1 cup ricotta cheese - 2 cups shredded mozzarella cheese - 1/2 cup grated Parmesan cheese - 1 teaspoon Italian seasoning - 1 teaspoon garlic powder - Salt and pepper to taste - Fresh basil leaves for garnish When choosing bread bowls, you can go with store-bought or make your own. Store-bought options save time and work well. Homemade bread bowls offer a fresh taste and a fun cooking project. If you opt for homemade, select a simple bread recipe that allows for a sturdy bowl. Italian seasoning and garlic powder are key to a rich flavor. They add warmth and depth to the dish. Without them, the bake might taste flat. Feel free to adjust the amounts to suit your taste. For garnishes, fresh basil leaves add color and a hint of brightness. Other options include chopped parsley or a sprinkle of red pepper flakes for heat. These can enhance both the look and flavor of your dish. Preheating your oven to 375°F (190°C) is key. This step warms the oven, ensuring even cooking. A hot oven helps the cheese melt perfectly and gives a nice golden finish. Next, cook the spaghetti. Boil water in a large pot. Add salt to the water for flavor. Cook the spaghetti for about 8-10 minutes until it is al dente. Al dente means the pasta is firm but not hard. After cooking, drain the spaghetti and set it aside in a large bowl. Now, it’s time to mix your ingredients. In the bowl with the spaghetti, add 2 cups of marinara sauce. Then, stir in 1 cup of ricotta cheese, 1 teaspoon of Italian seasoning, and 1 teaspoon of garlic powder. Don’t forget to add salt and pepper to taste. Mix well to coat the spaghetti evenly. This ensures every bite is full of flavor. Take each bread bowl and carefully hollow it out. You can use a knife or a spoon for this. Leave about 1 inch of bread at the edges. This keeps the bowl strong and holds the filling. Pack the spaghetti mixture into each bread bowl. Don’t overfill them. If they are too full, the filling will spill during baking. It’s better to have a little space at the top. Arrange the filled bread bowls on a baking sheet. This catches any drips while they bake. Place them in the preheated oven. Bake for about 25-30 minutes. You want the cheese to melt and bubble. It should also turn a lovely golden brown. Once baked, carefully remove the bowls from the oven. Let them cool for a few minutes before serving. This makes them safer to eat. Just before serving, add fresh basil leaves on top for a nice touch and extra flavor. To cook spaghetti just right, start with plenty of water. Bring it to a boil. Add a pinch of salt for flavor. Cook for about 8-10 minutes. You want the pasta to be firm, or al dente. Once done, drain the spaghetti well. This step keeps the bread bowl from getting soggy. For that perfect cheese melt, avoid overcrowding your bread bowls. Use a mix of mozzarella and Parmesan. They melt beautifully together. Bake at 375°F until the cheese is bubbly and golden. This takes about 25-30 minutes. Keep an eye on it to avoid burning. Serving your bread bowl spaghetti bake can be fun! Place each bowl on a rustic wooden board. It adds warmth to the meal. Drizzle extra marinara sauce around the plate for color. This makes the dish look inviting. For garnishing, fresh basil leaves work wonders. They add a pop of green and a fresh taste. You can also sprinkle some extra Parmesan on top. This gives it a nice finishing touch. To store leftovers, let the bread bowls cool completely. Wrap them in plastic wrap or foil. This keeps them fresh. You can also place them in an airtight container. When reheating, use your oven if possible. Preheat it to 350°F. Place the bread bowls on a baking sheet. Heat them for about 10-15 minutes. This way, the bread stays soft, and the cheese melts again. Enjoy your tasty treats! {{image_4}} You can easily switch up the cheeses in this dish. Try using provolone or gouda instead of mozzarella for a rich taste. If you want a sharper flavor, go for aged cheddar. For sauces, experiment with pesto or Alfredo sauce for a fun twist. Adding veggies is a great way to boost nutrition. Spinach, bell peppers, or mushrooms work well. If you want protein, consider adding cooked ground meat or sautéed sausage. You can also use grilled chicken for a lighter option. For those who need gluten-free options, there are many brands of gluten-free bread bowls available. You can also make your own using gluten-free flour. This way, you can enjoy the dish without worry. If you follow a vegan diet, substitute ricotta with a mix of blended tofu and nutritional yeast. For cheese, look for vegan mozzarella brands. You can use a plant-based marinara sauce to keep it completely vegan. These swaps will keep the dish tasty and satisfying. Pair your Bread Bowl Spaghetti Bake with a fresh salad. A simple mixed green salad works great. Toss baby spinach, cherry tomatoes, and cucumber with a light vinaigrette. This adds a crisp contrast to the warm dish. For appetizers, consider garlic bread or bruschetta. Both add a nice touch and enhance the Italian theme. Serve them warm to please your guests. For drinks, try a light red wine. A Chianti or a Pinot Noir complements the dish well. If you want non-alcoholic options, serve sparkling water with lemon. It refreshes and balances the meal nicely. For a family meal, serve one bread bowl per person. This makes sure everyone enjoys a hearty portion. If you're hosting a party, cut the bread bowls in half. This way, guests can taste more dishes. For gatherings, consider using smaller bread bowls. These allow for smaller servings and let guests sample more. Always keep a few extra bowls ready in case some guests want more. Keep in mind that the rich flavors of the spaghetti bake can be filling. So, adjust the portion size accordingly based on your guests' appetites. What is the best way to prevent the bread bowl from getting soggy? To keep your bread bowl firm, bake it first. Lightly toast the hollowed bread bowls for about 5 minutes before filling them. This step helps to create a barrier against moisture. You can also reduce the amount of sauce in the filling. Can I make this recipe ahead of time? Yes, you can prepare it ahead! Cook the spaghetti and mix it with sauce and cheese. Store it in the fridge for up to a day. Hollow the bread bowls right before baking to keep them fresh. How do I know when the bread bowl spaghetti bake is done? Look for melted cheese that is golden and bubbly. The edges of the bread should also be slightly toasted. Use a knife to check the center; it should be hot throughout. Can I speed up the cooking process? To save time, use pre-cooked or microwaveable spaghetti. You can also bake the filled bread bowls at a higher temperature, around 400°F (200°C), but watch them closely to avoid burning. What adjustments are needed for different oven types? If you use a convection oven, reduce the temperature by 25°F (about 15°C). This helps the dish cook more evenly. Keep an eye on the baking time, as it may vary. What can I substitute if I cannot find ricotta cheese? If ricotta is not available, use cottage cheese or cream cheese. Both will work well in this dish. Blend cottage cheese for a smoother texture if you prefer. How to make this recipe more budget-friendly? Use store-brand ingredients instead of name brands. You can also replace some cheese with a less expensive option. Adding veggies like spinach or bell peppers can stretch the dish further without adding much cost. This blog post shared a fun recipe for bread bowl spaghetti bake. We covered key ingredients and offered tips for choosing and preparing bread bowls. You learned how to cook spaghetti to the right texture and pack it into bowls. We also discussed variations, like gluten-free options and storage methods. Making this dish lets you get creative while serving it up. Enjoy the process and the smiles around the table! With these tips, you’ll impress everyone with your cooking skills.
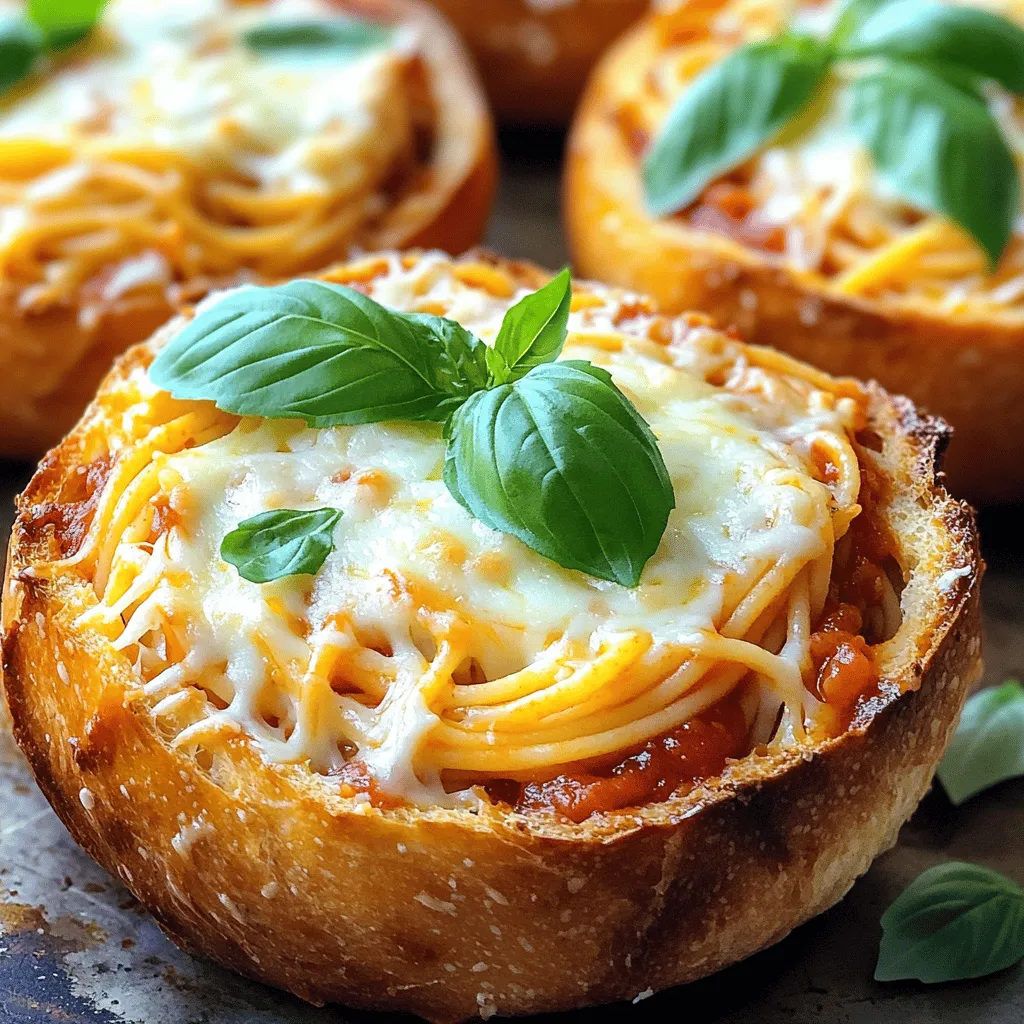
Bread Bowl Spaghetti Bake Savory and Satisfying Dish
Craving a dish that combines comfort and fun? Try my Bread Bowl Spaghetti Bake! This savory meal not only satisfies your hunger, but it also
- Chicken, beans, and broth essentials - 1 pound boneless, skinless chicken breasts - 1 can (15 oz) black beans, drained and rinsed - 4 cups chicken broth - Vegetables and spices - 1 medium onion, diced - 2 cloves garlic, minced - 1 bell pepper (red or yellow), diced - 1 can (14.5 oz) diced tomatoes with green chilies - 1 cup corn (frozen or canned) - 1 teaspoon ground cumin - 1 teaspoon chili powder - 1/2 teaspoon smoked paprika - Salt and freshly ground black pepper to taste - 1 tablespoon olive oil - Optional toppings and garnishes - Tortilla chips (for serving) - Fresh cilantro leaves (for garnish) - Avocado slices (for topping) - Shredded cheese (optional) - Juice of 1 fresh lime Gathering these ingredients makes each bowl of soup full of flavor. The chicken gives a nice base, while the beans add fiber and protein. The vegetables ensure you get a healthy dose of nutrients. Finally, spices like cumin and chili powder bring warmth and depth to this dish. The optional toppings make it even more exciting. You get to choose your favorites! First, I heat olive oil in a large skillet over medium heat. I add diced onion and bell pepper to the skillet. I sauté these veggies for about five minutes until they become soft and fragrant. Next, I incorporate minced garlic into the mix. I sauté for one more minute, allowing the garlic's aroma to fill the kitchen. Once the veggies are ready, I transfer them to my slow cooker. I layer the chicken breasts on top of the vegetables. Then, I add a can of diced tomatoes with their juices, chicken broth, black beans, and corn. Next, I sprinkle in ground cumin, chili powder, smoked paprika, and a pinch of salt and pepper. I gently stir everything together to ensure even mixing. I secure the lid on the slow cooker and set it to cook. I choose low heat for 6-8 hours or high heat for 3-4 hours. It’s key to check the chicken doneness; it should be tender and cooked through. Once the time is up, I remove the chicken and shred it with two forks. I return the shredded chicken to the soup, stir well, and finish with fresh lime juice. To boost flavor in your soup, try adjusting the spices. If you like it spicy, add more chili powder or cumin. You can also try adding some fresh herbs. Fresh lime juice is key. It adds brightness and tang. Squeeze it in right before serving for the best taste. You can switch up the proteins. Instead of chicken, try turkey or even shrimp. For a plant-based option, use black beans or lentils. If you need gluten-free options, make sure to use gluten-free tortilla chips. This soup is very flexible! Serve your tortilla soup with delicious sides. A simple side salad works great. You can also serve it with warm bread or cornbread. For presentation, use bright bowls. Arrange the toppings like cilantro, avocado, and cheese in a colorful way. This makes your dish look as good as it tastes! {{image_4}} To make a spicy version of this soup, add jalapeños or hot sauce. Start with one jalapeño, diced, and add more if you love heat. You can also use chipotle peppers for a smoky flavor. Adjust the spice levels to your taste. If it’s too hot, add more broth or cream to cool it down. For a creamy tortilla soup, add heavy cream or sour cream. Stir in half a cup of heavy cream about 30 minutes before serving. This makes the soup rich and smooth. Balance the flavors by tasting and adjusting spices. You want the creaminess to complement, not overpower, the spices. For low-sodium versions, use low-sodium chicken broth. You can also skip added salt in the recipe. If you have allergies, substitute black beans with lentils or chickpeas. You can replace chicken with tofu for a vegetarian option. Always check labels to avoid allergens in canned goods. After making your Slow Cooker Chicken Tortilla Soup, store any leftovers in an airtight container. This keeps the soup fresh and tasty. It stays good in the fridge for about 3 to 4 days. If you plan to eat it later, make sure to cool it down before sealing it up. For long-term storage, you can freeze the soup. Pour it into a freezer-safe container, leaving some space for expansion. It can last for about 3 months in the freezer. When you are ready to eat it, thaw it in the fridge overnight. You can also use the microwave for quicker thawing. To reheat your soup, use a pot on the stove. This method helps keep the texture and flavor. Heat it on medium until it's hot, stirring often. You can also use the microwave. Just heat it in short bursts. Aim for about 165°F to ensure it's safe to eat. Enjoy your warm bowl of soup! Yes, you can make this soup in a regular pot on the stovetop. Here’s how it works: - Cooking Time: On the stovetop, you cook it faster. It takes about 30-40 minutes. - Heat Setting: Start on medium heat. Once it boils, lower the heat to simmer. - Chicken Cooking: Add the chicken and cook until it is tender, about 20 minutes. - Flavor Development: Stir often to mix the flavors well. Using a stovetop gives a nice, quick option if you need the soup sooner. Yes, you can use frozen chicken breasts for this soup. Here’s what to consider: - Cooking Time: If using frozen chicken, cook on high for about 4-5 hours. - Thawing: It’s best to cook frozen chicken straight away. Do not thaw first. - Shredding: After cooking, shred the chicken as usual. It will still be tender. Frozen chicken works well, and it saves time on prep. Toppings can really enhance your soup experience. Here are some great options: - Tortilla Chips: Crunchy and salty, these add texture. - Fresh Cilantro: Adds a burst of freshness. - Avocado Slices: Creamy and rich, they balance the soup. - Shredded Cheese: Adds a cheesy flavor that melts nicely. - Sour Cream: A cool contrast to the spices. Feel free to mix and match toppings to suit your taste! This blog post covers how to make a delicious chicken tortilla soup. We discussed key ingredients, preparation steps, and cooking methods. I shared tips for flavor and variations to suit any dietary needs. Storing leftovers and reheating methods ensure your soup lasts longer and tastes great. Now, you have the tools to craft your perfect bowl of soup. Enjoy exploring flavors and making this dish your own!
Savory Slow Cooker Chicken Tortilla Soup Recipe
Looking for a warm and hearty meal that practically cooks itself? This Savory Slow Cooker Chicken Tortilla Soup Recipe is your answer! Packed with tender
- 8 oz whole wheat pasta (penne or fusilli) - 1 lb lean ground beef - 1 cup low-fat cottage cheese - 1 cup Greek yogurt - 1 teaspoon Italian seasoning - 1 cup fresh spinach, chopped - 1 cup cherry tomatoes, halved - 2 tablespoons olive oil - 4 cloves garlic, minced - Salt and black pepper to taste - Fresh basil leaves, for garnish The ingredients for this creamy high-protein beef pasta dish are simple yet effective. Whole wheat pasta gives you fiber and makes it filling. Lean ground beef brings in the protein you need. The creamy sauce comes from low-fat cottage cheese and Greek yogurt. This combo keeps the dish rich without adding too many calories. When it comes to seasoning, Italian seasoning adds a classic flavor to the dish. Fresh spinach and cherry tomatoes not only add color but also provide nutrients. Olive oil and garlic bring out the best in the beef and veggies, giving a rich, savory taste. Feel free to play around with the ingredients. You can swap the pasta type or even use ground turkey for a lighter option. The key is to keep it nutritious while making it enjoyable. To start, you need a large pot. Fill it with water and add salt. Bring the water to a rolling boil. This step is key for great pasta. Once boiling, add 8 oz of whole wheat pasta. Cook it according to the package instructions. Look for the pasta to be al dente; it should be firm but not hard. This usually takes about 8-10 minutes. After cooking, drain the pasta and set it aside. In a large skillet, heat 2 tablespoons of olive oil over medium heat. Add 4 cloves of minced garlic. Sauté it for about 30 seconds until it smells nice, but don't let it burn. Next, add 1 lb of lean ground beef to the skillet. Break it apart with a spatula. Cook until it turns brown and is no longer pink, which takes about 5-7 minutes. If there’s excess fat, drain it. After that, stir in 1 cup of chopped fresh spinach and 1 cup of halved cherry tomatoes. Cook for 2-3 minutes until the spinach wilts and the tomatoes soften. In a mixing bowl, combine 1 cup of low-fat cottage cheese and 1 cup of Greek yogurt. Add 1 teaspoon of Italian seasoning to this mix. Stir until it is smooth and well blended. Don't forget to add salt and black pepper to taste. This creamy sauce is what makes the dish special. Now, add the drained pasta into the skillet with the beef and veggies. Pour the creamy sauce over everything. Gently toss all the ingredients together. Make sure every piece of pasta is coated well with the sauce. Allow this to cook on low heat for another 2-3 minutes. Stir gently to ensure everything is warmed through and mixed well. To make your creamy high-protein beef pasta even tastier, consider these tips: - Seasoning Adjustments: If you want more flavor, add extra Italian seasoning or a pinch of red pepper flakes. You can also sprinkle in a little salt and black pepper to taste. This makes every bite pop. - Enhancing Creaminess: To make the dish creamier without adding calories, increase the Greek yogurt or cottage cheese. Both add creaminess and protein without extra fat. Using the right tools helps you cook better: - Recommended Skillet: A large non-stick skillet works best. It helps prevent sticking and makes browning the beef easier. - Browning Beef Properly: When browning the beef, break it into smaller pieces. This helps it cook evenly and develop a nice brown color. Avoid stirring too often; let it sear for a few minutes for best results. Serving your dish well makes it more appealing: - Presentation Ideas: Serve in deep bowls for a cozy look. Top with extra cherry tomatoes and fresh basil for color. This makes the dish pop on the table. - Pairing with Side Dishes: This pasta pairs well with a light salad or steamed vegetables. A simple green salad with a lemon vinaigrette is refreshing and balances the creamy pasta. {{image_4}} You can change the protein in this dish to fit your needs. If you want to use chicken or turkey, choose lean ground options. Cook them the same way you would the beef. This keeps the dish tasty and healthy. If you prefer vegetarian options, try using lentils or chickpeas. They add great protein and fiber. You can also use tofu for a plant-based choice. There are many pasta types you can use for this recipe. Whole grain pasta is a great choice. It has more fiber than regular pasta. You can try penne, fusilli, or any shape you love. If you need gluten-free options, look for pasta made from rice or quinoa. These choices cook well and taste great. You can make the sauce even better by adding more veggies. Try bell peppers, zucchini, or even broccoli. They add color and nutrition. For a dairy-free version, swap the cottage cheese and Greek yogurt for coconut yogurt. It gives a creamy texture without dairy. Just check the flavor to make sure it fits your taste! To store your creamy high-protein beef pasta, let it cool first. Place it in an airtight container. This keeps it fresh and safe. When stored properly, it lasts up to three days in the fridge. Always check for any off smells or changes in color before eating. If you want to keep it longer, freezing is a great option. Use freezer-safe containers or bags. Divide the pasta into portions for easy meals. Label each container with the date. This helps you track how long it's been stored. To reheat, take it out of the freezer and let it thaw in the fridge overnight. Heat it gently on the stove or in the microwave. Add a splash of water or broth to keep it creamy. Avoid high heat, as it can make the pasta dry. Enjoy your delicious meal later! Yes, you can prepare this creamy high-protein beef pasta ahead of time. To do this, cook the pasta and mix the beef and sauce as directed. - Storage: Let the dish cool completely. Place the pasta in an airtight container. - Refrigeration: Store it in the fridge for up to three days. - Reheating: When ready to eat, reheat in a skillet over low heat or in the microwave. You can easily boost the protein in this dish. Here are some great ideas: - Add Beans: Mix in black beans or chickpeas for extra protein. - Use Extra Beef: Increase the amount of lean ground beef to 1.5 pounds. - Include Eggs: Stir in scrambled eggs for added protein. - Cheese Options: Use higher-protein cheese like ricotta or add more Greek yogurt. Yes, this creamy high-protein beef pasta is excellent for meal prep. Here are some best practices: - Portion Sizes: Divide the dish into single servings for easy grab-and-go meals. - Containers: Use airtight containers to keep the pasta fresh. - Reheating: When reheating, add a splash of water to keep it moist. Stir well to combine flavors. This blog post covered a tasty dish made with lean ground beef, whole wheat pasta, and creamy sauce. We went through each step, from cooking pasta to mixing in fresh veggies. I shared tips to boost flavor and texture, plus variations for protein and pasta types. By following these steps, you can enjoy a healthy meal that suits your needs. Remember, cooking is about exploring flavors, so don’t hesitate to try new ingredients or techniques. With practice, you’ll make this dish your own!
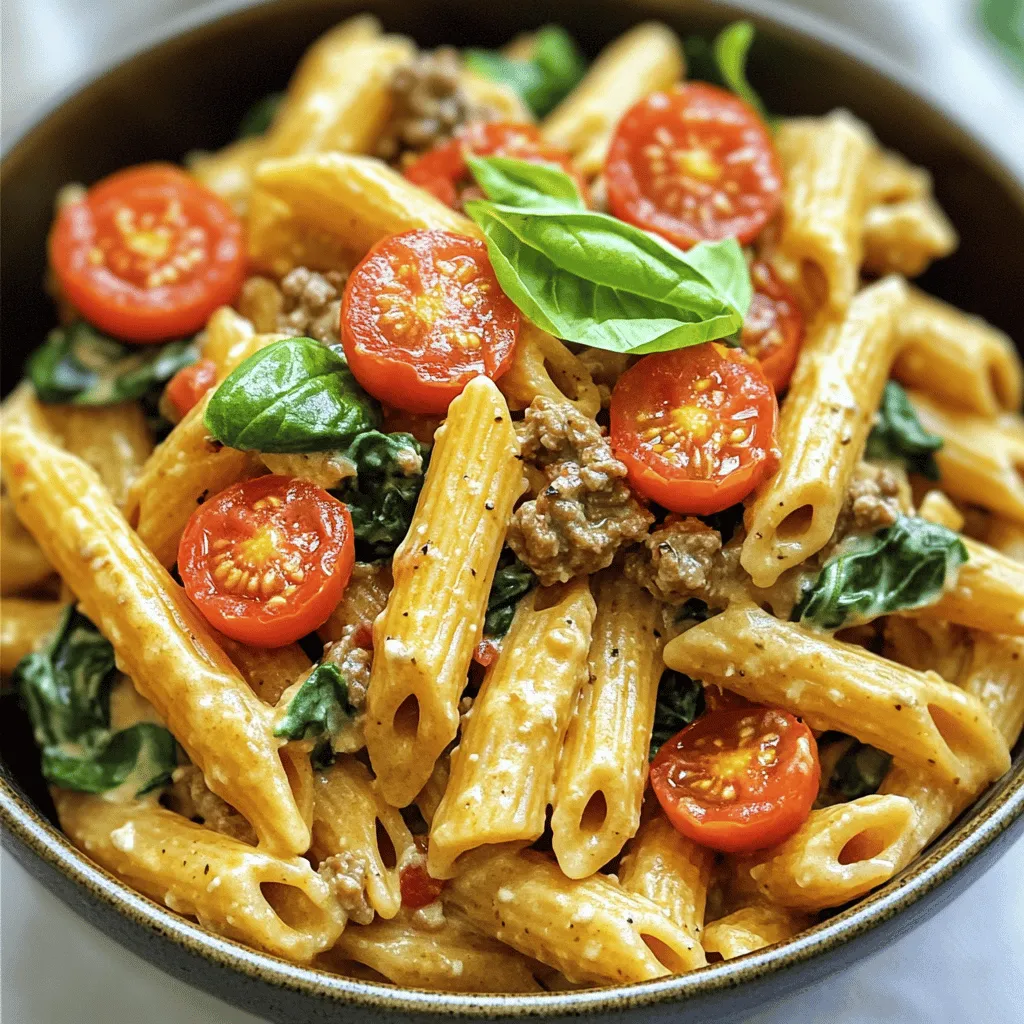
Creamy High-Protein Beef Pasta Savory and Filling Dish
Welcome to your new favorite meal: Creamy High-Protein Beef Pasta! If you want a dish that’s savory, filling, and full of nutrients, you’ve found it.
- 2 fresh salmon fillets (about 6 ounces each) - 1 medium zucchini, sliced into thin rounds - 1 colorful bell pepper, sliced into strips - 1 small red onion, thinly sliced - 2 tablespoons extra virgin olive oil - 2 cloves fresh garlic, minced - Juice of 1 large lemon - 1 teaspoon dried oregano - 1 teaspoon dried thyme - Salt and freshly ground black pepper to taste - Fresh parsley, chopped, for garnish You need fresh salmon fillets for this dish. Look for fillets that are firm and moist. The vegetables add color and crunch. Zucchini, bell pepper, and red onion work well together. The olive oil, garlic, and lemon juice create a tasty marinade. Dried oregano and thyme give depth to the flavor. Don't forget to add salt and pepper to enhance everything! - Additional herbs or spices - Cooking liquids You can add other herbs like dill or basil for different flavors. Want a little kick? Try adding some red pepper flakes. You can also use cooking liquids like white wine or vegetable broth. These add more moisture and flavor to the salmon and vegetables. - Aluminum foil - Mixing bowl - Baking sheet Gather your tools before you start. You need aluminum foil to create the packets. A mixing bowl helps you blend the marinade easily. A baking sheet will make moving the foil packets to the oven simple. Make sure everything is ready before you begin your meal prep. {{ingredient_image_2}} First, you need to preheat your oven to 375°F (190°C). This step ensures your salmon cooks evenly. Next, prepare two large sheets of aluminum foil, each about 12 inches long. Lay them flat on a clean surface. This will make it easy to pack everything later. In a mixing bowl, combine 2 tablespoons of olive oil, 2 cloves of minced garlic, the juice from 1 lemon, 1 teaspoon of dried oregano, and 1 teaspoon of dried thyme. Add a pinch of salt and pepper for taste. Whisk these together until they blend well. This marinade will give your salmon and veggies a burst of flavor. Place each salmon fillet in the center of a foil sheet. Make sure there's enough space around the fish to fold the foil later. Next, add the sliced zucchini, bell pepper, and red onion around the salmon. Distribute the vegetables evenly to balance the flavors. Now, drizzle the olive oil mixture over everything. Ensure each piece is coated for the best taste. Finally, carefully fold the foil edges over the salmon and veggies. Press to seal tightly, making sure no steam can escape. Transfer the sealed foil packets onto a baking sheet for easy handling. Slide them into your preheated oven and bake for 20-25 minutes. To check if the salmon is done, look for it to be opaque and flake easily with a fork. When it’s ready, carefully remove the foil packs from the oven. Open each one slowly to let the steam out. For a fresh touch, sprinkle some chopped parsley on top before serving. Check salmon for flakiness by using a fork. Gently press the fish. If it flakes easily, it's done. For thicker fillets, aim for 20-25 minutes at 375°F. Thinner fillets may need less time. Always keep an eye on your salmon to avoid overcooking. Marinades can boost your salmon's taste. Try mixing lemon juice, olive oil, and herbs. Let the salmon soak in the marinade for at least 15 minutes. This allows flavors to meld. You can add garlic for an extra kick. Fresh herbs like dill or basil also work well. Seal your foil packs tightly. Fold the edges several times to trap steam. This keeps your salmon moist and tender. Make sure there are no openings. A good seal ensures even cooking. If you want extra flavor, add a splash of broth or wine before sealing. Pro Tips Choose Fresh Salmon: Opt for wild-caught salmon if available, as it tends to have a richer flavor and firmer texture compared to farmed salmon. Vegetable Variations: Feel free to mix and match vegetables based on your preference or seasonal availability. Asparagus, cherry tomatoes, or broccoli also work beautifully. Seal Well: Ensure that the foil packets are tightly sealed to trap steam inside. This helps the salmon cook evenly and keeps it moist. Rest Before Serving: Allow the foil packets to rest for a few minutes after removing them from the oven. This helps the juices redistribute for optimal flavor. {{image_4}} You can swap salmon for other proteins. Chicken breast works great. Use boneless, skinless chicken. Shrimp is another tasty choice. They cook fast and soak up flavors well. For both chicken and shrimp, adjust cooking time. Chicken usually takes longer than salmon. Shrimp cooks quickly, about 10-15 minutes. Feel free to mix up your veggies. Use what is fresh and available. Try asparagus in spring or butternut squash in fall. Broccoli and green beans add crunch and color. Carrots bring a nice sweetness, too. Always aim for a mix of colors for a beautiful dish. You can change the whole vibe of your meal. For an Asian twist, add soy sauce and ginger. Swap out the lemon for lime for a zesty kick. You could even use sesame oil in place of olive oil. For a Mediterranean flair, try adding olives and feta cheese. The options are endless, so have fun experimenting. To store your cooked salmon foil packs, let them cool. Place each pack in an airtight container. You can also keep them in the foil but cover tightly with plastic wrap. Store in the fridge for up to three days. This keeps the salmon fresh and tasty. Reheat salmon packs gently to avoid drying them out. You can use the oven or microwave. For the oven, preheat to 350°F (175°C). Place the foil packs on a baking sheet and heat for about 10-15 minutes. If using a microwave, open the foil carefully, place the salmon on a microwave-safe plate, and cover loosely. Heat for about 1-2 minutes. Check often to keep it moist. You can freeze uncooked or cooked salmon foil packs. For uncooked packs, wrap tightly in plastic wrap and then in foil. Store in the freezer for up to three months. For cooked packs, let them cool first, then place in airtight containers. They also last about three months in the freezer. When ready to use, thaw overnight in the fridge before reheating. Baking salmon in foil takes about 20-25 minutes at 375°F (190°C). The time may vary based on the thickness of the fillets. For thinner fillets, check for doneness at 15 minutes. For thicker pieces, it may need up to 30 minutes. Always watch the salmon closely to ensure it stays juicy. Yes, you can use frozen salmon! Just add a few more minutes to the baking time. If your salmon is frozen, it’s best to bake it for about 30-35 minutes. Make sure to check if it flakes easily with a fork when done. This method ensures a tasty meal without thawing. Baked salmon foil packs pair well with several sides. Try fluffy rice or quinoa. These grains soak up the delicious juices. A simple green salad adds freshness and crunch. You can also serve roasted potatoes or steamed asparagus for a complete meal that looks great on the plate. You can tell salmon is done when it turns opaque and flakes easily with a fork. Use a fork to gently press down on the fillet. If it breaks apart easily, it is ready to eat. Additionally, the internal temperature should reach 145°F (63°C) for safe consumption. This blog post covered the essentials of making delicious salmon foil packs. We went through the key ingredients, the step-by-step cooking process, and helpful tips for flavor. You learned about variations and storage tips too. In wrapping up, creating these foil packs is simple and fun. You can enjoy a tasty meal without much mess. So go ahead, experiment with ingredients, and make it your own! You’ll love the results.
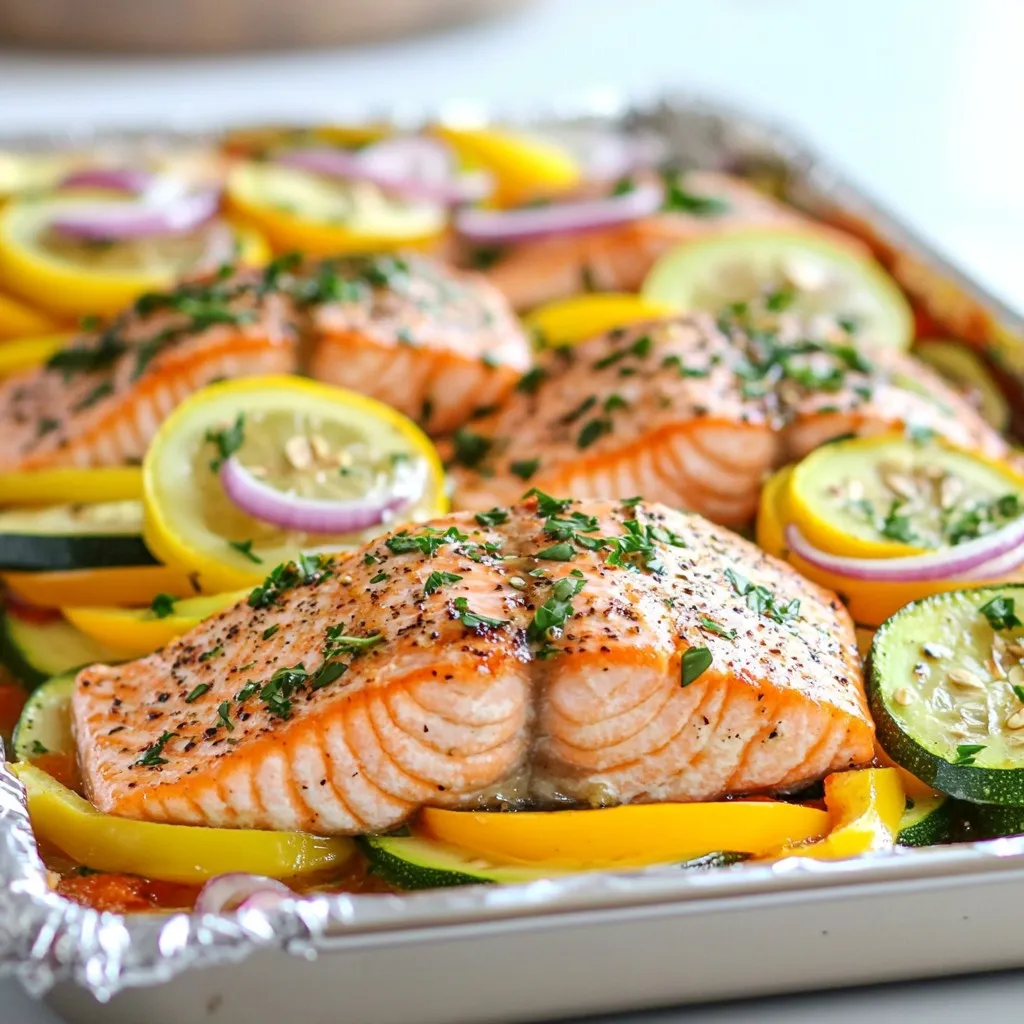
Baked Salmon Foil Packs Fresh and Easy Meal Idea
Looking for a hassle-free yet delicious dinner? Baked Salmon Foil Packs are your answer! This easy recipe combines fresh salmon fillets, vibrant veggies, and flavorful