Desserts

- 1 cup almond flour - 1/2 cup cocoa powder - 1/2 cup protein powder (vanilla or chocolate) - 1/2 teaspoon baking powder - 1/4 teaspoon salt I love starting with dry ingredients. Almond flour gives a light texture. Cocoa powder adds deep chocolate flavor. Protein powder boosts the health factor, while baking powder makes them rise. A pinch of salt balances everything. - 1/2 cup pure maple syrup - 1/4 cup creamy almond butter - 1/4 cup unsweetened applesauce - 1 teaspoon vanilla extract Next, the wet ingredients bring it all together. Maple syrup is sweet and rich. Almond butter adds creaminess and healthy fats. Applesauce keeps the brownies moist. Vanilla extract enhances the overall flavor. - 1/2 cup canned chickpeas, rinsed and drained - 1/4 cup creamy almond butter - 2 tablespoons pure maple syrup - 1/4 teaspoon vanilla extract - 2 tablespoons chocolate chips For that cookie dough layer, chickpeas are a surprise ingredient. They add protein and fiber without altering taste. Almond butter gives it creaminess. Extra maple syrup sweetens it, and chocolate chips make it fun. This layer adds a lovely contrast to the brownies. {{ingredient_image_2}} - Preheat your oven to 350°F (175°C). - Line an 8x8 inch baking pan with parchment paper. - In a large bowl, mix these dry ingredients: - 1 cup almond flour - 1/2 cup cocoa powder - 1/2 cup protein powder - 1/2 teaspoon baking powder - 1/4 teaspoon salt - Stir until no lumps remain. - In another bowl, whisk together these wet ingredients: - 1/2 cup pure maple syrup - 1/4 cup creamy almond butter - 1/4 cup unsweetened applesauce - 1 teaspoon vanilla extract - Mix until smooth and well-blended. - Gradually pour this mixture into the bowl with dry ingredients. - Stir gently until a smooth brownie batter forms. - Fold in 1/2 cup mini chocolate chips evenly. - Spread half of the brownie batter in the prepared pan. - For the cookie dough layer, use a food processor to blend: - 1/2 cup canned chickpeas, rinsed and drained - 1/4 cup creamy almond butter - 2 tablespoons pure maple syrup - 1/4 teaspoon vanilla extract - Blend until creamy, then stir in 2 tablespoons chocolate chips. - Drop dollops of cookie dough on the brownie layer and spread it out. - Cover with the remaining brownie batter, ensuring the cookie dough is hidden. - Bake in your preheated oven for 25–30 minutes. - The edges should look firm. A toothpick should come out clean or with a few crumbs. - Let the brownies cool in the pan on a wire rack. - Once cool, use the parchment to lift them out and cut into squares. To get the best texture, use room temperature ingredients. Cold items can cause clumps. Mix your batter gently. Overmixing can lead to dense brownies. Aim for a smooth but not overly worked batter. Want more flavor? Add nuts or dried fruit to the brownie mix. They give great crunch and taste. You can also change the sweetness. If you like it sweeter, add more maple syrup. For less sweetness, reduce the syrup. Make your brownies look great! Use dusting techniques to add flair. A light sprinkle of cocoa powder on top looks fancy. You can also serve them on a nice platter. Pair with ice cream or whipped cream for a tasty touch. Pro Tips Use Room Temperature Ingredients: Allow your almond butter and applesauce to come to room temperature for a smoother batter that incorporates better. Chickpea Texture Matters: Ensure your chickpeas are well-rinsed and drained to prevent excess moisture, which can affect the consistency of your cookie dough layer. Don’t Overmix: When combining the wet and dry ingredients, mix just until combined. Overmixing can lead to dense brownies. Storage Tips: Store leftover brownies in an airtight container at room temperature for up to 3 days or refrigerate for longer freshness. {{image_4}} You can make these brownies fun with different flavors. Try using chocolate protein powder for an extra rich taste. Vanilla protein powder adds a light sweetness. You can also switch up nut butters. Peanut butter gives a classic taste, while cashew butter adds a creamy twist. If you need gluten-free options, almond flour works great. You can also use coconut flour, but adjust the amount. For a vegan version, swap the eggs with flaxseed meal mixed with water. Use maple syrup as a sweetener to keep it plant-based and delicious. Want more texture? Add extra chocolate chips or nuts for crunch. Chopped walnuts or pecans add great flavor. For a fun twist, swirls of nut butter on top can create a tasty look. Just drop spoonfuls of nut butter before baking for a unique finish. Store your High-Protein Cookie Dough Brownies at room temperature. Use an airtight container to keep them fresh. A simple glass or plastic container works great. Place a piece of parchment paper between layers to prevent sticking. You can enjoy these brownies for about 3-5 days. For long-term storage, freezing is your best bet. Cut the brownies into squares and wrap each piece in plastic wrap. Then, place them in a freezer-safe bag or container. This way, they’ll stay fresh for up to three months. When you're ready to enjoy them, take out a brownie and let it thaw at room temperature. You can also warm it up in the microwave for about 10-15 seconds for a cozy treat. To keep your brownies fresh, store them in a cool, dry place. Always check for signs of spoilage. If the brownies smell off or have a dry texture, it’s best to toss them. Fresh brownies should be soft and slightly chewy. If they feel hard or crumbly, they're past their prime. Yes, you can swap almond flour for other flours. Good choices include oat flour or coconut flour. Both will change the taste and texture slightly. Oat flour tends to be softer, while coconut flour absorbs more moisture. You may need to adjust the liquid in the recipe if you use coconut flour. To add more sweetness, use extra maple syrup. You can also mix in more chocolate chips. If you enjoy a richer flavor, add a bit of brown sugar. Make sure to blend well. Taste your batter before baking to find your perfect sweetness level. For clean cuts, use a sharp knife. First, let the brownies cool completely. You can also warm the knife under hot water. Wipe the knife after each cut for neat edges. This technique gives you pretty squares that look great on a plate. Yes, you can make these brownies ahead of time. They store well for a few days. Keep them in an airtight container at room temperature. You can also freeze them for up to three months. Just thaw them in the fridge before serving. Absolutely! These brownies are perfect for meal prep. They are high in protein and keep you satisfied. Portion them into individual squares for easy grab-and-go snacks. They work well for breakfast or a post-workout treat. These brownies blend healthy ingredients for a tasty treat. You learned how to mix dry and wet components, layer cookie dough, and bake with ease. Tips for texture and flavor add fun to your baking. Explore variations to keep it fresh and store them wisely for later use. Don't hesitate to try new things. Your baking adventure starts now. Happy baking!
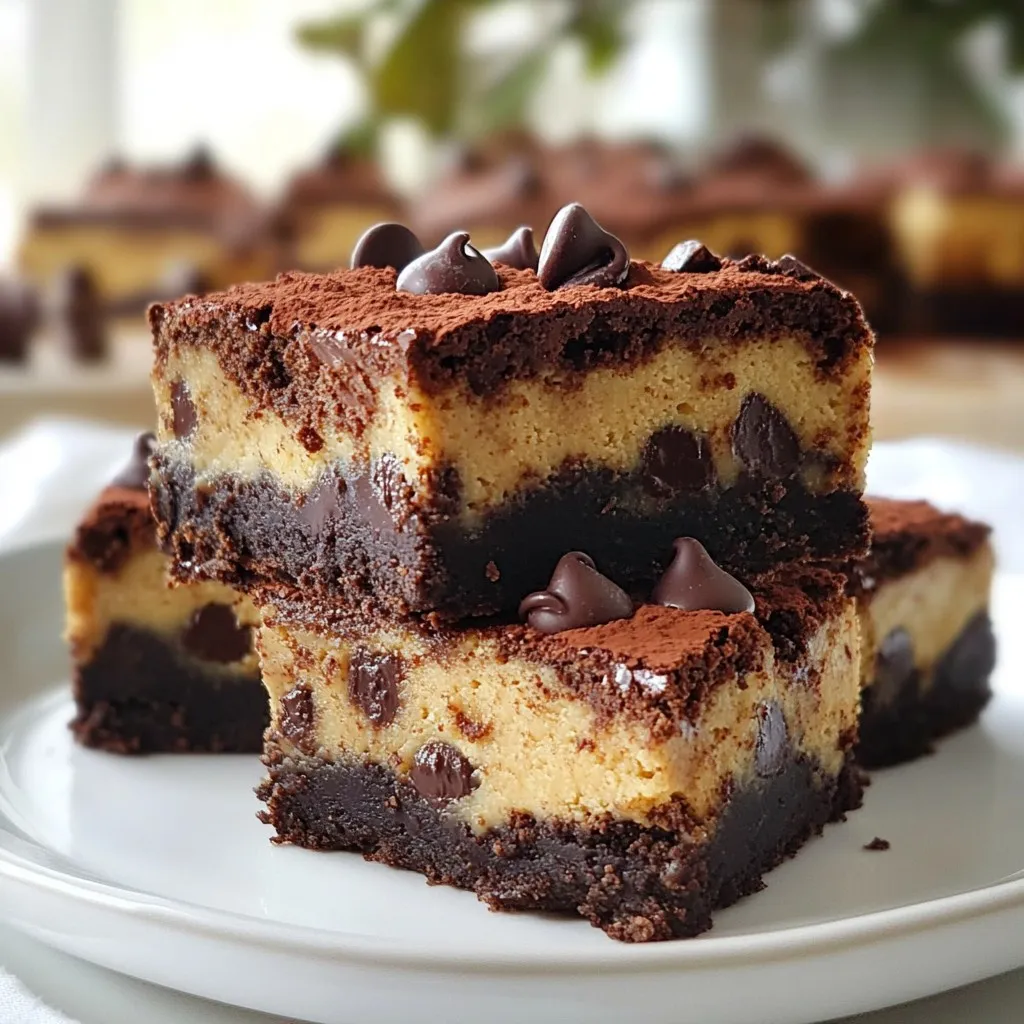
High-Protein Cookie Dough Brownies Delightful Treat
Looking for a tasty treat that gives you a protein boost? These High-Protein Cookie Dough Brownies are the answer! Made with simple ingredients, they blend
- 2 large apples (Granny Smith or Honeycrisp) - 1/4 cup packed brown sugar - 1 teaspoon ground cinnamon - 1/4 teaspoon ground nutmeg - 1 tablespoon freshly squeezed lemon juice - 1 tablespoon cornstarch - 10 egg roll wrappers - Vegetable oil for frying - Powdered sugar for dusting (optional) You can use other apple types, like Fuji or Gala. Both work well for sweetness. If you want less sugar, try a sugar substitute. Options like stevia or monk fruit are great. You can also use gluten-free wrappers. They will taste just as good. Choose ripe apples. Look for firm ones that are shiny and smell sweet. Store your apples in the fridge for best results. Keep the egg roll wrappers in the fridge too. Use them before the expiration date for the best taste. {{ingredient_image_2}} Start by dicing two large apples. I like using Granny Smith or Honeycrisp. Place the diced apples in a medium bowl. Add 1/4 cup of packed brown sugar, 1 teaspoon of ground cinnamon, and 1/4 teaspoon of ground nutmeg. Pour in 1 tablespoon of freshly squeezed lemon juice and sprinkle in 1 tablespoon of cornstarch. Mix everything gently. Make sure all the apples get coated well. Let this sit for about 10 minutes. This step allows the flavors to meld, resulting in a delicious filling. Now, let’s roll up the egg rolls! Take one egg roll wrapper and lay it flat. Make sure one corner points toward you. Scoop about 2 tablespoons of the apple filling and place it in the center of the wrapper. Fold the bottom corner over the filling. Then fold in the two side corners toward the center. Continue rolling the wrapper tightly up to the top corner. Use a little water to moisten the edge, and press to seal it. Repeat this until you use all the wrappers or filling. For frying, heat about 2 inches of vegetable oil in a deep pan. Set the heat to medium and wait for the oil to reach 350°F (175°C). Carefully add a few egg rolls to the hot oil. Do not overcrowd the pan. Fry them for 3 to 4 minutes on each side. Look for a golden brown color and crispy texture. When done, use a slotted spoon to remove the egg rolls. Place them on a paper towel-lined plate to drain extra oil. Let them cool slightly before serving. Dust with powdered sugar if you like! Enjoy the warm, crispy treat! To avoid soggy egg rolls, ensure you use a dry filling. Drain any excess liquid from the apples after mixing. Also, do not overfill the wrappers. This helps keep them crispy. Fry egg rolls in small batches. This keeps the oil temperature steady. The right heat makes all the difference. Aim for 350°F (175°C) for perfect frying. For presentation, arrange the hot egg rolls on a nice platter. Serve with a bowl of caramel sauce for dipping. Ice cream also pairs well, especially vanilla. You can sprinkle some powdered sugar on top for a sweet touch. For drinks, try serving apple cider or sweet tea. These beverages complement the flavors nicely. One common mistake is overfilling the wrappers. This can lead to messy frying. Another mistake is not sealing the edges well. Use a little water to moisten the wrapper edges. This helps them stick together. Make sure the egg rolls are tightly wrapped. Loose wrappers can open during frying, making a mess. Pro Tips Choose the Right Apples: For the best flavor and texture, use tart apples like Granny Smith or sweet ones like Honeycrisp. This balance enhances the overall taste of your egg rolls. Don’t Overfill: To prevent the egg rolls from bursting while frying, make sure not to overfill them with the apple mixture. Stick to about 2 tablespoons per wrapper. Maintain Oil Temperature: Keep an eye on the oil temperature while frying. If it’s too hot, the egg rolls will brown too quickly without cooking through. If it’s too low, they will absorb more oil and become greasy. Serve Fresh: For the best crispy texture, serve the egg rolls immediately after frying. They tend to lose their crunchiness as they cool down. {{image_4}} You can make apple pie egg rolls even more fun! Try adding cranberries or raisins for a twist. They add a nice tartness that pairs well with the sweet apples. You can also experiment with spices like ginger. A pinch of ginger gives your egg rolls a warm, spicy kick. Just be sure to balance the spices so they enhance the apple flavor. If you want a vegan option, use applesauce instead of the egg filling. It gives a nice texture and keeps it moist. For a keto-friendly version, swap the brown sugar with a keto sweetener. This way, you can enjoy the delicious flavors without all the carbs. Both options keep the essence of the recipe while catering to different diets. Pair your apple pie egg rolls with ice cream for a delightful treat. Vanilla ice cream is classic, but try caramel or cinnamon ice cream for a twist. You can also serve them with sauces like caramel or chocolate syrup. These dips add extra sweetness and richness to each bite. Enjoy the combinations to make your dessert even better! After making your crispy apple pie egg rolls, you might have some left. To keep them fresh, store the egg rolls in the fridge. Place them in an airtight container. This helps prevent them from getting soggy. They last about three days in the fridge. If you want to save them longer, freeze the egg rolls. Lay them on a baking sheet in a single layer. Freeze for about an hour until firm. Then, transfer them to a freezer bag. They can stay good for up to two months. When it's time to enjoy your leftovers, you can reheat them in two ways. The oven is the best choice for keeping them crispy. Preheat your oven to 375°F (190°C). Place the egg rolls on a baking sheet. Heat for about 10-15 minutes until warm and crispy. If you are short on time, you can use the microwave. Place the egg rolls on a microwave-safe plate. Heat them for 30 seconds, then check. If they are not warm, keep heating in 15-second bursts. However, this method may make them less crispy. Your apple pie egg rolls stay fresh for about three days in the fridge. When you freeze them, they can last for two months. Always check for any signs of spoilage before eating. If they look or smell off, it’s best to throw them out. I like to use Granny Smith or Honeycrisp apples. These apples are tart and sweet. They hold up well when cooked. This gives you a nice texture in your egg rolls. Other good options include Fuji or Gala apples. You can mix different types for fun flavors. Yes, you can bake the egg rolls! Preheat your oven to 400°F (200°C). Place the egg rolls on a baking sheet. Brush them lightly with oil to help them crisp up. Bake for about 15-20 minutes, flipping halfway through. They won't be as crispy as fried, but they will still taste great! Look for a golden brown color. This usually takes about 3-4 minutes on each side. If they float, they are likely done. Use a slotted spoon to take them out. Drain them on paper towels to remove excess oil. Yes, you can prepare the filling ahead of time. Mix the apples and spices, then store them in the fridge. You can keep it for up to 24 hours. Just remember to wrap the egg rolls when ready to cook. Absolutely! You can make a batch and store them. Keep them in an airtight container in the fridge. They stay fresh for 2-3 days. You can also freeze them for longer storage. Just fry or bake them when you're ready to eat! You’ve learned how to make delicious apple pie egg rolls. We covered the key ingredients and tips, how to prepare the filling, and wrap the egg rolls. I also shared variations for different tastes. Remember to choose fresh apples and store any leftovers correctly. Enjoy these tasty treats with friends or family. You’ll impress everyone with your cooking skills. Get ready to fry up some fun!
Delicious Apple Pie Egg Rolls Easy and Fun Recipe
Craving a fun twist on a classic dessert? These delicious Apple Pie Egg Rolls are your answer! With just a few ingredients and easy steps,
Here’s what you need to make these healthy banana oatmeal cookies: - 2 ripe bananas, thoroughly mashed - 1 cup rolled oats - 1/2 cup almond flour - 1/4 cup honey or maple syrup - 1/4 cup unsweetened applesauce - 1 teaspoon pure vanilla extract - 1/2 teaspoon baking powder - 1/2 teaspoon ground cinnamon - 1/4 teaspoon sea salt - Optional mix-ins: - 1/3 cup dark chocolate chips - 1/3 cup chopped nuts (like walnuts or pecans) Each ingredient plays a key role. The ripe bananas add natural sweetness and moisture. Rolled oats provide hearty texture, while almond flour adds a nutty flavor. Honey or maple syrup gives extra sweetness. Unsweetened applesauce helps keep the cookies soft. Baking powder helps the cookies rise slightly, and cinnamon adds warmth. The sea salt balances the flavors. Optional mix-ins like dark chocolate chips or nuts bring even more taste and crunch. You can mix and match these ingredients to fit your taste! {{ingredient_image_2}} Start by preheating your oven to 350°F (175°C). This step is key for even baking. While the oven heats, line a baking sheet with parchment paper. This helps prevent sticking and makes clean-up easy. In a large bowl, mash two ripe bananas until smooth. Then, add 1/4 cup of honey or maple syrup for sweetness. Next, mix in 1/4 cup of unsweetened applesauce and 1 teaspoon of pure vanilla extract. Use a fork to blend everything well. You want a smooth, creamy mix. In another bowl, stir together 1 cup of rolled oats, 1/2 cup of almond flour, 1/2 teaspoon of baking powder, 1/2 teaspoon of ground cinnamon, and 1/4 teaspoon of sea salt. Mixing these dry ingredients well ensures they spread evenly in the cookie dough. Gradually add the dry mix to the wet mixture. Use a spatula to fold them together gently. Be careful not to overmix, as this can make the cookies tough. If you want, fold in 1/3 cup of dark chocolate chips and 1/3 cup of chopped nuts for extra flavor. Take a tablespoon and scoop dough onto the prepared sheet. Space the dough balls about 1 inch apart. To flatten them slightly, press down gently with the back of the spoon. This gives them a nice cookie shape. Place the baking sheet in the oven and bake for 12-15 minutes. Watch closely as they bake. You want the edges to turn a lovely golden brown. When the cookies are done, take them out of the oven. Let them cool on the baking sheet for about 5 minutes. After that, move them to a wire rack to cool completely. This step helps keep them soft and chewy inside. To make the best banana oatmeal cookies, start with ripe bananas. The riper they are, the sweeter your cookies will taste. Use a fork to mash them until smooth. This helps blend well with other wet ingredients. When mixing, do not overmix the batter. Overmixing can make cookies tough. Aim for a gentle fold when combining wet and dry ingredients. The sweetness of your cookies is easy to change. Use honey, maple syrup, or both. If you prefer less sugar, try cutting the sweetener by a few tablespoons. You can also add extra mashed bananas for natural sweetness. If you like a touch of spice, a bit of extra cinnamon can enhance flavor. Taste your batter before baking for a hint of sweetness. You can swap some ingredients for different flavors. If you need a nut-free option, replace almond flour with oat flour. For a vegan version, use maple syrup instead of honey. Applesauce can also replace oil, making cookies moist without extra fat. You can add dried fruits, seeds, or other nuts if you want something new. This keeps your cookies fun and fresh. Pro Tips Riper Bananas for Sweetness: The riper the bananas, the sweeter your cookies will be. Look for bananas with brown spots for optimal flavor. Oat Variations: Feel free to experiment with different types of oats, such as quick oats or steel-cut oats, to get a different texture in your cookies. Storage Tips: Store your cookies in an airtight container at room temperature for up to a week, or freeze them for longer-lasting freshness. Mix-Ins for Fun: Customize your cookies by adding dried fruits, seeds, or spices to the batter for an extra flavor kick! {{image_4}} To make vegan banana oatmeal cookies, you only need to swap a few ingredients. Replace honey or maple syrup with agave nectar or another plant-based sweetener. This change keeps the cookies sweet and vegan-friendly. You can also use flaxseed meal mixed with water as an egg substitute. Mix 1 tablespoon of flaxseed meal with 2.5 tablespoons of water. Let it sit for about five minutes to thicken. This mix binds the ingredients well. Your cookies will still taste great! For gluten-free banana oatmeal cookies, simply use certified gluten-free oats and almond flour. These two ingredients provide a nice texture without gluten. You can also try coconut flour as an alternative. Just remember to use less coconut flour, as it absorbs more moisture. Start with 1/4 cup and adjust as needed. This way, you can enjoy delicious cookies while sticking to a gluten-free diet. Adding spices and extracts can make your cookies unique and fun! Try adding a pinch of nutmeg or ginger for extra warmth. You can also mix in a teaspoon of almond or coconut extract for a different flavor twist. If you want a chocolatey kick, use cocoa powder. Start with 2 tablespoons and reduce the almond flour by the same amount. These small changes can create a delightful new cookie that suits your taste! To keep your healthy banana oatmeal cookies fresh, store them in an airtight container. This helps keep them soft and tasty. You can place parchment paper between layers to prevent sticking. These cookies stay fresh for about five days at room temperature. If you want to keep them longer, consider freezing them. Freezing cookies is a great way to save them for later. To freeze, let the cookies cool completely first. Then, place them in a single layer on a baking sheet. Freeze them for about two hours. After that, transfer the cookies to a freezer-safe bag or container. This method helps prevent freezer burn. Cookies can last up to three months in the freezer. When you want to enjoy them, just pull them out and let them thaw. Reheating cookies can make them taste fresh again. You can use an oven or microwave for this. For the oven, preheat it to 350°F (175°C). Place the cookies on a baking sheet and warm them for about five minutes. If you use a microwave, heat them for 10 to 15 seconds. This will help them regain their soft texture. Enjoy your delicious treat warm! Yes, you can use other sweeteners. You can try agave nectar, coconut sugar, or stevia. Each will change the flavor a bit. Just remember to balance the sweetness to your taste. To make these cookies gluten-free, simply use certified gluten-free oats. You can also replace almond flour with a gluten-free flour blend. This keeps the cookies soft and tasty without gluten. If you need a substitute for almond flour, try using oat flour or ground sunflower seeds. Both options work well. They keep the cookies moist and add flavor. These cookies stay fresh for about three days at room temperature. Keep them in an airtight container. You can also store them in the fridge for one week. For longer storage, freeze them for up to three months. We explored simple ingredients to make delicious banana oatmeal cookies. You learned step-by-step how to create and bake them. Tips showed how to customize sweetness and substitute ingredients. We also discussed variations, like vegan and gluten-free options. Finally, storage tips helped ensure your cookies stay fresh. Remember, these cookies are easy and fun to make. Enjoy experimenting with flavors and sharing them with others!
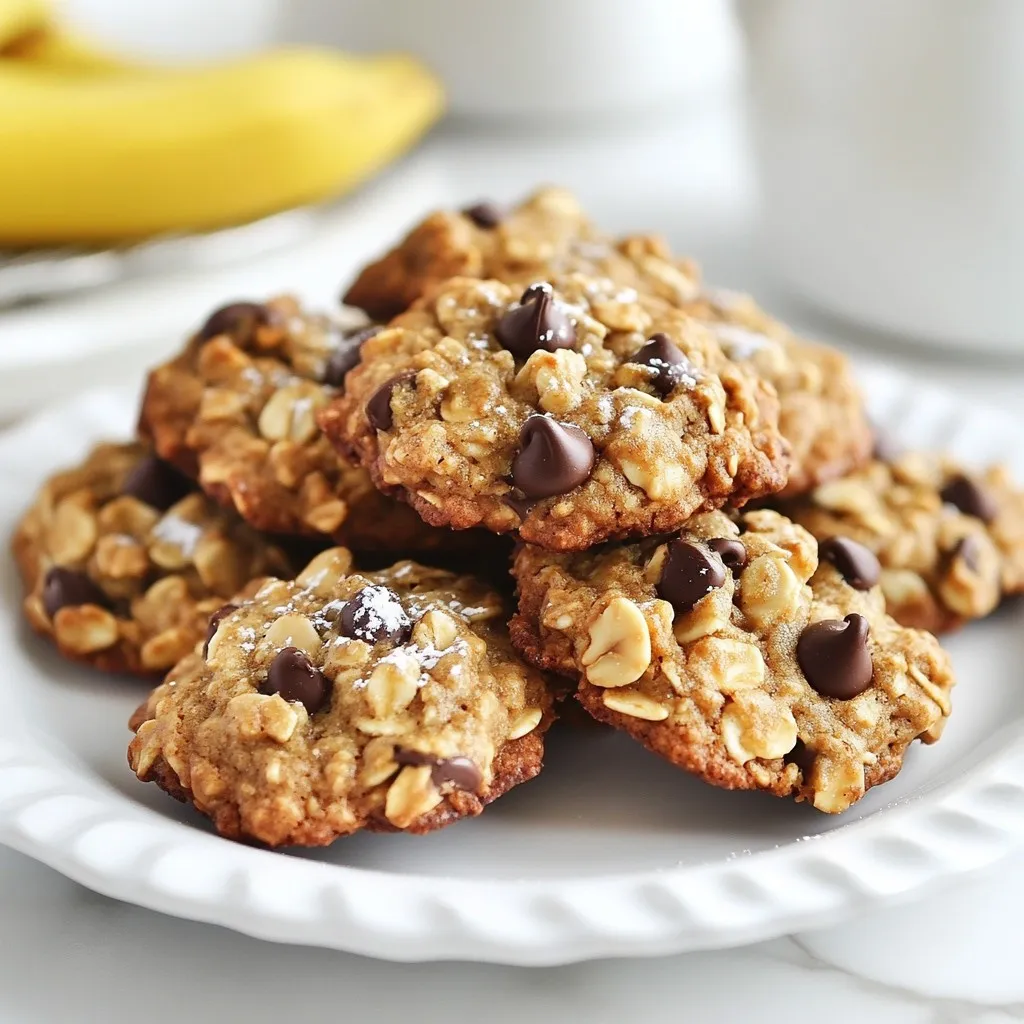
Healthy Banana Oatmeal Cookies Simple and Tasty Recipe
Are you looking for a healthy snack that’s easy to make and full of flavor? These Healthy Banana Oatmeal Cookies are just what you need!
Here’s what you need for the No-Bake Chocolate Peanut Butter Pie. Each ingredient plays a key role in creating that perfect balance of flavor and texture. - 1 ½ cups chocolate cookie crumbs (such as crushed Oreos) - ½ cup unsalted butter, melted - 1 cup creamy peanut butter - 1 cup powdered sugar - 8 oz cream cheese, softened to room temperature - 1 cup whipped topping (store-bought or homemade) - 1 cup semi-sweet chocolate chips - ½ cup heavy cream - Chopped peanuts and chocolate shavings for garnish These ingredients come together to create a delightful treat. The chocolate cookie crumbs form the crust, giving a rich base. The creamy peanut butter and cream cheese mix create a smooth filling. Topping it all off, the chocolate ganache adds a shiny finish. Don't forget the garnishes! Chopped peanuts and chocolate shavings make the pie look inviting. Each bite is a mix of flavors that everyone will love. {{ingredient_image_2}} In a medium bowl, combine 1 ½ cups of chocolate cookie crumbs with ½ cup of melted unsalted butter. Mix until every crumb is coated. Press this mixture firmly into a 9-inch pie pan. Make sure the crust is even on the bottom and sides. Refrigerate for about 15 minutes. This helps the crust firm up. Take a large bowl and add 8 ounces of softened cream cheese and 1 cup of creamy peanut butter. Use an electric mixer to beat them together until smooth. Gradually add 1 cup of powdered sugar. Mix well until fully combined. The filling should be light and fluffy. Now, take 1 cup of whipped topping. Carefully fold it into the peanut butter mixture with a rubber spatula. This step is key. You want to keep the airiness to make the filling light and creamy. Pour the peanut butter filling into the chilled crust. Use a spatula to spread it evenly. Smooth the top to make it nice and flat. Put the pie back in the fridge while you make the ganache. In a small saucepan, combine ½ cup of heavy cream and 1 cup of semi-sweet chocolate chips. Place it over low heat. Stir continuously until the chips melt and the ganache is smooth. Remove it from the heat and let it cool slightly. This allows it to thicken without hardening. Carefully pour the warm ganache over the peanut butter filling. Use a spatula to spread it into an even layer. Return the pie to the refrigerator. Chill for at least 4 hours. This helps the ganache set and become firm. To make a great crust, use chocolate cookie crumbs. I love crushed Oreos for their flavor. Mix the crumbs with melted butter until it looks like wet sand. When you press the crumbs, use a flat bottom of a cup for even pressure. Make sure to press the mix into the bottom and up the sides of the pie pan. Refrigerate the crust for 15 minutes to help it set. If you want a change, try graham crackers or vanilla wafers instead. For the filling, start with room temperature cream cheese. This helps it mix smooth with the peanut butter. Use an electric mixer on medium speed to blend. Add the powdered sugar slowly, mixing after each addition. This keeps the filling fluffy and light. When you fold in the whipped topping, be gentle. A rubber spatula works best here. This keeps air in the mix and makes it creamy. When making the ganache, melt the chocolate chips with the heavy cream over low heat. Stir continuously to prevent burning. Once melted, remove it from heat but let it cool slightly. This cooling helps it thicken without hardening. To check the thickness, dip a spoon in. If it coats the back, you’re ready to pour. For a smooth finish, pour slowly over the filling. Use a spatula to spread it evenly. Pro Tips Chill Your Ingredients: Ensure that the cream cheese and whipped topping are at room temperature before mixing to achieve a smooth and creamy filling. Use Quality Chocolate: Opt for high-quality semi-sweet chocolate chips for the ganache to enhance the overall flavor of the pie. Let It Set: For the best texture, allow the pie to chill for a full 4 hours or overnight. This will ensure that the ganache is perfectly set and the layers meld beautifully. Garnish Generously: Don't skimp on the chopped peanuts and chocolate shavings! They add a delightful crunch and visual appeal to your pie. {{image_4}} You can make this pie gluten-free easily. Just use gluten-free cookies for the crust. Brands like gluten-free Oreos work well. Crush them just like regular cookies. Mix with melted butter and press it into the pan. The result will be just as delicious! To make this pie extra special, add vanilla extract to the peanut butter mix. Just a teaspoon will do! You can also try using different types of chocolate. Dark chocolate can give a richer taste. White chocolate can add sweetness and creaminess. Experiment with what you like best! If you want a healthier pie, consider using natural peanut butter. It has simple ingredients and less sugar. You can also reduce the sugar in the filling. Use less powdered sugar or swap some for honey. This way, you can enjoy your treat and feel good about it! To keep your No-Bake Chocolate Peanut Butter Pie fresh, store it in the fridge. Cover it tightly with plastic wrap or aluminum foil. This keeps the pie moist and prevents it from absorbing other flavors. You can enjoy the pie for several days this way. If you want to save some for later, freezing is a great option. Slice the pie into individual pieces. Wrap each slice in plastic wrap, then place them in a freezer-safe bag or container. This way, you can grab a piece whenever you crave a sweet treat! In the fridge, your pie can last up to five days. After that, it may lose its taste and texture. If you see any signs of spoilage, like a sour smell or discoloration, it's best to throw it away. When frozen, the pie can last up to two months. To enjoy it, thaw it in the fridge overnight. This keeps the texture nice and creamy. Always check for any off smells or changes in appearance before serving. Yes, you can make this pie a day ahead. Store it in the fridge. Cover it tightly with plastic wrap. This way, it stays fresh and tasty. It will taste even better the next day. If you need a substitute for heavy cream, try using half-and-half. You can also use coconut cream for a dairy-free option. Both alternatives work well in the ganache. Yes, you can freeze this pie! Wrap it tightly in plastic wrap and foil. It can last up to three months in the freezer. To thaw, move it to the fridge overnight. To serve, slice the pie into pieces. Use a sharp knife for clean cuts. Add a dollop of whipped topping on each slice. Finish with chopped peanuts and chocolate shavings for a nice touch. Enjoy each creamy bite! In this blog post, we explored how to make a delicious no-bake chocolate peanut butter pie. We covered the ingredients, from chocolate cookie crumbs to whipped topping. Step-by-step, I shared how to prepare the crust and make the creamy filling. We discussed tips for a perfect pie and even variations for different diets. Finally, we looked at storage methods to keep your pie fresh. Enjoy making this treat, and feel free to get creative with your flavors! Your no-bake pie will surely impress!
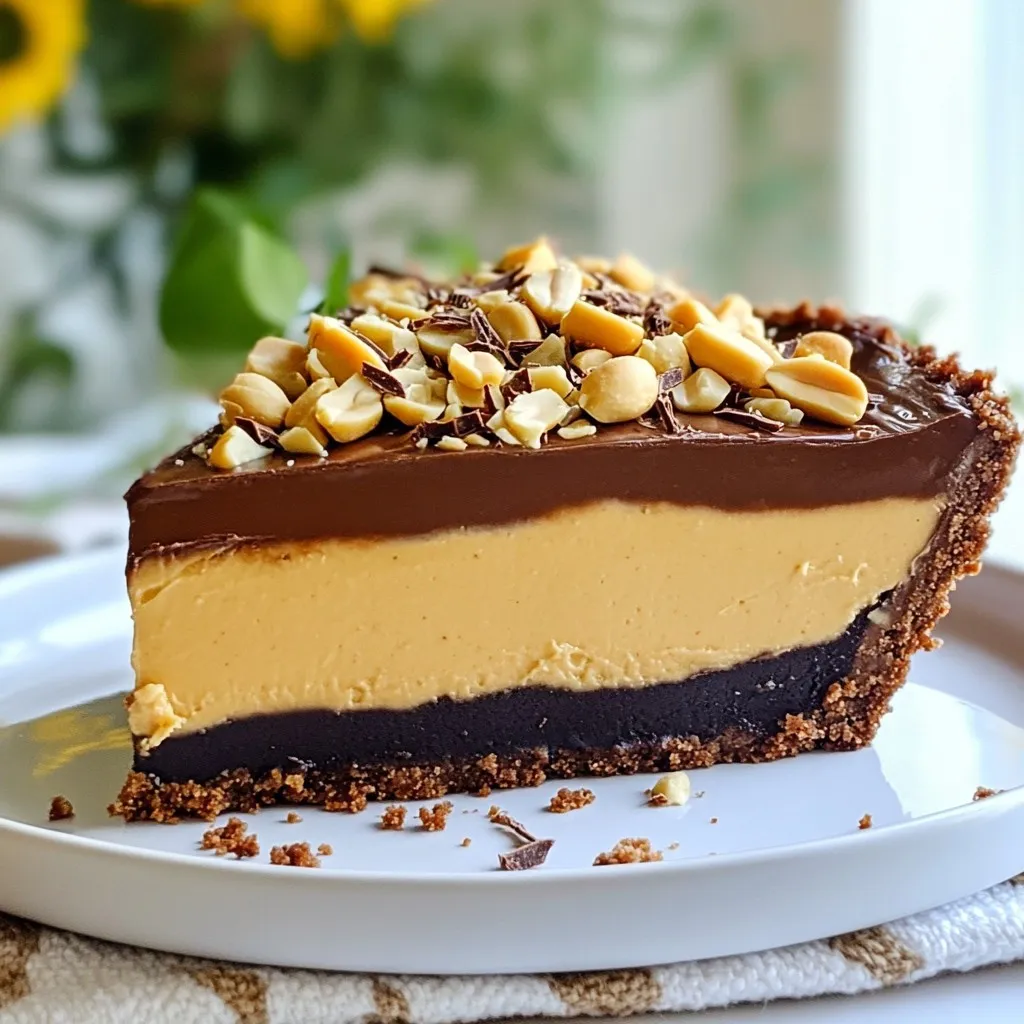
No-Bake Chocolate Peanut Butter Pie Delightful Treat
If you’re craving a sweet delight that doesn’t require baking, you’re in the right place! This No-Bake Chocolate Peanut Butter Pie is an easy treat