Desserts

- 1 ½ cups all-purpose flour - 1 cup granulated sugar - 1 teaspoon baking soda - 1 teaspoon cocoa powder - ½ teaspoon salt - 1 cup vegetable oil - 1 cup buttermilk, at room temperature - 2 large eggs, at room temperature - 2 tablespoons red food coloring - 1 teaspoon vanilla extract - 1 teaspoon white vinegar To make the red velvet cake layer, I combine the dry and wet ingredients. I mix the flour, sugar, baking soda, cocoa powder, and salt in one bowl. In another bowl, I whisk together the oil, buttermilk, eggs, food coloring, vanilla, and vinegar. The red food coloring gives the cake its signature color. I pour the dry mix into the wet mix and stir until just combined. This method keeps the cake light and fluffy. - 16 oz (2 packages) cream cheese, softened to room temperature - ½ cup granulated sugar - 1 teaspoon pure vanilla extract - 2 large eggs, at room temperature - ¼ cup sour cream - ¼ cup heavy cream For the cheesecake layer, I beat the cream cheese and sugar until fluffy. Then, I add vanilla, sour cream, and heavy cream. This combination creates a rich, smooth filling. I mix in the eggs one at a time for the best texture. Each step helps build that creamy feel people love in a cheesecake. - 8 oz cream cheese, softened to room temperature - ½ cup unsalted butter, softened - 4 cups powdered sugar - 2 teaspoons pure vanilla extract - 1 tablespoon milk (as needed for adjusting consistency) The cream cheese frosting is the final touch. I blend cream cheese and butter until smooth. Then, I slowly add powdered sugar. This keeps it sweet but not too sweet. I stir in vanilla extract for flavor. If the frosting is too thick, I add a splash of milk to reach the desired consistency. This frosting makes the cake not only taste great but look stunning too. For the full list of steps, check out the Full Recipe. Start by preheating your oven to 350°F (175°C). Grease a 9-inch springform pan well. Line the bottom with parchment paper. This step helps the cake release easily later. In a medium bowl, mix together the flour, sugar, baking soda, cocoa powder, and salt. In a large bowl, combine the oil, buttermilk, eggs, red food coloring, vanilla, and vinegar. Stir until smooth. Gradually add the dry mix to the wet ingredients. Mix gently until just combined. Pour this vibrant batter into your prepared pan. Place the pan in the oven. Bake for 25-30 minutes. Check by inserting a toothpick into the center. If it comes out clean, the cake is ready. Let it cool in the pan for 10 minutes. Carefully remove it and transfer it to a wire rack to cool completely. In a large bowl, beat the softened cream cheese and sugar until fluffy. Add the vanilla, sour cream, and heavy cream. Mix until smooth. Then, add the eggs one at a time. Mix gently after each addition to keep it creamy. Once the red velvet cake is cool, place it back in the springform pan. Pour the cheesecake batter over the cake layer. Use a spatula to spread it evenly. Bake the cheesecake for 50-60 minutes. The edges should set, and the center should jiggle slightly. Turn off the oven and crack the door open. Leave it inside for 1 hour to cool gradually. This helps prevent cracks. After cooling, transfer it to the fridge for at least 4 hours, or overnight for best results. Prepare the cream cheese frosting by beating together the softened cream cheese and butter until smooth. Gradually add powdered sugar. Stir in the vanilla and add milk as needed for a spreadable texture. Once chilled, frost the cheesecake evenly for a delicious finish. For a fun touch, sprinkle red velvet crumbs or fresh berries on top. For a complete guide, check the Full Recipe. Ensuring the Perfect Texture To get a smooth and creamy cheesecake, use room-temperature cream cheese. Cold cream cheese can clump and ruin your texture. Avoid overmixing the batter once you add the eggs. This helps keep the cheesecake light and fluffy. Also, bake it in a water bath if you want an even creamier texture. This technique keeps the heat gentle and even. Common Mistakes to Avoid One mistake is rushing the cooling process. Always let the cheesecake cool in the oven with the door open. This step helps avoid cracks. Another common error is using too much food coloring. Stick to two tablespoons for a beautiful red hue. Lastly, don’t skip chilling the cheesecake. Let it chill for at least four hours for the best flavor and texture. How to Achieve a Flawless Frosting For a perfect cream cheese frosting, make sure both the cream cheese and butter are soft. This ensures they blend well and create a smooth mix. Gradually add powdered sugar to avoid lumps. If the frosting is too thick, add a bit of milk until you reach the right consistency. Spread it evenly over the cheesecake for a beautiful finish. For added flair, sprinkle some red velvet cake crumbs or fresh berries on top. For the Full Recipe, be sure to check the detailed instructions. {{image_4}} To make a gluten-free version of the red velvet cheesecake, swap all-purpose flour with a gluten-free blend. You can use a 1:1 gluten-free flour mix. Make sure it contains xanthan gum, which helps with texture. This simple swap keeps the cake moist and delicious, just like the original. While cream cheese frosting is classic, you can try other options. - Use whipped cream for a lighter touch. - Try a chocolate ganache for a rich twist. - A tangy lemon frosting adds bright flavor. Each choice gives a unique taste and adds to this dessert's appeal. You can elevate your cheesecake with flavor enhancements. - Add a splash of almond extract for depth. - Mix in some mini chocolate chips for surprise bites. - Incorporate crushed nuts for crunch. These tweaks let you create a red velvet cheesecake that feels personal and special. For the complete recipe, check [Full Recipe]. To keep your cheesecake fresh, store it in the fridge. Place it in an airtight container. If you do not have one, cover it tightly with plastic wrap. This keeps the cheesecake moist and tasty. Leftover cheesecake can last for about 5 days in the fridge. If you want to save your cheesecake for later, freezing is a great option. First, cut the cheesecake into slices. Wrap each slice tightly in plastic wrap. Then, place the wrapped slices in a freezer-safe bag. This helps prevent freezer burn. You can freeze the cheesecake for up to 3 months. When you're ready to enjoy your frozen cheesecake, take it out of the freezer. Place the wrapped slices in the fridge to thaw overnight. This slow thaw keeps the texture nice. If you're in a hurry, you can thaw it at room temperature for about 1 hour. Just remember to unwrap it after a while to prevent sogginess. For the full details on how to make this delicious dessert, check out the Full Recipe! Yes, you can make the cheesecake ahead of time. In fact, it tastes better after sitting in the fridge. Let it chill for at least 4 hours, but overnight is best. This allows the flavors to blend and the texture to set nicely. To cut cheesecake, use a sharp knife dipped in warm water. Wipe the knife clean after each cut. This keeps the slices neat and smooth. For a clean edge, cut slowly and steadily. To make your cheesecake creamier, use room temperature cream cheese. This helps mix better and avoids lumps. Adding heavy cream also adds richness. Mix gently after adding eggs to keep the texture smooth. Yes, you can substitute cream cheese with mascarpone or ricotta. Both give a different but tasty flavor. For a lower-fat option, use Greek yogurt. Just remember that the taste and texture may change slightly. For the full recipe, check the details above. This blog post covered everything you need for a tasty red velvet cheesecake. We discussed the key ingredients, like the cake and cheesecake layers and the frosting. You learned how to prep, bake, and chill the cheesecake, along with tips for texture and common mistakes. Variations help you personalize this dessert, and storage tips keep it fresh. Now you're ready to impress with a delicious dessert that's sure to please everyone! Enjoy every bite!
Decadent Ultimate Red Velvet Cake Cheesecake Recipe
Imagine indulging in a dessert that combines two favorites: red velvet cake and rich cheesecake. My “Decadent Ultimate Red Velvet Cake Cheesecake Recipe” gives you
To make this Italian Lemon Pound Cake, you will need the following ingredients: - 1 ½ cups all-purpose flour - 1 teaspoon baking powder - ½ teaspoon salt - ½ cup unsalted butter, softened to room temperature - 1 cup granulated sugar - 3 large eggs, at room temperature - 2 tablespoons lemon zest (from about 2 medium lemons) - 1 teaspoon pure vanilla extract - ½ cup sour cream, at room temperature - ¼ cup freshly squeezed lemon juice (from about 1 large lemon) - Powdered sugar, for a light dusting These ingredients work well together and create a bright, zesty flavor. If you need to make some changes, here are a few easy swaps: - Gluten-free flour: Use a 1:1 gluten-free baking mix in place of all-purpose flour. - Dairy-free: Substitute butter with coconut oil. Use a non-dairy yogurt for sour cream. - Egg replacements: Try using flax eggs or applesauce for a vegan option. These substitutions can help you adjust the recipe to fit your needs without losing flavor. Choosing the best lemons makes a difference in your cake’s taste. Here are some tips: - Look for bright color: Choose lemons that are deep yellow. - Check the firmness: Choose lemons that feel heavy and firm, avoiding soft spots. - Smell the aroma: Fresh lemons have a strong, citrusy scent, which indicates ripeness. These tips will help you pick lemons that are perfect for your Italian Lemon Pound Cake. For the full recipe, check out the complete instructions. Start by preheating your oven to 350°F (175°C). This step helps the cake rise well. Next, take a 9x5-inch loaf pan and prepare it. You can grease and flour the pan, or use parchment paper. Parchment makes it easier to take out the cake later. Make sure to cover all the corners to avoid sticking. In a large mixing bowl, add the softened butter and granulated sugar. Use an electric mixer on medium speed. Beat these two together until the mix looks light and fluffy. This can take about 3 to 5 minutes. Next, add the eggs one by one. Mix well after each egg. This helps to keep the batter smooth. After that, stir in the lemon zest and vanilla extract. These ingredients bring bright flavors. Now, take a medium bowl and mix the dry ingredients. Combine the all-purpose flour, baking powder, and salt. Whisk them together well. Set this bowl aside for later. Return to your wet mixture. Gradually add the flour mix and sour cream, alternating between them. Start and end with flour. Mix just until everything is combined. This avoids overmixing, which can make the cake dense. Finally, gently fold in the freshly squeezed lemon juice using a spatula. This adds a nice tang. Your batter should be smooth and ready for the loaf pan. To make your Italian lemon pound cake moist, start with room-temperature ingredients. This includes butter, eggs, and sour cream. They mix better and create a smooth batter. Use fresh lemon juice and zest for bright flavor. Adding sour cream keeps the cake soft. Remember, do not overmix the batter. Mix until just combined to keep it tender. Many bakers make simple mistakes. One is not measuring flour correctly. Use a spoon to fill your measuring cup, then level it off with a knife. This way, you avoid using too much flour. Another mistake is skipping the cooling time. Let the cake cool in the pan for ten minutes before turning it out. If you take it out too soon, it might break. Lastly, avoid opening the oven door early. This can cause the cake to fall. Presentation makes your cake shine. Serve slices on a nice plate. Add fresh lemon slices and a sprig of mint for color. A light dusting of powdered sugar adds elegance. For extra flavor, drizzle a lemon glaze on top. You can make this glaze with powdered sugar and lemon juice. It adds a sweet and tangy touch that pairs well with the cake. Enjoy your beautiful Italian lemon pound cake! For the full recipe, check out the detailed instructions above. {{image_4}} You can add blueberries or poppy seeds for a fun twist. For blueberries, fold in one cup of fresh or frozen berries. They add a burst of fruit flavor. If you choose poppy seeds, add two tablespoons to the batter. This gives a nice crunch and looks pretty too. Both options work well with the lemon taste. If you prefer a different shape, try a lemon bundt cake. Use the same batter from the Italian lemon pound cake recipe. Grease a bundt pan well. Pour the batter into the pan and bake it for about 50-60 minutes. The bundt shape adds a nice design. It also makes it easy to serve at gatherings. A glaze can enhance the flavor and look of your cake. A simple lemon glaze is easy to make. Combine one cup of powdered sugar with two tablespoons of lemon juice. Stir until smooth and drizzle it over the cooled cake. You can also add zest for extra flavor. For a twist, try a vanilla glaze. Just mix powdered sugar with milk and a splash of vanilla extract. Both glazes will make your cake shine! For the full recipe, check out the Italian Lemon Pound Cake recipe. To keep your Italian lemon pound cake fresh, wrap it tightly in plastic wrap. This prevents air from getting in and keeps it moist. Store the wrapped cake in an airtight container. Place it in a cool, dry place, away from direct sunlight. It should stay fresh for about three days. If you have leftovers after that, freezing is a great option. If you want to save some cake for later, freezing works well. First, let the cake cool completely. Then, slice the cake into individual pieces. Wrap each slice in plastic wrap tightly. Next, place the wrapped slices in a freezer-safe bag. Be sure to label the bag with the date. The cake can last up to three months in the freezer. When you’re ready to enjoy it, just thaw the slices in the fridge overnight. To bring your cake back to life, try this simple method. Once thawed, preheat your oven to 350°F (175°C). Place the cake in the oven for about 10 minutes. This warms it up and revives its soft texture. For an extra touch, dust it with powdered sugar before serving. This will make it look fresh and inviting again. Yes, you can use bottled lemon juice, but fresh is best. Fresh lemon juice gives a vibrant taste. Bottled juice lacks the same bright flavor and aroma. For the best results, always choose fresh lemons when you can. Italian Lemon Pound Cake lasts about 3 to 4 days at room temperature. Wrap it well to keep it fresh. You can also store it in the fridge for up to a week. If you want it to last longer, freeze it for up to three months. To slice pound cake, use a serrated knife. This type of knife cuts without crushing the cake. Start at one end and use a gentle sawing motion. Avoid pressing down hard; let the knife do the work. This way, you’ll have clean, beautiful slices every time. For a perfect finish, warm the knife slightly before cutting. We've covered the key ingredients for a perfect Italian Lemon Pound Cake, including substitutions and lemon selection. Next, I shared step-by-step instructions to guide your baking. I also offered tips to ensure a moist cake and avoid common mistakes. Finally, we discussed variations, storage tips, and answered frequently asked questions. In summary, you now have all you need to bake a delicious cake. Enjoy your baking journey and savor each bite of your tasty creation.
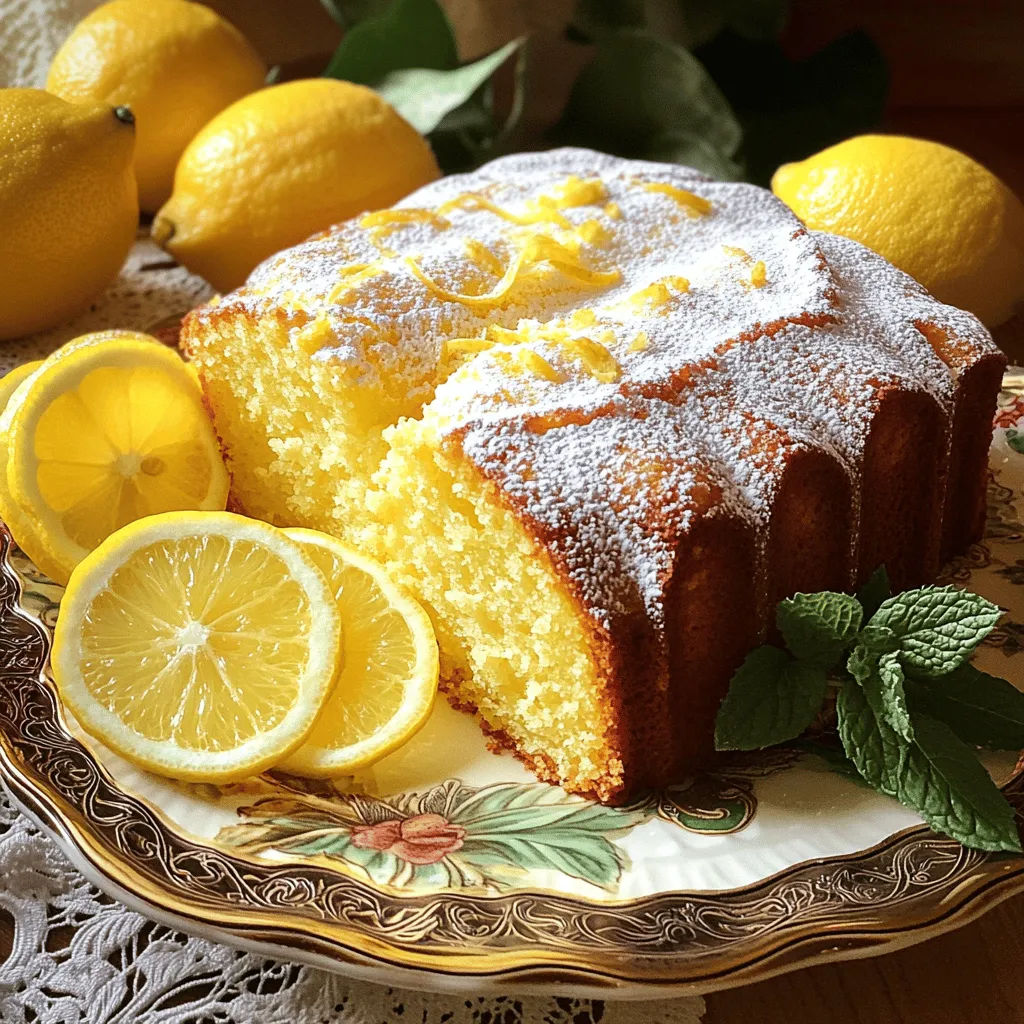
Italian Lemon Pound Cake Fresh and Flavorful Recipe
Are you ready to bake a scrumptious Italian Lemon Pound Cake that bursts with flavor? This simple recipe uses fresh lemons to create a moist
To make red velvet cinnamon rolls, you need to gather these simple items: - 2 cups all-purpose flour, plus extra for dusting - 1/2 cup granulated sugar - 2 tablespoons unsweetened cocoa powder - 2 teaspoons baking powder - 1/2 teaspoon baking soda - 1/4 teaspoon salt - 1/2 cup whole milk, warmed (not hot) - 1/2 cup sour cream - 1 large egg - 1 tablespoon red food coloring - 1/4 cup unsalted butter, melted - 1 tablespoon vanilla extract - 1/2 cup brown sugar, packed - 1 tablespoon ground cinnamon - 1/4 cup unsalted butter, softened (for filling) - 1 cup cream cheese (for frosting) - 1 cup powdered sugar (for frosting) - 2 tablespoons milk (for frosting) - 1 teaspoon vanilla extract (for frosting) The dough is the base of our rolls. Here are the key ingredients: - All-purpose flour gives structure. - Granulated sugar adds sweetness. - Cocoa powder gives a hint of chocolate flavor. - Baking powder and baking soda help the dough rise. - Salt enhances all the flavors. - Whole milk and sour cream keep the dough moist. - Red food coloring makes it bright and fun. - An egg binds everything together. The filling and frosting make these rolls truly special. You need: - Brown sugar for sweetness and depth. - Ground cinnamon for that warm, cozy flavor. - Unsalted butter (softened) creates a rich filling. - Cream cheese for a creamy frosting. - Powdered sugar sweetens the frosting. - Milk and vanilla extract add creaminess and flavor to the frosting. With these ingredients ready, you can start making your delightful red velvet cinnamon rolls. Check out the Full Recipe to get all the steps needed! To start, grab a big bowl. Whisk together the flour, sugar, cocoa powder, baking powder, baking soda, and salt. Mix until all the dry stuff is combined. In another bowl, mix the warm milk, sour cream, egg, red food coloring, melted butter, and vanilla extract. Stir this until it is smooth. Now, slowly add the wet mix to the dry ingredients. Stir gently until a soft and sticky dough forms. If it feels too sticky, add a little flour to help. Next, transfer your dough to a floured surface. Knead it gently for about 2-3 minutes. You want it to feel smooth and soft. Roll the dough out into a rectangle, about 1/4 inch thick. Make sure the thickness is even throughout. Spread the softened butter evenly over the dough. Then, sprinkle the brown sugar and ground cinnamon over the butter. This creates a sweet filling that makes the rolls tasty. Now, take one long edge of the dough and roll it up tightly like a log. Pinch the seam to seal it well. Next, use a sharp knife or some dental floss to cut the log into 12 equal slices. Place the slices in a greased baking dish. Make sure to leave some space between each roll. Cover them with a clean kitchen towel. Let the rolls rise in a warm place for about 30 minutes until they double in size. While they rise, preheat your oven to 350°F (175°C). Once they have risen, bake the rolls for 25-30 minutes. You want them golden brown. A toothpick should come out clean when tested in the center. While the rolls bake, prepare the cream cheese frosting. In a bowl, mix the cream cheese, powdered sugar, milk, and vanilla extract. Beat until it is creamy and smooth. After baking, let the rolls cool for a few minutes. Drizzle the creamy frosting over them while they are still warm. Enjoy your delightful Red Velvet Cinnamon Rolls! To get the best dough, start with the right flour. Use all-purpose flour for a soft texture. When mixing, add the wet ingredients slowly. This helps to control the stickiness. If your dough feels too wet, sprinkle in a bit of flour. Knead it gently until it’s smooth and elastic. Aim for a soft dough that springs back when poked. This key step ensures your rolls are fluffy and light. For even baking, make sure the rolls are spaced apart in the pan. This allows hot air to flow around each roll. Preheat your oven fully before putting the rolls inside. An oven thermometer can help check the right temperature. Rotate the pan halfway through baking for uniform heat. Keep an eye on them; golden brown is your goal. A toothpick inserted in the center should come out clean. For a smooth frosting, use softened cream cheese. Mix it well with powdered sugar and milk. This helps to avoid lumps. When drizzling, do it while the rolls are warm. The heat will help the frosting melt into every crevice. If you want it thicker, add more powdered sugar. For a fun twist, try adding a splash of vanilla or a pinch of salt to enhance the flavor. {{image_4}} You can easily add nuts to your red velvet cinnamon rolls. Chopped pecans or walnuts work best. To do this, sprinkle about 1/2 cup of nuts on the filling before rolling the dough. This adds a nice crunch and flavor. The nuts pair well with the sweet cream cheese frosting. You can enjoy a delightful texture contrast in every bite. For a gluten-free version, use a gluten-free flour blend. Ensure it has a good binding agent, like xanthan gum. Follow the same steps in the recipe. You may need to adjust the liquid amounts slightly for the right dough consistency. Gluten-free rolls can still rise and taste amazing. Trust me, they will be just as soft and delicious! To make vegan red velvet cinnamon rolls, swap out the dairy and egg. Use almond milk or soy milk instead of whole milk. Replace the sour cream with a non-dairy yogurt. For the egg, try using a flax egg. Mix 1 tablespoon of ground flaxseed with 2.5 tablespoons of water. Let it sit for a few minutes to thicken. These changes make your rolls vegan-friendly without losing flavor. Enjoy the same rich taste while being kind to animals! For the full recipe, check the link provided. Store leftover red velvet cinnamon rolls in an airtight container. Keep them at room temperature for up to two days. If you want them to last longer, place them in the fridge. They will stay fresh for up to a week. Make sure to let them cool completely before storing. This helps prevent sogginess. You can freeze your red velvet cinnamon rolls for later enjoyment. Once they cool, wrap each roll tightly in plastic wrap. Then, place them in a freezer bag. They can last for up to three months in the freezer. When you are ready to eat, simply thaw them in the fridge overnight. To reheat your cinnamon rolls, preheat the oven to 350°F (175°C). Place the rolls on a baking sheet. Cover them loosely with foil to keep them moist. Heat for about 10-15 minutes or until warm. If desired, you can add a bit of frosting after reheating. This makes them taste fresh and delicious again. For a quicker option, you can use the microwave. Heat each roll for about 15-20 seconds. Enjoy the warmth! Yes, you can prepare the rolls the night before. After cutting the rolls, place them in a greased dish. Cover with plastic wrap and refrigerate. In the morning, let them sit at room temperature for about 30 minutes before baking. This helps them rise. You will enjoy fresh rolls in no time! If you don't have sour cream, you can use plain yogurt. Buttermilk is another good choice. Both will give moisture and a slight tang. You can also mix cream cheese with milk for a similar effect. Each option will work well in this recipe. Check the rolls for a golden brown color. Insert a toothpick into the center of a roll. If it comes out clean, they are done. The rolls should feel soft to the touch. If they are firm or hard, they may need more time in the oven. Be sure to watch them closely! In this article, we explored the key ingredients for red velvet cinnamon rolls, from dough to frosting. We walked through step-by-step instructions for preparing and baking them, plus tips for a perfect finish. Variations like gluten-free and vegan options ensure everyone can enjoy these treats. Remember to store leftovers properly and reheat them for the best taste. Making these rolls is fun and rewarding, and they impress any crowd! Enjoy the delicious journey of baking your own red velvet cinnamon rolls.
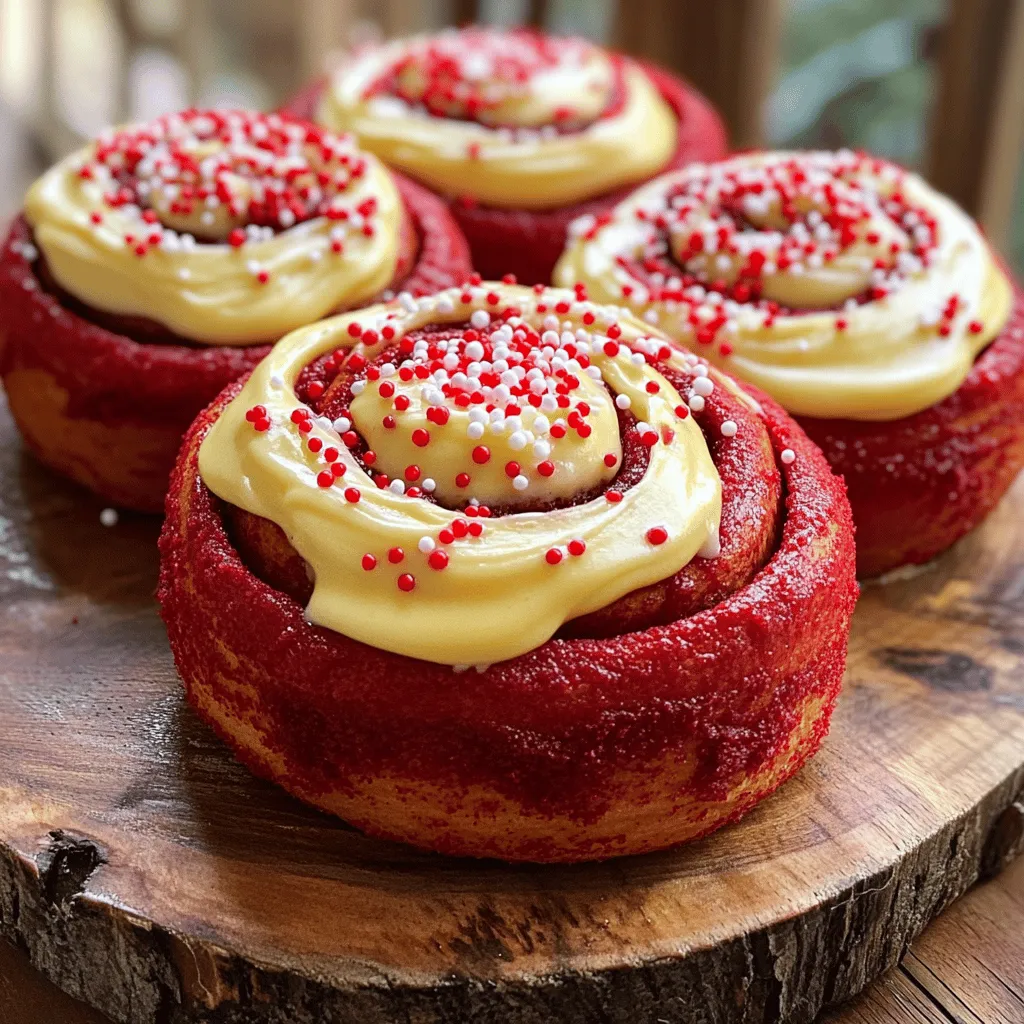
Red Velvet Cinnamon Roll Delightful and Easy Recipe
Are you ready to bake something scrumptious? This Red Velvet Cinnamon Roll recipe is both delightful and easy. With its rich flavor and stunning color,
To make these flaky treats, you need a few key ingredients. Here’s what you will need: - 2 cups all-purpose flour - 1/4 cup granulated sugar - 1 packet (2 1/4 teaspoons) instant yeast - 1/2 teaspoon salt - 1/2 cup whole milk, warmed to about 110°F (43°C) - 1/4 cup unsalted butter, melted and slightly cooled - 1 large egg, at room temperature - 1/2 teaspoon vanilla extract - 1/4 cup brown sugar (for filling) - 1 tablespoon ground cinnamon (for filling) - 1/2 cup unsalted butter, softened (for spreading) - Powdered sugar for dusting (optional) These ingredients create a rich dough that gives cruffins their unique texture. You can add extra flavors to your cruffins. Here are some ideas: - Chocolate chips for a sweet touch - Nuts for crunch - Fruit jams for a fruity filling - Zest from citrus fruits for a fresh flavor Feel free to mix and match these to suit your taste! To make your cruffins, you will need some tools: - Mixing bowls - A whisk - A rolling pin - A muffin tin - A clean kitchen towel - An oven Having the right equipment makes the process smoother and more fun. To start, you need to make the dough. In a medium bowl, mix the warmed milk, melted butter, and granulated sugar. Stir until the sugar dissolves. In a larger bowl, whisk together the all-purpose flour, instant yeast, and salt. Slowly pour in the milk mixture, stirring as you go. Add the egg and vanilla extract. Mix until the dough is shaggy. Next, transfer the dough to a floured surface. Knead it for 5-7 minutes until smooth and elastic. Place the dough in a greased bowl and cover it with a towel. Let it rise in a warm spot for about 1 hour, or until it doubles in size. Once the dough has risen, punch it down gently. Roll it out on a floured surface to a rectangle that is about 1/4 inch thick. Spread the softened butter evenly over the dough. In a small bowl, mix the brown sugar and cinnamon, then sprinkle it over the buttered dough. Now, fold the dough into thirds, like a letter. Roll it out again into a rectangle of the same thickness. Repeat the butter spreading and sugar-cinnamon sprinkling one more time. Cut the folded dough into rectangles about 3x4 inches. To shape the cruffins, start at the short edge of each rectangle. Roll it tightly into a log shape. Place each log in a greased muffin tin, spiraling it up so it fits snugly. Cover the muffin tin with a towel. Let the cruffins rise for another 30 minutes until puffy. During this time, preheat your oven to 375°F (190°C). Bake the cruffins for 20-25 minutes, or until they are golden brown. After baking, let them cool slightly. If desired, dust them with powdered sugar for a sweet finish. Enjoy your delicious cruffins! For the full recipe, refer to the instructions above. When making cruffins, avoid overmixing the dough. This can make them tough. Knead just until the dough is smooth. Don’t skip the rising time. If the dough does not rise enough, your cruffins will be dense. Ensure your yeast is fresh. Old yeast can ruin your cruffins. To achieve the best flaky texture, use cold butter when spreading. This helps create layers as the cruffins bake. Roll the dough thin enough, but not too thin. A 1/4 inch thickness works well. The more times you fold the dough, the flakier your cruffins will be. Each fold adds layers, making them light and airy. Make sure to place your dough in a warm area for rising. A cozy spot helps activate the yeast. Cover the dough with a damp towel to keep it moist. This prevents a dry crust from forming. For baking, preheat your oven fully before placing the cruffins inside. This ensures even cooking. Bake until golden brown for a perfect finish. Check out the Full Recipe for detailed steps and measurements to create these tasty treats! {{image_4}} Cruffins are not just flaky treats; they are a canvas for flavor. You can use many fillings to make your cruffins unique. Here are some options: - Chocolate Hazelnut Spread: Spread this inside for a rich, sweet treat. - Fruit Jam: Raspberry or strawberry jam adds a fruity burst. - Cream Cheese: Mix with sugar and vanilla for a creamy filling. - Nutella: A classic choice, perfect for chocolate lovers. - Peanut Butter: Spread it for a nutty flavor that pairs well with banana. Feel free to mix and match these fillings. Each variation brings a new twist to your cruffins. You can easily adapt cruffins for different diets. Here’s how: - Gluten-Free: Replace all-purpose flour with a certified gluten-free blend. Make sure your yeast is gluten-free too. - Vegan: Use almond milk instead of whole milk. Substitute the egg with flaxseed meal mixed with water. Use vegan butter for spreading. These swaps let everyone enjoy cruffins, regardless of dietary needs. Customization is key to making cruffins your own. Here are some ideas: - Spices: Add nutmeg or cardamom to your sugar mixture for extra warmth. - Zest: Mix in citrus zest, like lemon or orange, for a fresh kick. - Toppings: After baking, drizzle with icing or sprinkle with nuts for crunch. Experiment with flavors and textures. Each tweak can lead to a delightful surprise. For detailed steps, check the Full Recipe. To keep your cruffins fresh, place them in an airtight container. This will help maintain their flaky texture and flavor. Store them at room temperature for up to two days. If you plan to keep them longer, it's best to freeze them. For long-term storage, wrap each cruffin tightly in plastic wrap. Then, place them in a freezer bag. This method will prevent freezer burn. You can freeze cruffins for up to three months. Just be sure to label the bag with the date. To reheat cruffins, I recommend using the oven. Preheat it to 350°F (175°C). Place the cruffins on a baking sheet and heat for about 10 minutes. This method helps restore their crispiness. You can also microwave them for about 15-20 seconds, but they may lose some texture. Enjoy your cruffins warm for the best taste! Cruffins are a tasty mix of croissants and muffins. They have a flaky texture and a fun shape. You make them by rolling dough, just like croissants, then baking them in a muffin tin. The result is a soft inside and a crispy outside. You can fill them with sweet or savory options, like cinnamon sugar or chocolate. They are perfect for breakfast or a snack. Yes, you can prepare cruffins in advance! You can make the dough and shape the cruffins. Then, store them in the fridge overnight. In the morning, let them rise for about 30 minutes before baking. This saves you time and lets you enjoy fresh cruffins easily. If you want to make them even earlier, you can freeze the shaped cruffins. Just thaw them in the fridge overnight before baking. You can find cruffins at many bakeries and cafes. Look for places that make fresh pastries. Some grocery stores may also sell them in the bakery section. If you want the full experience, try making them at home using the full recipe. This way, you can enjoy them warm and fresh right out of the oven! We covered all you need to know about cruffins. You learned the key ingredients and tools, plus step-by-step baking instructions. I shared tips to avoid common mistakes and improve texture. We explored popular flavor ideas and ways to adapt recipes for different diets. Lastly, I explained how to store, freeze, and reheat your cruffins. Making cruffins can be fun and creative. Try different flavors and fillings. Enjoy the tasty results of your hard work!
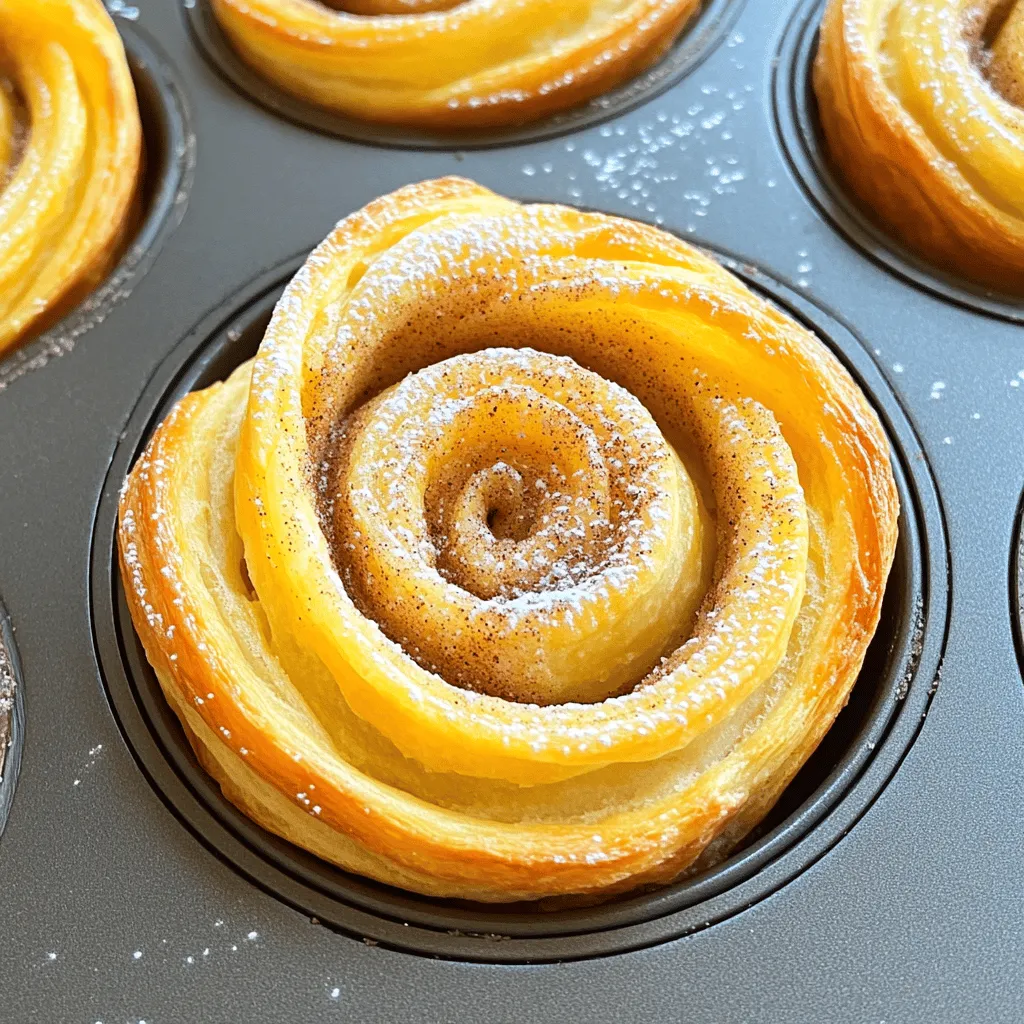
Delicious Cruffins Easy Recipe for Flaky Treats
Are you ready to elevate your baking game? My easy recipe for delicious cruffins will bring flaky, golden joy to your kitchen. Imagine layers of
- 1 cup graham cracker crumbs - 16 oz cream cheese, softened - 2 large eggs - 1 cup crushed pineapple - 1/4 cup brown sugar - Maraschino cherries - Fresh mint leaves for garnish - Muffin tin - Cupcake liners - Mixing bowls and electric mixer The main ingredients create a rich and creamy base. The graham cracker crumbs form a crunchy crust. Cream cheese gives the cheesecakes their smooth texture. Eggs help the filling set and hold together. Crushed pineapple adds a sweet, juicy flavor. For a sweeter touch, use brown sugar. Maraschino cherries make a lovely garnish. Fresh mint leaves add color and freshness. You need a muffin tin and cupcake liners to shape the cheesecakes. Mixing bowls and an electric mixer help blend the ingredients well. With these ingredients and tools, you're ready to make mini pineapple upside-down cheesecakes. For the full recipe, check the details above! - Preheat the oven to 325°F (160°C). - Combine 1 cup of graham cracker crumbs with 4 tablespoons of melted unsalted butter. - Press the mixture into muffin liners. Make sure the crust is even and firm. - Beat 16 oz of softened cream cheese with 1/2 cup of granulated sugar until smooth. - Add 2 large eggs and 1 teaspoon of vanilla extract, mixing well after each one. - Gently fold in 1 cup of well-drained crushed pineapple until blended. - Spoon the cheesecake mixture into each crust, filling them about 3/4 full. - Top with a mixture of 1/4 cup brown sugar and any leftover crushed pineapple. - Bake for 18-20 minutes, or until the centers jiggle slightly. - Cool the mini cheesecakes at room temperature, then chill in the fridge for at least 2 hours. For a delightful touch, add a Maraschino cherry on top before serving. Enjoy these tasty bites! If you want the full recipe, check out the details above. To get the best texture, start with cream cheese at room temperature. Cold cream cheese makes lumps in your batter. Leave it out for about 30 minutes before mixing. Next, avoid over-mixing the batter. Mix just until smooth. Over-mixing can add too much air and make your cheesecake puff up. For a great look, garnish each cheesecake with a Maraschino cherry. Place it right in the center for a pop of color. You can also use fresh mint leaves. They add a nice green touch and a bit of freshness. Arrange the mini cheesecakes on a pretty platter. Sprinkle extra crushed pineapple around for a fun touch. One issue is overbaking the cheesecakes. They should be set but still have a slight jiggle in the center. Keep an eye on them during baking. Another mistake is not letting them cool properly. Allow them to cool at room temperature first, then chill them in the fridge. Proper cooling helps the flavors develop and gives the right texture. For the full recipe, check out the recipe section above. {{image_4}} You can make these mini cheesecakes even better. Adding coconut gives them a fun, tropical twist. Just mix shredded coconut into the filling or sprinkle it on top. You can also try different fruit toppings. Fresh mango or strawberries add a nice touch. Just slice the fruit and place it on top before serving. If you want a different crust, consider using Oreo crumbs instead of graham crackers. The chocolate flavor adds a nice contrast to the sweet cheese filling. For those who need gluten-free options, use gluten-free graham crackers or almond flour. Both choices work well and keep the taste amazing. For a delightful serving idea, pair these cheesecakes with whipped cream or vanilla ice cream. The creaminess complements the cheesecakes perfectly. You can also serve them alongside a fresh fruit salad. The bright colors and flavors of the fruit enhance the overall dish. Explore these options to make your mini pineapple upside-down cheesecakes shine! For the full recipe, check out the detailed instructions above. Store your mini cheesecakes in the fridge. Place them in an airtight container. They will stay fresh for about 5 days. If you have leftovers, make sure to cover them well. You can freeze unbaked mini cheesecakes. Just prepare them in the muffin tin, then wrap the whole tin in plastic wrap. It keeps them safe from freezer burn. They can last up to 2 months in the freezer. When you want to serve them, thaw the cheesecakes in the fridge overnight. Once thawed, bake them as you normally would. This way, you enjoy fresh-tasting cheesecakes even after freezing. You can check the full recipe for more details on baking times and serving. In this post, we covered making mini cheesecakes with simple ingredients like graham crackers, cream cheese, and crushed pineapple. You learned how to prepare the crust, mix the filling, and bake the cheesecakes. We shared tips to avoid common mistakes and ways to customize your recipe. Whether you choose to freeze them or serve them fresh, these cheesecakes are fun and easy to make. Enjoy your delicious treats and share them with others for smiles all around!
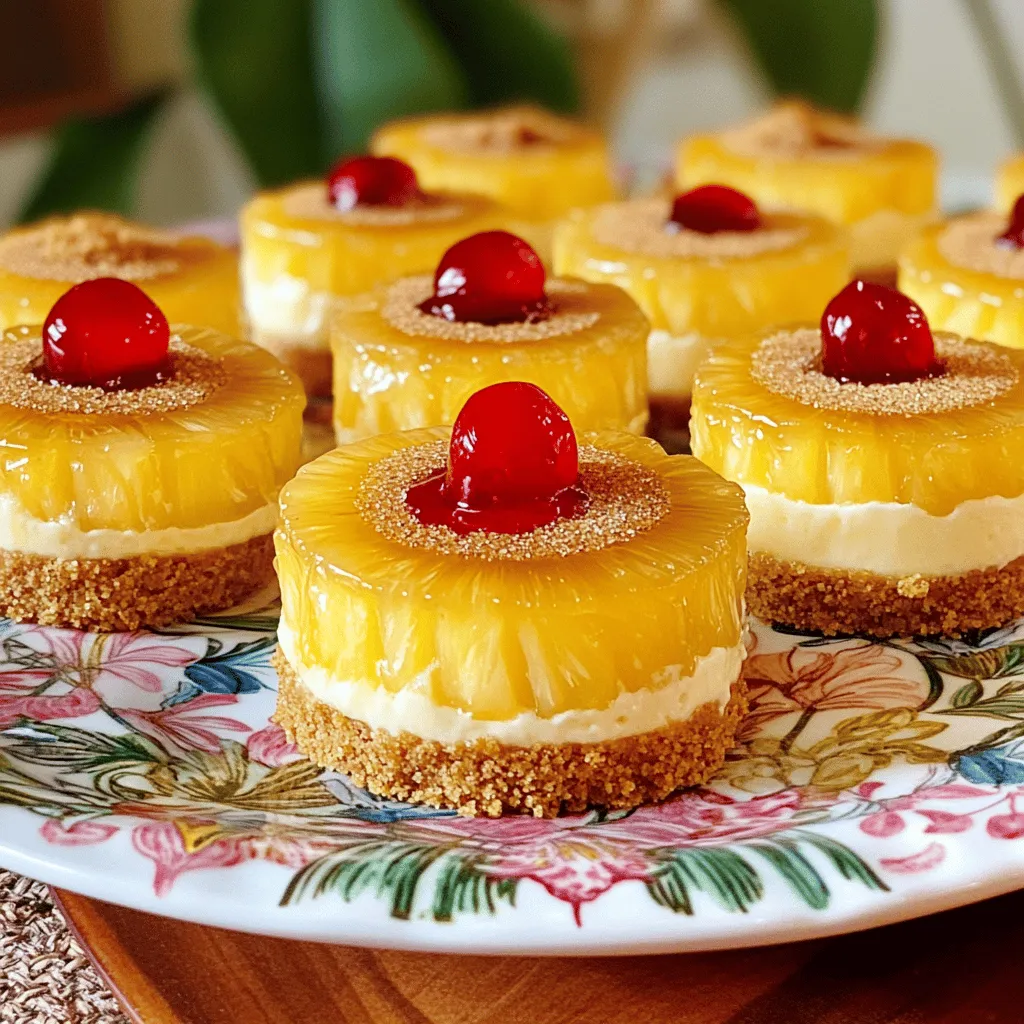
Mini Pineapple Upside-Down Cheesecakes Flavorful Treat
Do you love sweet and tangy treats? Then you’re in for a delightful surprise! These Mini Pineapple Upside-Down Cheesecakes are the perfect blend of creamy,
- 1 cup unsalted butter, softened to room temperature - 1 cup granulated sugar - 1 cup packed brown sugar - 2 large eggs - 1 teaspoon pure vanilla extract - 1 ¾ cups all-purpose flour - ⅔ cup unsweetened cocoa powder - 1 teaspoon baking powder - ½ teaspoon baking soda - ½ teaspoon salt - 1 cup semi-sweet chocolate chips - ½ cup rainbow sprinkles (plus extra for topping) Butter gives the cookies a rich and soft texture. Use unsalted butter for better control over saltiness. Granulated sugar adds sweetness and helps with spreading. Brown sugar makes the cookies chewy and moist. Eggs bind the ingredients together and add moisture. Flour is the base for the cookie structure. Cocoa powder gives that classic chocolate flavor. Baking powder and baking soda help the cookies rise and stay soft. Salt balances the sweetness and enhances the flavor. Chocolate chips and rainbow sprinkles add sweetness and fun colors. You can swap unsalted butter for coconut oil or margarine if needed. For sugar, use coconut sugar or a sugar substitute. If you want a vegan option, try flax eggs instead of regular eggs. All-purpose flour can be replaced with whole wheat flour for a healthier twist. Use any chocolate chips you like, or even chunks. If you want to skip sprinkles, add nuts or dried fruit instead. For the full recipe, check out Cosmic Brownie Cookies. First, gather all your ingredients. You will need: - 1 cup unsalted butter, softened to room temperature - 1 cup granulated sugar - 1 cup packed brown sugar - 2 large eggs - 1 teaspoon pure vanilla extract - 1 ¾ cups all-purpose flour - ⅔ cup unsweetened cocoa powder - 1 teaspoon baking powder - ½ teaspoon baking soda - ½ teaspoon salt - 1 cup semi-sweet chocolate chips - ½ cup rainbow sprinkles (plus extra for topping) Start by preheating your oven to 350°F (175°C). This step gets the oven ready for baking your cookies. Next, line a baking sheet with parchment paper. This will stop the cookies from sticking. In a large bowl, cream the softened butter, granulated sugar, and brown sugar together. Use a mixer on medium speed. Mix until smooth and fluffy for about 2-3 minutes. Now, add the eggs one at a time. Mix well after each egg until fully mixed. Then, add the vanilla extract and combine everything well. In another bowl, whisk together the flour, cocoa powder, baking powder, baking soda, and salt. This ensures the dry ingredients mix well. Gradually add this dry mix to the wet mix. Use a spatula to stir gently. Be careful not to overmix. This can make your cookies tough. Finally, fold in chocolate chips and rainbow sprinkles until they are evenly spread. Scoop tablespoon-sized balls of dough and place them on the baking sheet. Leave about 2 inches between each ball. This lets them spread while they bake. Add extra rainbow sprinkles on top for fun colors. Place the baking sheet in the oven and bake for 10-12 minutes. The edges should be set, but the center can look soft. This keeps them chewy. Once baked, let the cookies cool on the baking sheet for about 5 minutes. This helps them firm up a bit. After that, transfer them to a wire rack. Let them cool completely. This allows air to flow and gives the best texture. For a fun presentation, arrange the cookies on a colorful platter. Serve with a chilled glass of milk or a warm cup of hot chocolate for a delightful treat experience. For the complete recipe, check out the Full Recipe. To make chewy cookies, follow a few simple steps. First, use brown sugar. Brown sugar adds moisture, which helps keep cookies soft. Second, do not overmix your dough. Overmixing can lead to tough cookies. Mix just until combined. Third, underbake your cookies slightly. Take them out when the edges are set and the centers look soft. They will continue to cook as they cool. Avoid these common mistakes for perfect cookies. One mistake is using cold butter. Cold butter will not blend well with the sugars. Make sure it is softened. Another mistake is skipping the cooling time. Letting cookies cool on a wire rack helps them firm up. Lastly, do not skip the sprinkles. They add a fun touch and a bit of crunch to each bite. You can easily enhance the flavor and texture of your cookies. Add a pinch of sea salt to the dough. This brings out the sweetness of the chocolate. For more depth, try using different cocoa powders. Dark cocoa can give a richer taste. You can also mix in nuts for added crunch. Pecans or walnuts work well and add a nice texture. Check out the Full Recipe for more ways to customize your Cosmic Brownie Cookies! {{image_4}} You can make Cosmic Brownie cookie sandwiches for a fun twist. Take two cookies and spread frosting or whipped cream in between. You’ll create a dreamy dessert that kids and adults will love. Use chocolate frosting for a rich taste, or try vanilla for a lighter option. These sandwiches look great and taste even better. If you need a gluten-free choice, you can easily adapt this recipe. Replace all-purpose flour with a gluten-free flour blend. Make sure the blend has xanthan gum to help the cookies hold together. The texture may change a bit, but the taste will still be delicious. You won’t miss out on the fun! Mixing in different treats can make these cookies even more exciting! You can add nuts, like chopped walnuts or pecans, for a crunchy bite. Try different types of chocolate chips, like white chocolate or dark chocolate, for a unique flavor. You can also fold in crushed candy bars for a sweet surprise. Be creative! You can discover your favorite mix-ins. To keep your Cosmic Brownie Cookies fresh, store them in an airtight container. This helps to keep them soft and chewy. You can layer the cookies with parchment paper to prevent them from sticking together. If you want to enjoy these cookies later, freezing is a great option. Place the cooled cookies in a single layer on a baking sheet. Freeze them for about two hours. Once frozen, transfer them to a freezer bag. This way, they won’t stick together. These cookies stay fresh for about a week at room temperature. If you freeze them, they can last up to three months. Just remember to thaw them at room temperature for a few hours before enjoying. For more detailed storage tips, check the Full Recipe. Cosmic Brownies are a fun dessert made with rich chocolate. They have a soft, chewy texture and are topped with colorful sprinkles. These cookies mix the classic brownie flavors with a cookie crunch. They are perfect for parties or a sweet treat at home. You can enjoy them fresh from the oven or let them cool for later. Yes, you can use different types of chocolate chips. Milk chocolate, dark chocolate, or even white chocolate work well. Each choice gives a unique taste. You can also mix different kinds of chips for extra flavor. For a fun twist, try using peanut butter chips or caramel bits. To add more color, use vibrant sprinkles on top. You can also mix in colored candy pieces like M&Ms. Another option is to add colored frosting after baking. This way, you can create a fun design on each cookie. Get creative, and let your imagination run wild! Brownies are typically dense and fudgy, while brownie cookies are lighter and crispier. Brownies are baked in a pan, then cut into squares. Brownie cookies are portioned into balls and baked as individual cookies. This gives them a fun shape and texture. Both treats bring chocolate joy, but they offer different eating experiences. This blog post covered how to make delicious cookies with key ingredients and smart tips. We explored ingredient swaps and step-by-step baking instructions. I shared ways to make your cookies chewy and avoid mistakes. Plus, there are tasty variations and storage tips to keep them fresh. You now have all the tools to create perfect Cosmic Brownie Cookies. Enjoy experimenting with your favorite flavors and sharing them with friends!
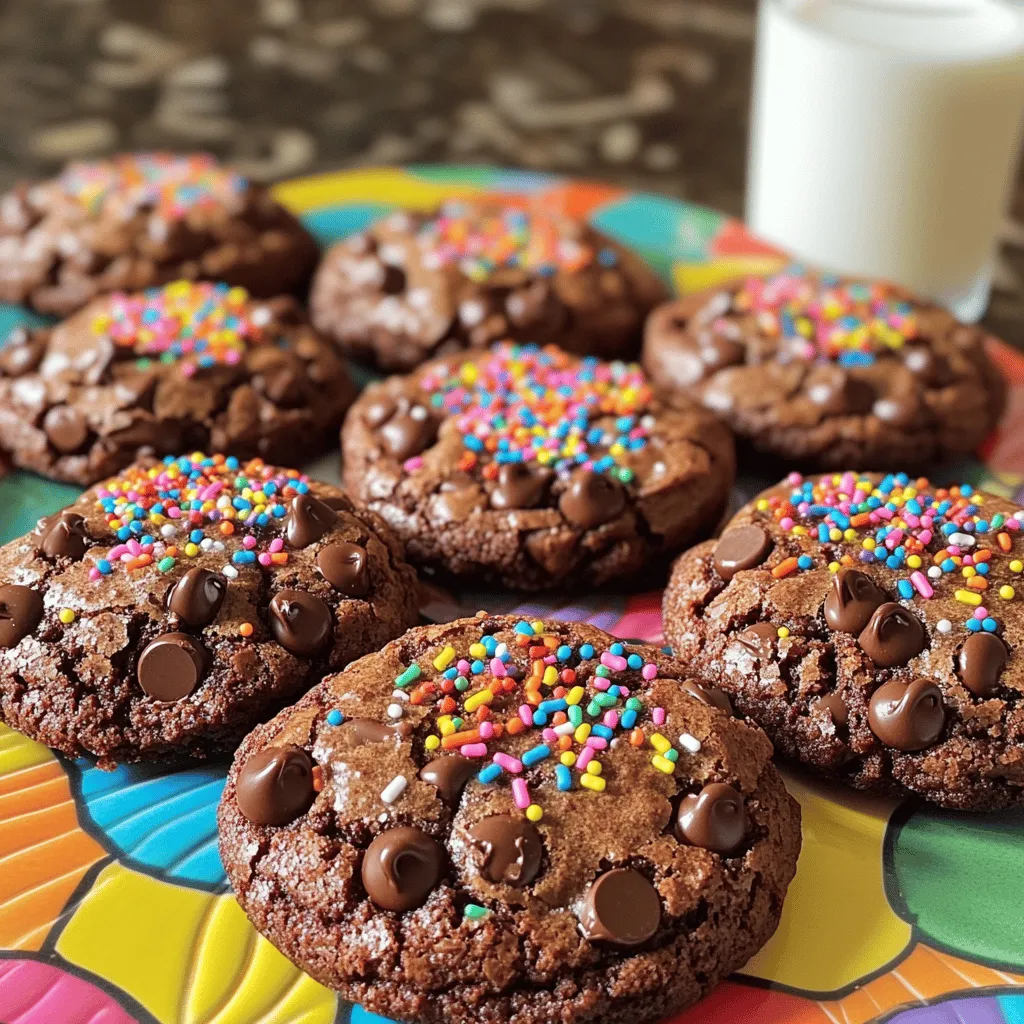
Cosmic Brownie Cookies Delightful and Easy Recipe
Who doesn’t love the rich, gooey goodness of Cosmic Brownies? Today, I’m sharing an easy recipe for Cosmic Brownie Cookies that brings all the classic
Let’s dive into the ingredients you need for banana bread cookies. These simple items will create a tasty treat that everyone will love. - 2 ripe bananas, thoroughly mashed (about 1 cup) - 1/2 cup unsalted butter, softened to room temperature - 1/2 cup packed brown sugar - 1/4 cup granulated sugar - 1 large egg, at room temperature - 1 teaspoon pure vanilla extract - 1 cup all-purpose flour - 1/2 teaspoon baking soda - 1/4 teaspoon baking powder - 1/4 teaspoon fine sea salt - 1/2 teaspoon ground cinnamon - 1/2 cup chopped walnuts (optional for added texture) - 1/2 cup chocolate chips (optional for a sweet twist) Each ingredient plays a key role. Ripe bananas give natural sweetness and moisture. Unsalted butter adds richness. The sugars create a soft texture. The egg binds everything together. Baking soda and baking powder help the cookies rise. Sea salt enhances all the flavors. Ground cinnamon adds warmth and spice. Walnuts and chocolate chips offer fun twists, but they are optional. Gather these ingredients to create your banana bread cookies. They will be delicious! {{ingredient_image_2}} 1. Preheat your oven to 350°F (175°C). This helps the cookies bake evenly. Line a baking sheet with parchment paper. This step stops cookies from sticking. 2. In a large bowl, cream the unsalted butter, brown sugar, and granulated sugar. Use an electric mixer on medium speed. Mix for about 2-3 minutes until the mix is light and fluffy. 3. Add the mashed bananas, egg, and vanilla extract to the bowl. Mix until smooth and all ingredients blend well. 4. In another bowl, whisk together the all-purpose flour, baking soda, baking powder, sea salt, and ground cinnamon. This step ensures even mixing of dry ingredients. 5. Slowly combine the dry mix with the wet mixture. Stir gently with a spatula until just mixed. It is okay if the dough has a few lumps. 6. Fold in chopped walnuts and chocolate chips, if you’re using them. Make sure they mix well without overworking the dough. 1. Use a tablespoon or cookie scoop to portion out the dough. Place each scoop on the prepared baking sheet, leaving about 2 inches between each scoop. This spacing allows the cookies to spread. 2. Bake the cookies in the oven for 10-12 minutes. Check for lightly golden edges. The centers should feel just set when you press them lightly. 3. Once baked, take the cookies out and cool them on the baking sheet for about 5 minutes. Then, transfer the cookies to a wire rack to cool completely. Enjoy your warm, tasty banana bread cookies! To make cookies that are soft and chewy, avoid overmixing the dough. Mix just until ingredients blend. If you see lumps, that is okay! Also, properly measuring ingredients is key. Use a scale if you can. This way, your cookies will bake evenly every time. For more flavor, try adding spices like nutmeg or allspice. A little pinch can change the taste! You can also experiment with different sweeteners. Honey or maple syrup can add a nice twist. Just remember to adjust the amount of flour if you add liquid sweeteners. Enjoy the fun of creating your own unique banana bread cookies! Pro Tips Use Overripe Bananas: The riper the bananas, the sweeter and more flavorful your cookies will be. Look for bananas with lots of brown spots for the best results. Chill the Dough: If you find the dough too sticky to scoop, consider chilling it in the fridge for 15-30 minutes. This will make it easier to handle and improve the texture of the cookies. Experiment with Add-ins: Feel free to customize your cookies by adding different mix-ins like dried fruits, pecans, or coconut. Each variation can give a unique twist to your banana bread cookies. Store Properly: To keep your cookies fresh, store them in an airtight container at room temperature for up to a week. You can also freeze them for longer storage, just make sure to separate layers with parchment paper. {{image_4}} Banana bread cookies offer fun ways to mix things up. You can easily add chocolate chips for a sweet twist. The chocolate pairs well with the bananas. Just fold in half a cup of chocolate chips after mixing your dough. It adds richness and joy. If you want a gluten-free version, swap all-purpose flour for a gluten-free blend. This works great. Check the blend for xanthan gum, as it helps with texture. Your cookies will still be soft and tasty! For vegan banana bread cookies, replace the egg with a flax egg. To make this, mix 1 tablespoon of ground flaxseed with 2.5 tablespoons of water. Let it sit for five minutes to thicken. Use plant-based butter instead of regular butter to keep it vegan. If you need nut-free options, simply leave out the walnuts. You can also replace them with seeds, like sunflower seeds or pumpkin seeds. This keeps the cookies safe for those with nut allergies while still adding crunch! You can store banana bread cookies at room temperature or in the fridge. For room temperature, place the cookies in an airtight container. They will stay fresh for up to five days. If you want to keep them longer, the fridge is best. Just make sure to wrap them well to prevent drying. Use a glass or plastic container for storage. Avoid metal containers, as they can change the taste. You can also use a resealable plastic bag. Just remove as much air as you can before sealing. To freeze baked cookies, wait until they cool completely. Then, place them in a single layer on a baking sheet. Freeze for about one hour. After they are solid, transfer the cookies to a freezer-safe bag. They can last up to three months in the freezer. When you want to eat them, take out the number you need. Leave them at room temperature for about 30 minutes to thaw. You can also heat them in the oven at 350°F for a few minutes. This will make them warm and soft again. Can I use frozen bananas? Yes, you can use frozen bananas. Just thaw them first. Make sure to mash them well before adding them to your mix. This gives the cookies great flavor and moisture. How to tell when the cookies are done? The cookies are done when the edges are lightly golden. The centers should feel set when you press them gently. This usually takes about 10-12 minutes in the oven. Can I make these cookies without an egg? Yes, you can make these cookies without an egg. Use a flaxseed meal or applesauce as a substitute. One tablespoon of flaxseed mixed with three tablespoons of water works well. What can I substitute for all-purpose flour? You can use whole wheat flour or oat flour. If you're gluten-free, almond flour or coconut flour are good options. Just remember to adjust the quantity as needed. You now have a full guide on making delicious banana bread cookies. We covered essential ingredients, step-by-step instructions, and helpful tips to achieve the best texture. You learned about creative variations and how to store these treats. Remember, baking is an art you can master. Use ripe bananas and play with flavors. Enjoy your cookie-making journey and share these delights with friends and family. Your kitchen can be a fun place to create tasty memories.
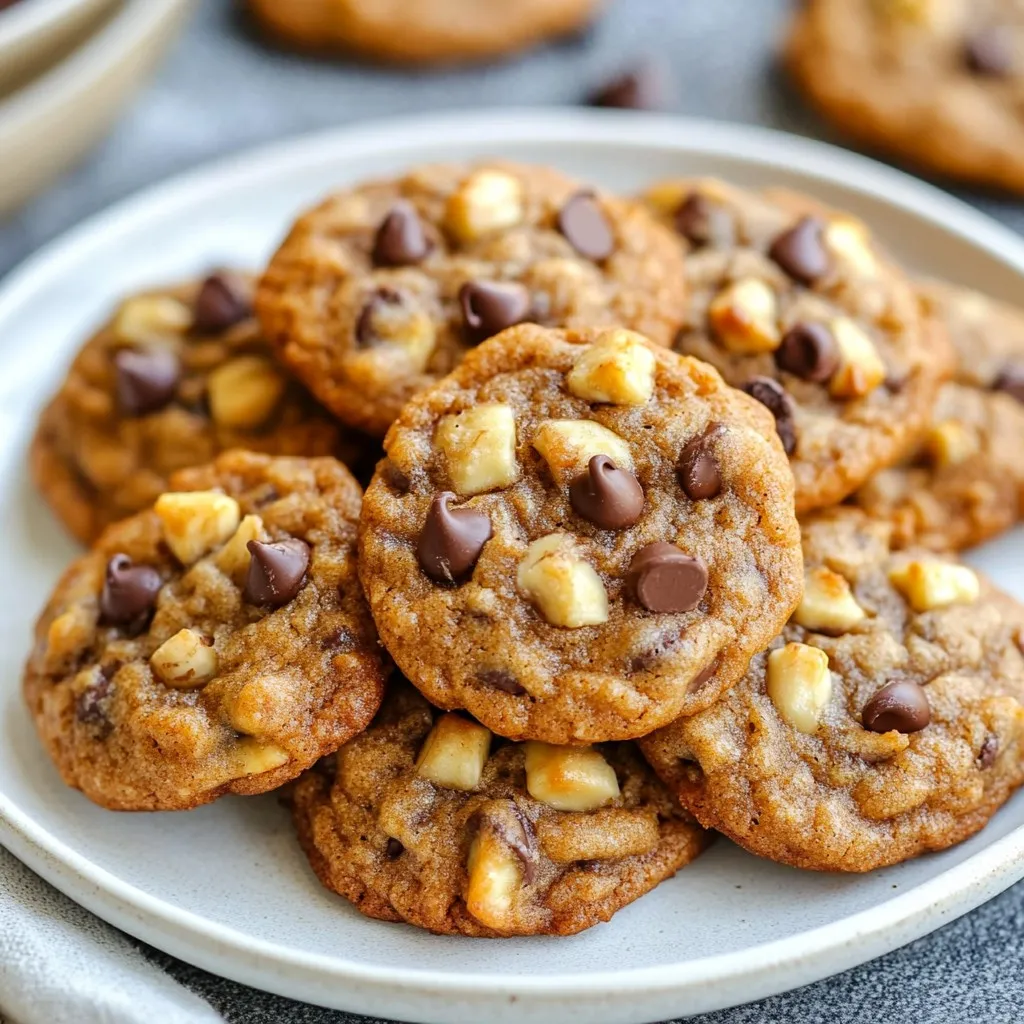
Banana Bread Cookies Delightful and Easy Recipe
Welcome to my delightful journey of baking Banana Bread Cookies! If you love the warm, comforting taste of banana bread, you’ll adore these cookies. They
- 6 large chocolate croissants, sliced into bite-sized pieces - 4 large eggs - 2 cups whole milk - 1/2 cup granulated sugar - 1 teaspoon pure vanilla extract - 1/2 teaspoon ground cinnamon - 1/4 teaspoon fine sea salt - 1 cup semi-sweet chocolate chips - Powdered sugar, for a delightful dusting To make a great chocolate croissant bake, you need simple ingredients. Each one plays a key role in the taste and texture. First, you need six large chocolate croissants. Slice them into small pieces. The croissants add a rich and flaky base. Next, use four large eggs. Whisk them well. Eggs help bind the mix and create a custard-like texture. For the liquid, you will need two cups of whole milk. This gives creaminess to the bake. You also need half a cup of granulated sugar. Sugar adds sweetness, making every bite delicious. Add one teaspoon of pure vanilla extract. This brings a warm flavor to the dish. Don't forget half a teaspoon of ground cinnamon. It adds a lovely spice that pairs well with chocolate. You will need a quarter teaspoon of fine sea salt. Salt balances the sweetness. One cup of semi-sweet chocolate chips is a must. They melt into gooey pockets of chocolate. Lastly, have powdered sugar ready for dusting. This adds a sweet finishing touch. With these ingredients, you can create a warm and decadent treat that everyone will love. - Baking dish (9x13 inch) - Mixing bowls - Whisk and spatula Using the right tools makes baking easier. A 9x13 inch baking dish works perfectly for this recipe. It holds all the ingredients well. Gather some mixing bowls for combining your ingredients. A whisk helps mix the eggs and liquids smoothly. A spatula is great for gently folding croissant pieces into the custard. This helps ensure each piece gets coated well. Having the right equipment makes your bake turn out great! {{ingredient_image_2}} - Preheat oven to 350°F (175°C). - Grease a 9x13 inch baking dish with butter or cooking spray. - Crack 4 large eggs into a bowl and whisk until frothy. - Combine the eggs with 2 cups of whole milk, 1/2 cup of granulated sugar, 1 teaspoon of pure vanilla extract, 1/2 teaspoon of ground cinnamon, and 1/4 teaspoon of fine sea salt. - Whisk these ingredients together until smooth. - Slice 6 large chocolate croissants into bite-sized pieces. - Soak the croissant pieces in the custard mixture. - Use a spatula to gently fold the croissant pieces until they are coated. - Transfer the soaked mixture to the prepared baking dish. - Sprinkle 1 cup of semi-sweet chocolate chips evenly over the top. - Bake in the preheated oven for 30-35 minutes. - Check for doneness by inserting a toothpick in the center. It should come out clean. - Soak the croissant pieces well. This helps them absorb the custard. - Adjust cooking time based on your oven. Each oven is different, so keep an eye on it. - Try adding a splash of orange zest for brightness. It adds a nice twist! - Use different chocolates like dark or milk chocolate for varied taste. Each type offers a unique flavor. - Plate the warm bake with fresh berries for a pop of color. - A scoop of vanilla ice cream on the side makes it extra special. - Finish with a dusting of powdered sugar right before serving to impress your guests. Pro Tips Use Day-Old Croissants: For the best texture, use croissants that are a day or two old. They will absorb the custard mixture better without becoming too soggy. Mix In Some Nuts: Add chopped nuts such as pecans or walnuts to the chocolate chip layer for added crunch and flavor depth. Experiment with Flavors: Try adding orange zest or almond extract for a unique twist on the classic chocolate flavor. Serve with Whipped Cream: For an extra indulgent touch, serve the bake with a dollop of freshly whipped cream or a scoop of vanilla ice cream. {{image_4}} You can change up this recipe by using different types of bread. Instead of chocolate croissants, try brioche or puff pastry for a new texture. Both add a rich flavor and make the bake even more delightful. If you want a dairy-free option, use almond or oat milk. This will keep the bake creamy while catering to dietary needs. For a fun twist, add nuts like pecans or almonds. These add crunch and a nutty flavor that pairs well with chocolate. You can also swap chocolate chips for butterscotch or white chocolate. This simple change can give your bake a whole new taste. In fall, mix in spices like nutmeg or pumpkin spice. This gives your bake a warm, cozy flavor that’s perfect for the season. You can also add dried fruits like cranberries or cherries for a unique touch. They bring sweetness and chewiness that balance the richness of the dish. To keep your chocolate croissant bake fresh, store it in the fridge. Use an airtight container. It stays good for up to three days. When reheating, preheat your oven to 350°F (175°C). Cover the dish with foil to prevent drying out. Heat for about 15 minutes, or until warmed through. For longer storage, you can freeze your chocolate croissant bake. Cut it into individual portions first. Wrap each piece tightly in plastic wrap. Place them in a freezer-safe bag or container. To thaw, move a portion to the fridge overnight. Reheat in the oven at 350°F (175°C) for about 20 minutes. This keeps the texture nice and soft. Yes, you can prepare this chocolate croissant bake a day in advance. Just follow the recipe steps up to the baking point. Cover the dish tightly and place it in the fridge. When you are ready to bake, let it sit at room temperature for about 30 minutes. Then, bake as instructed. This makes it easy for busy mornings! To reheat your chocolate croissant bake, preheat the oven to 350°F (175°C). Place the dish in the oven for about 10-15 minutes. This warms the bake evenly without drying it out. If you prefer the microwave, heat in 30-second intervals until warm. Just be careful not to overcook it. Absolutely! Stale croissants work great in this recipe. They soak up the custard mixture well, creating a soft and rich texture. If your croissants are very hard, you can toast them lightly to bring back some softness. This adds a nice crunch on top! Your chocolate croissant bake is done when the top is golden brown. Insert a toothpick into the center; it should come out clean. This indicates that the custard has set nicely. Keep an eye on it to avoid overbaking, as this can make it dry. This dish pairs well with fresh berries or a scoop of vanilla ice cream. The tartness of berries balances the rich chocolate. You can also serve it with whipped cream for added creaminess. A sprinkle of powdered sugar on top makes it even more delightful! This chocolate croissant bake is a delicious treat. We covered the key ingredients, equipment, and steps to make it. Remember to soak the croissant pieces well. Consider flavor twists like nuts or seasonal spices. Store leftovers properly or even freeze some for later. This dish is flexible and fun, perfect for sharing or enjoying alone. Try it out, and make it your own! Enjoy every bite; it’s hard not to!
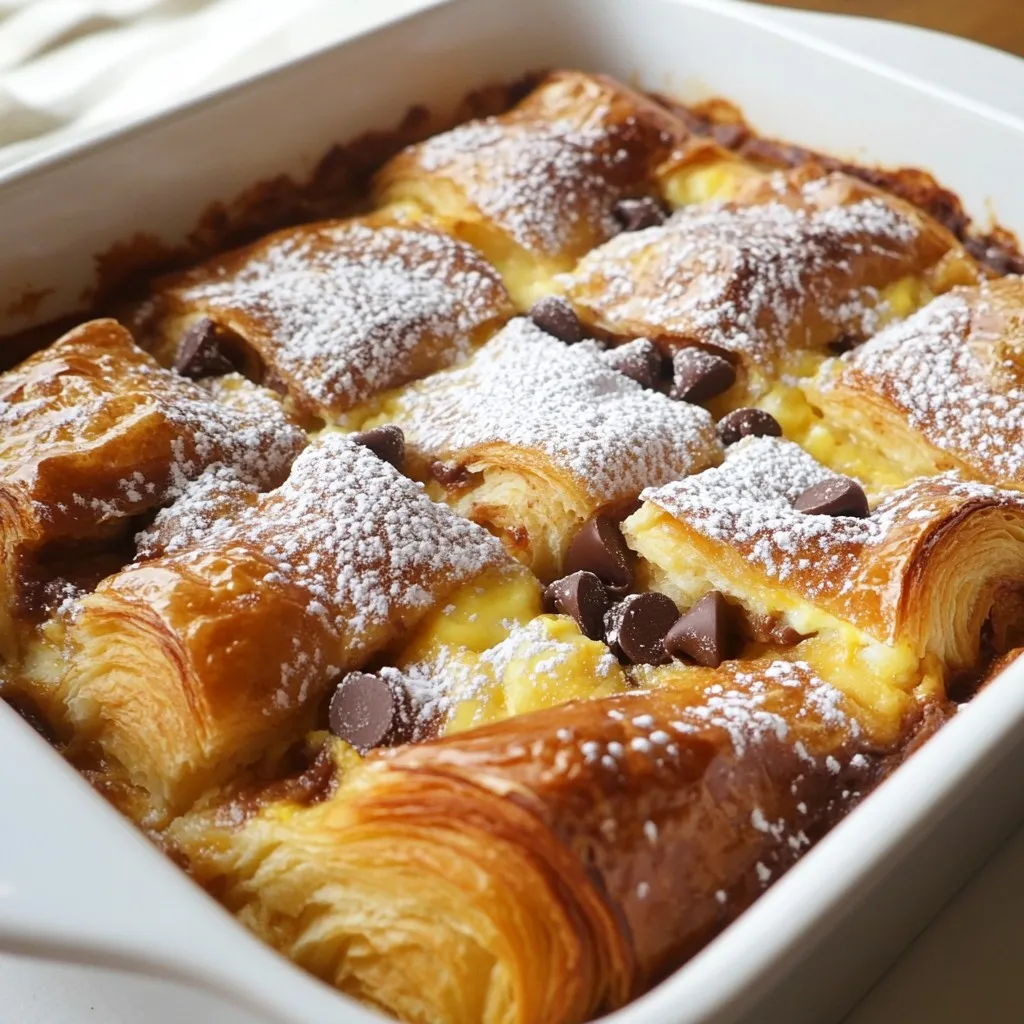
Chocolate Croissant Bake Easy and Delicious Recipe
Get ready to delight your taste buds with a Chocolate Croissant Bake that’s simple yet mouthwatering! This easy recipe transforms chocolate croissants into a rich,
- 1 cup almond flour - 1/2 cup cocoa powder - 1/2 cup protein powder (vanilla or chocolate) - 1/2 teaspoon baking powder - 1/4 teaspoon salt I love starting with dry ingredients. Almond flour gives a light texture. Cocoa powder adds deep chocolate flavor. Protein powder boosts the health factor, while baking powder makes them rise. A pinch of salt balances everything. - 1/2 cup pure maple syrup - 1/4 cup creamy almond butter - 1/4 cup unsweetened applesauce - 1 teaspoon vanilla extract Next, the wet ingredients bring it all together. Maple syrup is sweet and rich. Almond butter adds creaminess and healthy fats. Applesauce keeps the brownies moist. Vanilla extract enhances the overall flavor. - 1/2 cup canned chickpeas, rinsed and drained - 1/4 cup creamy almond butter - 2 tablespoons pure maple syrup - 1/4 teaspoon vanilla extract - 2 tablespoons chocolate chips For that cookie dough layer, chickpeas are a surprise ingredient. They add protein and fiber without altering taste. Almond butter gives it creaminess. Extra maple syrup sweetens it, and chocolate chips make it fun. This layer adds a lovely contrast to the brownies. {{ingredient_image_2}} - Preheat your oven to 350°F (175°C). - Line an 8x8 inch baking pan with parchment paper. - In a large bowl, mix these dry ingredients: - 1 cup almond flour - 1/2 cup cocoa powder - 1/2 cup protein powder - 1/2 teaspoon baking powder - 1/4 teaspoon salt - Stir until no lumps remain. - In another bowl, whisk together these wet ingredients: - 1/2 cup pure maple syrup - 1/4 cup creamy almond butter - 1/4 cup unsweetened applesauce - 1 teaspoon vanilla extract - Mix until smooth and well-blended. - Gradually pour this mixture into the bowl with dry ingredients. - Stir gently until a smooth brownie batter forms. - Fold in 1/2 cup mini chocolate chips evenly. - Spread half of the brownie batter in the prepared pan. - For the cookie dough layer, use a food processor to blend: - 1/2 cup canned chickpeas, rinsed and drained - 1/4 cup creamy almond butter - 2 tablespoons pure maple syrup - 1/4 teaspoon vanilla extract - Blend until creamy, then stir in 2 tablespoons chocolate chips. - Drop dollops of cookie dough on the brownie layer and spread it out. - Cover with the remaining brownie batter, ensuring the cookie dough is hidden. - Bake in your preheated oven for 25–30 minutes. - The edges should look firm. A toothpick should come out clean or with a few crumbs. - Let the brownies cool in the pan on a wire rack. - Once cool, use the parchment to lift them out and cut into squares. To get the best texture, use room temperature ingredients. Cold items can cause clumps. Mix your batter gently. Overmixing can lead to dense brownies. Aim for a smooth but not overly worked batter. Want more flavor? Add nuts or dried fruit to the brownie mix. They give great crunch and taste. You can also change the sweetness. If you like it sweeter, add more maple syrup. For less sweetness, reduce the syrup. Make your brownies look great! Use dusting techniques to add flair. A light sprinkle of cocoa powder on top looks fancy. You can also serve them on a nice platter. Pair with ice cream or whipped cream for a tasty touch. Pro Tips Use Room Temperature Ingredients: Allow your almond butter and applesauce to come to room temperature for a smoother batter that incorporates better. Chickpea Texture Matters: Ensure your chickpeas are well-rinsed and drained to prevent excess moisture, which can affect the consistency of your cookie dough layer. Don’t Overmix: When combining the wet and dry ingredients, mix just until combined. Overmixing can lead to dense brownies. Storage Tips: Store leftover brownies in an airtight container at room temperature for up to 3 days or refrigerate for longer freshness. {{image_4}} You can make these brownies fun with different flavors. Try using chocolate protein powder for an extra rich taste. Vanilla protein powder adds a light sweetness. You can also switch up nut butters. Peanut butter gives a classic taste, while cashew butter adds a creamy twist. If you need gluten-free options, almond flour works great. You can also use coconut flour, but adjust the amount. For a vegan version, swap the eggs with flaxseed meal mixed with water. Use maple syrup as a sweetener to keep it plant-based and delicious. Want more texture? Add extra chocolate chips or nuts for crunch. Chopped walnuts or pecans add great flavor. For a fun twist, swirls of nut butter on top can create a tasty look. Just drop spoonfuls of nut butter before baking for a unique finish. Store your High-Protein Cookie Dough Brownies at room temperature. Use an airtight container to keep them fresh. A simple glass or plastic container works great. Place a piece of parchment paper between layers to prevent sticking. You can enjoy these brownies for about 3-5 days. For long-term storage, freezing is your best bet. Cut the brownies into squares and wrap each piece in plastic wrap. Then, place them in a freezer-safe bag or container. This way, they’ll stay fresh for up to three months. When you're ready to enjoy them, take out a brownie and let it thaw at room temperature. You can also warm it up in the microwave for about 10-15 seconds for a cozy treat. To keep your brownies fresh, store them in a cool, dry place. Always check for signs of spoilage. If the brownies smell off or have a dry texture, it’s best to toss them. Fresh brownies should be soft and slightly chewy. If they feel hard or crumbly, they're past their prime. Yes, you can swap almond flour for other flours. Good choices include oat flour or coconut flour. Both will change the taste and texture slightly. Oat flour tends to be softer, while coconut flour absorbs more moisture. You may need to adjust the liquid in the recipe if you use coconut flour. To add more sweetness, use extra maple syrup. You can also mix in more chocolate chips. If you enjoy a richer flavor, add a bit of brown sugar. Make sure to blend well. Taste your batter before baking to find your perfect sweetness level. For clean cuts, use a sharp knife. First, let the brownies cool completely. You can also warm the knife under hot water. Wipe the knife after each cut for neat edges. This technique gives you pretty squares that look great on a plate. Yes, you can make these brownies ahead of time. They store well for a few days. Keep them in an airtight container at room temperature. You can also freeze them for up to three months. Just thaw them in the fridge before serving. Absolutely! These brownies are perfect for meal prep. They are high in protein and keep you satisfied. Portion them into individual squares for easy grab-and-go snacks. They work well for breakfast or a post-workout treat. These brownies blend healthy ingredients for a tasty treat. You learned how to mix dry and wet components, layer cookie dough, and bake with ease. Tips for texture and flavor add fun to your baking. Explore variations to keep it fresh and store them wisely for later use. Don't hesitate to try new things. Your baking adventure starts now. Happy baking!
High-Protein Cookie Dough Brownies Delightful Treat
Looking for a tasty treat that gives you a protein boost? These High-Protein Cookie Dough Brownies are the answer! Made with simple ingredients, they blend
- 2 large apples (Granny Smith or Honeycrisp) - 1/4 cup packed brown sugar - 1 teaspoon ground cinnamon - 1/4 teaspoon ground nutmeg - 1 tablespoon freshly squeezed lemon juice - 1 tablespoon cornstarch - 10 egg roll wrappers - Vegetable oil for frying - Powdered sugar for dusting (optional) You can use other apple types, like Fuji or Gala. Both work well for sweetness. If you want less sugar, try a sugar substitute. Options like stevia or monk fruit are great. You can also use gluten-free wrappers. They will taste just as good. Choose ripe apples. Look for firm ones that are shiny and smell sweet. Store your apples in the fridge for best results. Keep the egg roll wrappers in the fridge too. Use them before the expiration date for the best taste. {{ingredient_image_2}} Start by dicing two large apples. I like using Granny Smith or Honeycrisp. Place the diced apples in a medium bowl. Add 1/4 cup of packed brown sugar, 1 teaspoon of ground cinnamon, and 1/4 teaspoon of ground nutmeg. Pour in 1 tablespoon of freshly squeezed lemon juice and sprinkle in 1 tablespoon of cornstarch. Mix everything gently. Make sure all the apples get coated well. Let this sit for about 10 minutes. This step allows the flavors to meld, resulting in a delicious filling. Now, let’s roll up the egg rolls! Take one egg roll wrapper and lay it flat. Make sure one corner points toward you. Scoop about 2 tablespoons of the apple filling and place it in the center of the wrapper. Fold the bottom corner over the filling. Then fold in the two side corners toward the center. Continue rolling the wrapper tightly up to the top corner. Use a little water to moisten the edge, and press to seal it. Repeat this until you use all the wrappers or filling. For frying, heat about 2 inches of vegetable oil in a deep pan. Set the heat to medium and wait for the oil to reach 350°F (175°C). Carefully add a few egg rolls to the hot oil. Do not overcrowd the pan. Fry them for 3 to 4 minutes on each side. Look for a golden brown color and crispy texture. When done, use a slotted spoon to remove the egg rolls. Place them on a paper towel-lined plate to drain extra oil. Let them cool slightly before serving. Dust with powdered sugar if you like! Enjoy the warm, crispy treat! To avoid soggy egg rolls, ensure you use a dry filling. Drain any excess liquid from the apples after mixing. Also, do not overfill the wrappers. This helps keep them crispy. Fry egg rolls in small batches. This keeps the oil temperature steady. The right heat makes all the difference. Aim for 350°F (175°C) for perfect frying. For presentation, arrange the hot egg rolls on a nice platter. Serve with a bowl of caramel sauce for dipping. Ice cream also pairs well, especially vanilla. You can sprinkle some powdered sugar on top for a sweet touch. For drinks, try serving apple cider or sweet tea. These beverages complement the flavors nicely. One common mistake is overfilling the wrappers. This can lead to messy frying. Another mistake is not sealing the edges well. Use a little water to moisten the wrapper edges. This helps them stick together. Make sure the egg rolls are tightly wrapped. Loose wrappers can open during frying, making a mess. Pro Tips Choose the Right Apples: For the best flavor and texture, use tart apples like Granny Smith or sweet ones like Honeycrisp. This balance enhances the overall taste of your egg rolls. Don’t Overfill: To prevent the egg rolls from bursting while frying, make sure not to overfill them with the apple mixture. Stick to about 2 tablespoons per wrapper. Maintain Oil Temperature: Keep an eye on the oil temperature while frying. If it’s too hot, the egg rolls will brown too quickly without cooking through. If it’s too low, they will absorb more oil and become greasy. Serve Fresh: For the best crispy texture, serve the egg rolls immediately after frying. They tend to lose their crunchiness as they cool down. {{image_4}} You can make apple pie egg rolls even more fun! Try adding cranberries or raisins for a twist. They add a nice tartness that pairs well with the sweet apples. You can also experiment with spices like ginger. A pinch of ginger gives your egg rolls a warm, spicy kick. Just be sure to balance the spices so they enhance the apple flavor. If you want a vegan option, use applesauce instead of the egg filling. It gives a nice texture and keeps it moist. For a keto-friendly version, swap the brown sugar with a keto sweetener. This way, you can enjoy the delicious flavors without all the carbs. Both options keep the essence of the recipe while catering to different diets. Pair your apple pie egg rolls with ice cream for a delightful treat. Vanilla ice cream is classic, but try caramel or cinnamon ice cream for a twist. You can also serve them with sauces like caramel or chocolate syrup. These dips add extra sweetness and richness to each bite. Enjoy the combinations to make your dessert even better! After making your crispy apple pie egg rolls, you might have some left. To keep them fresh, store the egg rolls in the fridge. Place them in an airtight container. This helps prevent them from getting soggy. They last about three days in the fridge. If you want to save them longer, freeze the egg rolls. Lay them on a baking sheet in a single layer. Freeze for about an hour until firm. Then, transfer them to a freezer bag. They can stay good for up to two months. When it's time to enjoy your leftovers, you can reheat them in two ways. The oven is the best choice for keeping them crispy. Preheat your oven to 375°F (190°C). Place the egg rolls on a baking sheet. Heat for about 10-15 minutes until warm and crispy. If you are short on time, you can use the microwave. Place the egg rolls on a microwave-safe plate. Heat them for 30 seconds, then check. If they are not warm, keep heating in 15-second bursts. However, this method may make them less crispy. Your apple pie egg rolls stay fresh for about three days in the fridge. When you freeze them, they can last for two months. Always check for any signs of spoilage before eating. If they look or smell off, it’s best to throw them out. I like to use Granny Smith or Honeycrisp apples. These apples are tart and sweet. They hold up well when cooked. This gives you a nice texture in your egg rolls. Other good options include Fuji or Gala apples. You can mix different types for fun flavors. Yes, you can bake the egg rolls! Preheat your oven to 400°F (200°C). Place the egg rolls on a baking sheet. Brush them lightly with oil to help them crisp up. Bake for about 15-20 minutes, flipping halfway through. They won't be as crispy as fried, but they will still taste great! Look for a golden brown color. This usually takes about 3-4 minutes on each side. If they float, they are likely done. Use a slotted spoon to take them out. Drain them on paper towels to remove excess oil. Yes, you can prepare the filling ahead of time. Mix the apples and spices, then store them in the fridge. You can keep it for up to 24 hours. Just remember to wrap the egg rolls when ready to cook. Absolutely! You can make a batch and store them. Keep them in an airtight container in the fridge. They stay fresh for 2-3 days. You can also freeze them for longer storage. Just fry or bake them when you're ready to eat! You’ve learned how to make delicious apple pie egg rolls. We covered the key ingredients and tips, how to prepare the filling, and wrap the egg rolls. I also shared variations for different tastes. Remember to choose fresh apples and store any leftovers correctly. Enjoy these tasty treats with friends or family. You’ll impress everyone with your cooking skills. Get ready to fry up some fun!
Delicious Apple Pie Egg Rolls Easy and Fun Recipe
Craving a fun twist on a classic dessert? These delicious Apple Pie Egg Rolls are your answer! With just a few ingredients and easy steps,