Desserts
![- Key Components for Crust - 1 cup graham cracker crumbs - 1/4 cup unsalted butter, melted - Main Ingredients for Cheesecake Filling - 16 oz cream cheese, softened to room temperature - 1/2 cup granulated sugar - 1/4 cup sour cream - 1 tablespoon fresh lemon zest - 2 tablespoons freshly squeezed lemon juice - 1 teaspoon pure vanilla extract - 2 large eggs, at room temperature - 1 cup fresh blueberries (plus extra for garnish) - Optional Topping Ingredients - 1 tablespoon cornstarch (optional, for thickening the blueberry topping) - 1 tablespoon granulated sugar (for the blueberry topping) The crust is a simple mix of graham cracker crumbs and melted butter. This gives a nice crunch. For the filling, the cream cheese is key. It makes the cheesecake rich and creamy. The sugar adds sweetness, while sour cream gives a nice tang. Fresh lemon zest and juice brighten the flavor. Blueberries add a burst of sweetness and color. You can also make a topping with blueberries for extra flavor. This topping is simple to cook. Cook fresh blueberries with sugar and cornstarch. This helps to thicken the sauce. You can find the Full Recipe for all the steps to make these mini treats. Preheat Oven and Prepare Muffin Pan Start by preheating your oven to 325°F (160°C). Grab a muffin pan and line it with cupcake liners. This step makes it easy to remove the mini cheesecakes later. Make the Graham Cracker Crust In a medium bowl, mix 1 cup of graham cracker crumbs with 1/4 cup of melted unsalted butter. Stir well until the crumbs look like wet sand. This mixture forms the base of your cheesecake. Bake the Crust Scoop about one tablespoon of the crumb mixture into each liner. Press it down firmly with your fingers or a spoon. Bake the crust for 5-7 minutes. Once done, remove it from the oven and let it cool while you work on the filling. Blend Cream Cheese and Sugar In a large bowl, beat 16 oz of softened cream cheese and 1/2 cup of granulated sugar with an electric mixer. Mix on medium speed for about 2-3 minutes until smooth and creamy. Incorporate Remaining Filling Ingredients Next, add 1/4 cup of sour cream, 1 tablespoon of lemon zest, 2 tablespoons of lemon juice, and 1 teaspoon of vanilla extract. Mix until everything is well blended and creamy. Add Eggs and Fold in Blueberries With the mixer on low speed, add 2 large eggs one at a time. Make sure each egg is mixed in fully before adding the next. Then, gently fold in 1 cup of fresh blueberries with a spatula. Fill Liners with Cheesecake Batter Carefully pour the cheesecake filling into the muffin liners over the cooled crust. Fill each liner about 3/4 full to allow room for the cheesecake to rise. Bake the Mini Cheesecakes Place the muffin pan in the oven and bake for 18-20 minutes. The centers should be set but still have a slight jiggle. Keep a close watch to avoid overbaking. Cooling Instructions to Prevent Cracking Once baked, turn off the oven and let the mini cheesecakes cool inside for 10-15 minutes. This helps prevent cracks. After that, transfer them to a wire rack to cool completely. Refrigerate for at least 2 hours before serving. For more details, check out the Full Recipe. - Ensuring Creamy Texture: To get a smooth and creamy filling, start with room temperature cream cheese. Cold cream cheese can create lumps. Beat it well until it's fluffy before adding other ingredients. This step helps mix everything evenly. - Avoiding Overbaking: Keep an eye on your cheesecakes while they bake. They should look set but still jiggle slightly in the center. Overbaking can lead to a dry texture. If you notice the edges browning, it’s time to take them out. - Achieving the Right Sweetness: Taste your batter before baking. If it needs more sweetness, add a bit more sugar. Remember, the blueberry topping will also add sweetness, so balance is key. - Serving Suggestions: Serve your mini cheesecakes on a pretty platter. This adds a nice touch and makes them pop. You can also arrange them with fresh blueberries for a colorful display. - Garnishing Ideas: Top each cheesecake with a spoonful of blueberry syrup. Fresh mint leaves add a nice splash of green, making each bite more inviting. A light dusting of powdered sugar can also enhance the look. - Plating Techniques: When plating, space out the cheesecakes evenly. This gives each one room to shine. You can also use thin lemon slices around the plate for extra color and flair. For the complete recipe, check out the [Full Recipe]. {{image_4}} Alternative Fruit Toppings You can swap blueberries for other fruits. Try strawberries, raspberries, or peaches. Each fruit brings its own taste. This adds fun and variety to your cheesecakes. You can even mix fruits for a colorful look. Different Flavor Cheesecake Bases For a twist, change the flavor of the base. Use chocolate, vanilla, or even almond extract. Each base will change the taste and aroma. This keeps your cheesecakes fresh and exciting. Gluten-Free Options If you need gluten-free options, use gluten-free graham crackers. These work well for the crust. You can also use almond flour or crushed nuts for a different texture. This way, everyone can enjoy these tasty treats. Pairing with Beverages These mini cheesecakes pair well with drinks. Serve them with iced tea, lemonade, or sparkling water. Coffee also complements the flavors nicely. Choose a drink that matches the fruit topping for a great combo. Ideal Occasions for Serving Mini lemon blueberry cheesecakes fit many events. They are perfect for birthday parties, picnics, or family gatherings. They also make a lovely dessert for a romantic dinner. Their small size makes them easy to serve and enjoy. Transforming into a Platter Dessert You can create a dessert platter with these mini cheesecakes. Add some fresh fruits, chocolate, or cookies to the mix. This makes a stunning display for any table. You can impress your guests with this simple idea. For the full recipe, check out the [Full Recipe]. To keep your mini lemon blueberry cheesecakes fresh, follow these easy steps: - Refrigeration Instructions: Once the cheesecakes cool, place them in an airtight container. Store them in the fridge. They will stay fresh for a few days. - Freezing Guidelines: If you want to save them for later, you can freeze the cheesecakes. Wrap each one tightly in plastic wrap, then place them in a freezer-safe bag. They can last for about two months in the freezer. To eat, just thaw them in the fridge overnight. - How Long They Last in the Fridge: These cheesecakes will stay good for about 5 days in the fridge. - Signs of Spoilage: Look for any changes in texture or smell. If they look dry or smell sour, it’s time to toss them. Always trust your senses to ensure food safety. For the full recipe, check the [Full Recipe]. Can I use frozen blueberries? Yes, you can use frozen blueberries. They work well in this recipe. Just be careful not to overmix the batter. Thaw them first to avoid too much moisture. How do I know when they are done baking? Look for a slight jiggle in the center. The edges should be set. This usually takes about 18-20 minutes at 325°F. Can I make these ahead of time? Absolutely! You can make these mini cheesecakes a day in advance. Just store them in the fridge until you're ready to serve. What if I don’t have graham crackers? If you lack graham crackers, use crushed cookies or vanilla wafers. Just ensure they are finely crushed and mixed well with melted butter. How to fix a cracked cheesecake? If your cheesecake cracks, don’t worry! You can cover it with blueberry topping. This adds flavor and makes it look pretty. Can I substitute ingredients for dietary restrictions? Yes, you can! Use dairy-free cream cheese for a vegan option. Also, consider gluten-free cookies for the crust. Just check the labels to ensure they meet your needs. For the complete recipe, visit the [Full Recipe]. Enjoy your baking! This blog post covered all you need for mini lemon blueberry cheesecakes. You learned about key ingredients, step-by-step baking tips, and variations to try. Proper storage and answers to common questions help make this recipe a success. With a few simple steps, you can create a treat that delights everyone. Enjoy making these cheesecakes, and let your creativity shine!](https://roastedflavors.com/wp-content/uploads/2025/05/ca1f2e13-e795-4ea2-86db-4c9fa6bd9713.webp)
Mini Lemon Blueberry Cheesecakes Simple and Sweet Treat
Are you ready to indulge in a dessert that balances tart and sweet? In this article, I’ll show you how to make Mini Lemon Blueberry
![- 1 cup graham cracker crumbs - 1/4 cup unsalted butter, melted - 2 cups cream cheese, softened to room temperature - 1/2 cup granulated sugar - 1/2 cup sour cream - 2 large eggs, at room temperature - Zest of 2 limes - 1/4 cup fresh lime juice - 1 cup cherry pie filling When I make these cherry lime mini cheesecakes, I always start by gathering my ingredients. Each one plays a key role in making this dessert special. The graham cracker crumbs form a sweet base that contrasts nicely with the creamy filling. Don't forget to melt the butter first; it helps bind the crumbs together. Next, the cream cheese provides that rich, smooth texture we love in cheesecake. I prefer it to be soft, so I let it sit out for a while. The sour cream adds a tangy taste, which balances the sweetness of the sugar. Lime zest and juice bring a fresh, zesty kick that makes these cheesecakes stand out. Finally, the cherry pie filling tops it all off with a burst of flavor. This combination of ingredients creates a delightful treat. You can find the complete recipe in the Full Recipe section. - Set oven temperature to 325°F (160°C). - Prepare the muffin tin with liners or cooking spray. - Combine graham cracker crumbs with melted butter. - Press mixture into muffin cups. In this step, I love using my fingers to create a firm base. You want a nice, even layer. This helps the cheesecakes hold their shape later. - Beat cream cheese until smooth. - Gradually add sugar, sour cream, lime zest, and lime juice. I always use room temperature cream cheese for a smoother texture. Mixing in lime zest makes a big difference. It adds a bright, fresh taste that really lifts the cheesecake. - Incorporate eggs one at a time. - Fill muffin cups and bake for 18-20 minutes. When adding eggs, mix well after each one. This helps to keep the mixture creamy. Watch them closely while they bake. The centers should still jiggle slightly when you check. - Allow cheesecakes to cool before refrigerating. - Top with cherry pie filling before serving. After cooling, I pop them in the fridge for at least four hours. This helps them set perfectly. Adding cherry pie filling gives a sweet finish that complements the tart lime. For the full recipe, check out the details provided. To get the best texture in your cherry lime mini cheesecakes, start by ensuring all your ingredients are at room temperature. Cold cream cheese can lead to lumps, which you want to avoid. Let your cream cheese, eggs, and sour cream sit out for about 30 minutes before mixing. This simple step helps create a smooth batter. Next, be careful when adding eggs. Mix just enough to combine them into the batter. Overmixing can make the cheesecake dense and chewy instead of light and creamy. Remember, light mixing is key! Garnishing your mini cheesecakes can make them pop! Use fresh lime slices and tart cherries on top. These bright colors add visual appeal and enhance flavor. For the best presentation, arrange them on a decorative platter. A simple white plate can make the vibrant colors of the cheesecakes shine. This small detail can impress your guests and elevate your dessert. One common mistake is serving the mini cheesecakes too soon. Allow them to cool completely before refrigerating. If they are not cold, they may fall apart when you serve them. Another mistake is filling the muffin cups too full. Leave some space at the top. This allows the cheesecakes to rise without spilling over. Following these tips will help you make perfect mini cheesecakes every time. For the complete process, check the Full Recipe. {{image_4}} You can easily change the flavors of your mini cheesecakes. Try using different fruit toppings. Blueberries or strawberries can add a new twist. They bring their own sweetness and shine. You can also use other citrus zest. Lemon or orange zest can give a fresh kick. This adds a fun flavor twist to the creamy base. Feel free to mix and match your favorite fruits! If you need gluten-free options, it’s simple to adjust the crust. Use gluten-free graham cracker crumbs instead of regular ones. This keeps the crust tasty and safe for all. For vegan options, swap cream cheese with coconut cream or tofu. You can also use flax eggs instead of regular eggs. These changes keep the texture creamy while meeting dietary needs. Want to change how you serve these mini cheesecakes? Consider using mason jars. They create a cute and portable dessert. Just layer the crust, cheesecake filling, and topping. This idea works great for parties or picnics. You can also adjust the recipe for a larger cheesecake. Simply increase the filling and bake it in a springform pan. This way, you can share a big treat with more people! For the complete recipe, check out the [Full Recipe]. To keep your cherry lime mini cheesecakes fresh, store them in the fridge. Place them in an airtight container. This helps keep moisture out and flavor in. You can also use a glass container with a tight lid. This option works well to maintain their creamy texture. Yes, you can freeze mini cheesecakes! Wrap each cheesecake in plastic wrap. Then, place them in a freezer-safe bag or container. When you're ready to enjoy one, take it out and thaw it in the fridge overnight. Serve it cold for the best flavor. Cherry lime mini cheesecakes last about five days in the fridge. Check for signs of spoilage, like an off smell or a change in color. If they look or smell unusual, it’s best to discard them. Keeping an eye on their freshness ensures you enjoy them at their best. You can find the full recipe for these delightful treats here: [Full Recipe]. You can use a no-bake method. Start with a crust made of crushed graham crackers and melted butter. Instead of baking, chill the mixture in the fridge. For the filling, mix cream cheese, sugar, sour cream, lime juice, and zest. Pour this over the crust and let it set in the fridge for several hours. This method yields a creamy, no-bake cheesecake that is just as tasty. If you want an alternative to cream cheese, try Greek yogurt or ricotta cheese. Both options give a creamy texture. Greek yogurt adds a nice tang, while ricotta offers a mild flavor. You can also use vegan cream cheese for a dairy-free option. Adjust the sugar content based on the sweetness of your choice. To check doneness, look for the edges to be set while the center remains slightly jiggly. This way, you avoid overcooking them. A light touch in the center should feel firm but not hard. If you're unsure, you can gently shake the pan to see if they wobble. Yes, using store-bought cherry pie filling can save time. It gives a sweet and fruity topping with little effort. However, homemade filling allows for more control over sweetness and flavor. Store-bought may lack the fresh taste of homemade. Choose based on your time and taste preference. You can easily double the recipe. Just make sure to use a larger muffin tin or extra baking pans. Adjust the baking time slightly if needed. Keep an eye on the cheesecakes to ensure they don’t overbake. Doubling may also require more chilling time for the filling to set. This blog post detailed how to make delicious cherry lime mini cheesecakes. We explored the essential ingredients, like cream cheese and lime juice, along with step-by-step baking instructions. I shared tips for perfecting texture and noted common mistakes to avoid. You can even customize flavors or adjust portion sizes. Remember to store these treats properly for the best taste. Now, go ahead and impress everyone with your baking skills! Enjoy every bite of your mini cheesecakes.](https://roastedflavors.com/wp-content/uploads/2025/05/72f39162-3f0c-4fee-b77f-907cda1ddf38.webp)
Cherry Lime Mini Cheesecakes Rich and Flavorful Delight
Have you ever craved a dessert that bursts with flavor and feels like a treat? Cherry Lime Mini Cheesecakes are just that! These little delights
Oven-Baked S’mores Delightful Easy Recipe to Enjoy
Are you ready to dive into a fun and tasty treat? Oven-baked s’mores are a simple way to enjoy this classic dessert without a campfire!
![To make Cheesecake Deviled Strawberries, gather these simple and fresh ingredients: - 12 large, ripe strawberries - 4 oz cream cheese, softened at room temperature - 1/4 cup powdered sugar - 1 teaspoon pure vanilla extract - 1/4 cup Greek yogurt (or full-fat sour cream) - 1 tablespoon fresh lemon juice - 1 tablespoon graham cracker crumbs for garnish - Fresh mint leaves for garnish These ingredients work together to create a delightful, creamy filling that perfectly complements the sweet strawberries. When choosing strawberries, look for ones that are bright red and firm. This ensures your treat tastes fresh and sweet. The cream cheese adds richness, while the yogurt keeps it light. Each ingredient serves a purpose, making this dessert a hit at any gathering. You can find the full recipe for Cheesecake Deviled Strawberries in the section above. - Rinse strawberries and pat dry. - Remove leafy tops and scoop out centers. First, I wash the strawberries. I use cold water to rinse them well. After rinsing, I gently pat them dry with paper towels. This step is key to keep them firm and fresh. Next, I slice off the leafy tops. I want a flat surface for filling. Using a small knife, I scoop out a bit of the center. This creates a small cup, perfect for holding the cheesecake filling. Careful not to break the sides, I make sure to leave enough fruit around the edges. - Combine ingredients in a mixing bowl. - Beat mixture until smooth and creamy. Now, I move on to the filling. In a medium mixing bowl, I combine the cream cheese, powdered sugar, vanilla extract, Greek yogurt, and lemon juice. These flavors mix well together. I grab my electric mixer and beat the mixture for about 2 to 3 minutes. The goal is to achieve a smooth and creamy texture. It should look rich and inviting, just like traditional cheesecake. - Use piping bag or spoon to fill strawberries. - Top with graham cracker crumbs and mint leaves. Next, it’s time to fill the strawberries. I either use a piping bag or a small spoon for this part. I carefully fill each hollowed-out strawberry with the cheesecake mixture. I aim for a dollop effect to make them look pretty. Once filled, I sprinkle graham cracker crumbs on top. This adds a delightful crunch that reminds me of cheesecake crust. Lastly, I add a fresh mint leaf on each one. This adds a nice aroma and color. After filling, I arrange the strawberries on a platter. I pop them in the fridge for about 30 minutes. This chilling time helps the flavors blend. For the full recipe, check the [Full Recipe]. To make the best cheesecake filling, start with soft cream cheese. This helps it mix smoothly. If it’s cold, it will be lumpy. Let it sit out for about 30 minutes before you start. Also, taste your filling as you mix. You can adjust the sweetness with more powdered sugar or less, depending on your liking. Make your Cheesecake Deviled Strawberries pop on the plate. Arrange them in a colorful way. You can group similar colors or alternate them for contrast. For an extra touch, add edible flowers. They look lovely and add a gourmet feel to your dish. Chill your filled strawberries for at least 30 minutes. This helps the flavors blend well. It also makes them cool and refreshing. You can serve them at parties, picnics, or even as a fun dessert at home. For an elegant touch, serve them on a nice platter with mint leaves around. {{image_4}} You can have fun with Cheesecake Deviled Strawberries! Consider adding a drizzle of chocolate or caramel on top. This sweet touch adds depth and makes each bite even better. You can also try different fruit toppings. Think blueberries or raspberries for a pop of color and flavor. Each fruit brings its own taste and joy to the strawberries. If you need gluten-free options, you can skip the graham cracker crumbs or use gluten-free ones. This way, everyone can enjoy them. For vegan alternatives, try using plant-based cream cheese. It gives a creamy texture without dairy. Your guests will love these choices, and you can cater to all diets. Pair these strawberries with other desserts. A scoop of vanilla ice cream complements their flavor nicely. You can also use them at themed parties. Think summer picnics or birthday celebrations. They are bright and fun, making them a hit with guests. Feel free to get creative with your serving ideas! For the full recipe, click [Full Recipe]. To store filled strawberries, place them in a single layer in an airtight container. This keeps them fresh. If you stack them, the filling might spill out. Keep them in the fridge for up to two days. To maintain their taste, eat them sooner rather than later. You can freeze cheesecake filling. However, filled strawberries do not freeze well. The texture changes when thawed. If you want to freeze the filling, spoon it into an airtight container. It will last for up to one month. When ready to use, thaw it in the fridge overnight. Filled strawberries last about two days in the fridge. After that, they may spoil. Look for signs like a soft or mushy texture. If they smell sour, it’s time to toss them. Always check before you eat. Enjoy your Cheesecake Deviled Strawberries for the best flavor and freshness. For the full recipe, refer back to the earlier sections. Yes, you can make these strawberries a few hours ahead. Just keep them in the fridge. This helps the flavors blend well. You want them chilled when serving. If you don't have Greek yogurt, use full-fat sour cream. It gives a creamy texture and similar taste. Both options work well for this dessert. To reduce sweetness, cut back on powdered sugar. Start with half the amount and taste. You can also use less cream cheese for a lighter flavor. Yes, Cheesecake Deviled Strawberries are gluten-free. Just ensure the graham cracker crumbs are gluten-free too. Many brands offer gluten-free options for everyone to enjoy. These strawberries shine at parties, picnics, and holidays. Serve them at birthdays or family gatherings. They also make a fun treat for Valentine's Day or anniversaries. Using frozen strawberries is not ideal. They can become too mushy when thawed. Fresh strawberries give the best texture and flavor for this dish. For the full recipe, check out the detailed instructions above. You learned how to make delicious cheesecake deviled strawberries. We covered the simple ingredients and step-by-step instructions. You can create variations to fit your taste and dietary needs. Remember to store any leftovers properly for the best flavor. These treats are fun for parties and easy to share. Enjoy making them and impressing your family and friends!](https://roastedflavors.com/wp-content/uploads/2025/05/3ecab7dd-5033-45e3-a10a-949a6022c5f5.webp)
Cheesecake Deviled Strawberries Delicious and Easy Treat
Are you ready to impress with a fun twist on a classic dessert? Cheesecake Deviled Strawberries combine ripe strawberries and creamy cheesecake filling for a
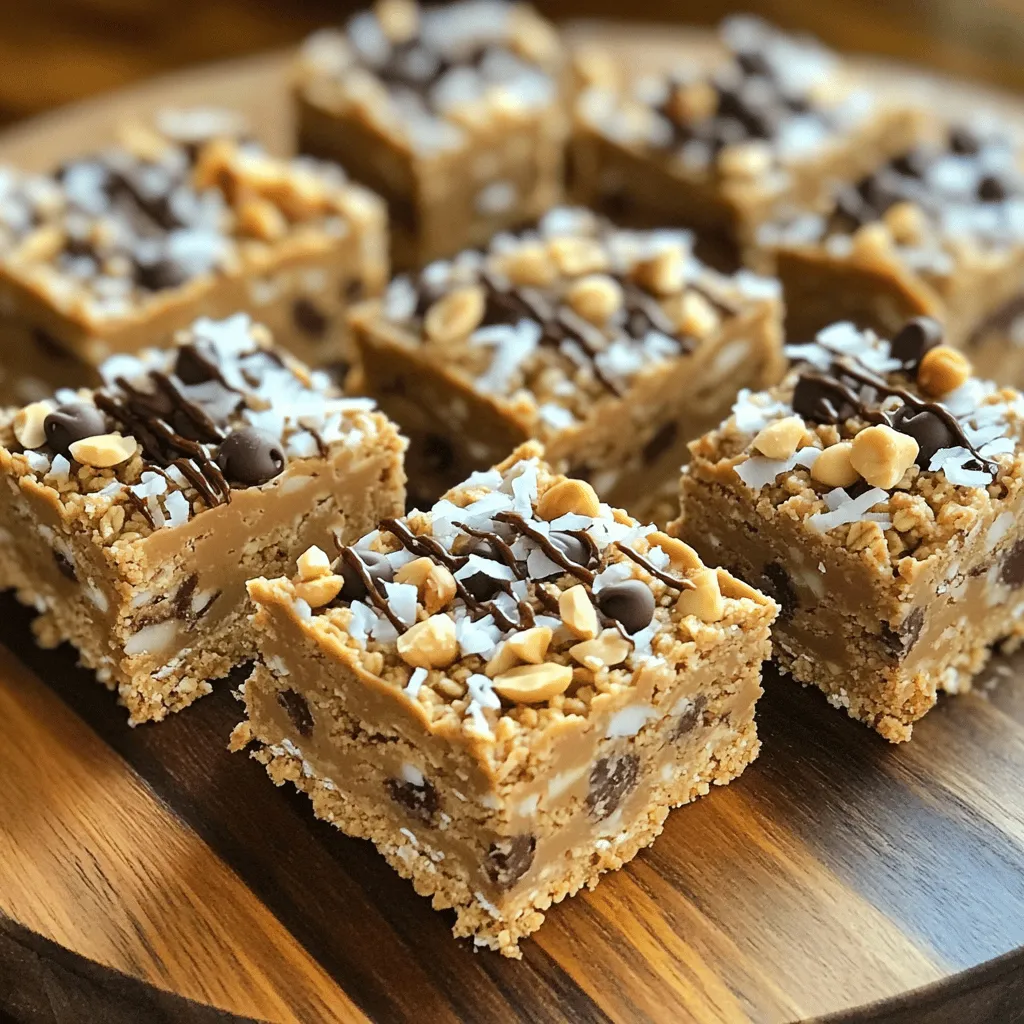
No-Bake Peanut Butter Bars Simple and Tasty Treat
Craving a sweet treat that’s easy to make? Look no further! These No-Bake Peanut Butter Bars are simple, tasty, and perfect for any occasion. You
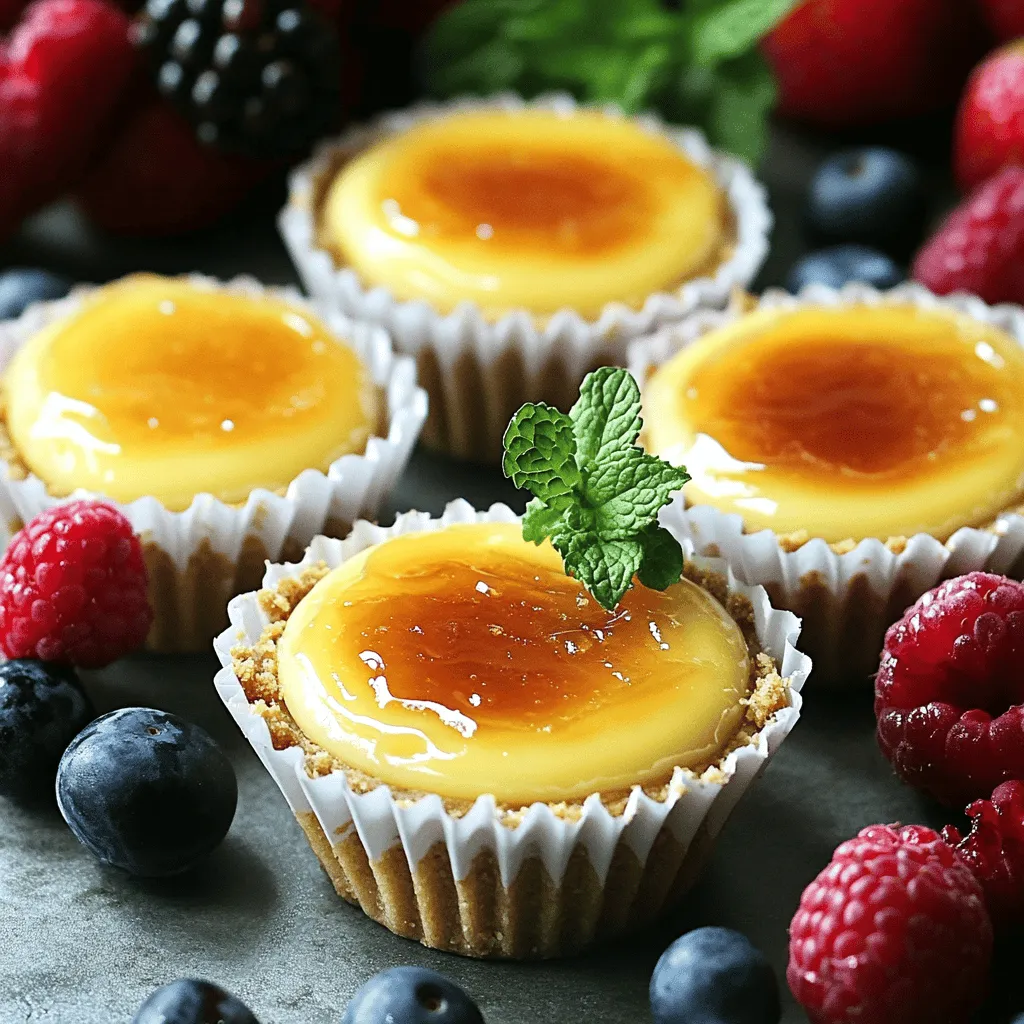
Mini Crème Brûlée Cheesecakes Delightful and Easy Recipe
If you love the creamy richness of cheesecake and the crunchy top of crème brûlée, this recipe is for you! Mini Crème Brûlée Cheesecakes are
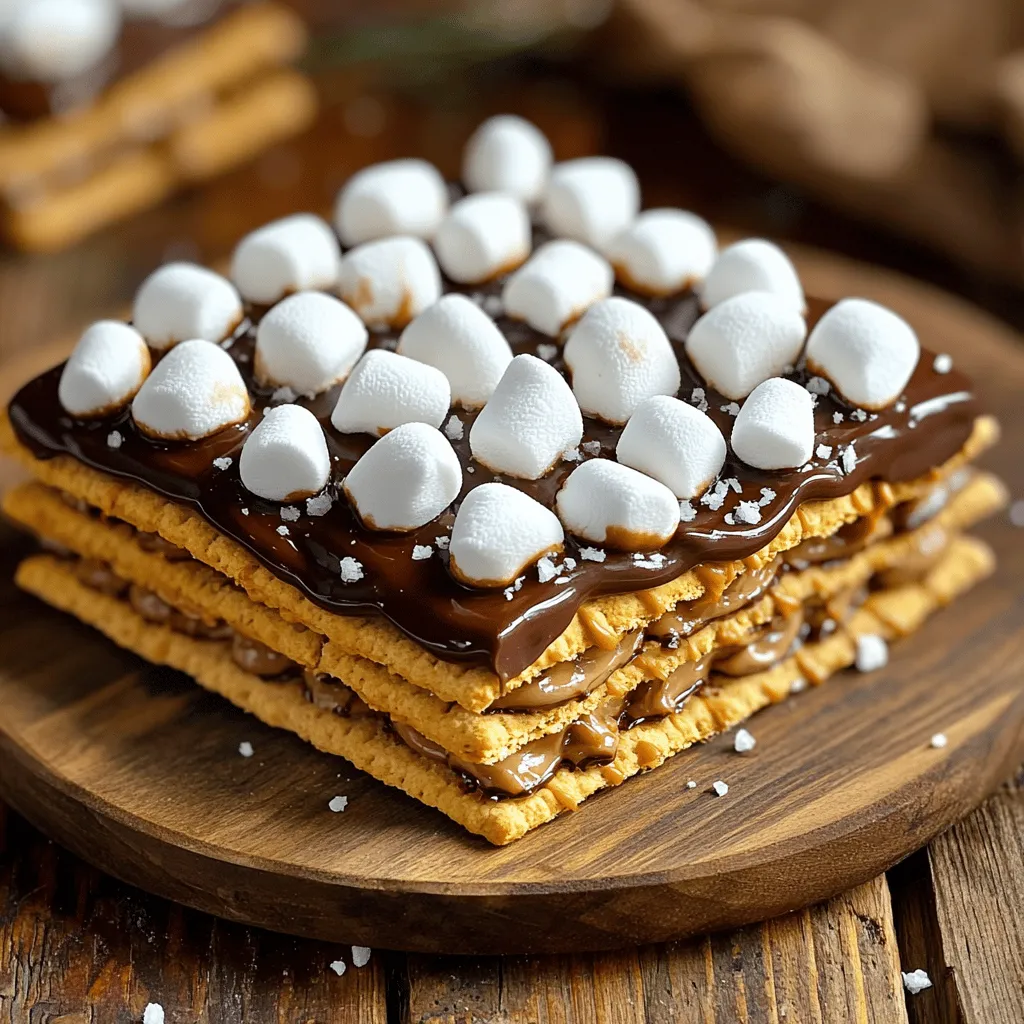
![To make the best campfire s'mores, you need a few key items. These are: - 1 sleeve of graham crackers - 1 cup of mini marshmallows - 1 cup of chocolate bars (milk chocolate or dark chocolate) - Skewers or roasting sticks These four ingredients create the classic s'more taste that everyone loves. The graham crackers provide a crunchy base. The chocolate adds a rich flavor. The marshmallows give that sweet, gooey texture. To make your s'mores even better, consider adding these fun extras: - 1 ripe banana, sliced - ¼ teaspoon ground cinnamon - ½ cup chopped nuts (optional) The ripe banana adds a unique twist. It brings a fruity taste that pairs well with chocolate. A sprinkle of cinnamon gives a warm spice. Chopped nuts add crunch and more flavor. You can mix and match these add-ins to suit your taste. Having the right tools makes s'mores easy and fun to prepare. Here’s what you need: - Skewers or roasting sticks for toasting marshmallows - A small plate for assembling your s'mores - A campfire or fire pit With these tools, you’ll be ready to enjoy your delicious treats. The skewers allow you to hold the marshmallows over the fire safely. A plate helps keep your workspace tidy while you build your s'mores. Start your campfire by gathering wood and kindling. Light the fire safely and let it burn down. Wait until you see glowing coals; this is the best time to cook. The heat will be even, making it perfect for roasting. While waiting, you can enjoy the fresh air and relax. Now, let’s build those tasty s'mores. First, break your graham crackers into squares. You’ll need two pieces for each s'more. Place one square on a clean surface. On top of it, add a piece of your favorite chocolate. You can use milk or dark chocolate. Next, slice a ripe banana and place a few slices on the chocolate. A sprinkle of ground cinnamon adds a nice touch too! Top it off with mini marshmallows. Make sure to pile them high for a gooey treat. Finally, place the other graham cracker square on top, pressing gently to hold everything together. Now comes the fun part—roasting the marshmallows! Take a skewer or roasting stick and carefully pierce your s'more. Hold it above the fire, but not too close. Rotate it slowly over the glowing embers. Keep an eye on it; you want the marshmallows to turn golden brown and start to bubble. This process takes about 1-2 minutes. Be careful not to let them catch fire! Once they are perfectly toasted, take your s'more off the fire. Allow it to cool for a few seconds before taking a big bite. If you want more crunch, roll the edges in chopped nuts. Enjoy your delicious campfire treat! For the complete Campfire S'mores Delight recipe, check out the [Full Recipe]. To roast marshmallows well, start by holding them away from the flames. Aim for the glowing embers; they heat evenly. Rotate your marshmallow slowly to achieve a nice golden color. If it catches fire, blow it out quickly. This will help avoid that burnt taste. A perfect marshmallow should be gooey on the inside. Safety is key when cooking over a fire. Always have a bucket of water or sand nearby. This helps in case the fire spreads or if you need to cool down hot items. Never leave the fire unattended, especially with kids around. Use long skewers to keep hands safe from heat. Wear closed shoes to protect your feet from hot coals. Cleanup can be simple with a few tricks. Bring trash bags to collect waste. Keep your area tidy as you cook. Use foil to wrap leftover food scraps. This keeps your site neat and makes it easier to carry home. After the fire cools, make sure to fully extinguish it. Pour water over the ashes and stir until cold. This way, you leave no trace behind. {{image_4}} You can use many kinds of chocolate for s'mores. Instead of milk chocolate, try dark chocolate or white chocolate. Each type gives a unique taste. If you want something fun, consider peanut butter cups or caramel-filled chocolates. They melt nicely and add a sweet twist. S'mores are not just about chocolate and marshmallows. You can mix flavors! Try adding fruit like strawberries or raspberries for a fresh touch. You can also spread peanut butter on your graham cracker before adding chocolate. This makes the s'mores rich and creamy. Don't forget spices! A pinch of sea salt or cinnamon can boost the taste. If you have food needs, you can still enjoy s'mores. Use gluten-free graham crackers if you're avoiding gluten. For a vegan option, swap out the chocolate for dairy-free chocolate and use vegan marshmallows. You can also replace graham crackers with rice cakes or cookies. These choices keep the fun alive while respecting your diet. For more fun ideas, check the Full Recipe! To keep your s'mores ingredients fresh, store them in airtight containers. This method will help maintain their flavor and texture. For graham crackers, place them in a sealed bag or container. Chocolate bars can stay in their wrappers, but a container adds extra protection. Mini marshmallows should also go in a sealed bag. Make sure to keep them in a cool, dry spot. You can prep some ingredients ahead of time for easy assembly. Break graham crackers into squares and store them in a container. Slice bananas and put them in a bowl with a bit of lemon juice. This keeps them from browning. You can also pre-portion your chocolate and nuts into small bags. This way, you save time when it’s time to make s'mores. - Graham crackers: They last about 6 months if stored properly. - Chocolate bars: They can stay fresh for up to a year. - Mini marshmallows: They usually last around 8 months. - Bananas: Use them fresh, as they don’t store well. By following these tips, you’ll enjoy your campfire s'mores at their best! For complete details on making this delicious treat, check the Full Recipe. If you can’t find graham crackers, use cookies or biscuits. Shortbread or digestive biscuits work well too. They add a nice crunch and sweetness to your s'mores. You can even try rice cakes for a gluten-free option. Just choose something that can hold the gooey filling well. Yes, you can make s'mores indoors! Use a microwave or an oven. For the microwave, stack your s'more on a microwave-safe plate. Heat it for about 10-15 seconds until the marshmallow puffs up. If using an oven, preheat it to 350°F (175°C). Bake your s'mores on a baking sheet for 5 minutes. This method gives you that tasty, melty goodness without a campfire. To toast marshmallows perfectly, hold them above the glowing embers, not the flames. Rotate them slowly for even cooking. Aim for that golden brown color. If they start to burn, move them further away from the heat. It takes practice, but you’ll get it right! Enjoy the sweet, melted marshmallow in your s'mores. Check out the Full Recipe for more tips on making delicious s'mores! S'mores are a fun and tasty treat that anyone can make. We covered all the key ingredients, tools, and steps to craft perfect s'mores over a campfire. I also shared tips to roast marshmallows safely and easily clean up afterward. Plus, we explored variations and storage methods to keep your ingredients fresh. Enjoy experimenting with flavors and sharing fun s'mores moments with friends. Remember, whether indoors or out, s'mores bring smiles to every gathering. Happy s'moring!](https://roastedflavors.com/wp-content/uploads/2025/05/a4f6216d-717d-44bb-b8e8-4eaa467376a3.webp)
Campfire S’mores Easy Guide to Delicious Treats
Get ready to explore the sweetest campfire treat: S’mores! In this guide, I’ll show you how to craft these gooey, chocolatey wonders. From essential ingredients
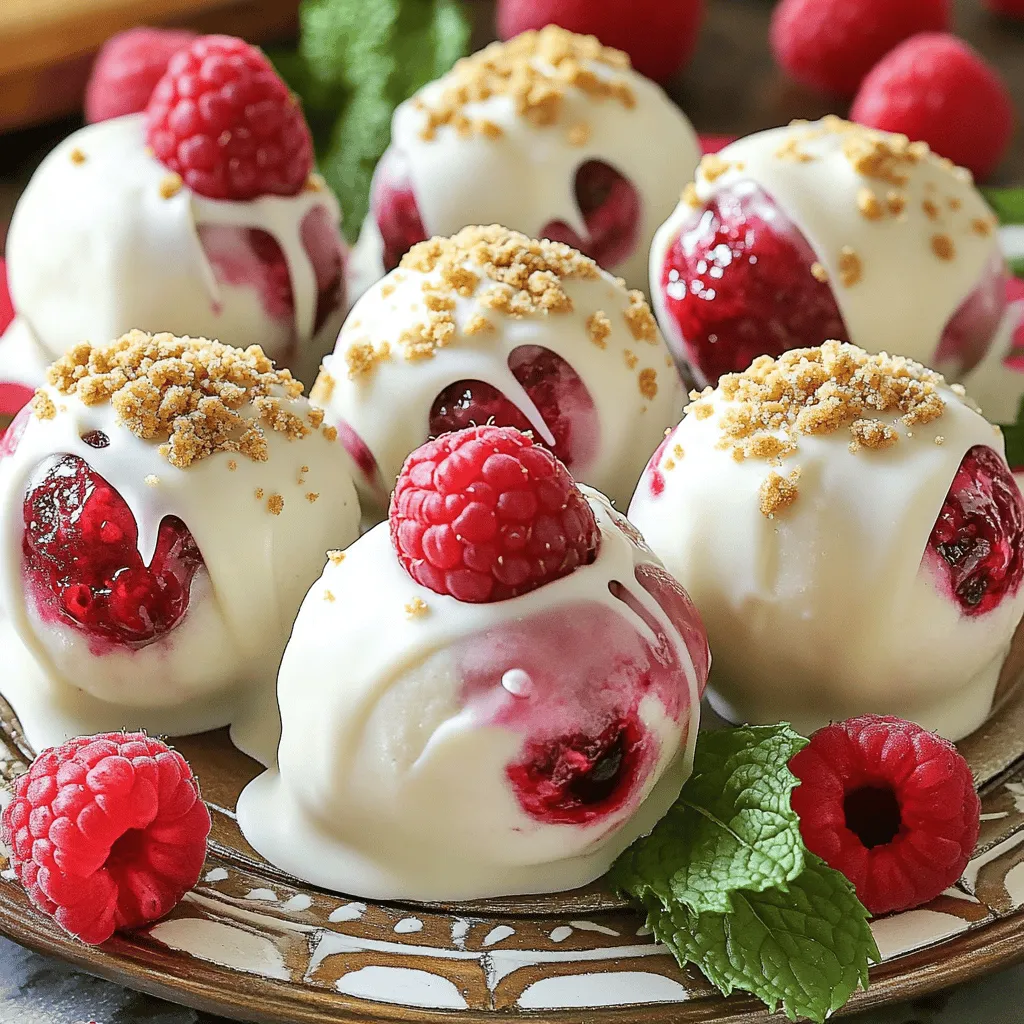
White Chocolate Raspberry Cheesecake Balls Delight
If you’re craving a sweet treat that blends tangy berries with rich white chocolate, you’re in for a delight! These White Chocolate Raspberry Cheesecake Balls
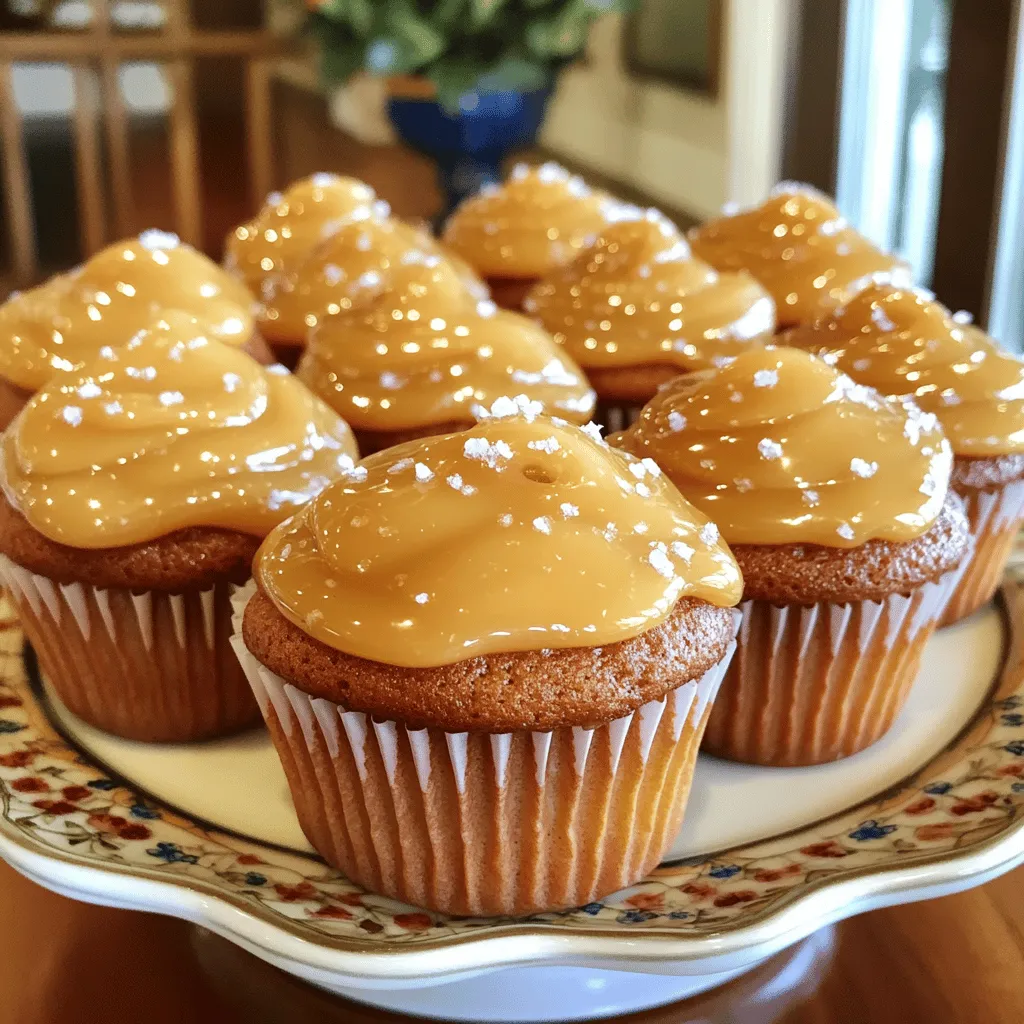
Gooey Salted Caramel Cupcakes Irresistible and Sweet
If you love sweet treats, you’re in for a delight! These gooey salted caramel cupcakes are the perfect blend of rich flavors and soft textures.
![- 1 cup fresh strawberries - 8 oz cream cheese Fresh strawberries bring bright flavor and color to the bites. Choose ripe, sweet strawberries for the best taste. The cream cheese gives that creamy, rich texture we all love in cheesecake. Make sure it is softened to mix easily. - 1 tablespoon granulated sugar - 1/4 cup powdered sugar - 1 teaspoon pure vanilla extract Use granulated sugar to sweeten the strawberries. This helps release their juices, creating a nice syrup. The powdered sugar adds smoothness to your cheesecake filling. Pure vanilla extract gives it a warm, inviting flavor that makes everything better. - 1 cup graham cracker crumbs - 2 tablespoons unsalted butter - 1/2 teaspoon ground cinnamon - Pinch of salt Graham cracker crumbs form the base of these bites. Mix them with melted butter for a rich taste. Ground cinnamon adds warmth, while a pinch of salt balances the sweetness. This combination creates a delightful crunch. - 1/4 cup mini chocolate chips (optional) If you want a chocolate twist, add mini chocolate chips. They add extra sweetness and a fun crunch. This option makes the bites even more exciting. Don't hesitate to play with flavors! For the full recipe, check out [Full Recipe]. Start by tossing 1 cup of finely chopped strawberries with 1 tablespoon of granulated sugar. This step helps the strawberries create a sweet syrup as they sit. Allow this mixture to rest for about 10 minutes. The sugar will draw out their juices, making them juicy and sweet. In a medium bowl, beat 8 ounces of softened cream cheese until it's smooth and creamy. Next, add in 1/4 cup of powdered sugar and 1 teaspoon of pure vanilla extract. Mix until everything is combined and fluffy. Gently fold in 1/2 cup of whipped cream with a spatula. This makes the filling light and airy. In a separate bowl, mix 1 cup of finely crushed graham cracker crumbs with 2 tablespoons of melted butter, 1/2 teaspoon of ground cinnamon, and a pinch of salt. Stir until all ingredients come together. You want the mixture to clump when you press it between your fingers. This will form a great crust. Line a mini muffin tin with cupcake liners. Take a tablespoon of the graham cracker mixture and press it firmly into the bottom of each liner. This forms the first layer. Then, spoon a generous layer of the sugared strawberries over the crust. Follow this by adding the cheesecake filling on top, smoothing it out with a spatula. Place the muffin tin in the refrigerator and let the bites chill for at least 2 hours. This allows them to set and firm up. Once chilled, carefully lift each cheesecake bite from the muffin tin. You can serve them in their cupcake liners for a fun look or on a platter for a classy touch. Don't forget to check out the Full Recipe for more details! To get the best cheesecake bites, start with softened cream cheese. If it’s cold, it won’t mix well. You want it smooth and creamy. This makes your filling light and fluffy. When you fold in whipped cream, do it gently. Use a spatula and lift from the bottom. This keeps air in the mixture, making it fluffy and light. If you stir too hard, the cream will deflate. For leftovers, keep them in an airtight container. This keeps them fresh for up to four days. You can also use plastic wrap. Just make sure it’s sealed tight. To prevent a soggy crust, use parchment paper in the muffin tin. This helps keep moisture away. You can also chill the crust before adding the filling. This helps it stay crunchy. Garnish your bites with a sprig of fresh mint. It adds a nice pop of color. You can also drizzle strawberry syrup over them for sweetness. These tasty bites pair well with coffee or dessert wine. The flavors blend nicely, making each bite a delight. Enjoy your treats with a warm drink or a sweet sip! {{image_4}} You can change the fruit in these bites. Raspberries or blueberries work well. They add a fresh twist. You can also try citrus flavors. Lemon or lime zest brings a bright taste. Just mix these fruits in the same way as the strawberries. The crust can be fun to switch up. Using chocolate graham crackers gives a rich flavor. You can also try gluten-free crust options. Almond flour or oat flour works well for a gluten-free base. Just mix with butter, and you’re set! If you want a vegan version, use cream cheese substitutes. Look for brands made from cashews or soy. For whipped cream, choose a plant-based alternative. Coconut cream or almond whipped cream are great choices. These swaps keep the flavor while making it dairy-free. For the full recipe, check the main section! Store your Strawberry Cheesecake Crunch Bites in the fridge for up to five days. Keep them fresh in an airtight container. This helps maintain their flavor and texture. I recommend using a glass container for the best results. It lets you see the bites and keeps them safe from other odors. Yes, you can freeze these cheesecake bites! They freeze well and make a great treat later. To freeze, place them in a single layer on a baking sheet. Once frozen, transfer them to a freezer-safe bag. Remove as much air as possible before sealing. This keeps them fresh for about three months. To thaw, simply move a few bites to the fridge for a few hours. You can also let them sit at room temperature for about 30 minutes. Serve them cool for the best taste. You can check the Full Recipe for more details on preparing and serving these bites! To make Strawberry Cheesecake Crunch Bites, follow these key steps: 1. Prepare the Strawberries: Mix chopped strawberries with sugar. Let them sit to make syrup. 2. Make the Cheesecake Filling: Beat cream cheese until smooth. Add powdered sugar and vanilla. Fold in whipped cream gently. 3. Combine Crust Ingredients: Mix graham cracker crumbs, melted butter, cinnamon, and salt until clumpy. 4. Assemble: Layer the crust, add strawberries, and top with cheesecake filling. 5. Chill: Refrigerate for at least 2 hours to set. These steps create a tasty treat that is fun to share. You can find the full recipe for more details. Yes, you can use frozen strawberries! Just thaw and drain them first. This helps to avoid excess liquid. Fresh strawberries taste great, but frozen ones work well too. The flavor will still be sweet and delicious. If you lack graham crackers, try these alternatives: - Digestive biscuits: They offer a similar crunch. - Vanilla wafers: These add a nice flavor twist. - Oatmeal cookies: Crushed oatmeal cookies can work too for a chewy texture. Get creative with your crust! To make Strawberry Cheesecake Crunch Bites healthier: - Reduce the sugar: Use less granulated and powdered sugar. - Swap cream cheese: Try low-fat or Greek yogurt. - Use whole grain crumbs: Choose whole wheat or oat crumbs instead. These tweaks help cut calories while keeping the flavor! Yes! You can adapt these bites for special diets: - Gluten-Free: Use gluten-free graham crackers or alternative crusts. - Dairy-Free: Substitute with dairy-free cream cheese and whipped cream. These options make it easy for everyone to enjoy a sweet treat! These strawberry cheesecake crunch bites are both simple and delicious. You learned how to make them using fresh strawberries, cream cheese, and a crunchy crust. I shared tips for perfect texture and storage. Plus, you can adapt this recipe with different fruits or crusts. With easy variations, everyone can enjoy these bites. So, gather your ingredients and start making a sweet treat today! Trust me; they will impress your friends and family. Enjoy the process and the tasty results!](https://roastedflavors.com/wp-content/uploads/2025/05/5d0a053b-6c88-4bfd-8508-3aeaea5d517a.webp)
Strawberry Cheesecake Crunch Bites Delightful Treat
Craving a sweet treat that’s easy to make and delicious? Dive into my Strawberry Cheesecake Crunch Bites! These bites combine fresh strawberries, creamy cheesecake, and