Desserts
![- 1 ¾ cups all-purpose flour - 1 ¾ cups granulated sugar - ¾ cup unsweetened cocoa powder - 1 ½ teaspoons baking powder - 1 ½ teaspoons baking soda - 1 teaspoon salt To make the best chocolate cake, gather these dry ingredients first. The flour gives structure. Sugar adds sweetness. Cocoa powder brings that rich chocolate flavor. Baking powder and baking soda help the cake rise. Salt brings balance, enhancing all the flavors. - 2 large eggs, at room temperature - 1 cup whole milk, at room temperature - ½ cup vegetable oil - 2 teaspoons pure vanilla extract - 1 cup boiling water - Optional: 1 cup dark chocolate chips Next, we need the wet ingredients. Eggs add moisture and help bind the cake. Milk gives a soft texture. Vegetable oil keeps it moist. Pure vanilla extract adds a lovely aroma. The boiling water helps the cocoa powder bloom, making the cake richer. For extra indulgence, you can add dark chocolate chips. This step makes the cake even more delightful. By preparing these ingredients, you set the stage for a simple yet delicious dessert. Follow the [Full Recipe] for a step-by-step guide to baking this cake. - Preheat oven to 350°F (175°C). - Grease and flour two 9-inch round cake pans. This helps the cake come out easily. - Combine dry ingredients in a large mixing bowl. Mix flour, sugar, cocoa powder, baking powder, baking soda, and salt. - Add wet ingredients and mix until smooth. Crack in the eggs, pour in the milk, oil, and vanilla. Use a mixer to blend until you see no lumps. - Gradually add boiling water to the batter. This step makes the cake moist. It may look thin, but that’s just right! - Divide and pour batter into prepared pans. Make sure both pans have the same amount of batter. - Bake for 30 to 35 minutes, checking for doneness. Insert a toothpick in the center. If it comes out clean or with a few crumbs, your cake is ready. Now you’re on your way to making a delightful chocolate cake! Follow the Full Recipe for more details. To make the best chocolate cake, start by ensuring all ingredients are at room temperature. This helps them mix better and create a smooth batter. Next, avoid overmixing the batter. This keeps the cake tender and fluffy. Mix just until everything combines. For frosting, I love using chocolate buttercream. It adds richness and creaminess. You can garnish your cake with melted dark chocolate or chocolate shavings. Fresh berries also add a nice color and taste contrast. I recommend using a stand mixer for easy blending. It saves time and effort. Also, use quality bakeware. Good pans help your cake bake evenly and release easily. Investing in the right tools makes all the difference in your baking journey. Enjoy making your cake! For the complete details, check the Full Recipe. {{image_4}} You can make your chocolate cake even better. Adding coffee boosts the chocolate taste. A little brewed coffee in the batter creates a rich flavor. You can also use different extracts. Almond or mint extract can give your cake a fun twist. Just a few drops can change the taste. If you want a healthier cake, try whole wheat flour. It has more nutrients than white flour. You can also cut back on oil. Use applesauce or Greek yogurt instead. This keeps the cake moist with less fat. This way, you enjoy a guilt-free treat. For those who need gluten-free options, there are easy swaps. Use almond flour or gluten-free all-purpose flour. Both work well in this recipe. Vegans can also enjoy this cake. Substitute eggs with flaxseed meal or applesauce. For dairy, use almond milk or coconut yogurt. These swaps keep the cake delicious for everyone. For the full recipe, check out the Decadent Chocolate Dream Cake. To store your chocolate cake at room temperature, wait until it cools completely. Wrap it in plastic wrap or place it in an airtight container. This keeps it moist and fresh. Store it in a cool, dry place. Your cake will stay fresh for up to three days this way. For long-term storage, you can freeze your cake and frosting. First, let the cake cool fully. Wrap each layer in plastic wrap, then in aluminum foil. This prevents freezer burn. You can freeze the frosting in a separate airtight container. Your cake can last up to three months in the freezer. To thaw a frozen cake, move it to the fridge for a few hours. Once it's soft, unwrap it. You can also leave it out at room temperature for quicker thawing. Just make sure it’s wrapped so it doesn’t dry out. After slicing your cake, keep it fresh by covering the exposed parts. Use plastic wrap or place it in a cake dome. This helps keep the cake moist. Store it in the fridge if you plan to eat it later. Enjoy your cake for up to a week this way. For more details, check the Full Recipe. To check if your cake is done, use a toothpick. Insert it into the center of the cake. If it comes out clean or with a few crumbs, your cake is ready. You can also look for a few signs of doneness. The cake will pull away from the sides of the pan. The top will feel firm to the touch. Yes, you can make this cake ahead of time. Bake the cake and let it cool completely. Wrap each layer in plastic wrap. Store them in the fridge for up to three days. You can also freeze the layers for up to three months. Just make sure to wrap them well. When ready to serve, thaw in the fridge overnight. Chocolate cake loves rich frosting. A classic choice is chocolate buttercream. Cream cheese frosting also works well, adding a tangy note. If you want a lighter touch, try whipped cream. For a twist, use peanut butter frosting. Each of these options enhances the cake's chocolate flavor. In this blog post, we explored how to make the best chocolate cake. We started with essential ingredients, then moved on to step-by-step instructions. I shared tips for perfecting your cake and offered variations for different tastes. Finally, we discussed storage methods to keep your cake fresh. With these details, you can create a chocolate cake that delights everyone. Remember, the right ingredients and care make all the difference. Enjoy baking!](https://roastedflavors.com/wp-content/uploads/2025/05/299407a2-d779-417a-a1c4-45a2288c8770.webp)
Best Chocolate Cake Recipe Delightfully Simple Treat
Looking to bake the perfect chocolate cake? You’ve found the right recipe! This guide breaks down every step, from mixing ingredients to storage tips. You’ll
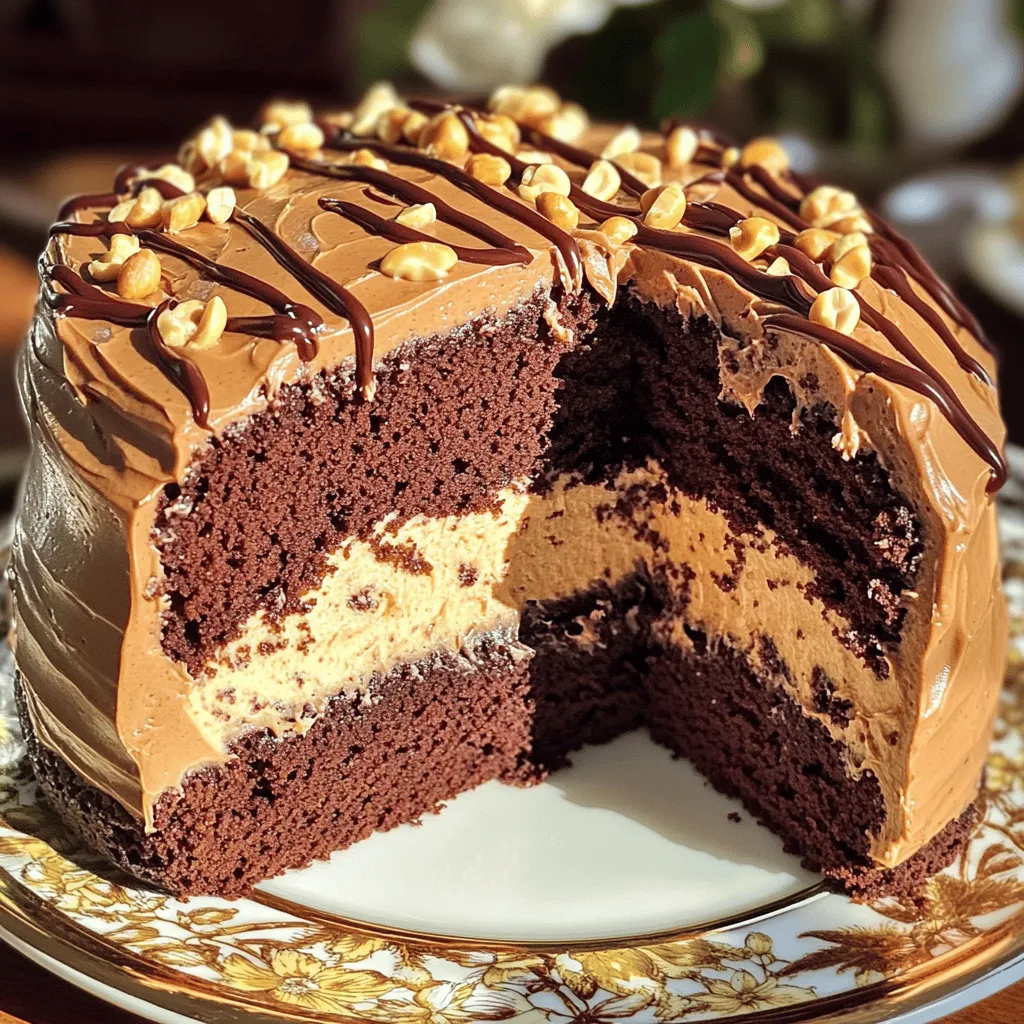
Extra Moist Chocolate Peanut Butter Cake Delight
Indulge in a slice of heaven with my Extra Moist Chocolate Peanut Butter Cake Delight! This rich and fluffy cake combines the deep flavors of
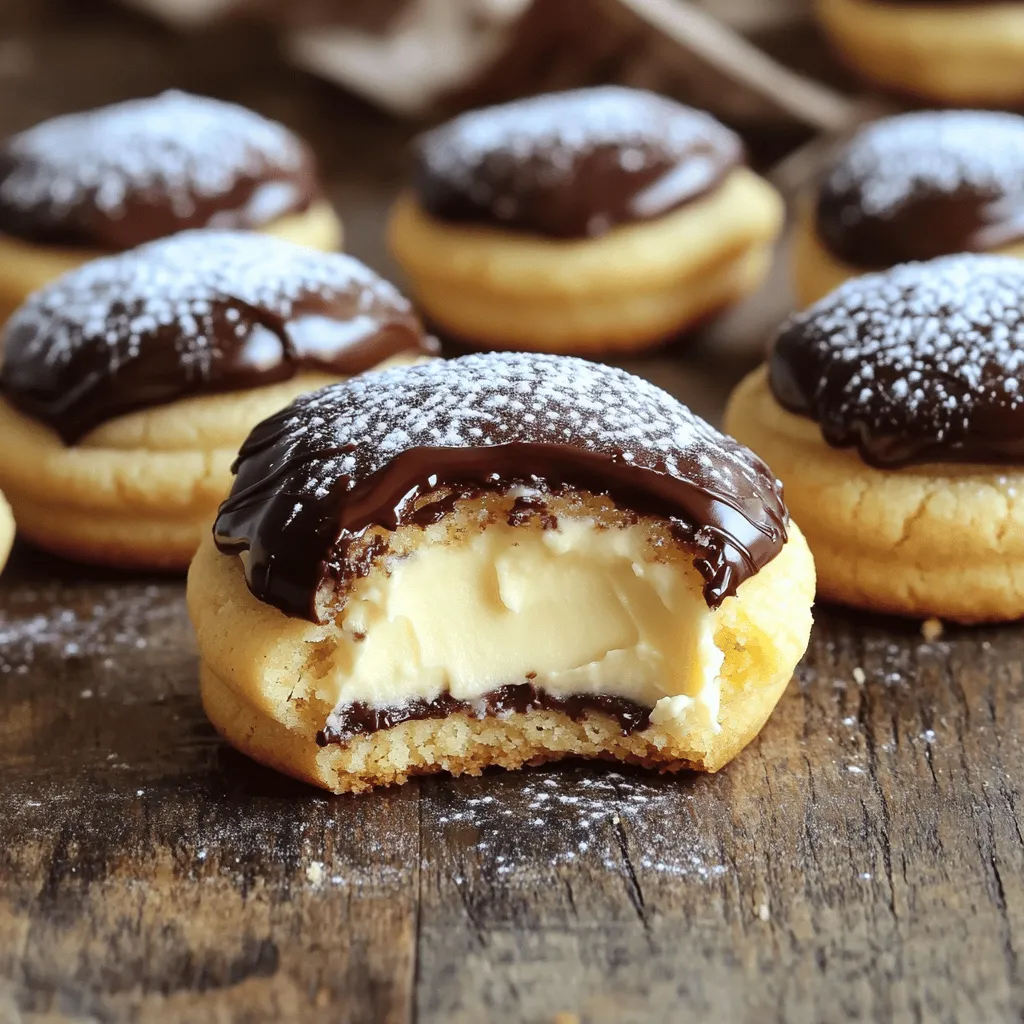
Easy Boston Cream Pie Cookie Bites Irresistible Treat
Ready to indulge in a delightful treat? These Easy Boston Cream Pie Cookie Bites combine rich flavors and fun textures in one bite-sized delight. I’ll

Berry Croissant Bake Easy and Tasty Delight
Are you ready to indulge in a sweet treat that’s both easy and delicious? This Berry Croissant Bake is perfect for breakfast or dessert, and
![When making No-Bake Oreo Cheesecake Minis, having the right ingredients is key. Let’s take a look at what you’ll need. - 24 Oreo cookies, finely crushed (plus extra for topping) - 4 tablespoons unsalted butter, melted - 8 oz cream cheese, softened at room temperature - 1/2 cup powdered sugar - 1 teaspoon pure vanilla extract - 1 cup heavy whipping cream, chilled - 1/4 cup chocolate ganache (optional for drizzling) Each ingredient plays a role in creating that creamy texture and rich flavor. The Oreo cookies form the perfect sweet crust and topping. The unsalted butter helps bind the crust together and adds richness. Cream cheese is the star of the show, offering a creamy base that is hard to resist. Powdered sugar adds sweetness without grittiness, while vanilla extract enhances the overall flavor. Heavy whipping cream brings lightness to the filling, making it fluffier. If you want to elevate your treats, a drizzle of chocolate ganache is a delightful option. For the full recipe, check the recipe section. Remember, fresh ingredients yield the best results. Enjoy gathering these items; it’s the first step to making a delicious dessert! To start, take 24 Oreo cookies and crush them well. You want fine crumbs for the crust. Next, mix these crumbs with 4 tablespoons of melted butter. Stir until the mixture feels like wet sand. Now, grab a mini muffin tin and line each cup with cupcake liners. Spoon about 1 tablespoon of the Oreo mixture into each liner. Use your fingers or the back of a spoon to press the mixture firmly down. This helps form a strong crust. Set the tin aside to let it firm up as you move on to the filling. In a large bowl, place 8 oz of softened cream cheese. Beat it with an electric mixer until it is smooth. This should take around 2-3 minutes. Next, sift in 1/2 cup of powdered sugar. Add 1 teaspoon of pure vanilla extract at the same time. Continue mixing until everything is well combined and free of lumps. Now it’s time to make it fluffy! In another bowl, pour in 1 cup of chilled heavy whipping cream. Whip it on high speed until you see stiff peaks form. This will take about 3-5 minutes. Carefully fold the whipped cream into the cream cheese mixture using a spatula. Be gentle to keep it airy. Once combined, scoop the cheesecake filling into each crust. Fill them right to the top. Use a spatula to smooth the tops. Cover the muffin tin with plastic wrap and chill in the fridge for at least 4 hours. This step helps the cheesecakes set up perfectly. Add crushed Oreo cookies on top before you serve them. You can also drizzle with chocolate ganache for extra fun. For the full recipe and more details, check out the [Full Recipe]. To get the best texture for your No-Bake Oreo Cheesecake Minis, start with the cream cheese. Beat it well until it’s smooth. Use a medium speed on your mixer for about 2-3 minutes. This helps to avoid lumps. Next, chill your heavy whipping cream before using it. Cold cream whips better and adds fluffiness. When you whip it, aim for stiff peaks. This will give your cheesecake a light and airy feel. For a beautiful presentation, place the cheesecake minis on a nice platter. You can add crushed Oreos on top for style. You could also sprinkle some mint leaves or chocolate shavings around them. Pair these treats with coffee or dessert wines. The rich creaminess of the cheesecake balances well with a nice cup of coffee. One common mistake is overmixing the cream. When you fold the whipped cream into the cream cheese, do it gently. This keeps the texture airy. Another mistake is not chilling the cheesecake long enough. Make sure to refrigerate for at least 4 hours. This helps the cheesecakes set properly and hold their shape. Following these tips will help you create perfect mini cheesecakes every time. For the full recipe, check the earlier section. {{image_4}} You can easily switch up the flavors of your No-Bake Oreo Cheesecake Minis. One fun way is by adding different extracts. For example, almond extract gives a nice twist. Just use a half teaspoon for that extra touch. You can also mix in other cookies like chocolate chip. This change adds fun and new tastes to your treats. If you need gluten-free options, swap out the regular Oreo cookies for gluten-free ones. Many brands now offer this choice, so it’s easy to find. For vegan alternatives, use vegan cream cheese and coconut cream instead of heavy whipping cream. These changes keep the taste great while meeting dietary needs. You can make larger cheesecakes if you prefer. Just use a springform pan instead of a mini muffin tin. Adjust the baking time and use the same filling. If you want a traditional cheesecake look, pour the filling into a pie dish. This way, you can serve slices instead of minis. For the full recipe, check the main article. To keep your No-Bake Oreo Cheesecake Minis fresh, place them in an airtight container. This helps to lock in moisture and flavor. Store them in the fridge for up to 5 days. If you want to keep them longer, consider freezing them for up to 3 months. Just make sure to wrap each mini well in plastic wrap before placing them in a freezer bag. You don’t need to reheat these treats. They taste best chilled. If you freeze them, allow them to thaw in the fridge overnight. This way, they regain their creamy texture. For serving, just take them out of the fridge, add your toppings, and enjoy! These cheesecake minis last about 5 days in the fridge. Store them in an airtight container. This keeps them fresh and tasty. Before serving, check for any signs of spoilage. Always use clean utensils to avoid contamination. Yes, you can use low-fat cream cheese. However, it may alter the taste and texture. The cheesecake might be less creamy and rich. It can still work, but the flavor may not be as bold. Choosing full-fat cream cheese gives the best results. Absolutely! You can make these cheesecake minis a day before your event. This saves time and stress on the day of the party. Just be sure to store them in the fridge. They will set perfectly and taste great the next day. To make these gluten-free, use gluten-free Oreo cookies. This simple swap keeps all the flavors while avoiding gluten. Check the labels on the cream cheese and toppings to ensure they are also gluten-free. Enjoy these treats without worry! For the full recipe, follow the steps above. You now have all the steps to make No-Bake Oreo Cheesecake Minis. Start with your crust using Oreo cookies and butter. Then, create a smooth filling with cream cheese, powdered sugar, and whipped cream. Remember the tips on texture and serving ideas. You can personalize your recipe with flavors or dietary options. With the right storage, these treats will stay fresh and tasty. Enjoy making these fun desserts for your next gathering! Your friends will love them. Keep experimenting and savoring each bite!](https://roastedflavors.com/wp-content/uploads/2025/05/957441cd-2f0f-41e1-a2b3-a213ff2ed0a9.webp)
No-Bake Oreo Cheesecake Minis Delightful and Easy Treat
Craving a delicious dessert that’s easy to make? Look no further! These No-Bake Oreo Cheesecake Minis are the perfect treat for any occasion. With a
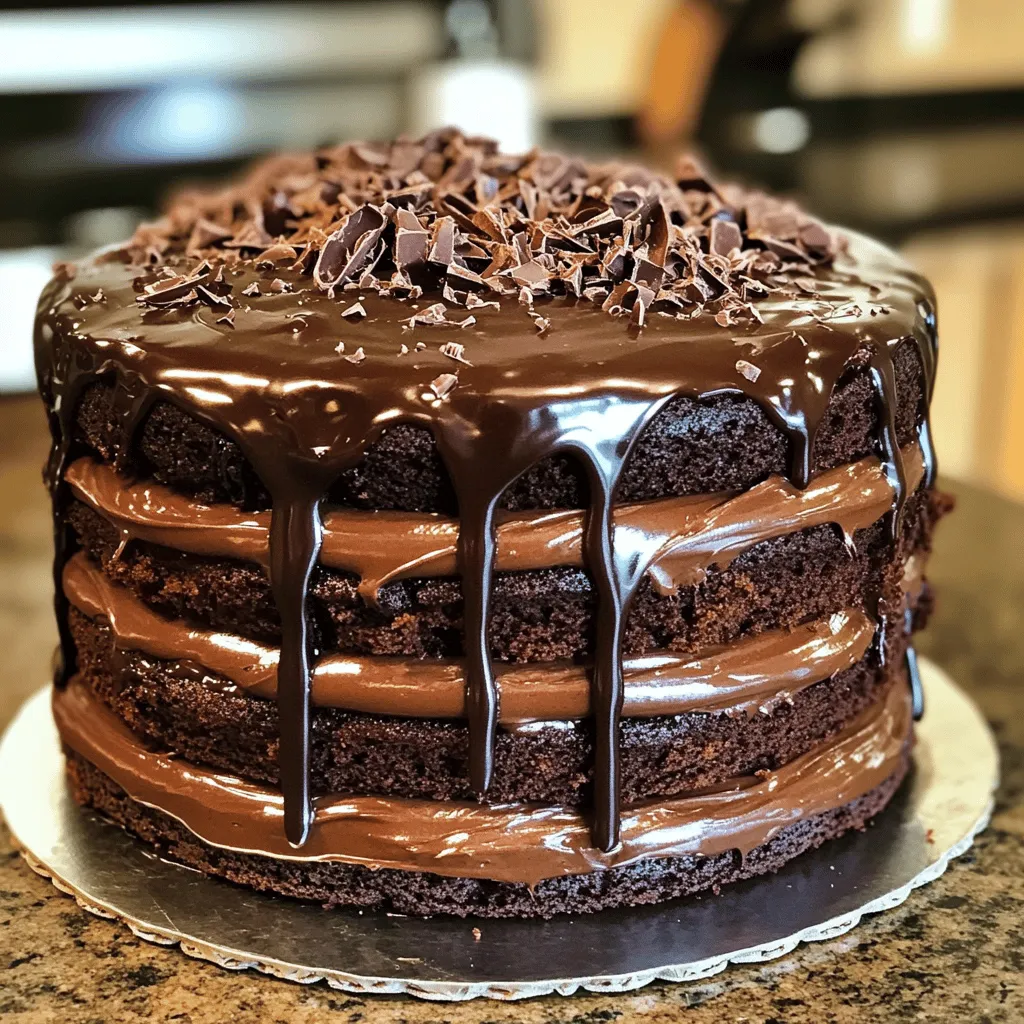
Death by Chocolate Cake Decadent and Rich Delight
Are you ready to dive into a chocolate lover’s dream? Death by Chocolate Cake is the ultimate treat for anyone who craves rich, velvety goodness.
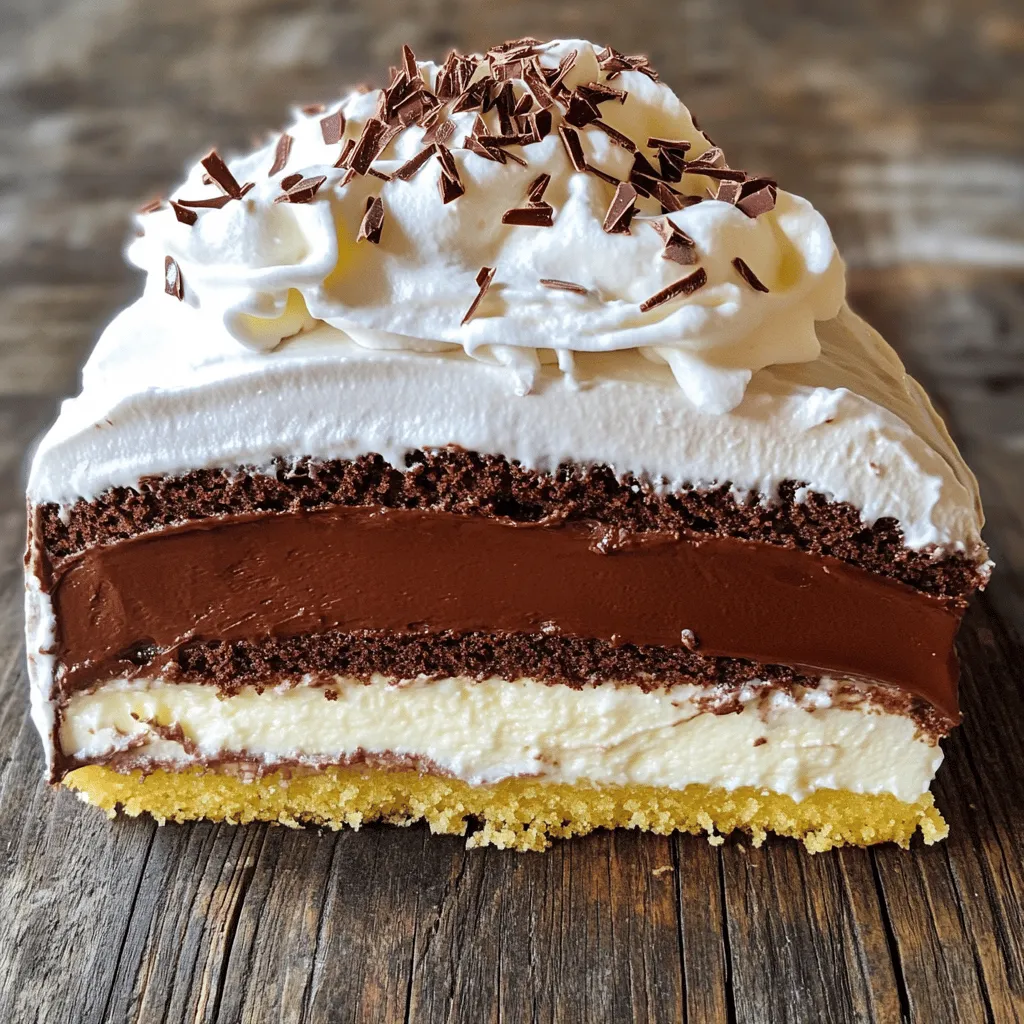
French Silk Pie Cake Delightful and Simple Recipe
If you’re craving a dessert that’s both elegant and easy to make, you’re in for a treat! The French Silk Pie Cake combines rich chocolate
![- 1 ¾ cups all-purpose flour - 1 ½ cups granulated sugar - ¾ cup unsweetened cocoa powder - 1 ½ teaspoons baking powder - 1 ½ teaspoons baking soda - 1 teaspoon salt - 2 large eggs, at room temperature - 1 cup whole milk, at room temperature - ½ cup vegetable oil - 2 teaspoons pure vanilla extract - 1 cup boiling water - 1 cup fresh raspberries (plus extra for decoration) - ½ cup dark chocolate chips Gathering the right ingredients is key for a great chocolate raspberry cake. The flour gives the cake structure, while sugar adds sweetness. Cocoa powder provides that rich chocolate flavor we all love. Baking powder and baking soda help the cake rise, making it light and fluffy. You need eggs for moisture and to bind everything together. Milk adds creaminess, while vegetable oil keeps the cake moist. Pure vanilla extract enhances the flavor. Boiling water helps to dissolve the cocoa and gives the cake a tender crumb. Fresh raspberries add a burst of tartness, and dark chocolate chips bring extra richness and texture. - Mixing bowls and electric mixer - 9-inch round cake pans - Spatula and wire racks Having the right tools makes baking easier and more fun. Use mixing bowls to combine your ingredients. An electric mixer is great for quickly blending the batter. Round cake pans help shape the cake perfectly. A spatula is useful for folding in raspberries and chocolate chips without breaking them. Lastly, wire racks allow the cakes to cool evenly, which prevents sogginess. - Gluten-free alternatives - Vegan substitutions If you want a gluten-free cake, use a gluten-free flour blend. This swap works well and keeps the texture light. For a vegan version, replace eggs with flaxseed meal mixed with water or applesauce. Use almond or soy milk in place of whole milk, and choose a vegetable oil that fits your diet. This way, everyone can enjoy a slice of this tasty cake! First, preheat your oven to 350°F (175°C). This step is key for even baking. Next, grab two 9-inch round cake pans. Grease them well with butter or cooking spray. This helps the cakes come out easily. After greasing, dust the pans lightly with flour. Tap out the excess flour. This step ensures no cake sticks to the pan. Now, let’s mix the batter. In a large bowl, sift together the dry ingredients. Combine 1 ¾ cups of flour, 1 ½ cups of sugar, ¾ cup of cocoa powder, 1 ½ teaspoons of baking powder, 1 ½ teaspoons of baking soda, and 1 teaspoon of salt. Mix these until they look airy. Next, add the wet ingredients. Crack in 2 large eggs, pour in 1 cup of whole milk, and add ½ cup of vegetable oil. Don’t forget 2 teaspoons of vanilla extract. Beat these together with an electric mixer on medium speed for about 2 minutes. The batter should be smooth and well mixed. Now, it’s time to add the boiling water. Carefully pour in 1 cup of boiling water. Stir gently until the batter is thin and mixed well. Trust me, the runny texture is just right. Finally, fold in 1 cup of fresh raspberries and ½ cup of dark chocolate chips with a spatula. Be gentle to keep the raspberries whole. Next, divide your batter evenly between the two prepared pans. Give each pan a gentle tap on the counter to release air bubbles. Place the pans in your preheated oven. Bake for 30-35 minutes. Check for doneness by inserting a toothpick into the center. If it comes out clean, your cakes are ready. After baking, remove the cakes from the oven. Let them cool in the pans for about 10 minutes. Then, move them to wire racks to cool completely. You can find the full recipe for more detailed steps. Using room temperature ingredients makes a big difference. It helps the batter mix well. Cold eggs or milk can lead to lumps. Always take them out early to warm up. When adding raspberries and chocolate chips, do it gently. Use a spatula to fold them in. This keeps the raspberries whole and juicy. Overmixing can break them and make the cake dense. Chocolate frosting pairs perfectly with this cake. You might also try cream cheese frosting for a tangy twist. Both add rich flavors that complement the chocolate. For decoration, use fresh raspberries on top. You can also sprinkle chocolate shavings for a fancy touch. Arrange the raspberries in a circle for a beautiful look. One common mistake is overmixing the batter. This can make your cake tough. Mix just until combined for a light texture. Another mistake is not cooling the cakes properly. Let them cool in the pans for ten minutes. Then transfer them to wire racks to cool completely. This prevents sogginess and helps the layers stay intact. For the [Full Recipe], dive into these tips for a perfect bake! {{image_4}} You can add espresso powder to the batter for a mocha twist. Just one tablespoon will do. It gives a deep, rich flavor that pairs well with chocolate and raspberries. You can also swap in other fruits. Strawberries and blueberries work great in this cake. They add a fresh taste and look beautiful. If you want to change up the frosting, consider cream cheese frosting. It adds a tangy flavor that contrasts nicely with chocolate. Another option is whipped ganache. It’s rich and creamy, perfect for chocolate lovers. You can also try buttercream for a sweet and smooth finish. To make mini cakes, use a cupcake pan or a 6-inch cake pan. Fill each cup or pan with batter, but don’t overfill. Bake the cupcakes for about 18-20 minutes. For a small cake, check it at 25-30 minutes. The cakes are ready when a toothpick comes out clean. These mini versions are perfect for parties or individual treats. For the full recipe, check out my detailed guide. To keep your cake fresh, store it in the fridge. Use an airtight container to seal it well. This helps keep moisture in and prevents it from drying out. If you want to save it longer, freezing is a good option. Wrap the cake tightly in plastic wrap, then place it in a freezer bag. This keeps out air and prevents freezer burn. When you’re ready to enjoy it again, just thaw it in the fridge overnight. To reheat a slice of cake, place it in the microwave for 10-15 seconds. This warms it without drying it out. If you want a little extra flavor, top your slice with whipped cream or ice cream. You can also use leftover cake to make a trifle. Layer pieces of cake with pudding and fresh raspberries for a fun dessert. At room temperature, your cake lasts about 2-3 days. Make sure to keep it covered to prevent it from getting stale. If you store it in the fridge, it can last up to a week. Watch for signs of spoilage, like changes in smell or texture. If the cake starts to feel hard or has mold, it's best to toss it out. You can use several egg replacements to keep the cake moist. Here are some great options: - Flaxseed meal: Mix 1 tablespoon of flaxseed meal with 3 tablespoons of water. Let it sit for 5 minutes. This works well for binding. - Applesauce: Use ¼ cup of unsweetened applesauce for each egg. This adds moisture and a hint of sweetness. - Yogurt: Substitute ¼ cup of yogurt for each egg. It adds creaminess and keeps the cake soft. - Silken tofu: Blend ¼ cup of silken tofu until smooth. This works great for a dense cake texture. These options keep your cake tasty and moist, just like the original recipe! Yes, you can use frozen raspberries in your cake. However, they may change the cake's texture and flavor. Here are some points to consider: - Frozen raspberries tend to be softer once thawed. This means they may break apart more in the batter. - They release extra juice, which can make the batter wetter. You may need to adjust the flour a bit. - If you want to use them, let them thaw first and drain any excess liquid. Using frozen raspberries is fine, but fresh ones give a better texture and flavor. If you want a less sweet cake, here are some tips to adjust the sweetness: - Reduce the sugar: Cut down the granulated sugar by ¼ to ½ cup. The cake will still be sweet enough with the raspberries. - Use unsweetened cocoa powder: This will balance the sweetness from the sugar. - Add more raspberries: Fresh raspberries bring a tart flavor that helps cut through the sweetness. - Try a sugar substitute: Consider using stevia or erythritol as a sweetener. These changes will give you a cake that fits your taste better! Yes, you can adapt this recipe to fit many dietary needs. Here are some ideas: - Gluten-free: Swap all-purpose flour with a gluten-free flour blend. Make sure it includes xanthum gum for structure. - Vegan: Use plant-based milk and replace eggs as mentioned above. This makes the cake dairy-free and egg-free. - Nut allergies: Check the labels of your ingredients. Use vegetable oil instead of any nut oils. These simple swaps can make the cake suitable for different diets while still tasting great! The chocolate raspberry cake is a modern classic. It combines rich chocolate with tart raspberries. This dessert has roots in French pastry traditions, where chocolate and fruit pair well. Raspberry cakes have been popular since the late 19th century. Chocolate became famous in desserts in the 20th century. Combining the two flavors created a fresh twist that many enjoy today. Today, this cake is a favorite for birthdays and special events. It’s loved for its beautiful look and delicious taste, making it a true crowd-pleaser. You’ve learned how to make a delicious chocolate raspberry cake from scratch. We explored key ingredients, tools, and step-by-step instructions. I shared tips to avoid common mistakes and offered storage advice for leftovers. The variations allow you to customize the cake to your taste. Remember, baking is both science and art. Enjoy the process, share your creations, and have fun experimenting with flavors. This cake can bring joy to any occasion. Keep baking and enjoy every sweet bite!](https://roastedflavors.com/wp-content/uploads/2025/05/183e50b4-1e0b-4d13-90b0-760881b91f1e.webp)
Chocolate Raspberry Cake Easy and Flavorful Recipe
If you love chocolate and berries, you’re in for a treat! This Chocolate Raspberry Cake recipe is simple and packed with flavor. With just a
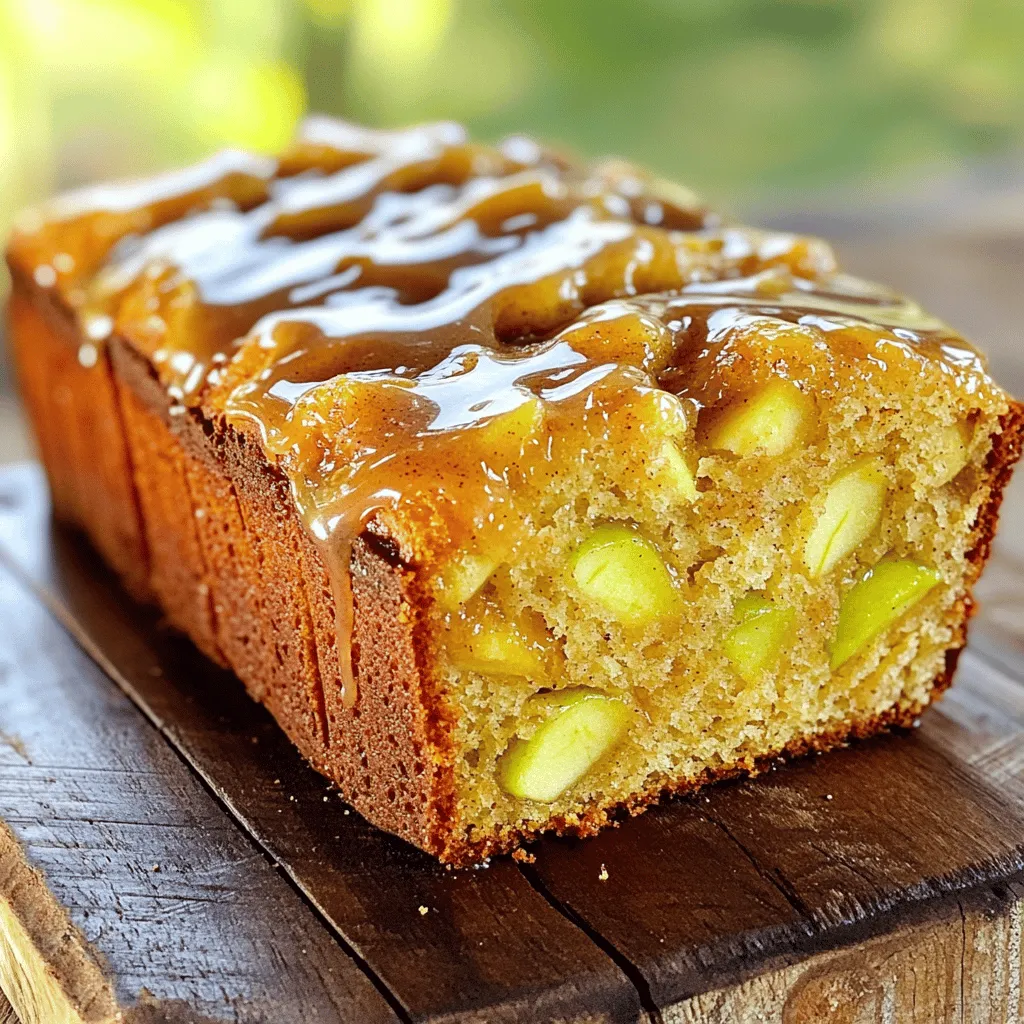
Easy Amish Apple Fritter Bread Delicious and Simple Recipe
Are you ready to bake a treat that will delight your family and friends? This Easy Amish Apple Fritter Bread recipe combines warm spices and
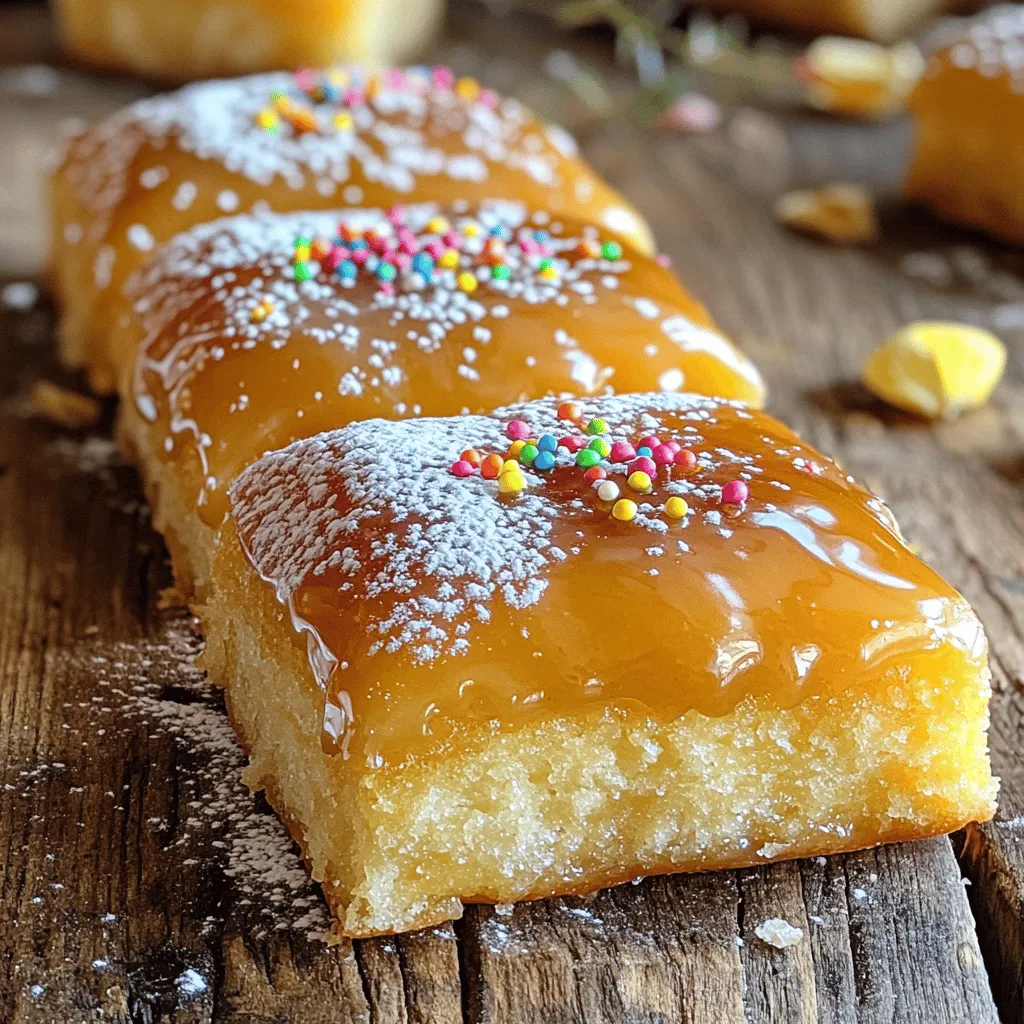
Maple Donut Bars Simple and Delicious Recipe
Ready to make your taste buds dance? I’m excited to show you how to whip up simple and delicious Maple Donut Bars! This guide covers