Desserts

To make these tasty banana bread cinnamon rolls, gather these key ingredients: - 2 ripe bananas, mashed - 2 cups all-purpose flour - 3/4 cup granulated sugar - 1/2 cup brown sugar, packed - 1/4 cup unsalted butter, softened - 1/2 cup milk - 2 large eggs - 1 teaspoon vanilla extract - 1 tablespoon baking powder - 1 teaspoon baking soda - 1/2 teaspoon salt - 1 tablespoon ground cinnamon These ingredients blend to create a soft, flavorful dough that is perfect for rolling. For the creamy topping, you will need: - 8 oz cream cheese, softened - 1/4 cup unsalted butter, softened - 2 cups powdered sugar - 1 teaspoon vanilla extract - 1-2 tablespoons milk (to adjust consistency) This frosting adds a sweet, tangy kick to the rolls. You can customize your rolls by adding: - 1/2 cup pecans or walnuts, chopped - Chocolate chips These add-ins provide extra texture and flavor. Feel free to get creative! For the full recipe, check out the details above. 1. Preheat Oven: Start by preheating your oven to 350°F (175°C). Grease a 9x13 inch baking dish to stop sticking. 2. Mix Wet Ingredients: In a big bowl, mash the ripe bananas. Add softened butter and granulated sugar. Mix until creamy. 3. Add Eggs and Milk: Next, include the eggs, milk, and vanilla extract. Stir until everything blends smoothly. 4. Combine Dry Ingredients: In another bowl, whisk together flour, baking powder, baking soda, salt, and half of the ground cinnamon. 5. Mix Wet and Dry: Slowly fold the dry mix into the wet mix. Stir gently. Remember, a few lumps are fine. 6. Roll the Dough: Pour the dough onto a floured surface. Roll it out into a rectangle about 1/4 inch thick. 7. Prepare Cinnamon Sugar Filling: In a small bowl, mix brown sugar, remaining cinnamon, and nuts if you want them. Spread softened butter over the dough. Then sprinkle the cinnamon sugar mix on top. 8. Form the Rolls: Start rolling the dough from one edge. Make a tight log. Slice the log into 12 equal pieces. 9. Let Them Rise: Place the slices in the greased baking dish. Let them rise for about 20 minutes while the oven heats up. 10. Bake the Rolls: Bake for 25-30 minutes. Look for a golden brown color. They should be fully cooked. 11. Prepare the Frosting: As the rolls bake, make the frosting. In a bowl, beat together softened cream cheese, softened butter, powdered sugar, vanilla extract, and milk. Mix until it’s creamy and smooth. 12. Frost the Rolls: After baking, let the rolls cool for a bit. Spread the cream cheese frosting on top while they are still warm. For the full recipe, check out the complete guide to making these tasty treats! To get soft and fluffy rolls, the dough needs care. First, don’t overmix the wet and dry ingredients. Mixing too much makes the rolls tough. Aim for a few lumps in the dough. Also, let your rolls rise before baking. This rise helps them become light and airy. Start with room temperature ingredients. This helps everything blend easily. Mix the bananas and butter until creamy, then add eggs and milk. Stir gently to keep the mixture smooth. When adding dry ingredients, fold them in slowly. This keeps your rolls from turning dense. For the perfect cream cheese frosting, use softened cream cheese and butter. Mix them well to avoid lumps. Gradually add powdered sugar and a bit of milk. If your frosting is too thick, add more milk a little at a time. It should be creamy and spreadable but not runny. For a special touch, swirl in extra vanilla for flavor. Check out the Full Recipe to make your delicious banana bread cinnamon rolls! {{image_4}} You can enhance your cinnamon rolls by adding nuts. Pecans and walnuts work best. They add a nice crunch and flavor. If you want a softer roll, leave out the nuts. For a fun twist, try adding almonds or hazelnuts. Chop them finely so they blend well in the dough. Want to change things up? You can infuse different flavors into your rolls. Add chocolate chips for a sweet bite. Or, mix in some pumpkin spice for a cozy fall flavor. You could even add a hint of orange zest for a fresh twist. Experiment with these flavors to find your favorite! You can make this recipe vegan or gluten-free. For a vegan roll, swap eggs for flaxseed meal or applesauce. Use almond milk instead of regular milk. For gluten-free, choose a gluten-free flour blend. Just make sure it includes a binding agent like xanthan gum. These changes keep the rolls delicious and friendly for all diets. For the complete recipe, check out the Full Recipe section! To keep your banana bread cinnamon rolls fresh, first let them cool. Once cooled, place them in an airtight container. You can also use plastic wrap to cover them tightly. Store them at room temperature for up to two days. If you want them to last longer, refrigerate them. This will keep them fresh for about a week. When you’re ready to enjoy your leftover rolls, preheat your oven to 350°F (175°C). Place the rolls on a baking sheet and cover them with foil. Heat them for about 10-15 minutes. This will warm them up without drying them out. If you prefer a quicker method, use the microwave. Warm each roll for about 15-20 seconds. This is great for a fast snack. If you want to save some rolls for later, freezing is a great option. Wrap each roll tightly in plastic wrap. Then, place them in a freezer-safe bag. You can freeze them for up to three months. When you're ready to eat one, simply thaw it in the fridge overnight. Reheat it as mentioned above for a warm treat. Enjoy your delicious rolls anytime! For the full recipe, check out the details above. You can tell your rolls are ready when they look golden brown on top. They should also feel firm to the touch. A toothpick inserted into the center should come out clean. If it has wet dough on it, bake for a few more minutes. Always trust your nose; the sweet aroma should fill your kitchen! Yes, you can prepare the dough ahead of time. Make the dough and roll it up into a log. Wrap the log tightly in plastic wrap and refrigerate it. You can keep it in the fridge for up to 24 hours. When you’re ready to bake, slice the rolls and let them rise before baking. You can use Greek yogurt or mascarpone cheese as a cream cheese substitute. They both add creaminess. If you want a dairy-free option, try coconut cream or a vegan cream cheese. Just make sure to adjust the sugar to taste, as some alternatives can be sweeter. Banana bread cinnamon rolls are a fun treat you can easily make. We covered the important ingredients, step-by-step instructions, and tips for perfect results. You can add nuts or chocolate chips for extra flavor. Remember to store leftovers properly to enjoy later. Baking should be enjoyable and rewarding. Experiment with variations to find your favorite. Now, it’s time for you to bake and share your delicious rolls with others!
Tasty Banana Bread Cinnamon Rolls with Cream Cheese Frosting
Are you ready to take your brunch game to the next level? These Tasty Banana Bread Cinnamon Rolls with Cream Cheese Frosting combine two beloved
- 1 can of refrigerated cinnamon rolls - 4 large eggs - 1/2 cup milk - 2 teaspoons vanilla extract - 1 teaspoon ground cinnamon - 1/4 teaspoon ground nutmeg - 1/4 cup pure maple syrup - Powdered sugar - Fresh berries The main ingredients create a sweet and rich flavor. The cinnamon rolls bring warmth, while eggs and milk add creaminess. Vanilla, cinnamon, and nutmeg give depth. Maple syrup adds a sweet twist. Powdered sugar creates a lovely finish, and fresh berries bring a burst of color and freshness. - Dairy-free alternatives - Extra toppings like whipped cream or chocolate sauce For those who prefer dairy-free, use almond or oat milk. You can add whipped cream for a fluffy touch. Chocolate sauce can enhance sweetness and make it more decadent. The choice of toppings can elevate your bites, making them even more special. If you want to check out the full recipe, I highly recommend doing so for the best results! - Preheat your oven to 375°F (190°C). - Lightly grease a baking dish with cooking spray or butter. - Open the can of cinnamon rolls. - Divide each roll into quarters. - Place the bite-sized pieces in a large mixing bowl. - In another bowl, whisk together the eggs, milk, and vanilla extract. - Add ground cinnamon and nutmeg to the mix. - Stir until everything blends. - Pour the egg mixture over the cinnamon roll pieces. - Gently toss with a spatula until all pieces are coated. - Let the mixture sit for about 5-10 minutes. - This helps the cinnamon rolls soak up the egg mix. - Transfer the coated pieces to your greased baking dish. - Spread them out evenly for even cooking. - Drizzle pure maple syrup over the top. - Bake in the preheated oven for 20-25 minutes. - Look for a golden brown color and a set center. - Once done, cool the bites for a few minutes. - Drizzle the icing from the can over the warm bites. - Finish with a dusting of powdered sugar and fresh berries. For the complete guide, check out the Full Recipe. Soaking time is key for a great texture in these bites. I let the cinnamon roll pieces rest in the egg mixture for about 5-10 minutes. This helps each piece soak up all that tasty goodness. If you skip this step, your bites may turn out dry. To avoid over-baking, keep an eye on your bites as they cook. Bake them for 20-25 minutes, or until they are golden brown and set in the center. If they start to brown too much, cover the dish with foil to shield them. You can add spices like nutmeg or allspice to deepen the flavor. A splash of almond extract can also elevate the taste. For syrup, I recommend pure maple syrup for a sweet touch. If you want a twist, try adding a fruit syrup or honey. A light dusting of powdered sugar makes everything feel special. Garnishing with fresh berries like strawberries or blueberries adds color and freshness. Arrange them on top or around the bites for a beautiful plate. Serve these bites with coffee or tea to create a cozy brunch vibe. You can also place them on a nice platter for a fun sharing experience. {{image_4}} You can make these Cinnamon Roll French Toast Bites even more fun with different flavors. Try pumpkin spice cinnamon roll bites. Just add pumpkin puree and a dash of pumpkin spice to the egg mixture. It brings a warm, festive taste that is great for fall. You can also use chocolate chip or fruit-filled alternatives. Simply swap regular cinnamon rolls for ones filled with chocolate or fruit. These options add a rich twist to your bites, making them even more delightful. If you need gluten-free options, look for gluten-free cinnamon rolls available in stores. These work well in the recipe. Just follow the same steps, and you won’t miss a thing. For those who prefer vegan dishes, you can make vegan replacements for eggs and dairy. Use flax eggs or applesauce instead of eggs. For dairy, choose almond or oat milk. Both swaps keep the bites tasty and fluffy. You can turn these bites into a fun brunch platter. Add fresh fruits, yogurt, or even whipped cream on the side. This makes a beautiful spread that everyone will enjoy. Alternatively, serve these bites as a dessert. Pair them with a scoop of ice cream or drench them in chocolate sauce. This sweet twist makes them a perfect treat after dinner. For the full recipe, check out the details above. To keep your Cinnamon Roll French Toast Bites fresh, store them in an airtight container. This helps keep them moist. Place the container in the fridge. They can last for up to three days this way. When you want to reheat the bites, use the microwave or oven. For the microwave, heat them for about 20-30 seconds. If using the oven, preheat it to 350°F (175°C) and warm them for about 10 minutes. This method keeps them nice and tasty. You can freeze these bites before or after baking. If you freeze them before baking, arrange the pieces in a single layer on a baking sheet. Freeze them for two hours, then move them to a freezer bag. This way, they won't stick together. To thaw, just place the frozen bites in the fridge overnight. When ready to bake, follow the original baking instructions. If you freeze them after baking, let them cool first. Wrap them tightly in plastic wrap and then in foil. They can stay in the freezer for up to two months. To reheat frozen baked bites, you can use the oven. Preheat it to 350°F (175°C) and bake for about 15-20 minutes. These steps will help maintain the great taste of your Cinnamon Roll French Toast Bites. For the full recipe, check the earlier section. Yes, you can use homemade cinnamon rolls. They can add a fresh taste and unique flavor. Homemade rolls often have better texture and warmth. Just cut them into small pieces like the store-bought ones. Soaking them in the egg mixture is key. This allows the flavors to blend well. This dish takes about 10 minutes to prepare. The baking time is around 20 to 25 minutes. So, you can enjoy this treat in just 35 minutes. It’s quick and easy, making it perfect for a busy weekend. You can pair these bites with many tasty sides. Fresh fruit like strawberries or blueberries works great. A side of crispy bacon adds a nice salty touch. For drinks, coffee or tea complements the sweetness well. You might even enjoy a glass of orange juice. Yes, this recipe is great for meal prep. You can make it ahead of time and store it. Just prepare the bites and refrigerate them before baking. When you are ready, bake them for a quick breakfast. Reheating in the oven helps keep them warm and soft. Check out the Full Recipe for more details on how to prepare these bites! This recipe for Cinnamon Roll French Toast Bites is easy and fun. You learned about the main and optional ingredients, plus simple steps to make this dish. The tips help create the best texture and flavor. You even discovered ways to vary the recipe for different diets. Remember, storing leftovers correctly keeps them fresh. Enjoy making this tasty treat for brunch or dessert. Each bite will bring smiles to your table. This recipe is sure to be a hit!
Cinnamon Roll French Toast Bites Tasty Weekend Treat
Are you ready to transform your weekend breakfast routine? With these Cinnamon Roll French Toast Bites, you’ll enjoy a sweet twist that combines two favorites
To make a great cheesecake fruit salad, you need fresh fruits. Here’s what I use: - 1 cup ripe strawberries, hulled and halved - 1 cup fresh blueberries - 1 cup pineapple chunks, preferably fresh - 1 cup kiwi, peeled and sliced into half-moons - 1 cup seedless grapes, halved These fruits add color and flavor to the salad. You can mix and match based on what you like or have on hand. Fresh fruits give the best taste and texture. The creamy part of the salad comes from dairy. Here’s what you need: - 8 oz cream cheese, softened at room temperature - 1/2 cup creamy Greek yogurt - 1/4 cup powdered sugar (adjust to taste) - 1 teaspoon pure vanilla extract - 1 tablespoon freshly squeezed lemon juice These ingredients blend well to create a smooth and rich base. The cream cheese gives a cheesecake flavor, while the yogurt adds a nice tang. For extra fun, you can add some optional ingredients: - 1/2 cup granola (optional, for a crunchy topping) Granola adds a nice crunch and contrast to the creamy salad. You can also use nuts or seeds for more texture. If you want to make it sweeter, feel free to add more powdered sugar to taste. For the full recipe, visit [Full Recipe]. Start by gathering your ingredients. You will need cream cheese, Greek yogurt, powdered sugar, vanilla extract, and lemon juice. In a large mixing bowl, add the softened cream cheese and Greek yogurt. Then, sprinkle in the powdered sugar. Next, pour in the vanilla extract and lemon juice. Using an electric mixer, beat everything together on medium speed. Mix for about 2-3 minutes. You want a smooth and creamy texture. Now, it’s time to prepare the fruits. Take your strawberries, blueberries, pineapple, kiwi, and grapes. In a separate bowl, gently toss these fruits together. Make sure they are evenly mixed. This step is key for a balanced flavor in your salad. The vibrant colors of the fruits will make your salad look amazing! Once the fruits are combined, it’s time to fold in the cream cheese mixture. Use a spatula to carefully mix the cream cheese with the fruit. Be gentle to avoid mashing the fruits. If you want some crunch, you can add half of the granola at this stage. Now, transfer your cheesecake fruit salad into a large serving bowl or individual cups. This makes it look fancy! Just before serving, sprinkle the remaining granola on top for added crunch. Enjoy your delightful creation! To achieve a smooth and creamy texture, start with softened cream cheese. This helps it mix well with yogurt and sugar. If you forget to soften it, microwave it for about 10 seconds. Mix the cream cheese with yogurt on medium speed for 2-3 minutes. This makes it airy and fluffy. You want every bite to feel rich and creamy. To keep your fruits fresh and colorful, use lemon juice. The acid in lemon juice slows down the browning process. Toss your cut fruits in lemon juice right after slicing. This helps strawberries, apples, and bananas stay bright. If you prepare the salad ahead, add the fruits last. This keeps them fresh and beautiful until serving. Presentation matters! Serve your cheesecake fruit salad in clear cups or a glass bowl. This shows off the vibrant colors of your fruits. You can also layer the fruits and cream mixture for a fun look. For a finishing touch, add a sprig of mint on top. It not only looks nice but also adds a fresh scent. For added crunch, sprinkle granola just before serving. This keeps it from getting soggy. {{image_4}} You can switch up the fruits in your cheesecake fruit salad. Try using peaches, mangoes, or raspberries for a fresh twist. You can even add bananas for a creamier texture. Choose seasonal fruits for the best flavor. Make sure your fruits are ripe for the sweetest taste. Mixing different colors makes your salad look pretty, too. If you want to cut down on sugar, you have options. You can use honey or maple syrup instead of powdered sugar. Stevia or monk fruit sweetener are great choices for low-calorie options. Always taste your mixture as you go. Adjust the sweetness to your liking. It’s all about finding that perfect balance. You can make this salad vegan easily. Use a plant-based cream cheese and coconut yogurt in place of dairy. For a sugar-free version, stick with natural sweeteners like mashed bananas. This way, you can still enjoy the creamy goodness without added sugars. The salad remains tasty and satisfying for everyone. Store any leftover cheesecake fruit salad in an airtight container. This keeps the salad fresh and tasty. Place it in the fridge right away. It stays good for about 2 to 3 days. If you wait longer, the fruit may get soggy. To keep your fruits fresh, check for ripeness before adding them. Use firm berries and ripe pineapple. Wash the fruits gently and dry them well. If you cut fruit ahead of time, soak it in lemon juice. This helps to keep it from browning. You don’t need to reheat cheesecake fruit salad. Just take it out of the fridge when ready to serve. The cold salad is refreshing and delicious. Give it a gentle stir before serving to mix the flavors again. If you added granola, sprinkle more on top for crunch. For the full recipe, check the Cheesecake Fruit Salad Delight above! Yes, you can use frozen fruit. However, it may release extra juice. This juice can make your salad watery. To avoid this, let the fruit thaw and drain excess liquid. Fresh fruit adds the best flavor and texture, but frozen is a good backup. Cheesecake fruit salad lasts about three days in the fridge. After that, the fruit may get mushy. Store it in an airtight container for best results. Just remember, the longer it sits, the more the fruit will soften. To keep granola crunchy, add it just before serving. If you mix it in too soon, it will soak up moisture from the fruit. This will make it soggy. I always recommend saving half for later. Sprinkle it on top for a nice crunch. You can prepare the cream cheese mixture ahead of time. Store it in the fridge for up to two days. Mix the fruit right before serving. This way, it stays fresh and colorful. I love using strawberries, blueberries, and kiwi. Pineapple adds a tropical twist. Grapes are sweet and easy to eat. You can also try bananas, but they brown quickly. Choose fruits that you enjoy for a personal touch. Yes, you can! Use dairy-free cream cheese and yogurt. This swaps in nicely for the creaminess. Coconut yogurt is a great choice. It adds a hint of coconut flavor, making it even tastier. Cheesecake fruit salad pairs well with whipped cream or extra granola. Serve it alongside a slice of cake for a special treat. You can also enjoy it as a light dessert on its own. Absolutely! It’s bright, colorful, and fun. Guests love the mix of flavors and textures. You can make it in advance and impress your friends. It's a real crowd-pleaser at any gathering. Yes, you can double or triple the Full Recipe. Just keep the same ratios for each ingredient. This makes it easy to serve more people without any hassle. Enjoy sharing this delightful dish! In this blog, we explored how to make a delicious cheesecake fruit salad. We covered essential ingredients, including fresh fruits and dairy options. You learned step-by-step instructions for making the cream cheese mixture and combining fruits. I shared tips for keeping your salad creamy and preventing browning. You also discovered fun variations and smart storage methods. Now, you can enjoy this tasty treat in many ways, whether for a gathering or a snack. Make it your own and have fun with it!
Cheesecake Fruit Salad Delightful and Easy Recipe
If you love cheesecake and fresh fruit, you’re in for a treat! This Cheesecake Fruit Salad combines creamy texture with tasty fruits, making it the
- 1 cup all-purpose flour - 1/2 cup granulated sugar - 1/2 teaspoon baking powder - 1/4 teaspoon baking soda - 1/4 teaspoon salt - 1/2 cup cream cheese, softened - 1/4 cup unsalted butter, softened - 1 large egg - 1/4 cup whole milk - Zest of 1 lemon - 2 tablespoons freshly squeezed lemon juice - 1 teaspoon pure vanilla extract - Optional: powdered sugar for dusting Every ingredient plays a key role in the flavor and texture of Lemon Cream Cheese Muffins. The all-purpose flour gives the muffins structure. Sugar sweetens the batter and helps with browning. Baking powder and baking soda are vital for a light and fluffy muffin. Salt enhances all the flavors. Cream cheese adds rich creaminess, while butter contributes moisture. The egg binds everything together. Whole milk keeps the muffins tender. Lemon zest and juice deliver that bright, zesty flavor we love. Finally, vanilla extract adds a warm note to the mix. If you want a little extra sweetness, powdered sugar makes a lovely dusting on top. You can find the full recipe in the section above. - Preheat to 350°F (175°C). - Line or grease the muffin tin. Start by preheating your oven. This helps the muffins bake evenly. Next, prepare your muffin tin. Use paper liners or grease it lightly to prevent sticking. - Whisk together flour, sugar, baking powder, baking soda, and salt. In a large bowl, whisk the dry ingredients. This includes all-purpose flour, sugar, baking powder, baking soda, and salt. Make sure they are well mixed for the best rise. - Beat cream cheese and butter. - Add egg, milk, lemon zest, lemon juice, and vanilla. In another bowl, beat the softened cream cheese and butter together. Use an electric mixer for about 2-3 minutes. The mixture should be smooth and creamy. Next, add the egg, milk, lemon zest, lemon juice, and vanilla. Mix them together on low speed until smooth. - Fold dry ingredients into wet mixture carefully. Now, carefully fold the dry mixture into the wet mixture. Use a spatula or wooden spoon. Be gentle; it’s okay if some lumps remain. Overmixing can make the muffins tough. - Fill muffin cups and bake for 18-20 minutes. - Check doneness with a toothpick. Using a scoop or large spoon, fill each muffin cup about three-quarters full. This allows room for rising. Place the muffin tin in the oven and bake for 18-20 minutes. Check for doneness by inserting a toothpick into the center. It should come out clean. - Cool muffins in the tin for 5 minutes. - Dust with powdered sugar if desired. After baking, let the muffins cool in the tin for 5 minutes. This makes them easier to remove. If you want a sweet touch, dust the tops with powdered sugar before serving. Enjoy your Lemon Cream Cheese Muffins! For the full recipe, check the recipe section. To make your Lemon Cream Cheese Muffins soft, use room temperature ingredients. Cold ingredients can make the batter dense. Room temperature butter and cream cheese blend well, adding moisture. Also, don't overmix the batter. Mix until just combined. A few lumps are okay. Overmixing can lead to tough muffins. Want a stronger lemon flavor? Add a bit of lemon extract. This small addition packs a punch. For texture, incorporate poppy seeds. They add a nice crunch and pair well with lemon. You can also try adding blueberries for extra sweetness. Serve your muffins on a decorative platter. This makes them look fancy and inviting. Garnish them with lemon slices or a sprig of mint. This adds a pop of color and freshness. For a sweet touch, dust the tops with powdered sugar. This simple step makes them look like a bakery treat. Try these tips to make your muffins stand out! For the complete recipe, check out the Full Recipe section. {{image_4}} You can make these lemon cream cheese muffins even better with fun add-ins. - Blueberries or raspberries: These fruits add a burst of sweetness. - Chopped nuts: Walnuts or pecans give a nice crunch. Adding these flavors can enhance your muffins and make them special. Mix in about one cup of these add-ins when you combine the dry and wet ingredients. For a gluten-free version, swap the all-purpose flour with a gluten-free flour mix. This change keeps your muffins soft and tasty. Make sure the mix you choose has a good blend of starches and flours for the best results. If you want a sugar-free treat, try using a sugar substitute like erythritol. This option will keep your muffins sweet without added sugar. Use the same amount as granulated sugar in the recipe. Enjoy the same great taste while being mindful of sugar intake! You can find the full recipe to explore these variations and more ways to enjoy lemon cream cheese muffins. Store your lemon cream cheese muffins in an airtight container at room temperature. They stay fresh for up to 3 days. This makes them perfect for a quick breakfast or snack. To keep them longer, freeze the muffins in a sealed bag. They last for up to 3 months in the freezer. This way, you can enjoy them anytime you want a treat. Just remember to label the bag with the date. When you’re ready to enjoy a muffin, thaw it overnight in the fridge. After it is thawed, warm it in the oven at 350°F for about 5-10 minutes. This will bring back the soft and fluffy texture that you love. For more detailed steps on making these muffins, check the Full Recipe. Softened cream cheese and proper mixing technique contribute to moisture. Cream cheese adds richness. It keeps the muffins soft. Mixing well combines the ingredients without overworking them. This method helps keep the muffins fluffy and light. Yes, you can prepare the batter and store it in the fridge for up to 24 hours before baking. This saves time in the morning. Just remember to stir the batter gently before baking. Freshly baked muffins are always best! When a toothpick inserted in the center comes out clean. This test is simple and effective. If the toothpick has wet batter, bake a few more minutes. Keep an eye on them as they bake. Cream cheese is recommended for its texture and flavor, but mascarpone can be a great alternative. Mascarpone gives a slightly different taste. It also keeps the muffins rich and moist. However, cream cheese is the classic choice. They are delicious on their own, but serve with tea or coffee for a delightful treat. A light dusting of powdered sugar adds a sweet touch. You can also pair them with fruit or yogurt for a nice balance. Lemon Cream Cheese Muffins are simple and delicious. We covered key ingredients, steps, and fun tips. Remember, using room temperature ingredients helps create a moist muffin. You can even try different flavors with added fruits or nuts. Store them easily for later enjoyment. Happy baking! Enjoy your tasty treats at any time.
Lemon Cream Cheese Muffins Soft and Flavorful Treat
If you crave a soft and flavorful treat, you need to try my Lemon Cream Cheese Muffins. These little delights mix creamy goodness with a
- 2 large flour tortillas - 1/2 cup creamy peanut butter - 1 ripe banana, thinly sliced - 1 tablespoon honey - 1/4 teaspoon ground cinnamon - 1/4 cup mini chocolate chips (optional) - Fresh fruits (strawberries, berries) - Nut butters (almond or cashew) - Seeds (chia or flaxseeds) - Non-stick skillet - Spatula - Measuring cups and spoons You need simple ingredients for this tasty treat. The main stars are tortillas and peanut butter. You can use creamy or chunky peanut butter based on your taste. Slicing a ripe banana brings sweetness and texture. Honey adds a nice touch of sweetness, while ground cinnamon gives warmth. If you want a little extra fun, toss in mini chocolate chips! You can also customize your quesadilla with suggested add-ins. Fresh fruits like strawberries or berries add color and freshness. Different nut butters, such as almond or cashew, can switch up the flavor. Seeds like chia or flaxseeds add crunch and nutrition. For tools, you only need a non-stick skillet and a spatula. Measuring cups and spoons make sure you get the right amounts. This recipe is not just easy, but it can also be a fun project for kids. They can help spread peanut butter and layer on the bananas. Making this dish together can create special moments in the kitchen. Check out the Full Recipe for all the details and step-by-step instructions to make your peanut butter quesadilla. 1. Preheat your skillet over medium heat. This step is key to a great quesadilla. 2. Take one large tortilla and spread 1/4 cup of creamy peanut butter on it. Make sure to cover it well. Repeat this with the second tortilla. 1. On the first tortilla, layer thin slices of ripe banana evenly. This gives a nice sweet taste. 2. Drizzle 1 tablespoon of honey over the banana slices. 3. Sprinkle 1/4 teaspoon of ground cinnamon on top. If you want more flavor, add 1/4 cup of mini chocolate chips. 4. Place the second tortilla on top, peanut butter side down. 1. Lightly coat your hot skillet with cooking spray or butter. This helps the quesadilla not stick. 2. Carefully place the quesadilla in the skillet. Cook for 3-4 minutes until the bottom is golden brown and crispy. 3. Using a spatula, gently flip the quesadilla over. Cook for another 3-4 minutes to brown the other side. 4. Once done, take the quesadilla off the heat. Let it sit for a minute before slicing into wedges. This simple recipe can be found in the Full Recipe section. Enjoy your tasty treat! To make the best peanut butter quesadilla, focus on even cooking. Always preheat your skillet to medium heat. This helps create a nice golden crust. Avoid high heat, as it can burn the outside while leaving the inside cold. Cook your quesadilla for about 3-4 minutes on each side. Flip gently to keep the filling intact. Before you serve, drizzle honey on top. A sprinkle of cinnamon adds flavor and a nice touch. You can also serve it with fresh fruit, like sliced strawberries or apples. Yogurt on the side makes a great dip. It adds creaminess and balances the sweetness of the quesadilla. You can adjust the recipe to fit your diet. If you need a nut-free option, use sunflower seed butter. For a vegan twist, swap honey with agave syrup. Get creative with flavors! Add a pinch of nutmeg or chili powder for a fun kick. You could also try different spreads, like almond or cashew butter, to mix things up. {{image_4}} If you want a nut-free quesadilla, try using sunflower seed butter. This tasty spread gives a similar nutty flavor. You can also use yogurt as a base. Creamy yogurt spreads easily and adds a cooling touch. Both options keep your quesadilla delicious without nuts. To make a vegan quesadilla, substitute honey with maple syrup or agave. These plant-based sweeteners taste great and work well. For tortillas, choose ones made with no animal products. Many stores sell vegan-friendly tortillas, making it easy to enjoy this dish. Want to turn your quesadilla into a sweet treat? Add toppings like marshmallows or caramel. You can layer these on top of the bananas. The warm quesadilla melts the marshmallows and caramel, creating a gooey delight. This variation makes a fantastic dessert choice! To keep your peanut butter quesadilla fresh, store it in an airtight container. Place parchment paper between layers if you stack them. This prevents sticking. Make sure it cools completely before sealing. You can keep it in the fridge for about three days. When reheating, use a skillet over medium heat. This keeps the quesadilla crispy. Heat it for about 2-3 minutes on each side. You can also use an air fryer if you have one. Set it to 350°F and heat for about 5 minutes. This method helps maintain a nice texture. Fresh quesadillas taste best right after cooking. The warm peanut butter and melted chocolate chips are heavenly. However, stored quesadillas are still tasty. They make a quick snack or easy breakfast. If you're in a hurry, grab a reheated slice, and enjoy! You can serve peanut butter quesadillas with many tasty sides. Try fresh fruit like apple slices or berries. You can also serve them with yogurt for dipping. A drizzle of extra honey adds a sweet touch. If you want a fun twist, try chocolate or caramel sauce. These options pair well and make your meal even better. Yes, you can prepare peanut butter quesadillas in advance. Make them and store them in the fridge for up to a day. When you’re ready to eat, just reheat them in a skillet. Heat them on medium for a few minutes on each side. This keeps them warm and crispy. Absolutely! Peanut butter quesadillas are great for kids. They are easy to hold and fun to eat. Kids love the sweet banana and chocolate flavors. You can let them help with the assembly too. This makes cooking a fun family activity. For a detailed guide on how to make this tasty treat, check out the Peanut Butter Quesadilla Delight recipe. It includes all the ingredients and step-by-step instructions. Peanut butter quesadillas are simple and fun to make. You learned the main ingredients, how to prepare, and ways to customize your dish. This tasty treat offers many options for add-ins and variations for all diets. Store leftovers properly to enjoy them later. Make sure to serve with fun sides. Overall, these quesadillas are a delightful snack or meal for everyone, especially kids. Try them today, and let your taste buds enjoy the magic of peanut butter!
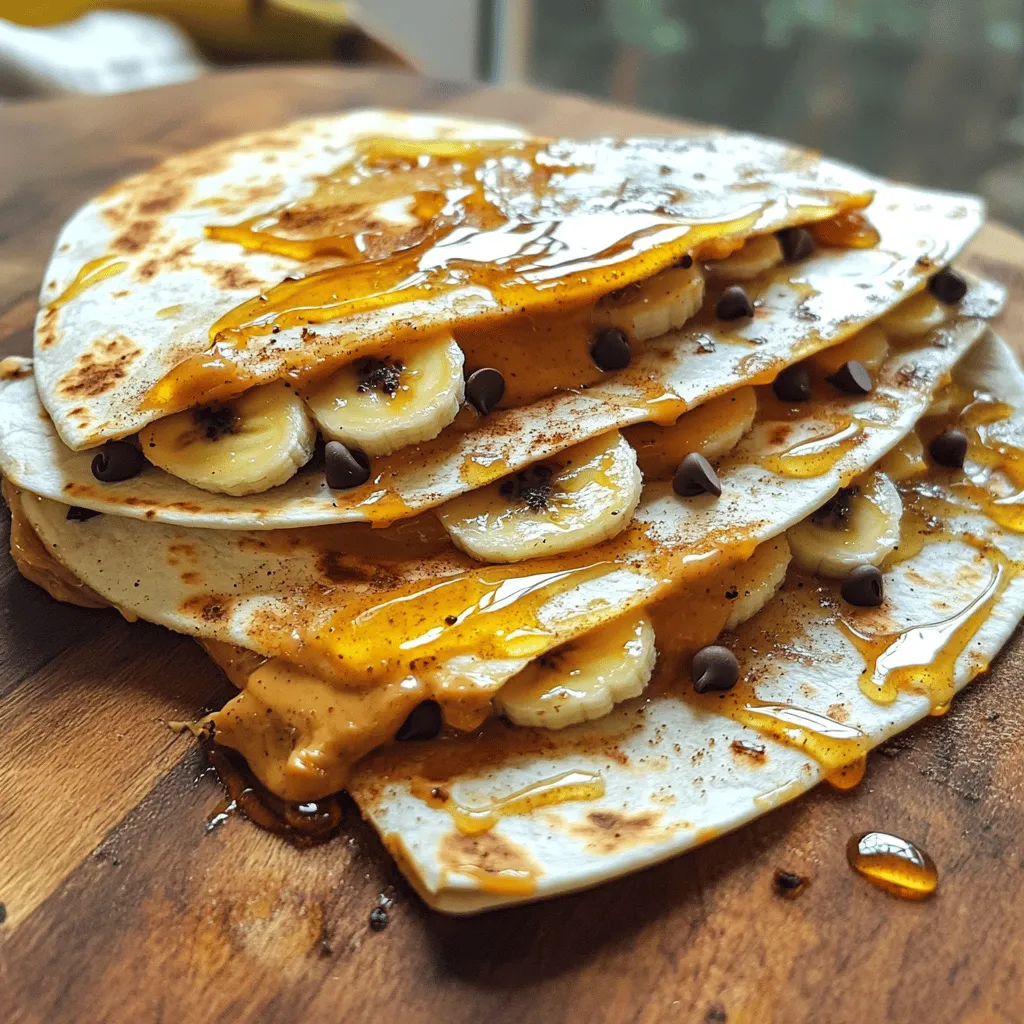
Peanut Butter Quesadilla Simple and Tasty Treat
Looking for a quick snack that bursts with flavor? The Peanut Butter Quesadilla is your answer! With just a few simple ingredients, you can whip
To make a delicious Banana Split Dump Cake, you need these simple ingredients: - 3 ripe bananas, sliced - 1 cup crushed pineapple, drained - 1 cup fresh strawberries, hulled and sliced - ½ cup walnuts, coarsely chopped - 1 box yellow cake mix (approximately 15.25 ounces) - ½ cup unsalted butter, melted and slightly cooled - 1 cup chocolate syrup (for drizzling) - 1 cup whipped cream (for topping) - Maraschino cherries (for garnish) These ingredients create a sweet treat that everyone will love. The bananas add a soft texture while the strawberries and pineapple give a fruity taste. Walnuts add a nice crunch to each bite. Using a box of yellow cake mix makes this recipe quick and easy. Don't forget the melted butter; it helps create a lovely topping. The chocolate syrup and whipped cream serve as the perfect finishing touches. For the ultimate look, add a maraschino cherry on top. This recipe is fun to make and share. Check out the Full Recipe for more details on how to bring this dish to life! - Step 1: Preheat your oven to 350°F (175°C). This is key for even baking. - Step 2: Lightly grease a 9x13 inch baking dish. This helps the cake not stick. - Step 3: Layer the sliced bananas evenly across the bottom. This forms a sweet base. - Step 4: Add crushed pineapple on top of the bananas. Spread it out gently. - Step 5: Layer the sliced strawberries over the pineapple. This adds a fresh flavor. - Step 6: Sprinkle the yellow cake mix over the fruit layers. Do not stir it! - Step 7: Drizzle the melted butter evenly over the cake mix. Then, add chocolate syrup on top. Now, bake for 40-45 minutes. The top should turn golden brown and bubble around the edges. You can check if it's done by inserting a toothpick; it should come out clean. This method ensures a delicious treat every time. Don’t forget to let the cake cool for about 10 minutes before serving. You can find the full recipe above for more details. - Use ripe bananas for better flavor. They add sweetness and moisture. - Don’t stir the cake mix for the best texture. This keeps the topping light. - Adjust baking time based on oven performance. Ovens can vary, so check often. - Serve warm with a dollop of whipped cream. It adds a creamy touch. - Drizzle with additional chocolate syrup. It enhances the sweet flavor. - Garnish with chopped walnuts and maraschino cherries. This adds crunch and color. These tips help you create a perfect banana split dump cake. You can find the full recipe to follow along! Enjoy the process and share your delicious results! {{image_4}} You can mix up the flavors of your banana split dump cake. Here are some fun ideas: - Substitute mixed berries for strawberries: Try using blueberries, raspberries, or blackberries. This adds a nice tartness. - Use coconut flakes for added tropical flair: Sprinkle some coconut flakes on top. This will give your cake a beachy vibe. - Try different nuts like pecans or almonds: Swap walnuts for pecans or sliced almonds for a different crunch. Each nut adds its own unique taste. You can also tweak the recipe for different diets. Here are two easy swaps: - Gluten-free option using gluten-free cake mix: Look for a gluten-free cake mix. This way, everyone can enjoy the cake. - Dairy-free using coconut oil instead of butter: Replace butter with coconut oil. This keeps the cake moist while making it dairy-free. These variations make the banana split dump cake fun and flexible. You can share it with everyone, no matter their dietary needs! After you enjoy your banana split dump cake, store leftovers in an airtight container. This keeps the cake fresh and moist. You can keep it at room temperature for a day. If you need more time, refrigerate it. Cold storage helps it last longer. To enjoy the cake warm again, reheat it in the oven or microwave. For the oven, set it to a low temperature. This warms the cake evenly without drying it out. The microwave is faster, but be careful not to overheat. Aim to eat the cake within 2-3 days for optimal freshness. The flavors are best when the cake is fresh! A dump cake is a simple, layered dessert. You "dump" ingredients into a pan without mixing. This method gives you a soft cake with a crisp top. It is quick and easy, making it perfect for busy days. You can use fruit, cake mix, and butter. The beauty lies in its simplicity and deliciousness. Yes, you can make this banana split dump cake ahead of time. You can prepare it a day before serving. Just cover it and keep it in the fridge. When ready to eat, warm it in the oven for a few minutes. This keeps the cake fresh and tasty. You will know the cake is done when the top is golden brown. The edges should be bubbling, too. A toothpick inserted in the center should come out clean. If it has wet batter on it, bake a few more minutes. Keep an eye on it to avoid overbaking. Yes, you can freeze banana split dump cake. Let it cool completely before freezing. Wrap it well in plastic wrap or foil. This helps prevent freezer burn. You can keep it frozen for up to three months. When ready to eat, thaw it overnight in the fridge and warm it up. This recipe for banana split dump cake offers a fun and easy dessert. You just layer fruit, cake mix, and drizzle with butter and chocolate. It bakes quickly, and the flavors blend well. Remember, using ripe bananas and adjusting your baking time makes a big difference. Feel free to customize with your favorite fruits or nuts. Enjoy this treat warm, topped with whipped cream and cherries. You will love how simple and delicious it is!
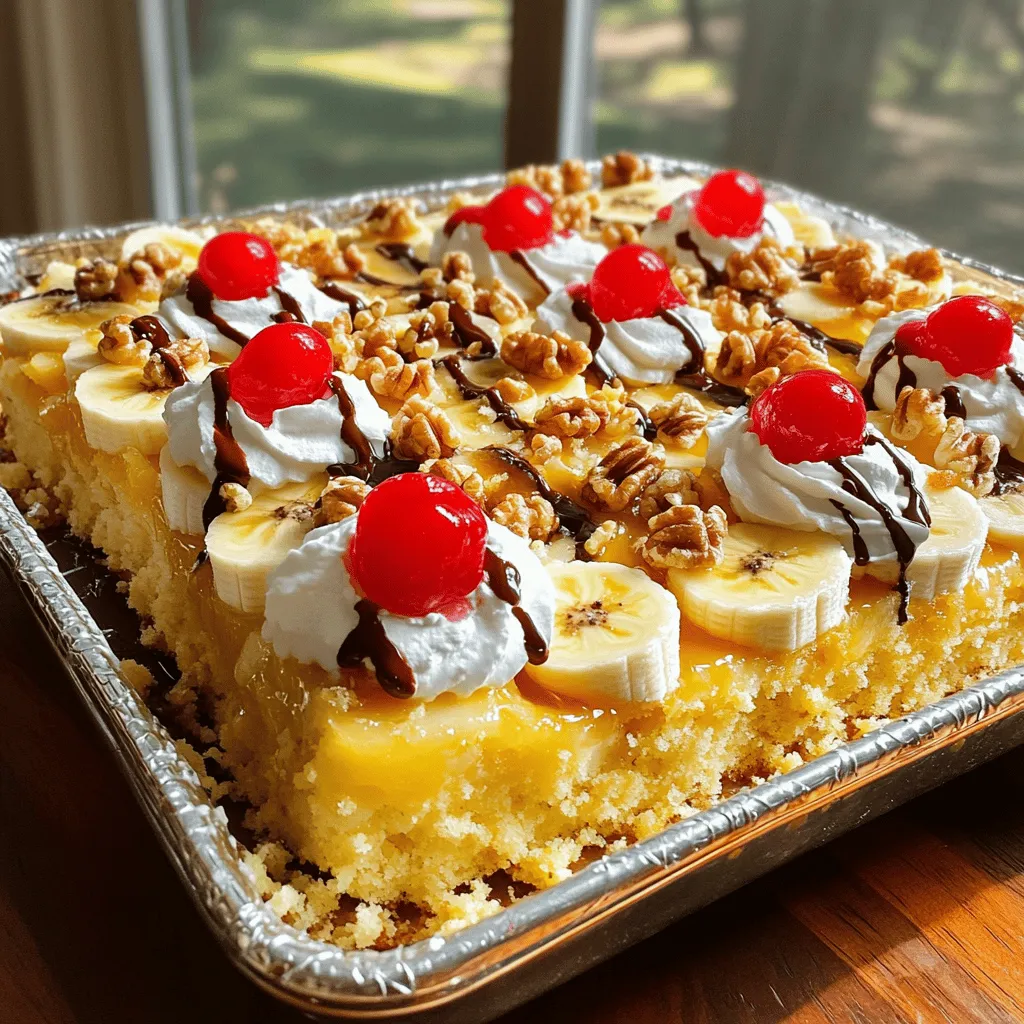
Banana Split Dump Cake Rich and Easy Dessert Recipe
Are you craving a sweet treat that’s both rich and simple? Look no further! This Banana Split Dump Cake combines fresh fruit, cake mix, and
To make Chia Banana Bread Energy Bites, you need a few key ingredients: - 2 ripe bananas, thoroughly mashed - 1 cup rolled or quick oats - 1/2 cup almond butter (or your favorite nut butter) - 1/4 cup chia seeds - 1/4 cup honey or maple syrup - 1 teaspoon vanilla extract - 1/2 teaspoon ground cinnamon These ingredients work together to create a tasty and healthy snack. The ripe bananas provide natural sweetness, while oats give a great base. Almond butter adds creaminess and healthy fats. Chia seeds are tiny powerhouses full of nutrients. You can also add some optional ingredients for extra flavor and texture: - 1/4 cup walnuts, roughly chopped - 1/4 cup dark chocolate chips These add-ins allow you to make the bites your own. Walnuts add crunch and healthy omega-3s. Dark chocolate chips bring a rich sweetness that kids love. Each ingredient has its own health benefits: - Bananas are rich in potassium and fiber. They help with energy and digestion. - Oats are a great source of whole grains. They keep you full and energized. - Almond butter offers protein and healthy fats. It supports heart health. - Chia seeds are high in fiber and omega-3s. They aid digestion and boost heart health. - Honey or maple syrup provides natural sweetness with some vitamins. - Vanilla extract adds flavor without extra calories. - Cinnamon may help regulate blood sugar levels. Using these ingredients can help you feel great while enjoying a delicious treat. For the full recipe, check out the instructions in the article. Start by peeling two ripe bananas. Put them in a large bowl and mash them well. I like to use a fork for this. Make sure to get them smooth with no lumps. This step is important because it helps blend all flavors together. Now, add 1/2 cup of almond butter to the mashed bananas. You can also use any nut butter you like. Next, pour in 1/4 cup of honey or maple syrup for sweetness. Don’t forget 1 teaspoon of vanilla extract. Mix everything well until it looks creamy. Then, slowly add 1 cup of oats and 1/4 cup of chia seeds. Sprinkle in 1/2 teaspoon of ground cinnamon. If you want, toss in 1/4 cup of chopped walnuts and 1/4 cup of dark chocolate chips. Stir gently until it’s all mixed nicely. Cover the bowl with plastic wrap. Place it in the fridge for about 30 minutes. This helps the mixture firm up. After chilling, take small portions and roll them into 1-inch balls using your hands. Arrange the balls on a baking sheet lined with parchment paper. Put them back in the fridge for another 30 minutes. This makes them hold their shape better. When they are ready, store them in an airtight container. You can enjoy these bites fresh for up to a week. For the full recipe, refer to the detailed instructions above. To get the right texture for your energy bites, use ripe bananas. The riper the bananas, the sweeter and smoother the mix will be. Make sure to mash them well. This helps avoid lumps. Mixing the ingredients until they are fully blended is key. If the mixture seems too dry, add a bit more nut butter or honey. This will keep your bites soft and chewy. If you have nut allergies, you can swap almond butter for sunflower seed butter. This change keeps the flavor while making it safe. For a gluten-free option, ensure your oats are certified gluten-free. You can also substitute honey with agave syrup for a vegan option. These swaps keep the snack tasty and friendly for everyone. Want to boost the flavor? Add-ins are a great idea! You can mix in dried fruits like cranberries or raisins. Chopped nuts add crunch, too. For a fun twist, try adding shredded coconut or peanut butter chips. If you love spices, add a pinch of nutmeg or ginger. Each addition gives your energy bites a unique flavor and texture. Don't hesitate to get creative! For the full recipe, check out the detailed guide provided. {{image_4}} When making Chia Banana Bread Energy Bites, you can change the flavors easily. Try adding a spoonful of peanut butter for a nutty taste. You can also mix in diced dried fruits like apricots or cranberries for a sweet twist. Want a tropical vibe? Add coconut flakes or even a hint of orange zest. Each change gives the bites a new life! Boosting the nutrition of your energy bites is simple. Add a tablespoon of flaxseeds for extra fiber. You can also stir in protein powder for a filling snack. For a hint of crunch, consider a handful of pumpkin seeds. These options help make your bites even healthier while keeping them tasty. The sweetness of your energy bites can be tailored to your taste. If you prefer less sugar, cut back on honey or maple syrup. You can also skip the chocolate chips for a more subtle flavor. If you want more sweetness, add a bit more honey or use flavored nut butter. Always taste the mixture before forming the bites to find your perfect level of sweetness. To keep your Chia Banana Bread Energy Bites fresh, store them in an airtight container. You want to keep air out to prevent them from drying out. Place them in the fridge for the best taste and texture. They will stay fresh for about one week. You can freeze these bites for longer storage. Just place them in a single layer on a baking sheet first. Once frozen, transfer them to a freezer-safe bag. Make sure to remove as much air as possible. They can last up to three months in the freezer. When you're ready to eat, let them thaw in the fridge overnight. To keep your energy bites tasting great, avoid exposing them to moisture. Always use clean hands or utensils when handling them. If you notice any condensation in the container, wipe it out. This will help prevent spoilage. Enjoy these bites as a quick snack, packed with flavor and nutrition. For the full recipe, check out the details above. Chia Banana Bread Energy Bites last up to one week in the fridge. Store them in an airtight container to keep them fresh. If you want to keep them longer, you can freeze them. They can stay frozen for up to three months. Just remember to thaw them in the fridge before eating. Yes, you can easily make these energy bites vegan! Simply replace honey with maple syrup. Use your favorite nut butter that is vegan-friendly. All other ingredients, such as bananas and chia seeds, are already vegan. Chia seeds are tiny powerhouses of nutrition. They are rich in omega-3 fatty acids, which are good for your heart. They also have a lot of fiber, which helps digestion. Chia seeds can help keep you full longer. They are also high in protein, making them a great addition to your snack! Yes, these energy bites are perfect for kids! They are easy to make and fun to eat. The natural sweetness from bananas and honey makes them tasty. Plus, they provide energy for activities. Their chewiness is sure to make your kids happy. You can also customize them to suit your child's taste. For the full recipe, check out the recipe section. Chia Banana Bread Energy Bites are easy to make and full of nutrition. You learned about key ingredients and how to create your bites step-by-step. I shared tips for texture, flavor, and storage. You can even personalize your bites with different flavors and boosters. Enjoy making these tasty snacks! They offer energy and health benefits, making them ideal for anyone.
Chia Banana Bread Energy Bites Quick and Easy Snack
Looking for a tasty snack that fuels your day? Try my Chia Banana Bread Energy Bites! These quick and easy bites blend the flavor of
- 1 ½ cups overripe bananas, mashed - ½ cup granulated sugar - ½ cup packed brown sugar - 1/3 cup unsalted butter, melted - 1 large egg - Ground cinnamon and optional nuts For these rolls, the overripe bananas are key. They add sweetness and moisture. You need about three medium bananas, mashed well. The sugars—granulated and brown—help create a sweet, rich taste. The brown sugar adds depth and a hint of caramel. Melted butter gives the rolls a tender texture. The large egg binds everything together. You can also add ground cinnamon for that signature flavor. If you like, toss in some chopped nuts for crunch. Walnuts or pecans work great. - 1 cup cream cheese, softened - 1 cup powdered sugar - 2 tablespoons milk The cream cheese icing is simple yet delicious. Start with softened cream cheese for a smooth blend. Mixing in the powdered sugar brings sweetness, while milk adjusts the icing's texture. This icing makes your rolls feel special and extra tasty. - Mixing bowls, whisk, rolling pin, and baking dish To make these rolls, you need a few basic tools. Use mixing bowls to combine the ingredients. A whisk helps mix everything smoothly. A rolling pin is essential for rolling out the dough. Finally, a baking dish holds your rolls while they bake. For the full recipe, check out the details above. - Preheat the oven to 350°F (175°C). - Prepare a 9x13 inch baking dish. Grease it lightly and add parchment paper for easy removal. - In a large mixing bowl, combine the mashed bananas, granulated sugar, brown sugar, and melted butter. Mix until smooth. - Add the large egg and vanilla extract. Beat well until fully mixed. - Sprinkle in the baking soda, baking powder, and salt. Stir gently to combine. - Gradually add the flour, mixing until just incorporated. Do not overmix. - Lightly flour your surface and roll out the dough into a rectangle, about ½ inch thick. - In a small bowl, mix the ground cinnamon with optional nuts. Sprinkle this mixture over the rolled-out dough. - Starting from the longer side, roll the dough into a tight log. - Slice the log into 1-inch pieces and place them in the prepared baking dish. Leave space between each roll. Now your delicious banana bread cinnamon rolls are ready to bake! For the full recipe, check the earlier section. To make your rolls great, first avoid overmixing the dough. When you mix too much, the rolls can turn out dense. Gently fold the flour in until you see no dry spots. Next, use a good rolling technique for even slices. Roll the dough into a rectangle, about ½ inch thick. When rolling, start at the longer side. This way, you get nice, even rolls. Use a sharp knife to cut them into 1-inch pieces. Use overripe bananas for extra flavor. The browner the bananas, the sweeter your rolls will taste. They also add great moisture. You can add nuts for texture. Chopped walnuts or pecans give a nice crunch. Mix them in with the cinnamon filling to make every bite exciting. To apply the cream cheese icing, drizzle it over warm rolls. This way, it melts a little and soaks in. Use a spoon for an artistic drizzle. For a smoother icing consistency, beat the cream cheese and sugar well. Add milk slowly until you get a creamy texture. If it’s too thick, just add a bit more milk. This icing will make your rolls even more delicious. You can find the full recipe to follow these tips easily. Enjoy making your banana bread cinnamon rolls! {{image_4}} You can add fun flavors to your banana bread cinnamon rolls. One tasty option is chocolate chip banana bread cinnamon rolls. Just mix in a cup of chocolate chips with your dough. The chocolate will melt and add sweetness. You will love the combo of chocolate and banana. Another idea is to swap the cream cheese icing for a maple syrup glaze. To make this, mix powdered sugar with maple syrup and a bit of milk. This glaze gives your rolls a warm, cozy taste. If you need gluten-free rolls, you can use gluten-free flour mixes. Many brands offer blends that work well in baking. Just follow the same measurements in the recipe. Your rolls will still taste great! For vegan options, replace the butter with coconut oil or vegan butter. You can use flaxseed meal mixed with water instead of an egg. This swap will keep your rolls moist and tasty. Try seasonal flavors for a fun twist. For fall, add pumpkin spice to your rolls. Mix in 1 teaspoon of pumpkin spice with the cinnamon for a new taste. This adds warmth and makes your rolls perfect for autumn. If you want a tropical flavor, mix in coconut and pineapple. Use shredded coconut and small pieces of pineapple in the filling. This will give your rolls a sunny vibe, perfect for summer treats. Explore these variations to make your banana bread cinnamon rolls unique. Enjoy the process and get creative! For the complete recipe, check out the Full Recipe section. To keep your banana bread cinnamon rolls fresh, place them in an airtight container. Store them in the fridge for the best results. This helps retain moisture and flavor. If you want to freeze them, wrap each roll tightly in plastic wrap and place them in a freezer bag. This way, they can last longer without losing taste. For a fresh taste, reheat your rolls in the oven. Preheat the oven to 350°F (175°C). Place the rolls on a baking sheet and cover them with foil. Heat for about 10-15 minutes. This warms them up without making them dry. For a quick fix, use the microwave. Heat a single roll for about 15-20 seconds. Check to ensure it’s warm, but not too hot. In the fridge, these rolls stay fresh for about 3-5 days. Keep them in an airtight container to prevent them from drying out. If you freeze them, they can last up to 3 months. Just remember to thaw them in the fridge overnight before reheating. This keeps them soft and tasty. You can use applesauce as a great substitute for bananas. Use 1 cup of applesauce for every banana. Another option is pumpkin puree. Use the same amount as you would for bananas. For a nutty flavor, you can try using mashed avocados. They work well, too, and add healthy fats. Yes, you can prepare these rolls in advance. Make the dough and fill it the night before. Store the rolls in the fridge overnight. When you are ready, let them sit at room temperature for about 30 minutes. Then, bake them as usual. You can also freeze the unbaked rolls. Wrap them tightly and store them in the freezer for up to three months. The rolls are done when they are golden brown on top. You can also use a toothpick to check. Insert it in the center of a roll. If it comes out clean, they are ready. The rolls should feel soft and spring back when lightly pressed. Banana bread cinnamon rolls are a fun twist on a classic treat. We covered essential ingredients, like overripe bananas and cream cheese icing. I shared step-by-step instructions to make these delicious rolls and tips for perfecting your technique. Don’t forget the tasty variations to keep things interesting. In the end, you can enjoy these rolls anytime. Whether it's for breakfast or dessert, they are sure to please. With a little practice, you’ll become a pro at making these treats. Happy baking!
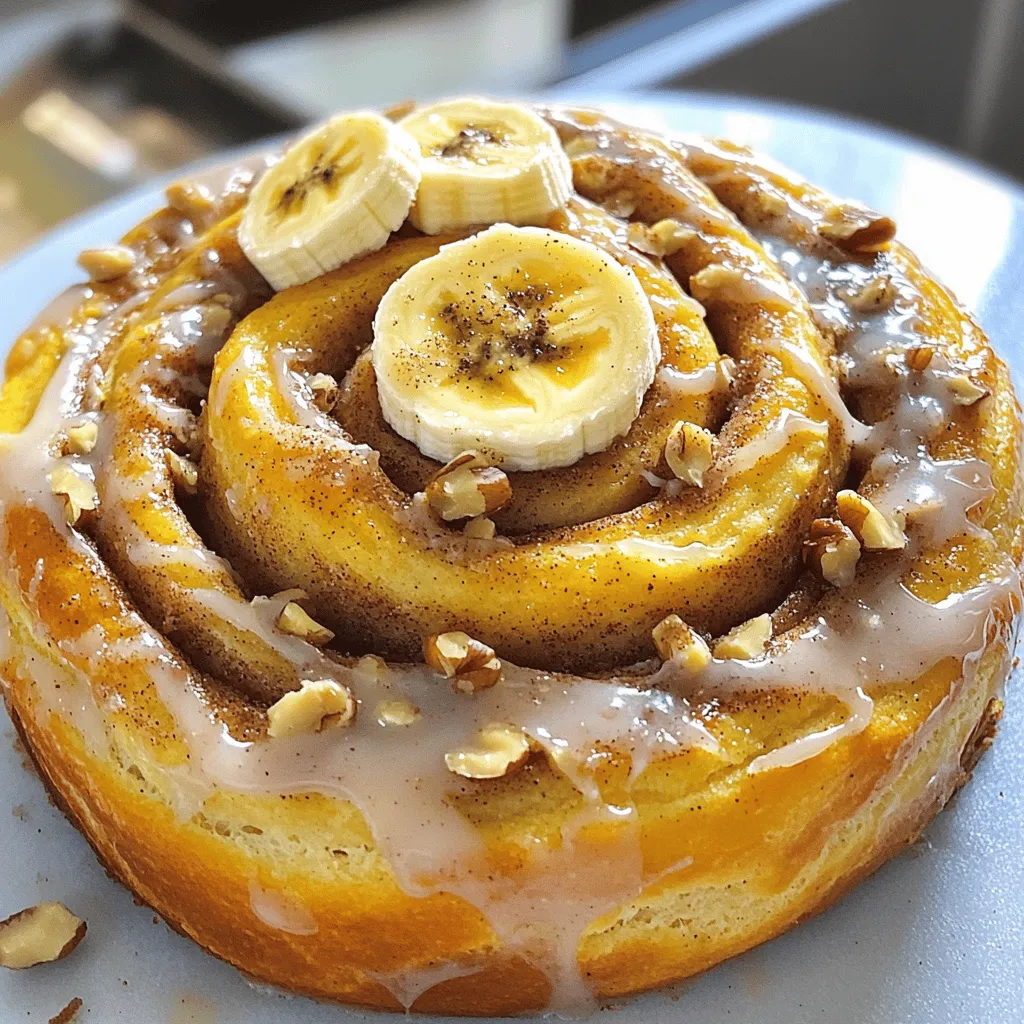
Delicious Banana Bread Cinnamon Rolls Easy to Make
Are you ready to take your baking to the next level? In this post, I’ll show you how to make delicious banana bread cinnamon rolls
- 8 slices of brioche bread - 1 cup cream cheese, softened to room temperature - 1/3 cup powdered sugar, plus extra for dusting - 1 teaspoon pure vanilla extract - 1 cup fresh strawberries, hulled and thinly sliced - 1 cup crushed graham crackers - 2 large eggs - 1/4 cup milk - 1 teaspoon ground cinnamon - Vegetable oil, for frying - Fresh mint leaves, for garnish (optional) Gathering the right ingredients is key to making Fried Strawberry Cheesecake Sandwiches. You will need brioche bread to create a soft, sweet base. Cream cheese adds the rich, creamy filling. Fresh strawberries bring a burst of flavor and sweetness. Crushed graham crackers add a nice crunch. Eggs and milk help bind the sandwiches before frying. - Mixing bowls and hand mixer - Shallow bowls and frying skillet You also need some simple equipment. Mixing bowls help you combine ingredients easily. A hand mixer makes blending the cream cheese quick. Shallow bowls are great for the egg wash and graham cracker coating. A frying skillet is essential for getting that perfect crispy outside. - Garnishes and presentation ideas - Pairing with beverages When serving, make your sandwiches look pretty. Cut each sandwich diagonally for a nice touch. Add a dusting of powdered sugar on top. You can place fresh strawberries around the plate for color. If you like, add mint leaves for extra flair. Pair these treats with coffee, milk, or a fruity drink. They are perfect for dessert or a fun snack. For the full recipe, check the details above. Start by blending the cream cheese, powdered sugar, and vanilla extract. Use a hand mixer or a fork to make it smooth and creamy. This mixture will be your delicious cheesecake filling. Once it’s ready, take four slices of brioche bread. Spread a generous layer of the cream cheese mixture on each slice. This creamy layer is the heart of your sandwich. Next, it’s time to layer the strawberries. Take your fresh strawberries, hull them, and slice them thin. Place the slices evenly on top of the cream cheese. This adds a fresh, fruity taste to your dessert. Now, take another slice of brioche and place it on top of each filled slice. Gently press down to seal the sandwiches. This keeps all the yummy filling inside. To prepare for frying, whisk together the eggs and milk in a shallow bowl. In another bowl, mix the crushed graham crackers with ground cinnamon. Take each sandwich and dip it into the egg mixture. Make sure all sides are well-coated. Then, press the sandwich into the graham cracker mix, covering it generously. Heat vegetable oil in a large skillet over medium heat until it shimmers. Carefully add the sandwiches to the hot oil. Fry them for about 3 to 4 minutes on each side. You want them to turn a lovely golden brown color and be crispy. When they are done, use a slotted spatula to take them out. Place them on a plate lined with paper towels to drain any extra oil. Finally, dust your fried sandwiches with extra powdered sugar before serving. This gives them a sweet finish. Enjoy your Fried Strawberry Cheesecake Sandwiches as a delightful treat! For more detailed steps, check out the Full Recipe. For the best fry, heat your oil to about 350°F. This temperature ensures that your sandwiches cook evenly. If the oil is too cool, they will absorb too much oil and become greasy. If it's too hot, the outside burns before the inside cooks. Fry each sandwich for about 3-4 minutes on each side. Look for a golden brown color. This color means they are crispy and ready to enjoy. Use a slotted spatula to remove them, allowing excess oil to drain off. To add more flavor, try mixing spices into the cream cheese. A pinch of cinnamon or nutmeg can work wonders. You can also add a dash of lemon zest for a fresh twist. Just remember to balance sweetness with a bit of salt or acidity. This will enhance the overall taste. If you want some fun flavor pairings, consider using different fruits. Raspberries or blueberries can add a nice twist. They bring both color and taste to your sandwiches. You can prep your ingredients a day before. Mix the cream cheese and sugar, and slice the strawberries. Keep these in the fridge. This saves time when you are ready to fry. Store your assembled sandwiches in the fridge as well. Wrap them in plastic wrap to keep them fresh. Just remember to fry them within a day for the best taste and texture. For the full recipe, check out the details provided earlier. {{image_4}} You can change the fruit in these sandwiches. Instead of strawberries, try bananas or blueberries. Both add a sweet touch. You can also use different types of cheese. Cream cheese is classic, but mascarpone brings a rich flavor. For a fun twist, spread Nutella on the bread. Layer it with fruit for a chocolatey delight. Spices can elevate your filling. A pinch of cinnamon or nutmeg adds warmth. You can also infuse the cream cheese with citrus zest. Grate some lemon or orange peel for a bright flavor. This small change can make a big difference in taste. If you need gluten-free options, use gluten-free bread. There are many tasty choices now. For a vegan version, substitute the cream cheese with a plant-based option. You can also use flax eggs instead of regular eggs for coating. To fry healthier, use an air fryer. This method cuts down on oil while keeping the crunch. For the full recipe, check out the section above! To keep your fried strawberry cheesecake sandwiches fresh, store them in the fridge. Place them in an airtight container. This helps to prevent them from drying out. They last for about three days in the fridge. If you want to enjoy them later, make sure to eat them within this time for the best taste! Reheating these sandwiches is easy. To keep them crispy, use an oven or an air fryer. Preheat your oven to 350°F (175°C). Place the sandwiches on a baking sheet and heat for about 10 minutes. If using an air fryer, set it to 350°F (175°C) for 5-7 minutes. Serve them warm. You can also add a fresh dusting of powdered sugar on top. Yes, you can freeze these sandwiches! To freeze, wrap each sandwich tightly in plastic wrap. Place them in a freezer bag to avoid freezer burn. They can last for up to a month in the freezer. To thaw, move them to the fridge overnight. For reheating, follow the same tips as above to keep them crispy and tasty! Yes, you can prepare the sandwiches a day ahead. Make the filling and spread it on the bread. Assemble the sandwiches, but do not fry them. Store the un-fried sandwiches in the fridge. Fry them just before serving. This keeps them fresh and crispy. Brioche bread works well for this recipe. It is soft and buttery. You can also use challah or white bread. If you want a healthier option, whole wheat bread is a good choice. Each type brings a different flavor and texture to your sandwiches. For a gluten-free option, use gluten-free bread. You can make a vegan version too. Replace cream cheese with a vegan cream cheese. Use plant-based milk and eggs. These swaps let everyone enjoy this treat. Serve the sandwiches warm for the best taste. Cut them in half for easy eating. Place them on a nice plate. You can add fresh strawberries and mint for a pop of color. Dust with powdered sugar for a sweet touch. This makes the dish look as good as it tastes. This article covered how to make Fried Strawberry Cheesecake Sandwiches step by step. You learned about the ingredients, equipment, and tips for perfect frying. We also discussed various fillings and storage tips to keep your sandwiches fresh. Enjoy these sandwiches hot, or try new flavors. Experimenting can lead to tasty surprises. With these ideas, you can impress your friends and family anytime!
Fried Strawberry Cheesecake Sandwiches Delightful Treat
Indulging in Fried Strawberry Cheesecake Sandwiches is like tasting happiness. This delightful treat blends creamy cheesecake with fresh strawberries, all nestled between crispy brioche. Imagine
- 1 ½ cups chocolate graham cracker crumbs - ½ cup unsalted butter, melted - 2 tablespoons granulated sugar - 3 (8-ounce) packages cream cheese, softened to room temperature - 1 cup granulated sugar - 1 cup sour cream - 1 teaspoon pure vanilla extract - 4 large eggs, at room temperature - 8 ounces dark chocolate, melted and cooled slightly - 1 cup heavy cream - 8 ounces semi-sweet chocolate chips - Optional toppings: whipped cream, dark chocolate shavings, fresh raspberries or strawberries The crust starts our journey. I use chocolate graham cracker crumbs for rich flavor. Melted butter binds it, adding moisture. Sugar sweetens the crust just right. I mix these in a bowl until they feel like wet sand. Next, the cheesecake filling brings the magic. Cream cheese is our base. It needs to be soft. I mix it until it’s smooth. Then, I add sugar for sweetness. Sour cream adds a slight tang. Vanilla extract gives warmth. Eggs come next, added one at a time. This makes the filling light and fluffy. Finally, I fold in melted dark chocolate for deep flavor. The ganache is the crowning glory. Heavy cream gets heated until simmering. This is poured over semi-sweet chocolate chips. I let it sit for a few minutes before mixing. It becomes smooth and glossy. For a little flair, I suggest toppings. Whipped cream is classic, while chocolate shavings add elegance. Fresh raspberries or strawberries bring a pop of color and taste. You can find the complete recipe in the Full Recipe section. - Preheat your oven to 350°F (175°C). - In a large mixing bowl, combine 1 ½ cups of chocolate graham cracker crumbs, ½ cup of melted unsalted butter, and 2 tablespoons of granulated sugar. Mix until it looks like wet sand. - Press this crumb mixture evenly into the bottom of a 9-inch springform pan. Make sure it's compact and even. - Bake the crust for 10 minutes. This sets it nicely. Remove it from the oven and let it cool completely in the pan. - In a large bowl, beat 3 packages of softened cream cheese with 1 cup of granulated sugar. Mix until it's smooth and creamy. - Now add 1 cup of sour cream and 1 teaspoon of pure vanilla extract. Blend until everything is well mixed. - Next, add 4 large eggs, one at a time. Make sure each egg is mixed in fully before adding the next one. - Finally, gently fold in 8 ounces of melted dark chocolate. The mixture should have a nice, uniform color. - Pour the cheesecake filling over the cooled crust in the springform pan. Use a spatula to smooth the top. - Bake the cheesecake for 55 to 60 minutes. The edges should be set, but the center can still wobble a bit. - After baking, turn off the oven and crack the door open. Let the cheesecake cool inside the oven for 1 hour. This helps prevent cracks as it cools. For further details and complete instructions, refer to the Full Recipe. To make a smooth cheesecake, start with room temperature ingredients. Cold cream cheese can lead to lumps. Let it sit out for about 30 minutes before mixing. Mix the ingredients well to avoid air bubbles. Air bubbles can ruin the creamy texture. Use an electric mixer on low speed for the best results. Cracks can spoil the look of your cheesecake. To avoid them, cool the cake gradually. Sudden temperature changes can cause cracks. After baking, turn off the oven and leave the door ajar. Let it cool inside for about an hour. You can also use a water bath when baking. This helps distribute heat evenly and keeps the cheesecake moist. When serving, add a touch of freshness. Pair your cheesecake with fruits and whipped cream. Fresh raspberries or strawberries brighten the dessert. For cleaner slices, use a hot knife. Run the knife under hot water, wipe it dry, and slice. This gives you nice, neat pieces. For a true treat, drizzle extra chocolate ganache on top. Enjoy every rich bite of this dessert! For the full recipe, check the earlier section. {{image_4}} You can easily change the taste of Death by Chocolate Cheesecake. Adding espresso or coffee gives it depth. Just mix in one or two teaspoons of strong coffee. This small change makes a big impact. If you want a different chocolate taste, try swapping dark chocolate for milk or white chocolate. Each type brings its own sweetness. Milk chocolate makes it creamy, while white chocolate adds a lovely sweetness. The crust can also be fun to change. Instead of chocolate graham crackers, use Oreo cookies. Crush them up and mix with melted butter for a rich flavor. You can also use shortbread cookies for a buttery touch. If you need a gluten-free option, gluten-free graham crackers work well. They keep the same great taste without the gluten. Toppings can elevate your cheesecake. Adding fresh berries, like strawberries or raspberries, adds color and flavor. The tartness balances the rich cheesecake. A sprinkle of sea salt on the chocolate ganache gives it a unique twist. The salt enhances the chocolate taste and adds a lovely crunch. For more ideas, check out the Full Recipe for tips on how to make this dessert even better! To keep your Death by Chocolate Cheesecake fresh, cover it well. Use plastic wrap or foil. This keeps it from absorbing other smells in the fridge. Store it in the fridge for up to five days. It tastes best within this time. After five days, the taste may change. You can freeze cheesecake for later use. First, let it cool completely. Then, wrap it tightly in plastic wrap. After that, place it in a freezer-safe bag or container. This helps prevent freezer burn. You can freeze it for up to three months. To thaw, move the cheesecake to the fridge. Let it sit overnight. This helps it regain its creamy texture. Avoid thawing at room temperature, as it can become watery. This way, you can enjoy your delicious dessert anytime! For the full recipe, check out the previous section. This cheesecake needs to chill for at least four hours. Chilling helps the flavors blend well. For the best taste and texture, I recommend leaving it overnight. This way, it firms up nicely. Plus, it tastes even better after a good chill. Yes! You can switch up the chocolate. Milk chocolate gives a sweeter taste. White chocolate adds a creamy flavor. Dark chocolate gives a rich and deep taste. You can mix different types, too. Just keep the total amount the same as in the recipe. Absolutely! This recipe is great for new bakers. Start with room temperature ingredients. This helps the cream cheese mix smoothly. Follow each step closely for the best results. Don’t rush; take your time. If you make a mistake, it’s okay. Enjoy the process and have fun! This blog post covered a rich Death by Chocolate Cheesecake recipe. We explored crust ingredients, cheesecake filling, ganache, and garnish. You learned step-by-step instructions to bake it perfectly. We also discussed tips to avoid cracks and improve texture. Plus, you found ideas for flavor and topping variations. Making this cheesecake can be fun and rewarding. Trust in using quality ingredients and techniques. Enjoy each bite of your delicious creation!
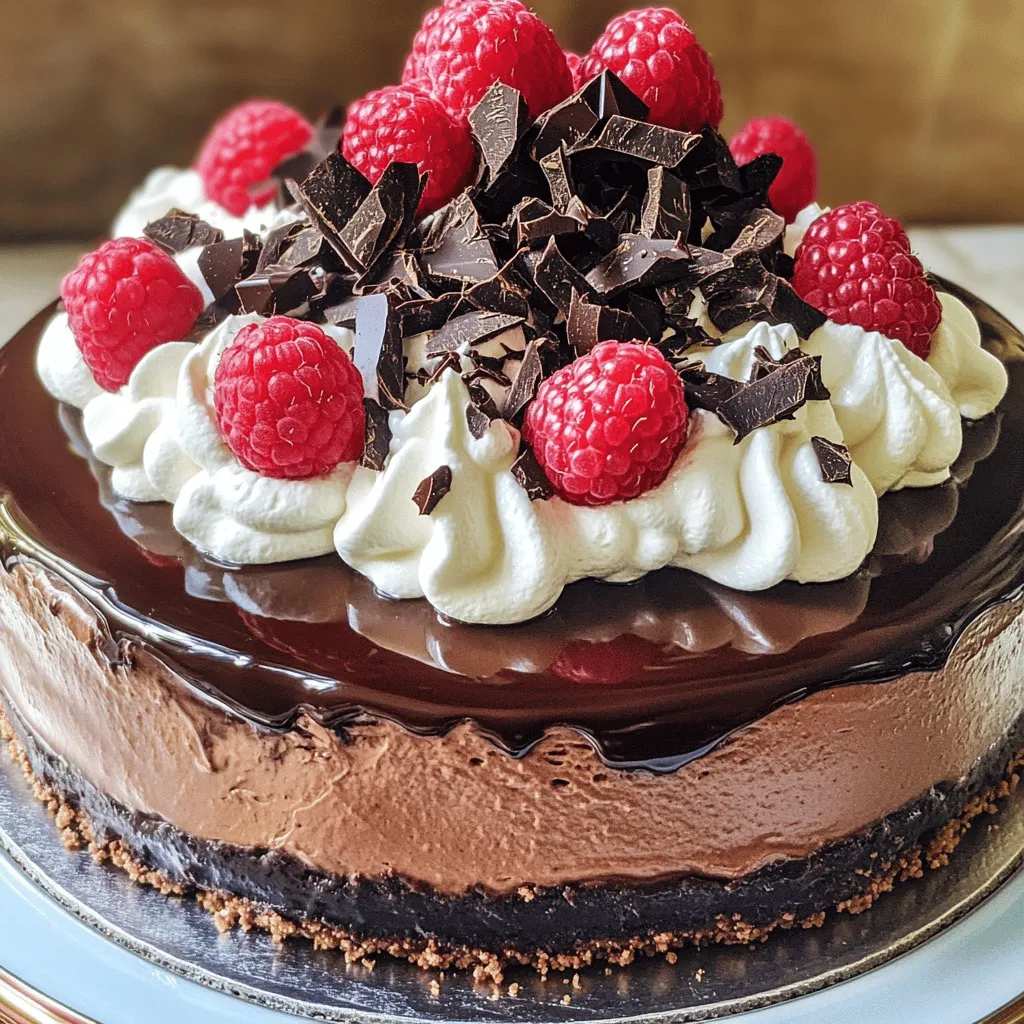
Death by Chocolate Cheesecake Decadent and Rich Dessert
If you crave a dessert that tantalizes your taste buds and satisfies your sweet tooth, you’re in for a treat. “Death by Chocolate Cheesecake” is