Desserts

Apple Cheesecake Buns Delightful and Easy Recipe
If you love sweet treats, you’ll adore my Apple Cheesecake Buns recipe. These soft, fluffy buns feature creamy cheesecake and zesty apples, giving you a
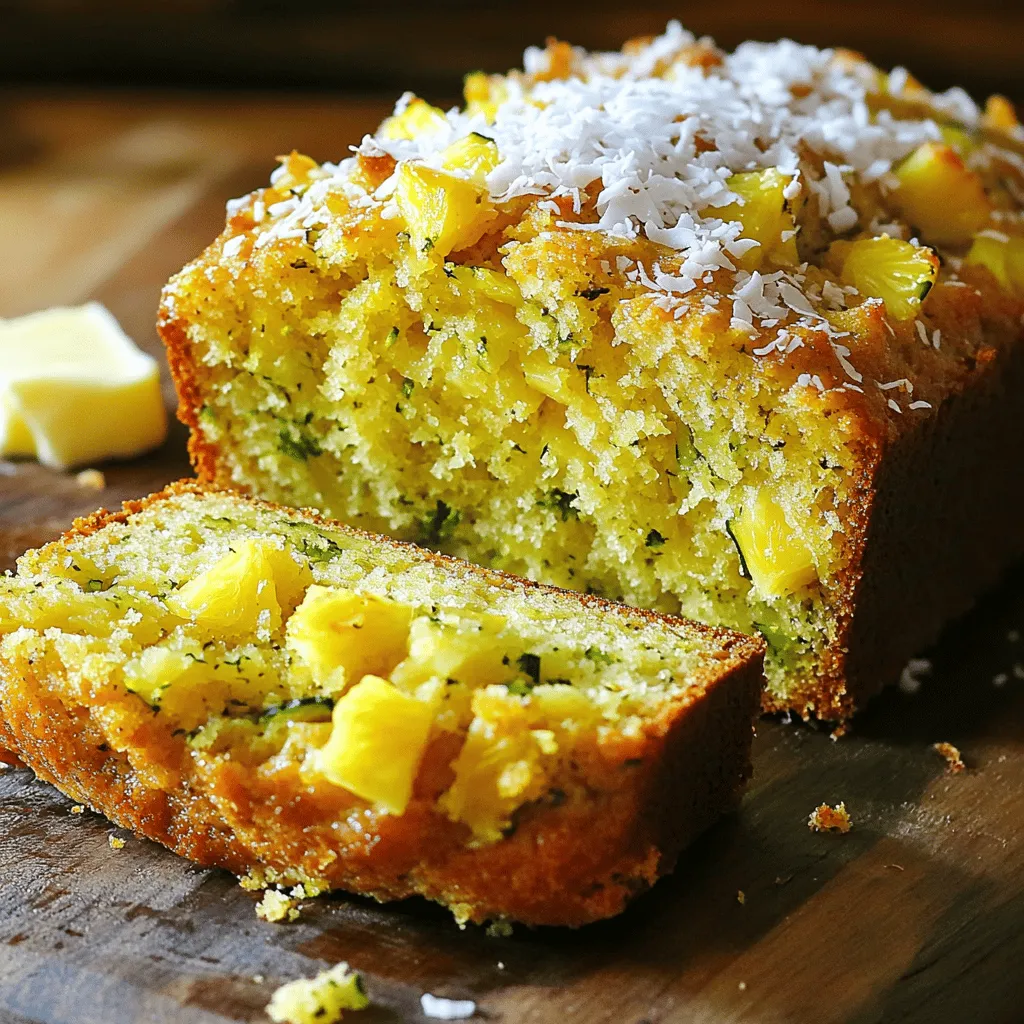
Pineapple Zucchini Bread Flavorful and Easy Recipe
If you’re looking for a moist and tasty treat, pineapple zucchini bread is a must-try. This simple recipe combines sweet flavors with healthy veggies, making
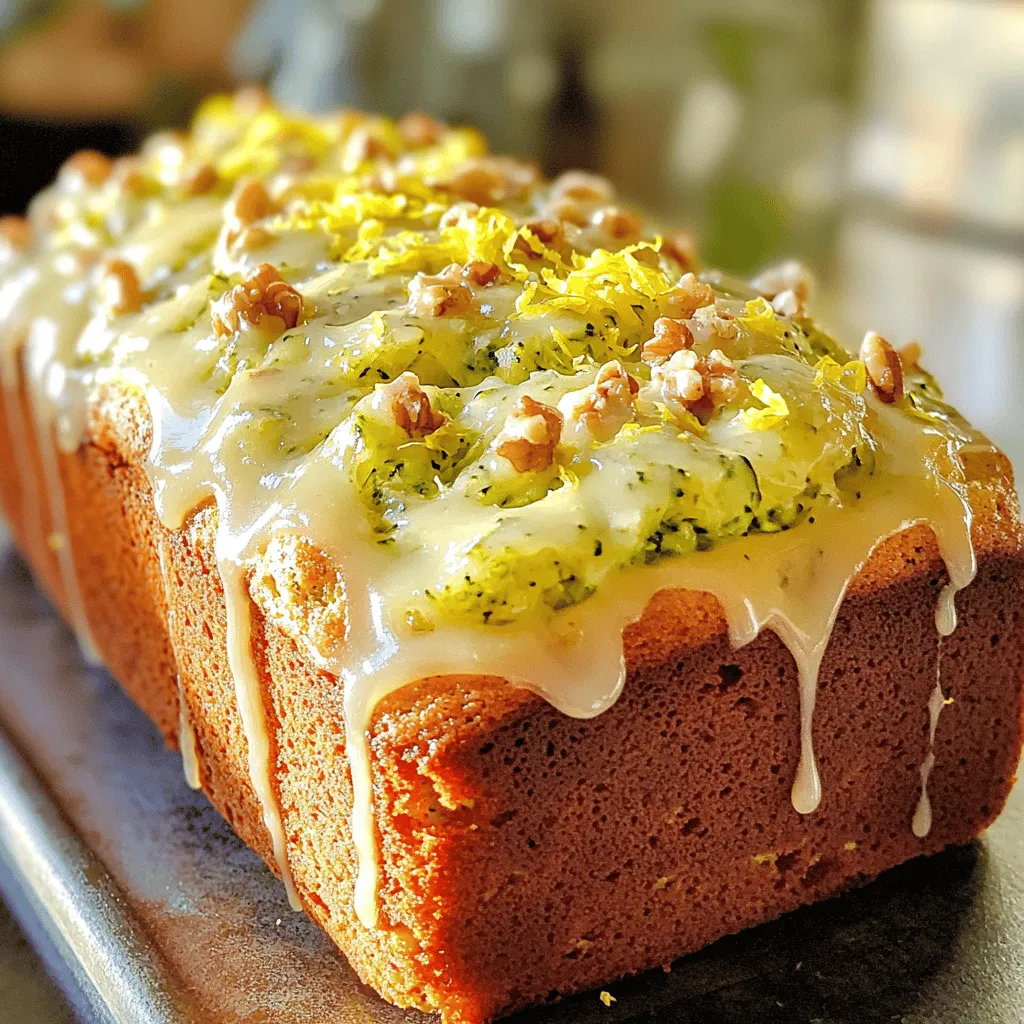
Lemon Zucchini Bread Flavorful and Easy Recipe
Are you ready to bring a burst of flavor into your kitchen? This Lemon Zucchini Bread recipe is both simple and delightful. With just a
![- Zucchini: Using finely grated zucchini keeps the bread moist. It blends well into the batter. This veggie also adds nutrients without a strong flavor. - Flour options: Almond flour gives a nutty taste and is low in carbs. Whole wheat flour adds fiber and a hearty texture. You can mix both for a balanced loaf. - Sweeteners: Natural sweeteners like maple syrup or applesauce work best. They add moisture and flavor without being too sweet. Opt for pure maple syrup for the best taste. - Nuts: Chopped walnuts or pecans add crunch and healthy fats. They make the bread more filling and enhance the flavor. - Raisins: Adding raisins brings a hint of extra sweetness. They also add chewiness and depth to the bread's texture. - Gluten-free alternatives: If you need a gluten-free option, use only almond flour or a gluten-free flour blend. Adjust the baking time slightly to ensure it cooks through. - Egg alternatives for vegan options: Substitute eggs with flaxseed meal or chia seeds mixed with water. This keeps the bread moist and binds the ingredients well. First, you need to prepare the zucchini. Start by washing and trimming the ends of your zucchinis. Use a grater to finely grate them. You want about two cups of zucchini, which is around two medium zucchinis. Make sure to squeeze out the extra moisture using a clean kitchen towel. This will keep your bread from being too wet. Next, measure out your other ingredients. Gather almond flour, whole wheat flour, baking soda, baking powder, sea salt, cinnamon, and nutmeg. You will also need your sweeteners: maple syrup or honey, and unsweetened applesauce. Do not forget the eggs, vanilla extract, and any nuts or raisins you want to add. Prepare your loaf pan by greasing it lightly with cooking spray. You can also line it with parchment paper for easy removal after baking. This step is key to prevent sticking. In a medium bowl, add your grated zucchini. Pour in the maple syrup or honey, applesauce, eggs, and vanilla extract. Use a whisk to mix these wet ingredients together until they look smooth. In a large bowl, sift together the dry ingredients: almond flour, whole wheat flour, baking soda, baking powder, sea salt, ground cinnamon, and ground nutmeg. Sifting helps to aerate the flour. This will make your bread light and fluffy. Now, carefully pour the wet mixture into the bowl with the dry ingredients. Use a spatula to gently fold the two together. Be careful not to overmix. Overmixing can make your bread tough instead of light. Once combined, add in your chopped walnuts or pecans and raisins if you choose. Fold these into the batter until they are evenly spread. Transfer the batter into your prepared loaf pan. Use the back of your spatula to smooth the top. This will help it bake evenly. Now you are ready to bake! Follow the [Full Recipe] for detailed baking instructions and enjoy the delightful aroma filling your kitchen. To get the best texture, avoid overmixing the batter. When you mix too much, the bread can turn out tough. Mix just until the dry and wet ingredients blend together. This keeps your zucchini bread nice and soft. For perfectly grated zucchini, use a box grater. Grate the zucchini finely, but leave the skin on. The skin adds color and nutrients. After grating, place the zucchini in a clean cloth. Squeeze out excess moisture. This step helps prevent a soggy loaf. You can customize the spices to fit your taste. Add more cinnamon for warmth or cardamom for a floral note. A pinch of ginger can give a nice kick too. Experiment with flavors to find your perfect blend. Using different nuts can change the taste as well. Walnuts add a rich, earthy flavor. Pecans give a sweet, buttery touch. Try adding almonds or hazelnuts for a unique twist. If your bread is too dense, it might be due to too much flour. Spoon flour into your measuring cup instead of scooping it. This prevents packing down the flour, which can lead to heaviness. To avoid sogginess, ensure the zucchini is well-drained. Too much moisture can make the bread wet. Also, bake your bread until a toothpick comes out clean. This means it is fully cooked and ready to enjoy. For the complete recipe, refer to the Full Recipe section. {{image_4}} You can easily make this low sugar zucchini bread your own. Adding citrus zest brings a bright and fresh twist. Lime or lemon zest works great. It gives a lovely aroma and a hint of tang. Incorporating chocolate chips is another fun option. Use dark chocolate chips for a rich flavor. They add sweetness without too much sugar. A handful will make your bread a sweet treat everyone will love. If you're looking for low-carb adaptations, you can swap out some ingredients. Try using only almond flour. This keeps your bread light and fluffy. You can also add in protein powder for an extra boost. For those who need vegan options, replace the eggs with flax eggs. Mix one tablespoon of ground flaxseed with three tablespoons of water. Let it sit for a few minutes to thicken. This simple swap works well in this recipe. Summer is the perfect time to enjoy zucchini bread. You can add fresh herbs like basil or mint for a unique taste. These herbs make this dish refreshing and bright. In the fall, try adding pumpkin puree. It gives a warm flavor and moist texture. You can also use other veggies like grated carrots or apples. They add unique sweetness and moisture. This makes your zucchini bread even more exciting to eat. For the full recipe, check out the amazing low sugar zucchini bread instructions. To keep your zucchini bread fresh, store it at room temperature. Wrap it in plastic wrap or place it in an airtight container. This way, it stays moist and tasty. If you live in a warm area, refrigerate it after a few days. This helps it last longer. Freezing is a great option for long-term storage. You can freeze either slices or the whole loaf. Wrap the bread tightly in plastic wrap and then in aluminum foil. This keeps out air and prevents freezer burn. When you want to enjoy it, thaw it in the fridge overnight or let it sit at room temperature for a few hours. For the best texture, toast slices lightly before eating. Your low sugar zucchini bread can stay fresh for about a week at room temperature. If refrigerated, it can last up to two weeks. Always check for signs of spoilage. If you see mold or smell something off, it’s time to throw it away. Enjoy your baking adventure with this delightful low sugar zucchini bread! For the full recipe, check out the link. You can tell if the zucchini bread is done by looking for a few signs. First, the edges should pull away from the sides of the pan. Second, the top should be golden brown. Lastly, use a toothpick—insert it into the center. If it comes out clean, your bread is ready. This toothpick test is a reliable way to check doneness. Remember, over-baking can dry it out, so keep an eye on the time. Yes, you can make this recipe gluten-free! Use almond flour for the full amount or mix it with coconut flour. If you use coconut flour, reduce the amount to about 1/3 cup. This helps keep the bread moist and fluffy. You can also try gluten-free all-purpose flour, following package instructions for ratios. If you want to replace eggs, there are several options. Common choices include applesauce, mashed banana, or flaxseed meal. Use 1/4 cup of applesauce or mashed banana for each egg. For flaxseed, mix 1 tablespoon of flaxseed meal with 2.5 tablespoons of water and let it sit. These replacements may change the texture a bit, making it denser or sweeter, but they work well. When serving zucchini bread, slice it into thick pieces. Arrange the slices on a wooden board for a rustic look. For a fun twist, offer cream cheese or Greek yogurt in a small dish for spreading. This bread is tasty warm or at room temperature. Pair it with a cup of coffee or tea for a delightful treat. In summary, this blog post covers how to make zucchini bread, focusing on key ingredients, detailed steps, and helpful tips. You learned about important elements like finely grated zucchini and flour choices. You also discovered optional ingredients that boost flavor and how to customize the recipe. Remember, careful mixing is crucial for great texture. Experiment with flavors and seasonal ingredients to make it your own. With these insights, you can confidently bake delicious zucchini bread that suits your taste and diet. Enjoy your baking journey!](https://roastedflavors.com/wp-content/uploads/2025/06/d987bddc-d356-4efd-aca1-99a0673db016.webp)
Amazing Low Sugar Zucchini Bread Perfectly Delicious Recipe
Looking for a tasty treat that won’t spike your sugar levels? Try my amazing low sugar zucchini bread! This perfectly delicious recipe uses natural sweeteners
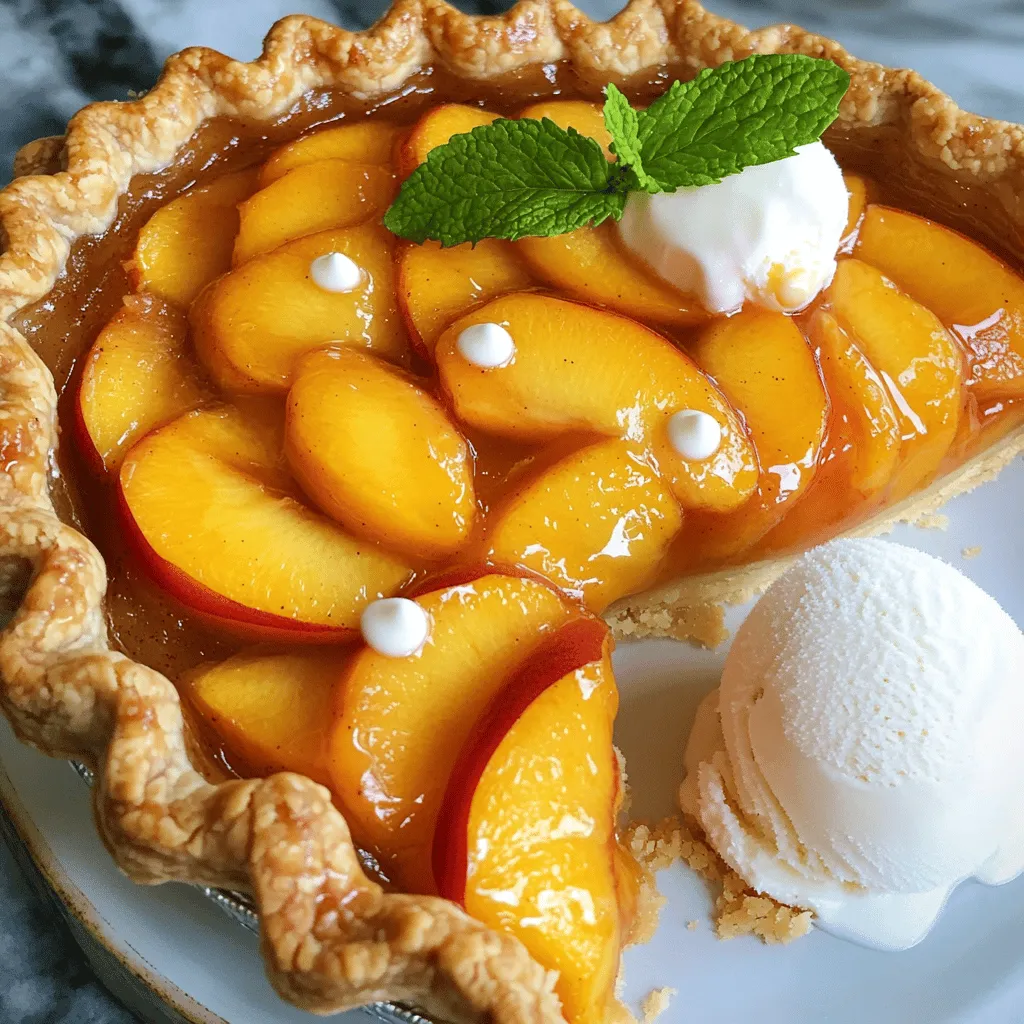
The BEST Peach Pie Recipe Simple and Delicious Treat
If you love peaches, you’re in for a treat! I’m excited to share my favorite peach pie recipe—simple and oh-so-delicious. This easy, step-by-step guide will
![- 1 cup almond flour - 1/4 cup unsweetened shredded coconut - 3 tablespoons coconut oil, melted - 2 tablespoons honey or maple syrup (for crust) - 1 cup low-fat cream cheese, softened - 1/2 cup Greek yogurt - 1/4 cup honey or maple syrup (for filling, additional) - 2 large eggs - 1 teaspoon vanilla extract - 1/2 teaspoon coconut extract - Pinch of salt Using low-fat ingredients helps keep these cheesecake bars lighter. Low-fat cream cheese and Greek yogurt reduce calories. They still give you that creamy taste you love. This means you can enjoy dessert without the guilt. You can satisfy your sweet tooth and feel good about it too. Plus, using natural sweeteners like honey or maple syrup adds flavor without excess sugar. If you want to switch things up, there are easy swaps. You can use oat flour instead of almond flour for a different texture. If you're not a fan of coconut, try crushed nuts for the crust. You can also use a dairy-free cream cheese for a vegan option. Maple syrup can be replaced with agave nectar if desired. These simple substitutions keep the recipe flexible and fun! Start by preheating your oven to 325°F (160°C). This helps the cheesecake bake evenly. Next, grab an 8x8 inch baking pan. Line it with parchment paper. Make sure you leave some overhang on the sides. This will help you lift the bars out later. In a medium mixing bowl, combine these ingredients: - 1 cup almond flour - 1/4 cup unsweetened shredded coconut - 3 tablespoons coconut oil, melted - 2 tablespoons honey or maple syrup Mix everything well until it looks crumbly. Then, press this mixture firmly into the bottom of your lined pan. Make sure it’s even and compact. In a large mixing bowl, beat 1 cup of softened low-fat cream cheese with a hand mixer. Mix until it is smooth and free of lumps. Next, add: - 1/2 cup Greek yogurt - 1/4 cup honey or maple syrup (additional) - 2 large eggs - 1 teaspoon vanilla extract - 1/2 teaspoon coconut extract - A pinch of salt Beat these ingredients together on medium speed until the mixture is creamy and well-combined. Pour the cheesecake filling over your cooled crust. Use a spatula to spread it evenly. Place the pan back in the oven. Bake for 25-30 minutes. The filling should set but still jiggle slightly in the center. Avoid overbaking to keep it creamy. Once baked, let the bars cool at room temperature for about 1 hour. After that, transfer the pan to the fridge. Chill for at least 4 hours or overnight. This helps the flavors blend and the texture firm up. When you’re ready to serve, lift the bars out using the parchment overhang. Place them on a cutting board and slice into squares. For a nice touch, you can dust the tops with extra shredded coconut before serving. Enjoy your Skinny Coconut Cheesecake Bars! To create a great crust, use almond flour. It gives a nice nutty flavor. Mix it with shredded coconut for added texture. Mix the dry ingredients with melted coconut oil and honey until crumbly. Press it into your pan firmly. This helps it hold together. Bake it until light golden. This gives the crust a crisp edge. Let it cool before adding the filling. Cooling helps the crust stay firm. For a creamy filling, use softened low-fat cream cheese. Beat it until smooth with a mixer. This makes sure there are no lumps. Add Greek yogurt for a tangy taste and extra creaminess. Mix in honey or maple syrup for sweetness. Add eggs one at a time while mixing. This helps the filling blend well. Finally, add vanilla and coconut extracts for flavor. Don’t over-mix once you add the eggs; just blend until combined. This keeps the filling light and fluffy. Make your bars look great by dusting them with extra shredded coconut. A sprinkle of coconut adds a nice touch. You can also add a sprig of fresh mint for color. For a sweet finish, drizzle honey or maple syrup on top. Slice the bars into squares for easy serving. Serve them chilled for the best taste. Pair these bars with fresh fruit for a refreshing contrast. Enjoy your beautiful, tasty Skinny Coconut Cheesecake Bars! For the complete recipe, check the Full Recipe. {{image_4}} You can play with flavors in these bars. Try adding chocolate for a rich treat. Just mix in chocolate chips or a swirl of melted chocolate. Citrus flavors also work well. A little lemon or lime zest can brighten the taste. You might also enjoy adding a dash of almond extract for a unique twist. If you have dietary needs, there are many swaps. For a vegan option, replace eggs with flaxseed or chia seeds mixed with water. Use a plant-based cream cheese and yogurt for a creamy texture. If you’re avoiding sugar, use stevia or a sugar alternative in place of honey. These changes keep the bars tasty while fitting your diet. These cheesecake bars are already gluten-free thanks to almond flour. If you want more options, you can use coconut flour or oat flour. Just remember to adjust the amount, as these flours absorb moisture differently. Always check your labels to ensure all ingredients are gluten-free. This way, everyone can enjoy the treat! For the full recipe, check out [Full Recipe]. To keep your Skinny Coconut Cheesecake Bars fresh, store them in the fridge. Use an airtight container to prevent any odors from other foods. You can also cover the bars tightly with plastic wrap. Make sure they are completely cool before storage. This helps maintain their creamy texture and flavor. When stored properly, these cheesecake bars can last about 5 to 7 days in the refrigerator. If you want to keep them longer, freezing is a great option. Always check for any signs of spoilage before eating, even if they are within the time frame. To freeze your cheesecake bars, cut them into squares first. Wrap each square in plastic wrap, then place them in a freezer-safe bag or container. You can freeze them for up to 3 months. When you’re ready to eat, just thaw in the fridge overnight. This keeps them tasty and prevents freezer burn. For the best results, enjoy them within a month of freezing. Yes, you can use regular cream cheese. I prefer low-fat cream cheese for a lighter dessert. It helps keep the calorie count lower and still gives a rich flavor. If you want a creamier texture, regular cream cheese works just fine. You’ll know the cheesecake is done when it’s set but still has a slight jiggle in the center. This means it’s creamy and not overbaked. A good test is to gently shake the pan. If the edges are firm but the middle wobbles, it’s ready to come out. Absolutely! Toppings can make your cheesecake bars even more fun. Some tasty choices include fresh fruit, whipped cream, or extra shredded coconut. You can also drizzle honey or chocolate on top for added sweetness. Be creative with your toppings! Each bar is a treat that balances flavor and health. On average, one bar contains about 120 calories, 8 grams of fat, and 5 grams of protein. This means you can enjoy a sweet dessert without too much guilt. For the full nutritional breakdown, check out the Full Recipe. In this post, we explored making delicious low-fat cheesecake bars. We covered ingredients, step-by-step baking methods, tips for a perfect texture, and storage options. Remember, you can substitute ingredients based on your needs and try new flavors for added fun. These bars are versatile and storage-friendly. Enjoy making a tasty treat that fits your lifestyle. With these tips, you’ll impress everyone with your cheesecake skills!](https://roastedflavors.com/wp-content/uploads/2025/06/ddf8ea89-471e-453d-a61c-ad82af42bc2e.webp)
Skinny Coconut Cheesecake Bars Simple and Delicious Treat
Are you craving a tasty dessert that won’t derail your healthy eating? Look no further than my Skinny Coconut Cheesecake Bars! These simple and delicious

Chocolate Chia Pudding Creamy and Delicious Recipe
Are you ready for a dessert that’s as tasty as it is healthy? Chocolate chia pudding is your new go-to treat. With simple ingredients like
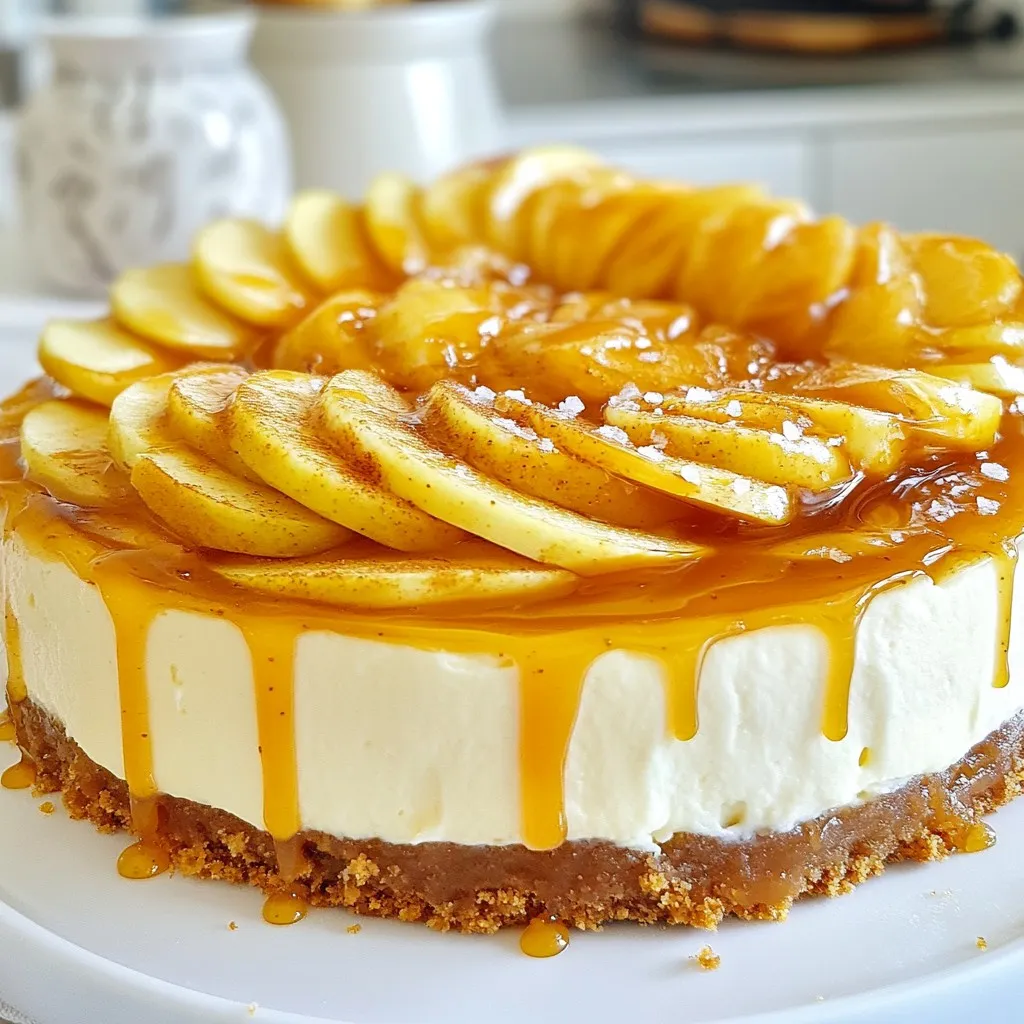
Salted Caramel Apple Pie Cheesecake Delight Recipe
Get ready to impress your friends with my Salted Caramel Apple Pie Cheesecake Delight recipe! This dessert blends creamy cheesecake, sweet apples, and rich caramel

Lemon Raspberry Cookies Fresh and Tasty Treat
Get ready to indulge in a burst of flavor with my Lemon Raspberry Cookies! Perfect for any occasion, these cookies blend zesty lemon and sweet
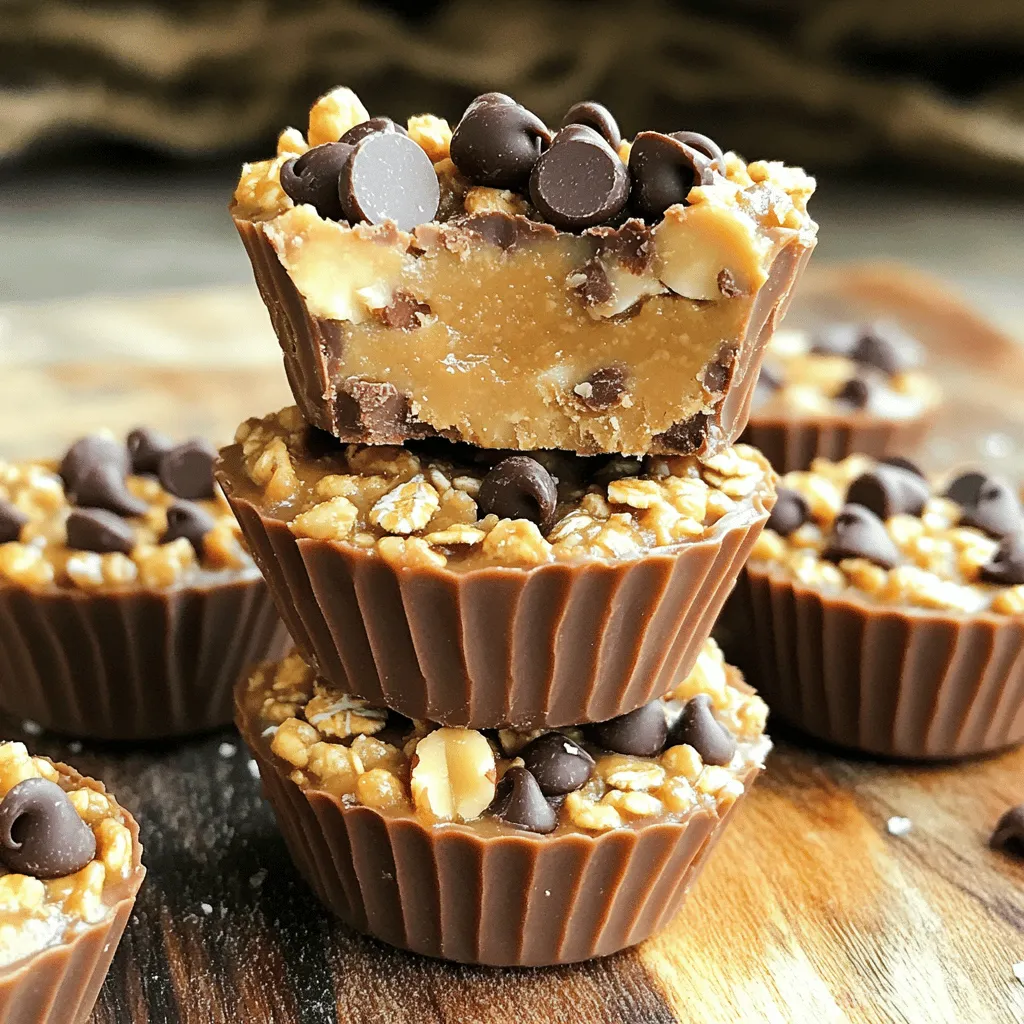
No Bake Peanut Butter Oat Cups Easy and Tasty Treat
Are you ready for a quick, delicious snack that’s easy to make? No Bake Peanut Butter Oat Cups are just what you need! These tasty