Desserts

To make this delightful Biscoff cake, you will need the following ingredients: - 1 ½ cups all-purpose flour - 1 cup granulated sugar - ½ cup unsalted butter, softened - 2 large eggs - 1 cup Biscoff cookie spread - 1 teaspoon baking powder - ½ teaspoon baking soda - ½ teaspoon salt - ½ cup milk (or any milk alternative) - 1 teaspoon pure vanilla extract - 1 cup Biscoff cookies, crumbled (for topping) - ½ cup heavy cream (for frosting) - 1 cup powdered sugar (for frosting) Here are the tools you will need to create this cake: - Electric mixer - Large mixing bowl - 9-inch round cake pan - Spatula - Wire rack - Measuring cups and spoons - Sifter When it comes to Biscoff cookie spread, I recommend these brands: - Lotus Biscoff - Trader Joe’s Speculoos - Nutiva Hazelnut Spread (for a twist) Using these brands ensures you get that rich, caramelized flavor that makes this cake so special. Enjoy baking! {{ingredient_image_2}} Start by preheating your oven to 350°F (175°C). Next, grab a 9-inch round cake pan. Grease it well with butter. Then, dust it with flour. This helps the cake come out easily after baking. In a large bowl, mix the softened butter and sugar. Use an electric mixer for about 3-5 minutes. The mixture should look light and fluffy. Next, add the eggs one by one. Mix well after each egg. Then, add the Biscoff cookie spread and vanilla. Blend until smooth and creamy. In another bowl, sift the flour, baking powder, baking soda, and salt. This step is key for a light cake. It helps the cake rise evenly. Now, slowly add this dry mix to the wet mix. Alternate with milk. Start with a third of the dry mix, then half the milk. Repeat this until all is combined. Be careful not to overmix. Pour your batter into the prepared cake pan. Use a spatula to smooth the top. Place it in the oven and bake for 25-30 minutes. To check if it’s done, insert a toothpick into the center. It should come out clean or with a few moist crumbs. While the cake cools, prepare the frosting. In a mixing bowl, whip the heavy cream until soft peaks form. Gradually add powdered sugar. Keep whipping until you see firm peaks. The frosting should be light and fluffy. Once the cake is cool, spread the whipped frosting on top. Use a spatula for an even layer. Finally, sprinkle crumbled Biscoff cookies on the frosting. This adds a nice crunch and flavor burst. Enjoy your delicious Biscoff cake! To make your Biscoff cake moist and soft, follow these steps: - Use room-temperature butter and eggs. This helps them mix well. - Don’t overmix the batter. Stir until just combined for the best texture. - Add milk slowly. Alternate with dry ingredients to keep the batter light. - Bake at the right temperature, 350°F (175°C), for even cooking. Here are some common mistakes I see: - Forgetting to grease the pan can cause sticking. Always grease and flour it well. - Baking too long can dry out the cake. Check it with a toothpick after 25 minutes. - Using cold ingredients leads to a dense cake. Always use room temperature. If you want to change the texture or flavor of your cake, try these ideas: - Swap the milk for a nut milk for a new taste. Almond or oat milk works great. - Add a pinch of cinnamon for warmth. It pairs well with Biscoff flavors. - For a richer taste, add a bit more Biscoff spread. It adds depth and creaminess. - Use a mix of flours, like almond or coconut, for a unique texture. Pro Tips Use Room Temperature Ingredients: Ensuring your butter and eggs are at room temperature will help create a smoother batter and a lighter cake. Avoid Overmixing: Mix the batter just until combined to keep the cake light and fluffy. Overmixing can lead to a dense texture. Cool Completely: Allow the cake to cool completely before frosting to prevent the frosting from melting and sliding off. Customize Your Toppings: Feel free to add nuts, chocolate shavings, or more crumbled cookies on top for added texture and flavor. {{image_4}} You can turn the Biscoff cake into a cheesecake. Start by making a crust. Use crushed Biscoff cookies mixed with melted butter. Press this mixture into the bottom of a springform pan. For the filling, blend cream cheese, sugar, and Biscoff cookie spread. Add eggs one at a time until smooth. Pour the filling onto the crust and bake. Chill it well before serving. This cheesecake is rich and creamy, with a lovely Biscoff flavor. Biscoff cupcakes are a fun way to enjoy this treat. Use the same batter as the Biscoff cake. Fill cupcake liners about two-thirds full. Bake for 18-20 minutes at 350°F (175°C). Let them cool before frosting. For the frosting, use the same whipped cream mix but add more Biscoff spread for flavor. Top with crumbled Biscoff cookies for that extra crunch. These cupcakes are perfect for parties or snacks. If you need a gluten-free option, replace the all-purpose flour with a gluten-free blend. Make sure the blend includes xanthan gum for structure. Follow the same steps in the recipe. The cake will still be moist and delicious. You can also use gluten-free Biscoff cookies for the topping. This way, everyone can enjoy the Biscoff cake without worry. To keep your cake fresh, wrap it in plastic wrap. Store it in the fridge. This will help it stay moist. You can also use an airtight container. The cake stays good for up to five days. If you want to, you can put slices in a zip-top bag. Just make sure to remove as much air as you can. You can freeze your Biscoff cake too! First, let it cool completely. Then, wrap it tightly in plastic wrap. Follow that with aluminum foil for extra protection. This way, it won’t get freezer burn. You can freeze the cake for up to three months. When you're ready to eat it, just take it out and let it thaw in the fridge overnight. When you want to enjoy your cake again, reheating is easy. Preheat your oven to 350°F (175°C). Place the slice on a baking sheet. Cover it loosely with foil. Heat it for about 10-15 minutes. This will warm it up without drying it out. You can also use the microwave. Heat it for about 10-15 seconds, but check it often. Enjoy your cake warm with a little extra Biscoff spread! Yes, you can use other cookie spreads. Options like Nutella or speculoos spread work well. They add a unique flavor but may change the cake's taste. I love trying new spreads for fun twists. To boost the chocolate flavor, add cocoa powder. Start with ¼ cup of unsweetened cocoa. Mix it into the dry ingredients. You can also fold in chocolate chips for extra richness. This transforms your cake into a chocolate-lovers dream. You can find Biscoff cookies and spread at most grocery stores. Look in the international or cookie aisle. Many online shops also sell them. Amazon or specialty food sites often have great deals. Serve slices with a drizzle of warm Biscoff spread. Add a whole Biscoff cookie on the side for fun. A dollop of whipped cream makes it even better. This adds creaminess to each bite and impresses your guests. You learned how to make a delicious Biscoff cake from start to finish. We covered ingredients, tools, and step-by-step instructions. I also shared tips for a moist cake and fun variations. Remember, you can store leftovers and freeze them too. Use the FAQs for any questions you may have. Enjoy baking this tasty treat and impress your friends and family with your skills. Happy baking!
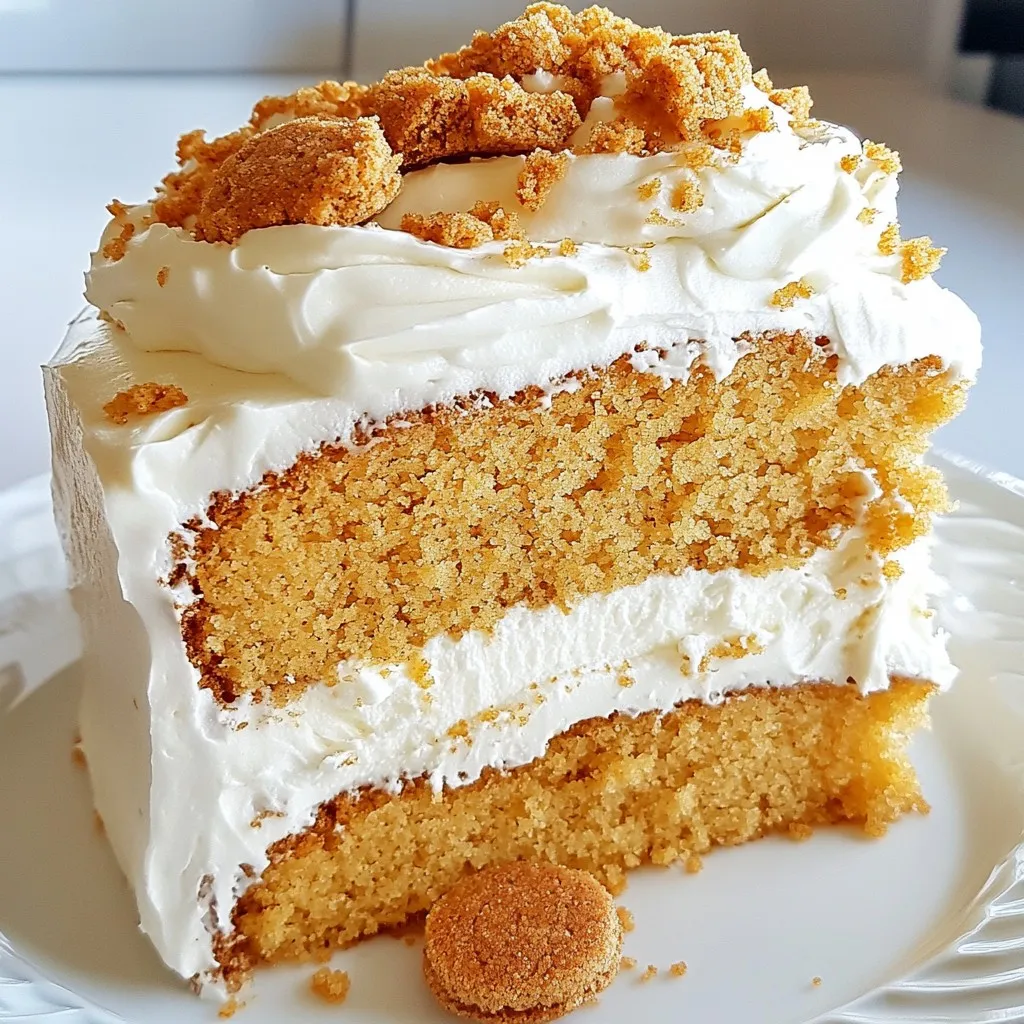
Biscoff Cake Deliciousness You Can’t Resist
Are you ready for a sweet treat that will delight your taste buds? Biscoff Cake is the answer! This dessert combines the rich, caramel flavors
To make the best peach cobbler, you need fresh peaches. I suggest using about six ripe peaches. They should be sweet and juicy. Peel and slice them before use. Fresh peaches bring the best flavor and texture. For the cobbler base, gather a few pantry staples: - 1 cup granulated sugar, divided - 1 tablespoon baking powder - 1 cup all-purpose flour - ½ teaspoon salt - ½ cup unsalted butter, melted - ½ cup milk (whole or 2% is best) - 1 teaspoon vanilla extract These ingredients help create a lovely, fluffy topping that complements the peaches well. For extra warmth and taste, consider adding: - 1 teaspoon ground cinnamon - 1 teaspoon ground nutmeg (optional) These spices enhance the peach flavor and add depth. You can use them as you like, but a little goes a long way. For the full recipe, check out the Heavenly Peach Cobbler Delight. First, set your oven to 350°F (175°C). Preheating helps the cobbler bake evenly. Make sure the oven reaches the right temperature before you put your dish in. Grab a large bowl and add the sliced peaches, ½ cup of sugar, lemon juice, cinnamon, and cornstarch. Mix them gently until the peaches are covered. Let this sit for 10 minutes. This step pulls out the natural juices and makes the peaches sweeter. In a different bowl, whisk the flour, the other ½ cup of sugar, baking powder, and salt. Mix well to combine. In another small bowl, mix the melted butter, milk, vanilla, and nutmeg. Then, pour the wet mix into the dry mix. Stir gently just until combined. A few lumps are okay—this helps keep the cobbler light. Grease a 9x13 inch baking dish with butter. Spread the batter evenly on the bottom. Spoon the peach mix on top without stirring. Bake it for 40-45 minutes. The top should be golden brown, and a toothpick should come out clean. Once done, cool it for 10 minutes before serving. Enjoy your delicious peach cobbler! For the complete recipe, refer to the Full Recipe. To make the best peach cobbler, start by picking ripe peaches. Look for peaches that feel slightly soft when you press them gently. The color should be a warm yellow or golden hue. Avoid peaches with green spots; this means they are not ripe yet. If you can smell a sweet peach scent, it’s a good sign. Always choose fresh peaches for the best flavor in your cobbler. You can also use frozen peaches if fresh ones are out of season. One common mistake is overmixing the batter. This can make the cobbler tough. Mix just until combined, even if it’s a bit lumpy. Another mistake is not letting the peach mixture sit. Allowing it to macerate brings out the juices, enhancing flavor. Also, make sure not to skip the cooling time after baking. It helps the cobbler set and makes serving easier. Serve your peach cobbler warm for the best taste. A scoop of vanilla ice cream on top adds creaminess that pairs well with the warm fruit. You can sprinkle a little cinnamon on top for extra warmth. Fresh mint leaves also make a pretty garnish. For a twist, try serving it with whipped cream or a drizzle of caramel sauce. These simple touches elevate your dish and impress your guests. For the full recipe, check out Heavenly Peach Cobbler Delight. {{image_4}} The classic Southern peach cobbler shines with its warm, sweet flavors. To make it, use fresh, ripe peaches. The juicy, tender fruit pairs perfectly with a buttery, flaky crust. In this version, I suggest adding a pinch of nutmeg for a cozy touch. This timeless recipe takes you back to grandma’s kitchen, where comfort food reigns. For a gluten-free peach cobbler, swap all-purpose flour for gluten-free flour. Use a blend that includes rice flour and tapioca starch. This will keep the texture light and fluffy. Make sure to check all other ingredients for gluten. You can still enjoy the same sweet flavors without the gluten! Mixing berries with peaches adds a fun twist. Blueberries or raspberries bring a burst of flavor and color. Simply fold in one cup of fresh or frozen berries into the peach filling. This blend balances sweetness with a slight tartness, making each bite exciting. You can impress your friends with this delicious variation! For the full recipe, check out the Heavenly Peach Cobbler Delight. To store leftover peach cobbler, first let it cool completely. Then, cover the dish tightly with plastic wrap or aluminum foil. You can also transfer it to an airtight container. This keeps the cobbler fresh. Store it in the fridge for up to three days. If you want to enjoy it later, freezing is a great option. To reheat peach cobbler, preheat your oven to 350°F (175°C). Place the cobbler in an oven-safe dish. Cover it loosely with foil to prevent over-browning. Heat for about 20 minutes, or until warm. You can also microwave individual servings for about 30 seconds. Just be careful not to overheat, as it can make the topping chewy. To freeze peach cobbler, make sure it’s completely cool. Cut it into portions for easy serving later. Wrap each piece in plastic wrap, then place them in a freezer bag. Squeeze out as much air as you can before sealing. This helps prevent freezer burn. You can freeze it for up to three months. When you're ready to enjoy it, let it thaw in the fridge overnight and reheat as needed. For the full recipe, check out the Heavenly Peach Cobbler Delight. Yes, you can use canned peaches. Make sure to drain them first. Canned peaches are softer, so your cobbler may be a bit different. Fresh peaches add a nice texture and flavor. Try to use ripe, juicy peaches when you can. To reduce the sweetness, cut back on the sugar. You can use half a cup of sugar instead of one cup. You can also add more lemon juice for a tangy taste. This balances the sweetness of the peaches. If you want to skip butter, try using coconut oil or vegetable oil. You can also use applesauce for a lower-fat option. The taste will change, but it can be a fun twist. Peach cobbler lasts about 3 to 5 days in the fridge. Make sure to cover it well to keep it fresh. For longer storage, consider freezing it. Just be aware that the texture may change after freezing. For the full recipe, check out the Heavenly Peach Cobbler Delight. Making peach cobbler is simple and fun. We covered fresh ingredients, dry staples, and optional flavors. You learned how to make a tasty filling and balance dry and wet ingredients. I shared tips to choose peaches and avoid common mistakes. We explored fun variations like gluten-free options and added fruits. Finally, I explained how to store leftovers and answered key questions. Now, you can make the best peach cobbler and enjoy it again and again.
Best Peach Cobbler Recipe Simple and Delicious Dish
If you’re craving a warm, comforting dessert, my Best Peach Cobbler Recipe is for you. It’s simple, quick, and packed with juicy peach flavor, making
Here are the simple and fresh ingredients you will need for the Cherry Peach Crisp: - 2 cups fresh cherries, pitted and halved - 2 cups ripe peaches, peeled and thinly sliced - 1 cup rolled oats - 1/2 cup all-purpose flour - 1/2 cup packed brown sugar - 1/4 cup granulated sugar - 1 teaspoon ground cinnamon - 1/2 teaspoon sea salt - 1/2 cup unsalted butter, melted and slightly cooled - 1/4 cup sliced almonds - 1 teaspoon pure vanilla extract Each ingredient plays a key role. The cherries and peaches bring bright, sweet flavors. The oats and flour give the topping its crunch. Brown sugar adds depth, while cinnamon warms the dish. Sea salt enhances all the flavors, making them pop. The butter binds it all together, giving a rich taste and texture. For the best results, choose ripe, juicy fruits. Fresh ingredients make every bite more delicious. If you want to explore more, check out the Full Recipe. It offers step-by-step guidance to help you create this delightful dessert. - Preheat the oven: Start by preheating your oven to 350°F (175°C). This step is key to ensure your crisp bakes evenly. - Prepare the fruit mixture: In a large bowl, mix 2 cups of fresh, pitted cherries and 2 cups of ripe, sliced peaches. Add 1/4 cup of granulated sugar and 1 teaspoon of pure vanilla extract. Toss the fruit gently until it is well-coated. Spread this mixture in a greased 9x13-inch baking dish. - Prepare the oat topping: In another bowl, blend together 1 cup of rolled oats, 1/2 cup of all-purpose flour, 1/2 cup of packed brown sugar, 1 teaspoon of ground cinnamon, and 1/2 teaspoon of sea salt. Mix these dry ingredients until combined. - Assemble the crisp: Drizzle 1/2 cup of melted, slightly cooled unsalted butter over the dry mixture. Stir until it forms a crumbly texture. Fold in 1/4 cup of sliced almonds for added crunch. Sprinkle this oat mixture evenly over the fruit in the baking dish. - Bake duration and temperature: Place your baking dish in the preheated oven. Bake for 30 to 35 minutes. - Indications for doneness: Look for a golden brown topping and bubbling fruit around the edges. This means your cherry peach crisp is ready. - Cooling time before serving: Let the crisp cool for at least 10 minutes. This helps the juices settle and improves the serving experience. - Presentation tips: Serve the warm cherry peach crisp in rustic bowls. Add a scoop of creamy vanilla ice cream on top. Drizzle with honey and sprinkle with ground cinnamon for a beautiful finish. - Recommended accompaniments: This dish pairs well with whipped cream or a dollop of yogurt for added flavor. Enjoy the warm fruit and cool toppings together! To make the best cherry peach crisp, start by picking ripe fruit. Ripe cherries should be deep red, while peaches should feel slightly soft when you press them. This ensures juicy flavor in your dessert. For the topping, you want it to be crumbly but not too dry. Mix rolled oats, flour, brown sugar, and sea salt well. Drizzling melted butter over this mix helps create a nice texture. Stir until you see clumps form. This will give you that perfect crispy top. You can switch up the fruits in this recipe. Try using blueberries or apples if you want something different. Each fruit brings its own taste and texture, making your dish unique. If you need a gluten-free option, swap all-purpose flour for almond or coconut flour. Make sure your oats are certified gluten-free, as some brands may have traces of gluten. Adding spices can elevate your cherry peach crisp. A pinch of nutmeg or fresh ginger can add warmth and depth. These spices blend well with the sweet fruit. Citrus zest is another great addition. A bit of lemon or orange zest brightens the flavors. Just a teaspoon mixed in with the fruit gives a fresh twist. For more details, check the Full Recipe. {{image_4}} I love to mix different fruits in my cherry peach crisp. You can add berries like blueberries or raspberries for a fun twist. Apples also work well, giving a nice crunch and tartness. Seasonal fruits make it fun, too. In summer, use fresh cherries and peaches. In fall, swap in apples and pears. Each fruit choice brings its own flavor, making your crisp unique. You can serve cherry peach crisp in different ways. One fun idea is to turn it into a parfait. Layer the crisp with yogurt and fresh fruit in a glass. This looks pretty and tastes great! You can also make mini individual servings. Use small ramekins, so each person gets their own. This makes serving easy and adds a special touch to your meal. Toppings can change the whole dish. If you want a crunchier texture, swap oats for chopped nuts or granola. This adds a nutty flavor that pairs well with the fruit. You can also mix in chocolate chips for a sweet surprise. This little twist makes your cherry peach crisp even more delightful. For more ideas, check the Full Recipe for other topping options. You can store cherry peach crisp at room temperature for a day. If you have leftovers, refrigerate them. Place it in an airtight container to keep it fresh. The cold helps the flavors meld and can make it even tastier. Reheat your crisp in an oven or a microwave. The oven gives it a crispy topping. Heat it at 350°F (175°C) for about 10-15 minutes. If using a microwave, heat in 30-second bursts. This keeps the fruit warm without making the topping soggy. You can freeze cherry peach crisp before or after baking. If freezing before baking, assemble it in a dish and cover it well. Bake from frozen; add 10-15 extra minutes. If baked, let it cool, then wrap and freeze. For thawing, leave it in the fridge overnight. You can also thaw it at room temperature for a few hours. Enjoy your cherry peach crisp anytime! Yes, you can use frozen fruit. Just be sure to thaw and drain it first. Frozen fruit can give you a tasty crisp, but it might be a bit juicier. Adjust the sugar if needed to balance the flavors. To make the topping crunchier, try adding more oats or nuts. You can also bake it a few minutes longer. Just watch it closely to avoid burning. A sprinkle of brown sugar on top can also help with that golden crunch. Yes, you can prepare the crisp ahead of time. Just assemble the fruit and topping but don't bake it. Cover and store it in the fridge for up to a day. When you’re ready, bake it straight from the fridge. Serve it warm for the best taste. A scoop of vanilla ice cream on top makes it even better. You can also drizzle some honey or sprinkle cinnamon for extra flavor. Cherry peach crisp lasts about 3 to 5 days in the fridge. Make sure to cover it well. Reheat it in the oven or microwave for a quick treat. Enjoy this delicious dessert again and again! This cherry peach crisp recipe is easy to make and delicious. We discussed ingredients, baking steps, and serving ideas. You can try fun variations for your needs. Remember to store your leftovers well to keep them fresh. Enjoy your tasty crisp warm or cold. This dessert is sure to impress everyone. Get creative and have fun with different fruits and toppings. Happy baking!
Cherry Peach Crisp Flavorful and Easy Dessert Recipe
If you’re craving a sweet and tangy dessert, you’ll love this Cherry Peach Crisp recipe. It combines juicy cherries, ripe peaches, and a crunchy topping
For the perfect peach crumble, start with ripe peaches. Choose four peaches that are soft but not mushy. Peel the peaches and slice them into wedges. This gives a nice texture and flavor. The fresher the peaches, the better your crumble will taste. To make the crumble, gather these ingredients: - 1 cup rolled oats - 1/2 cup all-purpose flour - 1/4 cup granulated sugar - 1/4 cup packed brown sugar - 1/3 cup unsalted butter, melted and slightly cooled - A pinch of salt These ingredients mix well to create a crunchy topping. The oats add heartiness, while the sugars give sweetness. To enhance the flavor, use: - 1 tablespoon fresh lemon juice - 1 teaspoon pure vanilla extract - 1/2 teaspoon ground cinnamon The lemon juice brightens the peaches. The vanilla and cinnamon add warmth and depth. These flavors work together to create a delicious, comforting dessert. For the full recipe, check the details provided. First, gather your peaches. You need four ripe peaches. Peel them and slice them into wedges. This step makes the fruit soft and sweet. Next, place the peach slices in a bowl. Add one tablespoon of fresh lemon juice. This juice brightens the flavor. Then, sprinkle in a quarter cup of packed brown sugar. This will add sweetness. Pour in one teaspoon of pure vanilla extract. Lastly, add half a teaspoon of ground cinnamon. Toss the peaches gently. Let them sit for about ten minutes. This helps the flavors blend. While the peaches marinate, it’s time for the crumble. In a separate bowl, combine one cup of rolled oats and half a cup of all-purpose flour. Then, add a quarter cup of granulated sugar for sweetness. Pour in one-third cup of melted unsalted butter. This butter gives the topping a rich taste. Lastly, add a pinch of salt. Mix everything together until it looks like damp sand. This texture is perfect for a crunchy topping. Now you’re ready to bake! First, preheat your oven to 350°F (175°C). Grease an 8x8 inch baking dish with a bit of butter. Pour the marinated peach mixture into the dish. Spread it out evenly across the bottom. Now, sprinkle the crumble topping on top of the peaches. Make sure it covers all the fruit. Place the baking dish in your preheated oven. Bake for 30 to 35 minutes. Look for a golden brown top and bubbling edges. Once baked, take it out of the oven. Let it cool for a few minutes before serving. You can find the full recipe for more details. To make your peach crumble shine, focus on the texture. Use cold butter for the topping. This helps create a crispy layer. Mix the dry ingredients well before adding the butter. You want the butter to blend evenly. Avoid overmixing; it can lead to a tough crumble. Bake until golden brown. This means it’s ready and delicious! You can change up your peach crumble to suit your taste. Try adding berries for extra flavor. Blackberries or raspberries work great! You can also switch the oats with nuts. Chopped almonds or walnuts add crunch. For a spice twist, add nutmeg or ginger. Feel free to adjust the sugar based on your peach sweetness. Serve your peach crumble warm for the best experience. A scoop of vanilla ice cream on top is a must! It melts into the warm crumble, creating a creamy delight. You can also drizzle honey or caramel sauce over the ice cream. For a fresh touch, add mint leaves as a garnish. This gives your dessert a lovely color and flavor. For the full recipe, check out the Summer Bliss Peach Crumble section! {{image_4}} You can easily make a gluten-free peach crumble. Just swap out regular flour for gluten-free flour. You can use almond flour or oat flour. Make sure the oats are gluten-free too. This way, you can enjoy the same great taste without gluten. To make it vegan, replace the butter with coconut oil or vegan butter. You can also use maple syrup instead of brown sugar. This keeps the sweetness while sticking to vegan rules. You won't miss the dairy in this tasty treat! Want to add more flavor? Try mixing in some fresh berries with the peaches. Raspberries or blueberries work great. You can also add a splash of almond extract for a nutty touch. For a spicy kick, sprinkle some nutmeg or ginger into the crumble. This adds depth to your peach crumble delight! For the full recipe, check out the Summer Bliss Peach Crumble . Store leftover peach crumble in an airtight container. Make sure it cools down before sealing. This keeps the flavors fresh and prevents sogginess. You can store it in the fridge for up to three days. If you want to enjoy it longer, freezing is a great option. To reheat, place the peach crumble in the oven. Preheat your oven to 350°F (175°C). Bake for about 15 to 20 minutes. This warms the crumble and keeps it crispy. You can also microwave individual portions for about 30 seconds. Just keep an eye on it to avoid overheating. You can freeze peach crumble if you have extra. Let it cool completely, then wrap it tightly in plastic wrap. After that, place it in a freezer-safe bag or container. It will stay good for up to three months. When you're ready to eat it, thaw it in the fridge overnight. Then, reheat it in the oven for the best taste. This keeps the texture lovely and the flavors intact. Yes, you can use frozen peaches! Just make sure to thaw them first. Drain any extra juice before mixing with the other ingredients. This will help keep your peach crumble from being too watery. Frozen peaches may also need a bit more time to bake. The crumble is done when the top is golden brown. You’ll also see the peaches bubbling at the edges. A good rule is to bake for 30-35 minutes at 350°F (175°C). Trust your eyes and nose; the smell will be heavenly when it’s ready! If you don’t have brown sugar, use granulated sugar. You can also mix granulated sugar with a bit of molasses for a similar taste. Another option is to use coconut sugar for a different flavor profile. Just remember, the sweetness level may change slightly. For this full recipe, it’s best to stick to what you love! This article covered how to make a tasty peach crumble. We discussed fresh peach needs, crumble topping ingredients, and flavor enhancers. I shared step-by-step instructions, tips for perfecting your crumble, and fun variations. Storage tips helped you keep leftovers fresh. In the end, making this dessert is easy and fun. Enjoy your delicious peach crumble with family or friends! Experiment with flavors to find your perfect mix. You can enjoy this treat any time of year.
Peach Crumble Delight Easy and Delicious Dessert Recipe
Are you ready to make a Peach Crumble that will impress everyone? This easy and delicious dessert recipe combines sweet peaches with a crunchy topping.
- 4 ripe peaches, pitted and sliced into thin wedges - 1 tablespoon freshly squeezed lemon juice - 1/4 cup packed brown sugar - 1 teaspoon ground cinnamon - 1/4 teaspoon ground nutmeg For a great peach crisp, you need ripe peaches. They should feel soft but not mushy. The lemon juice adds brightness and balances the sweetness. Brown sugar gives a rich flavor, while granulated sugar helps with sweetness. Ground cinnamon and nutmeg create warmth and depth in every bite. - 1 cup rolled oats - 1/2 cup all-purpose flour - 1/3 cup granulated sugar - 1/3 cup unsalted butter, melted - 1/2 teaspoon pure vanilla extract - 1/4 teaspoon fine sea salt The topping is what makes the crisp so special. Rolled oats add texture and chewiness. All-purpose flour helps bind it together. Melted butter brings richness and a golden color. Pure vanilla extract adds a sweet aroma, and fine sea salt enhances all the flavors. - Approximately 250 calories per serving - Breakdown of macronutrients: - Carbohydrates: 35g - Fat: 10g - Protein: 3g This warm bourbon peach crisp provides a comforting treat without too many calories. Each serving is about 250 calories, making it a delightful dessert. The carbohydrates mainly come from the peaches and oats, while the butter adds healthy fat. Enjoy this dessert knowing it offers a mix of flavors and nutrients. For the full recipe, check out the details above. First, preheat your oven to 350°F (175°C). This step is key for even cooking. While the oven heats, prepare the peaches. In a large bowl, mix the sliced peaches with freshly squeezed lemon juice. The lemon juice adds a bright flavor. Then, add brown sugar, ground cinnamon, and ground nutmeg. Gently toss the peaches to coat them evenly. Make sure each slice is covered in sweet spice. Now, it’s time to make the topping. In a medium bowl, combine rolled oats, all-purpose flour, granulated sugar, and fine sea salt. Mix these dry ingredients well. They should be evenly distributed. Next, pour in the melted butter and pure vanilla extract. Stir everything with a fork. You want a crumbly texture that will sprinkle nicely over the peaches. Carefully transfer the peach mixture to your greased baking dish. Spread it out evenly. This helps the peaches bake nicely. Then, sprinkle the oat topping over the peaches. Make sure to cover the fruit completely. This keeps the juices in while baking. Place the dish in your preheated oven. Bake for about 25-30 minutes. Check for a golden topping and bubbling edges. Once done, let the crisp cool for 5 minutes. Serve it warm for the best taste. For the full recipe, check the earlier section. To make the best warm bourbon peach crisp, start with ripe peaches. Look for peaches that are slightly soft and fragrant. They should have a golden color. If they feel hard, let them sit at room temperature for a few days. This helps them ripen. You can adjust the sweetness based on your taste. If you like it sweeter, add more brown sugar. If you prefer it less sweet, reduce the sugar. Taste the peach mixture before baking. This way, you can find the perfect balance. When you prepare the topping, make sure to distribute it evenly over the peaches. This helps the crisp cook well and become golden. If the topping is uneven, some parts may burn while others stay raw. Keep an eye on the baking time. Check your crisp at 25 minutes. You want the topping to turn golden brown, and the peaches should bubble. If it seems undercooked, give it a few extra minutes. The goal is a perfectly baked dessert. Serve your warm bourbon peach crisp while it’s still hot. This makes the flavors pop. Use individual bowls for a nice touch. For a special treat, pair it with ice cream or whipped cream. The cold creaminess contrasts well with the warm, spiced peaches. This combination will delight your taste buds and impress your guests. For the full recipe, see the details above! {{image_4}} You can swap out peaches if you want. Try using plums, cherries, or apricots. These fruits add their own unique taste. Mixing different stone fruits gives a fun flavor twist. You might even add some berries like blueberries or raspberries. Berries add a burst of color and sweetness. Want to spice things up? Experiment with liqueurs like amaretto or whiskey. A splash can add depth to the dish. You can also add nuts like walnuts or pecans. They give a nice crunch. If you want a tropical twist, add shredded coconut. It makes the crisp even more interesting! If you need gluten-free options, use almond flour instead of regular flour. Oats are usually gluten-free, just check the label. For a vegan version, replace butter with coconut oil or vegan butter. Also, use maple syrup instead of sugar. These swaps keep the flavor while fitting your diet. For the complete recipe, check the Full Recipe. To keep your warm bourbon peach crisp fresh, let it cool first. Then, cover it tightly with plastic wrap or aluminum foil. You can also place it in an airtight container. Store it in the fridge. It will stay good for about 3 to 5 days. When it's time to enjoy leftovers, the best way to reheat is in the oven. Preheat it to 350°F (175°C). Place the crisp in an oven-safe dish. Heat for about 10 to 15 minutes. This keeps the topping crunchy. Avoid the microwave if you can. It may make the crisp soggy. You can freeze the crisp both before and after baking. If you freeze it before baking, wrap it well and store it for up to 3 months. When you're ready, bake it straight from the freezer, adding a few extra minutes to the time. If you freeze it after baking, let it cool completely. Then, wrap it tightly and store it. Thaw it in the fridge overnight before reheating. Yes, you can use frozen peaches. However, you need to make some changes. First, thaw the peaches and drain excess liquid. This helps keep the crisp from becoming too watery. You might want to add a bit more sugar to balance the tartness. The flavor still shines through, even with frozen fruit. Absolutely! If you want to skip the bourbon, try using vanilla extract or almond extract instead. Both add a nice depth of flavor. You can also use a splash of apple juice or even a bit of peach nectar for a fruity twist. The crisp will still taste great without the bourbon. Making this peach crisp ahead of time is easy! You can prep the peach filling and the topping separately. Store them in the fridge for up to a day. When you're ready to bake, just combine them in a baking dish and pop it in the oven. This way, you save time on busy days. Warm Bourbon Peach Crisp pairs wonderfully with several treats. A scoop of vanilla ice cream is a classic choice. It melts into the warm crisp, creating a dreamy dessert. You can also serve it with whipped cream or Greek yogurt for a tangy touch. For drinks, try a sweet iced tea or a light white wine to complement the flavors. Enjoy! This article covered how to make a delicious peach crisp. We discussed fresh ingredients, step-by-step instructions, useful tips, fun variations, and smart storage methods. You now have all the tools to bake this tasty dessert successfully. Remember, using ripe peaches is key for great flavor. Don’t be afraid to get creative with fruit and toppings. Enjoy serving your warm peach crisp with ice cream or whipped cream for the perfect treat. Happy baking!
Warm Bourbon Peach Crisp Delicious and Comforting Treat
If you’re looking for a cozy dessert that warms the heart and soul, look no further. This Warm Bourbon Peach Crisp combines juicy peaches, rich
You'll need 4 cups of fresh peaches for this cobbler. Choose ripe peaches for the best flavor. Look for peaches that are firm but slightly soft when you press them. They should smell sweet and fragrant. Peel and slice the peaches before adding them to the mix. This step is key for a juicy filling. For sweetness, we use 1 cup of granulated sugar, divided into two portions. You can adjust this to your taste. If you want a healthier option, try using coconut sugar or honey. These alternatives can bring out different flavors. Also, sprinkle 1 tablespoon of sugar on top before baking for a nice crust. The base of your cobbler needs some important ingredients: - 1 cup all-purpose flour - 1 tablespoon baking powder - 1/2 teaspoon salt - 1 cup whole milk - 1/2 cup unsalted butter, melted and slightly cooled These ingredients come together to create a light and fluffy batter. The flour and baking powder help it rise, while the butter adds richness. The milk gives moisture to the batter, making it soft and delicious. For the full recipe, check out the [Full Recipe]. First, I set my oven to 375°F (190°C). This helps the cobbler bake evenly. While the oven heats up, I grease a 9x13-inch baking dish. I use unsalted butter or cooking spray for this. Greasing the dish ensures the cobbler does not stick. Next, I prepare the peach filling. I take 4 cups of fresh peaches and slice them. In a large mixing bowl, I add the sliced peaches. Then, I mix in 1 cup of granulated sugar, 1 teaspoon of vanilla extract, 1 teaspoon of lemon juice, 1 teaspoon of cinnamon, and 1/2 teaspoon of nutmeg. I toss the peaches gently until they are coated. Letting the mixture sit for about 15 minutes helps the flavors blend. This step also allows the peaches to release some juice, making them sweet and juicy. Now, I make the batter. In a separate bowl, I whisk together 1 cup of all-purpose flour, 1 tablespoon of baking powder, and 1/2 teaspoon of salt. After mixing, I slowly stir in 1 cup of milk. I mix until smooth. Next, I fold in 1/2 cup of melted butter. It’s important not to overmix; I want a light batter. To assemble the cobbler, I pour the batter into the greased baking dish. I spread it evenly across the bottom. Then, I spoon the peach mixture over the batter without stirring it in. This creates a lovely layering effect. Finally, I sprinkle 1 tablespoon of sugar over the top for added sweetness and a nice crunch. Now, I place the dish in the oven and bake it for 40-45 minutes. I check for a deep golden brown color. A toothpick inserted into the batter should come out clean. For a treat, I serve the cobbler warm with a scoop of vanilla ice cream. This adds a creamy contrast to the warm peaches. You can find the full recipe [Full Recipe]. To make the best peach cobbler, start with ripe peaches. Look for peaches that feel slightly soft when you press them. Their skin should be smooth and have a rich, golden color. If they smell sweet, they are likely ripe and ready. Avoid peaches with green spots, as they are not fully ripe. Ripe peaches add great flavor and sweetness to your cobbler. The batter is key to a great peach cobbler. It should be smooth and thick but not too runny. When mixing, add the milk slowly until you get the right texture. Use a whisk to mix the dry and wet ingredients gently. Overmixing can make the batter tough, so mix just until combined. This ensures a light, fluffy topping that will rise beautifully over the peaches. To enjoy your peach cobbler, serve it warm right from the oven. Adding a scoop of vanilla ice cream on top elevates the dish. The cold ice cream melts into the warm cobbler, creating a delightful mix of temperatures. You can also sprinkle some cinnamon or fresh mint on top for a lovely touch. For the ultimate experience, try serving it in individual bowls for a special presentation. For the complete recipe, check out the Full Recipe section. {{image_4}} You can use frozen peaches instead of fresh ones. They make a great alternative. Just remember to thaw them first. Drain any extra juice before adding to the mix. This helps keep the cobbler from being too watery. The taste remains sweet and juicy, just like fresh peaches. Follow the same steps in the Full Recipe for best results. If you need a gluten-free option, it’s easy to adapt! Replace all-purpose flour with a gluten-free flour blend. Make sure it includes xanthan gum for the right texture. You can also use almond flour or coconut flour as other options. Adjust the amount of liquid as needed. The cobbler will still taste amazing and be safe for all to enjoy! Adding spices can elevate your peach cobbler. Besides cinnamon and nutmeg, try a pinch of cardamom or ginger. They add a warm, rich flavor. You can even use a dash of almond extract for a nutty twist. Experiment with these spices to create your unique cobbler. This way, you can make each batch special and delightful! To keep your leftover peach cobbler fresh, let it cool down first. Then, cover it tightly with plastic wrap or aluminum foil. You can also use an airtight container. This method helps keep moisture in and prevents it from drying out. Store it in the fridge for up to 3 days. If you want it to last longer, consider freezing it. When you are ready to enjoy your peach cobbler again, preheat your oven to 350°F (175°C). Place the cobbler in an oven-safe dish. Cover it with foil to prevent it from getting too brown. Reheat for about 20 minutes or until it's warm throughout. You can also microwave individual servings for about 30-45 seconds. Just make sure to watch it so it does not get too hot. Freezing peach cobbler is easy and a great way to save it for later. After it cools completely, cut it into portions. Wrap each piece tightly in plastic wrap. Then, put the wrapped pieces in a freezer-safe bag or container. Be sure to label the bag with the date. It will stay good in the freezer for about 3 months. When you want to eat it, thaw it in the fridge overnight before reheating. For more details on making this delicious dessert, check out the Full Recipe. Yes, you can use canned peaches. Drain them well before adding to the mix. Canned peaches are softer, so they may not hold their shape like fresh ones. This will change the texture a bit. Use about 4 cups of canned peaches for the recipe. To ripen peaches, place them in a brown paper bag. This traps the ethylene gas they release, helping them ripen faster. Keep the bag at room temperature for 1-3 days. Check them daily. You can also add a banana to speed up the process. The cobbler takes about 40-45 minutes to bake. Make sure your oven is at 375°F (190°C). You’ll know it’s done when the top is golden brown. Insert a toothpick into the batter; if it comes out clean, it’s ready! Enjoy this warm with a scoop of ice cream. Check out the Full Recipe for all the details! This blog post covered how to make a delicious peach cobbler. We talked about selecting fresh peaches, the right sugars, and essential baking supplies. I provided easy steps to prepare the oven, make the filling, and create the batter. You also learned tips for choosing ripe peaches and serving your cobbler just right. We explored variations like using frozen peaches and making gluten-free options. Finally, I shared how to store leftovers and reheating tips. Get ready to impress your friends with your new peach cobbler skills!
The BEST Peach Cobbler Simple and Tasty Recipe
Are you ready to taste the best peach cobbler you’ve ever had? This simple and tasty recipe combines fresh peaches with just the right amount
- 4 ripe peaches - 1 tablespoon fresh lemon juice - 1/2 cup granulated sugar - 1 teaspoon ground cinnamon - 1 cup rolled oats - 1/2 cup all-purpose flour - 1/2 cup packed light brown sugar - 1/2 cup unsalted butter - 1/4 teaspoon sea salt - Vanilla ice cream - Whipped cream To make this easy peach crisp, you'll need some simple ingredients. First, pick four ripe peaches. They should feel soft but not mushy. A splash of lemon juice adds brightness. You'll also need sugar and cinnamon to sweeten and spice up the peaches. For the topping, gather rolled oats, flour, brown sugar, butter, and a pinch of sea salt. The oats give a nice crunch. You can top it off with vanilla ice cream or whipped cream. They add a creamy finish to the warm crisp. Check out the Full Recipe for all the details. Start by peeling, pitting, and slicing the peaches. This step is easy and fun. Use ripe peaches for the best flavor. Once sliced, toss them in a bowl with lemon juice, sugar, and cinnamon. This blend adds a bright taste to the peaches. The lemon juice helps keep the color fresh while the sugar enhances the sweetness. In a separate bowl, combine oats, flour, light brown sugar, and sea salt. This mix creates a delicious topping. Pour in melted butter and stir until the mixture looks crumbly. Use your fingers or a fork to mix it well. The goal is to have small clumps of topping that will get crispy in the oven. Now, layer the peach mixture in your greased baking dish. Spread it evenly for uniform baking. Next, sprinkle the oat mixture over the peaches. Make sure to cover them well with the topping. Bake in a preheated oven at 350°F (175°C) for 30 to 35 minutes. Watch for a golden brown topping and bubbling juices around the edges. Once baked, let it cool for 10 minutes before serving. This helps the juices settle. Enjoy your peach crisp warm, maybe with a scoop of vanilla ice cream on top. For the full recipe, check below! To make a great peach crisp, you need ripe peaches. Look for peaches that smell sweet. Their skin should be slightly soft to the touch. If fresh peaches aren't available, frozen peaches work well too. They save time and still taste great. Just thaw them before using. The topping is key to a yummy peach crisp. You can adjust the sweetness by changing the sugar amount. If you like crunch, add nuts or shredded coconut. They add a nice texture and flavor. Mix them into the topping to make it even better. Serve your peach crisp warm for the best taste. A scoop of vanilla ice cream adds creaminess. Whipped cream also makes a tasty topping. You can enjoy it as a dessert or a sweet snack. Each bite will be delightful! {{image_4}} You can easily make this peach crisp gluten-free. Just swap regular flour for almond flour or gluten-free oats. Both options add a nice nutty flavor. This way, everyone can enjoy a slice. Peach crisp is fun to change up. You can use apples, berries, or plums instead of peaches. Each fruit brings its own taste. Mixing fruits can create a unique dish that surprises your taste buds. Want to make your peach crisp even better? Add a splash of vanilla extract or a pinch of nutmeg. These little touches add richness and depth to the dish. It’s all about making it your own. For the full recipe, check out the link. After you finish your peach crisp, let it cool completely. This step helps keep the topping crunchy. Once cool, place it in an airtight container. This way, you can enjoy it later without losing flavor or texture. You can store your peach crisp in the fridge for up to 3 days. Just make sure the container is sealed well. This keeps the crisp fresh and tasty. If you don’t eat it all in three days, consider freezing it. When you want to enjoy your leftover peach crisp, warm it up first. You can use the oven or microwave. If you use the oven, heat it at 350°F (175°C) for about 10 to 15 minutes. In the microwave, heat it for about 30 seconds to 1 minute. Reheating brings back the crisp’s delicious flavors. Enjoy your peach crisp warm for the best taste! Yes, you can use canned peaches. Just adjust the sugar based on the syrup's sweetness. Canned peaches can save time, but fresh ones taste best. If you pick fresh peaches, choose ones that are ripe and sweet. To make a larger batch, simply double the recipe. Use a bigger baking dish to hold all the deliciousness. This way, you can share more with family and friends. Peach crisp is most delicious served warm. The warmth brings out the flavors and makes the topping crispy. I love adding a scoop of ice cream on top when it’s hot. It melts a bit and creates a sweet, creamy treat. Enjoy it fresh from the oven! To recap, I detailed how to make an easy peach crisp. You learned about the main ingredients, step-by-step instructions, and helpful tips. I also shared storage info and variations to try. Peach crisp is a simple and tasty dessert. It’s great with ice cream or on its own. You can mix and match flavors to suit your taste. Enjoy this sweet treat with friends or family.
Easy Peach Crisp Recipe Delightfully Simple Treat
Are you ready to whip up a dessert that brings smiles all around? My Easy Peach Crisp Recipe is just the treat you need! With
- Fresh peaches: The star of this dish! Peaches bring juicy sweetness and a lovely aroma. They create a warm, comforting flavor that pairs well with the sweet batter. Make sure to pick ripe peaches for the best taste. They should feel slightly soft to the touch. - Essential pantry items: - 1 cup granulated sugar (divided): This sweetens the peaches and the batter. - 2 tablespoons fresh lemon juice: This adds brightness and balances the sweetness. - 1 teaspoon pure vanilla extract: This gives a warm, sweet flavor. - 1 tablespoon cornstarch: This helps thicken the peach mixture. - 1 ½ cups all-purpose flour: This forms the base of the batter. - 1 tablespoon baking powder: This makes the batter rise. - ½ teaspoon fine salt: This enhances all the flavors. - ¼ teaspoon ground cinnamon: This adds a hint of spice. - ½ cup unsalted butter, melted: This enriches the batter. - 1 cup whole milk: This keeps the batter moist. - 1 large egg: This helps bind the ingredients. - ½ cup packed brown sugar: This adds a rich, caramel flavor. - 1 cup boiling water: This creates a lovely topping. - Optional toppings for serving: - Vanilla ice cream: This melts into the warm cobbler and adds creaminess. - Whipped cream: This adds a light, airy touch. - A light sprinkle of cinnamon: This gives a nice finish and aroma. For the full recipe, check the details above. Each ingredient plays a key role, making your peach cobbler a simple and tasty dish. Greasing the baking dish is key. It stops the cobbler from sticking. I use butter for this. Make sure to cover the dish well, especially the corners. Preheating your oven to 350°F (175°C) is next. This step helps the cobbler bake evenly. If you skip this, your cobbler may not rise well. To peel peaches, start by boiling water. Dip the peaches for 30 seconds. Then, place them in ice water. The skins will slip off easily. Slice the peaches into thin pieces. In a large bowl, mix the sliced peaches with ½ cup of granulated sugar. This helps draw out the juices. Add 2 tablespoons of lemon juice, 1 teaspoon of vanilla extract, and 1 tablespoon of cornstarch. Toss everything together gently. You want the peaches fully coated, but not mushy. In a medium bowl, mix 1 ½ cups of flour, 1 tablespoon of baking powder, ½ teaspoon of fine salt, and ¼ teaspoon of ground cinnamon. Then, add the remaining ½ cup of granulated sugar. In another bowl, whisk together ½ cup of melted butter, 1 cup of milk, and 1 large egg. Gradually pour the wet mix into the dry mix. Stir gently until just combined. Do not over-mix or your batter will be tough. Now, you’re ready to combine everything. Pour the batter over the peaches in the baking dish. Do not stir. Let the batter float on top. This creates layers for texture and flavor. Sprinkle ½ cup of packed brown sugar on top. Carefully pour 1 cup of boiling water over the whole dish. This step is important. It helps form a crispy topping while keeping the peaches juicy. Now you have everything set for baking! For the complete process, refer to the Full Recipe. To get a great texture in your peach cobbler, you need to layer the ingredients right. Start with the peach mixture at the bottom. This helps keep the peaches juicy. Pour the batter gently over the peaches. Do not mix them! This way, the batter stays on top, creating a nice crust. When baking, keep an eye on the time and temperature. I suggest baking at 350°F (175°C). Check your cobbler after 45 minutes. It should be golden brown. If it looks pale, let it bake a little longer. If it's browning too fast, cover it with foil. This protects the crust while the filling cooks through. For a tasty treat, serve your peach cobbler warm. It pairs well with vanilla ice cream or whipped cream. The cold cream melts slightly over the hot cobbler, creating a lovely mix of flavors. Think about presentation too! Use a big spoon to serve. Add a scoop of ice cream on top, then sprinkle some cinnamon for extra flavor. You can also serve it in small bowls for guests. This makes it feel special. Everyone will love this sweet dish! For the full recipe, check out the detailed steps above. {{image_4}} You can switch up the fruit in this recipe. Try using berries like blueberries or raspberries. Apples also work great. Each fruit adds its own unique taste. If you pick berries, you might want to cut back on sugar since they are often sweeter. For apples, add a pinch of nutmeg for added warmth. Mixing fruits can give your cobbler a fun twist. Just remember to keep the same amount of fruit as in the Full Recipe. If you need a gluten-free version, swap the all-purpose flour for a gluten-free blend. Look for blends that work well in baking. For a dairy-free option, use almond milk or oat milk instead of whole milk. You can also use coconut oil in place of butter. These swaps keep the flavor while fitting your diet. Just be sure to taste as you go. Each change can alter the flavor, but with the right adjustments, it will still be delicious. To store your peach cobbler, let it cool first. Cover it tightly with plastic wrap or foil. This keeps it tasty and stops it from drying out. You can keep it in the fridge for about 3 to 4 days. For the best flavor, eat it within this time. If you want to save it longer, freezing is a great option. Cut the cobbler into pieces. Wrap each piece in plastic wrap, then place them in a freezer bag. This way, it stays fresh for up to 3 months. When you're ready to enjoy it, thaw it in the fridge overnight. To reheat, preheat your oven to 350°F (175°C). Place the cobbler in an oven-safe dish. Cover it with foil to keep it moist. Heat for about 20-25 minutes or until it’s warm throughout. Enjoy your delicious peach cobbler just like fresh! For the full recipe, check out the [Full Recipe]. Yes, you can make peach cobbler ahead of time. Prepare it fully, then cover it with plastic wrap. Store it in the fridge for up to two days. When ready to serve, just bake it until hot. This way, you save time and still enjoy that fresh taste. For this peach cobbler, a 9x13-inch baking dish works best. This size allows for even baking and ensures the cobbler has enough room to rise. If you use a smaller dish, the cobbler might overflow. Check if the top is golden brown. You can also insert a toothpick into the batter. If it comes out clean, your cobbler is ready. The peaches should be bubbling around the edges, showing that they are cooked through. Yes, you can swap some ingredients. If you lack fresh peaches, use canned or frozen ones. Just make sure to drain canned peaches well. For sugar, try brown sugar in place of granulated sugar. If you don’t have cornstarch, use flour to thicken the peach mixture. Each swap may change the flavor slightly, but it will still taste great! In this post, we explored how to make a delicious peach cobbler. Fresh peaches offer great flavor, while pantry staples like flour and sugar complete the dish. I shared tips on preparing the oven and baking dish, along with the step-by-step process to create a rich batter. You learned ways to achieve the perfect texture and served ideas to impress guests. We also discussed variations for different fruits and dietary needs. Remember, your cobbler can be stored short-term in the fridge or long-term in the freezer. Enjoy your baking adventure!
The Best Peach Cobbler Recipe Simple and Tasty Dish
Are you ready to impress your family and friends with a dish that screams summer? My best peach cobbler recipe is not just simple; it’s
- 4 cups frozen peaches (thawed and drained) - 1 cup granulated sugar (divided) - 2 tablespoons fresh lemon juice To make a great frozen peach cobbler, you start with the main ingredients. You need frozen peaches that are thawed and drained. This step is key. It ensures that your cobbler won't be too watery. You also need sugar. I divide it into two parts. Half sweetens the peaches, and the other half goes into the topping. Fresh lemon juice adds a bright taste that complements the sweetness of the peaches. - 1 teaspoon ground cinnamon - 1/2 teaspoon salt - 1 tablespoon cornstarch Next, let's talk about the additional ingredients. Ground cinnamon brings warmth and depth to your cobbler. Salt is important too. It balances the sweet flavors. Cornstarch thickens the peach filling. This way, the filling holds its shape when baked. - 1 cup all-purpose flour - 1/2 teaspoon baking powder - 1/4 teaspoon baking soda - 1/4 cup rolled oats - 1/2 cup unsalted butter (melted) - 1/2 cup milk (preferably whole) - 1 teaspoon pure vanilla extract Now it's time for the cobbler topping. Start with all-purpose flour. It forms the base. Baking powder and baking soda help it rise. Rolled oats add a nice texture. Melted butter gives flavor and richness. Whole milk keeps the batter moist. Finally, vanilla extract adds a lovely scent. Gather all these ingredients, and you'll be set for a delightful peach cobbler. For the complete steps, check out the Full Recipe. Preheat your oven to 350°F (175°C). This makes sure your cobbler bakes evenly. Combine the thawed peaches, 1/2 cup of sugar, lemon juice, cinnamon, salt, and cornstarch in a bowl. Mix gently until the peaches are fully coated. This step is key for great flavor. Pour this peach mixture into a greased 9x13-inch baking dish. In another bowl, whisk together the flour, baking powder, baking soda, the remaining 1/2 cup of sugar, and rolled oats. This will be your cobbler base. Then, stir in the melted butter, milk, and vanilla extract. Mix until it’s smooth and thick. Carefully pour the batter over the peach mixture in your baking dish. Use a spatula to spread it evenly. This helps ensure that every bite has both peaches and batter. Place the baking dish in the oven and bake for 35-40 minutes. Check for a golden brown top and bubbly edges. This shows your cobbler is done. Let it cool in the dish for at least 10 minutes before serving. You can find the Full Recipe for more details. To get the best texture for your cobbler, focus on the batter. It should be smooth but thick. Mix the flour, baking powder, and oats, then slowly add wet ingredients. Don't overmix; this keeps the batter light. For the peaches, ensure they are well-drained. This prevents excess liquid in your cobbler. Want to elevate your cobbler? Add spices like nutmeg or ginger. A pinch of nutmeg adds warmth. You can also sprinkle chopped almonds or walnuts on top for crunch. These flavors make your cobbler more exciting and tasty. Try a splash of almond extract for a unique twist. When serving, go for the classics. A scoop of vanilla ice cream pairs perfectly. The cold ice cream melts into the warm cobbler. You can also add whipped cream for extra creaminess. Drizzle honey on top for a hint of sweetness. These toppings make your dessert even more delightful. {{image_4}} You can add fun fruit to your cobbler! Mixing frozen peaches with berries makes a tasty treat. Try blueberries, raspberries, or blackberries. Each fruit brings its own flavor. You can also mix in apples or cherries for a new twist. Just make sure to keep the total fruit amount the same. This way, the cobbler stays balanced and delicious. Want to change the sweetness? Use brown sugar instead of granulated sugar. Brown sugar adds a rich, caramel flavor. You can also use honey; it gives a floral taste. If you choose honey, use a little less than the sugar. This change makes your cobbler unique and sweet in a new way. Adjust the amount based on your taste. If you need a gluten-free option, you have choices! Almond flour or coconut flour works great. You can also use a gluten-free flour blend. Just follow the same measurements as all-purpose flour. This way, you can enjoy a tasty cobbler without gluten. Each option gives a different flavor and texture, so feel free to experiment! To freeze your peach cobbler, let it cool completely. Once cool, cover it tightly with plastic wrap. You can also use aluminum foil for extra protection. Make sure to remove all air to avoid freezer burn. Label the container with the date. This way, you’ll stay organized and know when to use it. When you are ready to enjoy the cobbler, take it out of the freezer. You can thaw it in the fridge overnight for best results. If you need it faster, place it in warm water for about an hour. Avoid using the microwave, as it can make the cobbler soggy. Your frozen peach cobbler can stay fresh in the freezer for up to three months. After that time, it may lose its flavor and texture. To enjoy it at its best, try to eat it within that time frame. Yes, you can use fresh peaches. Fresh peaches may taste better. You need to slice them and remove the pits. They will have more juice than frozen peaches. You might want to reduce the sugar a bit. This helps keep the filling from being too sweet. Look for a golden-brown top. The edges should bubble with peach juice. You can insert a toothpick into the center. If it comes out clean, it is done. Trust your nose too; a sweet smell means it's ready! Yes, you can! You might use flour or arrowroot instead. Flour will make it thicker, but not as smooth. Arrowroot gives a glossy shine. Each option changes the texture a little, so pick what you like. You can find the Full Recipe for Frozen Peach Cobbler Delight in this article. Just scroll up to see all the ingredients and steps! In this post, I covered how to make a delicious frozen peach cobbler. I shared essential ingredients, step-by-step instructions, and helpful tips. You can create amazing variations or store leftovers safely. Remember, baking is about experimenting and enjoying the process. Don't be afraid to try new flavors or techniques. With the right ingredients and guidance, you'll have a tasty dessert to share. Dive into this cobbler and let it bring joy to your table!
Frozen Peach Cobbler Delight Easy and Tasty Recipe
Are you ready to enjoy a sweet taste of summer? My Frozen Peach Cobbler Delight recipe brings juicy, thawed peaches together with a buttery topping
Here is what you need to make Southern style peach cobbler: - 4 cups fresh ripe peaches - 1 cup granulated sugar (divided) - 1 tablespoon fresh lemon juice - 1 teaspoon ground cinnamon - 1 teaspoon pure vanilla extract - 1 cup all-purpose flour - 1 tablespoon baking powder - 1/2 teaspoon salt - 1 cup whole milk - 1/2 cup unsalted butter (melted) - Optional: Whipped cream or vanilla ice cream for serving Each ingredient plays a key role in creating that warm, sweet, and comforting dish. The peaches give a juicy flavor. The sugar adds sweetness, while the lemon juice brightens the taste. Ground cinnamon brings warmth, and the vanilla extract adds depth. The flour, baking powder, and salt form the batter, giving it structure. Whole milk and melted butter keep the batter moist and rich. For a special touch, add whipped cream or vanilla ice cream when serving. It makes each bite heavenly! Enjoy gathering these ingredients as you prepare to make this delightful dessert. Don't forget to check out the Full Recipe to guide you through the process. - Preheat the Oven: Start by preheating your oven to 375°F (190°C). This step is key for a nice, golden crust. - Preparing the Peaches: Take 4 cups of fresh peaches, peel, and slice them. Toss the peaches with 1/2 cup of granulated sugar, 1 tablespoon of lemon juice, 1 teaspoon of cinnamon, and 1 teaspoon of vanilla extract. Mix gently and let them sit for about 15 minutes. This lets the peaches soften and create a sweet syrup. - Mixing Dry Ingredients: In a bowl, combine 1 cup of flour, 1 tablespoon of baking powder, 1/2 teaspoon of salt, and the remaining 1/2 cup of sugar. Whisk these together to ensure they blend well. - Combining Wet Ingredients: Now, add 1 cup of whole milk and 1/2 cup of melted butter to the dry mix. Stir gently until just combined. It’s okay if there are a few lumps; this gives the batter a rustic look. - Pouring the Batter: Carefully pour the batter into a greased 9x13 inch baking dish. Spread it evenly across the bottom. - Adding Peach Mixture: Spoon the peach mixture over the batter, including all the syrup. Do not stir. The peaches should rest on top, creating a lovely layer during baking. - Baking Time: Place the dish in the oven and bake for 45-50 minutes. Look for a golden brown top. Check doneness by inserting a toothpick in the batter; it should come out clean. Enjoy making this southern style peach cobbler with the full recipe for more details! Allowing peaches to rest is a key step. This lets the peaches create a sweet syrup. The syrup helps flavor the batter as it bakes. You should let the peaches sit for about 15 minutes after mixing. This simple wait makes a big difference in taste. Avoiding over-mixing is also important. When you mix the batter, stop as soon as it's combined. Lumps are good! They give the cobbler a nice rustic texture. If you mix too much, your cobbler can turn out tough. So, a gentle touch is best. Spice variations can really boost the flavor. You can use cinnamon, but don't be afraid to try nutmeg or allspice too. These spices can change the taste in fun ways. Just a little can add depth and warmth to the cobbler. Using different sweeteners is another great idea. Brown sugar works well in place of white sugar. It adds a rich, caramel flavor. You can also try honey or maple syrup for a unique twist. Each sweetener brings a different note to your cobbler, making it special. For the full recipe, refer to the earlier section. {{image_4}} You can change up the fruit in your cobbler. Instead of peaches, try using apples. They add a nice crunch. You can also use mixed berries for a burst of flavor. Raspberries and blueberries work great together. Seasonal fruits, like cherries or plums, can also be used. Each fruit gives a unique taste. Experiment to find your favorite! If you need a gluten-free version, you can swap the all-purpose flour. Try using almond flour or coconut flour. These flours give a different taste and texture. You may need to mix in a little more baking powder. This helps keep the cobbler light and fluffy. Always check the labels to ensure they are gluten-free. To make your cobbler even better, serve it warm. Top it with a scoop of vanilla ice cream. The cold ice cream melts slightly over the warm cobbler. This creates a delicious blend of flavors. You can also add whipped cream for extra creaminess. Both options elevate the dish and make it special. Enjoy your dessert with family and friends! To keep your peach cobbler fresh, store it in an airtight container. This will help keep it moist and flavorful. Make sure the cobbler is cool before sealing it up. If you do not have a container, you can cover it tightly with plastic wrap. Place the container in the fridge. Your cobbler should stay good for about 3-4 days. When it's time to enjoy your leftovers, you have two main options: the oven or the microwave. - Oven Method: Preheat your oven to 350°F (175°C). Place the cobbler in a baking dish. Cover it with foil to prevent over-browning. Heat for about 15-20 minutes, or until warm. This keeps the crust nice and crisp. - Microwave Method: For a quick option, slice the cobbler and place a piece on a microwave-safe plate. Heat it for about 30 seconds. Check if it is warm enough. If not, heat in 10-second bursts until it reaches your desired temperature. For the best taste, I recommend using the oven method when possible. It helps maintain that wonderful texture. For more tips, check out the Full Recipe! How do I make the cobbler crust more flaky? To make the crust flaky, use cold butter. Cut it into small pieces. Mix it gently with flour. Don’t overwork the dough. This keeps air pockets that create flakiness. You can also chill the batter for a bit before baking. Can I use canned peaches instead of fresh? Yes, you can use canned peaches. Just drain them well first. Canned peaches are softer, so adjust baking time. You may want to reduce added sugar since canned peaches often have syrup. What’s the best way to serve peach cobbler? Serve peach cobbler warm. Top it with a scoop of vanilla ice cream or a dollop of whipped cream. This adds a creamy contrast to the sweet peaches. You can also sprinkle some cinnamon on top for extra flavor. How long does peach cobbler last in the fridge? Peach cobbler lasts about 3 to 5 days in the fridge. Store it in an airtight container. Reheat it in the oven for the best taste. This keeps the crust nice and crisp. For the full recipe, check out the detailed instructions. This blog post covered all you need to make a delicious peach cobbler. First, we listed the important ingredients. Next, we walked through each step for easy baking. Then, we shared tips for perfecting your cobbler and offered some tasty variations. Finally, we discussed storage and reheating ideas. With these clear steps, you can bake a tasty dessert that everyone will love. Enjoy your peach cobbler warm, with ice cream or whipped cream. Happy baking!
Southern Style Peach Cobbler Easy and Delicious Recipe
Nothing says summer like a warm slice of Southern-style peach cobbler. This easy and delicious recipe lets you savor the sweet, juicy peaches in every