Desserts
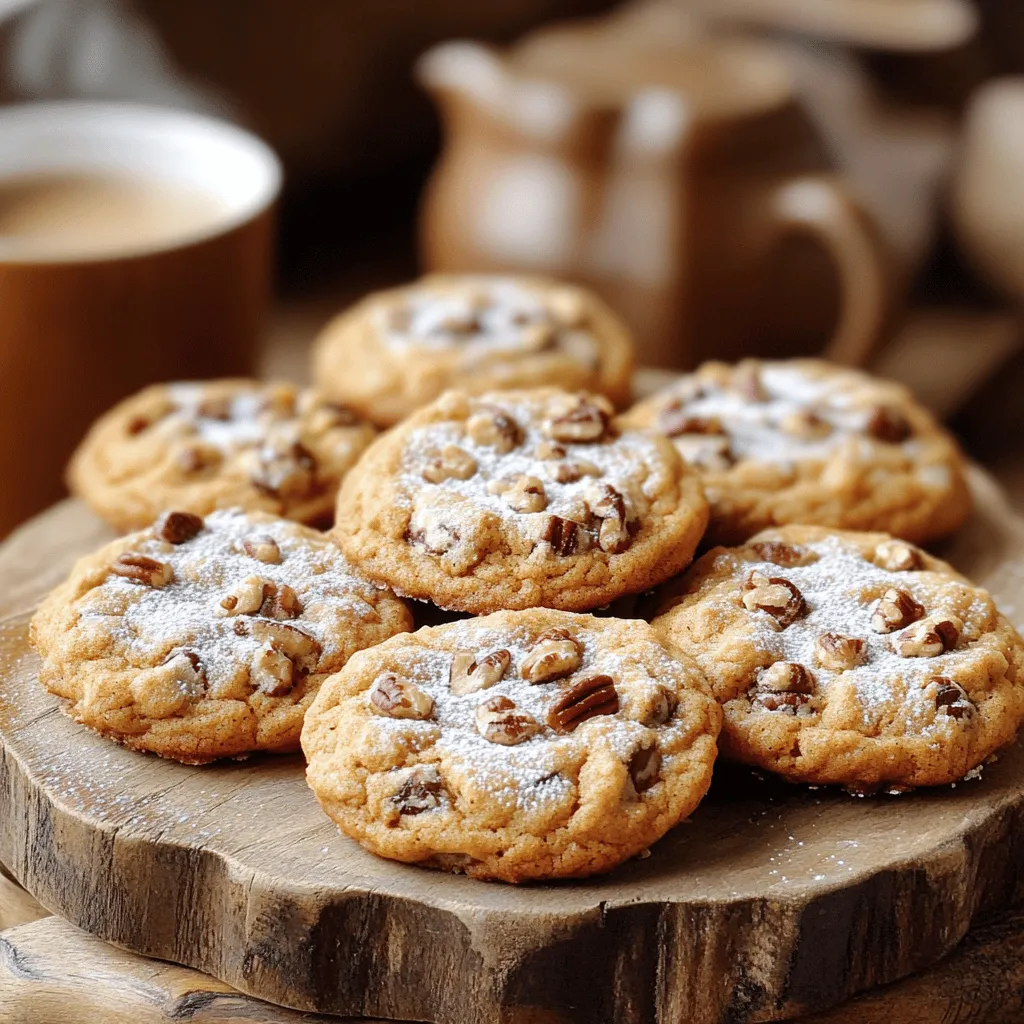
Pumpkin Coffee Cake Cookies Deliciously Simple Recipe
Craving a cozy treat? Let’s make Pumpkin Coffee Cake Cookies! This easy recipe combines the warmth of pumpkin spice with the tenderness of a cake,
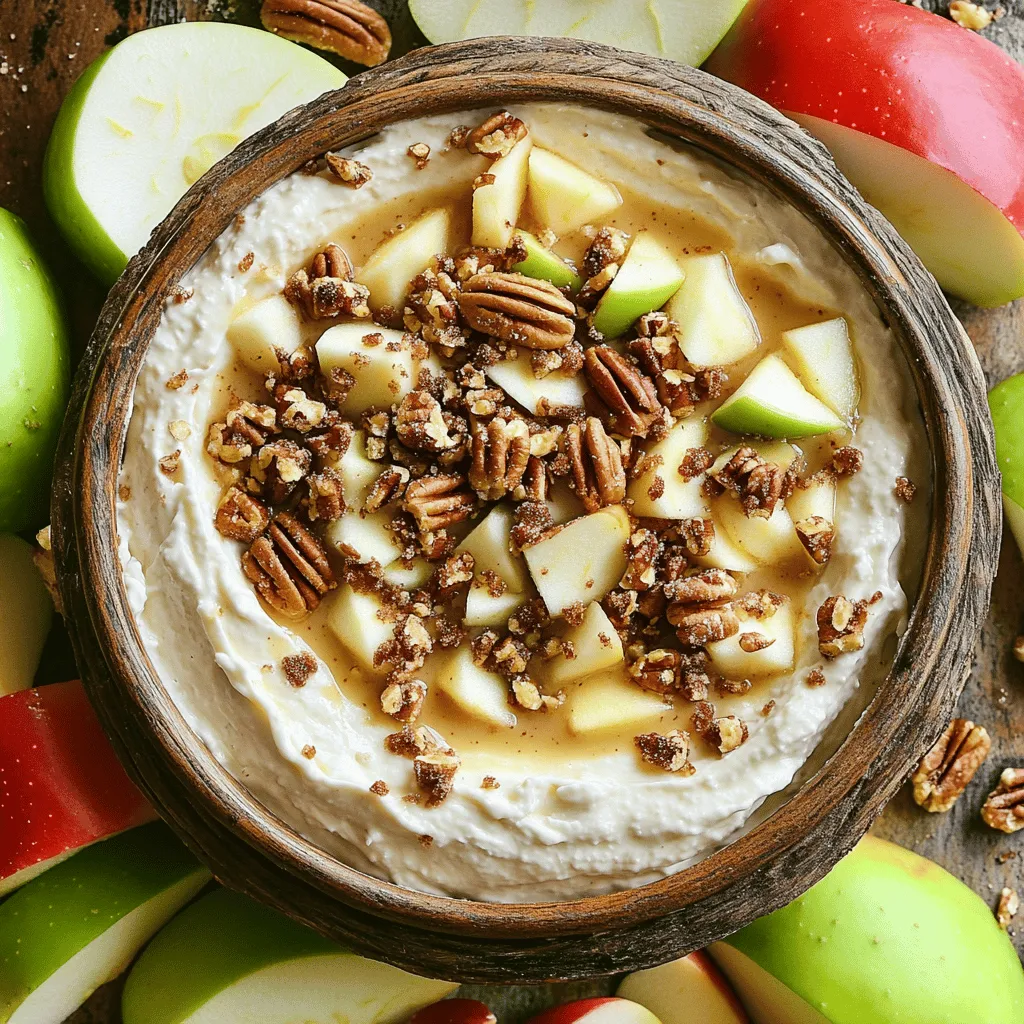
Apple Toffee Dip Rich and Creamy Party Delight
Looking for a sweet treat that impresses at gatherings? You’ve come to the right place! This Apple Toffee Dip is a rich and creamy delight
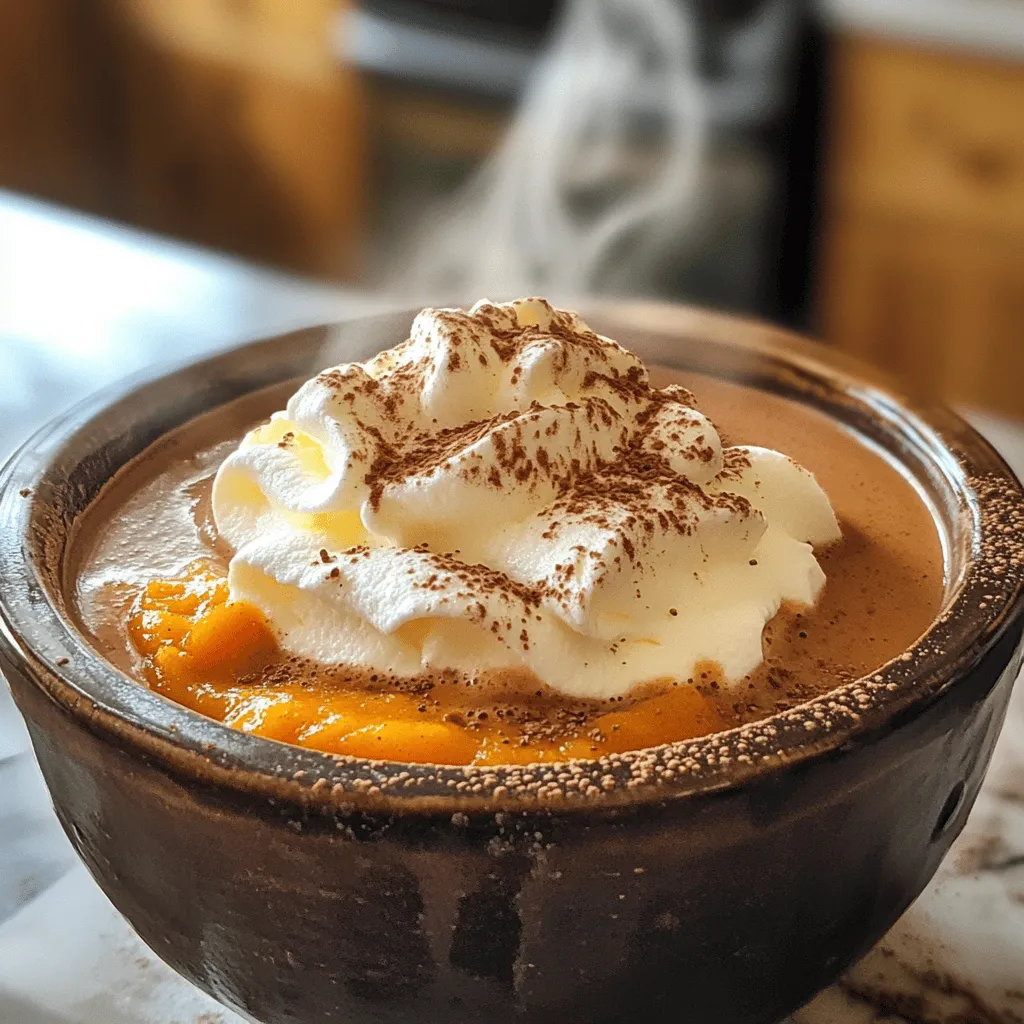
Crockpot Pumpkin Hot Chocolate Rich and Cozy Recipe
Do you crave a warm, cozy drink that embraces fall? Try my Crockpot Pumpkin Hot Chocolate! This rich and creamy beverage combines pumpkin and chocolate,
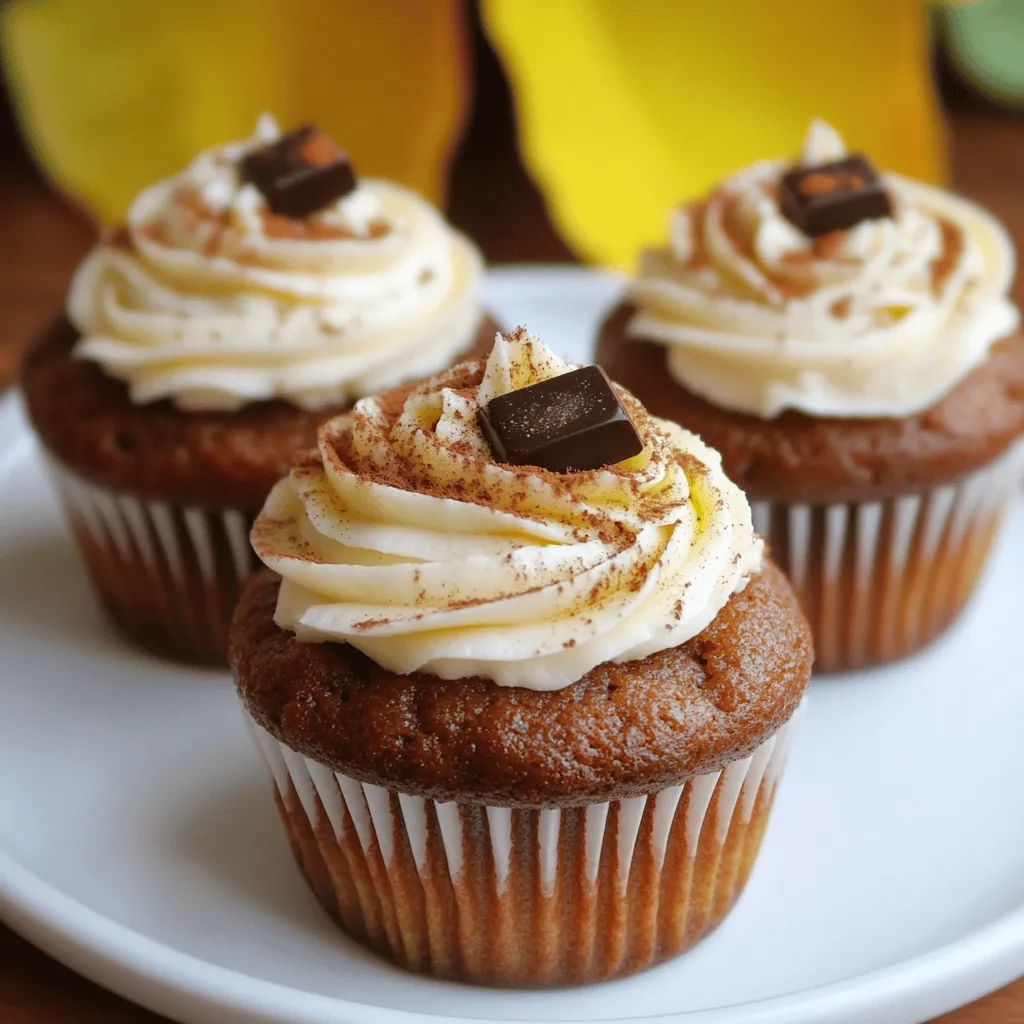
Brown Butter Dirty Chai Cupcakes Delightful Treat
Do you crave a sweet treat that warms your soul? Brown Butter Dirty Chai Cupcakes are here to satisfy that craving! These delightful cupcakes blend
![To make these tasty cinnamon sugar pumpkin donut holes, gather the following items: - 1 cup canned pumpkin puree - 1/4 cup unsweetened applesauce - 1/4 cup granulated sugar - 1/4 cup packed brown sugar - 1 large egg - 2 cups all-purpose flour - 1 teaspoon baking powder - 1/2 teaspoon baking soda - 1 teaspoon ground cinnamon - 1/2 teaspoon ground nutmeg - 1/4 teaspoon ground ginger - 1/4 teaspoon salt - 1/2 cup vegetable oil (for frying) - 1/2 cup granulated sugar (for coating) - 2 teaspoons ground cinnamon (for coating) You can swap some ingredients if needed. Here are a few options: - Pumpkin puree: Use homemade pumpkin puree if you prefer. Just cook and blend fresh pumpkin. - Applesauce: Replace it with mashed banana for a different flavor. - Granulated sugar: Try coconut sugar for a healthier option. - All-purpose flour: You can use gluten-free flour for a gluten-free version. Using fresh ingredients makes a big difference in taste. Fresh pumpkin puree has more flavor than canned. Fresh eggs also add richness. When you use fresh spices, you get the full aroma and taste. Always check the expiry dates and choose quality ingredients. This ensures your donut holes will be soft, moist, and full of flavor. You want them to shine, not just taste good! For the full recipe, check out the detailed instructions. Start by gathering the right tools. You need a large mixing bowl and a whisk. In the bowl, combine 1 cup of canned pumpkin puree, 1/4 cup of unsweetened applesauce, 1/4 cup of granulated sugar, 1/4 cup of packed brown sugar, and 1 large egg. Mix these ingredients until they blend together smoothly. This mixture will bring moisture and flavor to your donut holes. In a separate bowl, whisk together the dry ingredients. You will need 2 cups of all-purpose flour, 1 teaspoon of baking powder, 1/2 teaspoon of baking soda, 1 teaspoon of ground cinnamon, 1/2 teaspoon of ground nutmeg, 1/4 teaspoon of ground ginger, and 1/4 teaspoon of salt. Make sure everything is evenly mixed. This step is vital for getting the right rise and flavor in your donut holes. Chill your dough for about 30 minutes. This helps make it easier to handle. While waiting, prepare your frying station. Heat 1/2 cup of vegetable oil in a large pot to 350°F. Once the oil is hot, scoop about 1 tablespoon of the dough and roll it into a ball. Drop these balls into the oil in small batches. Fry them for about 3-4 minutes until golden brown. Use a slotted spoon to turn them gently for even cooking. Once golden brown, remove the donut holes and let them drain on paper towels. In a shallow bowl, mix 1/2 cup of granulated sugar with 2 teaspoons of ground cinnamon. While the donut holes are still warm, roll them in the cinnamon sugar until well coated. Serve them warm for the best taste. You can arrange them on a pretty plate or in a decorative bowl. For a fun touch, serve with warm apple cider. Enjoy your tasty treat! For the full recipe, check out the detailed instructions above. To get a light and fluffy donut hole, avoid overmixing the batter. When you combine the wet and dry ingredients, mix until just combined. This keeps the texture airy. Chilling the dough for about 30 minutes also helps. It makes rolling easier and improves texture. Keeping the oil at a steady 350°F (175°C) is key for great frying. If the oil is too hot, the outside cooks too fast, leaving the inside raw. If it’s too cool, the donut holes absorb too much oil. Use a thermometer to check the temperature. Fry in small batches to keep the oil hot. One big mistake is not using enough flour. Too little flour makes the donut holes spread too much in the oil. Another mistake is skipping the cinnamon sugar coating. This adds flavor and makes them irresistible. Always coat them while warm for the best taste. For the full recipe, check out the details above. Enjoy the sweet, spiced goodness of these cinnamon sugar pumpkin donut holes! {{image_4}} If you need a gluten-free option, you can easily swap out the all-purpose flour. Use a gluten-free flour blend instead. Look for a blend that contains xanthan gum. This helps mimic the texture of regular flour. Your donut holes will still be soft and tasty. Want to add more fun to your donut holes? You can mix in chocolate chips or nuts. About half a cup of mini chocolate chips adds a sweet touch. If you prefer a crunch, try chopped walnuts or pecans. Just fold them into the dough before frying. This gives each bite extra flavor and texture. While cinnamon sugar is classic, you can try other coatings. For a chocolate lover, drizzle melted chocolate on top. You can also toss the donut holes in powdered sugar for a sweet finish. If you want a spice twist, mix cocoa powder with sugar and sprinkle over the warm donut holes. These options keep your treat fresh and exciting. For the complete recipe, check out the [Full Recipe]. To keep your donut holes fresh, place them in an airtight container. Line the container with paper towels to absorb moisture. Store them at room temperature for up to two days. If you want to keep them longer, refrigerate them. They will last about a week in the fridge. Just remember, the longer they sit, the less crisp they become. Reheating is simple. Preheat your oven to 350°F (175°C). Place the donut holes on a baking sheet. Heat them for about 5 to 7 minutes. This method helps to regain some of their original texture. You can also use a microwave, but this may make them softer. Heat for about 10-15 seconds if using a microwave. You can freeze these donut holes for later enjoyment. Once they cool, arrange them in a single layer on a baking sheet. Freeze until solid, then transfer them to a freezer bag. They can last for up to three months. To thaw, leave them in the fridge overnight. For a quick option, microwave them for 20-30 seconds. Enjoy the taste of fresh cinnamon sugar pumpkin donut holes anytime! For the full recipe, click on [Full Recipe]. Yes, you can bake these donut holes. To bake, preheat your oven to 350°F (175°C). Shape the dough into balls and place them on a baking sheet lined with parchment paper. Bake for about 15-20 minutes until they are golden brown. Baking will make them slightly drier, but they will still taste great. To check if the oil is hot enough, use a thermometer. The oil should reach 350°F (175°C). If you don't have a thermometer, drop a small piece of dough into the oil. If it sizzles and rises to the top, the oil is ready. This method helps you fry the donut holes evenly. You can use homemade pumpkin puree or applesauce as a substitute. Another option is to use butternut squash puree. Each of these options will give a different taste but still keep the donut holes moist and delicious. These donut holes last for about 2-3 days at room temperature in an airtight container. If you want them to last longer, you can store them in the fridge for up to a week. Just remember, they may lose some of their fresh taste and texture after a day or two. In this post, we covered how to create delicious pumpkin donut holes. We explored the key ingredients, including essential substitutions and the need for fresh items. I shared step-by-step instructions and tips to make perfect donut holes, including mixing and frying techniques. We also discussed variations and how to store your leftovers. Remember, quality ingredients and careful cooking lead to great results. Now, you can create tasty treats that everyone will enjoy!](https://roastedflavors.com/wp-content/uploads/2025/07/aa08d20b-f820-467a-89a6-5a734a9e29ca.webp)
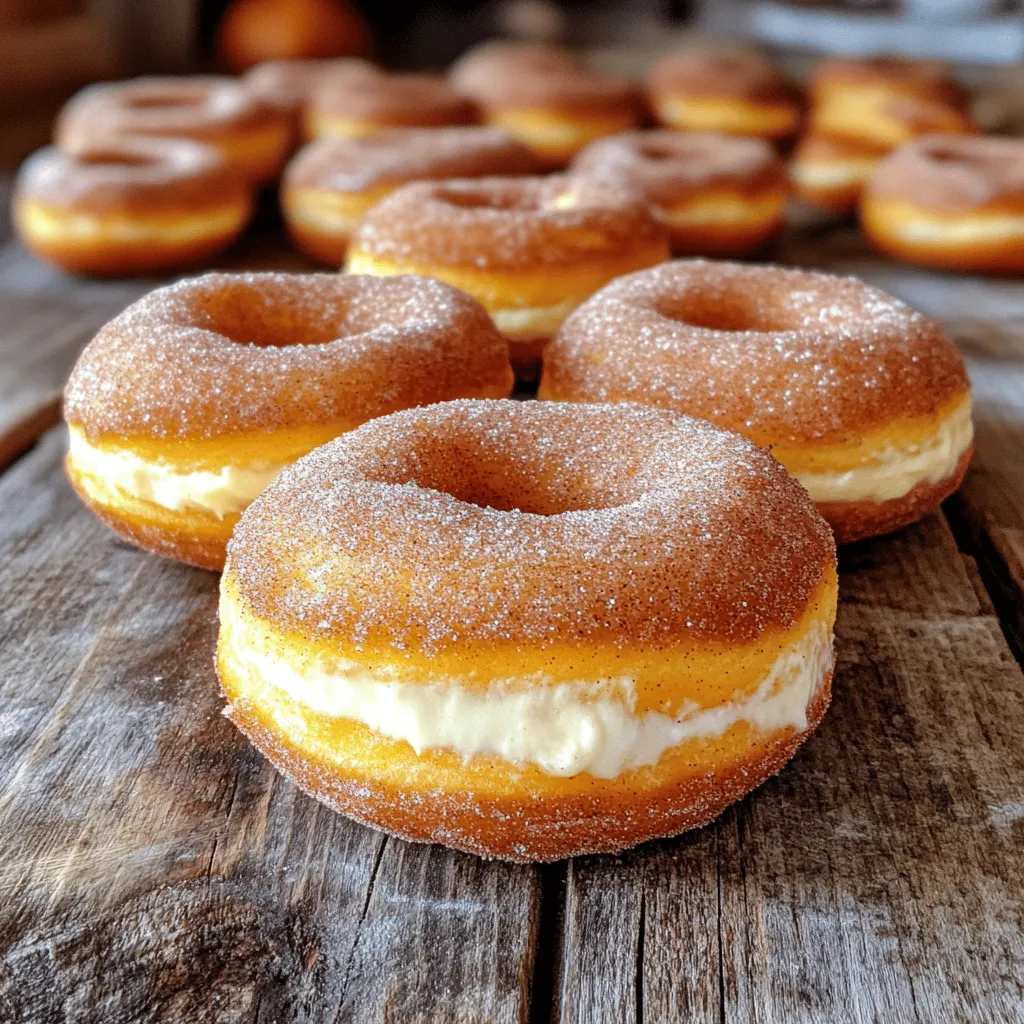
Cinnamon Sugar Pumpkin Donut Holes Irresistible Treat
Are you ready for a treat that combines fall flavors with irresistible sweetness? These Cinnamon Sugar Pumpkin Donut Holes are a must-try! Made with fresh
![- 1 ½ cups all-purpose flour - 1 teaspoon baking powder - 1 teaspoon baking soda - ½ teaspoon salt - 1 teaspoon ground cinnamon - ½ teaspoon ground nutmeg - ½ teaspoon ground ginger - ½ cup unsalted butter, softened - 1 cup granulated sugar - 2 large eggs - 1 cup canned pumpkin puree - ½ teaspoon vanilla extract - ½ cup packed brown sugar - 8 oz cream cheese, softened to room temperature - ½ cup unsalted butter, softened to room temperature - 1 teaspoon vanilla extract - 2 cups powdered sugar, sifted - ¼ cup caramel sauce (store-bought or homemade) To create delicious pumpkin cupcakes with caramel cream cheese frosting, gather these ingredients first. The dry mix includes flour and spices. Use baking powder, baking soda, and salt to help the cupcakes rise and taste great. The warm spices like cinnamon, nutmeg, and ginger bring a cozy fall flavor. Next, focus on the wet ingredients. Softened butter and sugar mix to create a fluffy base. Add in eggs, pumpkin puree, and vanilla for moisture and richness. This mix gives the cupcakes a soft texture that melts in your mouth. For the frosting, combine cream cheese and butter until smooth. This creamy base pairs perfectly with powdered sugar and caramel sauce. The frosting is sweet with a tangy twist, making it a delightful topping for the cupcakes. For the full recipe, check out the detailed instructions and baking times. To start, measure your dry ingredients. In a bowl, mix: - 1 ½ cups all-purpose flour - 1 teaspoon baking powder - 1 teaspoon baking soda - ½ teaspoon salt - 1 teaspoon ground cinnamon - ½ teaspoon ground nutmeg - ½ teaspoon ground ginger Whisk them together well and set aside. Next, cream the butter and sugar. In a large bowl, beat: - ½ cup unsalted butter, softened - 1 cup granulated sugar Use an electric mixer. Mix until fluffy, about 3-4 minutes. Now, add: - 2 large eggs, one at a time. Mix after each egg. Then, gently fold in: - 1 cup canned pumpkin puree - ½ teaspoon vanilla extract Stir until smooth. Gradually mix in your dry ingredients. Use a spatula or wooden spoon. Stop mixing when just combined to keep cupcakes light. Fill each cupcake liner about two-thirds full with the batter. Preheat your oven to 350°F (175°C). Bake for 18-20 minutes. To check if they're done, insert a toothpick in the center. It should come out clean. After baking, let cupcakes cool in the tray for 5 minutes. Then, place them on a wire rack to cool completely. While the cupcakes cool, let’s make the frosting. In a medium bowl, beat: - 8 oz cream cheese, softened - ½ cup unsalted butter, softened Mix until creamy. Then, add: - 1 teaspoon vanilla extract - 2 cups powdered sugar, sifted Mix until sweet and smooth. Finally, fold in: - ¼ cup caramel sauce Mix until fully blended. Once the cupcakes are cool, frost them generously. Use a spatula or piping bag. For a fun touch, drizzle more caramel sauce on top. Enjoy your tasty treats! You can find the Full Recipe for all the steps and details. Avoiding overmixing the batter Mixing too much makes cupcakes dense. After adding flour, stir gently. Only mix until you see no dry flour. This keeps your cupcakes light and fluffy. Temperature tips for butter and eggs Room temperature butter and eggs blend better. Cold butter can create lumps. Set them out an hour before baking. This makes your batter smooth and helps it rise well. Suggestions for spice adjustments You can tweak spices to match your taste. If you love cinnamon, add a bit more. For warmth, try extra ginger or nutmeg. These small changes can make a big difference. Alternative pumpkin sources Canned pumpkin is easy, but you can use fresh pumpkin. Roast it until soft, then puree it. This adds a fresh flavor and a fun twist to your cupcakes. Creative frosting tips Use a piping bag for a fancy touch. Swirl the frosting on top for a nice look. You can also use a spatula for a rustic feel. Both styles taste great! Decoration ideas Sprinkle cinnamon or nutmeg on top for flair. Add small caramel pieces or crushed nuts for crunch. These little details make your cupcakes pop and look festive. Enjoy your treats! {{image_4}} You can change your pumpkin cupcakes in fun ways. Adding chocolate chips gives a sweet twist. Nuts like walnuts or pecans add crunch and flavor. Try using different spices, too. Replace cinnamon with allspice or cardamom for a unique taste. Each variation keeps the cupcakes exciting and fresh. If you need gluten-free cupcakes, use a gluten-free flour blend. It works well in this recipe. For vegan options, swap eggs for applesauce or flaxseed meal. Use vegan butter and a dairy-free cream cheese for the frosting. These changes make it easy for everyone to enjoy. Pair these cupcakes with warm drinks like coffee or chai. They also go well with vanilla ice cream for a dessert party. Serve them at fall gatherings, birthday parties, or cozy family dinners. They add a festive touch to any occasion. For a fancy touch, arrange them on a pretty cake stand or platter. Don't forget to check the Full Recipe for all details! Error: Error code: 429 - {'error': {'message': 'Rate limit reached for gpt-4o-mini in organization org-zFeAnX8gJvsCtEtJubNX3NN3 on tokens per min (TPM): Limit 200000, Used 199229, Requested 2350. Please try again in 473ms. Visit https://platform.openai.com/account/rate-limits to learn more.', 'type': 'tokens', 'param': None, 'code': 'rate_limit_exceeded'}} To check if your cupcakes are done, use a toothpick. Insert it into the center of a cupcake. If it comes out clean, the cupcakes are ready. This method helps you avoid underbaking or overbaking. Remember, a little crumb is okay, but no wet batter should stick to the toothpick. Yes, you can make these pumpkin cupcakes ahead of time. Let them cool completely, then store them in an airtight container. They will stay fresh for about three days. If you want to keep them longer, you can freeze them. Wrap each cupcake in plastic wrap and place them in a freezer bag. They can last up to three months in the freezer. Just thaw them overnight in the fridge when you’re ready to enjoy. If you need a substitute for pumpkin puree, you can use applesauce or mashed sweet potatoes. Both options add moisture and sweetness. However, they may change the flavor slightly. You can also try butternut squash puree for a similar taste and texture. Just make sure to adjust the spices to fit the new ingredient. To keep your frosting from getting too runny, start with room temperature cream cheese and butter. Mix them well until smooth. Gradually add the powdered sugar to reach your desired thickness. If the frosting is still runny, add a bit more powdered sugar. This will help stabilize it and make it easier to spread or pipe. Avoid overmixing after adding the caramel sauce, as this can also make it runny. For best results, frost the cupcakes right after making the frosting. For the full recipe on how to make these delicious pumpkin cupcakes with caramel cream cheese frosting, check out the [Full Recipe]. In this blog post, we explored how to make delicious pumpkin cupcakes. We covered the key ingredients, both dry and wet, for the batter and creamy frosting. I shared step-by-step instructions to guide you through baking. Tips for enhancing flavors and serving ideas added extra layers to your baking skills. Try out the variations and storage tips to keep your treats fresh. Baking is fun, and with these cupcakes, you’ll impress everyone. Enjoy creating, taste testing, and sharing your yummy cupcakes!](https://roastedflavors.com/wp-content/uploads/2025/07/a806c365-c9bb-4231-9f6c-a094719cd902.webp)
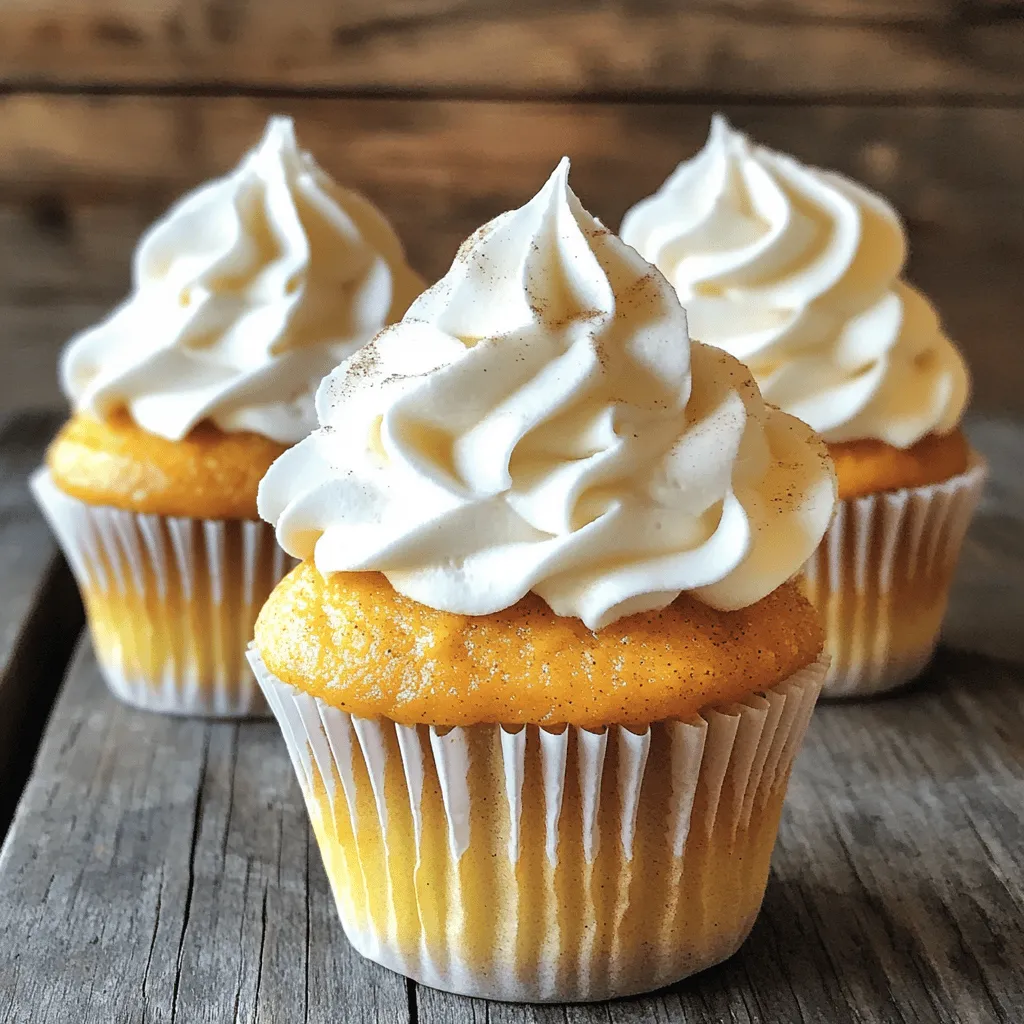
Pumpkin Cupcakes with Caramel Cream Cheese Frosting Delight
Get ready to fall in love with baking! These Pumpkin Cupcakes with Caramel Cream Cheese Frosting are perfect for any occasion. Imagine soft, spiced cupcakes
Vanilla Chai Pumpkin Latte Cupcakes Tempting Delight
Dive into a world of flavor with my Vanilla Chai Pumpkin Latte Cupcakes! These treats blend warm spices and sweet pumpkin for a cozy bite.
![- 1 cup canned pumpkin puree - 8 oz cream cheese, softened to room temperature - 1 cup powdered sugar - 1 cup whipped topping These main ingredients form the heart of the dip. Canned pumpkin puree gives the dip its signature flavor and smooth texture. Cream cheese adds richness and creaminess, while powdered sugar balances the flavors with sweetness. The whipped topping lightens everything up, making it fluffy and fun to enjoy. - 1 teaspoon pure vanilla extract - 1 teaspoon ground cinnamon - 1/2 teaspoon ground nutmeg - 1/4 teaspoon ground ginger - 1/4 teaspoon fine salt Spices make this dip truly special. Vanilla extract adds warmth. Cinnamon brings a familiar fall taste, while nutmeg and ginger add depth. A pinch of salt enhances the sweetness of the dip, making every bite better. Together, these flavors remind us of classic pumpkin pie. - Graham crackers - Apple slices - Assorted cookies For dipping, I love using graham crackers. They add crunch and sweetness. Apple slices bring a fresh taste that balances the creamy dip. Assorted cookies allow guests to choose their favorites. Each dipper adds a lovely twist to the experience. For the full recipe, check [Full Recipe]. Start by placing the cream cheese and powdered sugar in a large bowl. Use an electric mixer to beat the mixture on medium speed. Keep mixing until it is smooth and creamy, which takes about 1 to 2 minutes. This step gives the dip its rich base. Next, mix in the canned pumpkin puree and all the spices. Add the vanilla extract, ground cinnamon, ground nutmeg, ginger, and salt. Blend everything on low speed until it is well combined. You want a smooth consistency, which takes about 1 minute. The spices add warmth and flavor to the dip. Now, it’s time to fold in the whipped topping. Use a spatula or a wooden spoon to gently incorporate it. Be careful not to overmix, as you want to keep the dip light and airy. If you mix too much, the texture may become dense. For more detailed instructions, refer to the Full Recipe. To make your pumpkin pie dip extra special, try adding more spices. You can sprinkle in a bit of allspice or cardamom. These spices bring warmth and depth to the dip. You can also add a splash of maple syrup. This sweet touch makes the dip taste like fall in every bite. Just mix it in slowly so you keep the creamy texture. When serving, make it look festive! Use a fun bowl that matches your fall theme. You can arrange colorful dippers like apple slices and cookies around the dip. For a cute garnish, sprinkle some cinnamon or graham cracker crumbs on top. You can even add cinnamon sticks. They act as perfect stirrers and look great! If you have leftovers, store them in an airtight container. The dip stays fresh in the fridge for about three days. If you want to keep it longer, you can freeze it. Just make sure to use a freezer-safe container. It lasts for up to a month in the freezer. When you want to enjoy it again, thaw it in the fridge overnight before serving. {{image_4}} You can make this dip a bit healthier. Try using low-fat cream cheese. This keeps the dip creamy but cuts some fat. You can also swap out powdered sugar for a sugar alternative. Options like stevia or monk fruit can work well. Just adjust the amount to taste. Want to make this dip even more special? Add chocolate chips for a sweet twist. Dark chocolate chips give a nice contrast to the pumpkin flavor. You can also incorporate caramel into the dip. Swirl it in for a rich, sweet layer. Fall means pumpkin spice! You can add extra pumpkin spice to boost the flavor. It really brings out that cozy feeling. For holidays, think about adding a splash of eggnog or even whipped cream. These seasonal enhancements can make your dip a festive treat. For the full recipe, check out the complete guide. What should I serve with pumpkin pie dip? You can use many fun dippable options. I love using: - Graham crackers - Apple slices - Assorted cookies These dippers add crunch and flavor. You can also mix it up with pretzels for a salty twist. For a fun touch, arrange these on a colorful platter around the dip. It makes for an eye-catching display. How can I serve the dip creatively? Try these ideas. Use small cups for individual servings. This makes it easy for guests to grab. You can also place cinnamon sticks in the dip for stirring. This adds a festive look! What are some great events for pumpkin pie dip? Fall-themed parties are perfect! This dip brings warmth and comfort. Set the scene with cozy blankets and fall decorations. The dip fits right in with your pumpkin spice lattes. What about holiday gatherings? Serve this dip at Thanksgiving or Christmas. It adds a sweet touch to the dessert table. You can also pair it with other fall flavors. Think apple cider or pecan pie for a full spread. What dippers work best for kids? They love fun shapes! Use cookie cutters to make apple slices or graham crackers into fun shapes. This encourages kids to try new flavors. How can I make the dip fun for kids? Try making it interactive. Set up a “dip bar” with various toppings. Add sprinkles, mini chocolate chips, or whipped cream. Kids will love to create their own tasty treats! You can store pumpkin pie dip in the fridge for about 3 to 5 days. Keep it in an airtight container. This helps keep it fresh and tasty. If you see any signs of spoilage, toss it out. Yes, you can make this dip a day before your event. Just prepare it and store it in the fridge. It actually tastes better after chilling for a while. When ready, serve it cold with your favorite dippers. Yes, pumpkin pie dip is naturally gluten-free. For dipping, use gluten-free options like rice crackers or fresh fruits. Apple slices are a great choice too! Just check labels if you buy packaged items to ensure they are gluten-free. Pumpkin pie dip is easy and fun to make. You need just a few key ingredients, including pumpkin puree and cream cheese. Mixing in spices adds flavor, while whipped topping makes it light. You have many tasty dippers, from graham crackers to apple slices. Experiment with variations and serving ideas for your next gathering. This dip is not just tasty; it's perfect for fall-themed fun and holiday joy. Enjoy every creamy bite!](https://roastedflavors.com/wp-content/uploads/2025/07/9cb68a51-ff97-46f6-8dbc-6b21d443f219.webp)
Pumpkin Pie Dip Irresistible Fall Dessert Treat
Are you ready to savor the flavors of fall? This Pumpkin Pie Dip is your go-to treat! Using simple ingredients, like canned pumpkin puree and

Homemade Pumpkin Pecan Cobbler Irresistible Dessert Dish
If you love the warm flavors of fall, you’ll adore my Homemade Pumpkin Pecan Cobbler. This dessert combines rich pumpkin, crunchy pecans, and a tender,
Pumpkin Spice Cheesecake Doughnuts Delightful Treat
Get ready for a sweet treat that mixes fall flavors with creamy delight! Pumpkin Spice Cheesecake Doughnuts are a mouthwatering way to enjoy this season.