Desserts
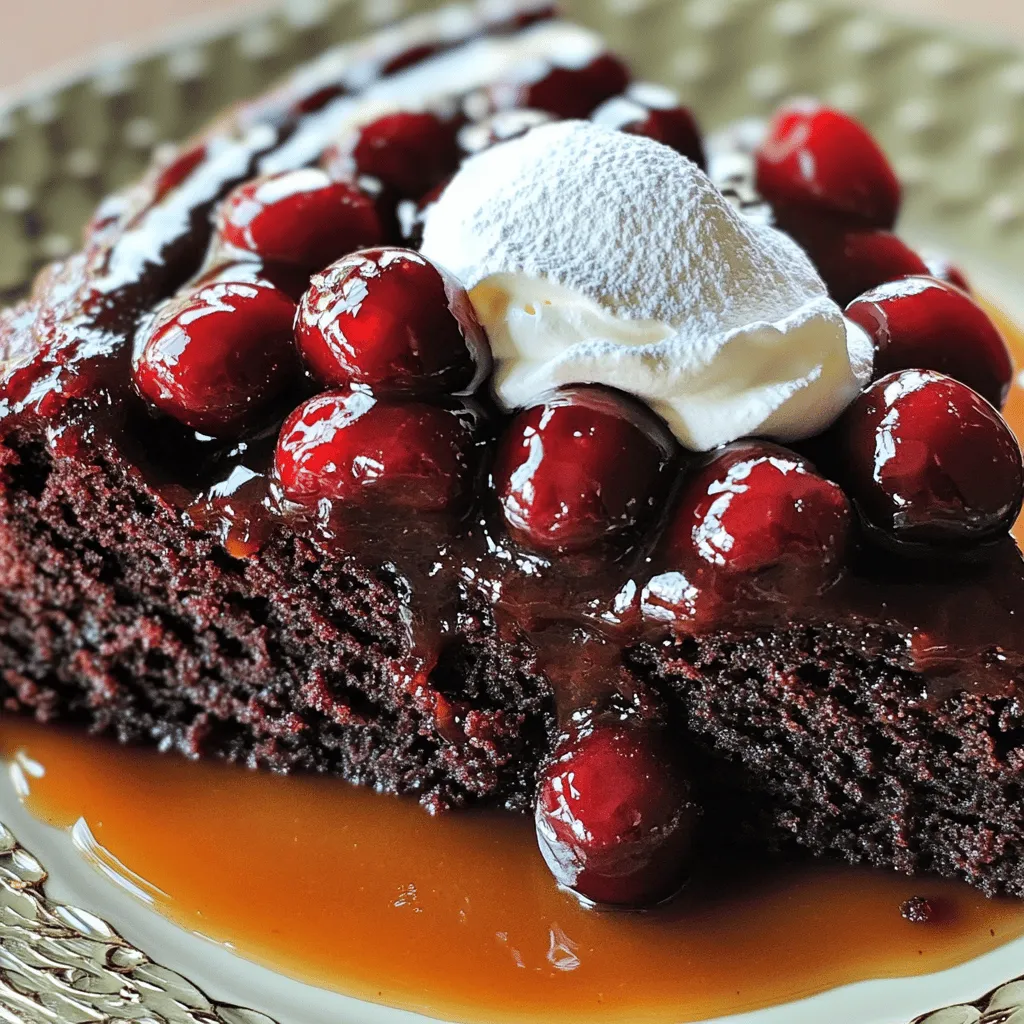
Chocolate Cherry Upside Down Cake Rich and Luscious Delight
Are you ready to indulge in a decadent dessert? This Chocolate Cherry Upside Down Cake is rich, luscious, and sure to impress. With sweet cherries

S’mores Cupcakes Deliciously Sweet Treats to Enjoy
Looking to sweeten your day? S’mores cupcakes are the perfect treat! Imagine soft chocolate cake, gooey marshmallow frosting, and a hint of graham cracker. With

Spooky Fun Halloween Cookies Easy and Festive Treats
Get ready for a spooky treat! Halloween is just around the corner, and I’m excited to share easy and fun cookie recipes with you. These

How to Make Banana Sushi Delightful and Fun Treat
Ready for a fun treat that’s both tasty and easy? Banana sushi is a tasty twist on a classic favorite! You can make this sweet
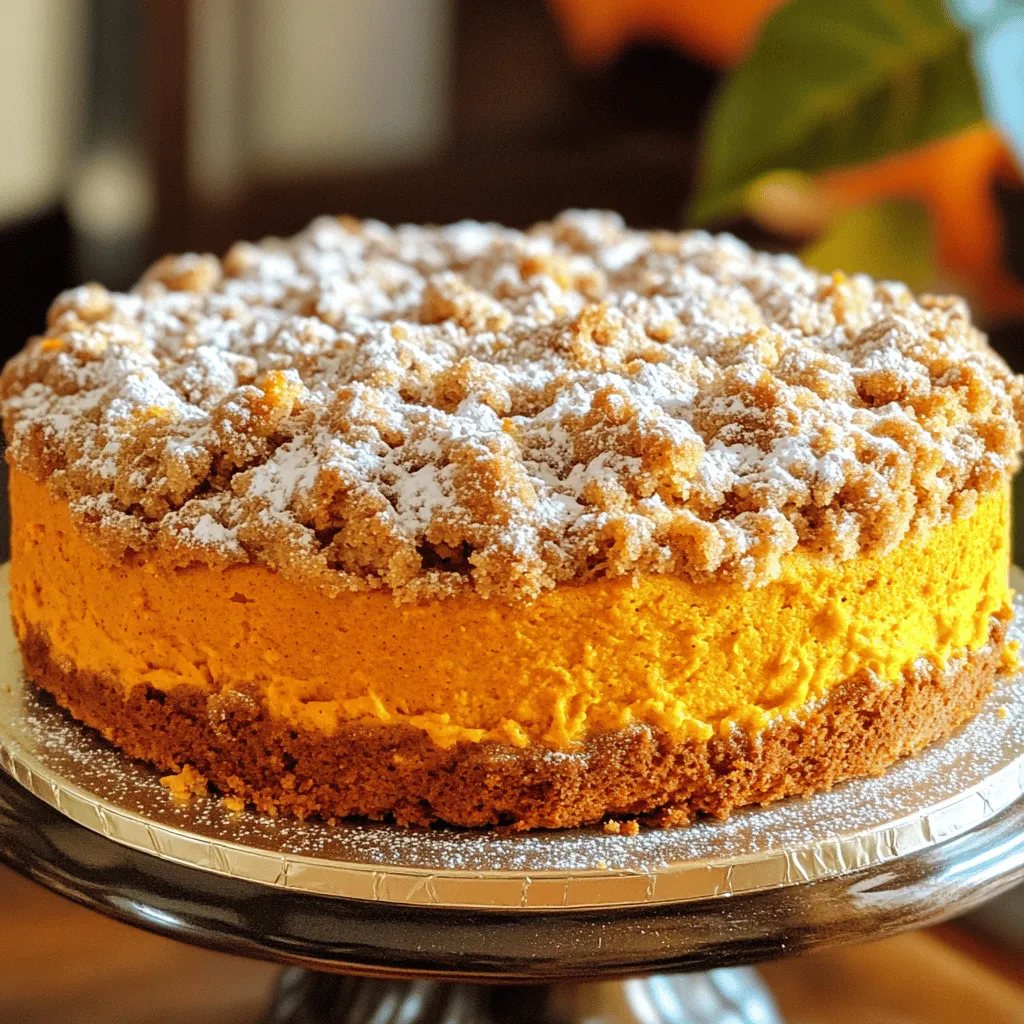
Cinnamon Streusel Pumpkin Coffee Cake Delightful Treat
Are you craving a cozy and delicious fall treat? My Cinnamon Streusel Pumpkin Coffee Cake will make your taste buds dance! With layers of warm
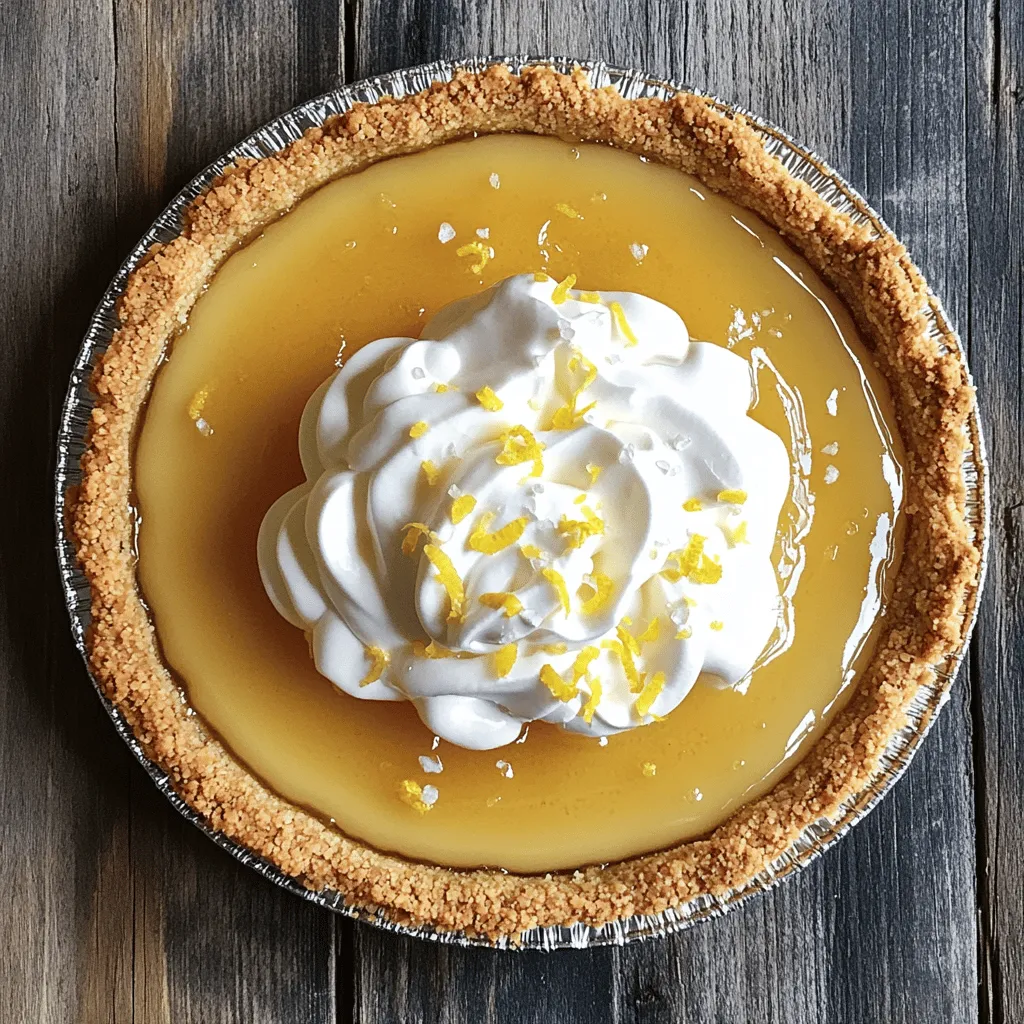
Salted Honey Pie Delightfully Sweet and Simple Recipe
Looking for a dessert that’s both sweet and simple? Let me introduce you to my Salted Honey Pie. This delightful treat combines the warm richness
![- 4 medium-sized apples (Granny Smith or Honeycrisp recommended) - 1 cup rolled oats - ½ cup packed brown sugar - 1 teaspoon ground cinnamon - ¼ teaspoon ground nutmeg - A pinch of salt - ¼ cup all-purpose flour - ½ cup unsalted butter, melted - ½ cup chopped pecans or walnuts (optional) When choosing apples, I love using Granny Smith or Honeycrisp. They bring the right balance of tartness. The oats and brown sugar create a rich base for the filling. The spices like cinnamon and nutmeg add warmth and depth to each bite. For the topping, the melted butter combines with flour and nuts, giving it a crunchy texture. You can skip the nuts if you want a simpler version. I often prepare this recipe with kids, who love to help fill the apples. If you want to make it even more special, serve the baked apples with vanilla ice cream or whipped cream on the side. This adds creaminess that pairs well with the crisp. For the full recipe, check the detailed guide above. - Preheat the oven to 350°F (175°C). - Core the apples without cutting through the bottoms. This keeps the juice inside. Use a corer or a knife. Be careful not to cut too deep. Set the cored apples aside. - Combine oats, brown sugar, cinnamon, nutmeg, flour, and salt in a bowl. - Mix in melted butter and vanilla extract. Stir until it looks crumbly. If you want a crunch, add chopped pecans or walnuts here. - Fill each apple with the oat mixture. Press it down gently. This makes sure the filling stays in. - Add about ¼ cup of water to the baking dish. This helps steam the apples. Cover the dish tightly with foil. - Bake for 25 minutes covered. After that, remove the foil. Bake for another 15-20 minutes. The apples should feel tender, and the topping should be golden brown. These steps make a simple yet delicious dessert. Enjoy the warm, sweet goodness of your baked apples! For the complete recipe, check out the Full Recipe. For the best apple crisp baked apples, I often use Granny Smith or Honeycrisp apples. These types have a nice mix of sweet and tart flavors. They hold their shape well when baked, too. You want apples that are firm, not soft. Soft apples can turn mushy and ruin the dish. To make your baked apples special, consider adding spices. You can use nutmeg or allspice for extra warmth. You might also add raisins or cranberries for a pop of color and sweetness. I sometimes mix in a bit of orange zest for a fresh taste. This tiny tweak can really brighten the dish. The topping is key to a great apple crisp. Use rolled oats for a chewy texture and add a bit of flour for binding. To get that perfect crunch, make sure to mix in melted butter well. For added crunch, toss in chopped nuts. I like pecans or walnuts. Bake until golden brown. This gives you that delightful crunch that everyone loves. For the complete recipe, check out the Full Recipe. {{image_4}} You can switch up the nuts or fruits in your baked apples. Try adding almonds or hazelnuts for a new crunch. You can also mix in dried cranberries or raisins for a sweet touch. Each choice adds a unique flavor twist to your dish. Experiment with your favorite nuts to find the best combo. Want to make this dish gluten-free? Swap the all-purpose flour for almond flour or a gluten-free blend. For a vegan version, replace the butter with coconut oil and use maple syrup instead of brown sugar. You can also find vegan ice cream to serve on top. These changes let everyone enjoy this treat without worry. To make your dessert even better, serve it with a scoop of vanilla ice cream. The warm apples and cold ice cream mix perfectly. You can also add a drizzle of caramel sauce for extra sweetness. If you want a bit of spice, sprinkle more cinnamon on top. These ideas create a complete dessert experience that will impress your guests. You can find the full recipe for this delightful treat in the earlier sections. To keep your apple crisp baked apples fresh, place them in an airtight container. Store them in the fridge. They will stay good for about 3 to 4 days. When you want to enjoy them again, simply reheat in the oven. Preheat the oven to 350°F (175°C). Bake for about 10 minutes until warmed through. This keeps the topping crispy and delicious. You can freeze these baked apples for later enjoyment. Let them cool completely before freezing. Wrap each apple in plastic wrap, then place them in a freezer-safe bag. They can last up to 3 months in the freezer. When ready to eat, thaw them in the fridge overnight. Reheat them in the oven at 350°F (175°C) for about 15-20 minutes. In the fridge, expect your apple crisp baked apples to last 3 to 4 days. In the freezer, they can stay fresh for up to 3 months. Always check for signs of spoilage before consuming. Enjoy the tasty flavors at their best! Yes, you can prepare these baked apples in advance. Core the apples and mix the filling a day ahead. Keep them in the fridge until you’re ready to bake. This saves time and keeps the flavors fresh. Just remember to add a little water to the baking dish before baking. You can get creative with toppings! Instead of nuts, try using shredded coconut or sunflower seeds. You can also add a swirl of caramel sauce for extra sweetness. If you like chocolate, sprinkle some mini chocolate chips on top. Each option adds a fun twist to your baked apples. The apples are done when they are soft to the touch. You can poke them gently with a fork. The topping should be golden brown and crisp. If the apples feel firm, give them more time in the oven. Trust your senses for the best results! For a detailed recipe guide, visit [Full Recipe]. These baked apples are delicious and easy to make. We covered key ingredients, step-by-step instructions, and helpful tips to ensure success. You learned about variations, storage, and common questions. Now it's time for you to try this tasty treat. Enjoy every bite as warm flavors fill your home. Happy baking!](https://roastedflavors.com/wp-content/uploads/2025/07/9e34790b-ea15-4dcb-b82e-36d181bd3b88.webp)
Savory Apple Crisp Baked Apples Delightful Treat
Looking for a warm and tasty dessert? Try my Savory Apple Crisp Baked Apples! These sweet treats blend tender apples with a crunchy oat topping,
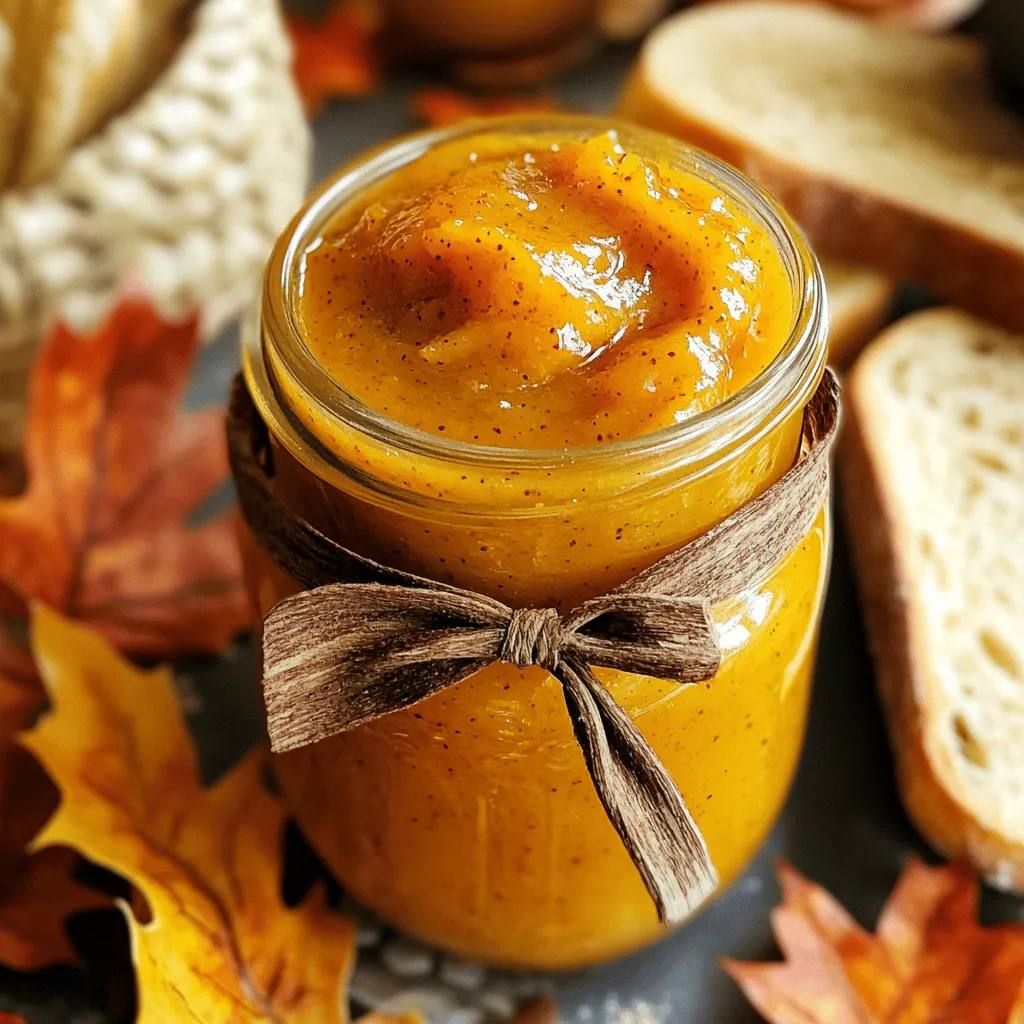
Easy Maple Pumpkin Butter Delightful Fall Spread
Are you ready to savor the rich flavors of fall? My Easy Maple Pumpkin Butter is the perfect blend of sweet and spicy, making it

Pancake Donuts Simple and Delicious Homemade Treats
Are you ready to enjoy a fun twist on a classic treat? Pancake donuts combine the fluffy goodness of pancakes with the sweet shape of
. Enjoy the process and get ready to savor these delicious cookies! Preheat your oven to 350°F (175°C). This step is key to even baking. Line a baking sheet with parchment paper. This keeps the cookies from sticking. Use room temperature ingredients for the best results. It helps them mix well and creates a smooth batter. In a large bowl, cream the softened butter and cream cheese together. Use an electric mixer for about 2-3 minutes until fluffy. This step adds air and lightness to the cookies. Now, add the granulated sugar, egg, and vanilla extract. Mix until everything is smooth, around 1-2 minutes. In another bowl, whisk together the flour, baking powder, cinnamon, nutmeg, and salt. This ensures even distribution of the dry ingredients. Gradually mix these into the butter mixture. Alternate adding dry ingredients with apple cider. Start with the dry mix and follow with cider. This method keeps the batter light and airy. Use a cookie scoop or a tablespoon to drop dough onto the baking sheet. Make sure to leave at least 2 inches of space between each scoop. This space allows the cookies to spread nicely. Bake in the preheated oven for 12 to 15 minutes. Look for lightly golden edges and a set center to know they are done. Let them cool for about 5 minutes before moving them to a wire rack. Enjoy your cookies drizzled with caramel and topped with nuts! For the complete recipe, check out the [Full Recipe]. To prevent cookies from spreading too much, chill the dough before baking. This helps them hold their shape. Use a cookie scoop for even-sized balls. This way, every cookie bakes evenly. For the ideal texture, use softened butter and cream cheese. This creates a soft and creamy base. Make sure to mix until light and fluffy. This adds air, making the cookies soft. You can spice up your cookies by adding more spices. Try a pinch of allspice or ginger for warmth. A dash of lemon zest can brighten the flavor. Using different types of apple cider changes the taste. Spiced cider adds warmth, while unfiltered cider gives a fresh twist. Experiment with what you like best! Serve your cookies on a rustic wooden platter. This looks great for holiday gatherings. Add fresh apple slices and a sprig of cinnamon sticks for a festive touch. Drizzling caramel can be fun! Use a spoon or squeeze bottle for a nice effect. Drizzle in zigzag patterns for an attractive finish. The caramel adds a sweet touch that everyone loves. {{image_4}} You can change up the flavor of these cookies easily. One fun twist is to make a pumpkin spice version. Just add pumpkin puree and swap out some spices. Use cinnamon, nutmeg, and ginger for that warm taste. You’ll enjoy a cozy fall flavor that everyone loves. Another option is to add chocolate chips. Mix in a cup of semi-sweet or dark chocolate chips into the dough. The rich chocolate pairs well with the apple cider and cream cheese. It makes each bite even more delightful. If you need gluten-free cookies, use gluten-free flour instead of all-purpose flour. This swap keeps the texture nice. It will still taste amazing! For a vegan option, replace the butter and cream cheese. Use coconut oil and a vegan cream cheese. Use a flax egg instead of a regular egg. You can mix one tablespoon of ground flaxseed with three tablespoons of water. Let it sit for a few minutes until it thickens. Your cookies will still be soft and tasty. You can dress up your cookies for the holidays. Add festive decorations like colored sprinkles or edible glitter. This makes them fun for parties or gift-giving. If you have leftover cider, use it in a warm drink. Mix it with spices and heat it up. You can also use cider in a glaze for your cookies. Just mix cider with powdered sugar for a sweet topping. This adds a nice touch to your treats. For the full recipe, check out the detailed instructions above. To keep your Apple Cider Cheesecake Cookies fresh, use an airtight container. Store them at room temperature. This will help maintain their soft texture. Avoid placing them in direct sunlight or near heat sources. If you have leftover cookies, they should stay fresh for about a week when stored this way. If you want to save some cookies for later, freezing is a great option. Place the cooled cookies in a single layer in a freezer-safe bag or container. Make sure to remove as much air as possible. You can freeze these cookies for up to three months. When you’re ready to enjoy them, take out the cookies and let them thaw at room temperature. For a warm treat, pop them in the oven at 350°F for about 5 minutes. When stored properly, these cookies can last up to a week at room temperature. In the freezer, they can last for up to three months. Always check for any signs of freezer burn or moisture when you take them out. Enjoy the delightful flavors of fall whenever you crave a sweet treat! For the full recipe, check out the link. To make your cookies thicker, use less apple cider. You can start with 1/3 cup instead of ½ cup. This helps the dough hold its shape better. You can also add a bit more flour, about 2-3 tablespoons. Chill the dough for 30 minutes before baking. This simple step can make a big difference. Yes, you can use mascarpone cheese. It has a similar texture and flavor. You can also try ricotta cheese for a lighter taste. If you use ricotta, make sure to drain it well to avoid excess moisture. This keeps the cookies from being too wet. If you don’t have apple cider, use apple juice as a substitute. You can also mix apple juice with a bit of lemon juice for a similar taste. Another option is to use white grape juice. These substitutes give your cookies a nice flavor without losing the essence of fall. The cookies are done when the edges are lightly golden. The centers should look set but still soft. A good rule is to take them out when they look slightly underbaked. They will firm up as they cool. Keep an eye on them during the last few minutes of baking. Yes, you can make the dough ahead of time. Chill the dough and wrap it tightly. Store it in the fridge for up to three days. You can also freeze the dough for up to three months. Just let it thaw in the fridge before baking. This way, you can enjoy fresh cookies anytime! This blog post covered all you need to make delicious cookies. You learned about essential ingredients, from butter to caramel. I shared step-by-step instructions and useful baking tips to ensure great cookies. Don't forget the variations for exciting flavors or dietary needs. These cookies are versatile and fun. With the right techniques, you can impress family and friends. Enjoy the baking process and make it your own. Happy baking!](https://roastedflavors.com/wp-content/uploads/2025/07/8066f664-be9c-422d-b65c-82e6ad1cbb6c.webp)
Apple Cider Cheesecake Cookies Irresistible Fall Treat
If you love fall flavors, you’re in for a treat! Apple cider cheesecake cookies blend the rich taste of cheesecake with the warm spices of