Desserts
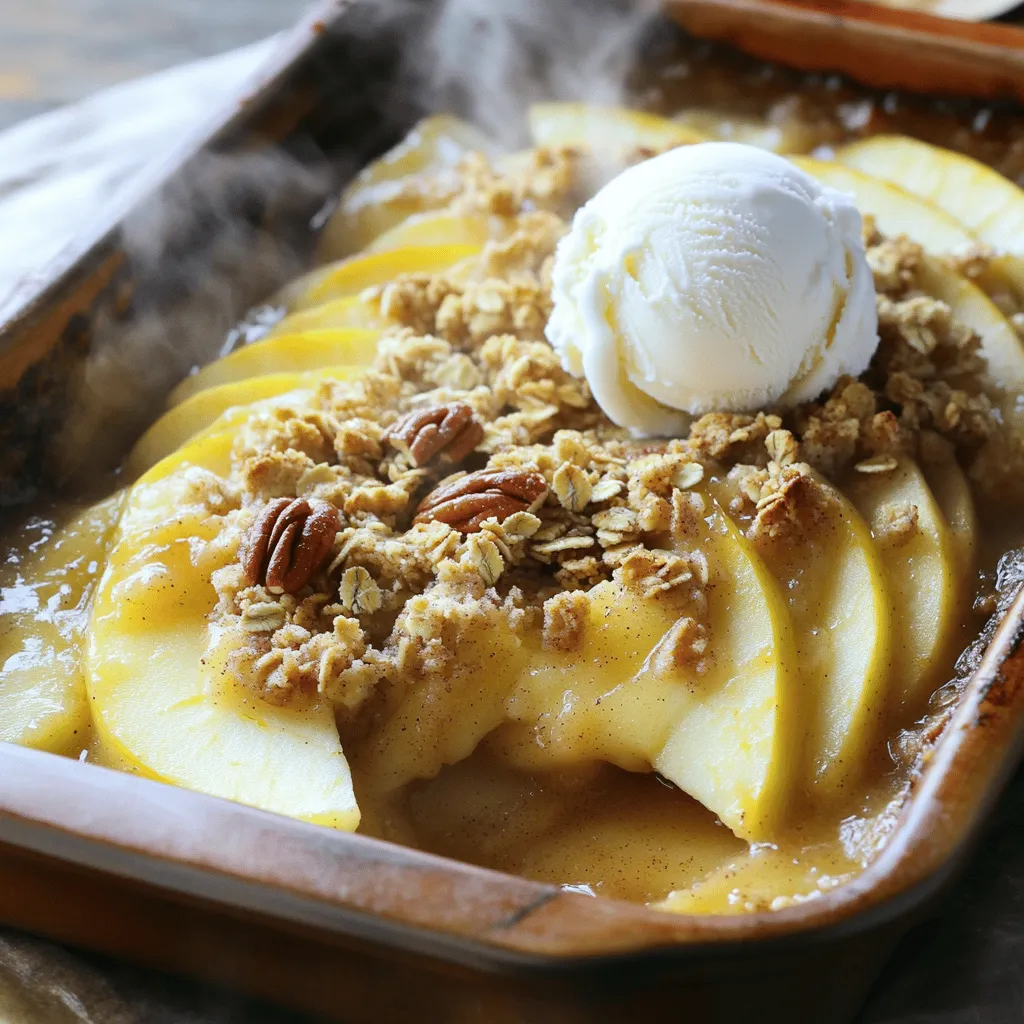
Insanely Good Fall Apple Desserts to Savor Now
Fall is here, and that means it’s apple season! If you’re craving something sweet and cozy, let me introduce you to Insanely Good Fall Apple
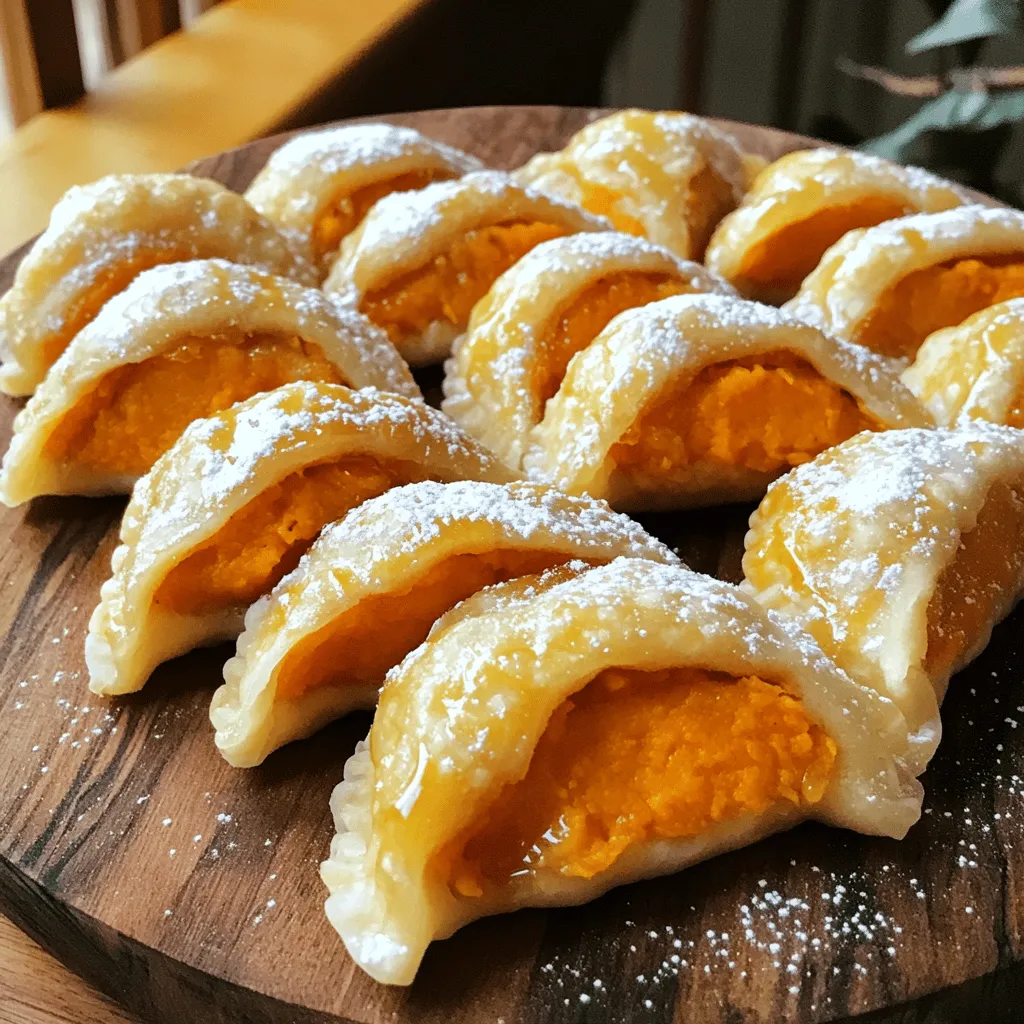
Maple Dumplings Delightful and Easy Homemade Recipe
If you love sweet treats, you’ll adore these Maple Dumplings! They are easy to make and full of flavor. Imagine fluffy dumplings drizzled with warm
![- 2 cups all-purpose flour - 1 ½ cups granulated sugar - ½ cup unsalted butter, softened to room temperature - 3 large eggs, at room temperature - 1 cup buttermilk, at room temperature These main ingredients create the base of your cake. The flour gives the cake structure. The sugar adds sweetness. Butter brings richness, while eggs help with binding. Buttermilk adds moisture and a slight tang. - 1 teaspoon freshly grated lemon zest - 1 cup strawberry jam, either homemade or your favorite brand The lemon zest brightens the flavor. It gives the cake a fresh note. Strawberry jam adds a fruity touch. This mix makes each bite delightful and fun. - Fresh strawberries - Powdered sugar Fresh strawberries enhance the look. They also add a burst of flavor. Dusting with powdered sugar gives a sweet finish. Together, they make the cake even more tempting and pretty. For the complete recipe, check the [Full Recipe]. 1. Preheating the oven: Start by preheating your oven to 350°F (175°C). This ensures the cake bakes evenly. 2. Greasing and flouring cake pans: Take two 9-inch round cake pans. Grease them well with butter or oil. Sprinkle flour into each pan, shaking off the excess. This step helps the cake come out easily after baking. 1. Creaming butter and sugar: In a large bowl, add ½ cup of softened butter and 1 ½ cups of granulated sugar. Use an electric mixer to beat them together until the mix is light and fluffy. This should take about 3-5 minutes. 2. Incorporating eggs, vanilla, and lemon zest: Add 3 large eggs, one at a time, mixing well after each. Now, add 1 teaspoon of pure vanilla extract and 1 teaspoon of freshly grated lemon zest. Mix until everything is well blended. 1. Whisking flour, baking powder, baking soda, and salt: In another bowl, whisk together 2 cups of all-purpose flour, 2 teaspoons of baking powder, 1 teaspoon of baking soda, and ½ teaspoon of fine salt. This helps to aerate the flour. 2. Alternating dry ingredients and buttermilk: Gradually add the dry mix to the butter mix. Alternate this with 1 cup of room temperature buttermilk. Start with one-third of the dry mix, then half of the buttermilk. Repeat, ending with dry ingredients. Mix gently until just combined. 1. Creating the marbled effect: Carefully fold in 1 cup of strawberry jam with a spatula. Do not fully mix it in; leave swirls to create a marbled look. Each slice will have lovely bursts of strawberry flavor. 1. Dividing the batter and baking: Pour the batter evenly into the two prepared pans. Smooth the tops with a spatula. 2. Cooling procedure: Bake for 25-30 minutes. To check if they are done, insert a toothpick in the center. If it comes out clean, they are ready. Let the cakes cool in the pans for 10 minutes, then transfer them to a wire rack. 1. Layering with strawberry jam: Once the cakes are cool, place one layer on a serving plate. Spread a thick layer of strawberry jam on top. Carefully add the second layer. 2. Dusting with powdered sugar and garnishing: Use a fine sieve to dust powdered sugar on top. Garnish with fresh strawberries for a beautiful look. You can find the full recipe for this delightful cake above. To make your cake soft and fluffy, always use room temperature ingredients. This includes butter, eggs, and buttermilk. They mix better and help create air in the batter. Avoid overmixing once you combine the wet and dry ingredients. Mix just until you see no dry flour. Overmixing can make your cake dense and tough. Use a toothpick to check if your cake is done. Insert it in the center of the cake. If it comes out clean, your cake is ready. To cool your cake without it getting soggy, place it on a wire rack. This allows air to circulate around it. If you leave it in the pan too long, moisture can build up. This cake shines when served at room temperature. Add a dollop of whipped cream or a scoop of vanilla ice cream for a tasty treat. For presentation, slice the cake neatly and arrange fresh strawberries on top. Dust it lightly with powdered sugar for a beautiful finish. You can also serve it on a colorful plate to make it pop. Enjoy the delightful flavors! {{image_4}} You can change the berries in this cake. Blueberries or raspberries work well too. Just swap them for strawberries. The cake will have a new flavor twist. You can also add lemon curd. This gives the cake an extra zing. The tart taste of lemon pairs nicely with sweet berries. If you need a gluten-free cake, use a gluten-free flour blend. This will keep the taste and texture great. You can also make this cake dairy-free. Use almond milk or coconut milk instead of buttermilk. These swaps help everyone enjoy the cake. Want to try something different? Add fresh herbs like basil or mint. These give a fresh taste that brightens the cake. You can also mix in nuts like walnuts or almonds. This adds a nice crunch and depth to each bite. For the full recipe, check the [Full Recipe]. To keep your Lemon Strawberry Jam Cake fresh, use an airtight container. This helps to lock in moisture and flavor. Make sure the cake is completely cooled before you store it. If you have leftover pieces, wrap them tightly in plastic wrap. This will help prevent them from drying out. You can freeze individual slices of the cake for later. Wrap each slice in plastic wrap, then place them in a freezer-safe bag. This keeps them fresh for up to three months. When you want to enjoy a slice, take it out of the freezer. Let it thaw at room temperature for about an hour. It will taste just as good as fresh! At room temperature, the cake stays delicious for about two days. If you want it to last longer, store it in the fridge. In the fridge, the cake remains tasty for about a week. Just remember to keep it in an airtight container to maintain its flavor. Enjoy your cake whenever you crave a sweet treat! Yes, you can use homemade strawberry jam. It adds a special touch. Fresh jam enhances the taste and texture. If you made your jam, it will work perfectly in this cake. Just be sure it has a nice spreadable consistency. You can use milk mixed with vinegar or lemon juice. Just add one tablespoon of vinegar or lemon juice to a cup of milk. Let it sit for about five minutes. This makes a great buttermilk substitute. To adjust sweetness, you can cut back on sugar. Try reducing the sugar by a quarter cup. You can also use a sugar substitute if you prefer. Just remember that it may change the texture a little. Yes, you can make this cake ahead of time. Bake it a day in advance and store it in an airtight container. This allows the flavors to blend nicely. Just add the jam and garnish on the day you serve. To cut the cake, use a sharp knife. Clean the knife between cuts for neat slices. Serve at room temperature for the best taste. You can add whipped cream or ice cream for extra delight. For added flair, place fresh strawberries on top. We explored the essential ingredients for a delicious cake and outlined the step-by-step process needed to create it. I shared tips to ensure the perfect texture and offered variations to cater to different tastes. In the end, this cake is not just a treat; it’s an opportunity to express your creativity. Keep experimenting and enjoy the process of baking! The journey brings joy, and the cake will delight all who taste it.](https://roastedflavors.com/wp-content/uploads/2025/07/8a73398b-d579-4728-927b-32d236ebc428.webp)
Lemon Strawberry Jam Cake Delightful and Easy Recipe
If you’re ready to treat yourself to something delicious, you’ve come to the right place! This Lemon Strawberry Jam Cake is not just easy to
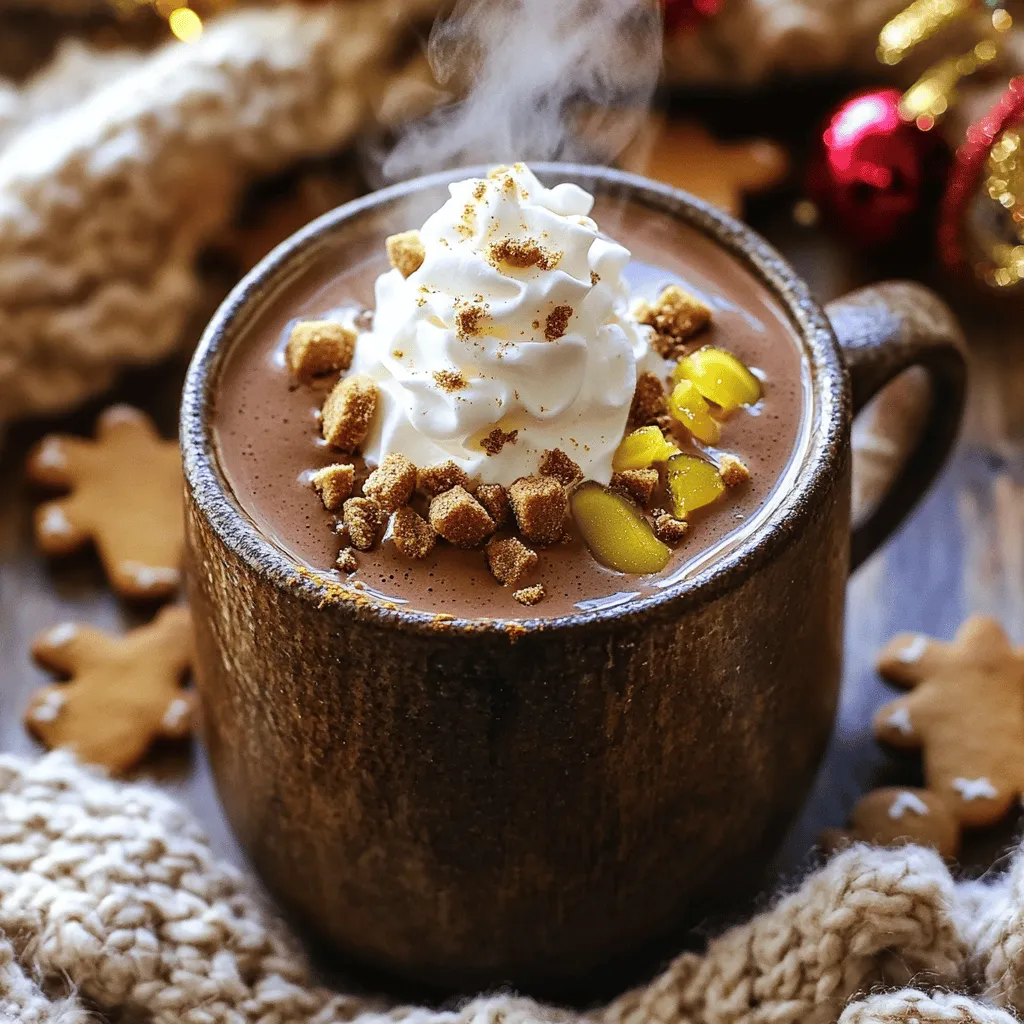
Cozy Up with Gingerbread Hot Chocolate Delight
Warm up your chilly evenings with a mug of Gingerbread Hot Chocolate Delight! This cozy beverage combines rich chocolate, creamy milk, and the warm spices
![To make these delightful cookies, gather the following ingredients: - 1 cup pumpkin puree - 1/2 cup unsalted butter, softened - 1 cup packed light brown sugar - 1/2 cup granulated sugar - 1 large egg - 1 teaspoon pure vanilla extract - 2 cups all-purpose flour - 1 teaspoon baking soda - 1/2 teaspoon baking powder - 1 teaspoon ground cinnamon - 1/2 teaspoon ground nutmeg - 1/4 teaspoon fine sea salt - 1 cup white chocolate chips - 1/2 cup chopped pecans (optional) When cooking, it helps to know conversions: - 1 cup = 240 ml - 1/2 cup = 120 ml - 1 teaspoon = 5 ml - 1 tablespoon = 15 ml You can use almond flour for a gluten-free option. Instead of pecans, try walnuts or leave them out. These cookies are tasty, but keep in mind: - They contain gluten from the flour. - The recipe includes dairy from butter. - Use vegan butter and dairy-free chocolate to make them vegan. Always check for allergies before sharing. Enjoy the flavors of fall with these sweet cookies! For the full recipe, see the previous section. Start by gathering your ingredients. This makes the process smooth and fun. I recommend measuring everything first. Preheat your oven to 350°F (175°C). Line two baking sheets with parchment paper. This prevents cookies from sticking and makes cleanup easy. 1. Cream the Butter and Sugars: In a large bowl, mix the softened butter, brown sugar, and granulated sugar. Use an electric mixer or a whisk. Beat until it is light and fluffy, about 2-3 minutes. 2. Incorporate Pumpkin and Egg: Next, add the pumpkin puree, egg, and vanilla extract. Mix well until smooth and combined. 3. Mix Dry Ingredients: In another bowl, sift the flour, baking soda, baking powder, cinnamon, nutmeg, and salt. This step helps the cookies rise and adds flavor. 4. Combine Wet and Dry Mixtures: Gradually add the dry mix to the wet mix. Stir gently until just combined. Be careful not to overmix; this keeps your cookies soft. 5. Fold in Chips and Nuts: Gently fold in the white chocolate chips and pecans, if using. Make sure they are evenly spread in the dough. 6. Shape the Cookies: Use a tablespoon or cookie scoop to drop rounded dough on the baking sheets. Space them about 2 inches apart for even baking. 7. Bake: Place the sheets in your oven. Bake for 12-15 minutes. The edges should be lightly golden, and the centers should look soft but puffy. 8. Cool the Cookies: Remove the sheets from the oven. Let the cookies cool on the sheets for 5 minutes. Then, transfer them to wire racks to cool completely. - Do Not Overmix: Overmixing can make cookies tough. Mix until just combined. - Watch the Time: Keep an eye on the cookies while they bake. They should look soft but set. - Cool Completely: Letting cookies cool on a wire rack helps keep them soft and chewy. For the full recipe, refer to the detailed instructions earlier. Enjoy baking these delightful treats! Baking can be tricky, especially with pumpkin white chocolate chip cookies. One common mistake is using too much flour. Always measure flour correctly by spooning it into the cup, then leveling it off. Another mistake is overmixing the dough. Mixing too long can lead to tough cookies. Mix just until everything blends. Finally, don’t skip chilling the dough. Chilling helps the cookies hold their shape. To keep your cookies soft and chewy, use brown sugar. Brown sugar adds moisture and gives a rich flavor. Adding more pumpkin puree can also help. It keeps the cookies moist. Bake them just until the edges are golden. The centers should look soft and puffy. Letting the cookies cool on the baking sheet for a few minutes helps them set perfectly. Creaming the butter and sugars well is key. I recommend beating them for about 2-3 minutes. This adds air and makes your cookies light. Use room temperature butter for the best results. When mixing in the dry ingredients, do it slowly. Gradually add the flour mixture to the wet one. This helps avoid lumps and keeps the dough smooth. For the best flavor, fold in the white chocolate chips gently. This keeps them intact and evenly distributed. For the full recipe, check out the details above! {{image_4}} You can make these cookies gluten-free. Use a gluten-free flour blend. Look for blends that include xanthan gum. This helps mimic the texture of wheat flour. Your cookies will still be soft and chewy. Just be sure to read the labels carefully. Want to mix it up? You can add spices to boost flavor. Try adding ginger or allspice for warmth. A pinch of cloves can also work wonders. If you like heat, add a bit of cayenne pepper. Start with a small amount and adjust to taste. Looking for new flavors? You can swap white chocolate chips for dark chocolate. Butterscotch chips or caramel bits are delicious, too. For a nutty crunch, add walnuts or almonds instead of pecans. You can even stir in dried fruits like cranberries or raisins. Each choice brings a new twist to this classic cookie. For the full recipe, check out the details above! To keep your pumpkin white chocolate chip cookies fresh, store them in an airtight container. This helps lock in moisture and flavor. You can use a plastic container or a resealable bag. Place a piece of bread in the container to keep the cookies soft. The bread will absorb excess air and moisture. This simple trick works wonders! You can freeze these cookies for later enjoyment. First, let the cookies cool completely. Then, place them in a single layer on a baking sheet. Freeze them for about an hour. Once frozen, transfer the cookies to a freezer-safe bag. Make sure to label the bag with the date. They can last up to three months in the freezer. Thaw them at room temperature or warm them in the oven for a quick treat. When stored properly, these cookies last about one week at room temperature. If you want to enjoy them later, you can reheat them. Preheat your oven to 300°F (150°C). Place the cookies on a baking sheet and warm them for about 5 minutes. This makes them soft and delicious again. Enjoy these treats fresh out of the oven! For the full recipe, check out the recipe section above. Yes, you can use fresh pumpkin. First, cook the pumpkin until soft. Then, mash it well. Make sure to drain excess water. This keeps your cookies from getting too wet. You will need about 2 cups of fresh pumpkin for this recipe. Check the edges of the cookies. They should be lightly golden brown. The centers will look soft and puffy. You can also do a gentle poke. If it springs back, they are ready. Remember, cookies will firm as they cool. Serve these cookies warm or at room temperature. Pair them with a glass of milk or hot cider. They are perfect for fall gatherings. You can also dust them with a bit of powdered sugar for a sweet touch. Absolutely! Chopped pecans add great flavor and crunch. You can also try walnuts or almonds. Just fold them in with the chocolate chips. This adds texture and a lovely nutty taste. Place the cookies in an airtight container. This keeps them fresh for several days. You can also layer them with parchment paper to avoid sticking. If you want to keep them longer, freeze them. Yes, you can! Prepare the dough and chill it in the fridge. This makes it easy to bake fresh cookies later. Just wrap it well in plastic wrap. It will stay good for up to three days. If your dough feels too sticky, add a little more flour. Start with a tablespoon at a time. Mix gently until you reach the right consistency. It should be soft but not stick to your hands. Yes, feel free to swap white chocolate with milk or dark chocolate. You can even use a mix of chocolates for a fun twist. Just make sure to chop large chocolate bars into small pieces. For the full recipe, click [Full Recipe]. We explored how to make delicious pumpkin white chocolate chip cookies. We covered ingredients, including measurements and substitutions, so you can make them easily. You learned step-by-step instructions that ensure perfect cookies every time. I shared tips to avoid common mistakes and how to store your treats for freshness. Experimenting with variations adds fun to the recipe. Enjoy this flavorful treat. Feel free to explore and make it your own!](https://roastedflavors.com/wp-content/uploads/2025/07/3bd6fa7e-b854-4573-9696-0b1b7bc6e376.webp)
Pumpkin White Chocolate Chip Cookies Delightful Treat
Do you love the cozy taste of fall? Let’s dive into making Pumpkin White Chocolate Chip Cookies! These treats are soft, sweet, and bursting with
![- 2 medium apples (Granny Smith or Honeycrisp) - 1/4 cup packed brown sugar - 1 teaspoon ground cinnamon - 1/8 teaspoon ground nutmeg - 1 tablespoon fresh lemon juice - 1 tablespoon unsalted butter - 10 egg roll wrappers - Vegetable oil for frying - Powdered sugar for dusting (optional) - Vanilla ice cream (optional, for serving) Using fresh ingredients makes a big difference. I like to use Granny Smith or Honeycrisp apples. They stay crisp and add a nice tartness. You will also need brown sugar to sweeten the filling. Cinnamon and nutmeg give it warmth and depth. A touch of lemon juice brightens the flavors. Butter is key for cooking the apples. It adds richness and helps them soften. The egg roll wrappers create a crunchy shell. They hold the filling inside and fry up nicely. Vegetable oil is best for frying. It heats well and cooks the egg rolls evenly. You can dust the rolls with powdered sugar for sweetness. A scoop of vanilla ice cream makes it extra special. This combo creates a fun dessert that everyone loves. For the full recipe, check the details on how to prepare these delicious treats! To make the filling, start by cooking the apples. I use unsalted butter in a medium saucepan. Heat it over medium heat until it melts. Next, add the diced apples along with brown sugar, lemon juice, ground cinnamon, and nutmeg. Stir everything to coat the apples well. Cook this mixture for about 5-7 minutes. You want the apples tender but still firm. Once done, remove the pan from heat and let the filling cool slightly. Now, it's time to assemble the egg rolls. Place an egg roll wrapper on a clean, dry surface. Position it with one corner facing you, like a diamond. Take 2-3 tablespoons of the cooled apple filling and spoon it onto the lower corner of the wrapper. First, fold the bottom corner over the filling. Next, fold in the sides. Now, roll the wrapper towards the top corner. Make sure to keep it tight. Dampen the edges with a small bit of water to help seal it. Repeat this with the rest of the wrappers and filling. For frying, pour vegetable oil into a deep skillet or pan. You want enough oil to cover the bottom by about one inch. Heat the oil over medium-high heat until it reaches 350°F (175°C). To check if the oil is ready, drop in a small piece of bread. If it sizzles, it's time to fry. Carefully place 2-3 egg rolls into the hot oil. Avoid putting too many in at once, as this can lower the oil temperature. Fry for 2-3 minutes on each side until they are golden brown and crispy. Use a slotted spoon to take them out and place them on a plate with paper towels to drain excess oil. For the full recipe, check out the earlier section. Enjoy making these fun treats! To make sure your egg rolls are not soggy, always use dry apples. After dicing, pat them with a paper towel. This helps remove excess moisture. Another tip is to fry them right after you assemble them. If you wait too long, the filling can make the wrappers soggy. For even cooking, keep the oil temperature steady. Ideal frying temperature is 350°F (175°C). Use a thermometer to check. If the oil is too cool, the egg rolls will absorb more oil and become greasy. If it’s too hot, they can burn before cooking through. I love to top my egg rolls with powdered sugar for a sweet finish. A sprinkle makes them look fancy and taste great. You can also serve them with a scoop of vanilla ice cream. The cold ice cream pairs perfectly with the warm egg rolls and makes each bite special. Another fun idea is to create a dessert platter. Arrange the egg rolls with fresh fruits, whipped cream, or caramel sauce. This makes for a great party treat or family dessert night. One big mistake is frying at the wrong temperature. If the oil is not hot enough, the egg rolls will soak up too much oil and become soggy. Always test your oil with a small piece of bread before frying. Another common issue is overfilling the egg rolls. If you add too much filling, they can burst open while frying. Stick to 2-3 tablespoons of filling for each roll. This ensures a secure seal and a nice bite every time. For the full recipe, check out the [Full Recipe]. {{image_4}} You can play with different apple types in this recipe. Granny Smith gives a nice tartness. Honeycrisp adds sweetness and crunch. You could even mix apples for more flavor. Adding caramel or nuts to the filling can also enhance taste. Caramel adds a rich, gooey layer. Nuts like walnuts or pecans add a crunchy texture. Just chop them small so they mix well with the apples. If you prefer baking, you can achieve great results. Preheat your oven to 400°F (200°C). Place the egg rolls on a baking sheet. Brush them lightly with oil for crispiness. Bake for 15-20 minutes, flipping halfway through. Your egg rolls will be golden and delicious. For an air fryer, set it to 375°F (190°C). Arrange the egg rolls in a single layer. Cook for about 10-12 minutes, shaking the basket halfway. This method gives you a crispy result without frying. You can change the filling based on the season. In fall, try adding pumpkin or cranberries. This gives a festive twist to your egg rolls. For summer, use berry fillings like blueberries or strawberries. They add a bright flavor and color. Just remember to adjust the sugar based on the fruit's sweetness. For the full recipe, check the beginning of this article. Enjoy your cooking! To keep your apple pie egg rolls fresh, place them in an airtight container. Store them in the fridge for up to three days. When you want to enjoy them again, reheat them in the oven. Set the oven to 350°F (175°C) and bake for 10-15 minutes. This way, they regain their crispiness. You can freeze apple pie egg rolls before or after frying. If freezing before frying, wrap each egg roll tightly in plastic wrap. Place them in a freezer bag to prevent freezer burn. They can last for about three months. If you fry them first, let them cool completely, then freeze in a single layer. After freezing, transfer them to a freezer bag. When you’re ready to eat frozen egg rolls, reheat them in the oven at 375°F (190°C) for 15-20 minutes. This helps them stay crispy. In the fridge, apple pie egg rolls last for about three days. In the freezer, they can stay good for up to three months. Keeping them sealed properly helps maintain their quality. Enjoy your treats at their best! Yes, you can use store-bought apple pie filling. Here are some pros and cons: - Pros: - Saves time and effort. - Consistent taste and texture. - No need to cook apples. - Cons: - May lack freshness. - Less control over spices. - Might be too sweet for some. Using pre-made fillings can work well in a pinch. Just check the label for quality. To make your egg rolls less greasy, try these tips: - Oil Management: - Use enough oil to cover the bottom of the pan. - Heat oil to 350°F (175°C) for best frying results. - Fry in small batches to avoid crowding. - Baking Method: - Brush or spray egg rolls lightly with oil. - Bake at 400°F (200°C) for 15-20 minutes. - Flip halfway through for even cooking. These methods help keep your egg rolls crispy and light. If your egg roll wrappers tear, follow these steps: - Repairing Tears: - Use a little water to seal the edges. - Patch small tears with an extra piece of wrapper. - Preventing Tears: - Keep wrappers covered with a damp cloth. - Avoid overfilling to reduce stress on the wrapper. Taking these steps can help keep your egg rolls intact during cooking. Apple pie egg rolls are a fun twist on a classic. We covered the best ingredients, step-by-step instructions, and tips for perfect results. You can play with filling flavors or try baking too. Remember to store leftovers properly for the best flavor. With this knowledge, you can make tasty treats that impress everyone. Enjoy your delicious creations and share them with friends and family!](https://roastedflavors.com/wp-content/uploads/2025/07/83531d27-5e3d-45f5-9476-6b2c2ee3b494.webp)
Easy Apple Pie Egg Rolls Tasty and Fun Dessert Treat
Get ready to bite into a delightful twist on a classic dessert! My Easy Apple Pie Egg Rolls combine the sweet, spiced goodness of apples
![- 1 cup unsweetened cocoa powder - 1 cup all-purpose flour - 1 teaspoon baking powder - ½ teaspoon salt - 1 cup granulated sugar - ½ cup unsalted butter, melted - 2 large eggs - 1 teaspoon vanilla extract - 8 oz cream cheese, softened - ½ cup canned pumpkin puree - ⅓ cup granulated sugar - 1 large egg - 1 teaspoon ground cinnamon - ½ teaspoon ground nutmeg - 1 teaspoon vanilla extract For these pumpkin cheesecake brownies, I use simple ingredients. The brownie base has cocoa powder, flour, and eggs. You mix the melted butter and sugar for a rich flavor. Then, you add in the eggs and vanilla for extra taste. The pumpkin cheesecake layer brings a lovely twist. Cream cheese blends with pumpkin puree for creaminess. The spices like cinnamon and nutmeg add warmth. You also use sugar and an egg to bind it all together. These ingredients make a great mix of flavors and textures. The brownies are rich and fudgy, while the pumpkin cheesecake is creamy and smooth. Together, they create a perfect dessert for any occasion. For the complete recipe, check out the [Full Recipe]. - Preheat the oven to 350°F (175°C). - Prepare the baking pan by greasing it or lining it with parchment paper. - In a medium bowl, whisk together the cocoa powder, flour, baking powder, and salt. - In a larger bowl, mix the melted butter and sugar. Add eggs one at a time, then stir in the vanilla. - Gently fold the dry mixture into the wet mixture until just combined. - In another bowl, beat the cream cheese until smooth. - Mix in the pumpkin puree, sugar, egg, cinnamon, nutmeg, and vanilla. Stir until creamy and lump-free. - Spread this mixture over the brownie batter in the pan. - Pour the remaining brownie batter on top of the cheesecake layer. - Use a knife or skewer to swirl the two batters together for a marbled look. - Bake in the preheated oven for 30-35 minutes. Check for doneness using a toothpick; it should come out clean or with a few moist crumbs. Once baked, let them cool for about 15 minutes in the pan. Then, transfer them to a wire rack to cool completely. This will make slicing easier later. For the full recipe, check out the details above! To get the best brownie texture, mix the wet and dry ingredients well. Start by whisking the dry ingredients first, then add them to the wet mix. This ensures even blending. Use a spatula to fold in the dry mix gently. Avoid stirring too much; this keeps your brownies fudgy. To prevent overbaking, set a timer for 30 minutes. Check them with a toothpick. If it comes out with a few moist crumbs, they are done. If you bake too long, they can turn dry. Adding spices can make your brownies even better. Try mixing in a pinch of ginger or allspice for warmth. You can also sprinkle in some chocolate chips for extra richness. Nuts like walnuts or pecans add a nice crunch. For serving, dust your brownies with powdered sugar to make them look fancy. A drizzle of caramel sauce adds sweetness and charm. For a creamy touch, serve with whipped cream or a scoop of vanilla ice cream. Each bite will be a delightful mix of flavors. Check out the Full Recipe for more details! {{image_4}} You can make pumpkin cheesecake brownies gluten-free. Use a gluten-free flour blend instead of all-purpose flour. Look for options that contain a mix of rice flour, almond flour, or oat flour. These blends can mimic the texture of regular flour well. You may need to adjust the baking time. Start checking for doneness a few minutes early to avoid overbaking. If you want a healthier treat, consider using low sugar or sugar substitutes. Options like stevia or monk fruit sweetener work well. They keep the sweetness without the extra calories. For the cheesecake layer, you can swap out cream cheese for a lighter option like Greek yogurt. It gives a nice tang and keeps the texture creamy. You can also find reduced-fat cream cheese for a similar taste with fewer calories. To keep your pumpkin cheesecake brownies fresh, you have two main options: room temperature or refrigeration. If you plan to eat them within two days, storing them at room temperature works fine. Just place them in an airtight container to avoid drying out. If you want to save them for longer, refrigerate them. This way, they stay moist and tasty for up to a week. For freezing, cut the brownies into squares before wrapping them. Use plastic wrap, then place them in a freezer-safe bag. This method keeps them safe from freezer burn. When you're ready to enjoy them, let them thaw at room temperature or pop them in the microwave for a few seconds. In the fridge, your brownies can last about a week. They may lose some freshness after a few days, but they'll still taste great. When frozen, they can last for up to three months. Just remember to wrap them well to keep their flavor intact. For the best taste, eat them sooner rather than later. Enjoy your delicious pumpkin cheesecake brownies whenever the craving strikes! Yes, you can make these brownies ahead of time. To prepare in advance, bake the brownies, allow them to cool, and store them in an airtight container. They can sit at room temperature for up to three days. For longer storage, freeze them. When you want to enjoy them, thaw them in the fridge overnight. This keeps them fresh and tasty. Absolutely! Adding nuts or chocolate chips can enhance the flavor and texture. I recommend using walnuts or pecans for a nice crunch. You can also mix in semi-sweet or dark chocolate chips for extra richness. Just fold them into the brownie batter before spreading it in the pan. If you want to skip cream cheese, try mascarpone or Greek yogurt. Both give a creamy texture. You can also use silken tofu for a dairy-free version. Blend it until smooth and mix in the pumpkin and spices. This keeps the cheesecake layer rich and tasty without using cream cheese. Watch for a few signs while baking. The edges should pull away from the pan. You can also insert a toothpick into the center. If it comes out clean or with a few moist crumbs, your brownies are ready. Keep an eye on them to avoid overbaking, which can lead to dry brownies. Enjoy the process! This blog post covered a delicious recipe for brownies with pumpkin cheesecake swirl. You learned key ingredients, step-by-step instructions, and tips to perfect your dessert. Consider variations to suit your needs, like gluten-free options or healthier ingredients. Also, I shared storage tips to keep your brownies fresh longer. Enjoy making this treat, and feel free to experiment. Both the brownies and cheesecake layer can shine with your own touch. Happy baking!](https://roastedflavors.com/wp-content/uploads/2025/07/d350ab57-b691-451c-a115-dc8585fec6e2.webp)
Pumpkin Cheesecake Brownies Decadent and Easy Treat
Are you ready to indulge in a dessert that combines two favorites: pumpkin and chocolate? These Pumpkin Cheesecake Brownies are not just easy to make;
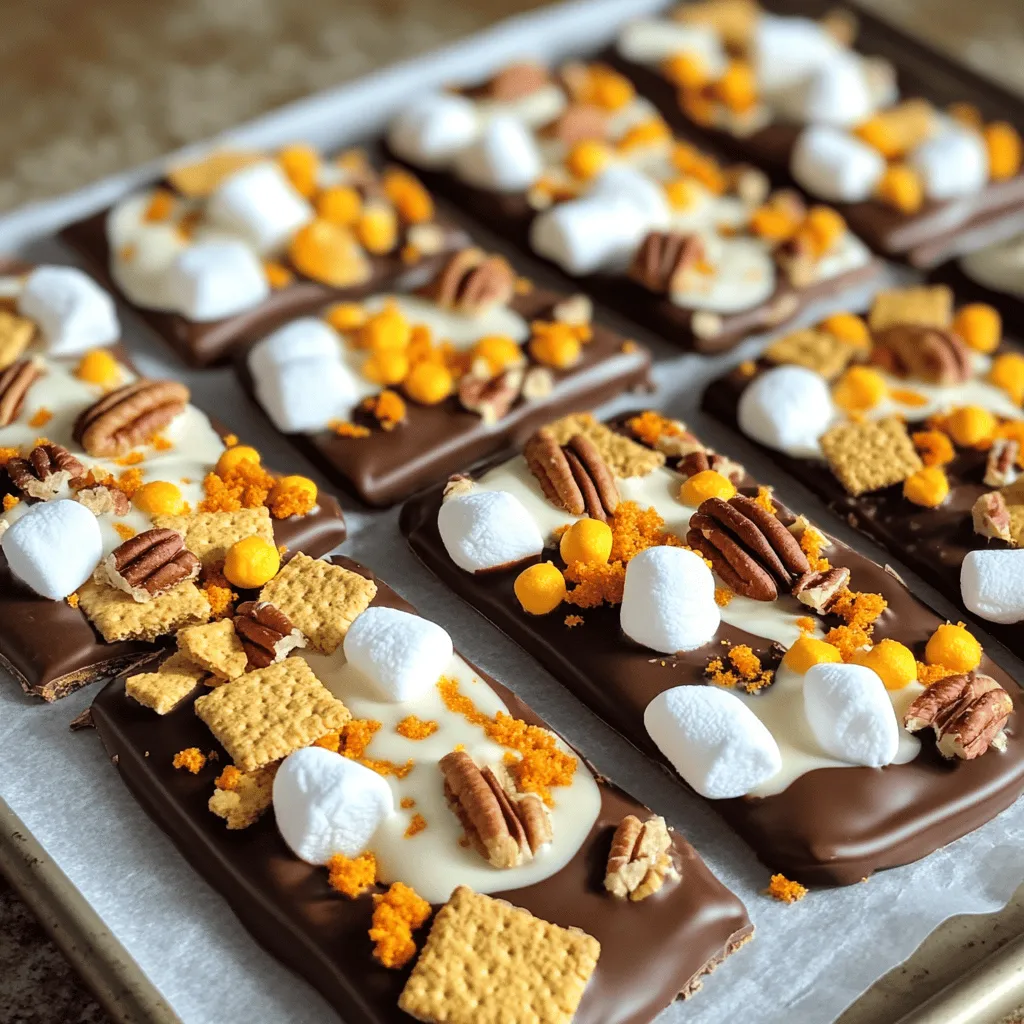
Pumpkin Spice Latte Bark Irresistible Fall Treat
Fall is here, and it’s time to indulge in a cozy treat! Pumpkin Spice Latte Bark is an easy and delicious way to enjoy this
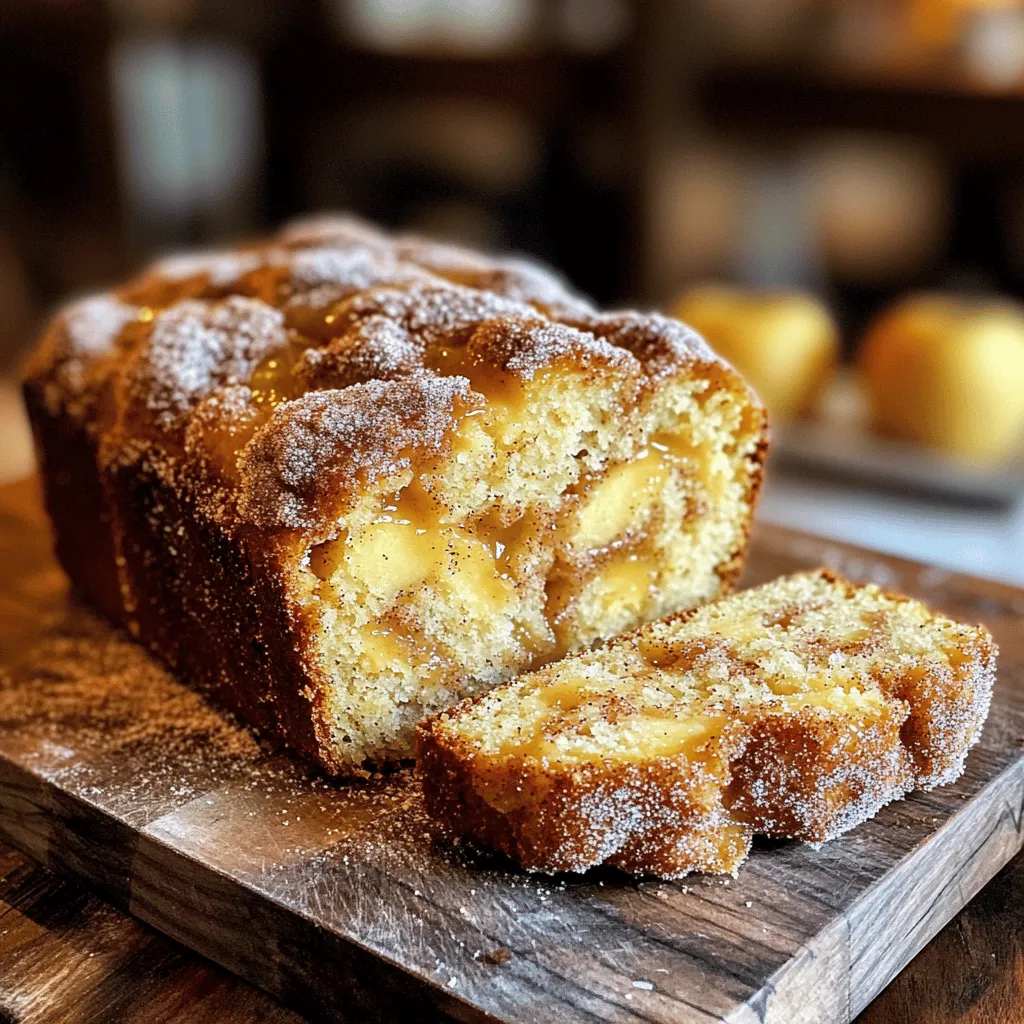
Spiced Apple Cider Donut Loaf Delightful and Easy Recipe
If you’re craving a cozy fall treat, you’ve come to the right place! This Spiced Apple Cider Donut Loaf is as delicious as it is
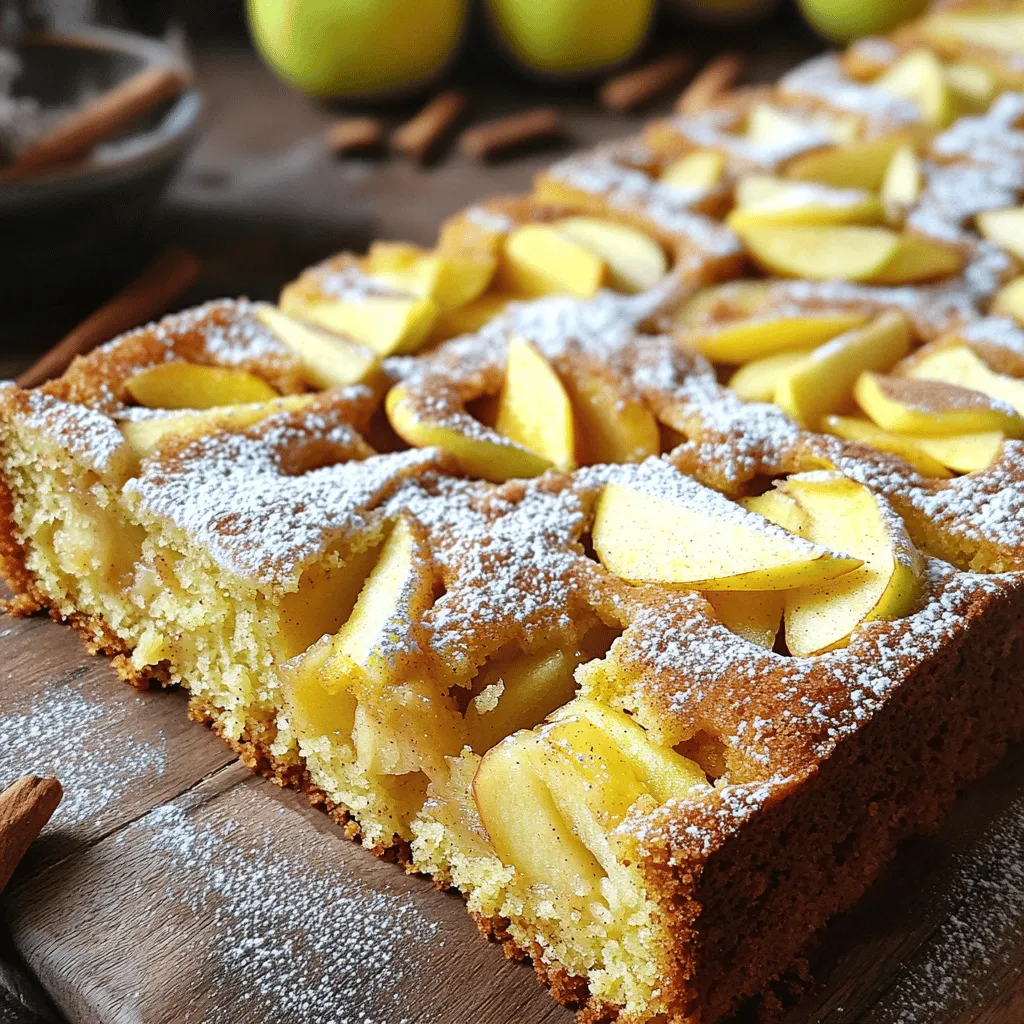
Jamie Oliver Apple Pie Cake Delightful and Simple Recipe
Are you ready to impress your family and friends with a delightful dessert? Jamie Oliver’s Apple Pie Cake blends the warm, sweet flavors of traditional