Desserts
![- 2 cups all-purpose flour - 1/2 cup granulated sugar - 1 tablespoon baking powder - 1/2 teaspoon salt - 1/4 teaspoon ground cinnamon - 1/4 teaspoon ground nutmeg - 1/2 cup unsalted butter, melted - 1/2 cup apple cider - 1 large egg - 1 sweet apple (such as Honeycrisp), peeled, cored, and diced - 1/4 cup brown sugar (for the filling) - 1 teaspoon vanilla extract - 1 tablespoon ground cinnamon (for the filling) When I bake, I love to gather fresh ingredients. For this apple cider pull-apart bread, you need a few simple items. Make sure your apples are sweet. Honeycrisp works great, but any sweet apple will do. The spices like cinnamon and nutmeg give the bread warmth. The melted butter adds richness. And, of course, the apple cider is key. It gives the bread its lovely flavor. Before starting, check that you have everything. This way, you can enjoy baking without running around. Remember, the right ingredients make all the difference. If you want the full recipe, just check the link. - Prep Time: 15 minutes - Total Time: 50 minutes - Servings: 8 slices This recipe is quick and easy. You can prep the dough in just 15 minutes. Then, in about 35 minutes, your bread will be done. This makes eight slices, perfect for sharing. - Preheat your oven to 350°F (175°C). - Grease a 9x5 inch loaf pan with butter or cooking spray. - In a large bowl, mix 2 cups of all-purpose flour, 1/2 cup of granulated sugar, 1 tablespoon of baking powder, 1/2 teaspoon of salt, 1/4 teaspoon of ground cinnamon, and 1/4 teaspoon of ground nutmeg. - In a separate bowl, blend 1/2 cup of melted butter, 1/2 cup of apple cider, 1 large egg, and 1 teaspoon of vanilla extract. - Pour the wet mixture into the dry ingredients. Stir gently with a spatula until just combined. A few lumps are okay. - Carefully fold in 1 sweet apple, peeled, cored, and diced. - In a small bowl, mix 1/4 cup of brown sugar with 1 tablespoon of ground cinnamon for the filling. - Shape small chunks of dough into flat disks. Place a spoonful of the cinnamon-sugar filling on each disk. Fold the dough over the filling. - Arrange the filled dough pieces in the loaf pan, stacking them tightly. - Bake the bread for 30-35 minutes until golden brown. Use a toothpick to check doneness; it should come out clean. - Let the bread cool in the pan for about 10 minutes. Then, transfer it to a wire rack to cool completely before slicing. For the full recipe, refer to the earlier section. Enjoy the warm and delicious Apple Cider Pull-Apart Bread! - Do not overmix the dough. Overmixing can lead to tough bread. - Use room temperature ingredients for better blending. Cold ingredients can make mixing hard. - Serve warm with powdered sugar or caramel drizzle. This adds sweetness and charm. - Garnish with apple slices for an appealing look. Fresh apples enhance the dish's visual appeal. - If your bread is dense, check if you overmixed the dough. Dense bread often results from this mistake. - If the bread is undercooked, ensure you bake it longer. Insert a toothpick to check for doneness. If it comes out wet, give it more time. These tips will help you create the best apple cider pull-apart bread. For the full recipe, refer back to the ingredients and instructions provided earlier. {{image_4}} You can change the flavor of your Apple Cider Pull-Apart Bread with a few tweaks. - Add nuts or raisins for extra texture. They will give each bite a nice crunch. - Experiment with different spices, like cloves or ginger. These spices add warmth and depth to your bread. Making this bread fit your diet is easy. - Use almond flour for a gluten-free option. It gives a unique flavor and texture. - Substitute butter and egg with vegan options. You can try coconut oil and flaxseed meal. You can also make this bread special for the seasons. - Incorporate pumpkin puree for a fall twist. This adds moisture and a lovely color. - Add lemon zest for a refreshing spring flavor. It brightens the taste and lifts your spirits. Feel free to explore these variations to make your Apple Cider Pull-Apart Bread truly your own! For the full recipe, see the [Full Recipe]. To keep your Apple Cider Pull-Apart Bread fresh, store it in an airtight container at room temperature. This method helps retain moisture and flavor. If you live in a humid area, you might want to refrigerate it. Just wrap it tightly to prevent any drying out. Freezing is a great way to save leftover bread. To freeze it properly, slice the bread first. Wrap each slice in plastic wrap, then place them in a freezer bag. This keeps the slices separate for easy access. For best results, thaw the bread in the fridge overnight. You can also warm it in the oven for a few minutes before serving. At room temperature, your bread will stay fresh for about three days. Look for signs like a dry crust or a stale smell to know if it's bad. If you see mold, it’s time to toss it out. Keeping an eye on these signs ensures you enjoy your delicious treat at its best! How to make Apple Cider Pull-Apart Bread gluten-free? To make this bread gluten-free, use a gluten-free flour blend. Look for a blend that works well in baking. You may need to add more liquid. Always check the package for the right amounts. Can I use regular cider instead of apple cider? Yes, you can use regular cider. However, apple cider adds a sweeter flavor. This sweetness helps in making the bread more tasty and aromatic. How do I know when the bread is done baking? You can check if the bread is done using a toothpick. Insert it into the center. If it comes out clean, the bread is ready. The top should also look golden brown. What beverages pair well with this bread? This bread pairs well with warm drinks like apple cider or tea. You can also serve it with coffee for a nice morning treat. It goes well with milk too. Is this bread suitable for breakfast or dessert? Yes, this bread is great for both breakfast and dessert. Its sweet flavor makes it feel like a treat. You can serve it warm or at room temperature. Can I substitute apple cider with another liquid? You can use other liquids like orange juice or pear juice. These will change the flavor but can still taste great. Choose a juice that you enjoy. What can I use instead of butter? If you need a substitute for butter, use coconut oil or margarine. You can also use applesauce for a healthier option. This will change the texture slightly but still work. For the full recipe, check out the detailed steps above! This blog post covered the delicious Apple Cider Pull-Apart Bread recipe. You learned about the simple ingredients, easy preparation steps, and tips for success. I shared ways to add unique flavors and discussed how to store the bread for freshness. Enjoy experimenting with variations or serving it warm. By following these steps, you’ll create a delightful treat perfect for any occasion. Happy baking!](https://roastedflavors.com/wp-content/uploads/2025/08/bfdd3d63-63db-4358-a3b8-4a361b6cd269.webp)
Apple Cider Pull-Apart Bread Scrumptious and Easy Bake
Looking for a warm, cozy treat to brighten your day? Apple Cider Pull-Apart Bread is the answer! This easy bake combines the sweet flavor of
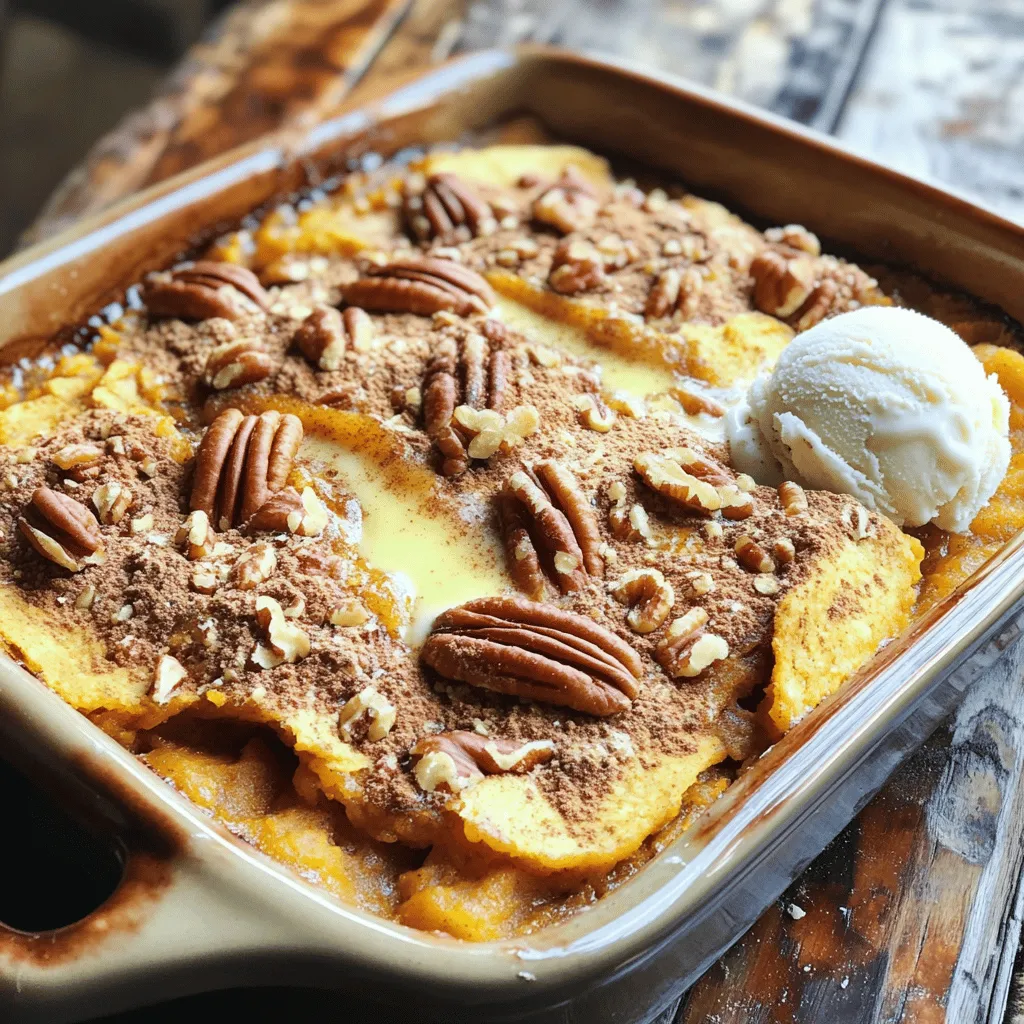
Pumpkin Pecan Cobbler Delightful Fall Dessert Recipe
Fall is here, and nothing says cozy like a warm slice of Pumpkin Pecan Cobbler. This delightful dessert blends rich pumpkin flavor with crunchy pecans
![- 1 can (16 oz) of refrigerated crescent roll dough - 1/2 cup packed brown sugar - 1 teaspoon ground cinnamon - 1 large Granny Smith apple, peeled, cored, and diced - 1/2 cup caramel sauce - 1/4 cup chopped pecans (optional) - 1/4 cup powdered sugar (for icing) - 1-2 tablespoons milk (for icing) If you want a different taste, try using a Honeycrisp or Fuji apple. These apples are sweet and juicy, adding a nice twist. For caramel sauce, you can make your own using sugar, cream, and butter. This homemade version is fun and extra tasty. You can make your rolls even more exciting by adding dried fruits like raisins or cranberries. If you're a chocolate lover, sprinkle in some chocolate chips for a delicious surprise. Both options will make your rolls unique and flavorful. For the full recipe, check the complete details above. 1. Preheat your oven to 350°F (175°C). Lightly grease a baking dish with cooking spray. This will help the rolls not stick. 2. Unroll the refrigerated crescent roll dough on a clean surface. Press the seams together to make a solid rectangle. This step is key for a nice roll. 1. In a small bowl, mix the brown sugar and cinnamon well. This makes a yummy cinnamon sugar mixture. 2. Sprinkle the cinnamon sugar evenly over the dough. Cover every inch for the best flavor. 3. Next, spread the diced apples across the cinnamon sugar. If you like, add chopped pecans for crunch. 1. Starting at a long edge, roll the dough tightly into a log. Seal the edges to keep the filling inside. 2. Cut the log into 8 equal pieces. Each roll should have some delicious filling. Place the rolls cut side up in your greased baking dish. 3. Drizzle caramel sauce over the rolls. Let it seep into the spaces between them. 4. Bake the rolls for 20-25 minutes. Look for a golden brown color. They should be cooked through but not burnt. 5. While the rolls bake, make the icing. Whisk together powdered sugar and milk until smooth. Adjust the milk until it’s just right. 6. Once the rolls are done, let them cool for a few minutes. Drizzle the icing over the warm rolls, letting it melt into every nook. For the full recipe, check out the details above. Enjoy your baking! To make your caramel apple cinnamon rolls even better, try these tips: - Add vanilla extract to the icing. A splash of vanilla gives a warm, rich taste. Just mix it in while whisking the powdered sugar and milk. - Use fresh spices for a better taste. Freshly ground cinnamon or nutmeg can lift the flavor. It makes a big difference in how your rolls taste. Avoid these common pitfalls to ensure your rolls turn out great: - Not sealing the dough properly. Make sure to press the seams together when rolling up the dough. This keeps the filling inside and prevents leaks. - Overbaking tips for perfect results. Keep an eye on the rolls during the last few minutes of baking. They should be golden brown but not too dark. If they look done, take them out! Here are some fun ideas for serving your rolls: - Pairing with ice cream or whipped cream. A scoop of vanilla ice cream or a dollop of whipped cream adds creaminess. It balances the sweet rolls perfectly. - Best ways to present the dish. Serve warm on a wooden platter. Drizzle extra caramel sauce over the top for a pretty look. Thinly sliced apples on the side add freshness and color. For the full recipe, check out the [Full Recipe]. {{image_4}} You can have fun with different flavors in these rolls. Try a pumpkin spice version in the fall. Just add pumpkin pie spice to the cinnamon sugar mix. It gives a warm taste that's perfect for the season. Another twist is a chocolate caramel version. Add mini chocolate chips to the filling. Mix them with the apples and brown sugar. This flavor is rich and sweet, making it a favorite for chocolate lovers. If you need gluten-free options, use gluten-free crescent roll dough. Many stores sell this now. It works just as well in the recipe. For vegan substitutions, swap the butter in the caramel for coconut oil. Use plant-based milk in the icing. You can also find vegan caramel sauce at some stores. These changes make the rolls suitable for everyone. You can make mini rolls or stick to traditional sizes. Mini rolls are great for parties. They are easy to grab and enjoy. For gatherings, try bite-sized portions. Slice the rolls smaller to serve more people. Everyone will love having a tasty treat in a small size. To keep your caramel apple cinnamon rolls fresh, store them in an airtight container. Place parchment paper between the rolls to prevent sticking. Refrigerate them for up to three days. If you want to save them longer, freeze them. Wrap each roll tightly in plastic wrap, then place them in a freezer bag. This helps keep the rolls fresh for about three months. To enjoy your rolls again, you can reheat them easily. The best method is using an oven. Preheat it to 350°F (175°C). Place the rolls on a baking sheet and cover them with foil. Heat for about 10-15 minutes until warm. If you're in a hurry, use the microwave. Place one roll on a microwave-safe plate and heat for 20-30 seconds. This method is quick, but it may make the rolls a bit softer. In the refrigerator, your caramel apple cinnamon rolls last for about three days. If you freeze them, they can stay good for up to three months. Just remember, the longer they sit, the more the taste may change. Always check for any signs of spoilage before eating. Enjoy your delicious treats while they are fresh! Yes, you can prepare these rolls ahead of time. Make the rolls up to the point of baking. Once you cut the rolls and place them in the baking dish, cover them with plastic wrap. You can store them in the fridge overnight. When you’re ready, bake them straight from the fridge. Just add a few extra minutes to the baking time. This way, you’ll have fresh rolls in the morning with no hassle. Both store-bought and homemade caramel sauce work great. Store-bought sauce is quick and easy. Look for a brand that uses simple ingredients. If you have time, making homemade caramel is fun and adds a personal touch. Homemade caramel gives you control over the flavor and sweetness. Use it to customize your rolls just how you like them. You can make simple swaps to reduce sugar and fat. Try using less brown sugar in the filling. Instead of white sugar, use natural sweeteners like honey or maple syrup. You can also replace some butter with applesauce. This will keep moisture without adding too much fat. Choose a low-fat milk for your icing, or skip it altogether. If you don’t have pecans, don’t worry! You can use other nuts like walnuts or almonds for a crunch. If nuts are not an option, leave them out. The rolls will still taste amazing. You can also use seeds like sunflower seeds for a nut-free option. They add a nice crunch and flavor too. This blog post covered how to make delicious cinnamon caramel apple rolls. We explored key ingredients and offered ideas for substitutions and add-ins. You learned step-by-step instructions from prep to baking, along with tips to enhance flavor and avoid common mistakes. We discussed variations to suit different tastes and dietary needs, plus storage and reheating tips. Now, you can confidently whip up these tasty rolls any time. Enjoy sharing them with friends and family, creating great memories together.](https://roastedflavors.com/wp-content/uploads/2025/08/9fc52d81-b857-4e54-b2ab-56b54c9270e9.webp)
Easy Caramel Apple Cinnamon Rolls Irresistible Delight
Craving a sweet treat that’s quick and easy? You’re in the right place! My Easy Caramel Apple Cinnamon Rolls are a warm, gooey delight everyone
![To create a Neapolitan Rose Cake, you need some key ingredients. Here’s the list: - 1 cup all-purpose flour - 1/2 cup unsweetened cocoa powder - 1 cup granulated sugar - 1/2 teaspoon baking soda - 1/2 teaspoon baking powder - 1/4 teaspoon salt - 1/2 cup unsalted butter, softened - 3 large eggs - 1 teaspoon vanilla extract - 1/2 cup milk - 1/2 cup heavy cream - 1/4 cup powdered sugar - Fresh strawberries for decoration - Edible rose petals for garnish These ingredients work together to create a rich and beautiful cake. You will also need some tools for this recipe. Here’s what you need: - 9-inch round cake pan - Mixing bowls - Electric mixer - Sifter - Spatula - Cooling rack - Measuring cups and spoons Having the right equipment makes the baking process smoother. To take your cake to the next level, consider these optional ingredients: - Almond extract for added depth - Different fruits like raspberries or blueberries - Dark chocolate shavings for a richer taste These extras can make your cake unique and even more delicious. For the full recipe, check out the [Full Recipe]. Start by gathering all your ingredients. You will need: - 1 cup all-purpose flour - 1/2 cup unsweetened cocoa powder - 1 cup granulated sugar - 1/2 teaspoon baking soda - 1/2 teaspoon baking powder - 1/4 teaspoon salt - 1/2 cup unsalted butter, softened - 3 large eggs - 1 teaspoon vanilla extract - 1/2 cup milk - 1/2 cup heavy cream - 1/4 cup powdered sugar - Fresh strawberries for decoration - Edible rose petals for garnish Next, preheat your oven to 350°F (175°C). Grease a 9-inch round cake pan and dust it with flour. This will prevent the cake from sticking. In a mixing bowl, sift together the flour, cocoa powder, baking soda, baking powder, and salt. Set this dry mixture aside. In another large bowl, cream the softened butter and granulated sugar with an electric mixer. Mix until the mixture becomes light and fluffy. This should take about 3 to 4 minutes. Add the eggs one at a time, mixing well after each addition. Then stir in the vanilla extract. Now, mix the dry ingredients into the butter-sugar mix. Alternate with the milk, starting and ending with the dry ingredients. Mix just until everything is combined. This is key for a soft cake. Pour the batter into the prepared cake pan. Use a spatula to smooth the surface. Bake in the preheated oven for 25 to 30 minutes. Check if the cake is ready by inserting a toothpick into the center. It should come out clean. After baking, let the cake cool in the pan for 10 minutes. Then transfer it to a wire rack to cool completely. Once the cake is cool, carefully slice it into two equal layers. In a separate bowl, whip the heavy cream with the powdered sugar until stiff peaks form. This will be your frosting. Spread a layer of whipped cream on the first cake layer. Top it with thinly sliced fresh strawberries. Place the second layer on top. Cover the top and sides of the cake with the remaining whipped cream. Decorate with more strawberries and edible rose petals. This adds beauty and elegance to your cake. For an extra touch, serve the cake on a decorative stand. Dust with cocoa powder for a refined look. If you want the full recipe with all details, you can find it within the article. Enjoy your Neapolitan Rose Cake! To make your cake layers perfect, follow these tips: - Use room temperature ingredients. Let your eggs and butter warm up before mixing. This helps the batter blend better. - Sift your dry ingredients. This adds air and makes your cake light and fluffy. - Don’t overmix. Mix just until combined. Overmixing can make the cake dense. - Check your oven temperature. Use an oven thermometer to ensure it’s accurate. An oven that’s too hot or too cold can affect baking time. - Line your cake pans. Use parchment paper to prevent sticking. This makes it easy to remove the cakes. For beautiful rose designs, try these methods: - Use a piping bag. A star tip works best for creating rose shapes. Practice on parchment before decorating your cake. - Start from the center. Pipe the first rose layer from the middle outwards. This creates a natural look. - Vary your colors. Use pink, white, or yellow frosting for a vibrant look. Mix colors to get soft gradients. - Add fresh fruit. Use thin slices of strawberries to enhance your rose design. Fresh fruit adds color and taste. - Finish with edible flowers. They add elegance. Just make sure they are safe for eating. Avoid these common mistakes for a great cake: - Skipping ingredient prep. Always measure and prepare ingredients before starting. This helps the process go smoothly. - Not cooling layers completely. Frosting a warm cake can cause melting. Let layers cool on a rack. - Ignoring cake structure. Make sure your layers are even. Uneven layers can lead to a lopsided cake. - Overloading on frosting. Use a thin layer between cake layers. Too much can make it slide. - Rushing the decoration. Take your time to create the rose design. A patient approach leads to beautiful results. For the full recipe, check the section above. Enjoy creating your Neapolitan Rose Cake! {{image_4}} You can twist the Neapolitan Rose Cake in many ways. Here are some ideas: - Chocolate Delight: Add more cocoa powder for a richer chocolate flavor. - Citrus Infusion: Mix in lemon zest or orange zest for a fresh touch. - Nutty Goodness: Fold in chopped nuts like almonds or walnuts for crunch. - Berry Bliss: Substitute strawberries with raspberries or blueberries for a different taste. Each change adds a new layer of fun to your cake. You can still enjoy this cake with different diets. Here’s how: - Gluten-Free: Use a gluten-free flour blend instead of all-purpose flour. - Vegan: Replace eggs with flax eggs (1 tablespoon flaxseed meal + 2.5 tablespoons water). Use plant-based butter and milk. These swaps keep the cake delicious while meeting dietary needs. Making your cake look great is just as fun as eating it! Try these ideas: - Layered Display: Use a clear cake stand to show off the layers. - Edible Flowers: Garnish with colorful edible flowers for a garden look. - Chocolate Drizzle: Drizzle melted chocolate on top for a fancy touch. - Themed Decor: Match the decorations to your event, like hearts for Valentine’s Day. These tips help make your Neapolitan Rose Cake a true showstopper. For the full recipe, refer back to our earlier section. Enjoy the process and get creative! To keep your Neapolitan Rose Cake fresh, store it in an airtight container. This helps lock in moisture and flavor. If you leave it out, it can dry out quickly. Place the cake in a cool, dark spot, away from direct sunlight. For best results, keep it in the fridge if you plan to eat it later. If you want to save part of your cake, freezing works well. First, let the cake cool completely. Then, slice it into pieces for easy access. Wrap each piece tightly in plastic wrap. After that, place the wrapped slices in a freezer-safe bag. Make sure to remove any extra air before sealing. This method helps prevent freezer burn. The Neapolitan Rose Cake stays fresh for up to five days in the fridge. If frozen, it can last for three months. When you are ready to enjoy a slice, take it out of the freezer. Let it thaw in the fridge for a few hours or overnight. For a warm treat, you can microwave a slice for about 10-15 seconds. Enjoy your cake at its best! Neapolitan Rose Cake comes from Naples, Italy. It is known for its colorful layers and floral design. The cake blends chocolate, vanilla, and strawberry flavors. This mix reflects the vibrant culture of Naples. The rose design adds a touch of elegance. It makes the cake perfect for special events. Yes, you can use boxed cake mix. It saves time and is easy to use. Just follow the instructions on the box for the cake base. You can still add your flavors and decorations. However, I recommend making it from scratch for the best taste. The homemade cake has great texture and flavor, which boxed mixes may lack. You can make the cake a day ahead. Bake and cool the layers first. Wrap each layer in plastic wrap to keep it fresh. Store the layers at room temperature or in the fridge. When ready to serve, assemble the cake. Just add the whipped cream and strawberries before serving. This keeps the cake looking fresh and tasty. In this post, we explored how to make a Neapolitan Rose Cake. We covered key ingredients, equipment, and optional flavors. You learned step-by-step how to prepare, bake, and decorate your cake. I shared tips for perfect layers and creative designs. We also discussed variations for different diets and how to store your cake. Making this cake can be fun and rewarding. Enjoy making your own delicious masterpiece!](https://roastedflavors.com/wp-content/uploads/2025/07/7bc4f51c-e381-4f20-8631-6fe6712b634e.webp)
Neapolitan Rose Cake Delightful Dessert Recipe Guide
Get ready to wow your friends and family with the Neapolitan Rose Cake! This delightful dessert combines rich flavors of chocolate, strawberry, and vanilla, all
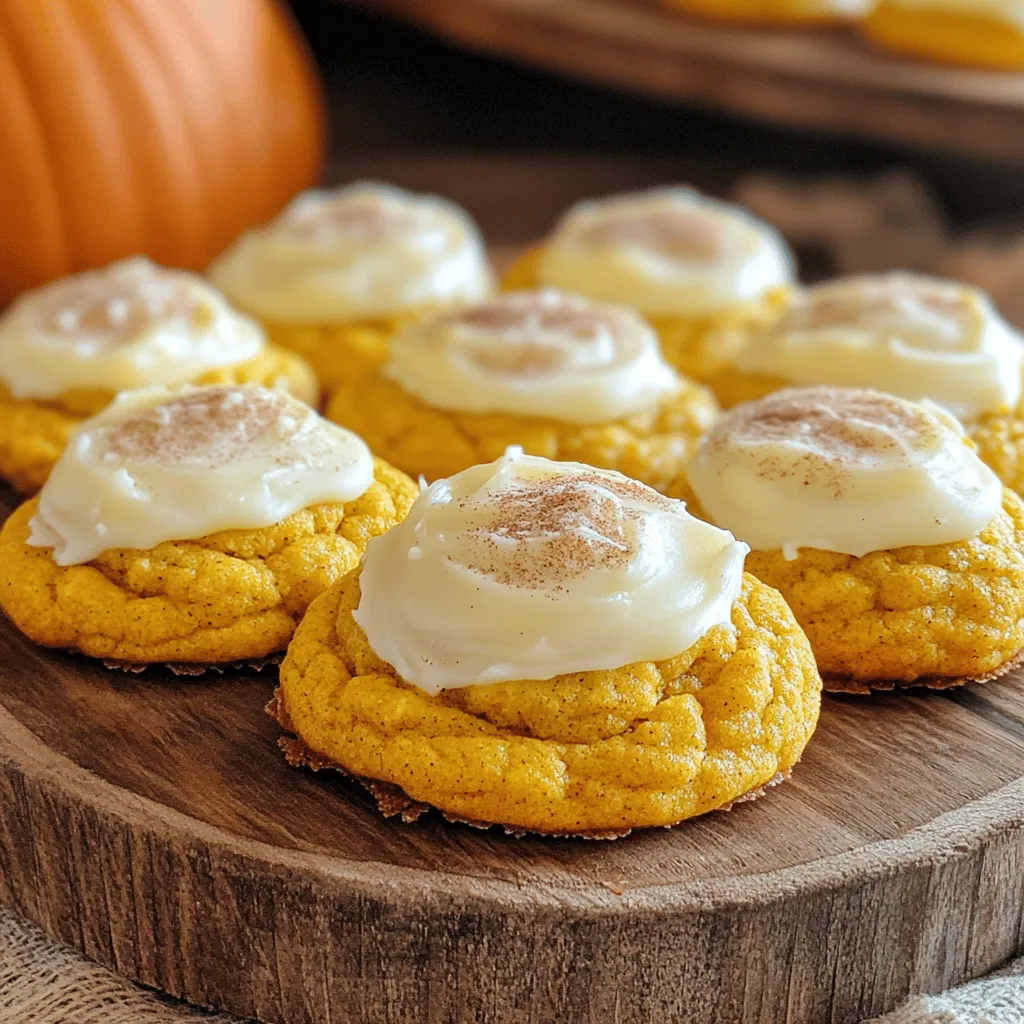
Soft Pumpkin Cookies with Cream Cheese Icing Delight
Get ready to enjoy a warm, sweet treat with my Soft Pumpkin Cookies topped with creamy icing! These cookies pack the perfect blend of pumpkin
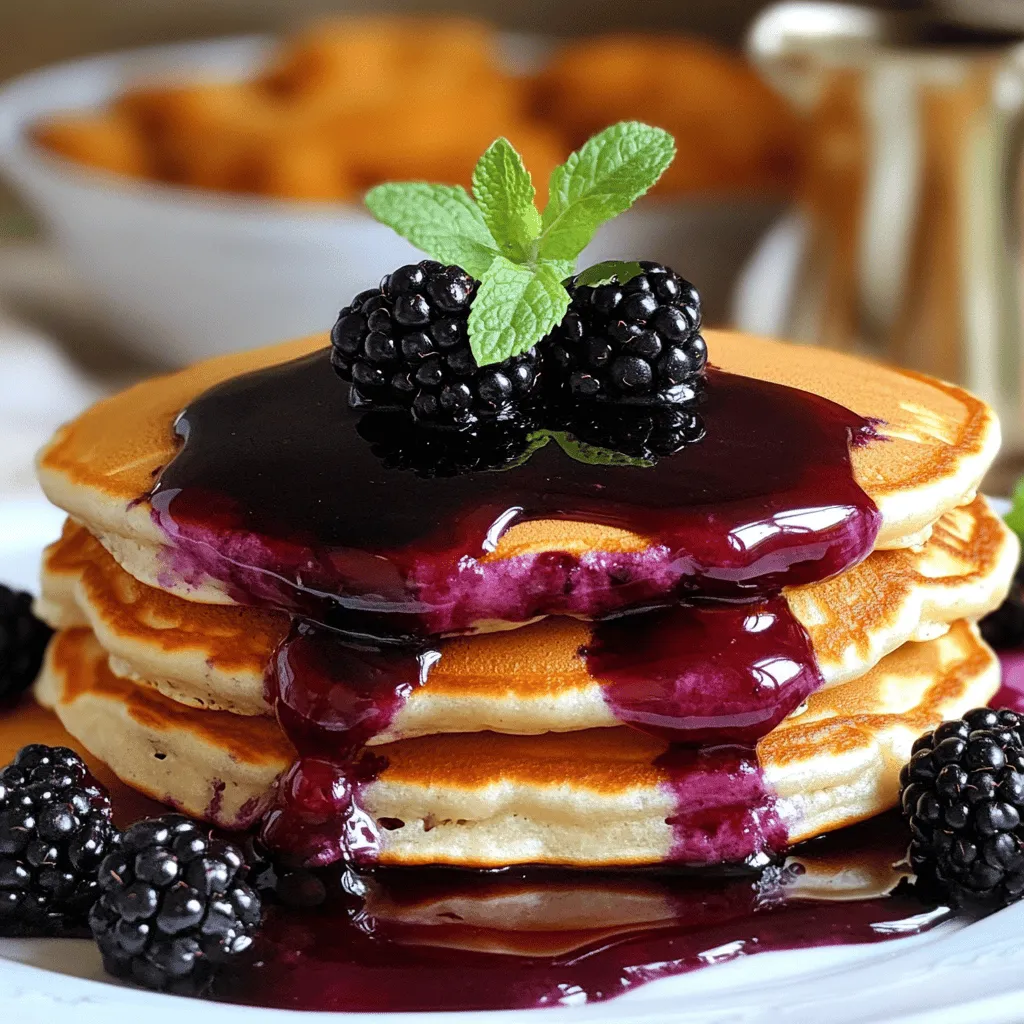
Thick Blackberry Syrup for Pancakes Delightful Recipe
Are you ready to transform your pancakes into a culinary delight? This thick blackberry syrup recipe will make your breakfast unforgettable. With its sweet, tangy
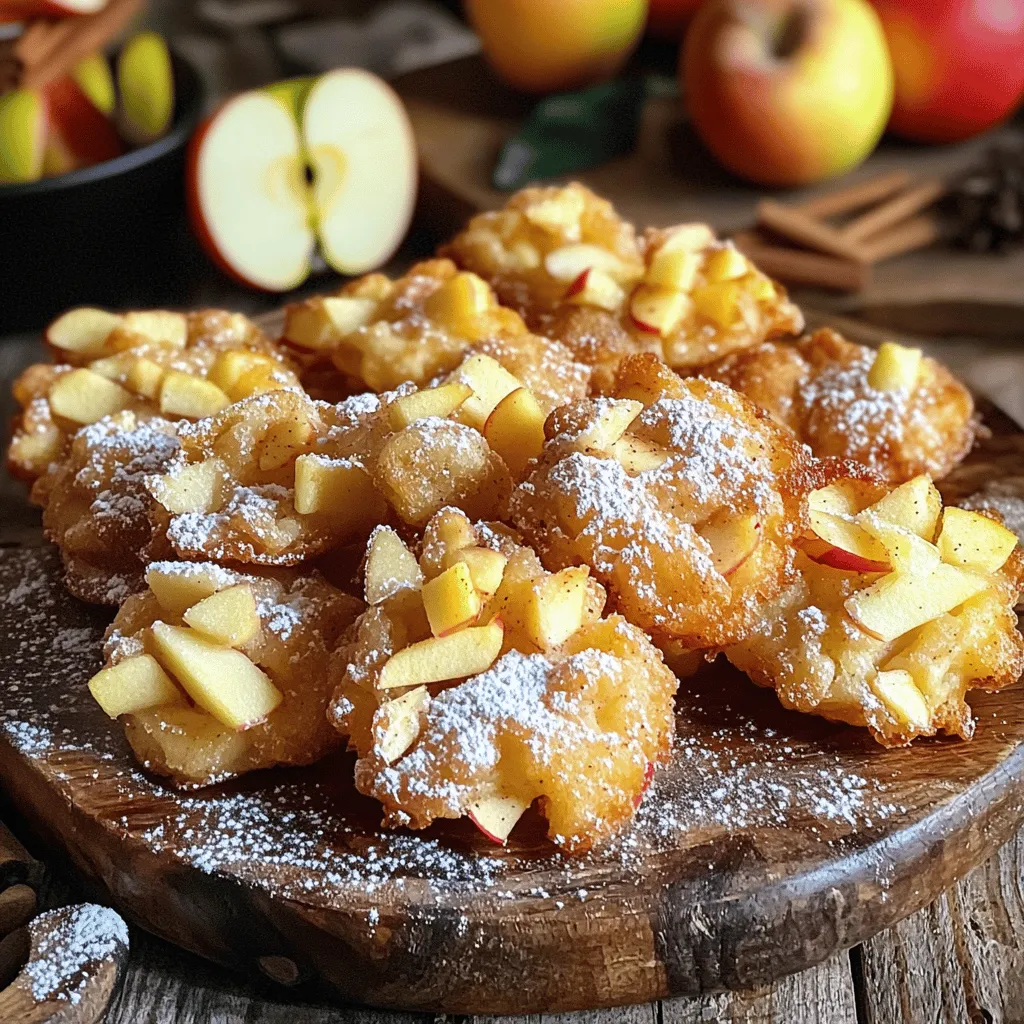
Amish Apple Fritters Tasty and Easy Homemade Recipe
Are you ready to savor the delightful taste of Amish apple fritters? These sweet treats are easy to make and bursting with flavor. In this
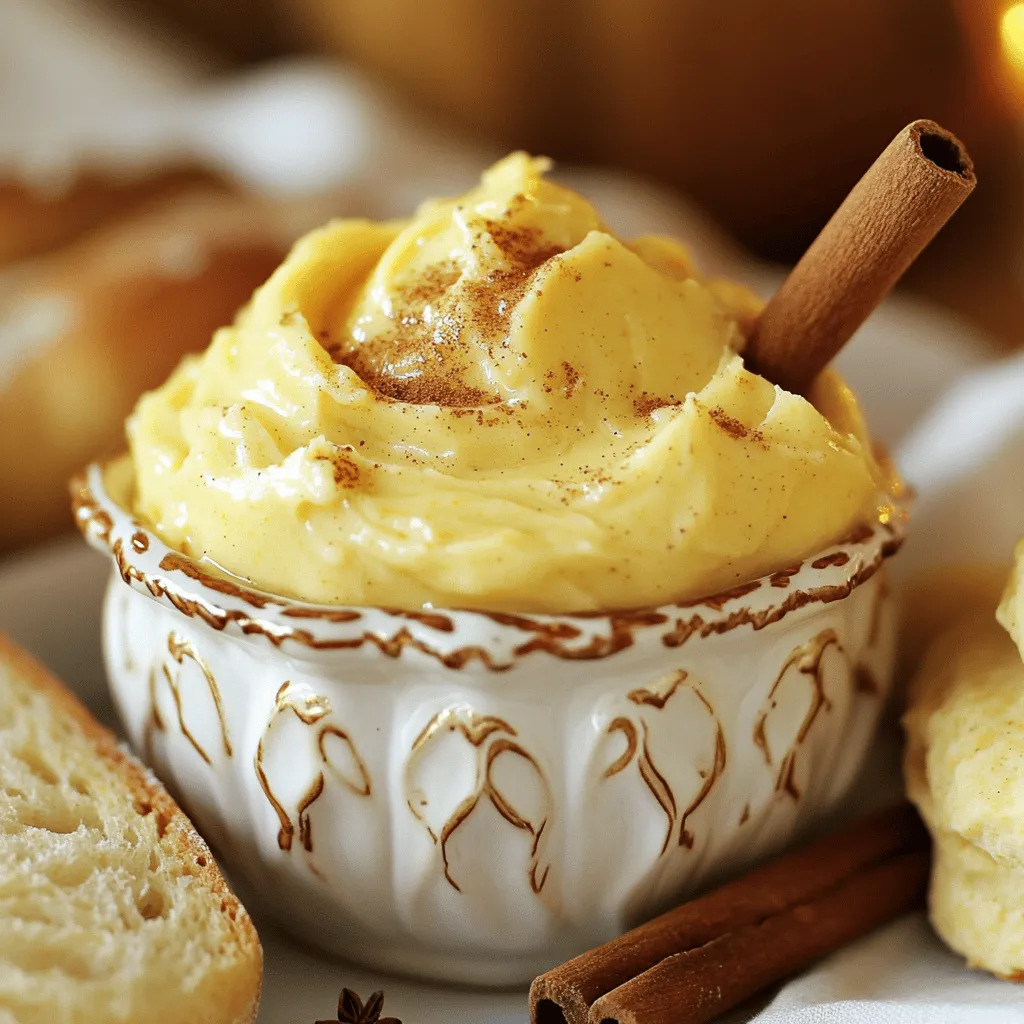
Whipped Pumpkin Spice Honey Butter Creamy Delight
Are you ready to elevate your breakfast game? Whipped Pumpkin Spice Honey Butter is the perfect blend of creamy sweetness and fall flavors. Imagine spreading
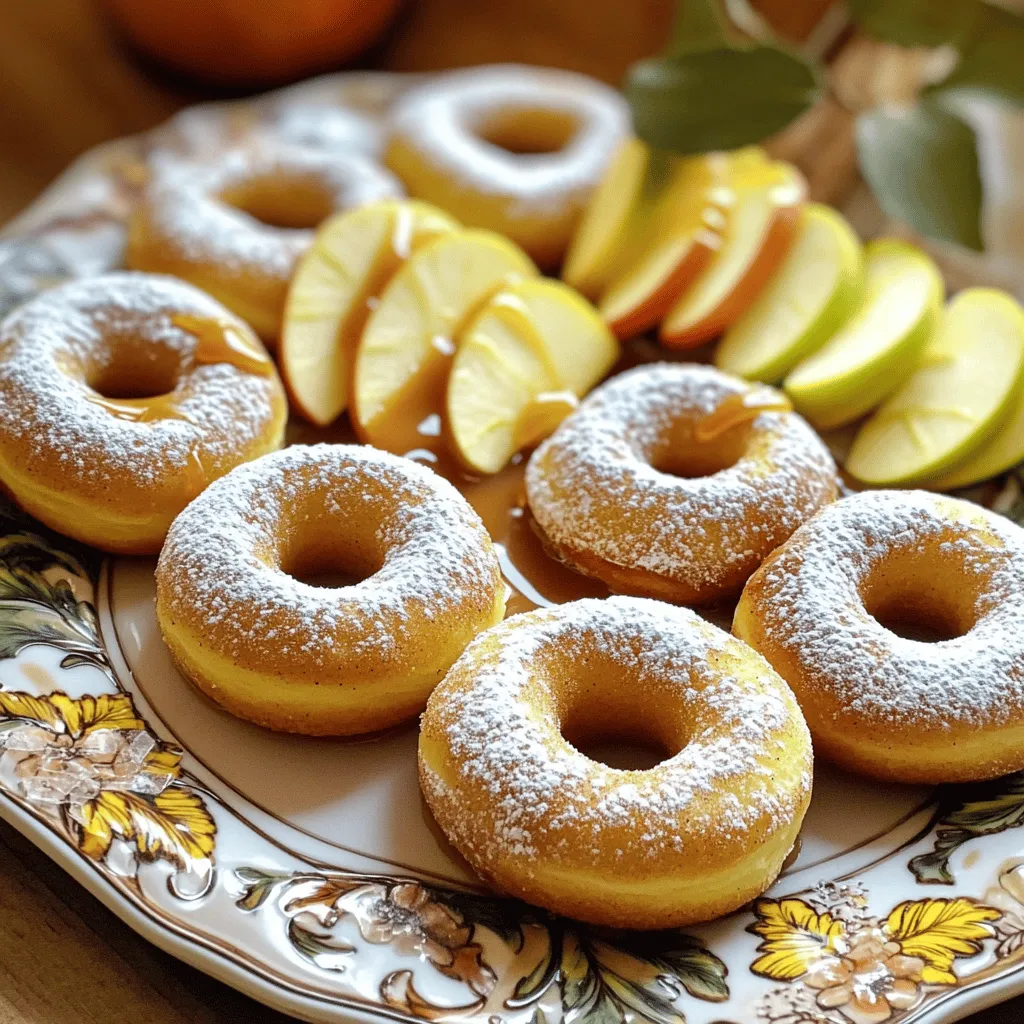
Easy Baked Apple Cider Donuts Quick and Simple Recipe
Are you ready to indulge in a warm, fall treat? My Easy Baked Apple Cider Donuts are just the thing! This quick and simple recipe
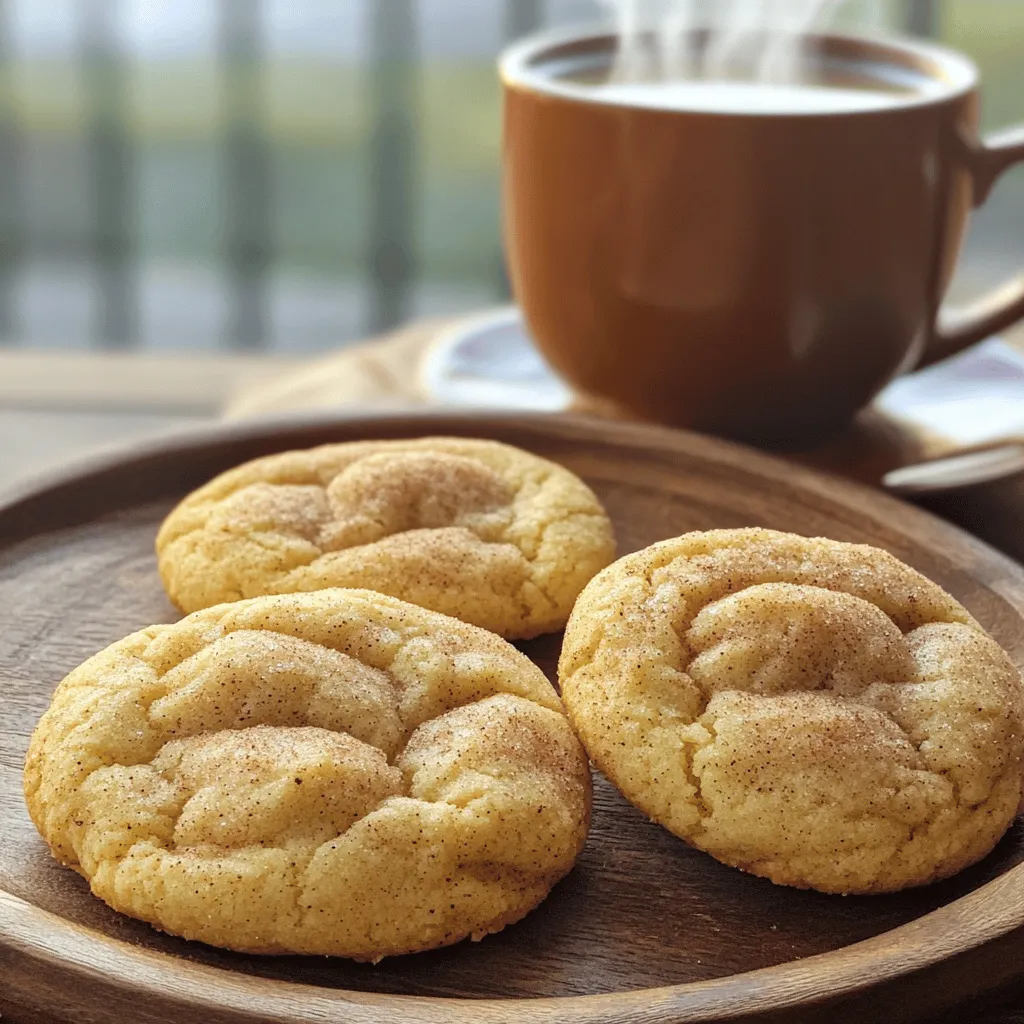
Chai-Spiced Snickerdoodles Irresistible Cookie Delight
If you’re seeking a warm, cozy treat, you’re in the right place! Chai-spiced snickerdoodles combine the classic sweet cookie with fragrant chai spices for a