Desserts

- 1 cup pumpkin puree - 1/2 cup granulated sugar - 1/2 cup packed brown sugar - 2 large eggs - 1/2 cup vegetable oil Pumpkin puree is the star of this bread. It gives a moist texture and rich flavor. Granulated and brown sugars add sweetness and depth. Eggs help bind the mix together while vegetable oil keeps it soft. - 1/4 cup all-purpose flour - 1/4 cup packed brown sugar - 1/4 teaspoon ground cinnamon - 2 tablespoons melted butter - 2 tablespoons rolled oats The streusel topping adds a crunchy layer. Flour provides the base, while brown sugar sweetens it. Cinnamon gives warmth and flavor. Melted butter helps bind the crumbs, and rolled oats add a hearty touch. - 1 cup powdered sugar - 2 tablespoons maple syrup - 1-2 tablespoons milk Maple glaze finishes the bread perfectly. Powdered sugar forms the base, while maple syrup adds sweetness and flavor. Milk helps achieve the right smooth consistency. Adjust the milk to your liking for the best drizzle. First, preheat your oven to 350°F (175°C). This temp helps the bread cook evenly. Grab a 9x5 inch loaf pan. Grease it lightly or line it with parchment paper. This makes it easy to remove the bread after it bakes. In a large bowl, combine 1 cup of pumpkin puree, 1/2 cup of granulated sugar, and 1/2 cup of brown sugar. Add 1/2 cup of vegetable oil, 2 large eggs, and 1 teaspoon of vanilla extract. Mix these until the mixture is smooth and creamy. Make sure there are no lumps. In another bowl, whisk together 1 1/2 cups of all-purpose flour, 1 teaspoon of baking soda, and 1 teaspoon of baking powder. Add 1 teaspoon of ground cinnamon, 1/2 teaspoon of ground nutmeg, 1/4 teaspoon of ground ginger, and 1/2 teaspoon of salt. This mix adds flavor and helps the bread rise. Gradually add the dry mix into the wet mix. Stir gently until just combined. Do not overmix; this keeps the bread light and fluffy. If you want nuts, fold in 1/2 cup of chopped walnuts now. They add a nice crunch! For the streusel topping, mix together 1/4 cup of all-purpose flour, 1/4 cup of brown sugar, and 1/4 teaspoon of ground cinnamon in a small bowl. Pour in 2 tablespoons of melted butter and 2 tablespoons of rolled oats. Use your fingers or a fork to mix until it looks like coarse crumbs. Pour the batter into the prepared loaf pan. Evenly spread the streusel topping over the batter. Bake in your preheated oven for 55-60 minutes. A toothpick should come out clean when inserted in the center. Let the bread cool in the pan for about 10 minutes. Then transfer it to a wire rack to cool completely. For the maple glaze, whisk together 1 cup of powdered sugar, 2 tablespoons of maple syrup, and 1-2 tablespoons of milk in a medium bowl. Adjust the thickness by adding more milk if needed. Once the bread cools, drizzle the glaze over the top. Let it set before slicing. Enjoy! - Avoiding Overmixing: When you mix the wet and dry ingredients, stir just until you see no more flour. Overmixing makes the bread tough. It’s okay if the batter looks a bit lumpy. This helps keep your bread soft and moist. - Checking for Doneness: To know if your bread is done, insert a toothpick in the center. If it comes out clean, it’s ready. If it has batter on it, bake for a few more minutes. Keep an eye on it, as ovens can vary. - Adjusting Thickness and Application: For the glaze, start with 1 tablespoon of milk. Mix it in with the powdered sugar and maple syrup. If it’s too thick, add more milk, one teaspoon at a time. You want it pourable but not runny. A good glaze should drizzle nicely over the bread. - Garnishing and Serving Suggestions: When ready to serve, slice the bread and place it on a pretty plate. For extra flair, add crushed walnuts on top. You can also drizzle more maple glaze over the slices. A light dusting of powdered sugar makes it look fancy and inviting. {{image_4}} You can make this bread nut-free by leaving out the walnuts. The bread will still be moist and tasty. The nuts add crunch, but the flavor remains rich and pumpkiny without them. You can also add some seeds, like sunflower or pumpkin seeds, for some texture. To change things up, try adding chocolate chips or dried fruits. Chocolate chips can give a sweet twist that pairs well with pumpkin. Dried fruits, like cranberries or raisins, add a chewy texture and a burst of flavor. Just mix them in gently before baking. If you need a gluten-free version, substitute the all-purpose flour with a gluten-free blend. Look for a mix that includes xanthan gum for better structure. This way, everyone can enjoy this delicious bread without worry. The taste and texture will still shine through. Store your pumpkin streusel maple glaze bread at room temperature. Place it in an airtight container. This keeps it fresh for about three days. If you live in a warm area, refrigerate it. This may dry it out a bit, but it keeps it safe. To freeze the bread, wrap it tightly in plastic wrap. Then, place it in a freezer bag. Be sure to remove as much air as possible. You can freeze it for up to three months. When ready to eat, thaw it in the fridge overnight. You can also leave it out at room temperature for a few hours. This delicious bread lasts up to three days at room temperature. If refrigerated, it lasts about a week. For the best taste, eat it fresh. To keep it moist, store it properly. Check for signs of spoilage before eating. If it smells off or has mold, toss it. Yes, you can use fresh pumpkin. Fresh pumpkin gives a bright flavor. However, it requires more prep time. You need to cook and puree the pumpkin first. Canned pumpkin is easy and quick. It is consistent and ready to use. Both options are tasty, but pick what fits your time best. To make this recipe vegan, you can replace eggs with flaxseed meal or applesauce. Use 1 tablespoon of flaxseed meal mixed with 2.5 tablespoons of water per egg. For dairy, swap milk with almond milk or oat milk. These changes will keep your bread moist and delicious. If you don't have maple syrup, you can use honey or agave nectar. Both provide sweetness, but honey is not vegan. You can also try brown sugar mixed with a bit of water for a syrupy feel. Each sweetener will change the taste slightly, so pick what you enjoy most. This blog post covered the key ingredients and steps to make a delicious pumpkin treat. You learned how to create a tasty streusel topping and a sweet maple glaze. I shared tips to ensure your bake is perfect every time. Variations like nut-free and gluten-free options make this recipe adaptable for everyone. Lastly, proper storage keeps your treats fresh longer. Enjoy your baking journey and let the flavors shine.
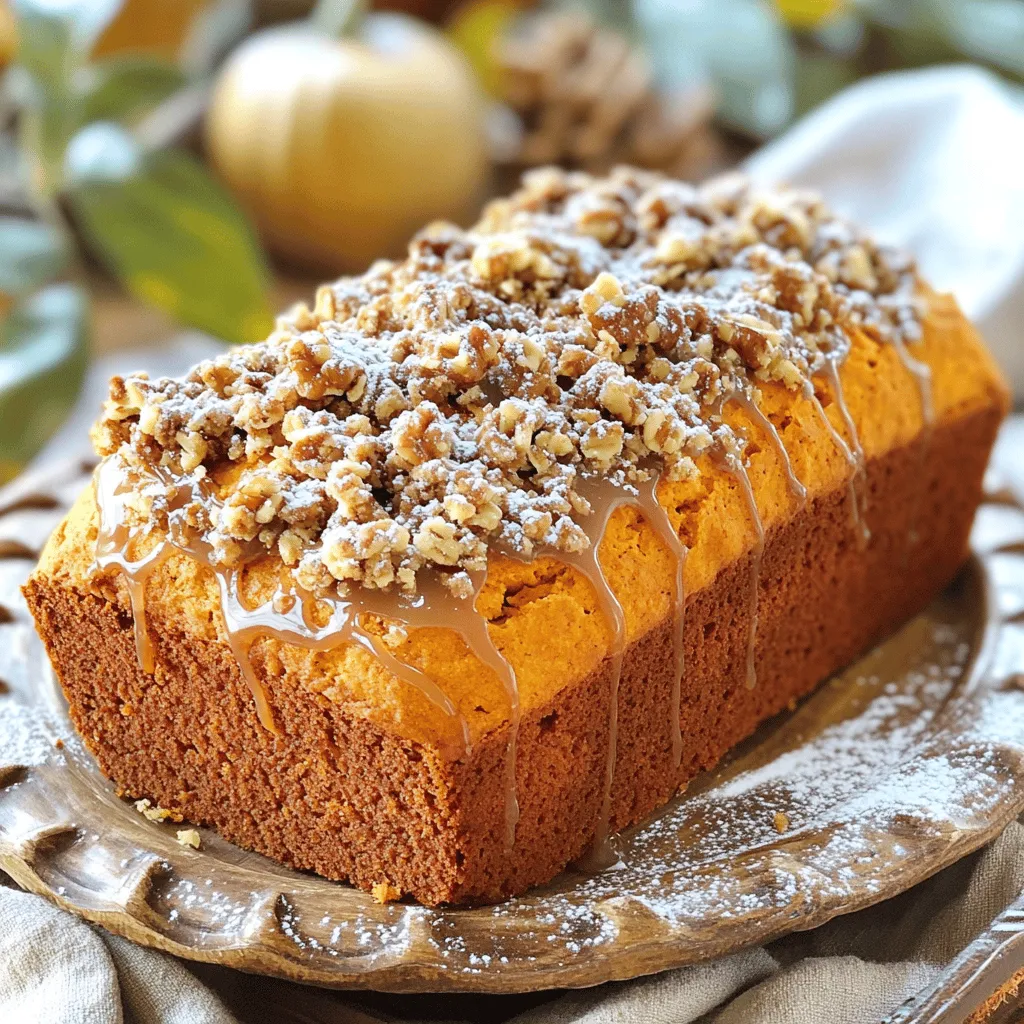
Pumpkin Streusel Maple Glaze Bread Tasty Fall Treat
Fall is here, and it’s time to embrace the season with something special. Imagine the sweet, warm aroma of Pumpkin Streusel Maple Glaze Bread filling
- 2 cups unsweetened applesauce - 1 ½ cups all-purpose flour - 1 cup granulated sugar - ½ cup brown sugar, packed - 1 teaspoon baking soda - 1 teaspoon baking powder - 1 teaspoon ground cinnamon - ½ teaspoon ground nutmeg - ½ teaspoon salt - ½ cup vegetable oil - 3 large eggs - 1 teaspoon vanilla extract - 8 oz cream cheese, softened to room temperature - ½ cup unsalted butter, softened to room temperature - 4 cups powdered sugar - 1 teaspoon vanilla extract - 1 teaspoon ground cinnamon This cake starts with simple ingredients that bring rich flavor. Unsweetened applesauce is the star. It keeps the cake moist and adds natural sweetness. The blend of sugars, granulated and brown, gives depth to the taste. For the dry mix, combine flour, baking soda, baking powder, and spices. Cinnamon adds warmth while nutmeg gives a hint of spice. The salt balances the sweetness. In the wet mix, vegetable oil keeps it tender. Eggs help with rise and structure. Vanilla extract enhances the cake's flavor. For the frosting, cream cheese and butter create a smooth base. Powdered sugar sweetens and thickens it. The vanilla and cinnamon make it special. This simple list of ingredients comes together for a delightful treat. Preheat the Oven Start by preheating your oven to 350°F (175°C). This step is key for a great bake. Grease and flour a 9x13-inch baking dish. This will help the cake release easily after baking. Prepare the Dry Ingredients In a large mixing bowl, whisk together the all-purpose flour, baking soda, baking powder, ground cinnamon, ground nutmeg, and salt. Mixing these dry ingredients well ensures the spices and leavening agents distribute evenly throughout the cake. Mix the Wet Ingredients In a separate bowl, combine the unsweetened applesauce, granulated sugar, packed brown sugar, vegetable oil, eggs, and vanilla extract. Use a whisk or electric mixer to blend until the mixture is smooth. This step adds moisture and sweetness to the cake. Combine Wet and Dry Mixtures Next, gradually fold the dry ingredients into the wet mixture. Stir gently until just combined. Be careful not to overmix. This helps keep your cake light and fluffy. Pour and Spread the Batter Pour the batter into the prepared baking dish. Use a spatula to spread it evenly across the surface. This ensures even baking and a nice rise. Bake the Cake Place the baking dish in the preheated oven. Bake for 30-35 minutes. Check for doneness by inserting a toothpick into the center. It should come out clean when the cake is fully baked. Cooling Instructions Let the cake cool in the pan for about 15 minutes. Then, carefully transfer it to a wire rack. Allow it to cool completely before frosting. This helps the frosting stay smooth and not melt. Beat the Frosting Ingredients In a large bowl, beat together the softened cream cheese and unsalted butter using an electric mixer. Mix until smooth and creamy, which should take about 2-3 minutes. Add Powdered Sugar Gradually add the powdered sugar to the cream cheese mixture. Start on low speed to avoid a cloud of sugar. Once combined, increase the speed to medium and mix until fluffy. Mix in Flavorings Stir in the vanilla extract and ground cinnamon. Ensure everything is well mixed and smooth. This adds a lovely flavor to your frosting. Apply the Frosting Once the cake has cooled completely, use a spatula to spread the cinnamon cream cheese frosting evenly over the top of the cake. Aim for a generous layer. This adds a delicious finish to your applesauce cake. Checking for Doneness To check if your cake is done, use a toothpick. Insert it into the center of the cake. If it comes out clean, the cake is ready. If it has wet batter on it, bake for a few more minutes. Remember, overbaking can dry out the cake, so check early. Ensuring a Fluffy Texture To keep your cake fluffy, mix your wet and dry ingredients gently. Overmixing can lead to a dense cake. Fold the dry mix into the wet mix until just combined. This preserves air bubbles, which create a light texture. Achieving a Smooth Frosting For a smooth frosting, start with room temperature cream cheese and butter. Beat them together until creamy. Add the powdered sugar slowly to avoid lumps. Mix on medium speed until fluffy. A spatula can help spread the frosting evenly. Storing Leftover Frosting If you have leftover frosting, store it in an airtight container. Refrigerate it for up to one week. When ready to use it again, let it sit at room temperature. Re-whip it if needed to regain that fluffy texture. {{image_4}} Gluten-Free Options You can easily make this cake gluten-free. Use a gluten-free flour blend instead of all-purpose flour. Look for blends that include xanthan gum. This helps create a nice texture. You may need to adjust the baking time slightly. Start checking for doneness a few minutes early. Vegan Adaptations To make this cake vegan, substitute eggs with flaxseed meal. Mix one tablespoon of flaxseed meal with three tablespoons of water. Let it sit for a few minutes to thicken. Use plant-based butter instead of regular butter for the frosting. You can also use nut milk in place of dairy. Adding Nuts or Fruits You can add a fun twist by putting in nuts or fruits. Chopped walnuts or pecans add crunch. Diced apples or raisins bring extra sweetness. Mix these into the batter before baking. This creates a cake with even more flavor and texture. Alternative Frosting Options Try different frostings for a unique taste. A simple vanilla buttercream is a great choice. You can also use a chocolate ganache for a rich flavor. Cream cheese frosting with a hint of orange zest adds a nice touch too. It’s fun to mix and match and find your favorite! - Room Temperature Storage: You can keep the cake at room temperature for up to three days. Make sure to cover it with plastic wrap or a cake dome. This keeps it fresh and moist. - Refrigeration Recommendations: If you want to store it longer, place it in the fridge. It can last up to a week there. Just wrap it well to prevent it from drying out. The cool air in the fridge helps keep the flavors fresh. - How to Freeze Slices: Cut the cake into slices. Wrap each slice tightly in plastic wrap. Then place them in a freezer bag. Label the bag with the date. It’s best to freeze the cake for up to three months. - Thawing and Reheating Tips: To enjoy, take a slice out and let it thaw in the fridge overnight. If you want it warm, you can microwave it for about 15-20 seconds. This brings back its soft texture. Enjoy your cake even after freezing! Yes, you can use sweetened applesauce. It will add extra sugar to the cake. You might want to reduce the granulated sugar by ¼ cup. This helps keep the cake balanced and delicious. Check the cake by inserting a toothpick into the center. If it comes out clean, the cake is ready. The edges should also pull away slightly from the pan. This shows the cake is fully baked. The cake lasts about 3-4 days at room temperature. If you store it in the fridge, it can last up to a week. Just keep it covered to keep it fresh. Yes, you can make the cake one day in advance. Just let it cool completely before covering it. Frost it on the day you plan to serve it for the best taste. Yes, this cake freezes well. Wrap it tightly in plastic wrap or foil. You can freeze it for up to three months. Thaw it in the fridge overnight before serving. You learned how to make a delicious applesauce cake with creamy frosting. We covered all the ingredients, step-by-step instructions, and helpful tips. Remember, baking is about having fun and experimenting. Feel free to try different flavors or dietary options. Enjoy your cake fresh or stored for later. The best part? You're now ready to impress with your baking skills!
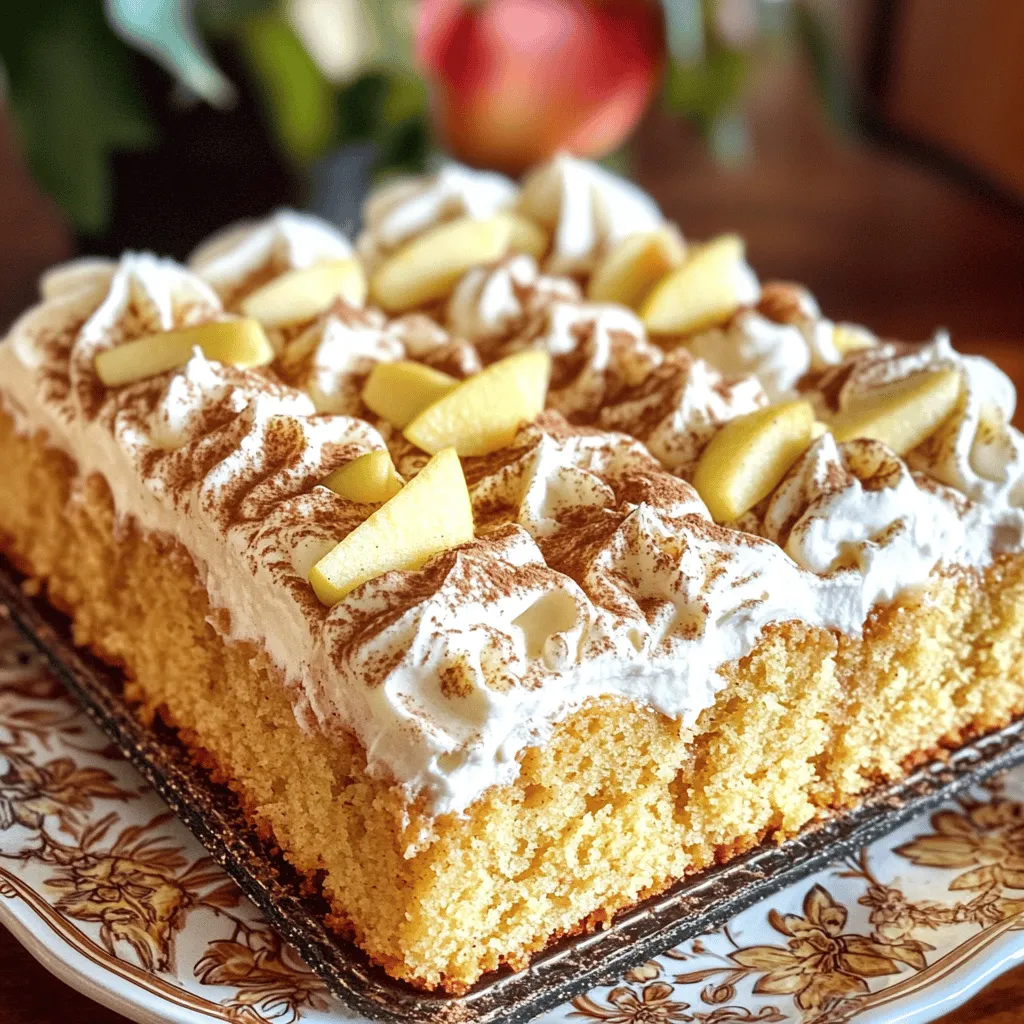
Applesauce Cake with Cinnamon Cream Cheese Frosting Delight
Welcome to a delicious adventure with my Applesauce Cake with Cinnamon Cream Cheese Frosting! This recipe blends sweet applesauce and warm spices into a soft,
- 2 ½ cups all-purpose flour - 1 ½ teaspoons baking powder - 1 teaspoon baking soda - 1 teaspoon salt - 1 teaspoon ground cinnamon - 1 cup unsalted butter - 1 ½ cups granulated sugar - 4 large eggs - 1 teaspoon vanilla extract - 1 cup buttermilk - ½ cup packed light brown sugar - 2 tablespoons ground cinnamon (for the swirl) - ½ cup chopped pecans or walnuts (optional) Gathering the right ingredients makes all the difference. I love using good quality butter for a rich taste. All-purpose flour gives the cake its perfect texture. Baking powder and baking soda help the cake rise well. Ground cinnamon adds warmth and flavor. Brown sugar brings a nice sweetness and moisture. If you like nuts, pecans or walnuts add a nice crunch. Make sure your butter is at room temperature. This helps it cream nicely with the sugar. If you don’t have buttermilk, you can make some by mixing milk with a little vinegar. This will give a similar tang. Having all these ingredients ready will make your baking smooth. Trust me, it’s worth it! 1. Preheat the oven: Set your oven to 350°F (175°C). This ensures even baking. 2. Grease and flour the bundt pan: Generously coat a 10-cup bundt pan with butter. Then, sprinkle flour inside. This helps the cake come out easily. 1. Combine dry ingredients: In a bowl, mix 2 ½ cups of flour, 1 ½ teaspoons of baking powder, 1 teaspoon of baking soda, 1 teaspoon of salt, and 1 teaspoon of ground cinnamon. Whisk them well and set aside. 2. Cream butter and sugar: In a large bowl, blend 1 cup of softened butter and 1 ½ cups of granulated sugar using an electric mixer. Mix until the color lightens, about 3-4 minutes. 3. Incorporate eggs and vanilla: Add 4 large eggs one at a time. Mix well after each. Then, stir in 1 teaspoon of vanilla extract. 1. Combine wet and dry ingredients: Gradually add the dry mix to the butter mixture. Alternate with 1 cup of buttermilk. Start and end with the flour mix. Mix gently until just combined to keep it light. 2. Prepare the swirl mixture: In a small bowl, mix ½ cup of packed light brown sugar, 2 tablespoons of ground cinnamon, and ½ cup of chopped nuts if you want. Set this aside. 3. Assemble the cake layers: Pour half of the batter into the bundt pan. Sprinkle half of the cinnamon mixture over it. Add the rest of the batter, then the remaining swirl mix. Use a knife to swirl gently. 1. Bake the cake: Place the pan in the oven. Bake for 55-65 minutes. The cake is done when a toothpick comes out clean. 2. Cool the cake: Let the cake cool in the pan for 10-15 minutes. Then, turn it onto a wire rack to cool completely. How to avoid overmixing To keep your cake light, mix the batter gently. After adding the dry ingredients, stir just until combined. If you see flour, that’s okay! Overmixing can make your cake dense. Ensuring even baking Make sure your oven is at the right temperature. An oven thermometer helps check this. When placing the bundt pan, center it on the middle rack. This allows heat to circulate well around the cake. Dusting with powdered sugar After your cake cools, dust the top with powdered sugar. Use a fine sieve for even coverage. This adds a lovely touch and makes it look special. Serving suggestions with whipped cream and beverages Serve each slice with a dollop of whipped cream. It adds creaminess and pairs well with the spices. Enjoy your cake with coffee or herbal tea to enhance the flavors! Incorrect oven temperature If your oven is too hot or too cold, your cake may not bake well. Use an oven thermometer to avoid this issue. This small step can save your cake! Skipping ingredient measurements Always measure your ingredients carefully. Baking is like science! A little too much or too little can change the texture and taste of your cake. Stick to the recipe for the best results. {{image_4}} You can make this cake even better with simple changes. Try adding other spices like nutmeg or cardamom. Just a pinch can give your cake a warm twist. You can also mix in chocolate chips for extra sweetness. The chocolate pairs well with the cinnamon. If you need gluten-free options, use almond flour or a gluten-free blend. They work great in this recipe. For a vegan version, replace eggs with flaxseed meal. Mix one tablespoon of flaxseed with three tablespoons of water. Let it sit for five minutes before adding it to the mix. Adding a cream cheese glaze can elevate your cake. Just mix cream cheese, powdered sugar, and a splash of milk. Drizzle this over the cooled cake for a rich finish. You can also use a chocolate drizzle. Melt some chocolate and pour it over the top for a decadent look. To keep your cinnamon swirl bundt cake fresh, store it at room temperature. Use an airtight container or wrap it in plastic wrap. This keeps the cake moist and prevents it from drying out. If you want to save it for later, freezing is a great option. Slice the cake first, then wrap each piece in plastic wrap. Place the wrapped slices in a freezer bag. This method makes it easy to enjoy a slice any time. At room temperature, the cake lasts about three days. If you freeze it, it can last up to three months. When you are ready to eat it, thaw the cake in the fridge overnight. For quick thawing, leave the slices at room temperature for about an hour. Avoid refreezing once it has thawed, as this can change the texture. Enjoy your cinnamon swirl bundt cake at its best! To check if the cake is done, use the toothpick test. Insert a toothpick into the center of the cake. If it comes out clean or with a few crumbs, your cake is ready. If it has wet batter, bake it a little longer. Keep an eye on the time; it usually takes 55-65 minutes. Yes, you can use other pans. If you lack a bundt pan, a 9x13-inch pan works well. Just adjust the baking time. Check for doneness with the toothpick test. A loaf pan is also an option; it may take longer to bake. A sinking cake can happen for a few reasons. It might be due to overmixing or too much leavening. Make sure to mix just until combined. If your oven is too hot or cold, it can cause sinking too. Use an oven thermometer to check the temperature. Yes! You can make this cake a day or two in advance. Store it tightly wrapped at room temperature. If you want to keep it longer, freeze it. Wrap it well in plastic wrap and foil. It can last up to three months in the freezer. Just thaw it overnight in the fridge before serving. You now have all the key steps to make a delicious cake. From gathering ingredients to using tips for a perfect bake, you should feel ready. Remember to add your twist with flavors or toppings. Baking can be fun, so don’t rush the process. With practice, you’ll see the results improve. Use the storage tips to enjoy your cake longer. I hope you find joy in baking this recipe!
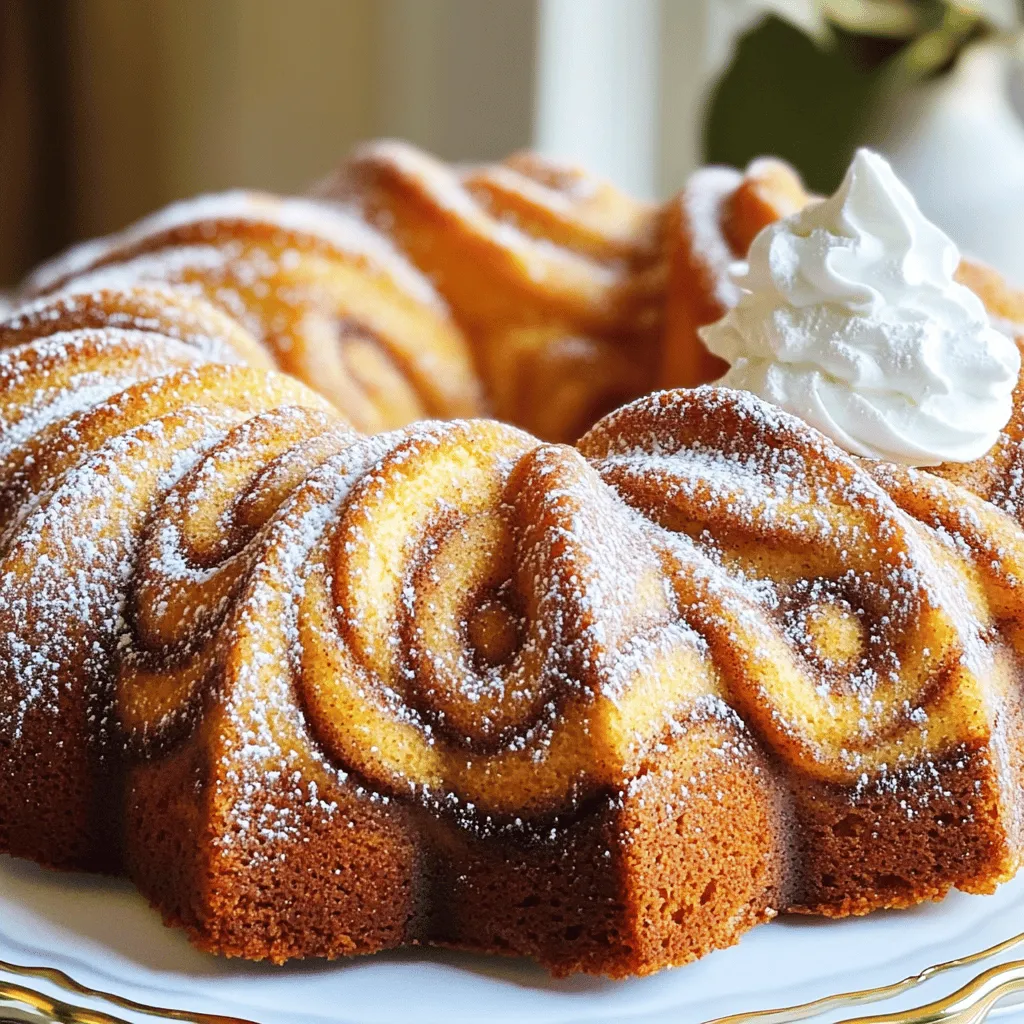
Cinnamon Swirl Bundt Cake Simple and Delicious Recipe
Looking for a comforting treat that delights every time? This Cinnamon Swirl Bundt Cake is simple and delicious, perfect for any occasion. With its rich
To make the apple crumb cake, you will need the following items: - 2 cups all-purpose flour - 1 cup granulated sugar - 1 tablespoon baking powder - 1/2 teaspoon salt - 1 teaspoon ground cinnamon - 1/2 cup unsalted butter, softened - 2 large eggs, at room temperature - 1 cup milk, at room temperature - 2 cups apples, peeled, cored, and diced (I recommend Granny Smith or Honeycrisp) - 1/2 cup walnuts or pecans, chopped (optional) The crumb topping adds a nice crunch. Gather these items: - 1 cup all-purpose flour - 1/2 cup packed brown sugar - 1/2 teaspoon ground cinnamon - 1/4 cup unsalted butter, melted This drizzle gives a sweet finish. You will need: - 1 cup powdered sugar - 2 tablespoons milk - 1 teaspoon ground cinnamon Start by preheating your oven to 350°F (175°C). This step is key for even baking. Next, grab a 9x13-inch baking pan. Grease it with butter and sprinkle a bit of flour. This will help the cake come out easily after baking. In a large mixing bowl, whisk together 2 cups of flour, 1 cup of sugar, 1 tablespoon of baking powder, 1/2 teaspoon of salt, and 1 teaspoon of cinnamon. Mix these dry ingredients until they are well blended. Then, add in 1/2 cup of softened butter, 2 large eggs, and 1 cup of milk. Stir until the batter is smooth and creamy, which should take about 2 to 3 minutes. Now, it’s time to add some flavor! Take 2 cups of diced apples and gently fold them into the batter. Granny Smith or Honeycrisp apples work best. If you like a bit of crunch, add 1/2 cup of chopped walnuts or pecans. Make sure the apples and nuts are evenly mixed in. In a separate bowl, mix together 1 cup of flour, 1/2 cup of packed brown sugar, and 1/2 teaspoon of cinnamon for the crumb topping. Then, pour in 1/4 cup of melted butter. Use a fork to mix until you see coarse crumbs form. This topping will add a nice crunch. Pour half of your cake batter into the greased pan. Spread it out evenly. Next, sprinkle half of the crumb topping over this layer. Pour the rest of the batter on top and finish with the remaining crumb topping. This layered look makes the cake extra special. Place your cake in the preheated oven. Bake it for 40 to 45 minutes. To check if it’s done, insert a toothpick into the center. If it comes out clean, your cake is ready. If not, give it a few more minutes. While the cake bakes, make the cinnamon drizzle. In a small bowl, whisk together 1 cup of powdered sugar, 2 tablespoons of milk, and 1 teaspoon of cinnamon. Keep mixing until the drizzle is smooth. If it's too thick, add a splash more milk until it’s just right. When the cake is done baking, let it cool in the pan for about 10 minutes. Then, carefully move it to a wire rack to cool completely. After it cools, drizzle the cinnamon icing generously over the top before cutting it into squares. Enjoy every bite of your delicious creation! Use apples that give a mix of sweet and tart. Granny Smith and Honeycrisp are great choices. They hold their shape well during baking. Avoid soft apples like Red Delicious; they turn mushy. Always pick fresh apples for the best flavor. The crumb topping adds a nice crunch. Mix the flour, brown sugar, and cinnamon well. Use melted butter to bind them together. Don't overmix; aim for coarse crumbs. This texture creates a delightful contrast to the soft cake. Serve the cake warm for the best taste. A sprinkle of powdered sugar makes it look fancy. Pair it with a scoop of vanilla ice cream for a treat. For a fun twist, add fresh apple slices on top. Enjoy with a cup of coffee or tea! {{image_4}} You can easily make this cake gluten-free. Use a 1:1 gluten-free flour blend. Look for blends with xanthan gum. This helps to mimic the structure of wheat flour. The rest of the recipe stays the same. Enjoy the same great taste without gluten. To make this cake vegan, swap out the eggs and milk. Use 1/4 cup unsweetened applesauce for each egg. For milk, use almond or oat milk. Replace the butter with vegan butter or coconut oil. This way, you keep the delicious flavor and texture while being plant-based. Want to spice it up? Add a pinch of nutmeg or cardamom with the cinnamon. You can also mix in dried fruits like raisins or cranberries for extra sweetness. For a nutty twist, try adding almond or hazelnut extract. These little changes can make your cake even more special! To keep your apple crumb cake fresh, store it at room temperature. Use an airtight container or wrap it tightly in plastic wrap. This helps keep moisture in and prevents it from drying out. If you have leftovers, it should stay good for about 3 to 4 days. You can freeze this cake for later enjoyment! First, let it cool completely. Then, wrap slices in plastic wrap and place them in a freezer bag. Remove as much air as possible before sealing. The cake can last up to 3 months in the freezer. When you’re ready to enjoy it, thaw the slices in the fridge overnight. To reheat the cake, first take it out of the fridge or freezer. If frozen, let it thaw. Preheat your oven to 350°F (175°C). Place the cake on a baking sheet and cover it with foil to keep it moist. Heat for about 10 to 15 minutes, or until warmed through. You can also use the microwave for a quick fix. Warm individual slices for about 20 to 30 seconds. Enjoy it warm for a delicious treat! You can use applesauce as an egg substitute. Use 1/4 cup of unsweetened applesauce for each egg. This keeps the cake moist and adds flavor. Another option is to use flaxseed meal. Mix 1 tablespoon of flaxseed meal with 2.5 tablespoons of water. Let it sit for five minutes before adding it to the batter. To keep the apples from sinking, toss them in a little flour before adding them to the batter. This helps coat the apples and gives them grip. Also, make sure your batter is thick enough. A thicker batter holds the apples better. Yes, you can make this cake ahead of time. Bake it and let it cool completely. Store it in an airtight container at room temperature for up to three days. You can also freeze the cake for up to three months. Just wrap it well in plastic wrap. I recommend using a 9x13-inch baking pan for this recipe. This size allows the cake to bake evenly and creates a nice crust. You can use a metal or glass pan, but keep in mind that baking times may vary slightly. Apple Crumb Cake lasts about three days at room temperature. If you store it in the fridge, it can last up to a week. Remember to keep it covered to keep it fresh. If frozen, it can last for up to three months, making it great for meal prep! You now have all the details to make a tasty Apple Crumb Cake. We covered the ingredients, step-by-step instructions, tips, and variations. You learned how to choose apples, get the crumb right, and store the cake. Whether you go gluten-free or vegan, these options fit your needs. Try your hand at this delightful recipe. It's a simple way to enjoy great flavors. Bake, share, and savor every bite!
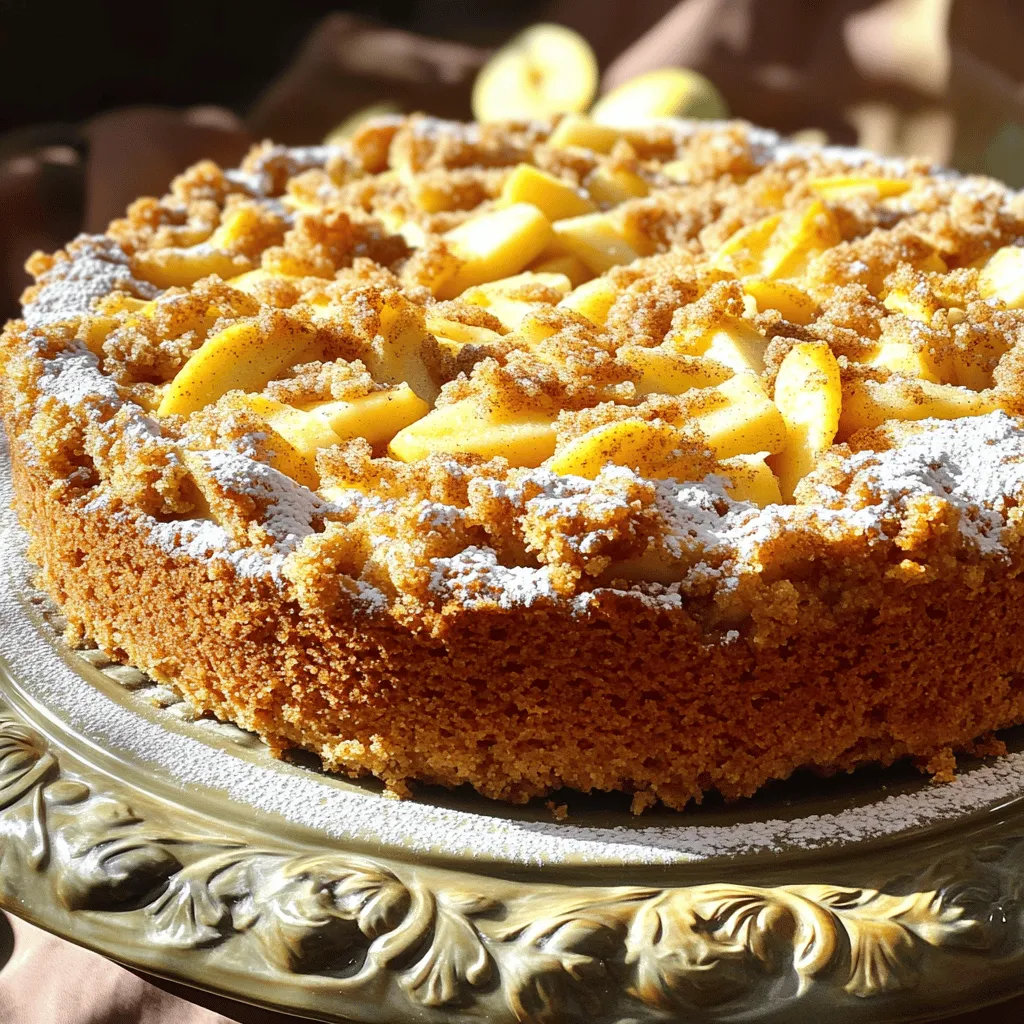
Apple Crumb Cake with Cinnamon Drizzle Delight
Get ready to indulge in a sweet treat that combines the warmth of apples with a crunchy topping and a dreamy cinnamon drizzle! In this
To make fluffy pumpkin cinnamon rolls, gather these key ingredients: - 2 cups all-purpose flour, plus extra for dusting - 1 cup canned pumpkin puree - 1/4 cup warm milk (around 110°F/43°C) - 1/4 cup granulated sugar - 2 1/4 teaspoons active dry yeast (1 packet) - 1/2 teaspoon salt - 1/2 teaspoon ground cinnamon - 1/4 teaspoon ground nutmeg - 1/4 cup unsalted butter, melted - 1 large egg, at room temperature - 1/2 cup packed brown sugar - 1 tablespoon ground cinnamon for filling - 1/4 cup chopped pecans or walnuts (optional, for added crunch) - 1 cup powdered sugar - 2-3 tablespoons milk for icing Each ingredient plays a role in creating that perfect fluffy texture. The all-purpose flour gives structure. The pumpkin puree adds moisture and flavor. The warm milk activates the yeast, helping the dough rise. You can add chopped nuts for a nice crunch. They bring a different texture, making each bite special. Make sure to measure each ingredient carefully. This ensures your rolls turn out just right. A small mistake in measurements can change the final result. Enjoy crafting these delightful treats! 1. Activating the yeast: Start by mixing the warm milk and active dry yeast in a small bowl. Let it sit for about 5 minutes. It should become frothy. This means the yeast is ready to work. 2. Mixing dry ingredients: In a large bowl, whisk together 2 cups of all-purpose flour, 1/4 cup of granulated sugar, 1/2 teaspoon of salt, 1/2 teaspoon of ground cinnamon, and 1/4 teaspoon of ground nutmeg. This will blend the flavors. 3. Combining wet and dry: Add 1 cup of canned pumpkin puree, 1/4 cup of melted unsalted butter, and 1 large egg to the dry mix. Stir until it forms a thick dough. 4. Kneading the dough: Turn the dough onto a floured surface. Knead it for 5 to 7 minutes until it feels smooth and elastic. 5. First rise: Place the dough in a lightly greased bowl. Cover it with a kitchen towel and let it rise in a warm area for about 1 hour. It should double in size. 1. Rolling out the dough: After the dough rises, gently punch it down. Roll it out on a floured surface into a rectangle about 1/4 inch thick. 2. Adding filling: Brush the rolled dough with melted butter. Evenly sprinkle 1/2 cup of packed brown sugar, 1 tablespoon of ground cinnamon, and chopped nuts if you want. 3. Forming cinnamon rolls: Starting from the longer edge, tightly roll the dough into a log. Slice it into 12 equal pieces to create your rolls. 4. Second rise: Arrange the sliced rolls in a greased baking dish. Cover with a towel and let them rise for another 30 minutes. 1. Preheating the oven: While the rolls rise, preheat your oven to 350°F (175°C). 2. Baking the rolls: Bake the rolls in the preheated oven for 20 to 25 minutes. They should turn golden brown on top. 3. Tips for perfect rolls: Keep an eye on the color. They should look golden but not too dark. A toothpick can help check if they are done inside. These steps will lead you to fluffy pumpkin cinnamon rolls that are soft and delicious. Enjoy the process, and let the aroma fill your kitchen! Ensuring yeast activation Always check your yeast. Mix the warm milk and yeast. Wait for 5 minutes. If it’s frothy, it’s ready. If not, your yeast may be dead. Start over for best rolls. Properly measuring ingredients Use measuring cups for dry ingredients. Level them off with a knife. For liquids, use a clear measuring cup. This keeps your dough just right. Too much flour or too little liquid can ruin your rolls. Techniques for optimal dough texture Knead your dough until it feels smooth. Use a floured surface. Kneading helps develop gluten. This makes the rolls light and fluffy. Don’t rush this step; it’s key to great texture. Allowing sufficient rising times Let your dough rise in a warm spot. Cover it with a towel to keep warmth in. The first rise should take about 1 hour. The second rise is about 30 minutes. This time helps the dough grow and become airy. Pairing ideas and presentation tips to enhance flavor Serve warm rolls on a wooden board. Drizzle with icing for a sweet touch. Sprinkle a little cinnamon on top. Adding pecans gives extra crunch. Pair with coffee or tea for a cozy treat. {{image_4}} You can change up the flavor of your pumpkin cinnamon rolls easily. Try adding a pinch of ground ginger or cardamom for a warm twist. You can also use vanilla or almond extract for a rich taste. For the icing, swap milk for cream cheese. This creates a rich, tangy topping. You can also add maple syrup for a sweet, fall vibe. If you need a gluten-free option, use a mix of gluten-free flour. Look for blends that include xanthan gum. This helps keep the rolls fluffy. For a vegan version, replace the butter with coconut oil or vegan butter. Use flax eggs instead of a real egg. To make a flax egg, mix one tablespoon of ground flaxseed with three tablespoons of water. Let it sit for a few minutes to thicken. Pumpkin isn’t the only fall flavor! You can add apples or pears for a fruity touch. Throw in some cranberries for a pop of color and flavor. For holiday gatherings, try adding chocolate chips or caramel bits. Mix in nuts like pecans or walnuts for more crunch. These tweaks make your rolls festive and fun! To keep your fluffy pumpkin cinnamon rolls fresh, store them properly. Place the rolls in an airtight container. You can also wrap them tightly in plastic wrap. This keeps air out and moisture in. For the best taste, eat the rolls within three days. If you need to store them longer, put them in the fridge. They will stay good for about one week in the fridge. You can also freeze them. Wrap each roll in plastic wrap, then in foil. Frozen rolls are best for up to three months. When it’s time to enjoy your rolls again, reheating is key. You can use the microwave or the oven. For the microwave, place a roll on a plate. Heat it for about 15-20 seconds. Check it to make sure it’s warm, not hot. If you want a crispy outside, use the oven. Preheat it to 350°F (175°C). Place the rolls on a baking sheet. Heat for about 10 minutes. This method keeps the texture soft and the flavors bright. For day-old rolls, adding a little butter before reheating helps revive them. This makes them taste fresh again. Enjoy your rolls warm with icing for a perfect treat! Yes, you can prepare the dough a day ahead. Mix the dough and let it rise. After it rises, punch it down and wrap it tightly. Store it in the fridge overnight. The next day, let it come to room temperature, then roll and fill it. You can also bake the rolls, cool them, and store them in an airtight container. They stay fresh for about 2 days. Reheat them in the oven before serving for the best taste. Look for the dough to double in size. It should feel soft and airy. When you poke it lightly with your finger, it should spring back slowly. If it does not spring back, it is ready. Make sure to cover the dough with a towel while it rises. This keeps it warm and moist. Rising time usually takes about 1 hour. If your rolls are too dense, check your yeast. If it is old or inactive, it won’t rise well. Always activate yeast in warm milk before mixing it in. Next, ensure you knead the dough enough. Kneading helps develop gluten, which makes the rolls light. If your dough seems too dry, add a little more milk. In future batches, measure your ingredients carefully. This helps keep the dough light and fluffy. This article covered making perfect cinnamon rolls with pumpkin. You learned about the key ingredients, step-by-step instructions, and useful tips. Remember to activate your yeast and let the dough rise. Try adding nuts or different spices for unique flavors. Store your rolls properly to keep them fresh. Whether for a family treat or a holiday gathering, these rolls are sure to please. Enjoy the process and share your tasty results!
Fluffy Pumpkin Cinnamon Rolls Perfectly Simple Treat
Get ready to delight your taste buds with fluffy pumpkin cinnamon rolls! This simple treat combines the warm flavors of pumpkin and cinnamon, making it
- 1 cup canned pumpkin puree - 1/2 cup vegetable oil - 1 cup brown sugar, packed - 1/2 cup granulated sugar - 2 large eggs - 1 teaspoon vanilla extract The main ingredients in these muffins create a moist and rich texture. Canned pumpkin puree offers a sweet, earthy flavor. Vegetable oil keeps the muffins soft. Brown sugar adds depth, while granulated sugar gives a touch of sweetness. Eggs bind everything together, and vanilla extract enhances the taste. - 1 1/2 cups all-purpose flour - 1 teaspoon baking soda - 1/2 teaspoon baking powder - 1 teaspoon ground cinnamon - 1/2 teaspoon ground nutmeg - 1/4 teaspoon ground ginger - 1/4 teaspoon salt The dry ingredients are crucial for structure and flavor. All-purpose flour gives the muffins a nice rise. Baking soda and baking powder work together for leavening. Ground spices like cinnamon, nutmeg, and ginger create that warm, cozy taste we all love. Salt balances the sweetness and enhances the flavors. - 1/2 cup chopped walnuts - 1/2 cup chocolate chips Optional ingredients let you customize your muffins. Chopped walnuts add crunch and a nutty flavor. Chocolate chips bring a sweet twist. You can mix and match based on what you enjoy! - Preheat your oven to 350°F (175°C). - Line a muffin tin with paper liners or grease each cup. - In a large bowl, mix 1 cup of canned pumpkin puree and 1/2 cup of vegetable oil. - Add 1 cup of packed brown sugar and 1/2 cup of granulated sugar. - Whisk these ingredients together until smooth. - Crack in 2 large eggs and pour in 1 teaspoon of vanilla extract. - Whisk until the mixture is creamy and all ingredients are mixed. - In a separate bowl, whisk together 1 1/2 cups of all-purpose flour, 1 teaspoon of baking soda, 1/2 teaspoon of baking powder, 1 teaspoon of ground cinnamon, 1/2 teaspoon of ground nutmeg, 1/4 teaspoon of ground ginger, and 1/4 teaspoon of salt. - Gradually fold the dry mixture into the wet ingredients with a spatula. - Stir gently until just combined. Be careful not to overmix. - If you want, fold in 1/2 cup of chopped walnuts and/or 1/2 cup of chocolate chips. - Fill each muffin cup about two-thirds full with batter. - Place the muffin tin in the oven and bake for 20-25 minutes. - To check if they are done, insert a toothpick into a muffin. It should come out clean. - Once baked, cool the muffins in the pan for 5 minutes before moving them to a wire rack. To get the right texture in your muffins, avoid overmixing your batter. Overmixing makes muffins tough. Mix only until the dry and wet ingredients blend together. Another key point is the temperature of your ingredients. Use room temperature eggs and oil. This helps create a smooth batter and fluffy muffins. Checking for doneness is key. Insert a toothpick into the center of a muffin. If it comes out clean, your muffins are ready. Remember that baking times can vary with different ovens. If your oven runs hot, reduce the baking time a bit. If it’s cooler, you might need to add a few minutes. Serve your muffins warm for the best taste. A light sprinkle of powdered sugar can add a nice touch. For a special treat, drizzle some cream cheese frosting on top. Store muffins in an airtight container at room temperature. This keeps them fresh for longer. To keep them extra fresh, consider freezing them. {{image_4}} To make these muffins even better, consider adding spices. Cardamom gives a warm flavor boost. You might also add dried fruits like raisins or cranberries for a sweet twist. These small changes can make a big difference in taste and texture. If you need gluten-free options, use almond or coconut flour. These flours work well but need some tweaking. For vegan substitutions, swap eggs with flaxseed meal mixed with water. This keeps the muffins moist and fluffy while being egg-free. Mixing in different nuts or seeds can add crunch. Try pecans or sunflower seeds for variety. You can also use flavored chocolate chips, like pumpkin spice or dark chocolate. These little swaps keep the muffins exciting and fun to eat! To keep your muffins fresh, store them in an airtight container. Place them at room temperature for up to three days. If you want to keep them longer, freezing is an excellent option. Wrap each muffin tightly in plastic wrap or foil. Then, put them in a freezer-safe bag. They can last for up to three months in the freezer. When you’re ready to enjoy your muffins again, reheating is key. For the best taste, use an oven. Preheat it to 350°F (175°C). Place the muffins on a baking sheet and heat for about 10 minutes. This method keeps them moist and delicious. You can also use the microwave if you're short on time. Heat each muffin for about 15-20 seconds. This method is quick but may make the muffins a bit soft. Choose based on your time and taste preferences. To get that Panera flavor, use quality spices. Fresh spices give a better taste. Make sure to use both brown and granulated sugar. This mix adds depth to the sweetness. Also, don’t forget vanilla extract; it enhances the overall flavor. Lastly, keep an eye on baking time for a perfect rise and texture. Yes, you can use fresh pumpkin. Just be sure to roast and puree it first. Fresh pumpkin adds a vibrant flavor. It may also be a bit wetter, so adjust flour if needed. Aim for about one cup of pureed fresh pumpkin. These muffins last about three days at room temperature. Store them in an airtight container to keep them fresh. You can also freeze them for up to three months. Just wrap each muffin well to prevent freezer burn. You can use applesauce as an egg substitute. Use 1/4 cup of applesauce for each egg. Mashed banana works, too, for a different flavor. Another option is to mix flaxseed meal with water. Use one tablespoon of flaxseed meal with three tablespoons of water for one egg. These pumpkin muffins blend flavor and ease. You learned about key ingredients like pumpkin puree and spices. Mixing wet and dry elements carefully makes all the difference. Remember to store your muffins right for lasting taste. You can also customize with nuts or swap ingredients for dietary needs. Whatever you choose, enjoy your tasty treat! Your next batch can be even better now that you have these tips. Happy baking!
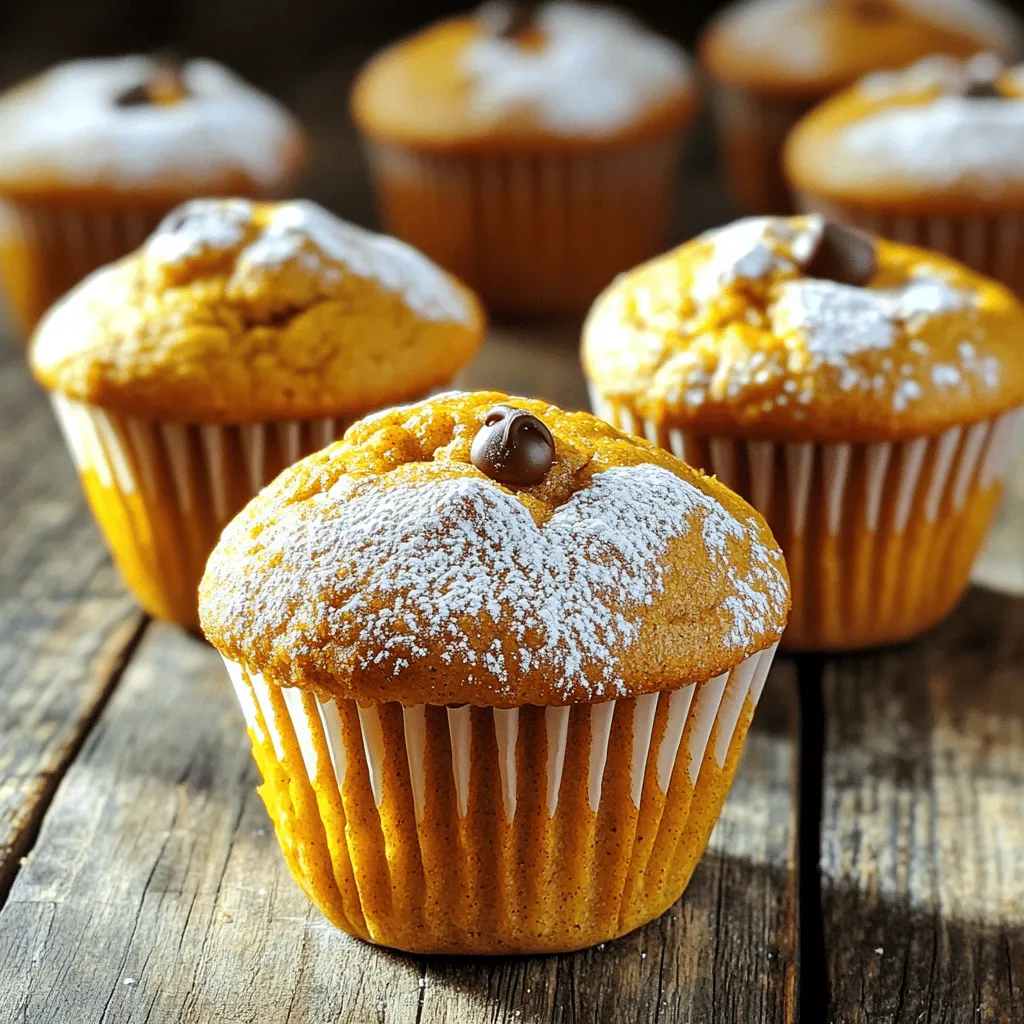
Copycat Panera Pumpkin Muffins Delightful and Easy Recipe
If you love Panera’s pumpkin muffins, you’re in for a treat! I’ll show you how to make an easy, copycat version right at home. Packed
- 1 cup canned pumpkin puree - 1/2 cup vegetable oil - 1/2 cup unsweetened applesauce - 1 cup packed brown sugar - 1/2 cup granulated sugar The main ingredients of this pumpkin bread are quite simple. Canned pumpkin puree is the star. It gives the bread its rich flavor and moist texture. I use vegetable oil and applesauce to keep it tender. The mix of brown and granulated sugars adds sweetness and depth. - 2 cups all-purpose flour - 1 teaspoon baking soda - 1/2 teaspoon baking powder - 1 teaspoon ground cinnamon - 1/2 teaspoon ground nutmeg - 1/4 teaspoon ground ginger - 1/2 teaspoon salt Now, let’s talk about dry ingredients. All-purpose flour provides the structure. Baking soda and baking powder help it rise. The spices add warmth and flavor. Cinnamon, nutmeg, and ginger create a cozy taste. Salt balances the sweetness and brings out the flavors. - 1/2 cup chopped walnuts or pecans - 1/2 cup chocolate chips You can make this bread even better with optional add-ins. Chopped walnuts or pecans add crunch. If you love chocolate, mix in some chocolate chips. They melt and create sweet pockets in the bread. You can customize it to fit your taste! - Preheat the oven to 350°F (175°C). - Prepare a 9x5-inch loaf pan by greasing it with butter or cooking spray. Dust it with flour, or line it with parchment paper. - In a large bowl, combine 1 cup of canned pumpkin puree, 1/2 cup of vegetable oil, and 1/2 cup of unsweetened applesauce. Mix until smooth. - Add 1 cup of packed brown sugar and 1/2 cup of granulated sugar. Stir until the mixture is uniform and lump-free. - Beat in 3 large eggs one at a time. Make sure each egg blends well before adding the next. Finally, stir in 1 teaspoon of vanilla extract. - In another bowl, whisk together 2 cups of all-purpose flour, 1 teaspoon of baking soda, 1/2 teaspoon of baking powder, 1 teaspoon of ground cinnamon, 1/2 teaspoon of ground nutmeg, 1/4 teaspoon of ground ginger, and 1/2 teaspoon of salt. - Gradually add the dry mixture into the wet ingredients. Use a spatula to gently fold until just combined. A few lumps are okay; do not overmix. - If you want, fold in 1/2 cup of chopped walnuts or pecans and/or 1/2 cup of chocolate chips. This step adds extra flavors and textures. - Pour the batter into the prepared loaf pan. Use the spatula to smooth the top for even baking. Using canned pumpkin puree is key. It adds moisture and flavor. Make sure it's pure pumpkin, not pie filling. This gives your bread the right texture and taste. Measuring flour correctly is also crucial. Use a spoon to scoop flour into your measuring cup. Then, level it off with a knife. Avoid packing the flour down. Too much flour makes the bread dry. Do not overmix the batter. Mixing too much can make the bread tough. Stir just until ingredients combine. A few lumps are okay. This keeps the bread soft and moist. When folding in ingredients, use a spatula. Gently lift and turn the batter. This method helps keep the air in the batter. It helps your bread rise nicely. Set your oven to 350°F (175°C). This temperature bakes the bread evenly. Bake for 60 to 70 minutes. Check for doneness by inserting a toothpick into the center. If it comes out clean, your bread is ready. Using a toothpick is simple and effective. It helps you avoid cutting into the bread too soon. Wait until it cools a bit to enjoy its full flavor. {{image_4}} You can make pumpkin bread even better by adding spices. Try allspice or cloves for a warm kick. These spices bring out the pumpkin flavor and make your bread feel cozy. You can also swap in different sugars. Coconut sugar adds a unique taste and a deeper color. It makes your bread slightly caramel-like, which is a delightful twist. Want to make the bread gluten-free? Use almond flour or a gluten-free blend instead of all-purpose flour. This keeps the bread soft and tasty. If you need a vegan option, replace eggs with flax eggs or applesauce. Use almond milk in place of dairy. These swaps maintain the moist texture and flavor you love. Add seasonal ingredients to shake things up! Dried cranberries or raisins add a sweet chewiness. They also bring a pop of color to your loaf. For a chocolate twist, mix in chocolate chips. This creates a rich, decadent bread that’s perfect for any occasion. Each variation allows you to adapt the recipe to your taste and the season. To keep your pumpkin bread fresh for a few days, store it at room temperature. The best way is to use an airtight container. This prevents air from drying out your bread. Place a piece of wax paper or parchment between the bread and the lid for extra moisture. You can also wrap the bread tightly in plastic wrap. This method keeps it soft and delicious. For longer storage, freezing is a great option. Wrap your bread tightly in plastic wrap, then in aluminum foil. This protects it from freezer burn. You can also use a freezer bag. Make sure to squeeze out all the air. When you want to eat it, take it out and let it thaw in the fridge overnight. For a quick fix, you can microwave slices for about 15-20 seconds. Pumpkin bread stays fresh for about 3 to 5 days at room temperature. In the fridge, it can last up to a week. If you freeze it, it can be good for up to 3 months. Signs that your bread has gone bad include mold, a dry texture, or an off smell. Always check before eating! Pumpkin bread gets its moisture from a blend of key ingredients. The canned pumpkin puree is the star here. It has a lot of water and fiber. This helps make the bread soft. Vegetable oil also plays a big role. It keeps the bread rich and moist. Unsweetened applesauce adds even more moisture and flavor. Using both brown and granulated sugars gives a nice texture too. Brown sugar has more moisture than white sugar. Yes, you can change the sugar levels in the recipe. If you want less sugar, use less brown sugar. You can cut it by a quarter cup. For a natural sweetener, try using honey or maple syrup. Remember, these may change the texture a bit. If you use liquid sweeteners, reduce the oil slightly. This keeps the texture right. To check if your pumpkin bread is done, use a toothpick. Insert it into the center of the loaf. If it comes out clean, the bread is ready. If there is batter on the toothpick, bake a bit longer. Keep the oven door closed to avoid losing heat. This method will not harm your loaf. You can use different types of loaf pans for baking pumpkin bread. A metal pan works well and gives a nice crust. Glass pans are good too, but they may need a few extra minutes. If you use a silicone pan, the bread may bake faster. Always remember to grease the pan or line it with parchment paper. This helps the bread come out easily. Ultra moist pumpkin bread is a delight that brings warmth and joy. You learned the key ingredients like canned pumpkin, oils, and sugars. We explored important tips on mixing and baking for the best texture. You can also enjoy various flavors and storage options to keep it fresh. Remember, small changes can make a big difference. So, bake, share, and enjoy your creation with family and friends. Your pumpkin bread can become a favorite in no time!
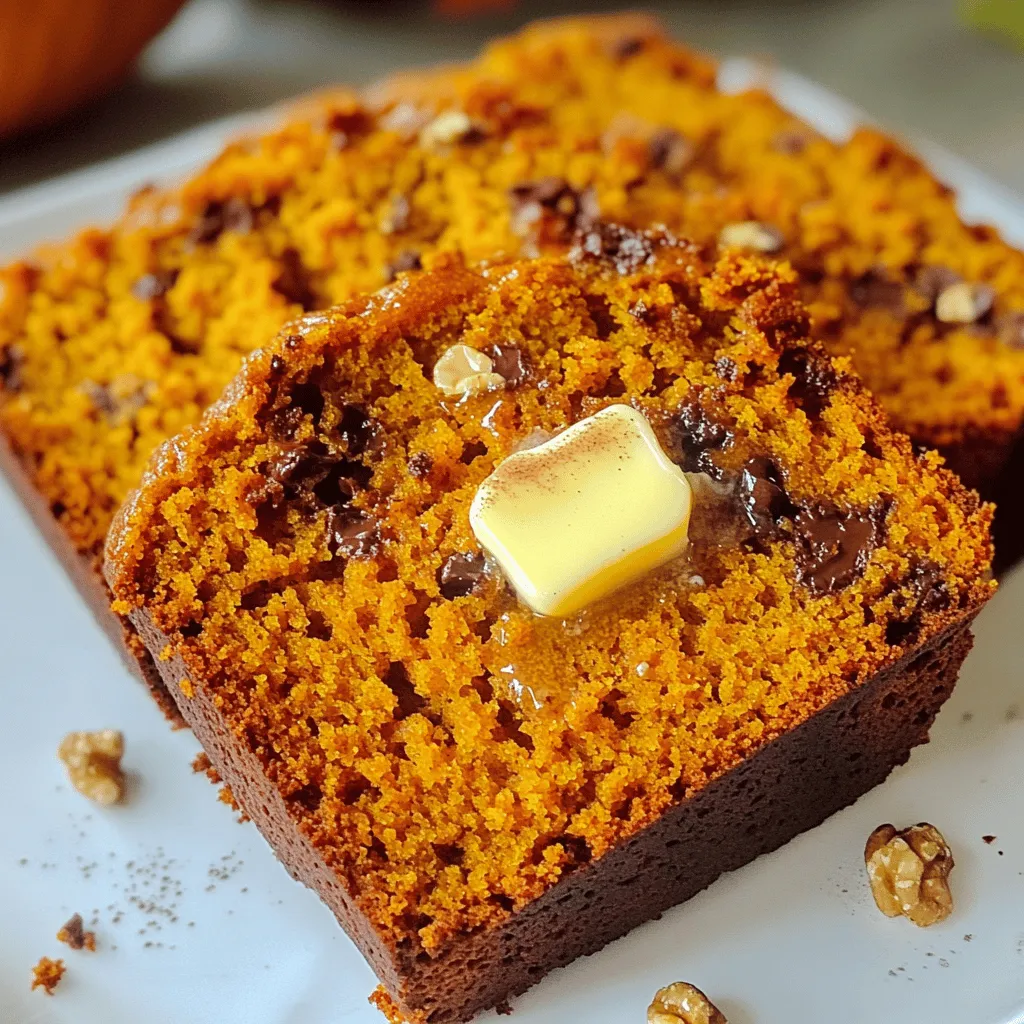
Ultra Moist Pumpkin Bread Simple and Delicious Recipe
Are you ready to bake the ultimate pumpkin bread? This Ultra Moist Pumpkin Bread recipe is simple yet packed with flavor, making it a fall
- 2 cups all-purpose flour - 1 cup pumpkin puree - 1/2 cup brown sugar - 1/2 teaspoon salt To make No-Knead Pumpkin Bread, you need a few basic items. Start with all-purpose flour. You will need two cups of it. The flour gives the bread its structure. Pumpkin puree adds moisture and flavor. You can use canned or fresh pumpkin. Brown sugar adds a lovely sweetness. It helps create a nice crust too. Don’t forget the salt! It brings out all the flavors in the bread. - 1/2 teaspoon baking soda - 1 teaspoon baking powder - 1 tablespoon pumpkin pie spice Next, we have the leavening agents and spices. Baking soda and baking powder help the bread rise. You only need a little of each. Pumpkin pie spice adds that warm, cozy flavor. It usually has cinnamon, nutmeg, and ginger. This blend gives your bread that fall flavor everyone loves. - 1/4 cup vegetable oil - 2 large eggs - 1/2 cup chopped walnuts or pecans (optional) - 1/2 cup chocolate chips (optional) Now, let's talk about the wet ingredients. You will need one-fourth cup of vegetable oil. It keeps the bread moist and tender. You also need two large eggs. They help bind everything together. If you like nuts, you can add half a cup of chopped walnuts or pecans. They give a nice crunch. For a sweet treat, add half a cup of chocolate chips. These options let you make the bread your own! First, grab a large mixing bowl. In this bowl, whisk together: - 2 cups all-purpose flour - 1/2 cup brown sugar - 1/2 teaspoon salt - 1/2 teaspoon baking soda - 1 teaspoon baking powder - 1 tablespoon pumpkin pie spice Make sure you mix well. You want no lumps in your dry mix. In a separate bowl, blend together: - 1 cup pumpkin puree - 1/4 cup vegetable oil - 2 large eggs Stir until the mixture is smooth and creamy. This step adds moisture and flavor. Next, pour the wet mixture into the dry ingredients. Using a spatula, gently fold the two together. Stop mixing once you see a few lumps. This keeps your bread fluffy. If you want, add: - 1/2 cup chopped walnuts or pecans - 1/2 cup chocolate chips Fold these in until they are even in the batter. Now, cover the bowl with plastic wrap or a clean towel. Let it rest for at least 1 hour at room temperature. This step is key! It enhances the flavors and helps the dough rise without kneading. Preheat your oven to 350°F (175°C). While it heats, grease a 9x5-inch loaf pan. This keeps the bread from sticking. After the batter has rested, carefully pour it into the loaf pan. Use your spatula to smooth the top. Bake the bread for 50-60 minutes. To check if it’s done, insert a toothpick into the center. It should come out clean. Once baked, remove it from the oven and let it cool in the pan for 10 minutes. After that, transfer it to a wire rack to cool completely. Enjoy the warm, cozy aroma! - Use room temperature ingredients. This helps mix the batter well. - Avoid overmixing. It keeps the bread light and fluffy. When you mix the dry and wet ingredients, a gentle touch is key. If you see lumps, that’s okay! They’re normal. Overmixing can lead to dense bread, which we want to avoid. - Use fresh pumpkin puree for a richer taste. It brings out the squash’s natural sweetness. - Swap pumpkin pie spice for a mix of cinnamon, nutmeg, and ginger. This can change the flavor profile and make it unique. Adding fresh spices can make the bread shine. You might also try adding a pinch of allspice or cloves for a warm kick. - Serve slices warm or at room temperature. This keeps the bread soft and inviting. - Garnish with a dollop of cream cheese spread. A sprinkle of pumpkin pie spice on top looks great too. Plating is important. Use a decorative platter to make your bread pop. It will impress your guests! {{image_4}} You can add cranberries to the bread for a tart twist. The berries bring a nice contrast to the sweet pumpkin. Just fold in about 1/2 cup of fresh or dried cranberries when mixing the batter. Another idea is to swap pumpkin puree with sweet potato puree. This change still gives you that wonderful fall flavor. It also adds a slight sweetness to the bread. Experimenting with spices can change the flavor of your bread. You might try adding ground ginger or allspice. These spices can give the bread a new taste that surprises your family and friends. Drizzling your bread with a glaze or frosting can make it even more special. A simple mix of powdered sugar and milk works great. You can also add vanilla or maple syrup to the glaze for extra flavor. If you need a gluten-free option, you can use a gluten-free flour blend. Make sure to check that the blend includes a binding agent, like xanthan gum. This helps the bread hold together well. For a vegan version, swap the eggs with flax eggs. To make a flax egg, mix 1 tablespoon of ground flaxseed with 3 tablespoons of water. Let it sit for a few minutes until it thickens. This will help your bread stay moist and delicious. To keep your pumpkin bread fresh, place it in an airtight container. This helps avoid dryness. You can also wrap it tightly in plastic wrap. Store the bread in the fridge for up to one week. Use a clean kitchen towel to absorb any moisture. To freeze your pumpkin bread, slice it first. Place the slices in a single layer on a baking sheet. Freeze for about one hour. Then, transfer the slices to a freezer bag. Remove as much air as possible. You can freeze the bread for up to three months for best taste. To thaw, simply leave it in the fridge overnight. For reheating, use the oven for best results. Preheat the oven to 350°F (175°C). Wrap the bread in foil to keep it moist. Heat for about 10-15 minutes. You can also use a toaster oven for individual slices. Aim for a warm temperature for the best flavor. Enjoy it plain or with a spread! To check if your no-knead pumpkin bread is done, use a toothpick. Insert it into the center of the bread. If it comes out clean, your bread is ready. If you see wet batter on the toothpick, it needs more time. Bake it for an extra 5 to 10 minutes and check again. This simple test helps ensure you have a perfectly baked loaf. Yes, you can use fresh pumpkin instead of canned. To do this, cook your pumpkin until soft. Then, puree it until smooth. Measure out one cup of your fresh pumpkin puree. This will work just like canned pumpkin in the recipe. The taste may be a bit fresher, and you'll have a homemade touch. The no-knead method changes how gluten forms. When you allow the batter to rest, gluten develops naturally. This gives your bread a soft and tender crumb. You avoid tough bread because you don’t knead it. The resting time is key to getting that perfect texture. You can enhance the flavors of your pumpkin bread in many ways. Adding 1/2 cup of chopped walnuts or pecans gives a nice crunch. You can also mix in 1/2 cup of chocolate chips for a sweet surprise. Try adding dried cranberries or raisins for extra flavor. Experimenting with these options makes the bread even more fun. To store your pumpkin bread, wrap it tightly in plastic wrap. This keeps it fresh for a few days at room temperature. You can also place it in an airtight container. For longer storage, freeze the bread. Just slice it first, wrap each slice, and store in a freezer bag. This way, you can enjoy a slice anytime. No-knead pumpkin bread is both easy to make and fun to enjoy. We covered the essential ingredients, step-by-step instructions, tips for great flavor, and storage methods. Remember, letting the batter rest helps create a better texture. Feel free to experiment with add-ins or spices to make this recipe your own. With these simple steps, you can bake a delicious treat for any season. Enjoy sharing your warm bread with family and friends!
No-Knead Pumpkin Bread Simple and Flavorful Recipe
Are you craving a simple yet delicious fall treat? My No-Knead Pumpkin Bread recipe is here to satisfy your taste buds! With just a handful
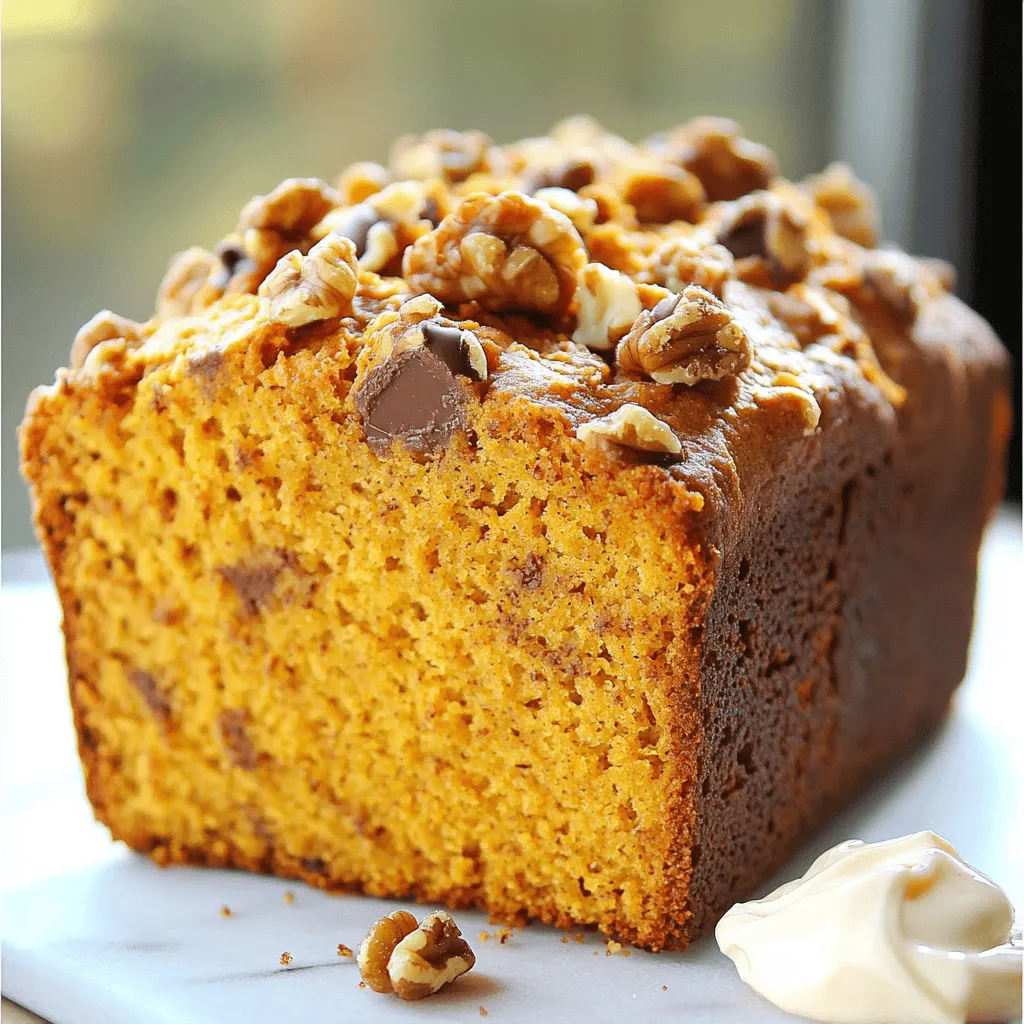
To make a delicious pumpkin bread, you need simple and tasty ingredients. Here’s a list of what you will need: - 1 ½ cups all-purpose flour - 1 teaspoon baking powder - ½ teaspoon baking soda - 1 teaspoon ground cinnamon - ½ teaspoon ground nutmeg - ½ teaspoon ground ginger - ¼ teaspoon salt - 1 cup canned pumpkin puree - ¾ cup granulated sugar - ½ cup packed brown sugar - ½ cup vegetable oil - 2 large eggs - 1 teaspoon vanilla extract - ½ cup walnuts or pecans, chopped (optional) - ½ cup chocolate chips (optional) Each ingredient plays an important role in this recipe. The all-purpose flour gives the bread its structure. Baking powder and baking soda help it rise. The spices, like cinnamon and nutmeg, add warmth and flavor. Canned pumpkin puree makes it moist and rich. You can choose between granulated sugar and brown sugar for sweetness. Brown sugar adds a hint of caramel flavor. Vegetable oil keeps the bread tender, while eggs help bind everything together. If you want to add some crunch or extra flavor, consider the optional nuts or chocolate chips. They make the bread even more delightful! For the full recipe, check out the Spiced Pumpkin Delight Bread section. - Preheat the oven to 350°F (175°C). - Prepare a 9x5-inch loaf pan by greasing it or lining it with parchment paper. - In a medium bowl, whisk together: - 1 ½ cups all-purpose flour - 1 teaspoon baking powder - ½ teaspoon baking soda - 1 teaspoon ground cinnamon - ½ teaspoon ground nutmeg - ½ teaspoon ground ginger - ¼ teaspoon salt - Set this bowl aside for later use. - In a large bowl, combine: - 1 cup canned pumpkin puree - ¾ cup granulated sugar - ½ cup packed brown sugar - ½ cup vegetable oil - Mix these until smooth. - Gradually add: - 2 large eggs - 1 teaspoon vanilla extract - Mix thoroughly after each addition. - Slowly add the dry ingredients into the wet mixture. - Use a spatula to gently fold until just combined. - Avoid overmixing for the best results. - If you want, fold in: - ½ cup walnuts or pecans, chopped - ½ cup chocolate chips - This adds fun flavor and texture. - Pour the batter into your prepared pan. - Bake for 55 to 60 minutes. - Check for doneness by inserting a toothpick in the center. - It should come out clean when the bread is ready. For the full recipe, refer to the detailed instructions provided. To make great pumpkin bread, avoid overmixing. When you mix too much, the bread can turn out dense and tough. Instead, use a gentle folding method. Start with the dry ingredients and slowly add them to the wet mixture. Use a spatula and fold until just combined. This keeps the texture light and fluffy. For a beautiful presentation, slice the bread neatly. Dust it lightly with powdered sugar for a touch of charm. You can also serve slices with whipped cream. A drizzle of maple syrup adds a sweet touch. These simple ideas make your pumpkin bread even more delightful. One common mistake is overbaking the bread. Keep an eye on the time and check for doneness. If the toothpick comes out clean, it's ready. Another mistake is not measuring ingredients correctly. Use measuring cups and spoons for accuracy. This helps ensure your pumpkin bread turns out perfect every time. {{image_4}} You can easily mix up the flavors of your pumpkin bread. One great idea is to add dried fruits like raisins or cranberries. They give a sweet and chewy texture. Another option is to play with spices. Try adding a bit of allspice or cardamom for a unique twist. Each change makes the bread taste special and fresh. If you need a gluten-free option, you can use a gluten-free flour blend. This still gives you a soft and tasty loaf. For those who want a vegan version, replace the eggs with flaxseed meal mixed with water. You can also use applesauce or a banana as an egg substitute. For oil, try using coconut oil or applesauce to keep it moist. Get creative with mix-ins! You can add seeds like pumpkin or sunflower seeds for crunch. If you love coconut, add shredded coconut for a tropical touch. You might even want to toss in some extra chocolate chips. These mix-ins make your pumpkin bread even more fun and exciting to eat. By exploring these variations, you can create a pumpkin bread that suits your taste and needs. For a detailed guide on making this delicious bread, check out the Full Recipe. To keep your pumpkin bread fresh, use an airtight container. This method helps retain moisture and flavor. Wrap the bread tightly in plastic wrap before placing it in the container. Store it at room temperature for up to three days. If you want to keep it longer, consider freezing. Freezing is a great way to save your pumpkin bread for later. First, wrap the cooled bread tightly in plastic wrap. Then, place the wrapped bread in a freezer bag. Press out as much air as possible before sealing it. For best results, use it within three months. To thaw, place it in the fridge overnight. You can also heat it in the oven at a low temperature until warm. Pumpkin bread lasts about three days at room temperature. In the fridge, it can stay fresh for up to one week. If you freeze it, enjoy it within three months for the best taste. Always check for signs of spoilage, like mold or an off smell, before eating. Enjoy this delightful treat whenever you want! For the full recipe, check out [Full Recipe]. You can check for doneness with a toothpick. Insert it into the center of the bread. If it comes out clean, your bread is done. If there is batter on the toothpick, it needs more time. I usually start checking around the 55-minute mark. Yes, you can make pumpkin bread without eggs. A few good egg substitutes include applesauce, mashed banana, or flaxseed meal mixed with water. Use 1/4 cup of applesauce or mashed banana for each egg. For flaxseed, mix 1 tablespoon with 2.5 tablespoons of water and let it sit for a few minutes. You can substitute sugar with honey, maple syrup, or stevia. If you use honey or maple syrup, reduce the liquid in your recipe slightly. If you choose stevia, follow the package instructions for the right amount. Yes, you can use fresh pumpkin. First, roast or steam the pumpkin until it is soft. Then, mash it until smooth. You may need to adjust the moisture in your recipe, as fresh pumpkin can be wetter than canned puree. You can double the recipe easily. Just use two loaf pans or make one large loaf. Keep an eye on the baking time, as larger loaves may need more time to bake. Check for doneness as usual. For the full recipe, refer to the section above. You now have all the tools to bake delicious pumpkin bread. We explored the essential ingredients, step-by-step instructions, handy tips, and creative variations. Remember to avoid overmixing and to check the bread for doneness. I hope you try out these methods and enjoy your baking. It's all about creating something special and sharing it with loved ones. Enjoy your tasty bread!
Easy Pumpkin Bread Delightful and Simple to Make
Welcome to my guide on making Easy Pumpkin Bread! This recipe is a simple delight, perfect for autumn or any cozy day. With just a
To make the Cinnamon Swirl Snickerdoodle Blondies, you need the following ingredients: - 1 cup unsalted butter, melted - 1 cup packed light brown sugar - 1/2 cup granulated sugar - 2 large eggs, at room temperature - 2 teaspoons pure vanilla extract - 2 cups all-purpose flour - 1 teaspoon baking powder - 1/2 teaspoon baking soda - 1/2 teaspoon salt - 2 teaspoons ground cinnamon - 1/4 teaspoon freshly grated nutmeg (optional) - 1/4 cup granulated sugar (for topping) - 1 tablespoon ground cinnamon (for topping) Using room temperature eggs helps create a smooth batter. It allows the eggs to blend better with the melted butter and sugars. Melted butter adds moisture and richness to the blondies. This combination ensures your blondies bake evenly and develop that soft, chewy texture we all love. For an extra layer of flavor, consider adding freshly grated nutmeg. This spice deepens the warm, cozy notes of the blondies. You can also experiment with toppings or mix-ins. Try adding chocolate chips for a sweet twist or chopped nuts for some crunch. These simple changes can elevate your treats and make them unique to your taste. Want to take it up a notch? You could even drizzle some melted white chocolate on top. It will look fancy and taste amazing! Start by preheating your oven to 350°F (175°C). Then, prepare a 9x13 inch baking dish. Line it with parchment paper. Make sure the paper hangs over the edges. This helps lift the blondies out easily later. In a large mixing bowl, combine 1 cup of melted unsalted butter with 1 cup of packed light brown sugar and 1/2 cup of granulated sugar. Whisk this mixture until it becomes smooth. Next, add 2 large eggs, one at a time. Mix well after each addition. Then, stir in 2 teaspoons of pure vanilla extract. Continue to mix until everything is well combined. Now, in a separate bowl, whisk together the dry ingredients. Combine 2 cups of all-purpose flour, 1 teaspoon of baking powder, 1/2 teaspoon of baking soda, 1/2 teaspoon of salt, and 2 teaspoons of ground cinnamon. Whisking helps ensure even distribution of the ingredients. This step is key for the best flavor and texture. Next, gently fold the dry ingredients into the wet mixture. Be careful not to overmix. The batter should be thick and slightly chunky. To create the perfect swirl, pour half of the batter into your prepared baking dish. Spread it evenly using a spatula. Now, sprinkle half of the cinnamon-sugar mixture over this layer. Set the rest of the mixture aside. Pour the remaining batter on top of the first layer. To create the swirl, use a knife or spatula. Drag it through both layers of batter. Be careful not to over-swish. You want a nice marbled look. After swirling, top with the rest of the cinnamon-sugar mixture. Now, bake your blondies in the preheated oven for 25-30 minutes. Check for doneness by inserting a toothpick in the center. If it comes out clean or with a few moist crumbs, they are ready. After baking, let them cool in the pan for about 10 minutes. Use the parchment paper to lift the blondies onto a wire rack. Once cooled, cut them into squares and enjoy your sweet treat! For the full recipe, refer to the instructions above. - Always check for doneness with a toothpick. Insert it into the center. If it comes out clean or with a few crumbs, you're good! - Ovens can behave differently. Start checking your blondies at 25 minutes. If they are not done, keep an eye on them and add a few minutes if needed. - For a lovely presentation, drizzle melted white chocolate over the blondies. A dusting of powdered sugar also adds charm. - These blondies pair perfectly with vanilla ice cream or a warm cup of coffee. The flavors blend beautifully! - Avoid overmixing the batter. This can make your blondies tough. Mix just until combined. - Let your blondies cool properly before cutting. If you cut them too soon, they may crumble. Patience pays off! For the full recipe to create these delicious treats, check out the full recipe. {{image_4}} You can make these blondies even more exciting! Adding chocolate chips gives a rich twist. You can use semi-sweet or dark chocolate for a deeper flavor. Dried fruits like cranberries or cherries also work great. They add a nice chew and sweetness. If you want a different spin, try a caramel swirl instead of cinnamon. Melt caramel and drizzle it over the batter before baking. Swirl it in gently for a sweet surprise in every bite. You can serve these blondies in many fun ways. For a quick treat, cut them into small bites. These are perfect for parties or snacks. If you prefer a more classic look, slice them into bars. Warm blondies are soft and gooey, which is great for dessert. You can serve them with ice cream for a special touch. Chilled blondies have a firmer texture, making them easy to pack for lunch. Each serving style offers a unique taste experience. For the full recipe, check out the detailed instructions to make these delicious treats! To keep your blondies fresh, store them at room temperature. Place them in an airtight container. This helps maintain their soft texture and rich flavor. You can also layer them with parchment paper to prevent sticking. Enjoy them within a week for the best taste. For long-term storage, you can freeze the blondies. First, cut them into squares. Wrap each piece in plastic wrap, then place them in a freezer bag. This method prevents freezer burn and keeps them tasty. When you’re ready to eat, thaw them in the fridge overnight. You can also warm them in the microwave for a few seconds. This restores their warm, gooey goodness. Enjoy your treats anytime! For the full recipe, refer to the earlier section. Cinnamon swirl snickerdoodle blondies can last about five days when stored properly. Keep them in an airtight container at room temperature. If you want them to last longer, consider freezing them. They can stay fresh in the freezer for up to three months. Just remember to thaw them before enjoying! Yes! You can easily make these blondies gluten-free. Simply substitute the all-purpose flour with a gluten-free blend. Look for a blend that contains xanthan gum, as it helps with texture. You can also use almond flour, but mix it with a little coconut flour for the best results. Definitely! Adding nuts can enhance the texture and flavor. Chopped walnuts or pecans work great. Just fold in about half a cup of your chosen nuts when mixing the batter. You can also sprinkle some on top before baking for extra crunch. Cinnamon Swirl Snickerdoodle Blondies are fun and simple to make. We covered the right ingredients, from room temperature eggs to optional mix-ins. I shared step-by-step instructions to help you get the perfect swirl. We also discussed baking tips, serving ideas, and storage methods. With these tips, you can create delicious blondies and avoid common mistakes. Enjoy experimenting with flavors and make this treat your own. Now, go enjoy your sweet creation!
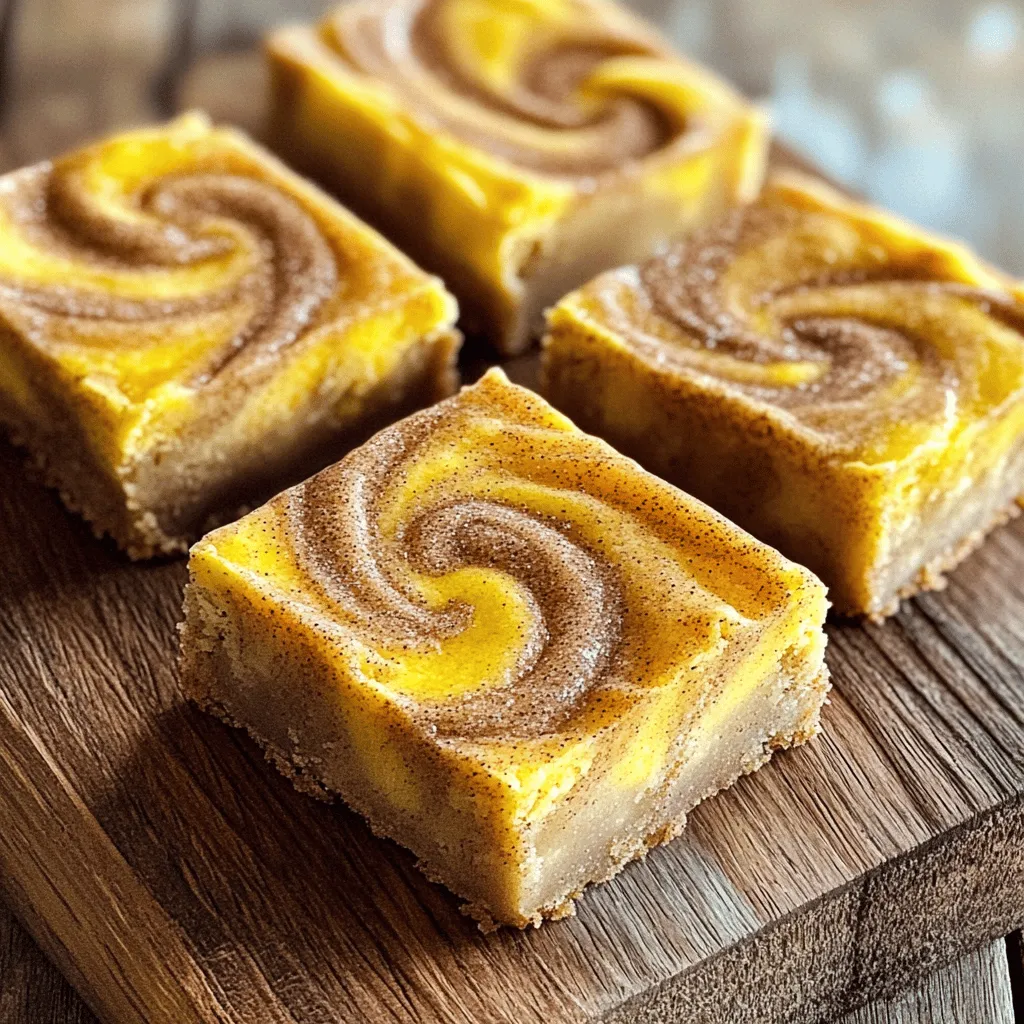
Cinnamon Swirl Snickerdoodle Blondies Irresistible Treat
Welcome to a world of sweet bliss! These Cinnamon Swirl Snickerdoodle Blondies are a must-try. Imagine warm, gooey blondies with a cinnamon swirl that will