Breakfast

To make a delicious Mediterranean frittata, you need simple, fresh ingredients. Here are the key items: - 6 large eggs - 1/4 cup milk - 1/2 cup feta cheese, crumbled - 1/2 cup cherry tomatoes, halved - 1/2 cup bell peppers (a vibrant mix of red and yellow), diced - 1/2 small red onion, finely chopped - 1/2 cup fresh baby spinach - 2 tablespoons fresh basil, finely chopped - 1 tablespoon extra-virgin olive oil - Salt and freshly cracked black pepper to taste Each ingredient brings its own flavor and flair. Eggs form the base, while milk adds creaminess. Feta cheese gives a salty, rich touch. Cherry tomatoes add sweetness and brightness, while bell peppers offer crunch and color. Red onion adds a mild bite, and baby spinach gives a fresh green taste. Fresh basil adds a hint of earthiness, making the dish fragrant. Extra-virgin olive oil provides a smooth finish and enhances the flavors. Salt and black pepper round out the taste. You can easily swap ingredients based on your needs. For a dairy-free option, use almond or coconut milk instead of regular milk. For cheese, try using dairy-free feta or nutritional yeast for a cheesy flavor. If you have allergies, substitute the eggs with a chickpea flour mix. This works well for a vegan frittata. You can also change up the herbs. Try parsley or oregano instead of basil for a different twist. Feel free to mix in other vegetables too! Zucchini, mushrooms, or artichokes can all work well. Just make sure to adjust the cooking time to ensure everything cooks evenly. To start, gather your fresh veggies. Dice bell peppers and chop red onion finely. Halve the cherry tomatoes and rinse the spinach. For the herbs, finely chop the basil. Next, grab a large bowl. Whisk together the eggs and milk until smooth. Season with salt and black pepper to taste. This mixture is the heart of your frittata. Tips for efficiency: - Keep your cutting board clear. - Use a sharp knife for quick chopping. - Measure all ingredients before you start cooking. Heat your oven to 400°F (200°C) first. Take an oven-safe skillet and add olive oil over medium heat. Once hot, add red onion and bell peppers. Sauté these for about 3-4 minutes. You want them soft but not brown. Next, toss in the cherry tomatoes and spinach. Stir for another 2 minutes until the spinach wilts. Now, pour the egg mixture over the veggies. Gently stir to mix everything evenly. Sprinkle the crumbled feta cheese and chopped basil on top. Cook on the stovetop for around 5 minutes. Look for the edges to start setting. Carefully place the skillet in the oven. Bake for about 10-12 minutes. The frittata should puff up and turn golden. To check doneness, insert a toothpick in the center. It should come out clean. Slice the frittata into wedges. You can serve it warm or at room temperature. For a stunning display, use a rustic wooden board. Garnish with more fresh basil for color. Pair the frittata with a fresh green salad. A light lemon vinaigrette will add brightness. You can also add a lemon wedge for extra zest. Enjoy your Mediterranean delight! For the full recipe, refer to the Full Recipe section. To make a great frittata, start with fresh eggs. Fresh eggs taste better and hold their shape. Use a whisk to blend eggs and milk well. This helps create a fluffy texture. Add salt and pepper for flavor, but don’t overdo it. Taste your mix before cooking. Common mistakes often include overcooking. A frittata should be soft and tender, not dry. Avoid cooking on high heat. Instead, cook on medium heat to control the cooking process. Also, don’t skip the oven step! Baking helps set the frittata evenly. Want to add more flavor? Try using herbs like thyme or oregano. They boost the taste without adding much work. You can also add spices like paprika for a smoky kick. For a richer taste, mix in sun-dried tomatoes or olives. To make your frittata more elaborate, consider adding cooked meats like sausage or bacon. Just make sure to chop them small so they blend well. You can even layer different cheeses for a creamy finish. This way, you stay creative without complicating the recipe. If you're curious about the full recipe, check out the Mediterranean Delight Frittata. {{image_4}} You can mix and match veggies in your Mediterranean frittata. Try seasonal options like zucchini, asparagus, or artichokes. Each adds a fresh taste. You can also explore regional flavors. For a Spanish twist, use potatoes and chorizo. For an Italian flair, add sun-dried tomatoes and olives. Making your frittata fit your needs is simple. To make it vegetarian, skip the meat and focus on veggies. For a gluten-free version, ensure your ingredients are labeled as gluten-free. If you're dairy-free, replace feta with tofu or a dairy-free cheese. To boost protein, add cooked chicken, turkey, or legumes like chickpeas. You can find even more ideas in the Full Recipe. To store any leftover Mediterranean frittata, let it cool first. Then, wrap it tightly with plastic wrap or place it in an airtight container. This keeps the frittata fresh and prevents it from drying out. You can store it in the fridge for up to three days. If you want to keep it longer, place it in the freezer. It can last up to two months when frozen. Just remember to label it with the date for easy tracking. When it's time to enjoy the frittata again, reheating is key. For the best results, use an oven. Preheat your oven to 350°F (175°C). Place the frittata on a baking sheet and cover it with foil. Heat for about 15 minutes, until warm. This method keeps the texture nice and fluffy. If you're short on time, you can also use a microwave. Place a slice on a microwave-safe plate, cover it with a damp paper towel, and heat for 30 seconds. Check if it’s warm enough; if not, heat in 10-second bursts. This method may change the texture a bit, but it’s quick and simple. For the complete recipe, check the Full Recipe section. Making a Mediterranean frittata is quick and easy. Here’s a breakdown: - Prep Time: 10 minutes - Cooking Time: 20 minutes - Total Time: 30 minutes With just a little time, you can enjoy a tasty dish. Yes, you can prepare this frittata ahead of time! After cooking, let it cool. Then, store it in an airtight container in the fridge. It will stay fresh for about three days. You can even freeze it for up to two months. Just ensure you thaw it overnight in the fridge before reheating. This makes it great for meal prep or brunch gatherings. The Mediterranean frittata pairs well with many sides. Here are some ideas: - Fresh Green Salad: A light salad with arugula or mixed greens works great. - Roasted Vegetables: Try roasted zucchini, bell peppers, or eggplant for extra flavor. - Crusty Bread: Serve slices of rustic bread for a satisfying crunch. For drinks, I recommend: - Chilled White Wine: A crisp Sauvignon Blanc complements the frittata well. - Sparkling Water with Lemon: This adds a refreshing twist. These pairings enhance the meal and make it even more enjoyable. You can find the full recipe for the Mediterranean frittata above! In this post, we explored the Mediterranean frittata, highlighting key ingredients like feta and olives. We discussed how to prep, cook, and serve this tasty dish. You learned tips to avoid common mistakes and how to store leftovers. Finally, we covered dietary variations, making this frittata great for everyone. With these insights, you'll create a delicious frittata that fits your taste and needs. Enjoy experimenting in your kitchen!
Mediterranean Frittata Flavorful and Simple Dish
Are you ready to impress your taste buds? The Mediterranean frittata is a flavorful and simple dish that packs a punch in every bite. This
To make a tasty vegetable frittata, gather these ingredients: - 6 large eggs - 1/2 cup milk (or your favorite plant-based alternative) - 1 cup fresh spinach, thoroughly chopped - 1/2 cup bell peppers, diced - 1/2 cup cherry tomatoes, halved - 1/4 cup red onion, finely chopped - 1 cup zucchini, diced - 1 teaspoon garlic powder - 1/2 teaspoon salt - 1/4 teaspoon freshly ground black pepper - 1 teaspoon olive oil (for sautéing) - 1/2 cup shredded cheese (cheddar or feta) - Fresh herbs (such as parsley or basil) for garnish You can change the frittata to fit your taste. Here are some options: - Mushrooms, chopped - Broccoli florets - Asparagus, cut into small pieces - Kale or arugula instead of spinach - Different cheese like goat cheese or mozzarella - Fresh herbs like thyme or cilantro Each serving gives you a good balance of nutrients. Here’s what you can expect: - Calories: 230 - Protein: 15g - Carbohydrates: 6g - Fat: 17g - Fiber: 1g - Vitamin A: 30% of daily value - Calcium: 20% of daily value Feel free to check the Full Recipe for more details on making this delicious dish! First, preheat your oven to 375°F (190°C). This step is key for baking the frittata. While the oven heats, gather all your ingredients. You will need eggs, milk, spinach, and other vegetables. This is a great time to chop your veggies and measure out everything. Next, heat 1 teaspoon of olive oil in an oven-safe skillet over medium heat. A cast iron skillet works best. Once the oil is hot, add 1/4 cup of finely chopped red onion. Cook for about 2-3 minutes until it becomes soft and fragrant. Then, add 1 cup of diced zucchini and 1/2 cup of bell peppers. Stir these veggies for 4-5 minutes. They should start to soften and look bright. After that, add 1 cup of chopped spinach and 1/2 cup of halved cherry tomatoes. Cook for another minute until the spinach wilts. Now it’s time to combine everything. Pour your egg mixture over the cooked veggies. Make sure the eggs cover the vegetables evenly. Next, sprinkle 1/2 cup of shredded cheese on top. Let this cook on the stovetop for about 2 minutes. You’ll see the edges start to set. Carefully transfer the skillet to your preheated oven. Bake for 15-20 minutes. It’s done when the frittata is puffed up and fully set. Once it’s ready, take it out of the oven and let it cool for a few minutes. Slice it into wedges and garnish with fresh herbs for a lovely finish. Enjoy your vibrant vegetable frittata! For the full recipe, check the earlier section. When making a frittata, fresh vegetables make a big difference. Look for veggies that are firm and colorful. Check for bright colors, as they show ripeness. Avoid any that feel soft or have dark spots. - Spinach: Choose vibrant green leaves, free from yellowing. - Bell peppers: Pick ones that are shiny and heavy for their size. - Zucchini: Select ones that are small to medium, with smooth skin. Fresh vegetables add lots of taste and nutrition to your frittata. Cooking a frittata is simple, but some tips help it shine. Use an oven-safe skillet, like cast iron, to cook your frittata. This allows for even cooking and easy transfer to the oven. - Preheat your oven before starting. This gives a nice finish to your frittata. - Don’t rush the cooking on the stovetop. Let the veggies cook until soft. - Stir gently when adding the egg mixture. This keeps the veggies evenly spaced. These practices will make your frittata both tasty and beautiful. Timing is key for a perfectly set frittata. You want it cooked through but not dry. Here’s how to get it just right: - Keep an eye on the edges. They should start to set while the center remains a bit wobbly. - Bake at 375°F (190°C) for 15-20 minutes. Check for a puffed center and a golden top. - Let it cool slightly before slicing. This helps it hold its shape. Following these steps ensures a lovely frittata every time. For the full recipe, check out the vibrant vegetable frittata delight! {{image_4}} You can mix and match veggies in your frittata. Try using broccoli, asparagus, or mushrooms. Each one adds its unique flavor. If you have leftover vegetables, toss them in! This dish is a great way to clean out your fridge. Cheese makes every frittata better. While cheddar and feta offer great taste, you might try goat cheese or mozzarella. These cheeses melt nicely and add creaminess. Use your favorite cheese to make it just right for you. Want to make your frittata more filling? Add proteins like ham, bacon, or sausage. Cook the meat first, then mix it with the veggies. This adds flavor and makes your meal heartier. You can even use leftover cooked meats for quick prep! For more ideas, check out the Full Recipe. To store leftover frittata, let it cool to room temperature. Cut it into slices for easy storage. Place the slices in an airtight container. You can keep it in the fridge for up to three days. This helps keep it fresh and tasty! When you’re ready to eat your frittata, you can reheat it in a few ways. The best method is using the oven. Preheat it to 350°F (175°C). Place the frittata slices on a baking sheet. Heat for about 10-15 minutes until warm. If you’re in a hurry, use the microwave. Heat each slice for 30 seconds. Check it, and if it’s not warm, add more time in small bursts. If you want to save frittata for longer, freezing is a great choice. Wrap each slice in plastic wrap. Then, place the wrapped slices in a freezer bag or container. Make sure to remove as much air as possible. Label the bag with the date. You can freeze frittata for up to three months. To eat it later, just thaw it overnight in the fridge before reheating. For a quick treat, you can reheat it straight from the freezer. Just add a few extra minutes to your cooking time. For the full recipe, check out the details above! The best pan for a frittata is an oven-safe skillet. I prefer cast iron because it heats evenly. A non-stick skillet also works well, making it easy to slide out your frittata. Just ensure the handle can withstand the oven heat. Yes, you can make a frittata ahead of time. It stores well in the fridge for up to three days. Simply let it cool, then cover it tightly. You can reheat slices in the oven or microwave. This makes it a great option for meal prep! A frittata is done when the edges are set and the center is slightly puffed. You can gently shake the pan; it should not jiggle. A toothpick inserted in the middle should come out clean. This ensures a perfect, fluffy result every time. If you want the full recipe, check out the vibrant vegetable frittata delight for all the details! In this post, we explored the easy vegetable frittata, sharing ingredients and steps. You learned how to choose fresh veggies and achieve that perfect set. Frittatas are versatile, allowing for many variations and custom flavors. Store leftovers properly and enjoy them later. Remember, cooking can be fun and healthy. Each frittata you make is a chance to try new flavors. So, grab your pan and get started! You’ll love the results.
Easy Vegetable Frittata Simple and Quick Recipe
Looking for an easy, tasty meal that fits any time of day? My Easy Vegetable Frittata is your answer! With just a few simple ingredients,
To make a great asparagus frittata, you need some key ingredients. Here’s what you will use: - 6 large eggs - 1 cup milk - 1 cup fresh asparagus, trimmed and cut into 1-inch pieces - 1 medium onion, finely diced - 1 cup cherry tomatoes, halved - 1 cup grated mozzarella cheese - 2 tablespoons extra virgin olive oil - Salt and freshly ground black pepper to taste - Fresh basil leaves for garnish These ingredients create a tasty, healthy dish. The eggs and milk form the base, while the asparagus and other veggies add flavor and color. The mozzarella cheese melts and makes everything creamy. Using fresh ingredients makes a big difference. Fresh asparagus has a nice crunch. It also brings a bright green color to your meal. The onions and tomatoes add sweetness and depth. You can find all these items at your local grocery store. Once you gather them, you’ll be ready to make this delicious frittata. For detailed cooking steps, check out the Full Recipe. Enjoy cooking! 1. Preheat the oven and prepare your skillet Start by preheating your oven to 375°F (190°C). This step is key for a great frittata. Grab a large oven-safe skillet. You’ll use it for cooking and baking. 2. Whisk the egg mixture In a large bowl, whisk together 6 large eggs and 1 cup of milk. Add salt and black pepper to taste. Mix well until it’s frothy and well combined. This is the base of your frittata. 1. Sauté onions and asparagus Pour 2 tablespoons of olive oil into the skillet. Heat it on medium. Once hot, add 1 medium diced onion. Sauté for about 3-4 minutes. The onion should be soft and fragrant. Then, add 1 cup of chopped asparagus. Cook for another 5 minutes. Stir often until the asparagus is bright green and tender. 2. Add tomatoes and eggs Next, stir in 1 cup of halved cherry tomatoes. Cook for an extra 2 minutes. This allows the tomatoes to soften and add flavor. Now, carefully pour your egg mixture over the veggies in the skillet. Make sure it covers everything evenly. Lastly, sprinkle 1 cup of grated mozzarella cheese on top. 1. Cook on the stove and transfer to the oven Let the frittata cook on the stove for about 5-6 minutes. You will see the edges start to set. The center will still be a bit jiggly, which is just right. Now, transfer the skillet to your preheated oven. 2. Check for doneness Bake for 15-20 minutes. The frittata will puff up as it cooks. To check if it’s done, insert a toothpick in the center. If it comes out clean, your frittata is ready. Once done, remove it from the oven and let it cool for a bit before slicing. For more details, check the Full Recipe. Enjoy your savory asparagus frittata! To make a great frittata, focus on texture. You want it fluffy and light. Whisk the eggs and milk well until frothy. This adds air and creates a nice rise while cooking. Sauté your vegetables properly. Start with the onions, cooking them until soft and sweet. This step builds flavor. Next, add the asparagus. Cook it until tender but still bright green. This keeps the vegetable’s crunch and flavor intact. Garnish your frittata for a beautiful touch. Fresh basil leaves add color and a burst of flavor. You can also drizzle a bit of olive oil on top. For a complete meal, serve your frittata with sides. A simple salad pairs well. You can also add crusty bread or roasted potatoes for extra heartiness. Enjoy your savory asparagus frittata! {{image_4}} You can change up the vegetables in your frittata for new flavors. Try using spinach, bell peppers, or mushrooms. Each option brings a unique taste and texture. If you prefer a different cheese, consider feta or goat cheese. They add a tangy twist that complements the eggs well. To enhance the frittata, add herbs and spices. Fresh herbs like parsley or chives brighten the dish. Dried herbs like oregano or thyme work well too. You can also spice it up with red pepper flakes or smoked paprika for a kick. Don't forget about proteins! You can mix in cooked bacon, ham, or even beans for added nutrition. These swaps keep the dish fresh and exciting. Enjoy experimenting and discovering your favorite combinations! Store leftover frittata in the fridge. Use an airtight container for best results. It will stay fresh for up to four days. If you plan to eat it later, freezing is a great option. Slice the frittata into wedges before freezing. Wrap each slice in plastic wrap, then place them in a freezer bag. This way, you can enjoy a piece anytime. To reheat the frittata, use the oven or a skillet. For the oven, set it to 350°F (175°C). Place the frittata on a baking sheet. Heat for about 10-15 minutes, until warm. If using a skillet, add a small amount of oil. Place the frittata in the skillet over low heat. Cover it with a lid. Heat for 5-7 minutes, checking often. This keeps the frittata fluffy and moist. Avoid using high heat to prevent drying it out. Enjoy your frittata just like fresh! Can I make frittata ahead of time? Yes, you can make frittata ahead of time. Simply prepare it and let it cool. Store it in the fridge for up to three days. Reheat it in the oven or on the stovetop. This makes it perfect for brunch or quick meals. Is asparagus frittata healthy? Asparagus frittata is quite healthy. It includes fresh veggies, eggs, and a bit of cheese. Asparagus is full of vitamins and fiber. Eggs provide protein, and the milk adds creaminess without too many calories. What to do if the frittata is too dense? If your frittata is too dense, try adding more milk to the egg mixture next time. Whisk the eggs thoroughly to incorporate air. This will help create a fluffier texture. How to fix a watery frittata? A watery frittata may occur if the veggies release too much water. To fix this, ensure you sauté veggies until they are tender and any moisture is gone. You can also cook it a bit longer in the oven to help set it. Can this recipe be made gluten-free? Yes, this recipe can be made gluten-free. All the ingredients are naturally gluten-free, so you can enjoy it without worry. Just ensure any added ingredients also meet gluten-free standards. Tips for reducing calories in the frittata To reduce calories, use fewer eggs or substitute egg whites for some whole eggs. You can also use low-fat milk instead of whole milk. Lastly, cut back on cheese or choose a lighter variety. For the full recipe, check out the detailed steps to make your own delicious frittata! In this post, we explored making a delicious asparagus frittata. We covered the key ingredients, like eggs and fresh veggies, and outlined step-by-step cooking tips. You learned how to achieve perfect texture and what to serve alongside your dish. Remember, you can customize your frittata with different ingredients or flavors. Proper storing and reheating help keep it tasty for later. With these tips, you can enjoy a satisfying meal anytime. Happy cooking!
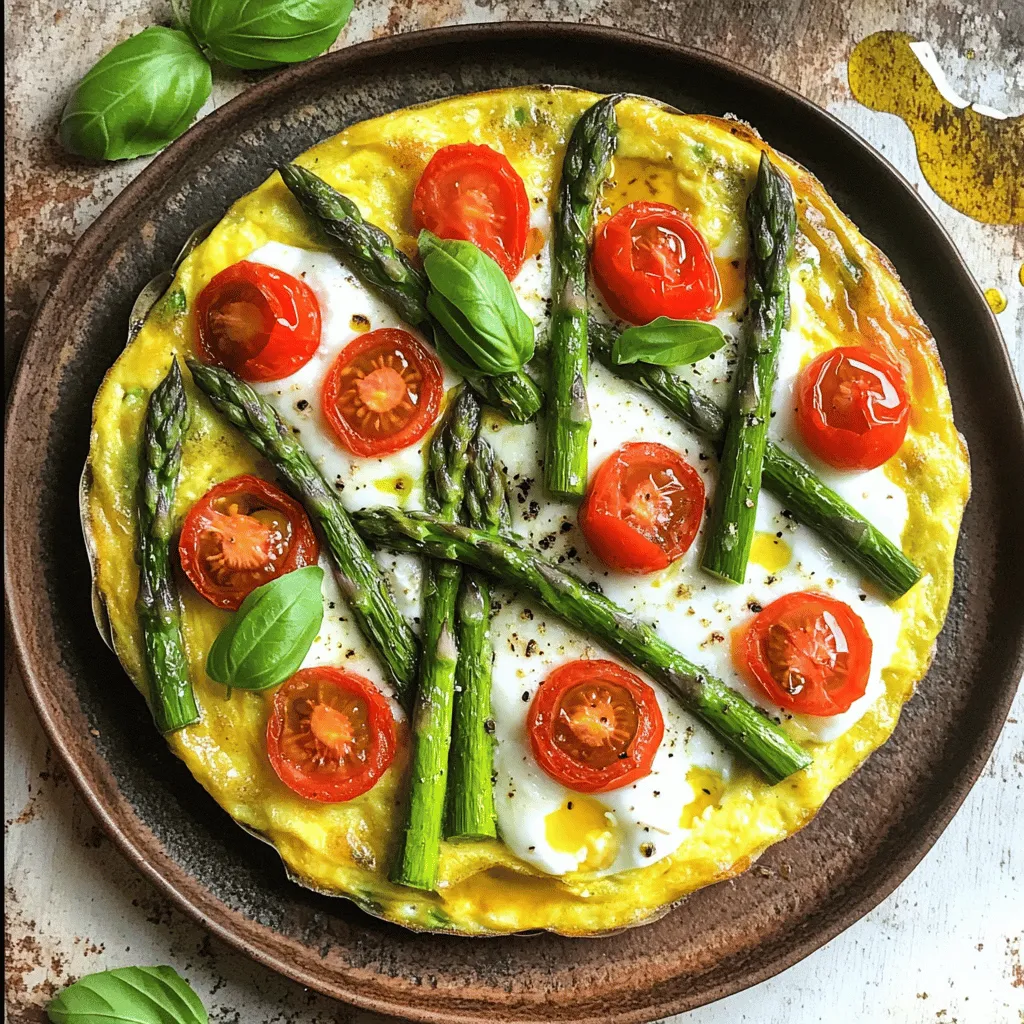
Savory Asparagus Frittata Simple and Healthy Recipe
Looking for a quick and healthy meal? Try my Savory Asparagus Frittata! This dish is packed with fresh veggies and rich flavors. With just a
- 6 large eggs - 1 cup milk (dairy or plant-based) - 1 cup fresh spinach, chopped - 1/2 cup bell peppers, diced - 1/2 cup cherry tomatoes, halved - 1/2 cup shredded cheese (cheddar or mozzarella) - 1/4 cup red onion, finely chopped - Salt and pepper to taste - 1 teaspoon garlic powder - 1 teaspoon dried oregano - Cooking spray or oil The stars of this dish are eggs and milk. Eggs give the muffins their structure, while milk adds creaminess. Spinach adds color and nutrients. Bell peppers and cherry tomatoes bring sweetness and crunch. Cheese makes everything rich and gooey. Red onion adds a mild zing. The spices—garlic and oregano—boost the flavor, while salt and pepper balance it. You can mix and match these ingredients to suit your taste. Try adding: - Zucchini for moisture - Cooked bacon or sausage for protein - Mushrooms for earthiness - Fresh herbs like basil for added freshness For cheese, feel free to swap in feta or goat cheese for a tangy twist. To make these muffins, you need a few tools: - A muffin tin to shape the muffins - Mixing bowls for combining the ingredients Using cooking spray or oil is key. It keeps the muffins from sticking to the tin. This step ensures easy release. You want to enjoy your delicious creations without any mess! To start, preheat your oven to 350°F (175°C). This step is key for even baking. Next, grab a muffin tin and grease it well with cooking spray or oil. This helps the muffins come out easily after baking. Now it’s time to chop your ingredients. Take fresh spinach and chop it into small pieces. Dice your bell peppers into tiny cubes for even cooking. Halve the cherry tomatoes, and finely chop the red onion. Measure out your cheese too. In a large bowl, crack the six eggs and add one cup of milk. Use a whisk to beat them well together. You want a nice, frothy mix. This froth will help your muffins rise and become fluffy. Once mixed, add salt, pepper, garlic powder, and dried oregano for flavor. Stir it all together until it’s well combined. Now, it’s time to fill your muffin tin. Carefully pour the egg mixture into each cup. Fill them about 3/4 full. This allows space for the muffins to puff up while baking. Be careful not to overfill, or they may spill over. Place the muffin tin in your preheated oven. Bake for 18 to 20 minutes. Keep an eye on them as they puff up. To check if they’re done, insert a toothpick into the center of a muffin. If it comes out clean, they are ready. Once baked, take the muffin tin out of the oven. Let them cool for about 5 minutes. Then, gently transfer the muffins to a wire rack. This helps them cool completely and keeps them fluffy. For the full recipe, refer to the recipe section above. To make your mini frittata muffins fluffy, preheat your oven to 350°F (175°C). Use a whisk to beat the eggs and milk together until frothy. This adds air to the mix. Avoid overmixing after adding your veggies. Gently fold them in. This keeps the texture light. Prevent sogginess by using fresh vegetables. Make sure to drain excess moisture from ingredients like spinach. You can also sauté your veggies for a few minutes before mixing them in. This step helps remove water and keeps your muffins dry. These mini frittata muffins are great for brunch or breakfast. Pair them with salsa or hot sauce for a kick. They also taste good with a dollop of sour cream or yogurt. You can serve them as snacks too. They’re easy to grab on the go! Consider making a big batch for a gathering. They look lovely on a platter. You can offer a variety of flavors to please everyone. Make your mini frittata muffins look stunning. Use a colorful plate or a fun muffin stand. This adds flair to your table. You can stack them high or arrange them in a circle. Garnish your muffins with fresh herbs like parsley or chives. This adds color and makes them pop. You can also sprinkle some cheese on top right before serving for extra appeal. For the full recipe, check out the recipe section. Enjoy making these delightful mini frittata muffins! {{image_4}} You can have fun with mini frittata muffins by changing the flavors. Try adding cooked bacon or sausage for a meaty twist. You can also experiment with seasonal veggies like zucchini or asparagus. Using fresh herbs such as basil or dill brightens up the taste. You can mix and match ingredients based on what you have and what you love. If you need a gluten-free option, these muffins are already perfect. Just make sure any added ingredients, like meats or sauces, are also gluten-free. For vegan frittata muffins, swap the eggs with a mix of silken tofu and a bit of nutritional yeast. Use plant-based milk and cheese for a creamy texture without dairy. These changes keep the flavor while meeting dietary needs. Making your mini frittata muffins look pretty can add to the fun. Use colorful cupcake liners for a festive touch. You can also grease the muffin tin for a classic look. For special occasions, garnish with fresh herbs or a sprinkle of paprika. This adds color and makes your dish stand out. Your guests will love the effort you put into the look! To store mini frittata muffins in the refrigerator, place them in an airtight container. You can also use a resealable plastic bag. Keep the muffins in the fridge for up to four days for the best freshness. This way, they stay moist and tasty, ready for your next meal. To freeze your mini frittata muffins, let them cool completely first. Arrange them in a single layer on a baking sheet. Freeze them for about one hour. Once frozen, transfer the muffins to a freezer-safe bag. They can last for up to three months. To thaw, put them in the fridge overnight. For best results, reheat them in the oven or microwave. To keep your muffins fluffy when reheating, use the oven at a low temperature. Set it to 350°F (175°C) and warm them for about 10 minutes. This method helps retain moisture. Avoid using the microwave as it can make them chewy and dry. If you must use a microwave, heat them in short bursts of 15 seconds. This helps prevent any mishaps with texture. Mini frittata muffins can last in the fridge for up to five days. Store them in an airtight container. This keeps them fresh and tasty. If you want to savor them longer, freeze them. When frozen, they keep well for about three months. Just remember to thaw them in the fridge before reheating. Yes, you can make mini frittata muffins ahead of time. Prepare them the night before and store them in the fridge. This way, you can enjoy them for breakfast or a quick snack. Just reheat them when you're ready to eat. They hold up well when cooked and stored correctly. If you need an egg substitute, you have options. You can use 1/4 cup of unsweetened applesauce for each egg. Flaxseed meal mixed with water is another option. Combine one tablespoon of flaxseed with three tablespoons of water, let it sit for five minutes, and use it as an egg. These substitutes can change the taste and texture slightly. Applesauce adds sweetness, while flaxseed gives a nutty flavor. Mini frittata muffins are easy to make and great for any meal. We covered essential ingredients, cooking tips, and creative variations. You can customize them with your favorite veggies or meats. Don't forget the right tools for better results. Whether you eat them fresh or store them, enjoy these tasty muffins for breakfast or snacks. Experiment with flavors and presentation to impress your friends. They’re not just good; they’re fun to make, too!
Mini Frittata Muffins Delicious and Easy to Make
Looking for a quick and tasty breakfast? Mini frittata muffins are your answer! They’re easy to make, packed with flavor, and perfect for grabbing on
To make a delicious Egg Breakfast Casserole, gather the following ingredients: - 12 large eggs - 1 cup whole milk - 2 cups finely shredded cheddar cheese - 1 cup assorted bell peppers, diced - 1 cup cooked ham or turkey, diced - 1 cup fresh spinach, chopped - 1 teaspoon garlic powder - 1 teaspoon onion powder - Salt and freshly cracked black pepper, to taste - 1 tablespoon extra virgin olive oil - Fresh chives for garnish (optional) Each ingredient plays a key role in the flavor and texture of the dish. The eggs and milk create a creamy base, while the cheese adds richness. Bell peppers bring sweetness and color, and spinach offers a fresh note. Ham or turkey gives a savory touch, making this casserole hearty. I love using fresh veggies. They brighten up the dish and add nutrition. You can mix and match the peppers. Red, yellow, or green all work well. You can even use mushrooms or zucchini for a fun twist. The spices? They enhance the overall flavor. Garlic powder and onion powder add depth without overpowering. Adjust the salt and pepper to your taste. This recipe is flexible. You can swap out the meat for more veggies if you like. You can also try different cheeses, like feta or mozzarella. The [Full Recipe] gives you all the steps to create this tasty breakfast that everyone will enjoy. First, preheat your oven to 350°F (175°C). This temperature helps cook the casserole evenly. While the oven heats, grease a 9x13 inch baking dish with cooking spray or olive oil. This step ensures that the casserole does not stick. Next, take a large mixing bowl. Crack 12 large eggs into the bowl and pour in 1 cup of whole milk. Whisk these together until the mix is smooth. Season this mix with 1 teaspoon of garlic powder, 1 teaspoon of onion powder, salt, and freshly cracked black pepper. This egg and milk base adds rich flavor to your casserole. For the next step, heat 1 tablespoon of extra virgin olive oil in a skillet over medium heat. Once the oil is warm, add 1 cup of diced assorted bell peppers. Sauté them for 3-4 minutes. You want them tender but still crisp. Now, add 1 cup of chopped fresh spinach to the skillet. Cook for another 2 minutes. The spinach will wilt quickly. Once cooked, remove the skillet from the heat and let it cool for a few minutes. Spread the sautéed bell peppers and spinach evenly in the bottom of your greased baking dish. This layer adds color and nutrition. Next, layer 1 cup of diced cooked ham or turkey on top of the veggies. Finally, sprinkle 2 cups of finely shredded cheddar cheese over everything. Carefully pour the egg and milk mixture over the layered ingredients. Make sure to cover everything evenly. Then, take a spatula and gently stir the mixture to combine the layers slightly. This creates a nice texture in your casserole. Place the baking dish in the preheated oven and bake for 30-35 minutes. Keep an eye on it, as the eggs need to set and the top should turn light golden brown. To check for doneness, insert a toothpick into the center. If it comes out clean, your casserole is ready. After baking, remove the dish from the oven and let it cool for about 5 minutes. This cooling period makes it easier to slice into squares for serving. Enjoy your delicious egg breakfast casserole! To get a soft and fluffy texture in your casserole, whisk the eggs well. This helps to add air and makes them light. Mix in the milk until it is smooth. After you sauté the veggies, let them cool before layering. If they are too hot, they can cook the eggs too soon. Add your own twist with spices like paprika or cumin for heat. You can also mix in fresh herbs, like parsley or basil, for extra flavor. For garnishes, I love using fresh chives. They add both color and a mild onion taste. A dollop of salsa or sliced avocado on the side can boost flavor and freshness. This casserole pairs well with fresh fruit or a light salad for balance. When you cut it, aim for even squares to serve. This helps everyone get a good portion. If you have leftovers, store them in the fridge. They are perfect for breakfast on busy days. Check out the Full Recipe for more details! {{image_4}} You can easily modify this dish to fit different diets. For a vegetarian option, skip the meat. You can replace it with extra veggies like mushrooms or zucchini. This keeps the dish hearty and tasty. For gluten-free needs, just check your cheese and other ingredients. Most are safe, but always read labels to be sure. Want to mix things up? Try different cheeses! Feta or mozzarella can add a unique twist. You can also use cottage cheese for a lighter touch. When it comes to veggies, the sky's the limit. Swap bell peppers for broccoli, asparagus, or even sweet potatoes. Each change can create a new flavor profile, keeping breakfast exciting. Busy mornings don't have to mean skipping breakfast. You can prepare the casserole a day before. Just mix all your ingredients, pour them into the dish, and cover it. Store it in the fridge overnight. When morning comes, pop it in the oven. You can also freeze leftovers. Cut them into squares, then wrap each piece tightly. When you're ready, just reheat in the oven or microwave. This makes life so much easier! To keep your casserole fresh, let it cool first. Place it in an airtight container. This helps avoid any bad smells. Store it in the fridge for up to four days. If you want to keep it longer, freezing is a great option. When you want to enjoy your leftovers, reheating is key. The best way to reheat is in the oven. Set it to 350°F (175°C) and warm the casserole for about 15-20 minutes. This keeps it moist and tasty. You can also use the microwave. Heat for one to two minutes, checking often to avoid drying it out. If you need to freeze the casserole, wrap it tightly in plastic wrap. Then, put it in a freezer-safe bag. This way, it will stay fresh for up to three months. When you are ready to eat, take it out and thaw it in the fridge overnight. Bake it at 350°F (175°C) until it is hot all the way through. Enjoy your meal! Bake the Egg Breakfast Casserole for 30-35 minutes at 350°F (175°C). You know it’s done when the eggs are set and the top is a light golden brown. To check, insert a toothpick in the center. If it comes out clean, your casserole is ready. This baking time gives it a fluffy texture and a nice color. Yes, you can customize the ingredients easily! Swap out the ham for turkey or even leave out the meat for a vegetarian version. You can also change the cheese. Try mozzarella or feta for a different taste. Don’t like bell peppers? Use zucchini or mushrooms instead. The options are endless! Absolutely! This breakfast casserole is great for meal prep. You can make it ahead and store it in the fridge. Simply slice it into squares and reheat portions as needed. It holds up well, so you can enjoy it throughout the week. You can even freeze it for longer storage. Just thaw and reheat when you're ready to eat. This blog post covered a tasty egg breakfast casserole. You learned about the ingredients, preparation steps, and tips for the best flavor and texture. I shared ways to adapt the recipe for different diets and preferences. Proper storage and reheating methods help you enjoy leftovers. Overall, this dish is easy, flexible, and great for meal prep. You can impress friends and family with a quick breakfast that satisfies all tastes. Cooking doesn’t have to be hard; it can be fun and rewarding!
Egg Breakfast Casserole Flavorful and Easy Recipe
Are you tired of boring breakfasts? The Egg Breakfast Casserole is here to change that! This simple, flavorful recipe packs a punch with eggs, cheese,
- 1 can (15 oz) black beans - 1 can (15 oz) diced tomatoes - 1 small onion, chopped - 2 cloves garlic, minced - 1 bell pepper, diced - 1 jalapeño, finely chopped (optional) - 1 teaspoon ground cumin - 1 teaspoon chili powder - 4 large eggs - 2 tablespoons extra virgin olive oil - Salt and black pepper to taste - Fresh cilantro leaves for garnish - Ripe avocado slices for serving In this recipe, the ingredients play a key role in building flavor. The black beans add protein and texture. The diced tomatoes bring a juicy base, enhancing the dish. The onion and garlic provide a sweet and savory aroma. Bell peppers add a nice crunch, while jalapeños can give it a spicy kick. Cumin and chili powder deliver warmth and depth. Using high-quality olive oil makes everything richer. The eggs, poached in the chili, bring creaminess. Fresh cilantro brightens the dish, making it vibrant. And don't forget the avocado slices, which add creaminess and balance the heat. To see how to put these ingredients together, check the Full Recipe. - Heat olive oil in a skillet over medium heat. - Sauté onion and garlic until translucent, about 3-4 minutes. - Add bell pepper and jalapeño, cooking until tender, about 2-3 minutes. - Incorporate black beans, diced tomatoes, cumin, and chili powder into the skillet. - Simmer for 10 minutes to meld flavors together. - Create wells in the chili for the eggs. - Cover and cook until eggs are set to your desired doneness. This simple method allows the flavors to shine. I love how the warm spices mix with the beans and fresh vegetables. It makes breakfast exciting! Check out the Full Recipe for complete details. - To cook the eggs evenly, cover the skillet while they poach. - If you prefer a runny yolk, check the eggs at 5 minutes. Cook longer for firm yolks. - This dish shines with fresh avocado slices on top. - For a filling meal, serve with toasted bread or warm tortillas. - Sprinkle cheese on top for added creaminess and flavor. - Try adding fresh herbs, like cilantro or parsley, to garnish your dish. These tips will help you make the most of your breakfast chili and eggs. For the full recipe, check out the Sunny Breakfast Chili Delight! {{image_4}} If you want a vegetarian twist, skip the eggs. You can add more beans or tofu for protein. Consider using black beans, kidney beans, or chickpeas. Adding veggies like zucchini or corn makes it even better. These choices boost flavor and nutrition. Do you like it spicy? Adjust the jalapeño and chili powder to match your taste. For less heat, try milder peppers like bell peppers or banana peppers. You can also leave out the jalapeño entirely. This way, everyone can enjoy it. Want to mix things up? You can add proteins like cooked sausage or crispy bacon. This boosts the dish’s heartiness. Experiment with different beans such as pinto or white beans. Changing the type of peppers can also make a big difference. Try poblano or Anaheim peppers for unique flavors. Store any leftovers in an airtight container. This keeps the chili fresh and tasty. It will stay good for 3-4 days in the fridge. Just make sure to let it cool down before sealing the container. You can freeze the Breakfast Chili and Eggs for up to 2 months. It’s a great way to save extra portions. When you’re ready to eat, thaw it in the fridge overnight. This will help it heat evenly. Reheat the chili gently to avoid overcooking the eggs. You can use a skillet or microwave. If using a skillet, add a splash of water while reheating. This keeps the dish moist and delicious. Enjoy the flavors just like when it was fresh! Yes, you can prepare the chili mixture and add eggs just before serving. This way, the eggs stay fresh and perfectly cooked. You can store the chili in the fridge for a few days. When you are ready, heat it up and add the eggs. You can use kidney beans or pinto beans as alternatives. Both beans add great flavor and texture. This swap keeps your dish delicious and interesting. Omit any cheese and focus on plant-based ingredients. You can still enjoy the rich flavors without dairy. Fresh avocado adds creaminess and taste too. Absolutely! It's perfect for batch cooking and reheating throughout the week. Make a big batch and store it in containers. You can grab it for a quick breakfast any day. Serve it hot with fresh avocado slices, cilantro, and additional toppings as desired. You can also add hot sauce or cheese. This makes each bowl unique to your taste. Yes, consider adding hot sauce or more chili powder for additional heat. You can also try different spices to make it your own. Adjust the spice level to match your preference. This recipe for Breakfast Chili and Eggs is simple and tasty. You learned what ingredients to use and how to prepare them. I shared helpful tips for cooking and serving this dish. You can easily adjust the spice level and make it vegetarian or freezer-friendly. Experiment with flavors and toppings to make it your own. Enjoy a fun and hearty meal that warms you up and fuels your day. Dive in, get creative, and serve up some deliciousness!
Breakfast Chili and Eggs Easy and Flavorful Recipe
Start your day with a burst of flavor! This Breakfast Chili and Eggs recipe is easy to make and packed with taste. You’ll love how
To make these tasty Blueberry Oatmeal Breakfast Bars, you need a few simple items. Here’s your list: - 2 cups rolled oats - 1 cup almond milk (or your preferred milk) - 1 cup fresh or frozen blueberries - 1/4 cup honey or maple syrup - 1/4 cup natural peanut butter (or almond butter) - 1/2 teaspoon vanilla extract - 1 teaspoon baking powder - 1/2 teaspoon ground cinnamon - A pinch of salt - Optional: 1/4 cup chopped nuts or seeds (such as walnuts or chia seeds) These ingredients come together to create a delicious and healthy snack. The oats provide fiber, while blueberries add vitamins and antioxidants. Honey or maple syrup gives it sweetness, and peanut butter adds healthy fats. You can even mix in nuts or seeds for extra crunch. For the full recipe, refer to the earlier section. 1. Preheat your oven to 350°F (175°C). Prepare a 9x9 inch baking dish by lining it with parchment paper. This makes removal easy after baking. 2. In a large mixing bowl, mix the dry ingredients. Combine 2 cups of rolled oats, 1 teaspoon of baking powder, 1/2 teaspoon of ground cinnamon, and a pinch of salt. Stir until even. 3. In a separate bowl, whisk together the wet ingredients. Blend 1 cup of almond milk, 1/4 cup of honey or maple syrup, 1/4 cup of natural peanut butter, and 1/2 teaspoon of vanilla extract. Mix until smooth. 4. Combine the wet and dry ingredients. Pour the wet mix into the dry bowl. Stir until everything is well mixed. Make sure there are no dry spots left. 1. Fold in the blueberries. Add 1 cup of fresh or frozen blueberries. If you like, add 1/4 cup of chopped nuts or seeds. Gently mix to avoid breaking the berries. 2. Transfer to the baking dish. Pour the mixture into your prepared baking dish. Use a spatula to spread it evenly. Press down gently to make it compact. 1. Bake until golden brown. Place the dish in the oven and bake for 25-30 minutes. The edges should turn golden brown, and the center should be set. 2. Cool and slice the bars. After baking, let them cool in the pan for 10 minutes. Use the parchment paper to lift them out. Place the bars on a wire rack to cool completely. Once cool, slice them into bars. Enjoy your Blueberry Oatmeal Breakfast Bars! For the full recipe, check the details above. You can easily switch ingredients to fit your taste. If you want to try different types of milk, go ahead! Almond milk works well, but soy or oat milk are great too. Each milk gives a unique flavor. For sweeteners, honey is a classic choice. It adds a rich taste. Maple syrup is a fun swap for a lighter flavor. Both options are sweet, so use what you like best! Checking for doneness is key. The edges should be golden brown. The center should feel firm to the touch. If it wobbles, give it a few more minutes. Ovens vary, so you may need to adjust baking time. If your oven runs hot, check the bars a bit earlier. If it runs cool, they might need extra time. Always keep an eye on them! When serving, get creative with toppings! A dollop of yogurt adds creaminess. Fresh fruit on top makes it bright and fun. You can also sprinkle some nuts for crunch. Pair these bars with coffee or tea. The warm drink complements the bars well. Enjoy them as a quick breakfast or a snack anytime. They are versatile and delicious! {{image_4}} You can change the flavor of your Blueberry Oatmeal Breakfast Bars easily. Adding spices like nutmeg or ginger can give a warm twist. Just a pinch of these spices can take your bars to the next level. You can also add other fruits. Bananas or apples work great. They add natural sweetness and moisture. If you want to make your bars healthier, consider using less sweetener. You can cut back on honey or maple syrup. This will lower the sugar content without losing flavor. You can also go gluten-free. Simply choose gluten-free oats. They will work just as well in this recipe. To boost protein, try adding protein powder. This simple change makes your bars more filling. You can also include seeds like chia or flaxseed. These seeds add texture and healthy fats. They make your breakfast bars even better for you. For the full recipe, check out the complete guide above. To keep your blueberry oatmeal breakfast bars fresh, store them in airtight containers. This will help prevent moisture and air from making them soggy. You can also refrigerate or freeze them for a longer shelf life. In the fridge, they can last up to a week. If you freeze them, they can stay good for up to three months. At room temperature, these bars last about three days. Always check for signs of spoilage. If you see mold, or if the bars smell off, throw them away. Freshness is key to enjoying these tasty snacks. To enjoy your bars after storage, reheat them in the microwave. Heat for 10 to 15 seconds for a warm treat. You can also pop them in the oven at 350°F for about 5 minutes. This keeps the texture nice and chewy. Enjoy them warm for the best flavor! For the full recipe, click here: [Full Recipe]. Yes, you can use quick oats, but the texture will differ. Quick oats are smaller and cook faster. This will make the bars softer and less chewy. If you want a heartier bite, stick with rolled oats. They hold up better in the baking process. You can try almond butter or sunflower seed butter. Each has a unique taste. Almond butter adds a nutty flavor, while sunflower seed butter is great for nut-free diets. Both work well in the recipe. To make these bars vegan, swap honey for maple syrup. Use almond milk or another plant-based milk instead of dairy milk. This way, you can enjoy the bars without animal products. Yes, you can double the recipe. Just use a larger baking dish, like a 9x13 inch pan. Keep an eye on the cooking time; it may take a few extra minutes to bake through. Yes, they are quite nutritious! They provide fiber from oats and antioxidants from blueberries. Each bar is packed with energy and can help you feel full. You get healthy fats from the nut butter too. You can get creative with toppings! Try adding yogurt, fresh fruit, or a drizzle of honey. You can also sprinkle some chopped nuts for extra crunch. This makes each bar unique and tasty. You now have a tasty recipe for Blueberry Oatmeal Breakfast Bars. We covered the ingredients you need and the steps to make them. I shared tips for swapping ingredients and ways to keep your bars fresh. You can even get creative with flavors and add protein. These bars not only taste great but also offer nutrition. Customize them to fit your needs. Enjoy your homemade bars for breakfast or a snack. Happy baking!
Blueberry Oatmeal Breakfast Bars Healthy and Tasty Snack
Start your day right with delicious and healthy Blueberry Oatmeal Breakfast Bars! These bars offer a perfect blend of sweet and hearty flavors, making them
For this Whole30 breakfast casserole, you need fresh and simple ingredients. Here’s what you will need: - 2 medium sweet potatoes, peeled and diced into small cubes - 1 cup fresh spinach, chopped into bite-sized pieces - 1/2 cup bell pepper, diced (any color for a vibrant dish) - 1/2 cup red onion, diced finely - 6 large eggs - 1/2 cup full-fat coconut milk - 1 teaspoon garlic powder - 1 teaspoon onion powder - Salt and freshly ground black pepper to taste - 1 tablespoon extra virgin olive oil - Fresh herbs for garnish (such as parsley or cilantro for color and freshness) These ingredients align with Whole30 rules. They provide great flavor and nutrition while keeping your meal compliant. Using fresh produce is key for this dish. Fresh vegetables add flavor and texture. Sweet potatoes give a hearty base, while spinach offers a burst of color and nutrients. Fresh herbs, like parsley or cilantro, brighten the dish. They not only enhance taste but also make it visually appealing. Always choose organic produce when possible. This choice supports health and local farms. If you want to mix things up, you have options. You can replace sweet potatoes with zucchini or butternut squash. These veggies also work well and are Whole30 friendly. Different greens, like kale or arugula, can replace spinach for varied flavors. If you need a dairy-free option, almond milk can substitute for coconut milk, but remember to check for additives. This flexibility lets you tailor the casserole to your tastes while staying within Whole30 guidelines. For the complete recipe, check out the Full Recipe link. To start, grab your sweet potatoes. Peel and dice them into small cubes. This helps them cook evenly. Next, chop your spinach into bite-sized pieces. You can use fresh baby spinach for a tender touch. Dice the bell pepper and red onion. I like to mix colors for a vibrant look. Once all your veggies are ready, heat a skillet over medium heat with olive oil. Add the sweet potatoes first. Cook them for about 5-7 minutes. Stir often until they soften and get a nice brown color. Then, add the bell pepper and red onion. Cook for another 5 minutes until the onions are clear. Finally, toss in the spinach and let it wilt down for 2 minutes. Now, it's time for the egg mixture. In a large bowl, crack six large eggs. Whisk them well until they blend. Add 1/2 cup of full-fat coconut milk for creaminess. Sprinkle in garlic powder, onion powder, salt, and black pepper. Mix until it's frothy and smooth. This adds flavor and richness. Carefully fold in the sautéed veggies. Make sure everything is well combined. This mixture will be the heart of your casserole. Next, pour the mixture into your greased 9x13 inch baking dish. Spread it out evenly so it cooks well. Preheat your oven to 375°F (190°C) while you prepare. Once ready, place the dish in the oven. Bake for 25-30 minutes. You’ll know it’s done when the center is set and the top is golden brown. After baking, remove the dish from the oven. Let it cool for 5 minutes. This helps with slicing. Before serving, add fresh herbs to make it pop. Enjoy your savory sweet potato and spinach breakfast casserole! You can find the full recipe to try this delicious dish. To boost the taste of your Whole30 breakfast casserole, use fresh herbs like thyme or oregano. These herbs add depth and freshness. You can also try adding a pinch of smoked paprika for a warm, smoky flavor. If you enjoy a bit of heat, consider diced jalapeños or crushed red pepper flakes. These simple tweaks will elevate your dish and keep it exciting. For a fluffy texture, beat the eggs well before mixing them with the veggies. Whisking incorporates air, making the casserole light and airy. Also, avoid overcooking the sweet potatoes. They should be soft but still hold their shape. This balance ensures a delightful bite in every forkful. Letting the casserole cool for a few minutes before slicing also helps it hold its shape. To save time, prep your ingredients the night before. Dice the sweet potatoes, bell peppers, and onions. Store them in an airtight container in the fridge. You can also whisk the egg mixture ahead and keep it chilled. When it’s time to cook, all you need to do is sauté the veggies and combine everything. This makes mornings easier without sacrificing flavor or freshness. For the full recipe, check the details provided. {{image_4}} You can boost the protein in your Whole30 breakfast casserole easily. Try adding cooked sausage or diced chicken. Ground beef also works well. Just cook the meat first, then mix it into the veggie and egg mix. For a meat-free option, use black beans or lentils. These add protein while keeping it plant-based. Feel free to swap in your favorite veggies. Zucchini, mushrooms, or broccoli can make great additions. Just remember to chop them small so they cook evenly. If you want more colors, add sliced carrots or cherry tomatoes. You can also use frozen veggies for convenience. Just make sure to thaw them first. Change the flavor of your casserole by adding spices or herbs. Try smoked paprika for a smoky kick. If you prefer a fresh taste, add basil or dill. You can even use a splash of hot sauce for some heat. Different cheese can also change the dish's vibe. Just make sure it fits Whole30 rules. Check out the full recipe for more tips on flavors and ingredients. To keep your Whole30 breakfast casserole fresh, let it cool first. Then, cover it tightly with plastic wrap or foil. You can also use an airtight container. Store it in the fridge for up to four days. This helps keep the flavors intact and prevents drying out. When you're ready to eat leftovers, preheat your oven to 350°F (175°C). Place the casserole in an oven-safe dish. Cover it with foil to keep it moist. Heat for about 15-20 minutes, or until warm. You can also use the microwave. Just heat in short bursts, checking often to avoid overcooking. If you want to save some for later, freezing is a great option. Cut the casserole into portions before freezing. Wrap each piece tightly in plastic wrap, then place them in a freezer-safe bag. This way, you can easily grab a portion anytime. You can freeze it for up to three months. When you’re ready to eat, thaw it in the fridge overnight and reheat as mentioned above. Enjoy the ease of meal prep with this simple method! Yes, you can make this Whole30 breakfast casserole ahead of time. Prepare the dish and store it in the fridge overnight. This makes mornings easier. Just bake it fresh in the morning or reheat it. The flavors blend well when made ahead. You can serve this casserole with fresh fruit, avocado slices, or a green salad. These sides add color and texture. A simple fruit salad brings sweetness, while avocado adds creaminess. You can also pair it with a hot sauce for a spicy kick. Yes, this recipe is very customizable. You can swap out vegetables based on what you like. If you need a dairy-free option, use almond milk instead of coconut milk. For added protein, you can add cooked chicken or turkey. This way, it fits many diets. This blog post covered how to make a Whole30 breakfast casserole. We explored compliant ingredients, fresh produce, and tasty alternatives. You learned step-by-step instructions for prepping, mixing, and baking. Tips on enhancing flavor and ensuring texture made your dish shine. We discussed protein options, veggie swaps, and more. Lastly, you got key storage details and answered common questions. Cooking can be fun and rewarding. You can enjoy this dish and feel good about eating it. Now, go make your Whole30 casserole a reality!
Whole30 Breakfast Casserole Simple and Tasty Recipe
Looking for a delicious way to start your day on the Whole30 plan? This Whole30 Breakfast Casserole is simple to make and tastes amazing! Packed
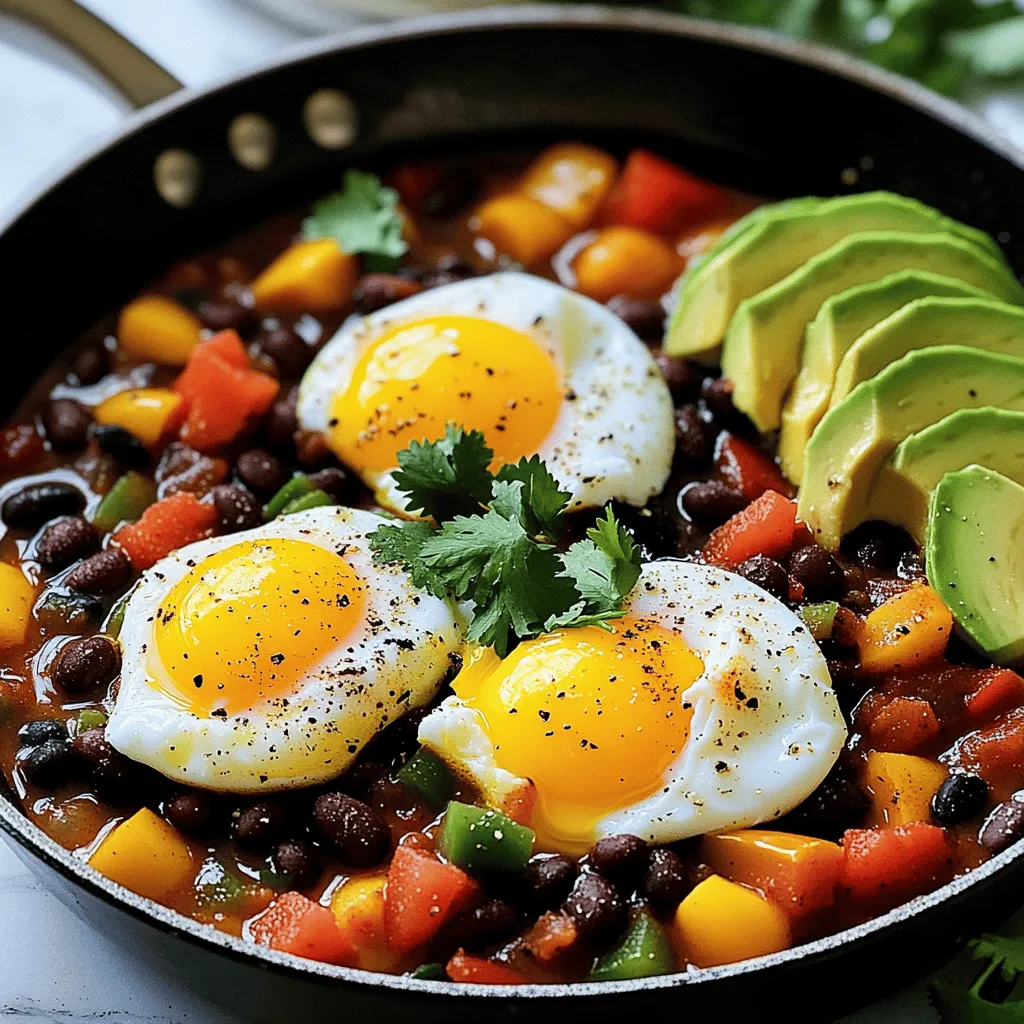
- 4 large eggs - 1/4 cup milk - 1 cup black beans - 1 small red bell pepper, diced - 1 small green bell pepper, diced - 1/2 cup corn kernels - 1/2 teaspoon ground cumin - 1/4 teaspoon smoked paprika - 1 cup shredded sharp cheddar cheese - 1 ripe avocado, sliced - Salsa and fresh cilantro To create a flavorful breakfast burrito, start with the essential ingredients. The eggs bring richness, while milk makes them fluffy. Black beans add protein and heartiness. The red and green bell peppers provide a sweet crunch. You can also add some optional ingredients for extra flavor. Corn gives sweetness, while cumin and smoked paprika add warmth. Feel free to play with these options. For toppings and sides, shredded cheddar cheese is a must. It melts beautifully and enhances flavor. Add slices of ripe avocado for creaminess. Salsa brings zest, and fresh cilantro adds a pop of freshness. This combination makes for a delicious meal that is simple to prepare. For the full recipe, check out the Sunrise Breakfast Burritos. Start by cracking 4 large eggs into a bowl. Add 1/4 cup of milk. Whisk them together well until they are smooth. You want the mixture to look frothy. Next, add a pinch of salt and freshly cracked black pepper. Stir it all together to mix in the seasoning. Heat a non-stick skillet on medium heat. Once hot, add the diced red and green bell peppers. Sauté them for about 3-4 minutes. You want them to soften and smell great. Then, add 1 cup of rinsed black beans and 1/2 cup of corn kernels to the skillet. Sprinkle in 1/2 teaspoon of ground cumin and 1/4 teaspoon of smoked paprika. Stir well and cook for another 2 minutes. This will warm everything up and blend the flavors. Now, pour the egg mixture into the skillet with the veggies. Cook gently while stirring. You want the eggs to become fluffy but not dry. This should take around 3-5 minutes. While the eggs cook, warm your tortillas in another skillet or microwave for a few seconds. Once the eggs are done, take a warm tortilla and place some of the egg and veggie mix in the center. Top it with shredded cheddar cheese and a few slices of avocado. To wrap the burrito, fold the sides in first. Then, roll it from the bottom up tightly. This will keep all the yummy fillings inside. Serve your burritos warm with salsa on the side. Enjoy your Sunrise Breakfast Burritos with a sprinkle of fresh cilantro if you like! You can find the full recipe [here]. To make fluffy scrambled eggs, whisk the eggs and milk well. Use a non-stick skillet for even cooking. Cook over medium heat and stir gently. This helps keep the eggs soft. Avoid overcooking eggs by removing them from heat when they look slightly moist. They will finish cooking off the heat. Keep an eye on them, and don’t rush the process. Warm tortillas by placing them in a dry skillet over low heat. You can also microwave them for a few seconds. This makes them soft and easy to wrap. For cutting and plating, slice burritos in half diagonally. This not only looks nice but makes them easy to eat. Arrange them on a plate for a tidy display. Use garnishes like avocado slices or fresh cilantro. These add color and freshness to your dish. A small bowl of salsa on the side makes it even more appealing. For dairy-free options, use almond or soy milk in the egg mixture. You can also replace cheddar cheese with a dairy-free version. This keeps the dish tasty for everyone. Consider different vegetables and proteins. Swap bell peppers for zucchini or spinach. You can add proteins like bacon, sausage, or even tofu for variety. This adds new flavors and textures to your breakfast burritos. {{image_4}} You can change your breakfast burrito in many ways. Adding different proteins is a great start. You might love crispy bacon or savory sausage. If you prefer a meatless option, try tofu. Each choice adds unique flavors and textures. You can also adjust the spice levels. If you like heat, add jalapeños or a dash of hot sauce. They give your burrito a nice kick. Just remember to start with a little and taste as you go. You can always add more spice! If you want a fun twist, try a breakfast burrito bowl. Here, you keep all the good stuff but skip the wrap. Start with a base of rice or quinoa. Then, add the egg and vegetable mix on top. It’s a hearty meal that still feels fresh. You can layer in toppings like avocado and cheese. You might also add salsa on top for extra flavor. This bowl version is great for meal prep too. Just pack the ingredients in separate containers for easy meals. For those who want plant-based meals, you have options. Substitute eggs with scrambled tofu or chickpea flour. Both options give you protein and a nice texture. You can also use nutritional yeast instead of cheese. It adds a cheesy flavor without dairy. You can mix in your favorite vegetables too. Spinach, mushrooms, or zucchini work well. This way, you can enjoy a tasty breakfast without animal products. Plus, it’s a great way to sneak in more veggies! To keep your leftover burritos fresh, wrap them in plastic wrap or foil. Place them in an airtight container. This helps prevent drying and keeps flavors intact. Leftover burritos last about 3 to 4 days in the fridge. Always check for any signs of spoilage before eating. To freeze burritos, first, let them cool completely. Wrap each burrito tightly in plastic wrap. Then, place them in a freezer-safe bag or container. Make sure to label the bag with the date. Frozen burritos can last for up to 3 months. When ready to eat, you can reheat them straight from the freezer. For the best taste, use an oven or microwave. Heat them in the oven at 350°F for about 20 minutes or microwave for 2-3 minutes. Enjoy your burritos warm and tasty! Meal prep can save you time on busy mornings. Chop your vegetables the night before and store them in the fridge. You can also cook the egg mixture ahead of time. Just cool it and store it in a container. For a simple breakfast, warm some tortillas, fill them, and roll them up. Burritos freeze well, so make a batch for later. They are perfect for quick meals during the week. Making breakfast burritos is simple. First, whisk eggs with milk in a bowl. Next, cook diced bell peppers in a skillet until soft. Then, add black beans and corn, cooking until warm. Pour the egg mix into the skillet and scramble until fluffy. Warm tortillas in another pan or microwave. Place the egg mixture in each tortilla, add cheese and avocado, and roll them up. You can find the full recipe in the article. Yes, you can prepare breakfast burritos ahead of time. Cook the egg and vegetable mix, then cool it down. You can store this filling in the fridge for up to three days. When ready to eat, warm the filling, and wrap it in a heated tortilla. You can also freeze burritos. Wrap them tightly in foil and keep them in the freezer for up to a month. Just reheat in the oven or microwave when you want to enjoy them. The best tortillas are large and sturdy. Flour tortillas are soft and chewy, making them popular for burritos. Whole wheat tortillas add fiber and a nutty flavor. Corn tortillas work too but may break more easily. Choose the one that suits your taste. You can also try spinach or tomato tortillas for fun colors and flavors. To make breakfast burritos healthier, focus on fresh ingredients. Use egg whites instead of whole eggs for fewer calories. Swap regular cheese for a low-fat version or skip it altogether. Add more veggies like spinach or zucchini for extra nutrients. You can also use whole grain tortillas for added fiber. These simple swaps make a big difference without losing flavor. Breakfast burritos pair well with many sides. Fresh fruit like berries or melon adds sweetness. A simple green salad offers a fresh contrast. You can also serve crunchy tortilla chips with salsa or guacamole for extra flavor. For a drink, try a smoothie or fresh juice. These sides help create a balanced meal that’s full of color and taste. You can create delicious breakfast burritos with simple ingredients and easy steps. We covered essential items like eggs and peppers, along with tasty toppings. I offered tips for cooking, presentation, and storage. You can even customize your burrito with different flavors or make bowls. Remember, meal prep can save time. Enjoy making your perfect burrito that fits your taste. With these tips, you can impress family or friends at any meal!
Breakfast Burritos Recipe Flavorsome and Simple Dish
Ready to wake up your mornings with a tasty twist? My Breakfast Burritos Recipe is both flavorsome and simple. Packed with eggs, beans, and peppers,
To make an Overnight French Toast Casserole, you need a few key items. Here’s the list of essential ingredients: - 1 loaf of challah or brioche bread - 6 large eggs - 2 cups whole milk - 1/2 cup heavy cream - 1/2 cup pure maple syrup - 2 teaspoons pure vanilla extract - 1 teaspoon ground cinnamon - 1/2 teaspoon freshly grated nutmeg (or ground nutmeg) - 1/4 teaspoon salt - 1 cup mixed fresh berries - 1/4 cup chopped pecans or walnuts (optional) - Powdered sugar for dusting Choosing the right bread is important. Challah or brioche gives a rich taste. They soak up the egg mixture well, making each bite soft and flavorful. The eggs, milk, and cream create a creamy base that holds everything together. Adding maple syrup, vanilla, and spices gives it a sweet and warm flavor. Berries add freshness and a pop of color. Nuts give a nice crunch if you choose to add them. Finally, a dusting of powdered sugar adds a sweet finish. With these ingredients, you can make a breakfast that will impress everyone. For the complete preparation process, check the Full Recipe. 1. Start with a big bowl. Whisk together the eggs, whole milk, heavy cream, maple syrup, vanilla, cinnamon, nutmeg, and salt. Mix until smooth. 2. Next, take your loaf of challah or brioche bread. Cut it into 1-inch cubes. 3. Add the bread cubes to your egg mixture. Gently toss to coat each piece well. 4. If you like nuts, you can fold in the chopped pecans or walnuts. Then, add your mixed fresh berries. Be careful not to mash them. 1. Preheat your oven to 350°F (175°C). This step helps to bake evenly. 2. Grease a 9x13-inch baking dish. Pour your mixture into this dish, spreading it out evenly. 3. Cover the dish with plastic wrap and let it chill in the fridge overnight or at least 4 hours. 4. In the morning, take the casserole out of the fridge. Let it sit for 20 minutes at room temperature. 5. Now, bake the casserole uncovered for 45-50 minutes. Look for a golden brown top and a firm center. 1. Allow the casserole to cool for about 5 minutes after baking. 2. Dust it generously with powdered sugar for a sweet touch. 3. Serve warm, and if you want, drizzle extra maple syrup on top for added flavor. Soaking your casserole overnight is key. This step allows the bread to soak up the egg mixture. Without this soak, your casserole can become dry. For best results, store your casserole covered in the fridge. This keeps it fresh and prevents any strong fridge odors from getting in. Choosing the right bread is vital. I love using challah or brioche. They are soft and soak well. You can use other types too, like sourdough or whole wheat. Just make sure the bread is not too dry. To bake evenly, let the casserole sit at room temperature for about 20 minutes before you bake. This helps it bake through without burning the top. Spices can make a big difference. Adding cinnamon or nutmeg gives great warmth. You can also use vanilla extract for more depth. Want a fruity twist? Try adding seasonal fruits like apples or peaches. Fresh berries work well too. They add color and taste. You can mix and match to find your favorite flavor. Check out the Full Recipe for more ideas! {{image_4}} You can use different types of bread for your casserole. Sourdough adds a nice tang. Whole wheat gives it a hearty twist. Both choices work well in soaking up the egg mixture. If you need a gluten-free option, look for gluten-free bread. Many brands make tasty gluten-free loaves. Just ensure the bread is fresh for the best results. Want to mix things up? You can add chocolate chips for a sweet treat. Caramel bits also make a great addition. Think about using flavored syrups or extracts too. Almond or orange extract can add a fun twist. You can even try spices like cardamom for a warm flavor. These options let you personalize your casserole. Garnish your casserole with whipped cream for extra creaminess. It adds a nice touch on top. You can also pair it with breakfast meats like bacon or sausage. The salty taste of meat goes well with the sweet casserole. This combination makes a filling and tasty breakfast. Enjoy experimenting with these ideas to make your dish special! To keep your Overnight French Toast Casserole fresh, store any leftovers in airtight containers. This helps prevent drying out and keeps flavors intact. You can safely store it in the fridge for up to three days. If you plan to eat it later, make sure to cool it down before sealing it up. If you want to save your casserole for later, freezing is a great option. First, let the baked casserole cool completely. Then, cut it into squares and wrap each piece tightly in plastic wrap. Place the wrapped pieces in a freezer-safe bag or container. You can freeze it for up to three months. When you're ready to enjoy it, take it out and thaw it overnight in the fridge. You have two choices for reheating: oven or microwave. If you want the best texture, the oven is ideal. Preheat to 350°F (175°C), then place the casserole in for about 15-20 minutes. This keeps it warm and helps restore its original texture. If you're in a hurry, the microwave works too! Heat it in short bursts, around 30 seconds at a time, checking frequently to avoid overcooking. Enjoy your tasty treat! You can store Overnight French Toast Casserole in the fridge for up to three days. Make sure to keep it in an airtight container. This way, it stays fresh and ready for a quick breakfast. You can also freeze leftovers for up to three months. Just remember to thaw it in the fridge before you reheat it. Yes, you can make this casserole vegan! Swap eggs with a mixture of ground flaxseed and water. Use almond milk or soy milk instead of whole milk and heavy cream. Maple syrup is already vegan, so that’s great. You can also try using vegan bread. Just make sure it’s egg-free. For this recipe, challah or brioche bread works best. They are soft and soak up the egg mixture well. You can also use sourdough or whole wheat bread if you prefer. Just make sure the bread is a bit stale. This helps it hold its shape when you bake it. Refrigerating overnight is key for the best flavor. It allows the bread to soak up all the yummy flavors. If you can’t wait, refrigerate for at least four hours. This will still make a tasty casserole, but overnight is best! Absolutely! You can add other fruits like bananas or peaches. Just chop them into small pieces. Be careful not to add too much fruit. Too much moisture can make the casserole soggy. Stick to one cup of fruit for the best results. For the full recipe, check out the Decadent Overnight French Toast Casserole. To make a delicious Overnight French Toast Casserole, gather the right ingredients and follow the steps. You whisk the egg and dairy mix, fold in berries and nuts, then bake. Overnight soaking really helps the bread absorb flavors. You can try different breads and fruits for variety. Store leftovers properly to keep them fresh. This dish is fun to share at breakfast. With these tips, your casserole will surely impress. Enjoy the flavors and create happy memories around the table.
Overnight French Toast Casserole Simple and Tasty Treat
Ready to elevate your breakfast game? This Overnight French Toast Casserole is simple, tasty, and perfect for any morning. With soft bread, creamy eggs, and