Breakfast

- 1 cup rolled oats - 2 tablespoons chia seeds - 1 cup almond milk (or any milk of your choice) - 1/2 cup pure pumpkin puree - 2 tablespoons maple syrup - 1 teaspoon pumpkin pie spice - 1/2 teaspoon vanilla extract - Pinch of salt The main ingredients for pumpkin spice chia overnight oats are simple and wholesome. You start with rolled oats, which are a great source of fiber. Chia seeds add a nice crunch and boost the nutrition. For the liquid, almond milk works well, but feel free to use any milk you like. The pumpkin puree gives a smooth texture and a rich flavor. Maple syrup sweetens the mix, while the pumpkin pie spice brings that cozy fall taste. A splash of vanilla and a pinch of salt round it all out. - Crushed walnuts - Dollop of yogurt - Sprinkle of cinnamon Toppings can make your oats even better. I love adding crushed walnuts for a nice crunch. A dollop of yogurt adds creaminess and a touch of tang. A sprinkle of cinnamon on top enhances the flavor and makes it look pretty. - Calories per serving: Approximately 250-300 - Macronutrient breakdown: - Carbs: 40g - Fats: 8g - Proteins: 8g - Fiber content: Around 10g These oats are not just tasty; they are nutritious too! Each serving has about 250 to 300 calories. You get a good mix of carbs, fats, and proteins. The oats and chia seeds pack in roughly 10 grams of fiber, which helps you feel full longer. They make a healthy start to your day! 1. First, grab a mixing bowl. Add 1 cup rolled oats and 2 tablespoons chia seeds. Stir them together well. 2. In a separate bowl, whisk 1 cup almond milk, 1/2 cup pure pumpkin puree, 2 tablespoons maple syrup, 1 teaspoon pumpkin pie spice, 1/2 teaspoon vanilla extract, and a pinch of salt. Make sure it is smooth. 3. Pour the pumpkin mixture over the oats and chia seeds. Stir gently until everything is mixed. Ensure no dry bits remain. 1. Take two mason jars or airtight containers. Divide the mixture evenly. Make sure each jar has the same amount. 2. Seal the jars tightly to keep the mixture fresh. 1. Place the jars in the fridge. Let them soak for at least 4 hours or overnight. This helps the oats and chia seeds absorb the liquid. 2. For the best texture, stir the mixture before serving. If it seems thick, add a splash of milk to reach your desired consistency. To make your pumpkin spice chia overnight oats even tastier, you can adjust the sweetness. If you want a sweeter taste, add more maple syrup. Start with one extra teaspoon at a time. This lets you find the right balance for you. You can also experiment with spice levels. If you love strong flavors, add more pumpkin pie spice or a pinch of nutmeg. This will give your oats a warm, cozy flavor. Sometimes your oats might be too thick for your liking. If that happens, just thin them with extra milk. Add a splash of almond milk and stir well. Let it sit for a minute to soak in. This will help you get the perfect creamy texture. Chill times are key too! For the best texture, let your oats soak for at least four hours, but overnight is best. This helps the oats and chia seeds absorb the flavors. Serving your oats in mason jars gives them a fun, rustic look. It makes breakfast feel special! If you want a more elegant touch, you can transfer them to different bowls. Layering the oats with toppings like yogurt and cinnamon can make it look fancy. Try to arrange toppings in a way that looks nice. A sprinkle of walnuts on top adds a nice crunch and visual appeal. {{image_4}} You can use many non-dairy milk options for your oats. Almond milk is popular, but you can also try oat milk, coconut milk, or soy milk. Each option brings its own flavor and texture. For toppings, consider coconut yogurt or almond-based yogurt. They add creaminess and fit a vegan diet. If you want a chocolate twist, add cocoa powder. Just a tablespoon or two can make a rich change. You can also add nuts and seeds for crunch. Chopped almonds, pecans, or sunflower seeds work well. They will give your oats a nice texture and added nutrients. For fall, switch to apple cinnamon. Just replace the pumpkin with applesauce and add some cinnamon. In summer, think fruity! You can use berries or sliced bananas as toppings. They add a fresh taste and bright colors to your dish. To keep your pumpkin spice chia overnight oats fresh, store them in the fridge. Use airtight jars or containers. This way, they stay safe from odors and moisture. The maximum time to store these oats is 4 to 5 days. After this period, they may lose flavor and texture. Can you freeze overnight oats? Yes, you can! However, I recommend freezing these oats only if needed. To freeze, place the jars in the freezer. Make sure they are sealed tightly. To thaw, move the jars to the fridge the night before you plan to eat them. This method helps maintain their creamy texture. If you need them quicker, you can also leave them at room temperature for a couple of hours. If you enjoy them warm, here’s how to serve them if chilled. Simply stir the oats well. If they are too thick, add a splash of almond milk to your liking. For quick heating, use the microwave. Place your jar in the microwave without the lid. Heat in short bursts, about 30 seconds at a time. Stir between heating to ensure even warmth. Enjoy your cozy breakfast! Chia seeds are tiny black seeds from the Salvia hispanica plant. They are packed with nutrients. - Nutritional benefits: Chia seeds are high in fiber, protein, and omega-3 fatty acids. These nutrients help keep you full and support heart health. - Health properties: They can absorb water, forming a gel-like substance. This helps with digestion and keeps you hydrated. Yes, you can make these oats ahead of time. It’s a great way to save time. - Best practices for making ahead: Mix all the ingredients the night before. Store them in jars. - Storage duration: These oats last in the fridge for up to five days. Just grab a jar each morning. Yes, they can fit well into a weight loss plan. They are filling and nutritious. - Discussing calorie count and satiation: Each serving has about 300 calories. The fiber and protein help keep you satisfied longer. - Incorporating into a balanced diet: Pair these oats with fruit or nuts to add more nutrients without extra calories. You can keep overnight oats in the fridge for several days. - Recommended storage duration: They stay fresh for about five days. - Signs of spoilage: If you see mold or if they smell sour, it’s time to toss them out. Pumpkin spice chia overnight oats are a delicious and nutritious meal option. We covered the main ingredients, like oats, chia seeds, and pumpkin puree, along with preparation steps. Don’t forget optional toppings for extra flavor. I also shared tips for consistency, storage, and exciting variations for any season. Using these oats in your diet can be fun and flexible. Enjoy creating your perfect jar and savoring every bite. You now have everything to make this tasty dish your own.
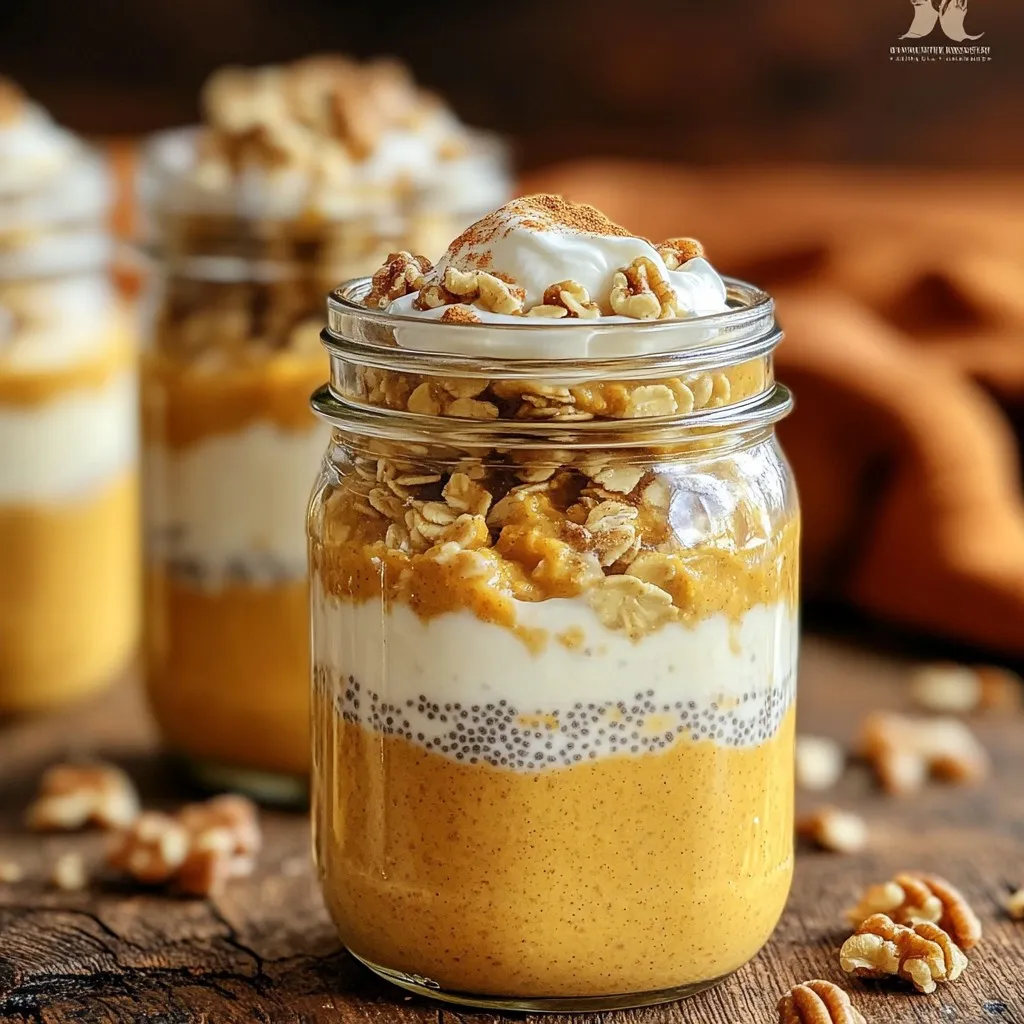
Pumpkin Spice Chia Overnight Oats Simple Recipe
Start your day with a cozy twist! Pumpkin Spice Chia Overnight Oats are simple to make, packed with flavor, and perfect for busy mornings. In
Here is a list of what you need for the High-Protein Eggnog Cottage Cheese Smoothie: - 1 cup cottage cheese - 1 cup unsweetened almond milk - 1 medium ripe banana - 1/2 teaspoon pure vanilla extract - 1/2 teaspoon ground nutmeg (plus extra for garnish) - 1/4 teaspoon ground cinnamon (plus extra for garnish) - 1 tablespoon honey or maple syrup (optional) - Ice cubes (optional) These ingredients come together to make a smooth and creamy drink. The cottage cheese adds protein, while the banana gives sweetness. Almond milk keeps it light and dairy-free. You can add honey or maple syrup if you want more sweetness. The spices, like nutmeg and cinnamon, create that cozy, holiday feel. Enjoy this smoothie as a quick breakfast or a tasty snack. - Start by placing 1 cup of cottage cheese into your blender. - Add 1 cup of unsweetened almond milk. - Blend on medium speed until the mixture is smooth and creamy. - Peel and add 1 medium ripe banana to the blender. - Pour in 1/2 teaspoon of pure vanilla extract. - Sprinkle in 1/2 teaspoon of ground nutmeg and 1/4 teaspoon of ground cinnamon. - For sweetness, add 1 tablespoon of honey or maple syrup if you like. - Increase the speed to high and blend until everything is well mixed. - If you want a thicker smoothie, add a handful of ice cubes. - Blend again until the ice is crushed and mixed in well. - Taste the smoothie and adjust sweetness or spices if needed. - Pour it into a glass and garnish with a sprinkle of nutmeg and cinnamon. To make your smoothie thicker, add ice cubes. Ice gives it a frosty feel. Blend the ice until it is crushed well. If you want a creamier texture, blend on high speed. This helps mix everything smoothly. You can also blend longer for a whipped consistency. You can change the spices to fit your taste. If you love nutmeg, add more. If cinnamon is your favorite, feel free to increase it too. For sweetness, use honey or maple syrup. Start with a little, then taste it. Add more if you want it sweeter. To make your smoothie look nice, garnish it with nutmeg and cinnamon. Just sprinkle a little on top for a festive touch. You can serve it in a tall glass for an elegant look. Add a straw or a fun drink stirrer to make it more inviting. {{image_4}} You can easily switch cottage cheese for Greek yogurt. Greek yogurt gives a creamy texture and adds protein. If you want a dairy-free option, try different plant-based milk. Almond, oat, or soy milk work well. Each type adds its unique flavor to the smoothie. Want to mix things up? Incorporate other fruits like strawberries or cherries. They add freshness and a fun twist. You can also add protein powder for extra energy. This is great for after workouts or busy mornings. Just blend it in with the other ingredients. For fall, make a pumpkin spice version. Add a teaspoon of pumpkin puree and a pinch of pumpkin spice. It gives a warm, cozy flavor. In winter, try mint or peppermint changes. A drop of peppermint extract adds a festive touch. It’s a fun way to celebrate the season! Store your smoothie in the fridge. Use a sealed container to keep it fresh. It’s best to drink it within 1 to 2 days. If you have leftovers, pour the smoothie into a jar or bottle. This helps prevent spills and keeps it cold. You might wonder if you can reheat a smoothie. It’s not the best idea. Smoothies taste best cold and refreshing. If you want it warm, try blending it again. This can smooth out any changes in texture. You can keep your smoothie for up to 48 hours in the fridge. After that, it may lose flavor and texture. Signs of spoilage include a sour smell or off appearance. If it looks or smells bad, don’t drink it. Yes, you can use flavored almond milk. Flavored options add extra sweetness and taste. However, it may change the overall flavor of the smoothie. If you prefer a sweet drink, flavored almond milk works well. If you want a more classic taste, stick to unsweetened. You can make this smoothie ahead of time. Just blend the ingredients and store it in the fridge. It’s best to drink it within 24 hours for freshness. If you want it to last longer, freeze the smoothie in portions. Thaw it overnight in the fridge before drinking. Cottage cheese is high in protein and calcium. It helps build strong bones and muscles. Eggnog, especially homemade, can provide vitamins like A and D. Using low-fat options can make it healthier. Together, they create a filling drink with added nutrition. To make this smoothie vegan, swap the cottage cheese for vegan yogurt. You can also replace the honey with maple syrup or agave syrup. Use plant-based milk like soy or oat milk. This way, you keep the creamy texture while staying plant-based. Yes, this smoothie is great for post-workout recovery. It has protein from cottage cheese, which helps repair muscles. The banana adds carbs for energy. Together, they make a perfect blend to help you recover and feel great after your workout. This smoothie combines simple ingredients for a tasty treat. We blend cottage cheese, almond milk, and banana for a creamy base. You can spice it up with nutmeg, cinnamon, or swap ingredients for fun twists. Don’t forget to store any leftovers right. This recipe is perfect for breakfast or a snack. Enjoy experimenting with flavors and enjoy a nutritious drink!
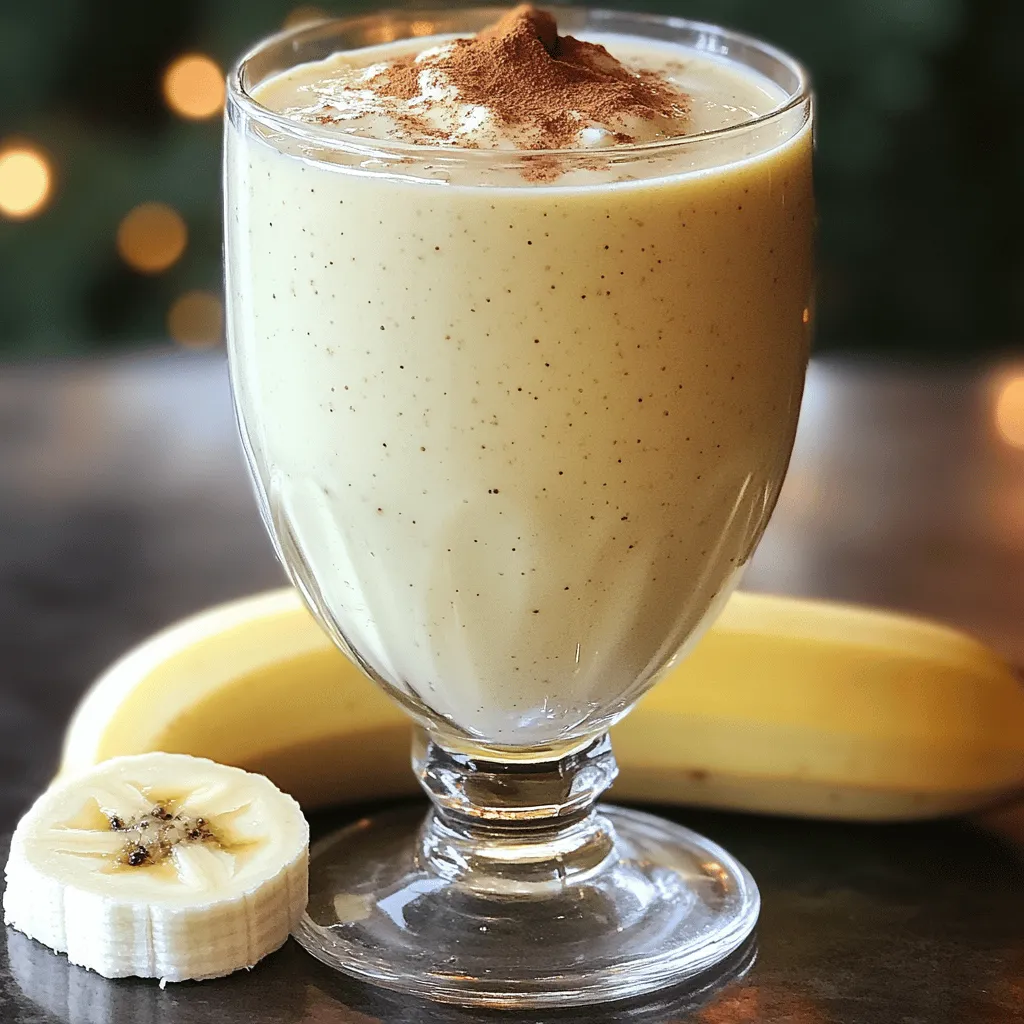
High-Protein Eggnog Cottage Cheese Smoothie Recipe
Are you ready to boost your holiday spirit and your protein intake? This High-Protein Eggnog Cottage Cheese Smoothie is a creamy, festive treat that’s quick
To make Air Fryer Pumpkin Spice French Toast Sticks, gather these key ingredients: - 1 cup pumpkin puree - 2 large eggs - 1 teaspoon vanilla extract - 1 teaspoon pumpkin pie spice - ¼ teaspoon salt - 1 cup milk (dairy or non-dairy) - 8 slices thick bread (like brioche or challah) These ingredients blend together to create a tasty batter that coats the bread sticks. You can add a touch of sweetness with these optional ingredients: - 1 tablespoon sugar (for added sweetness) - Cooking spray or oil for the air fryer These extras help enhance the flavor and texture of the dish. If you have specific dietary needs, consider these substitutions: - Use almond milk or oat milk instead of regular milk for a dairy-free option. - Choose gluten-free bread to make this dish gluten-free. - You can skip the sugar if you want a lower-sugar version. These options allow everyone to enjoy this delicious treat while meeting their dietary needs. Start by mixing the pumpkin puree, eggs, and vanilla in a bowl. Add the pumpkin pie spice, salt, and sugar if you want it sweet. Whisk until it is smooth and free of lumps. Then, slowly pour in the milk while whisking. Keep mixing until the batter is creamy and well blended. This pumpkin mixture adds rich flavor to your French toast sticks. Cut each slice of thick bread into three equal sticks. This makes them easy to dip and eat. Now, dip each stick into the pumpkin mixture. Make sure each piece gets a good coat, but don’t let it soak. Shake off any extra batter. This helps prevent soggy sticks later on. Preheat your air fryer to 360°F (182°C). Arrange the coated sticks in a single layer in the air fryer basket. Avoid overlapping them to ensure even cooking. Lightly spray the sticks with cooking spray or drizzle a little oil on top. Cook them for 10-12 minutes, flipping halfway through. This gives them a golden brown color and a nice crunch. When they are done, let them cool for a few minutes before serving. Enjoy them warm, with syrup or powdered sugar on top for a sweet treat! To make sure your French toast sticks cook evenly, follow these tips. First, cut the bread into equal-sized sticks. This helps them cook at the same rate. Next, don’t overcrowd the air fryer basket. Leave space between each stick. This allows hot air to flow around them. If your air fryer is small, cook in batches. Lastly, remember to flip the sticks halfway through cooking. This way, both sides get nice and golden. For that perfect crunch, you need to coat the sticks just right. Dip them quickly in the pumpkin mix. Don’t let them soak too long, or they will become soggy. After dipping, shake off the extra mixture. A light spray of cooking spray or a drizzle of oil helps too. This adds crispiness as they cook. Make sure to air fry at 360°F (182°C) for 10-12 minutes. The result should be golden brown and crunchy. These pumpkin spice French toast sticks taste amazing on their own. For a fun twist, serve them with maple syrup for dipping. You can also sprinkle some powdered sugar on top for sweetness. Want more flavor? Try cinnamon or nutmeg as a garnish. Arrange the sticks in a fan shape on a plate. A small bowl of syrup in the center makes it look great. These simple touches make your dish even more inviting! {{image_4}} You can change the spice mix to suit your taste. Try using cinnamon or nutmeg instead of pumpkin pie spice. You can also add ginger for a warm kick. Just one teaspoon of your new spice will elevate the flavor. Mixing spices gives your French toast sticks a unique twist. While maple syrup is classic, you have many choices. Honey adds sweetness without being too sticky. You can also try a yogurt dip mixed with vanilla. For a fun option, serve with chocolate or peanut butter sauce. These dips add a new layer of flavor to your French toast sticks. Bread choice affects taste and texture. Thick breads like brioche or challah are great. You can also use whole grain for a healthy twist. Gluten-free bread works well too if you need a substitute. Each type of bread gives a different taste to your dish, making it special every time. You should store leftover French toast sticks in an airtight container. Place them in the fridge. They will stay fresh for about three days. If you want to keep them longer, consider freezing. To reheat, set your air fryer to 350°F (175°C). Place the sticks in the basket. Heat for about 5 minutes until warm. You can also use a microwave, but the air fryer gives a better crunch. If you want to freeze the sticks, ensure they are fully cooled. Arrange them in a single layer on a baking sheet. Freeze them for about an hour, then place them in a freezer bag. They can last for up to two months in the freezer. To thaw, move them to the fridge overnight before reheating. This method helps keep their texture intact. Yes, you can use regular bread. Thin bread will work, but it may not hold the batter well. I prefer thick bread like brioche or challah for this recipe. Thick bread gives it a nice texture and holds the pumpkin mixture better. If you use thin bread, be quick when dipping to avoid sogginess. To make these sticks dairy-free, swap the milk for any non-dairy milk. Almond, soy, or oat milk works well. Use the same amount as regular milk. The pumpkin mixture will still be creamy and delicious. This change keeps the flavor, while making it friendly for those avoiding dairy. Besides syrup, you can try many tasty toppings. A dusting of powdered sugar adds sweetness. You can also use whipped cream for a rich treat. For a fun twist, try a sprinkle of cinnamon or nutmeg on top. Fresh fruit like sliced bananas or berries also pairs well with these sticks. In this post, we explored how to make a tasty pumpkin dish using simple steps. We discussed key ingredients, optional add-ins for more flavor, and how to adjust recipes for different diets. Plus, we covered tips for perfect cooking and fun variations to try. Finally, we looked at storage options and answered common questions. Now, you can enjoy this dish in many ways. Keep this guide handy for your next cooking adventure!
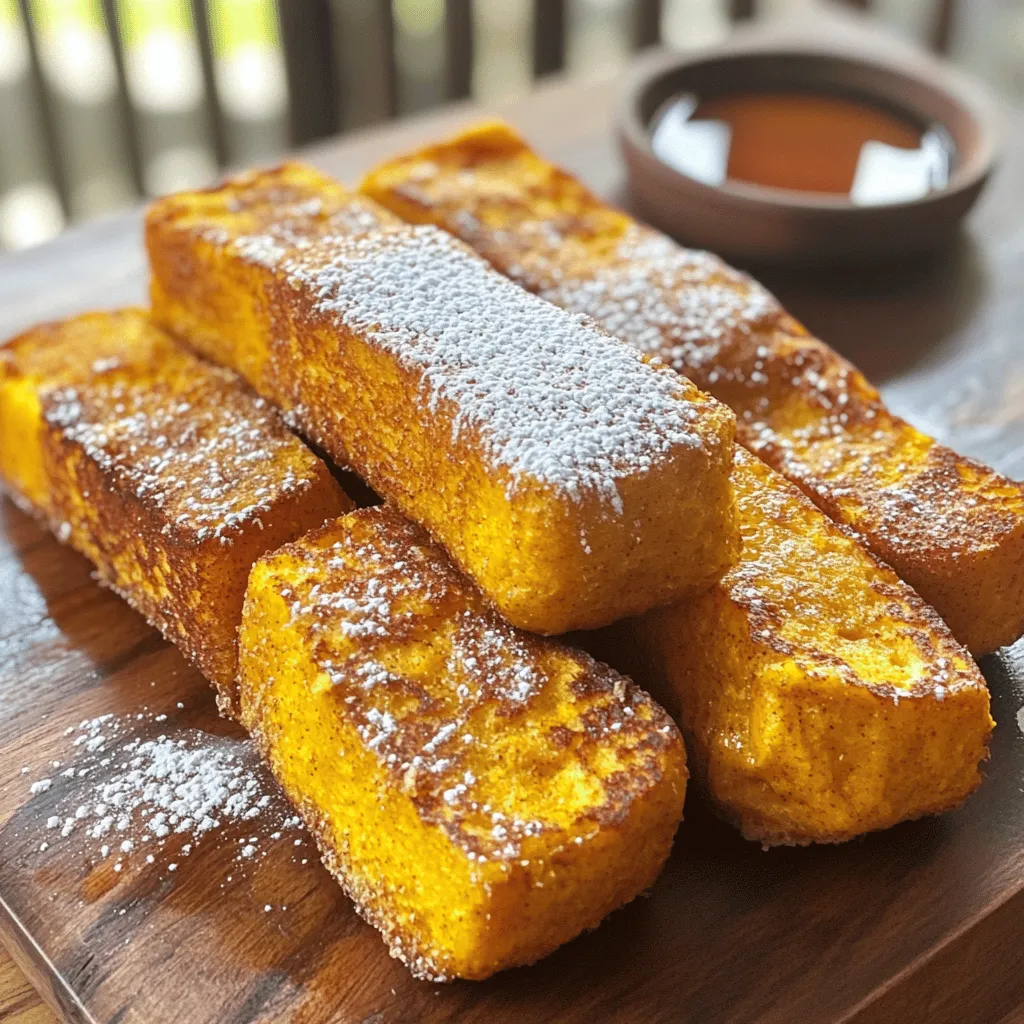
Air Fryer Pumpkin Spice French Toast Sticks Delight
Craving a cozy fall treat? You’ll love my Air Fryer Pumpkin Spice French Toast Sticks! With warm spices and a crispy outside, these sticks are
To make delicious pumpkin streusel muffins, you will need these main ingredients: - 1 cup canned pumpkin puree - 1/2 cup granulated sugar - 1/2 cup packed brown sugar - 1/2 cup vegetable oil - 2 large eggs - 1 teaspoon vanilla extract - 1 1/2 cups all-purpose flour - 1 teaspoon baking powder - 1 teaspoon baking soda - 1 teaspoon ground cinnamon - 1/2 teaspoon ground nutmeg - 1/2 teaspoon salt These ingredients combine to create a moist and flavorful muffin. Pumpkin puree gives a rich taste and lovely color. The sugars add sweetness, while the spices bring warmth. The streusel topping adds a delightful crunch. Here’s what you need for it: - 1/4 cup all-purpose flour - 1/4 cup packed brown sugar - 1 teaspoon ground cinnamon - 2 tablespoons cold butter, cubed This mixture will create a crumbly texture that contrasts beautifully with the soft muffin. For this recipe, the measurements are straightforward. You use standard cups and teaspoons. Keep everything in mind for accuracy. - Dry Ingredients: Measure flour and sugar carefully to avoid dense muffins. - Wet Ingredients: Ensure your pumpkin and oils are mixed well to create a smooth batter. These ingredients and measurements will help you create the best pumpkin streusel muffins! First, preheat your oven to 350°F (175°C). This step is key for even baking. Next, take a muffin tin and line it with paper liners. If you don’t have liners, grease each cup with oil or butter. This will keep your muffins from sticking. In a large bowl, add 1 cup of canned pumpkin puree. Then, mix in 1/2 cup of granulated sugar and 1/2 cup of packed brown sugar. Pour in 1/2 cup of vegetable oil. Crack in 2 large eggs and add 1 teaspoon of vanilla extract. Use a whisk to blend these ingredients until the mixture is smooth. Grab another bowl and add 1 1/2 cups of all-purpose flour. Then, add 1 teaspoon of baking powder and 1 teaspoon of baking soda. Sprinkle in 1 teaspoon of ground cinnamon, 1/2 teaspoon of ground nutmeg, and 1/2 teaspoon of salt. Whisk these dry ingredients together. Make sure there are no lumps. This helps your muffins rise nicely. In a small bowl, combine 1/4 cup of all-purpose flour, 1/4 cup of packed brown sugar, and 1 teaspoon of ground cinnamon. Cut in 2 tablespoons of cold, cubed butter. Use a fork or your fingers to mix until you see coarse crumbs. This will create a tasty crust for your muffins. Now, it’s time to fill the muffin cups. Spoon the pumpkin batter into each cup, filling them about 2/3 full. Sprinkle a tablespoon of the streusel topping on each one. Bake in your preheated oven for 18-20 minutes. To check if they are done, insert a toothpick into the center of a muffin. If it comes out clean or with a few moist crumbs, they are ready. Let them cool for about 5 minutes in the pan. Then, move them to a wire rack. To get the best muffin texture, focus on mixing. After combining wet and dry ingredients, stir gently. Overmixing adds air and makes muffins dense. You want a lumpy batter, not smooth. This keeps your muffins soft and fluffy. Also, use room temperature ingredients. They blend better and create a nice rise. Lastly, fill the muffin cups only two-thirds full. This allows room for them to rise perfectly. You can switch some ingredients if you need to. For example, use applesauce instead of oil. This will cut calories and add moisture. If you want less sugar, try using honey or maple syrup. These options add flavor and sweetness. For a gluten-free version, swap all-purpose flour with a gluten-free blend. Just make sure it has a good binding agent, like xanthan gum. To boost the flavor, add spices! A pinch of ginger gives warmth. Cloves add depth and a unique taste. You could even try cardamom for a twist. A touch of vanilla extract enhances sweetness too. Mix and match spices based on your preference. Experimenting can lead to a new favorite flavor! {{image_4}} You can easily add chocolate chips to your pumpkin muffins. Just mix 1 cup of semi-sweet chocolate chips into the batter before pouring it into the muffin cups. The rich chocolate pairs well with the warm spices and pumpkin flavor. This adds a sweet touch that both kids and adults will love. You can use mini chips for a more subtle chocolate flavor. To make gluten-free pumpkin muffins, swap regular flour for a gluten-free blend. Look for a blend that contains xanthan gum, which helps mimic the texture of wheat flour. You may also add an extra egg to improve the muffins' structure. This way, everyone can enjoy the delightful taste of pumpkin muffins without gluten. For vegan muffins, replace the eggs with flax eggs. To make one flax egg, mix 1 tablespoon of ground flaxseed with 3 tablespoons of water. Let the mix sit for about five minutes. You can also use plant-based oil instead of vegetable oil. Maple syrup or coconut sugar can replace granulated and brown sugar. These changes keep the muffins moist and delicious while being vegan-friendly. To keep your pumpkin streusel muffins fresh, store them in an airtight container. This keeps moisture in and prevents them from drying out. Place a piece of parchment paper between layers to avoid sticking. If you plan to eat them within a few days, they can stay at room temperature. For longer storage, refrigerate them for up to a week. Freezing is a great way to save muffins. First, let the muffins cool completely. Then, wrap each muffin tightly in plastic wrap. Place the wrapped muffins in a freezer bag, removing as much air as possible. You can freeze them for up to three months. When you're ready to enjoy, simply thaw them at room temperature or warm them in the oven. Reheating your muffins is easy. If frozen, let them thaw first. For warm muffins, preheat your oven to 350°F (175°C). Place the muffins on a baking sheet for about 10 minutes. You can also use a microwave. Heat each muffin for about 15-20 seconds. Enjoy them warm for the best flavor! You can use butternut squash puree in place of pumpkin puree. It has a similar taste and texture. Sweet potato puree is another option. It adds a nice sweetness to the muffins. You can also use applesauce if you want to reduce fat. Just keep in mind that it will change the flavor a bit. To check if the muffins are done, insert a toothpick into the center of a muffin. If it comes out clean or with a few moist crumbs, your muffins are ready. If the toothpick has wet batter on it, bake them a few more minutes. Typically, you should bake them for 18-20 minutes at 350°F. Yes, you can make these muffins in advance. They store well for a few days. Place them in an airtight container at room temperature. If you want to keep them longer, freeze them. Just wrap each muffin in plastic wrap and place them in a freezer bag. When you're ready to eat, thaw them at room temperature or microwave them for a few seconds. Pumpkin streusel muffins are easy and fun to make. We covered key ingredients, step-by-step instructions, and helpful tips. You learned how to get the best texture and flavor. Don’t forget the exciting variations, like chocolate chips or vegan options. Store them well to keep them fresh and tasty. With these simple steps and ideas, you can bake muffins your friends and family will love. I hope you enjoy your baking adventure!
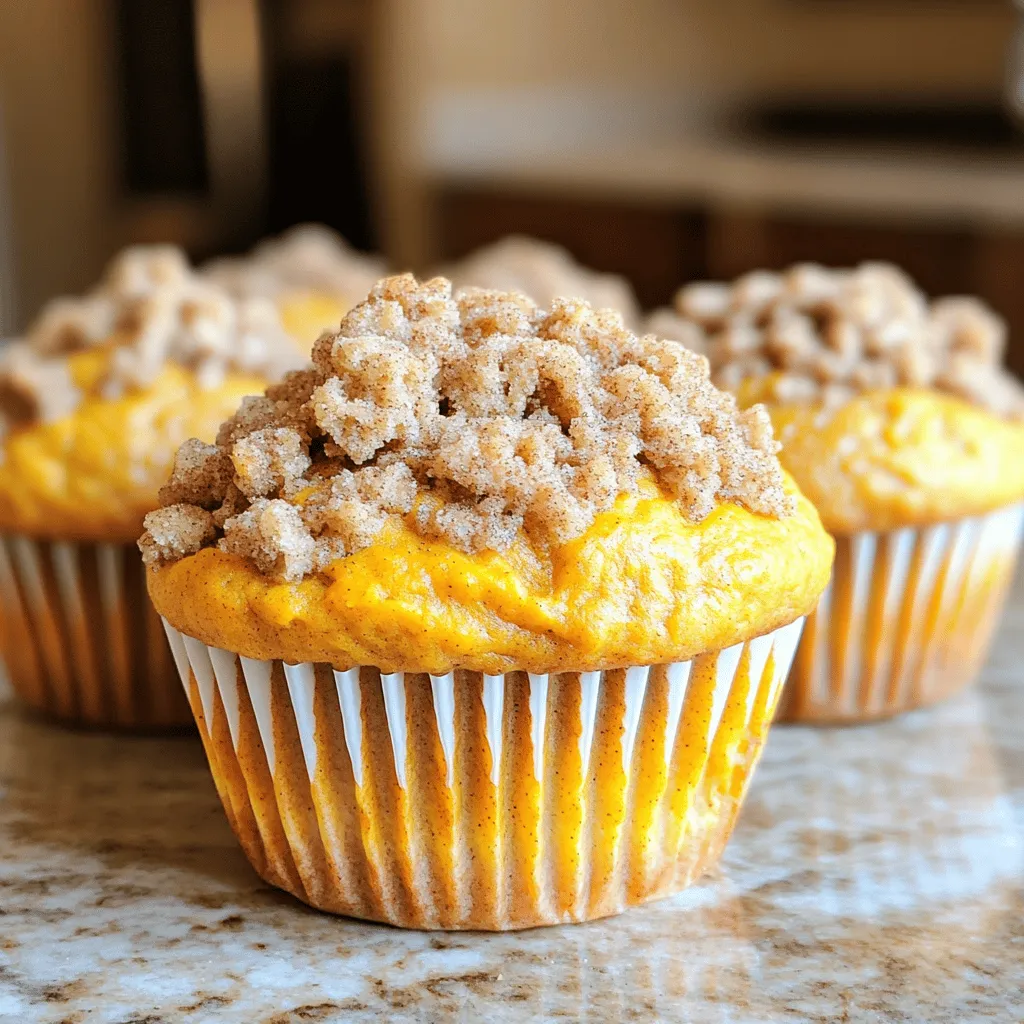
Pumpkin Streusel Muffins Delightfully Flavorful Recipe
Welcome to the delightful world of Pumpkin Streusel Muffins! If you love warm, spiced treats, this recipe is for you. I’ll guide you step-by-step to
- 1 cup rolled oats - 1 cup almond milk (or any milk of your choice) - 1/2 cup unsweetened applesauce - 1 medium apple, peeled and diced into small cubes - 1 teaspoon ground cinnamon - 1 teaspoon pure vanilla extract - 2 tablespoons pure maple syrup (or honey) - 1 tablespoon chia seeds - A pinch of ground nutmeg - 1/4 cup chopped walnuts - Fresh apple slices - Additional cinnamon for garnish When I make Apple Pie Overnight Oats, I focus on simple yet tasty ingredients. The rolled oats serve as a great base. They soak up all the flavors while keeping a nice texture. I love using almond milk, but any milk works great. Unsweetened applesauce adds natural sweetness and moisture. Diced apples bring a fresh crunch and taste just like pie. To enhance the flavor, I add ground cinnamon and nutmeg. These spices remind me of cozy fall days. A bit of vanilla extract adds warmth, while maple syrup or honey provides extra sweetness. Chia seeds are a fun addition. They help thicken the oats and add some healthy fats. For toppings, I often sprinkle chopped walnuts for crunch. Fresh apple slices look pretty and taste great. A light dusting of cinnamon on top makes it even better. Each bite feels like a dessert, but it’s healthy enough for breakfast! Start by grabbing a large mixing bowl. Combine 1 cup of rolled oats, 1 cup of almond milk, 1/2 cup of unsweetened applesauce, and 1 teaspoon of pure vanilla extract. Stir well to coat all oats with the liquid. Next, add in 1 medium diced apple, 1 teaspoon of ground cinnamon, a pinch of nutmeg, 1 tablespoon of chia seeds, and 2 tablespoons of maple syrup or honey. Mix everything until well blended. If you want some crunch, fold in 1/4 cup of chopped walnuts. This step is optional, but it adds great texture to your oats. Now, divide the mixture evenly into four jars. Cover each jar tightly with a lid or plastic wrap. Place them in the refrigerator to chill overnight or for at least 4 hours. This helps the oats absorb all the flavors. In the morning, take the jars out of the fridge. Stir the oats well. If you like a creamier texture, add a splash of almond milk and mix again. Just before serving, top each jar with fresh apple slices, a sprinkle of cinnamon, and optional walnuts for extra crunch. Enjoy your tasty and healthy breakfast! To get the right creaminess, adjust the liquid. If your oats feel too thick, add a splash of almond milk. This small change helps achieve the perfect balance. For a richer texture, use less liquid. Just remember, the oats will absorb more liquid overnight. Want to mix it up? Substitute almond milk with coconut milk for a tropical twist. You can also swap applesauce for mashed banana. This adds natural sweetness and a new taste. Try using maple syrup or honey for different flavors too. Each choice creates a new experience in every bite. Planning for busy mornings? Make several jars at once. This saves time and keeps breakfast ready. Store the jars in the fridge for up to five days. Grab one each morning! You will enjoy a tasty meal without the hassle of cooking. Each jar is a healthy start to your day. {{image_4}} You can use any milk you like for your oats. Here are some tasty choices: - Dairy milk: This is a classic choice, rich and creamy. - Oat milk: A smooth option that adds a nice flavor. - Coconut milk: This gives a tropical twist and a creamy texture. Try different milks to find your favorite. Each one changes the taste and feel of your oats. You can switch up your oats based on the season. Here are some great ideas: - Pumpkin spice: This adds warmth and is perfect for fall. - Berries: Fresh or frozen berries add sweetness and color. - Bananas: Slice them in for a creamy texture and natural sweetness. Adding these fruits or spices makes your oats fun and new with each season. You can easily adapt this recipe to fit your diet. Here are some options: - Vegan: Use plant-based milk and maple syrup instead of honey. - Nut-free: Skip the walnuts and check your milk for nuts. These changes help you enjoy delicious oats without worries about your diet. Apple Pie Overnight Oats stay fresh in the fridge for up to 5 days. Keep the oats in airtight jars or containers. This helps prevent them from drying out. The flavors meld together nicely over time, making each bite more delicious. You can freeze the prepared mixture for later. However, the texture may change when thawed. To freeze, use a freezer-safe container. Leave some space at the top, as oats expand when frozen. Thaw overnight in the fridge before serving. To warm up your overnight oats, use the microwave. Heat for about 30 seconds to 1 minute. Stir well after heating. If they seem too thick, add a splash of almond milk to get the right consistency. Enjoy your tasty breakfast warm! Yes, you can use quick oats. They cook faster and soak up liquid quickly. This may change the texture slightly. Your oats might be creamier but less chewy. To make this recipe gluten-free, use certified gluten-free oats. Many brands offer gluten-free rolled oats. Always check the label to be sure. Yes, you can substitute applesauce with fresh apples. Just peel and dice a medium apple. Mix these into your oats for a nice crunch. You can add many healthy toppings! Here are some ideas: - Chopped nuts like walnuts or almonds - Fresh fruits like berries or banana slices - A dollop of Greek yogurt - A sprinkle of seeds, like pumpkin or sunflower Apple Pie Overnight Oats last for about 3 to 5 days in the fridge. Store them in sealed jars to keep them fresh. Always check for any signs of spoilage before eating. Apple Pie Overnight Oats are a simple and tasty treat. We covered key ingredients like rolled oats, almond milk, and apples. Flavor enhancers such as cinnamon and vanilla boost taste. I shared step-by-step prep, tips for texture, and meal prep ideas. You can even switch up ingredients for fun variations. Store your oats well for freshness. Enjoy your creamy, healthy breakfast. I hope you try this recipe to make your mornings easier and more delicious. Your mornings will thank you!
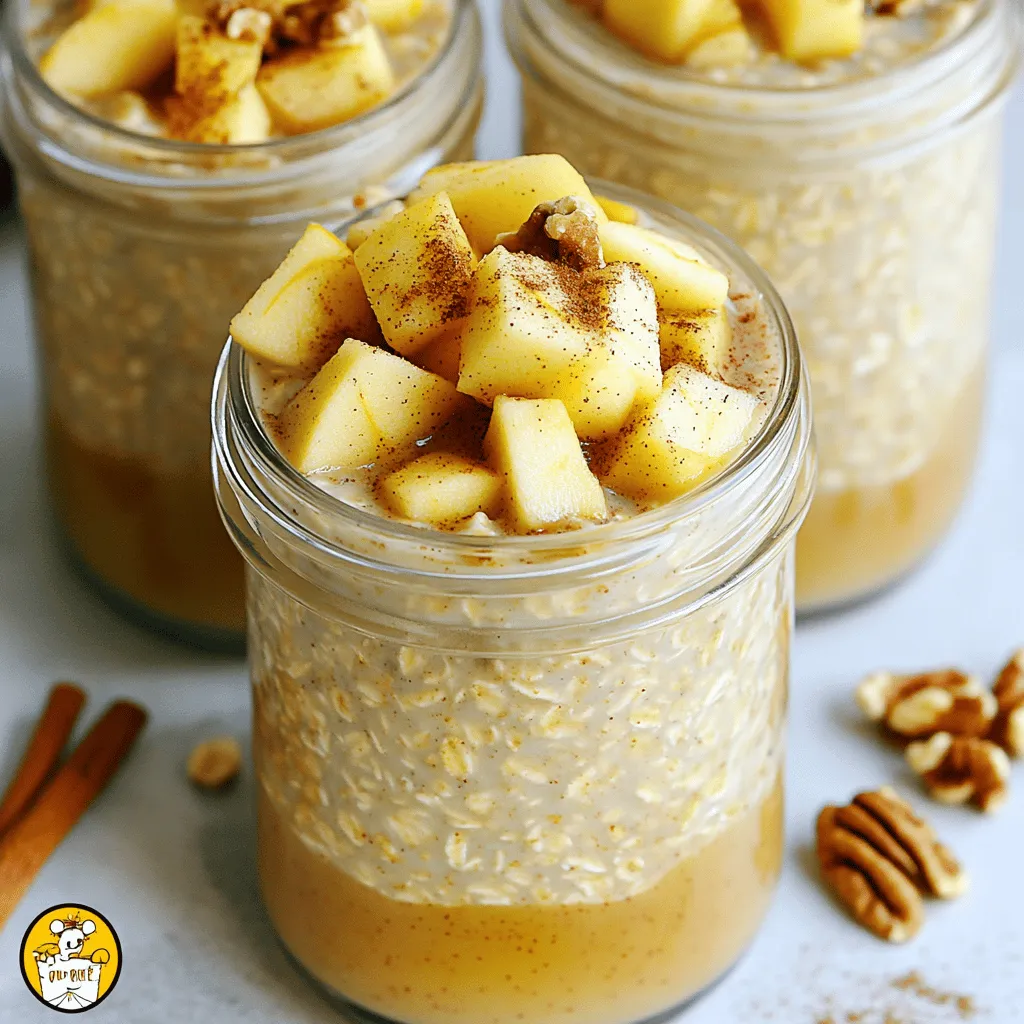
Apple Pie Overnight Oats Tasty and Healthy Breakfast
Are you ready to make your breakfast as tasty as dessert? Apple Pie Overnight Oats offer a delicious, healthy way to start your day. With
To make Peanut Butter Cup Protein Overnight Oats, you will need: - 1 cup rolled oats - 2 cups unsweetened almond milk - 2 tablespoons natural peanut butter - 2 tablespoons chocolate-flavored protein powder - 1 tablespoon honey or pure maple syrup - 1 tablespoon chia seeds - 1/4 teaspoon pure vanilla extract - A pinch of sea salt - 2 tablespoons mini dark chocolate chips You can add fun toppings to your oats like: - Sliced bananas - Crushed nuts (almonds or walnuts) - A dollop of extra peanut butter Each ingredient in this recipe adds flavor and nutrition. - Rolled oats provide fiber, which helps keep you full. - Almond milk is low in calories and dairy-free. - Peanut butter adds healthy fats and protein. - Chocolate protein powder boosts protein content without extra calories. - Honey or maple syrup adds a touch of sweetness. - Chia seeds are rich in omega-3s and help thicken the oats. - Vanilla extract enhances flavor without added sugar. - Sea salt balances sweetness and enhances taste. - Dark chocolate chips add a treat while giving antioxidants. This simple mix creates a tasty, healthy breakfast that fuels your day! 1. Start by taking a medium mixing bowl. Add 1 cup of rolled oats and 2 cups of unsweetened almond milk. Make sure the oats are fully soaked. 2. Next, add 2 tablespoons of natural peanut butter. You can choose creamy or crunchy. Then, add 2 tablespoons of chocolate-flavored protein powder. 3. Sweeten your mix with 1 tablespoon of honey or pure maple syrup. Add 1 tablespoon of chia seeds for texture and health. 4. Pour in 1/4 teaspoon of pure vanilla extract and a pinch of sea salt. 5. Now it’s time to mix! Use a whisk or spoon to blend everything well. Make sure the peanut butter is spread out evenly. 6. Gently fold in 2 tablespoons of mini dark chocolate chips. This adds a fun chocolatey touch. 7. Transfer the mixture into two airtight jars. Leave a little room at the top for the oats to expand. 8. Seal the jars and put them in the fridge overnight or for at least 6 hours. This soaking time is key for the best texture. - Mix the oats and almond milk first. This helps the oats soak up the milk quickly. - When adding peanut butter, warm it slightly. This makes it easier to mix. - Use a whisk for a smoother blend. It helps break up any clumps of peanut butter. - Be gentle when adding chocolate chips. You want them to stay whole for bites of chocolate. Soaking overnight is vital. It allows the oats to absorb the almond milk. This makes them soft and creamy. Chia seeds also thicken the mix, adding fiber and nutrients. If you skip this step, the oats may be too hard. A good soak leads to a tasty treat that’s ready to eat! To make great overnight oats, follow some simple tips. First, always use rolled oats. They soak well and stay chewy. Instant oats become mushy, and that’s not what we want. Second, ensure the oats sit in enough liquid. Use a 2:1 ratio of liquid to oats. This helps them absorb flavors and become creamy. Third, mix the ingredients well. Stir until everything blends, especially the peanut butter. You can easily change the flavor of your overnight oats. Try different nut butters like almond or cashew for a twist. If you want a sweeter taste, add more honey or syrup. To mix up the texture, add nuts or seeds. They will give your oats a satisfying crunch. Want a chocolate kick? Swap in different chocolate protein powders or add cocoa powder. Add fruits like berries or apples for natural sweetness and freshness. Store your overnight oats in airtight containers. Glass jars work well, too. This keeps them fresh and prevents spills. They last about five days in the fridge. If you notice any strange smells or colors, it’s best to discard them. For meal prep, make a few jars at once. This way, you have a quick breakfast ready to go. {{image_4}} You can change up the recipe to fit your needs. If you are gluten-free, use gluten-free oats. For nut allergies, try sunflower seed butter instead of peanut butter. This keeps the flavor tasty and safe. If you want lower sugar, swap honey for a sugar-free sweetener. Mixing flavors can make your oats fun! Use vanilla protein powder for a sweet twist. If you love chocolate, try a chocolate nut butter. You can even add cocoa powder for a richer taste. For a fruity touch, add cinnamon or nutmeg. These flavors enhance the overall dish. To make it vegan, use maple syrup instead of honey. Almond milk is already vegan, so you are set there! For gluten-free oats, check the label. Not all oats are gluten-free, so pick those that are certified. These small changes let everyone enjoy this dish. To keep your Peanut Butter Cup Protein Overnight Oats fresh, use airtight jars. I love using glass jars because they hold the flavor well. After you prepare the oats, fill each jar, leaving some space at the top. This space allows the oats to expand. Make sure the jars are sealed tightly before placing them in the fridge. This way, your oats stay safe and tasty! These oats will last in the fridge for about 3 to 5 days. I recommend making them on a Sunday for easy breakfasts during the week. For meal prep, you can double or triple the recipe. Just divide the mixture among more jars. This saves time and makes breakfast easy. If you want to add toppings, keep them separate until you’re ready to eat. This keeps them fresh and crunchy. Always check your oats before eating. If you see mold or a strange smell, toss them out. The oats may also change color or texture, which means they’re not good anymore. If they feel slimy or sticky, it’s best to throw them away. Trust your senses! Fresh oats should smell nutty and chocolatey, with a smooth texture. Enjoy your delicious, safe breakfast! You can keep these oats in the fridge for up to five days. This makes them a great meal prep option. Just ensure they are in airtight containers to maintain freshness. If you notice any off smells or changes in texture, it’s best to toss them. Yes, you can use quick oats. However, the texture will change. Quick oats will absorb liquid faster and may become mushy. If you prefer a chewier bite, stick with rolled oats. They hold their shape better and provide a heartier feel. If you're not a fan of almond milk, you can use other plant-based milks. Options like oat milk or soy milk work well. You can also use regular dairy milk if you prefer. Just remember that each milk type can slightly change the flavor and creaminess of your oats. Peanut Butter Cup Protein Overnight Oats are simple and tasty. We discussed key ingredients, step-by-step instructions, and tips to make the best oats. You learned how to customize your oats and store them for later. Remember, the right ingredients make a big difference. Experiment with flavors to find your favorite mix. Keep these oats fresh for quick, healthy meals. Enjoy creating your perfect bowl!
Peanut Butter Cup Protein Overnight Oats Simple Recipe
Are you ready to transform your morning routine? With this Peanut Butter Cup Protein Overnight Oats recipe, you can enjoy a delicious and healthy meal
To start, gather your dry ingredients. You will need: - 1 cup all-purpose flour - 1 tablespoon brown sugar - 1 teaspoon baking powder - 1/2 teaspoon baking soda - 1/2 teaspoon ground cinnamon - 1/4 teaspoon ground nutmeg - 1/4 teaspoon allspice - 1/4 teaspoon salt These ingredients create a warm, spiced base for the pancakes. The mix of spices adds great flavor. Next, you will mix the wet ingredients. You will need: - 1 cup apple cider (preferably fresh) - 1 large egg - 2 tablespoons unsalted butter, melted (plus extra for cooking) Apple cider gives these pancakes a lovely sweetness. The egg binds everything together while the melted butter adds richness. Toppings can make your pancakes even better. Here are some ideas: - Maple syrup, for serving - Extra diced apples, for garnish - A dusting of powdered sugar - A dollop of whipped cream These toppings add texture and flavor. You can mix and match to find what you like best. Enjoy your cozy pancakes! First, grab a big mixing bowl. In it, whisk together: - 1 cup all-purpose flour - 1 tablespoon brown sugar - 1 teaspoon baking powder - 1/2 teaspoon baking soda - 1/2 teaspoon ground cinnamon - 1/4 teaspoon ground nutmeg - 1/4 teaspoon allspice - 1/4 teaspoon salt Make sure to mix well. You want no lumps in this mix. Each spice adds warmth and flavor to the pancakes. Now, take a separate bowl. Crack one large egg into it and whisk lightly. Then pour in 1 cup of apple cider and 2 tablespoons of melted unsalted butter. Stir until smooth. This mix brings sweetness and moisture. Next, gently combine the wet and dry mixes. Pour the wet mix into the dry mix. Stir just until combined. It's okay to see small lumps. Then, fold in 1/2 cup of diced apples. This gives a nice crunch. Heat a non-stick skillet over medium heat. Add a bit of butter to coat the bottom. Pour about 1/4 cup of batter for each pancake. Cook for 2-3 minutes. Look for bubbles on top. The edges should look set. Now flip the pancake carefully. Cook for another 1-2 minutes until golden brown. Repeat this until your batter is gone. Serve warm with maple syrup. Enjoy! To get fluffy pancakes, mix the batter carefully. Overmixing makes them tough. You want a few lumps in the batter. This keeps the pancakes light and airy. Let the batter rest for about five minutes. This helps the gluten relax and gives a better texture. Cook your pancakes on medium heat. If it's too hot, the outside burns while the inside stays raw. Use a non-stick skillet or griddle. Melt a small amount of butter before adding the batter. This helps create a nice golden crust. Watch for bubbles on the surface. When bubbles form and edges look set, it’s time to flip. Spice up your pancakes with extras. Try adding chopped nuts or dried fruits. Walnuts or raisins pair well with the apple flavor. You can also add a dash of vanilla extract to the wet mix for depth. If you like more spice, increase the cinnamon or add a pinch of clove. These small tweaks can elevate your pancake experience. {{image_4}} You can use various apples for your pancakes. Granny Smith apples give a tart flavor. Honeycrisp apples add sweetness and crunch. Fuji apples are juicy and sweet, making them a great choice too. Experiment with your favorite apple to find the best taste. Each type can change the flavor and texture of your pancakes. To make these pancakes gluten-free, swap all-purpose flour for a gluten-free blend. Look for a blend that has xanthan gum in it, as it helps with texture. You may also use almond flour or oat flour. Adjust the liquid slightly, as gluten-free flours can absorb more moisture. This way, everyone can enjoy these cozy pancakes. Adding nuts or dried fruits makes these pancakes even better. Chopped walnuts or pecans add a nice crunch. You can also include dried cranberries or raisins for a sweet touch. Mix them into the batter when you fold in the apples. This adds flavor and texture, making your pancakes special. Don't be afraid to get creative! You can store leftover pancakes in the fridge. Place them in an airtight container. They will keep fresh for about 2-3 days. If you want them to taste their best, let them cool completely before storing. This helps prevent sogginess. Freezing is a great option for longer storage. To freeze pancakes, stack them with parchment paper in between each one. This prevents sticking. Place the stack in a freezer-safe bag or container. They will stay good for up to 2 months. When you’re ready to eat, just pull out what you need. Reheating pancakes is quick and easy. For the microwave, place one pancake on a plate and heat for about 20-30 seconds. For extra crispiness, use a skillet. Heat the skillet over medium heat and warm each pancake for about 1-2 minutes on each side. Enjoy them warm with maple syrup again! Yes, you can make the batter ahead. Mix the dry and wet ingredients as directed. Store the wet mix in the fridge for up to 24 hours. When ready to cook, gently fold in the diced apples. This will save you time on busy mornings. Maple syrup is the classic choice for these pancakes. Its rich flavor pairs perfectly with the spiced apple cider. You can also try apple syrup for a fun twist. If you want to get creative, caramel sauce adds a sweet touch too. Watch for bubbles to form on the surface of the pancakes. When the edges look set, it's time to flip them. Cook until they turn golden brown. You can also use a toothpick to check; it should come out clean when inserted into the center. In this post, we explored the key elements of making delicious pancakes. We covered ingredients, cooking steps, and tips for perfect texture. We also looked at fun variations and storage methods. Pancakes can be a simple treat or a fun project. Enjoy different flavors by adding nuts or fruits. Remember, cooking is about trying and having fun. So gather your ingredients and start flipping some pancakes today!
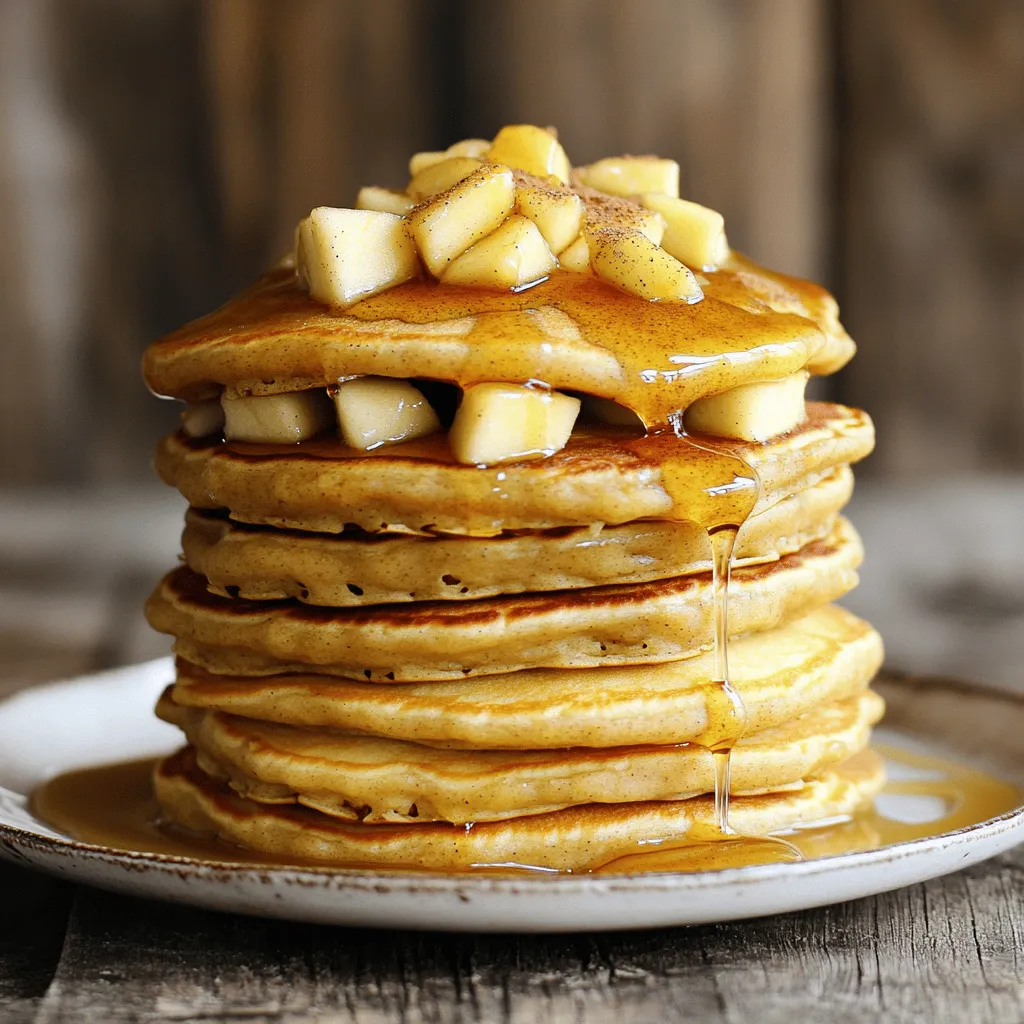
Cozy Spiced Apple Cider Pancakes Perfect Weekend Treat
Imagine waking up to the cozy smell of spiced apple cider pancakes. These pancakes are a perfect way to enjoy your weekend mornings. With simple
To make Strawberry Protein Overnight Oats, you will need: - 1 cup rolled oats - 1 cup almond milk (or your preferred milk alternative) - 1 scoop vanilla protein powder - 1 cup fresh strawberries, hulled and sliced - 1 tablespoon chia seeds - 1 tablespoon honey or maple syrup (optional, to taste) - ½ teaspoon vanilla extract - A pinch of salt - Extra strawberries and nuts/seeds for topping Each ingredient in these oats brings health perks. - Rolled oats are high in fiber. They help keep you full longer. - Almond milk is low in calories and rich in vitamin E. - Vanilla protein powder adds protein for muscle repair and growth. - Strawberries are full of vitamins and antioxidants. They support heart health. - Chia seeds provide omega-3 fatty acids. They help with brain function. - Honey or maple syrup can add a touch of natural sweetness without refined sugar. - Vanilla extract enhances flavor and adds antioxidants. - Salt balances sweetness and enhances flavors. You can easily swap out items if needed. - If you have gluten issues, use gluten-free oats. - Any milk works—cow’s milk, coconut milk, or oat milk. - Swap vanilla protein powder for unflavored protein if desired. - Use any berry if strawberries aren’t available. Raspberries or blueberries work great! - Chia seeds can be replaced by ground flax seeds. - For sweeteners, try agave syrup or stevia instead of honey or maple syrup. These options keep the recipe flexible and fun! {{ingredient_image_2}} To start, grab a medium mixing bowl. Add 1 cup of rolled oats and 1 cup of almond milk. Next, include 1 scoop of vanilla protein powder and 1 tablespoon of chia seeds. If you like sweetness, add 1 tablespoon of honey or maple syrup. Then, pour in ½ teaspoon of vanilla extract and a pinch of salt. Mix all the ingredients well until the oats soak up the milk. Now, take your fresh strawberries. Hull and slice 1 cup of them. Gently fold these strawberry slices into the oat mixture. Make sure to save a few slices for later. Once everything is mixed, divide the mixture into two jars or airtight containers. Seal them tightly and place them in the fridge for at least 6 hours. Overnight is best for full flavor. When you take your oats out of the fridge, give them a good stir. If the oats seem too thick, add a splash of almond milk. This step helps you reach your perfect texture. You want your oats creamy but not runny. The chia seeds also help thicken the mix, so adjust as needed. For serving, top your oats with the reserved strawberry slices. Add some nuts or seeds for crunch. You can enjoy your oats straight from the jar for easy eating. If you want something fancier, transfer them to a bowl. Either way, you have a tasty and nutritious start to your day! You can easily change the flavors in your overnight oats. Try using different fruits, like bananas or blueberries. You can also mix in nut butters for a creamy taste. Almond butter or peanut butter works great. For a crunch, add nuts or seeds as toppings. You can even switch up the protein powder flavor. Chocolate or strawberry protein powders can make it fun. I love using glass jars or airtight containers. They keep your oats fresh and ready to eat. Make sure to fill the jars, but leave some space at the top. This allows room for the oats to expand. Store your jars in the fridge. They’ll stay good for about three to five days. To keep your oats fresh, use clean utensils to scoop them out. Avoid leaving the jar open for long. If you notice any moisture or odd smells, toss them out. If you want to enjoy them later, you can freeze them. Just remember to thaw them in the fridge before eating. This way, your oats will taste just as good as the first day! Pro Tips Use Steel-Cut Oats: For a chewier texture, consider using steel-cut oats instead of rolled oats. Just remember to soak them longer, ideally overnight. Sweetness Control: Adjust the sweetness of your overnight oats by experimenting with different natural sweeteners like agave or coconut sugar. Flavor Variations: Don’t hesitate to add other fruits, such as banana or blueberries, for additional flavor and nutrition. Meal Prep: These oats store well in the fridge for up to five days, making them perfect for meal prep. Just grab and go! {{image_4}} You can change the flavor of your overnight oats to keep things fun. Try different fruits like bananas, blueberries, or peaches. You can mix in nut butters for extra flavor. Almond butter or peanut butter adds a rich taste and healthy fats. For a tropical twist, add pineapple or mango. You can also sprinkle in spices like cinnamon or nutmeg for warmth. If you want to skip the vanilla protein powder, that's fine! You can use plant-based protein powders like pea or hemp. You can even try using Greek yogurt for protein. It adds creaminess and works well with the oats. Just adjust the liquid ingredients if you use yogurt. This gives you flexibility based on your diet. To make this recipe vegan, swap honey for maple syrup or agave nectar. Choose gluten-free oats if you're avoiding gluten. Most rolled oats are gluten-free, but check the label. You can also use any non-dairy milk like coconut or soy. These swaps keep the recipe friendly for everyone. Enjoy your tasty, nutritious oats no matter your diet! To keep your strawberry protein overnight oats fresh, use airtight containers. Glass jars work great because they seal well. Make sure the lids close tightly to prevent air from getting in. Label your jars with dates. This helps you track when they were made. Store them in the fridge to keep them cool and safe to eat. Your overnight oats will last for about 4 to 5 days in the fridge. After that, they may lose flavor and texture. If you notice any off smells or changes in color, it's best to toss them. Always check before eating! You can freeze overnight oats if you want to save some for later. Use freezer-safe jars or bags. Fill them with the oat mixture, leaving some space for expansion. They can stay in the freezer for up to 3 months. When you're ready to eat, thaw them in the fridge overnight. You can warm them in the microwave or enjoy them cold. Just add fresh toppings before serving! Yes, you can make this recipe gluten-free. Use certified gluten-free rolled oats. Many brands offer oats that are tested for gluten. Always check the label to ensure they are safe for your needs. This small change keeps the dish tasty and safe. To adjust the sweetness, simply use less or more honey or maple syrup. Start with one tablespoon and taste the mixture. If you like it sweeter, add more. You can also use ripe bananas or dates for natural sweetness. They blend well with the oats and strawberries. You can use any milk alternative instead of almond milk. Options include soy milk, coconut milk, or oat milk. Each type adds its unique flavor. Choose one that fits your taste and dietary needs. You can even use regular cow's milk if you prefer. In this post, we explored the key ingredients for overnight oats and their benefits. We covered how to prepare and serve them, plus tips for customization. You learned about storing methods and how to keep your oats fresh. Variations for flavor, protein, and dietary needs were shared. Now, you have the tools to make delicious and healthy oats. Enjoy getting creative with your recipes!
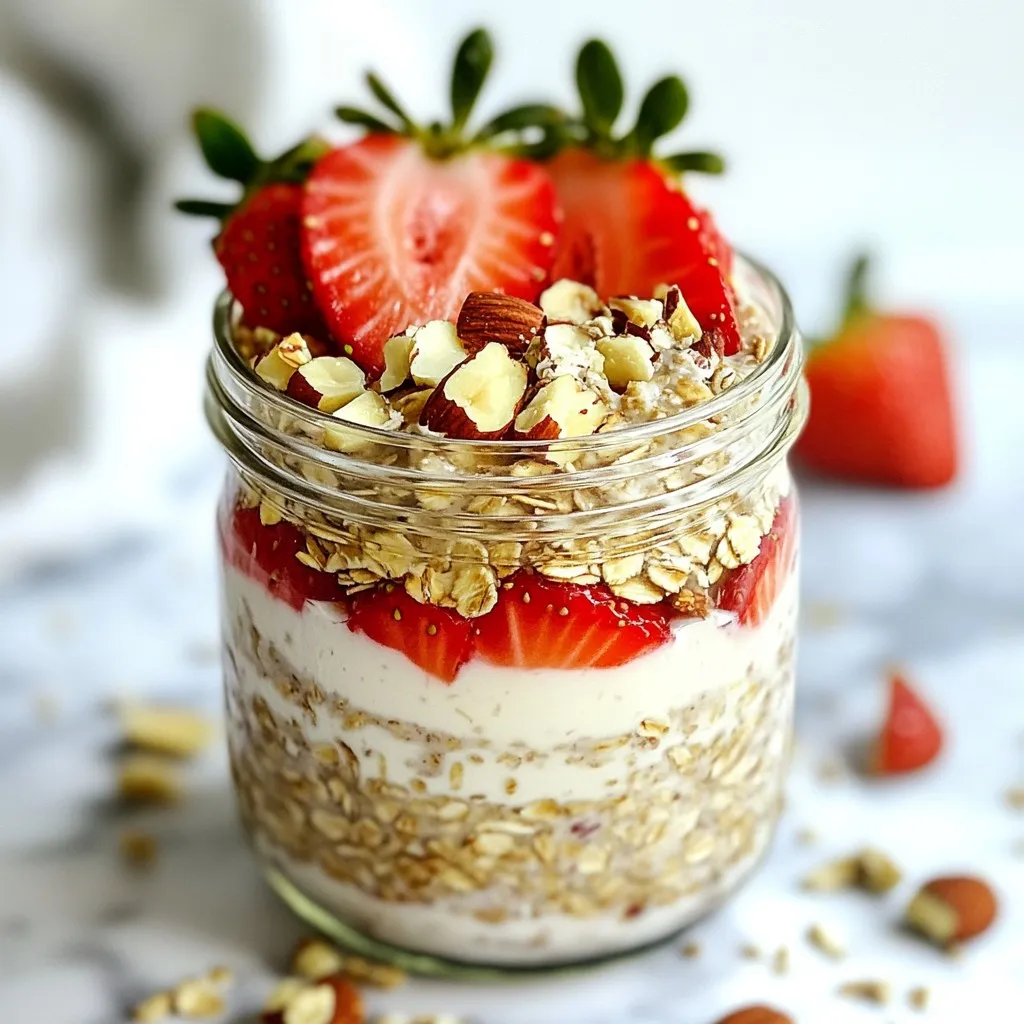
Strawberry Protein Overnight Oats Easy and Nutritious
Start your day right with Strawberry Protein Overnight Oats—easy, tasty, and full of goodness. These oats are not only simple to make but also packed
- 1 cup rolled oats - 1 cup whole wheat flour - 1 teaspoon baking soda - 1 teaspoon ground cinnamon - 1/2 teaspoon ground nutmeg - 1/4 teaspoon salt - 1/2 cup unsweetened applesauce - 1/4 cup almond butter (or preferred nut butter) - 1/4 cup honey or maple syrup - 1 teaspoon pure vanilla extract - 1 cup diced apples (peeled and cored) - 1/3 cup raisins or chopped walnuts I love using simple and healthy ingredients for my Apple Pie Oatmeal Breakfast Cookies. The base starts with rolled oats and whole wheat flour, which give my cookies great texture. Baking soda helps them rise, making them soft and chewy. Next, I add spices to create that warm, cozy apple pie flavor. Ground cinnamon and nutmeg bring a lovely taste, while a little salt balances everything out. For moisture and sweetness, I use unsweetened applesauce and almond butter. Honey or maple syrup adds a touch of natural sweetness. The vanilla extract rounds it all out with a rich aroma. I often toss in diced apples for a fresh crunch. If you want a little extra, raisins or walnuts make perfect add-ins. They boost flavor and add fun texture. These ingredients come together to make cookies that are not just tasty but also wholesome. - Preheat the oven to 350°F (175°C). - Line a baking sheet with parchment paper. Start by preheating your oven. It helps the cookies bake evenly. While the oven warms, grab a baking sheet and line it with parchment paper. This step keeps the cookies from sticking and makes cleanup simple. - Combine rolled oats, whole wheat flour, baking soda, cinnamon, nutmeg, and salt. In a large bowl, mix the rolled oats and whole wheat flour. Add baking soda, cinnamon, nutmeg, and salt. Stir these dry ingredients well until they blend evenly. This mix gives the cookies their great flavor and texture. - Whisk together applesauce, almond butter, honey (or maple syrup), and vanilla extract. In another bowl, whisk together the applesauce and almond butter. Add honey or maple syrup, along with the vanilla extract. Whisk until smooth. This mix adds moisture and sweetness to the cookies. - Gradually add wet ingredients to dry ingredients and mix. - Fold in diced apples and optional add-ins. Now, pour the wet mix into the dry mix. Stir well until everything combines. Next, fold in the diced apples. If you want extra flavor, add raisins or chopped walnuts. This step brings in that apple pie taste. - Scoop dough onto prepared baking sheet, leaving space between cookies. - Flatten cookies slightly and bake for 12-15 minutes. Using a tablespoon, scoop the dough onto the baking sheet. Leave some space between each scoop. Lightly flatten the tops with your spoon. Bake them in the oven for 12 to 15 minutes. Watch for the edges to turn golden brown. - Cool cookies on the baking sheet for 5 minutes. - Transfer to a wire rack to cool completely. Once baked, let the cookies cool on the sheet for about five minutes. This allows them to set. After that, move them to a wire rack to cool fully. Enjoy the wonderful smell while they cool down! To make your cookies chewy, use less flour. A thicker dough means a crunchier cookie. Try baking your cookies for 12 minutes for chewiness. For a crispier texture, bake them for up to 15 minutes. Keep an eye on them to avoid burning. If you need a nut-free option, swap almond butter for sunflower seed butter. You can also use cashew or peanut butter if you prefer. For sweeteners, replace honey with agave syrup for a lighter taste. Maple syrup adds a nice flavor too. For uniform cookies, use a tablespoon to scoop the dough. This ensures each cookie is the same size. If you want to make a big batch, simply double the recipe. Just remember to adjust your baking time based on the size of your cookies. {{image_4}} You can make these cookies even more fun! Here are a few ideas: - Add spices like ginger or cloves. These spices bring warmth and depth. - Try dark chocolate chips for a rich, sweet twist. They pair well with apples. Need to adapt the recipe? No problem! - For gluten-free cookies, use oat flour or almond flour. They work great and taste good. - You can also make them vegan. Just swap the honey for maple syrup. Don’t be afraid to get creative! - Use different fruits like juicy pears or mixed berries. They add a fresh taste. - Experiment with nuts and seeds. Walnuts, almonds, or sunflower seeds give a nice crunch. To keep your cookies fresh, store them in an airtight container. This helps prevent them from getting dry. Place a piece of bread in the container to help keep cookies soft. Use a container made of glass or plastic with a tight lid. Keep the cookies at room temperature, away from heat and light. Freezing cookies is easy. Let them cool completely first. Place cookies in a single layer on a baking sheet. Freeze them for about an hour until firm. After that, transfer them to a freezer bag. Remove as much air as possible before sealing. To thaw, take out a cookie and leave it at room temperature. For warm cookies, microwave them for about 10 seconds. When stored properly, these cookies last about a week at room temperature. You can keep frozen cookies for up to three months. Signs that cookies have gone stale include a hard texture or a dry taste. If they lose their tasty flavor, it's time to toss them out. Enjoy your fresh cookies while they last! Yes, you can make these cookies gluten-free! Use gluten-free rolled oats and almond flour instead of whole wheat flour. You can also try oat flour, which works well. To make the cookies sweeter, you can add more honey or maple syrup. You could also use mashed bananas for natural sweetness. If you like, try adding a bit of brown sugar too. Store the cookies in an airtight container at room temperature. They stay fresh for about a week. You can also refrigerate them for longer shelf life. Just let them warm up before serving. Yes, you can add protein powder! Start with one scoop and mix it into the dry ingredients. Make sure to reduce the flour slightly to keep the texture nice. Serve the cookies warm with a sprinkle of cinnamon. Pair them with yogurt or fresh fruit for a balanced breakfast. You can also add a drizzle of honey for extra sweetness. You now have a simple and tasty recipe for Apple Pie Oatmeal Breakfast Cookies. We covered the key ingredients, easy steps, and helpful tips. You can customize the flavors and even store them well for later. Remember, perfect cookies start with the right mix of dry and wet ingredients. Try new flavors and adjust to your taste. Enjoy making these cookies as a fun breakfast or snack option!
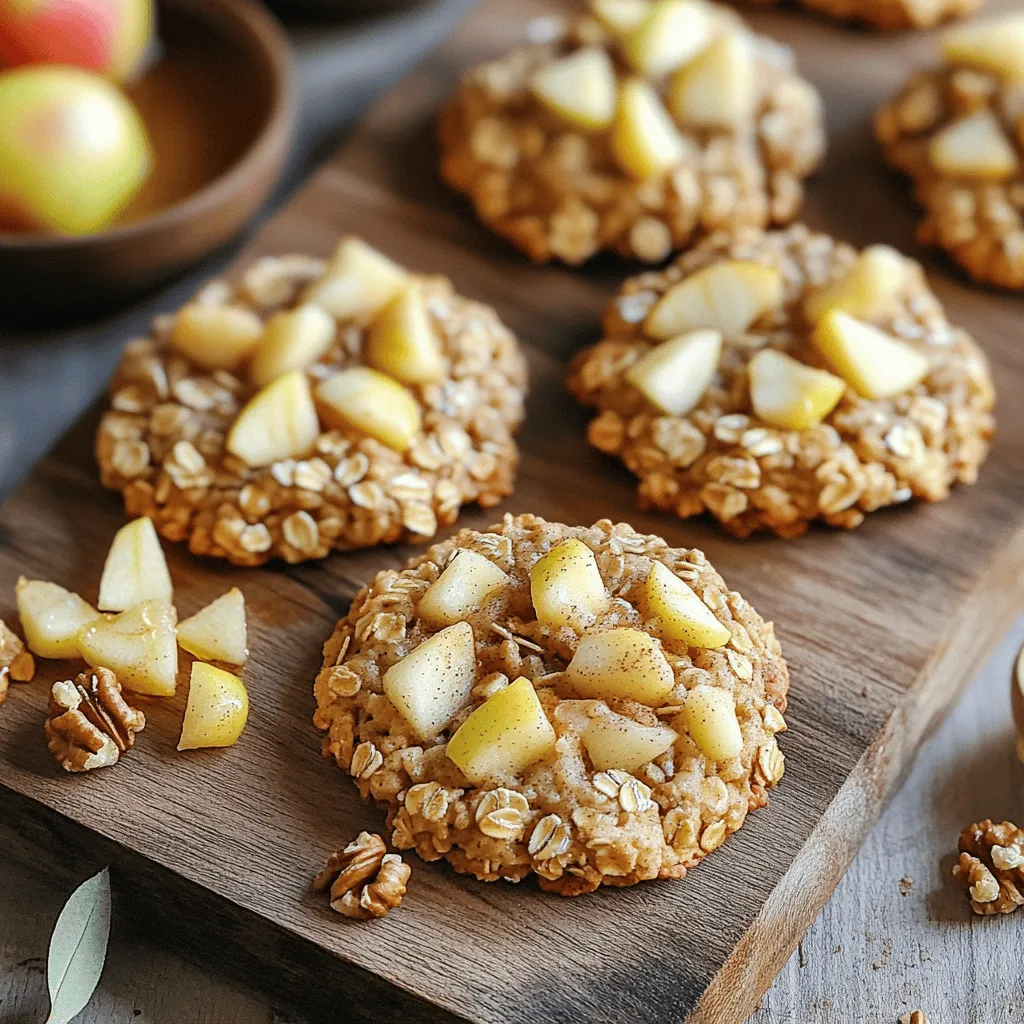
Apple Pie Oatmeal Breakfast Cookies Tasty and Wholesome
Start your day with a delicious twist on breakfast! Apple Pie Oatmeal Breakfast Cookies combine the flavors of classic apple pie with wholesome oats. They
- Cottage cheese options: You can choose between low-fat and regular cottage cheese. Low-fat gives you fewer calories, while regular offers more creaminess. - Mixed berries options: Use a mix of strawberries, blueberries, and raspberries. Each berry adds sweetness and color to your smoothie. - Additional optional ingredients: Honey or maple syrup can boost the sweetness. This is great if you prefer a sweeter taste. - Milk alternatives: Unsweetened almond milk is a popular choice. You can also use oat milk, soy milk, or regular milk. - Health-boosting ingredients: Chia seeds add fiber and protein. A dash of vanilla extract enhances the flavor and makes it more exciting. Choosing your ingredients wisely makes a big difference. Each option can change the taste and texture of your smoothie. Enjoy picking what you like best! 1. Start by adding 1 cup cottage cheese to your blender. This is the creamy base for your smoothie. 2. Next, toss in 1 cup mixed berries. Use strawberries, blueberries, and raspberries for a burst of flavor. 3. If you want a sweeter taste, drizzle in 1 tablespoon honey or maple syrup. Adjust to your liking. 4. Then, sprinkle in 1 tablespoon chia seeds. These tiny seeds add great health benefits. 5. Pour in 1/2 cup unsweetened almond milk. This helps blend everything smoothly. You can use any milk you prefer. 6. Add 1/2 teaspoon vanilla extract. This enhances the flavor of your smoothie. 7. If you like a colder drink, toss in a handful of ice cubes. This step is optional, depending on how thick you want it. 8. Blend all the ingredients on high speed. Stop the blender to scrape down the sides. This makes sure everything is mixed well. 9. Taste your smoothie. If you want it sweeter, add more honey or syrup. Blend again if you make any changes. 10. Finally, pour the smoothie into two tall glasses. It’s ready for you to enjoy! To make it look nice, garnish each glass with whole berries and a sprinkle of chia seeds. This not only looks good but also adds texture! - Achieving the perfect texture: To get a smooth and creamy blend, use ripe bananas and chilled ingredients. If you want it thicker, add more cottage cheese or ice cubes. For a thinner smoothie, increase the almond milk. - Adjusting sweetness to personal preference: Taste your smoothie after blending. If it's not sweet enough, add more honey or maple syrup a little at a time. This way, you can control how sweet it gets. - Blending in batches versus all at once: If your blender is small, blend the ingredients in two batches. Start with the cottage cheese and a bit of milk, then add the fruits. This helps mix everything better. - Recommended topping for garnish: For a fun look, sprinkle whole berries and chia seeds on top. This adds color and a nice texture. Plus, it makes your smoothie more inviting! {{image_4}} You can easily adapt this smoothie to fit your diet. Here are some fun ideas: - Vegan-friendly substitutions: Use silken tofu or dairy-free yogurt instead of cottage cheese. This keeps the creaminess while making it vegan-friendly. - Low-carb or keto adaptations: Swap the banana for half an avocado. This change lowers the carbs and adds healthy fats. Use unsweetened almond milk for fewer carbs. - Enhancements with different fruit combinations: Try different fruits! Use mango or spinach for a twist. You can mix in pineapple for a tropical vibe or add spinach for a nutrient boost. - Protein boost options: For an extra protein kick, mix in a scoop of your favorite protein powder. Nut butters like almond or peanut butter also work great. They add flavor and healthy fats, making your smoothie even more filling. These variations make the smoothie not just tasty but also fit for many diets. Enjoy mixing and matching to find your perfect blend! - Best practices for refrigerator storage: After making your smoothie, pour it into a sealed container. This keeps air out and helps maintain freshness. Store it in the fridge. - How long the smoothie stays fresh: Your smoothie will stay fresh in the fridge for up to 24 hours. However, for the best taste and texture, enjoy it within a few hours. - Freezing options for pre-made smoothies: If you want to save some for later, freezing is a great option. Pour the smoothie into ice cube trays or freezer-safe bags. This makes it easy to grab a portion when you need it. - Thawing and re-blending instructions: To thaw, place your smoothie in the fridge overnight. You can also use the microwave for a quick thaw, but do it in short bursts. After thawing, give it a quick blend to restore the creamy texture. Is cottage cheese healthy for smoothies? Yes, cottage cheese is a healthy choice for smoothies. It is high in protein and low in fat. This makes it great for muscle growth and keeping you full. It also adds creaminess without extra calories. Can I use frozen berries instead of fresh? Absolutely! Frozen berries work well in this smoothie. They blend easily and make your drink cold and thick. Plus, they are often picked at peak ripeness, so they taste great. What are the nutritional benefits of chia seeds? Chia seeds are tiny powerhouses. They are rich in fiber, which helps digestion. They also have omega-3 fatty acids, good for heart health. Adding just a tablespoon gives your smoothie a nutrient boost. How can I make this smoothie more filling? To make the smoothie more filling, you can add a scoop of protein powder. Nut butters also work well. Adding more banana or oats can help, too. These options increase fiber and keep you satisfied longer. Can I substitute with other types of cheese? You can use other cheeses like ricotta or Greek yogurt. Each option will change the texture and taste a bit. Ricotta is creamy like cottage cheese, while Greek yogurt adds tanginess. We explored how to make a delicious smoothie using cottage cheese and mixed berries. You learned about the best ingredients, step-by-step preparation, and practical tips for texture and sweetness. Variations allow you to fit different diets, while storage tips keep your smoothie fresh. In the end, smoothies can be healthy, tasty, and fun to make. Try new flavors and enjoy your creations!
Cottage Cheese Berry Protein Smoothie Energizing Recipe
Looking for a tasty way to boost your energy? Try my Cottage Cheese Berry Protein Smoothie! This easy recipe blends creamy cottage cheese with mixed