Appetizers
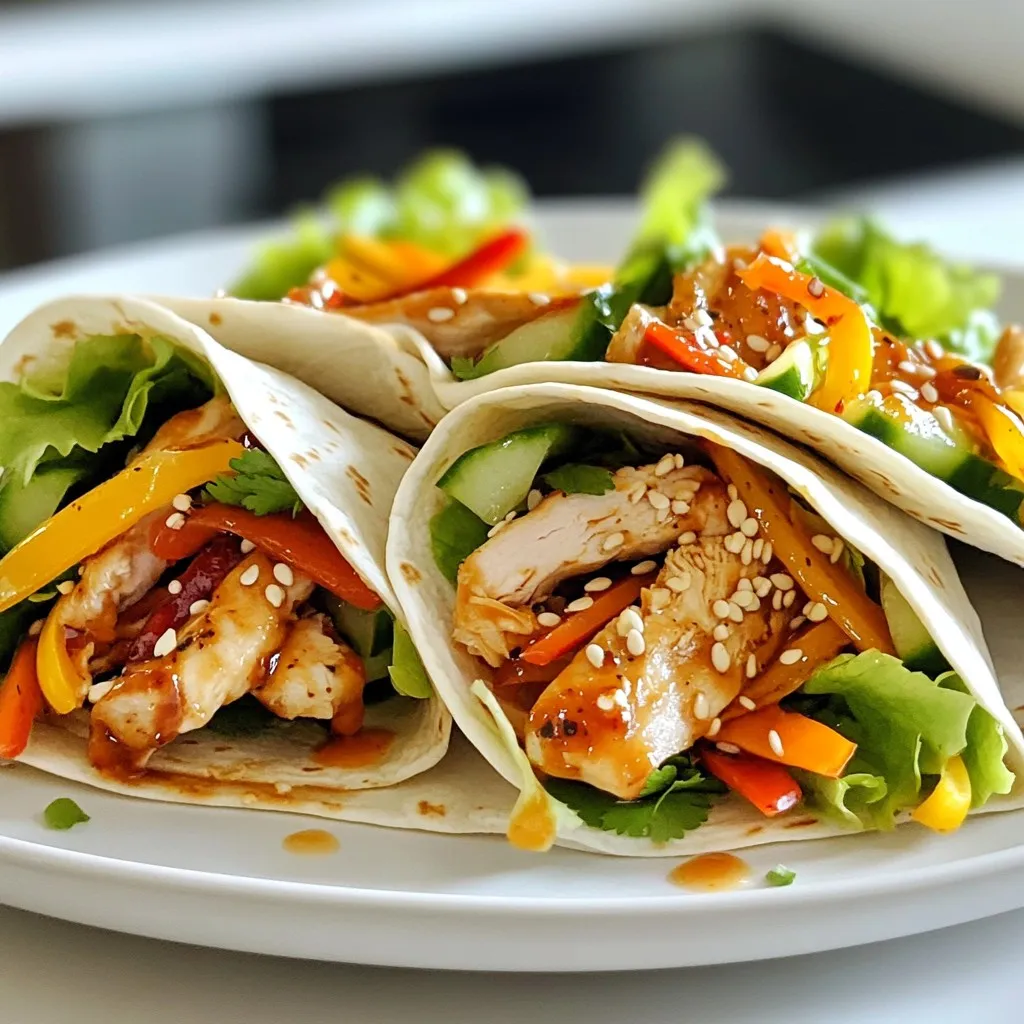
Delicious Sweet Chili Chicken Wraps Easy to Make
Craving a quick and tasty meal? You’ll love these Delicious Sweet Chili Chicken Wraps! With tender chicken marinated in a zesty sauce, crunchy veggies, and
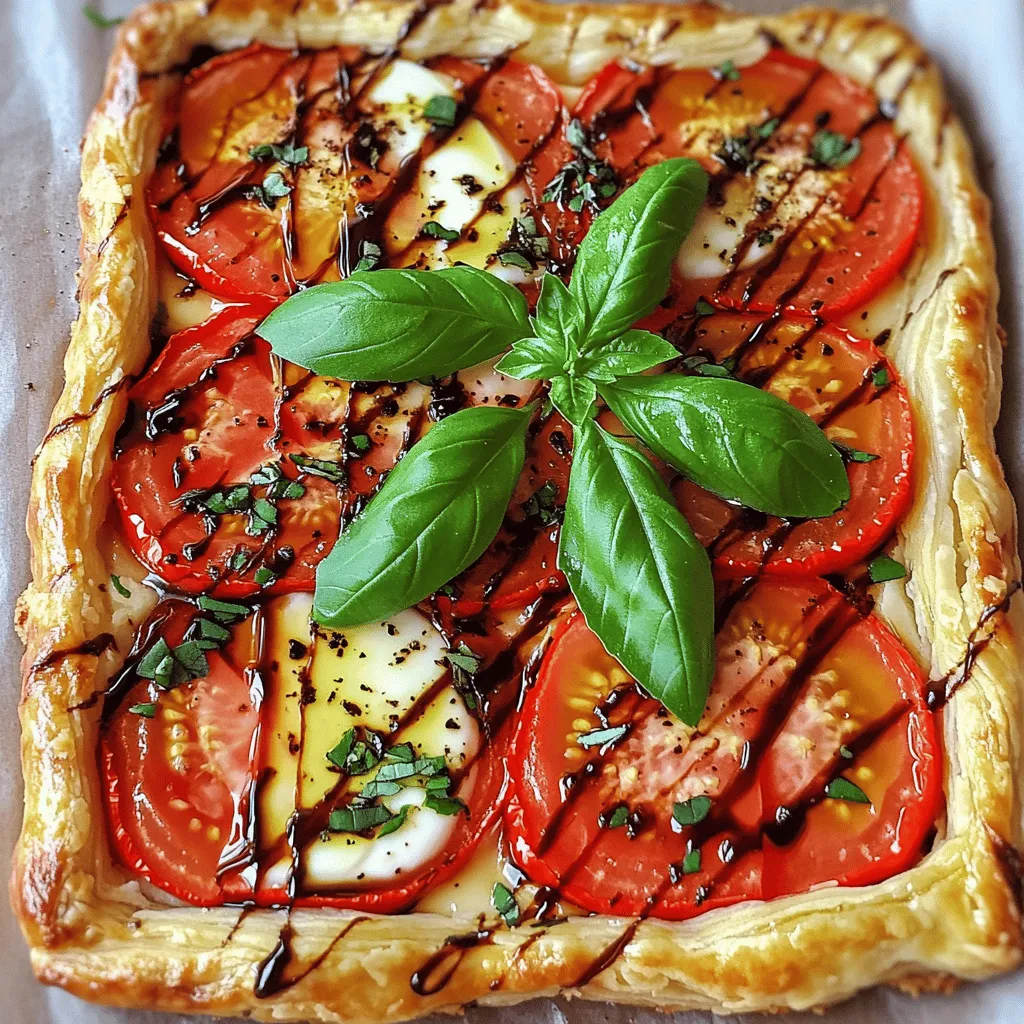
Tomato Mozzarella Basil Tart Delicious and Simple Recipe
Are you ready to impress your friends and family with a mouthwatering dish? This Tomato Mozzarella Basil Tart is simple to make and bursting with
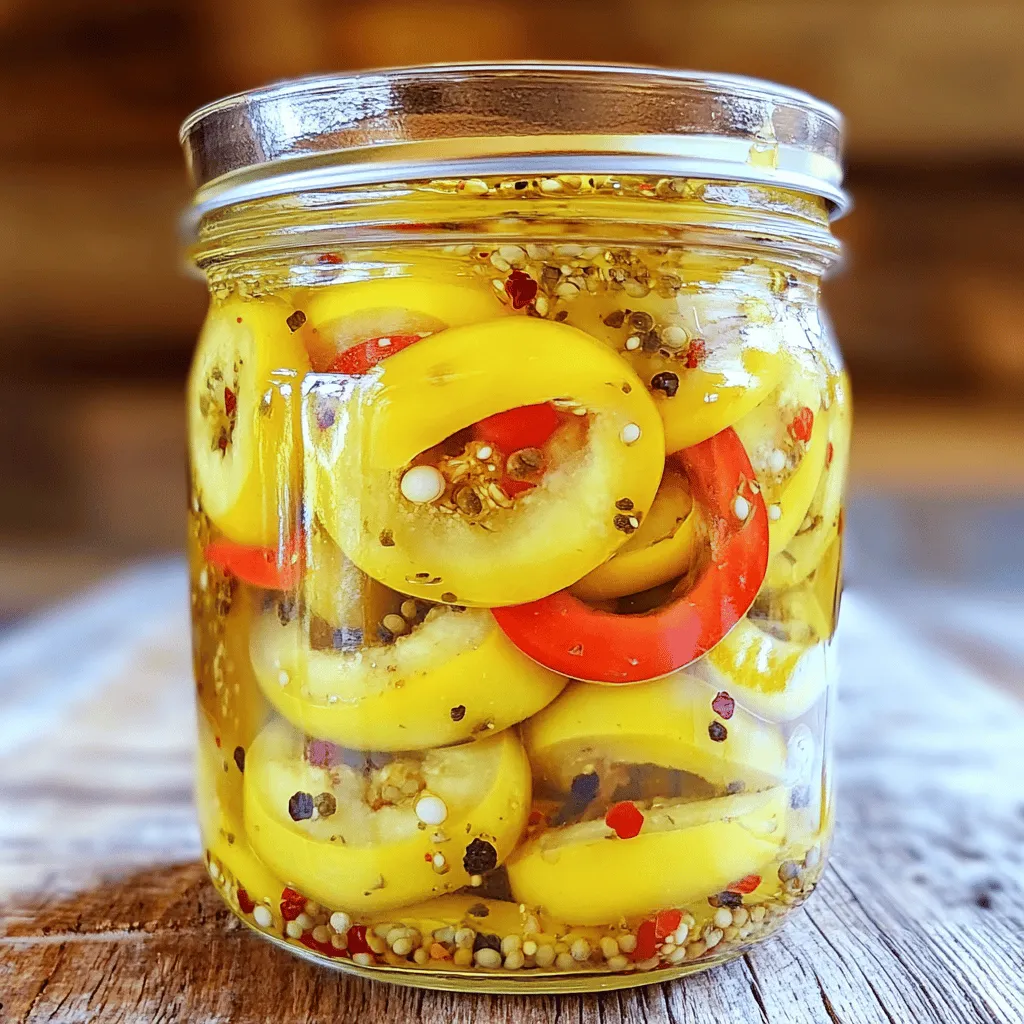
Easy Pickled Banana Peppers Flavorful and Simple Recipe
Do you love bold flavors and easy recipes? If so, you’re in for a treat! This easy pickled banana peppers recipe packs a punch and
![To create the best peach bruschetta with whipped ricotta, gather these essential items: - 1 French baguette, cut into 1/2 inch slices - 2 ripe peaches, diced - 1 cup creamy ricotta cheese - 2 tablespoons golden honey - 1 teaspoon pure vanilla extract - 1 tablespoon fresh lemon juice - Fresh basil leaves, for garnish - Extra virgin olive oil, for drizzling - Sea salt and freshly cracked black pepper, to taste These ingredients come together to deliver a sweet and savory delight. To enhance your bruschetta even more, consider these optional ingredients: - A sprinkle of cinnamon for warmth - Chopped nuts like walnuts or pistachios for crunch - Additional herbs like mint for a refreshing twist - A dash of balsamic glaze for tangy sweetness These options can add layers of flavor and texture to your dish. Ensure you have the right tools for a smooth cooking experience: - Baking sheet for toasting the baguette - Parchment paper to prevent sticking - Mixing bowls for preparing the ricotta and peaches - Hand mixer or whisk for whipping the ricotta - Knife and cutting board for chopping Having these tools handy will make the process enjoyable and efficient. For the full recipe, check out the details above! Start by preheating your oven to 400°F (200°C). This step is key for crispy bread. Line a baking sheet with parchment paper to prevent sticking. Cut your French baguette into slices, about 1/2 inch thick. Arrange the slices in a single layer on the sheet. Lightly brush each slice with extra virgin olive oil. This adds flavor and helps them crisp up nicely. Place the baking sheet in the oven. Toast the bread for about 5-7 minutes. Watch closely, as you want them golden but not burnt. While the bread toasts, it's time to make the whipped ricotta. Grab a medium mixing bowl and add 1 cup of creamy ricotta cheese. To this, add 2 tablespoons of golden honey, 1 teaspoon of pure vanilla extract, and 1 tablespoon of fresh lemon juice. These ingredients create a sweet and tangy flavor. Use a hand mixer or a whisk to combine everything until it's smooth and creamy. Don't forget to add a pinch of sea salt and freshly cracked black pepper. This seasoning brings out the best in your ricotta. Once your baguette slices are out of the oven, it’s assembly time! Spread a generous layer of whipped ricotta on each toasted slice. This will be the base of your bruschetta. Next, take your diced peaches and carefully place them on top of the ricotta. The sweetness of the peaches pairs perfectly with the creamy cheese. To finish, garnish each bruschetta with freshly torn basil leaves. Drizzle a bit of extra virgin olive oil on top and sprinkle with black pepper. Serve your peach bruschetta right away to enjoy the fresh flavors. For the complete recipe, check out the Full Recipe section. Toasting bread is key for great bruschetta. Start with a fresh French baguette. Cut it into 1/2 inch slices for the best crunch. Preheat your oven to 400°F (200°C). Use parchment paper on the baking sheet to keep the bread from sticking. Brush each slice lightly with extra virgin olive oil. This step gives it flavor and a nice color. Bake the bread for 5-7 minutes. Watch closely to prevent burning. The goal is a golden crust with a crisp texture. Whipped ricotta is creamy and smooth. Use high-quality ricotta for the best taste. In a bowl, combine 1 cup of ricotta, 2 tablespoons of honey, 1 teaspoon of vanilla extract, and 1 tablespoon of fresh lemon juice. Mix it well with a hand mixer or whisk. Beat until it’s fluffy and light. Add a pinch of sea salt and black pepper to enhance the flavor. This whipped ricotta will pair perfectly with the sweet peaches. Serve your bruschetta right after you make it. The bread should still be warm and crispy. You can add extra toppings like a drizzle of honey or a sprinkle of nuts for crunch. Fresh basil leaves add a nice touch and aroma. For drinks, pair this dish with a light white wine or sparkling water. This combination works well with the fruity and creamy flavors. You can find the full recipe to guide your steps and impress your guests. {{image_4}} If you want to mix things up, try different cheeses. You can use goat cheese or cream cheese instead of ricotta. They both add unique flavors. For a hint of spice, add a touch of chili flakes. This will give your bruschetta a fun kick. You can also swap honey for maple syrup for a different sweetness. Each change brings a new taste. Peaches are great, but you can use other fruits too. Try strawberries, figs, or plums. Each fruit brings its own flavor. For a tart twist, use raspberries or blackberries. These fruits bring bright colors and fresh tastes. You can even mix and match fruits for fun combinations. Always pick ripe fruit for the best taste. You can easily make this bruschetta vegan. Use a plant-based ricotta or cashew cream instead. This keeps the creamy texture without dairy. For gluten-free options, switch to gluten-free bread. There are many great choices out there. Always check labels to make sure they fit your needs. This way, everyone can enjoy this dish! For the full recipe, check out the detailed steps. To store your peach bruschetta, place it in an airtight container. Keep the bruschetta in the fridge for a maximum of three days. I recommend separating the bread from the toppings. This keeps the bread from getting soggy. When you want to enjoy leftovers, reheat the bread slices. Preheat your oven to 350°F (175°C). Place the bread on a baking sheet and warm it for about 5 minutes. Add the whipped ricotta and peaches after reheating. This way, you keep the flavors fresh. - Baguette: Best eaten within 1-2 days for freshness. - Peaches: Store for up to 4 days in the fridge. Check for ripeness. - Ricotta cheese: Keep for about 5 days once opened. Always check for signs of spoilage. - Honey: Lasts indefinitely when stored in a cool, dry place. - Lemon juice: Fresh juice lasts up to a week in the fridge. - Basil leaves: Use within 3-5 days for best flavor. By following these tips, you can enjoy your peach bruschetta with whipped ricotta longer. For the full experience, remember to check the Full Recipe for detailed steps! You can keep leftovers in an airtight container for about 2 days. The bread may get soggy, so eat it quickly for best taste. If you keep the peaches and ricotta separate, they will last longer. Yes, you can use other cheeses like goat cheese or cream cheese. These options will change the flavor, but they can still taste great. Try mixing different cheeses for a unique twist. Peach bruschetta pairs well with salads, grilled meats, or wine. You can also serve it with a cheese platter. These options add variety and complement the sweet and savory notes. Yes, this recipe is great for meal prep. You can prepare the whipped ricotta and diced peaches in advance. Just toast the bread shortly before serving for a fresh taste. Yes, you can make the whipped ricotta ahead of time. Store it in the fridge for up to 3 days. When ready to serve, give it a quick stir for the best texture. Check the [Full Recipe] for more details. This blog post covered how to make delicious peach bruschetta. We listed the ingredients you need, along with optional extras to boost flavor. The step-by-step guide showed you how to prepare the baguette and whip the ricotta. We also shared helpful tips for toasting and serving. You can explore different flavor variations to fit your taste and dietary needs. Lastly, we discussed how to store leftovers. With these insights, you can enjoy this tasty dish any time. Now, it’s your turn to create something special!](https://roastedflavors.com/wp-content/uploads/2025/06/b0c80505-72ba-4a0e-af4b-a670e428606b.webp)
Best Peach Bruschetta With Whipped Ricotta Delight
If you love fresh flavors, you’re in for a treat! This Best Peach Bruschetta With Whipped Ricotta Delight is a simple yet stunning dish. With
20-Minute Quick Pickled Onions Simple Flavor Boost
Looking to add a fresh zing to your meals? My 20-Minute Quick Pickled Onions recipe is your answer! This simple guide makes flavorful pickled onions
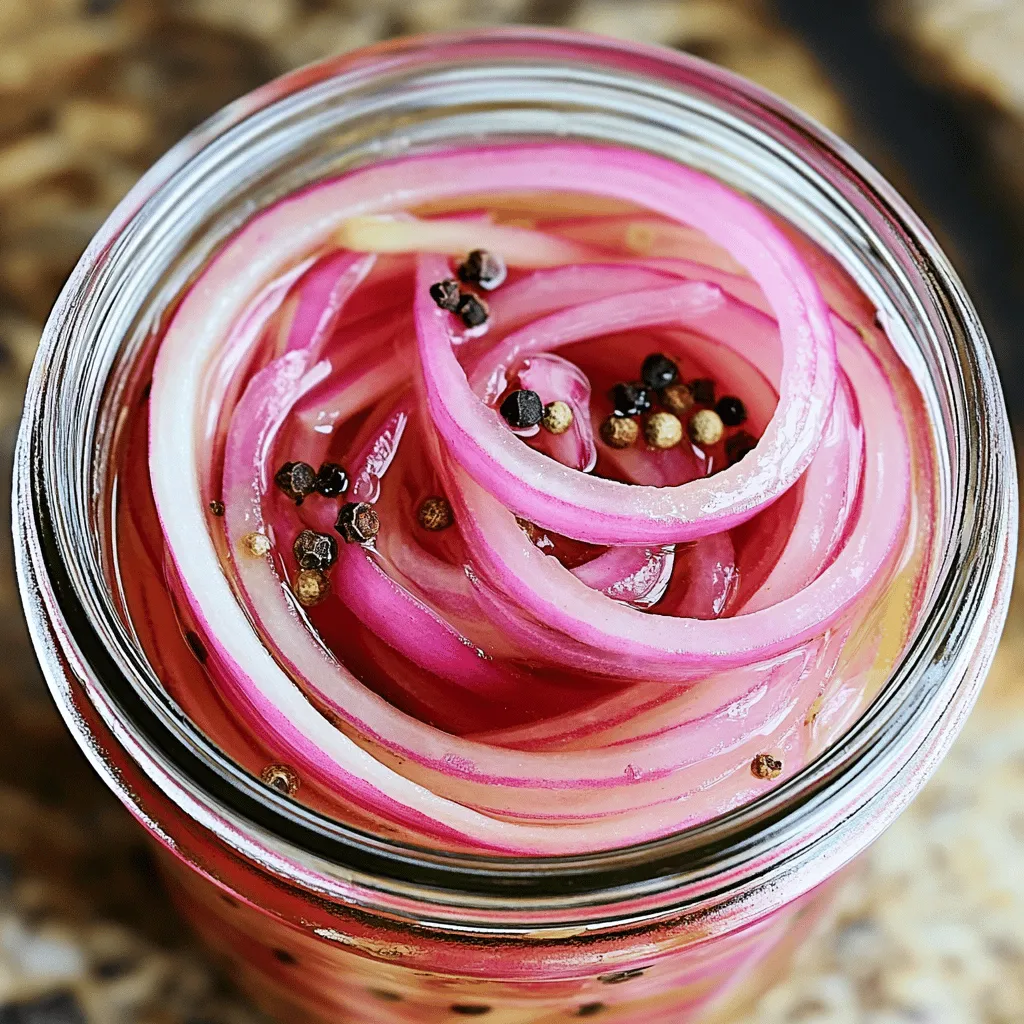
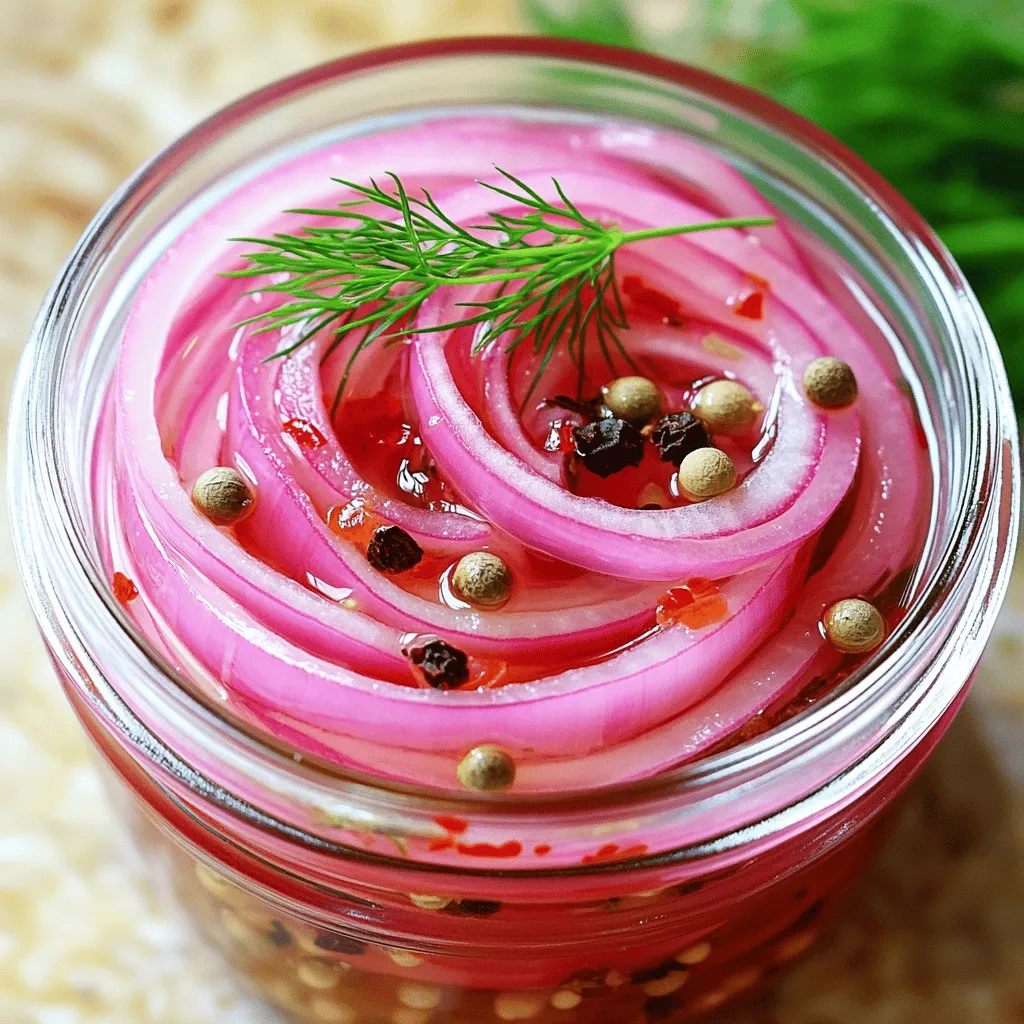
Quick Pickled Red Onions for Fresh Flavor Boost
Looking for a fresh way to elevate your meals? Quick pickled red onions are the answer! They’re easy to make and add a bright, tangy

Bang Bang Chicken Crispy Delightful Flavor Bomb
Get ready to elevate your dinner game with Bang Bang Chicken! This dish is a crispy, flavor-packed explosion that will have your taste buds dancing.
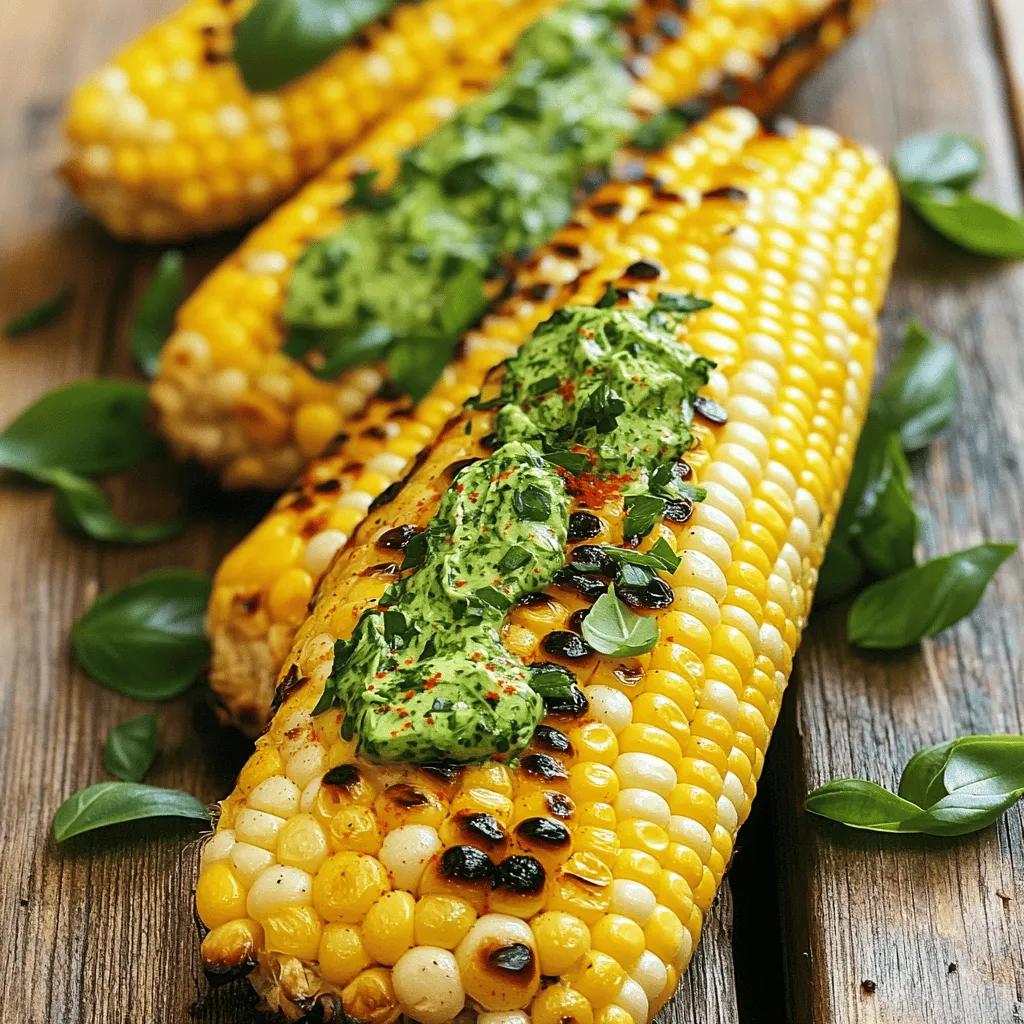
Grilled Corn-On-The-Cob Flavorful and Simple Recipe
Grilled corn-on-the-cob is a summer favorite that’s both tasty and easy to make. With just a few ingredients, you can create a delicious side dish

Crispy Fried Chicken Tenders Easy and Delicious Recipe
Craving a crunchy, golden bite? Look no further! My crispy fried chicken tenders recipe is simple and so tasty, you’ll want to make it again

Spicy Pickled Green Beans Flavorful and Tangy Snack
Are you ready to add a delicious kick to your snack game? Spicy pickled green beans combine crunch, heat, and tang in every bite. This