Appetizers
![- 2 medium zucchinis, sliced into fry-shaped sticks - 1 cup almond flour - 1/2 cup freshly grated Parmesan cheese - 2 large eggs - 1 teaspoon garlic powder - 1 teaspoon onion powder - 1 teaspoon dried oregano - Salt and freshly ground black pepper to taste - Olive oil cooking spray - Calories per serving: About 150 calories - Total carbs per serving: Approximately 8 grams - Macros breakdown: - Protein: 6 grams - Fat: 10 grams - Fiber: 2 grams Zucchini fries are a great snack. They are low in carbs and gluten-free. Each serving gives you a nice boost of healthy fats and protein, too. Almond flour and Parmesan make them crispy and tasty. You can enjoy these fries without the guilt! When you make this dish, you get fresh zucchinis packed with nutrients. Plus, you can customize the spices to match your taste. I love adding garlic and onion powder for extra flavor. It all comes together in a yummy way. For the full experience, check out the Full Recipe. This recipe makes it easy to enjoy a healthy snack that feels indulgent. 1. Preheat your oven to 425°F (220°C). This high heat helps the fries crisp up nicely. 2. Line a baking sheet with parchment paper. This prevents the fries from sticking and makes cleanup easy. 1. In a shallow dish, mix the almond flour, Parmesan cheese, garlic powder, onion powder, and oregano. Add a pinch of salt and pepper for flavor. 2. In another bowl, crack the two eggs and beat them until they are frothy. This air helps the coating stick well. 1. Take each zucchini stick and dip it into the beaten eggs. Make sure both sides are coated. 2. Roll the egg-coated stick in the almond flour mix. Press lightly to cover the zucchini well. This creates the crispy outer layer. 1. Arrange the coated fries on your prepared baking sheet in a single layer. This allows hot air to circulate evenly. 2. Lightly spray the tops with olive oil. This aids in achieving a golden crisp. 3. Bake in the preheated oven for 20-25 minutes. Flip the fries halfway through for even crispiness. 4. Once they are golden brown and crispy, remove them from the oven. Let them cool for a few minutes on the baking sheet. This step enhances their crispiness. For the complete recipe, check out the [Full Recipe]. To get the best crispiness from your zucchini fries, space them well on the baking sheet. If they are too close, they will steam instead of crisp. A single layer works best. When you bake, preheat the oven to 425°F (220°C). This high heat helps the fries cook fast and crisp up nicely. Remember to flip them halfway through baking. This step ensures all sides get that golden crunch. Zucchini fries can be fun with flavor. You can add spices like paprika or cayenne for heat. A dash of smoked salt gives a great twist. For dipping sauces, marinara is a classic choice. Try ranch or garlic aioli for a fresh taste. You can even mix yogurt with herbs for a cool dip. These options will elevate your fries and make them even more tasty! To serve your crispy fries, use a basket lined with parchment paper. This gives it a fun, rustic look. You can sprinkle fresh herbs like parsley or chives on top for a pop of color. For a creative touch, serve your fries with a side of assorted dips. This makes it a fun dining experience. You can even add a squeeze of lemon to brighten the flavors. Enjoy your crispy zucchini fries in style! {{image_4}} You can change up the coating for zucchini fries. Try using coconut flour or chickpea flour instead of almond flour. Each flour offers a different texture and flavor. You can also add herbs like thyme or rosemary to the coating. Spices like paprika or chili powder can give your fries a kick. Experiment with different flavors to find what you love. If you want a vegan version, switch the eggs for flaxseed meal. Mix one tablespoon of flaxseed meal with two and a half tablespoons of water. Let it sit for a few minutes to thicken. For a cheesy flavor, sprinkle in some nutritional yeast instead of Parmesan cheese. This makes your fries tasty and keeps them plant-based. Get creative with your zucchini fries by adding cheese blends to the coating. A mix of mozzarella and cheddar can give a richer taste. You can also use spices that reflect different cultures. Consider using curry powder for an Indian twist or taco seasoning for a Mexican flair. These little changes can take your fries from good to great. To keep your cooked zucchini fries fresh, let them cool first. Place them in an airtight container. I recommend using glass containers for the best results. They help prevent moisture build-up. You can store them in the fridge for up to 3 days. If you want to keep them longer, freezing is an option. When it's time to enjoy your leftovers, reheating is key for crispiness. The best method is to use an oven. Preheat it to 375°F (190°C). Place the fries on a baking sheet and reheat for about 10 minutes. This helps the fries regain their crunch. Avoid using a microwave if you can. Microwaving often makes fries soft and soggy. If you must use it, keep the time short, and check often. Always aim to keep that crispy texture. To make zucchini fries crispy, focus on a few key factors: - Dry the zucchini: Remove excess moisture by patting the zucchini strips dry with paper towels. - Use almond flour: Almond flour gives a great crunch. It coats well and crisps in the oven. - Space them out: Place the fries in a single layer without touching. This helps air circulate. - Spray with oil: Use olive oil cooking spray on top for extra crispiness. Yes, zucchini fries are healthy! Zucchini is low in calories and high in nutrients. - Low in carbs: They fit well in low-carb diets. - Rich in vitamins: Zucchini is full of vitamin C and potassium. - High in fiber: Fiber helps with digestion and keeps you full longer. You can freeze gluten-free zucchini fries! Here’s how: - Before baking: Coat the zucchini fries as usual. - Lay them flat: Place them on a baking sheet and freeze until solid. - Store in bags: Once frozen, transfer to freezer bags. This prevents clumping. - Thaw before baking: When ready to eat, thaw in the fridge and bake as usual. Zucchini fries pair well with many sides and dips! Here are some ideas: - Dipping sauces: Marinara, ranch, or garlic aioli work great. - Sides: Serve with a fresh salad or grilled chicken. - Toppings: Sprinkle with fresh herbs for added flavor. Zucchini fries last up to three days in the fridge. Here are some tips: - Store in a container: Use an airtight container to keep them fresh. - Reheat properly: Use an oven or air fryer to keep them crispy when reheating. - Check for spoilage: If they look or smell off, it’s best to discard them. For the full recipe, check out the Crispy Zucchini Fries 🥒 section! Zucchini fries are a great snack with a tasty twist. We covered the key ingredients, step-by-step cooking, and tips for maximum crispiness. Plus, we discussed fun flavor variations and easy storage methods. Enjoy these healthy bites as a snack or side. With the right techniques, you can elevate any meal. Don't forget to get creative with spices and sauces. Your kitchen will become a hub of delicious flavors. Dive in and savor the joy of making zucchini fries!](https://roastedflavors.com/wp-content/uploads/2025/06/55d56466-0e2b-4439-86f8-09046dfa51c2.webp)
Gluten Free Low Carb Zucchini Fries Crispy and Fresh
Are you ready to crunch into a tasty guilt-free snack? These Gluten Free Low Carb Zucchini Fries are crispy, fresh, and full of flavor. They’re

Roasted Zucchini Delight Simple and Flavorful Dish
Are you ready to transform simple zucchini into a mouth-watering dish? Roasted zucchini is easy to make and full of flavor. This versatile veggie can
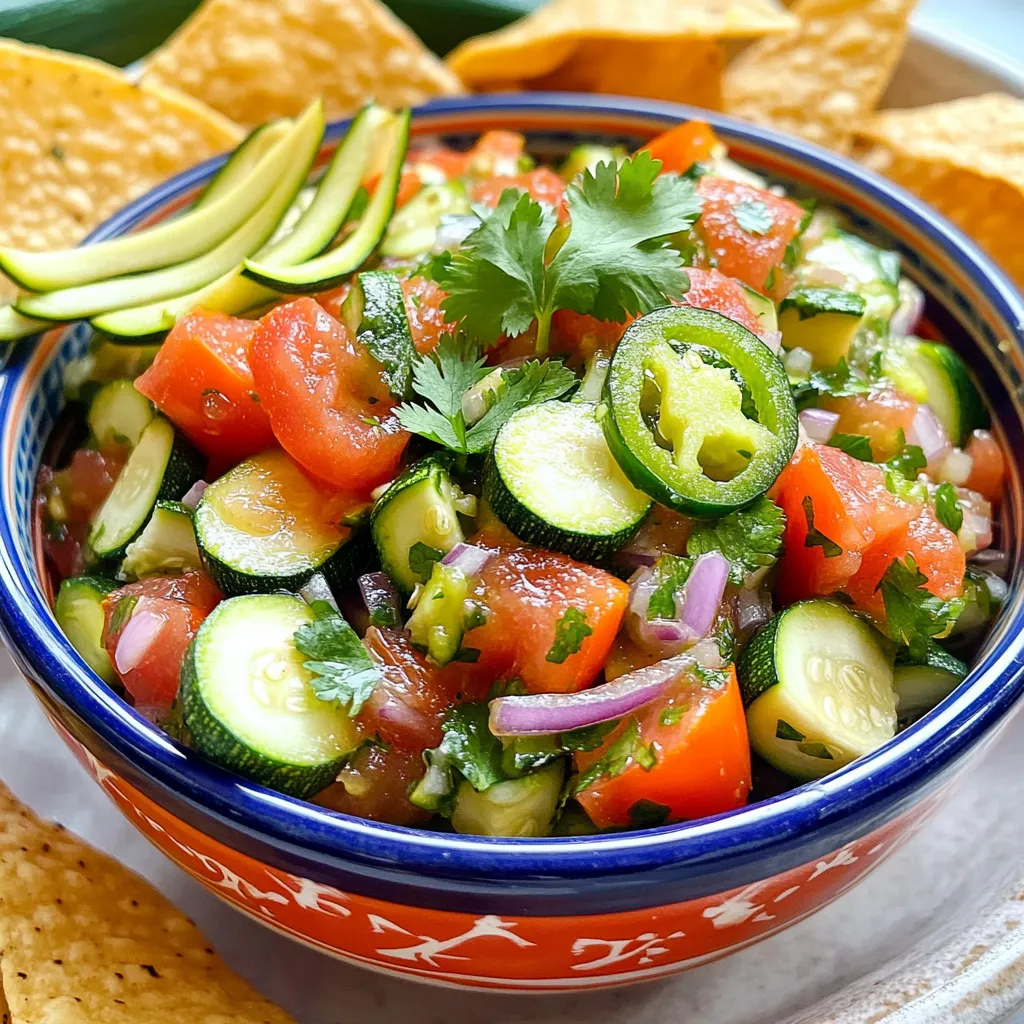
The Best Zucchini Salsa Flavorful and Fresh Recipe
If you love fresh flavors and easy recipes, then you’ve found your new go-to dish: zucchini salsa! This vibrant and tasty salsa, packed with garden-fresh
![Here’s what you need for Zucchini Parmesan Delight. Gather these items to create a tasty dish: - 3 medium zucchinis, sliced into 1/4-inch rounds - 1 cup breadcrumbs (whole wheat recommended for a richer flavor) - 1/2 cup grated Parmesan cheese - 1 cup shredded mozzarella cheese - 2 large eggs, beaten - 2 tablespoons fresh basil, finely chopped - 1 teaspoon garlic powder - 1 teaspoon onion powder - Salt and freshly ground black pepper, to taste - Olive oil spray or 2 tablespoons olive oil for drizzling - Fresh parsley, finely chopped, for garnish (optional) These ingredients come together to create a delicious layer of cheese and zucchini. The mix of cheeses adds richness, while the herbs bring freshness. Using whole wheat breadcrumbs gives your dish a heartier texture. Each bite will be filled with flavor. If you want more ideas, check the Full Recipe for tips and tricks! Set your oven temperature to 375°F (190°C) for optimal baking. This step is key for a crispy finish. In a large mixing bowl, combine breadcrumbs, Parmesan cheese, garlic powder, onion powder, salt, and pepper. Mix these ingredients well to blend flavors. In another bowl, beat the eggs. Dip each zucchini slice into the eggs, letting excess drip off. Then, roll it in the breadcrumb mixture until fully coated. Place the coated slices on a clean plate. Drizzle olive oil in a baking dish. You can also use an olive oil spray. Arrange the zucchini slices in a single layer. This helps them cook evenly. First, bake the zucchini for 20 minutes. They should turn golden and crispy. After that, add mozzarella on top and bake for an additional 10 minutes. The cheese should melt and bubble. Once the cheese has melted, take the dish out of the oven. Garnish with fresh basil and parsley for extra flavor. Enjoy this cheesy delight! For the full recipe, check the earlier sections. Choose firm zucchinis with smooth skin for the best results. Fresh zucchinis have a vibrant color and feel heavy. Avoid those with soft spots or wrinkles. Picking the right zucchini improves the taste and texture of your dish. You can explore using gluten-free breadcrumbs or crushed crackers for variations. If you want a crunch, try crushed cornflakes. For a nutty flavor, use ground almonds or oats. Each option gives a unique twist to your Zucchini Parmesan. Add spices or herbs to the breadcrumb mix for extra flavor. I like to use dried oregano or thyme for a savory kick. You can also try a pinch of smoked paprika for depth. Fresh herbs like parsley or basil work well too. This small addition makes your dish even more delicious. {{image_4}} Want a little heat? Add red pepper flakes to your breadcrumb mix. This tiny change gives the dish a fun kick. Just a pinch can transform the flavor. You can adjust the amount to fit your taste. Start small and taste as you go! Cheese lovers can get creative. Try using different cheeses like cheddar or Gruyère. Each cheese brings a unique flavor. Cheddar adds sharpness, while Gruyère gives a nutty taste. Mix and match cheeses for a tasty twist. Don't be afraid to experiment! For a vegan option, swap eggs for flaxseed meal. Mix one tablespoon of flaxseed meal with three tablespoons of water. Let it sit for five minutes until it thickens. Use plant-based cheese instead of dairy. This way, you can enjoy a delicious dish that fits your diet. Everyone can savor Zucchini Parmesan! For the full recipe, check out the [Full Recipe]. You can keep leftover zucchini Parmesan in an airtight container. It stays fresh for up to 3 days in the fridge. This way, you can enjoy this dish again without losing flavor. If you want to save it for later, freeze your baked zucchini Parmesan. It lasts for up to 2 months in the freezer. Just remember to thaw it before reheating. This is a great way to have a delicious meal on hand. To reheat, use the oven for the best texture. It keeps the crispy crust intact. If you're in a hurry, you can use the microwave for convenience. Just be careful not to overheat it. Enjoy your meal once again! You can pair Zucchini Parmesan with many tasty sides. A fresh salad adds a nice crunch. Try a simple green salad with vinaigrette for balance. Pasta goes great too! A light garlic or marinara sauce enhances the meal. Crusty bread is another good choice. It soaks up any extra sauce and adds texture. Yes, you can prepare Zucchini Parmesan in advance! You can coat the zucchini and store it in the fridge. Just bake it when you are ready to eat. This helps save time on busy days. You can also bake it completely. Then, store it in the fridge. Just reheat it when you want to serve. Look for a golden brown color on the top. The cheese should be melted and bubbly. You can poke a slice to check. It should feel soft but not mushy. If you see these signs, your Zucchini Parmesan is ready! To make Zucchini Parmesan gluten-free, use gluten-free breadcrumbs. You can find these at most grocery stores. You can also crush gluten-free crackers if needed. Ensure all other ingredients are gluten-free as well. This way, everyone can enjoy the dish! Check the labels for any hidden gluten. Zucchini Parmesan is an easy, tasty dish you can make at home. You learned about the ingredients, simple steps, and tips for great results. Experiment with flavors and find what you love. Whether you're cooking for yourself or family, this dish is sure to please everyone. Remember, you can tweak the recipe as you wish. Enjoy your cooking and share this treat with others!](https://roastedflavors.com/wp-content/uploads/2025/06/79f0fc7b-112c-477c-86b1-52dbb422ac0b.webp)
Zucchini Parmesan Delight Easy and Flavorful Recipe
Are you ready to enjoy a tasty treat? This Zucchini Parmesan Delight is easy to make and packed with flavor. With just a few simple

Quick Roasted Parmesan Zucchini Flavorful Side Dish
Looking for a quick and tasty side dish? Let me introduce you to Quick Roasted Parmesan Zucchini! This simple recipe uses fresh zucchini, savory Parmesan
![- 2 medium zucchinis, finely grated - 1 cup panko breadcrumbs - 1/2 cup freshly grated Parmesan cheese - 2 cloves of garlic, finely minced - 2 large eggs, well beaten - 1/4 cup fresh parsley, finely chopped - 1/2 teaspoon onion powder - 1/2 teaspoon baking powder - Salt and freshly ground black pepper to taste - Olive oil spray Zucchini garlic bites shine with fresh flavors. The main ingredient, zucchini, brings a light taste and a moist texture. Grating the zucchini makes it easy to blend with other ingredients. I like to use panko breadcrumbs for a crispier bite. The Parmesan cheese adds a nice salty flavor that works well with the garlic. Garlic is a star in these bites. It gives a punchy taste that pairs perfectly with zucchini. I always use fresh garlic for the best results. The eggs hold everything together, while parsley brightens the mix. Onion powder and baking powder help enhance the savory notes and give it a fluffy texture. Using quality ingredients makes a big difference. Fresh herbs and good cheese elevate your dish. You can find the full recipe in the article. These bites are easy to make and great for sharing! 1. Preheat your oven to 400°F (200°C). This ensures even cooking. 2. Grate the zucchinis into a large bowl. Sprinkle with a pinch of salt. Let it sit for 10 minutes. This helps pull out excess moisture. 3. After 10 minutes, take a clean kitchen towel. Bundle up the grated zucchini and squeeze it tightly. Remove as much moisture as you can. This step is key for crisp bites. 4. Return the drained zucchini to the bowl. Now, add the panko breadcrumbs, grated Parmesan cheese, minced garlic, beaten eggs, fresh parsley, onion powder, baking powder, and a sprinkle of salt and pepper. Mix until all ingredients are combined. 5. With your hands, form small patties, about 2 inches wide. Place them on your baking sheet, leaving space between each for even cooking. 1. Lightly spray the tops of each zucchini bite with olive oil spray. This helps them turn golden brown and crispy. 2. Bake in the preheated oven for 20 to 25 minutes. Flip them halfway through for even cooking. You'll know they are done when they are golden and crispy on the outside. 3. Once finished, remove the baking sheet from the oven. Let the zucchini bites cool for a few minutes. This helps them hold their shape. For the full recipe, check out the details provided above. You will love how simple and tasty these bites are! - Squeezing out moisture for crispness: After grating the zucchini, sprinkle it with salt. Let it sit for about 10 minutes. This helps pull out extra moisture. Then, use a towel to squeeze out as much water as you can. This step is key for crispy bites. - Using fresh ingredients vs. dried: Always choose fresh garlic and parsley. Fresh herbs bring more flavor than dried ones. Fresh ingredients help your zucchini bites taste bright and delicious. - Presentation tips for serving: Place the zucchini bites on a nice platter. Drizzle with olive oil for shine. Add a sprinkle of parsley for color. This simple touch makes your dish look fancy. - Recommended dips like yogurt or marinara: Serve your zucchini bites with yogurt dip or marinara sauce. Both options add a tasty contrast. They enhance the flavor and make your bites more enjoyable. If you want the complete recipe, check out the [Full Recipe]. {{image_4}} You can easily switch some ingredients in zucchini garlic bites for different tastes. If you want a vegan option, use nutritional yeast instead of cheese. This will give a cheesy flavor without dairy. You can also try using cashew cheese for a creamy texture. Want to add more flavor? Sprinkle in some smoked paprika or cayenne pepper. These spices add warmth and depth. You can also use fresh herbs like basil or dill for a vibrant twist. You don’t have to bake these bites. Try using an air fryer for a crispier finish. Preheat your air fryer to 375°F (190°C). Place the patties in a single layer and cook for about 12 minutes. Flip them halfway for even cooking. If you prefer pan-frying, heat a little olive oil in a skillet. Cook the patties for about 3-4 minutes on each side. This method gives a nice golden color and a crunchy texture. For the full recipe, check out the Zesty Zucchini Garlic Bites. To keep your zucchini garlic bites fresh, store them in the fridge. Place them in an airtight container. They will stay good for up to three days. If you want to save them longer, freezing is a great option. Here’s how to do it: - Cool the bites completely before freezing. - Layer them between parchment paper in a freezer-safe bag. - They can last for up to three months in the freezer. When you're ready to eat them, just take out what you need! Reheating your zucchini bites is easy. For the best texture and flavor, use the oven: - Preheat your oven to 350°F (175°C). - Place the bites on a baking sheet. - Heat them for about 10 to 15 minutes. You can also reheat them in an air fryer for a crispy finish. Set the air fryer to 350°F (175°C) and cook for about 5 minutes. Enjoy your delicious bites just like they were fresh out of the oven! Can I make these bites ahead of time? Yes, you can! Just prepare the mixture and form the patties. Then, store them in the fridge for up to a day. Cook them when you are ready to serve. This keeps them fresh and tasty. Are zucchini garlic bites healthy? Absolutely! They use fresh zucchini and herbs. They are low in calories and high in nutrients. The panko adds crunch without too many carbs. You can enjoy these bites guilt-free. What can I do with leftover zucchini? Leftover zucchini can be used in many ways. You can add it to salads, stir-fries, or soups. It’s also great in smoothies for extra nutrients. Don’t let it go to waste! How can I make these gluten-free? To make zucchini garlic bites gluten-free, simply replace panko with gluten-free breadcrumbs. You can also use crushed gluten-free crackers. This keeps the texture while making it safe for gluten-sensitive folks. For the full recipe, check out the Zesty Zucchini Garlic Bites section. In this post, we shared a simple recipe for zucchini garlic bites. We covered ingredients, preparation steps, and cooking methods. I provided tips to make your bites crispy and delicious. Remember, you can also try different flavors or cooking methods like air frying. Overall, these bites are fun to make and great for snacks or appetizers. Enjoy these treats with your favorite dips! Happy cooking!](https://roastedflavors.com/wp-content/uploads/2025/06/dc333eac-a466-4b53-9f4c-d47e8699ceba.webp)
Zucchini Garlic Bites Flavorful and Easy Appetizer
If you’re looking for a simple and tasty appetizer, you’ve found it! Zucchini Garlic Bites combine fresh flavors and crunch in every bite. This dish

Cajun Corn On The Cob Flavorful Grilled Delight
Are you ready to spice up your summer barbecues? Cajun Corn On The Cob is your new go-to dish! With a mix of flavorful spices
![- 4 fresh corn cobs, husked Fresh corn is key for this dish. Use sweet, tender cobs. Look for bright green husks and moist silk. Fresh corn gives the best taste and texture. - 120 ml unsalted butter, melted - 4 garlic cloves, finely chopped The garlic butter adds rich flavor. Melt the butter gently. Mix in the finely chopped garlic. Let it sit to infuse the flavors. This step creates a fragrant, tasty base. - 50 g grated Parmesan - 1/2 teaspoon paprika - Salt and black pepper to taste - 1 tablespoon fresh parsley, chopped (for garnish) - 1/4 teaspoon red pepper flakes (optional, for heat) Seasonings boost the taste. Sprinkle Parmesan evenly on the corn. Add paprika, salt, and pepper to make it pop. If you like heat, add red pepper flakes. Finish with fresh parsley for color and freshness. For the complete process, check the full recipe. Start by filling a big pot with water. Bring the water to a boil. Once it bubbles, add the fresh corn on the cob. Cook the corn for about 5 to 7 minutes. You want it to be tender but not too soft. After cooking, drain the corn and let it cool slightly. This step is key to getting the best flavor and texture. Next, we need to make the garlic butter. In a small bowl, mix together melted butter and finely chopped garlic. Stir it well to combine. Letting it sit for a few minutes lets the garlic flavor soak into the butter. This makes the butter even tastier when you apply it to the corn. Once the corn is cool enough to handle, it’s time to add the toppings. Use a brush or a spoon to spread the garlic butter all over each corn cob. Be generous! After that, sprinkle grated Parmesan cheese evenly on top of the corn. Season with paprika, salt, and black pepper to taste. If you like heat, add red pepper flakes for a spicy kick. If you want to grill the corn, preheat your grill to medium-high heat. Place the buttered corn directly on the grill. Grill for about 6 to 8 minutes, turning occasionally. You want nice grill marks and melted cheese. If grilling isn’t an option, you can bake the corn in the oven at 400°F (200°C) for about 10 minutes. After cooking, take the corn off the heat. Don't forget to sprinkle some chopped parsley on top before serving. Enjoy your cheesy garlic butter corn on the cob hot! For the full recipe, check out the earlier section. To make cheesy garlic butter corn on the cob, choose fresh corn. Look for bright green husks. The silk should be slightly sticky. Press the kernels with your thumb. They should feel firm and plump. If they feel soft or dry, skip them. Fresh corn makes all the difference in taste. Garlic butter is key to this dish. Use fresh garlic for the best flavor. Chop it finely so it blends well with the butter. Mixing it in melted butter helps release its strong taste. Let the butter sit a bit after mixing. This allows the garlic to infuse more. You can also add herbs like parsley or basil for extra flavor. Grilling and baking both work well for corn. Grilling gives a nice smoky flavor. It creates beautiful grill marks and adds a fun texture. Bake your corn if you don’t have a grill. Preheat your oven to 200°C (400°F), then bake for about 10 minutes. Both methods yield delicious cheesy garlic butter corn. Choose whichever suits your cooking style! For the full recipe, check out the details above. Enjoy your cooking! {{image_4}} You can easily boost the taste of your cheesy garlic butter corn on the cob. Adding spices gives it a fun twist. For heat, try a pinch of cayenne pepper or chili powder. If you like herbs, sprinkle some oregano or thyme for a fresh kick. You can also use lemon zest for a bright, citrusy note. Mix and match until you find your favorite flavor blend. While Parmesan is tasty, many cheeses work well here. Try using crumbled feta for a tangy bite. You might enjoy sharp cheddar for a richer taste. For a creamy finish, consider adding mozzarella. You can even blend different cheeses to create a unique flavor profile. Don't be afraid to experiment with what you have on hand. Want to make it vegetarian? It’s simple! You can replace the butter with olive oil or a vegan butter alternative. For cheese, use plant-based cheese made from nuts or soy. This way, everyone can enjoy this tasty treat. You can also add grilled veggies on the side for a colorful plate. These changes keep the dish fresh and delicious. For the full recipe, check out the [Full Recipe]. After enjoying your cheesy garlic butter corn on the cob, let it cool. Place any leftovers in an airtight container. Store them in the fridge. They can last for up to three days. Make sure to keep it sealed tightly to prevent drying out. To reheat, you can use the microwave. Place the corn on a plate and cover it with a damp paper towel. Heat for about 30 seconds. Check if it's hot enough, and heat in 15-second bursts if needed. You can also reheat it in the oven. Preheat your oven to 350°F (175°C). Wrap the corn in foil and heat for about 10-15 minutes. This keeps the butter moist and tasty. If you want to save your corn for later, freezing is a great option. First, let the corn cool completely. Wrap each ear tightly in plastic wrap. Place them in a freezer bag, removing as much air as possible. You can freeze them for about three months. When you're ready to eat, thaw it in the fridge overnight before reheating. For the full recipe of cheesy garlic butter corn on the cob, click here. Yes, you can use frozen corn. Just thaw it first. Cook it in boiling water for about 3-5 minutes. This will warm it up and make it tender. The flavors of garlic butter will still shine through. If you need a substitute for Parmesan cheese, try using Pecorino Romano. It has a similar flavor but is a bit saltier. You could also use nutritional yeast for a dairy-free option. This adds a cheesy taste without using cheese. To spice up your cheesy garlic butter corn, add a pinch of cayenne pepper. You can also mix in some diced jalapeños for a fresh kick. If you love heat, sprinkle more red pepper flakes on top before serving. Enjoy the extra flavor! For the full recipe, check out the Cheesy Garlic Butter Corn on the Cob section. This blog post showed you how to prepare delicious garlic butter corn on the cob. We covered the best ingredients, cooking steps, and helpful tips. You learned variations to satisfy your taste. Don’t forget about storing leftovers properly for another meal. Experiment with flavors and enjoy! With these ideas, you can make corn on the cob fun and tasty every time. Try it out and impress your friends and family!](https://roastedflavors.com/wp-content/uploads/2025/06/ec9040e1-4fce-4c1a-adcb-de799d98668a.webp)
Cheesy Garlic Butter Corn on the Cob Delight
Are you ready to elevate your summer BBQ? In this post, I’ll show you how to make Cheesy Garlic Butter Corn on the Cob that

Tomato Fritters Crunchy and Flavorful Snack Recipe
If you’re craving a crunchy and flavorful snack, tomato fritters might just be your new favorite. These golden bites bring together ripe tomatoes and simple
![To make sweet and spicy pickled peppers, you need a few main ingredients: - 2 cups assorted mini sweet peppers (red, yellow, orange), sliced into rings - 1 cup apple cider vinegar - 1/4 cup honey - 1 tablespoon granulated sugar These mini sweet peppers are the star of the show. They add a nice crunch and bright color. The apple cider vinegar gives a tangy kick, while the honey and sugar balance the heat and tang with sweetness. To enhance the flavor, add these extra ingredients: - 2 garlic cloves, smashed - 1 teaspoon red pepper flakes (adjust for desired heat) - 1 tablespoon coarse sea salt Garlic adds depth and aroma. Red pepper flakes bring the heat; you can adjust this based on your taste. The coarse sea salt helps with the brining process and boosts flavor. For the full recipe to create these delightful pickled peppers, check out the [Full Recipe]. First, you need to sterilize your jars. This step is key for safety. Place clean jars in a large pot of boiling water. Let them boil for 10 minutes. After that, take them out and let them air dry completely. Next, prepare the brine mixture. In a medium saucepan, mix these ingredients: - 1 cup apple cider vinegar - 1/2 cup filtered water - 1/4 cup honey - 1 tablespoon granulated sugar - 1 tablespoon coarse sea salt - 2 garlic cloves, smashed - 1 teaspoon red pepper flakes - 1 teaspoon mustard seeds - 1/2 teaspoon coriander seeds Now, place the saucepan over medium heat. Bring the mixture to a gentle simmer. Stir occasionally. This helps the honey and sugar dissolve well into the brine. Once it simmers, remove the saucepan from heat. Let the brine cool for about 10 minutes. While the brine cools, pack the sliced mini sweet peppers into the sterilized jars. Make sure they fit snugly. Leave about a half-inch of space at the top of each jar. After the brine has cooled slightly, pour it over the packed peppers. Ensure the peppers are fully submerged. If needed, use a spoon to push them down gently. Wipe the rims of the jars with a clean cloth. This step ensures a good seal. Seal the jars tightly with their lids. Place them on a cooling rack or clean surface. Let them cool to room temperature. Once they are cool, store the jars in the refrigerator. Wait at least 24 hours before tasting. This waiting time helps the flavors mix well. For the full recipe, check the details above. To make your sweet and spicy pickled peppers shine, you can adjust the spice levels. Start with 1 teaspoon of red pepper flakes, then taste the brine. If you want more heat, add more flakes gradually. This lets you control the spice to match your taste. Fresh herbs also add flavor when serving. Try topping your peppers with chopped cilantro or parsley. The herbs bring freshness and color, making your dish look and taste better. One common mistake is not sterilizing jars properly. If jars aren't clean, bacteria can spoil your peppers. Always boil your jars for 10 minutes before using them. Make sure they air dry completely. Another mistake is overfilling jars with peppers. Leave about half an inch of headspace at the top. This space lets the brine cover the peppers fully and helps with sealing. If jars are too full, lids may not seal tightly, leading to spoilage. {{image_4}} You can change the heat of your sweet and spicy pickled peppers by choosing different types of peppers. For a mild flavor, use mini sweet peppers. They add crunch without much spice. If you want a kick, try jalapeños or serranos. They bring heat while still pairing well with the sweet brine. Adding different spices can also shift the heat level. For example, you can include extra red pepper flakes for more spice. You might even try adding a dash of cayenne pepper. Adjust these spices based on your taste. Just remember, it’s easier to add heat than to take it away! The sweetness of your pickled peppers can also be adjusted. You can use different sweeteners if you prefer. Maple syrup or agave nectar can replace honey. Each sweetener gives a unique taste. Play around until you find what you love. You can also change the amount of honey and sugar in the recipe. If you like it sweeter, add more honey. If you want less sweetness, cut back on the sugar. Remember, the balance of sweet and spicy makes these peppers shine. The goal is to create a flavor that makes your taste buds dance! For the full recipe, check out the Sweet and Spicy Pickled Peppers section. To keep pickled peppers fresh, you need to store them right. After sealing the jars, place them in the refrigerator. The cold temperature slows spoilage and helps flavors develop. Make sure the jars are tightly sealed. This keeps air out and prevents any unwanted growth. You should enjoy your pickled peppers within 2 to 3 months. They taste best when consumed within the first month. After that, check for signs of spoilage. If you see any mold or off smells, toss them out. Freshness is key to enjoying these sweet and spicy treats. For more details on making this dish, check out the Full Recipe. Pickled peppers last about 1 to 3 months in the fridge. The vinegar helps preserve them. After opening, they stay fresh longer when kept sealed. Always check for any signs of spoilage. If they smell bad or look off, it's best to toss them. Yes, you can use other types of peppers. Jalapeños, banana peppers, or even poblano peppers work great. Each pepper adds its own flavor and heat. Choose mild peppers for a sweet taste or hot ones for a kick. Mixing different peppers can create fun flavor combos. The spice level depends on the red pepper flakes you choose. If you want more heat, add extra flakes. For a milder version, reduce the amount. The mini sweet peppers give a nice sweet base, balancing the spice. You control the heat in your jar. Making sweet and spicy pickled peppers is simple and fun. You learned about the main ingredients, like mini sweet peppers and apple cider vinegar. We covered how to prepare and sterilize your jars for safety. You can also tweak flavors, adjust spice levels, and avoid common mistakes. Remember to store your pickled peppers properly to enjoy them longer. Pickled peppers add great taste to meals. Give it a try, and enjoy your homemade treat!](https://roastedflavors.com/wp-content/uploads/2025/06/ac5a9757-0ae1-403e-9606-e7c6678e362c.webp)
Sweet and Spicy Pickled Peppers Flavorful Jarred Treat
If you love a burst of flavor in every bite, then you’re in for a treat! Sweet and spicy pickled peppers combine the perfect mix