Appetizers
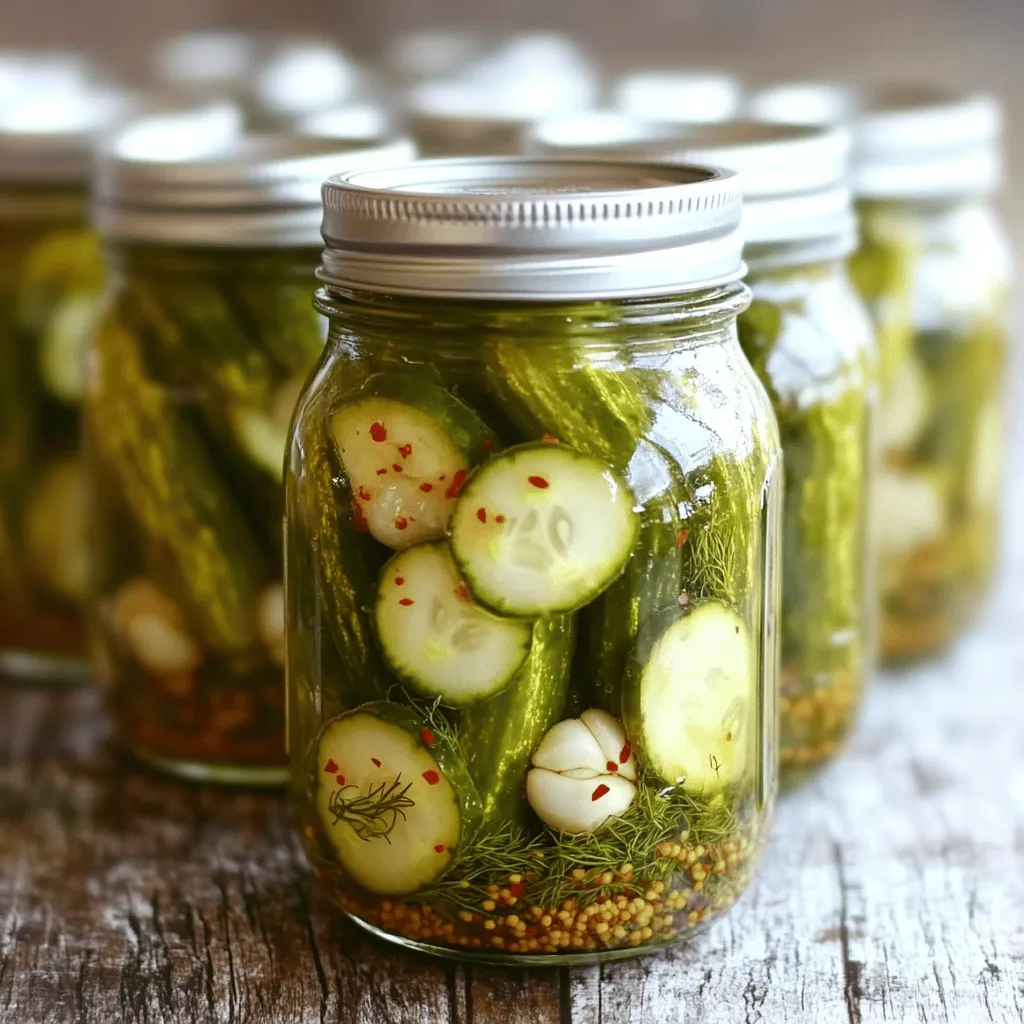
The Best Sour Pickles Recipe Fresh and Flavorful Guide
Are you ready to crunch into some delicious homemade sour pickles? In this guide, you’ll discover a recipe that brings out fresh and bold flavors
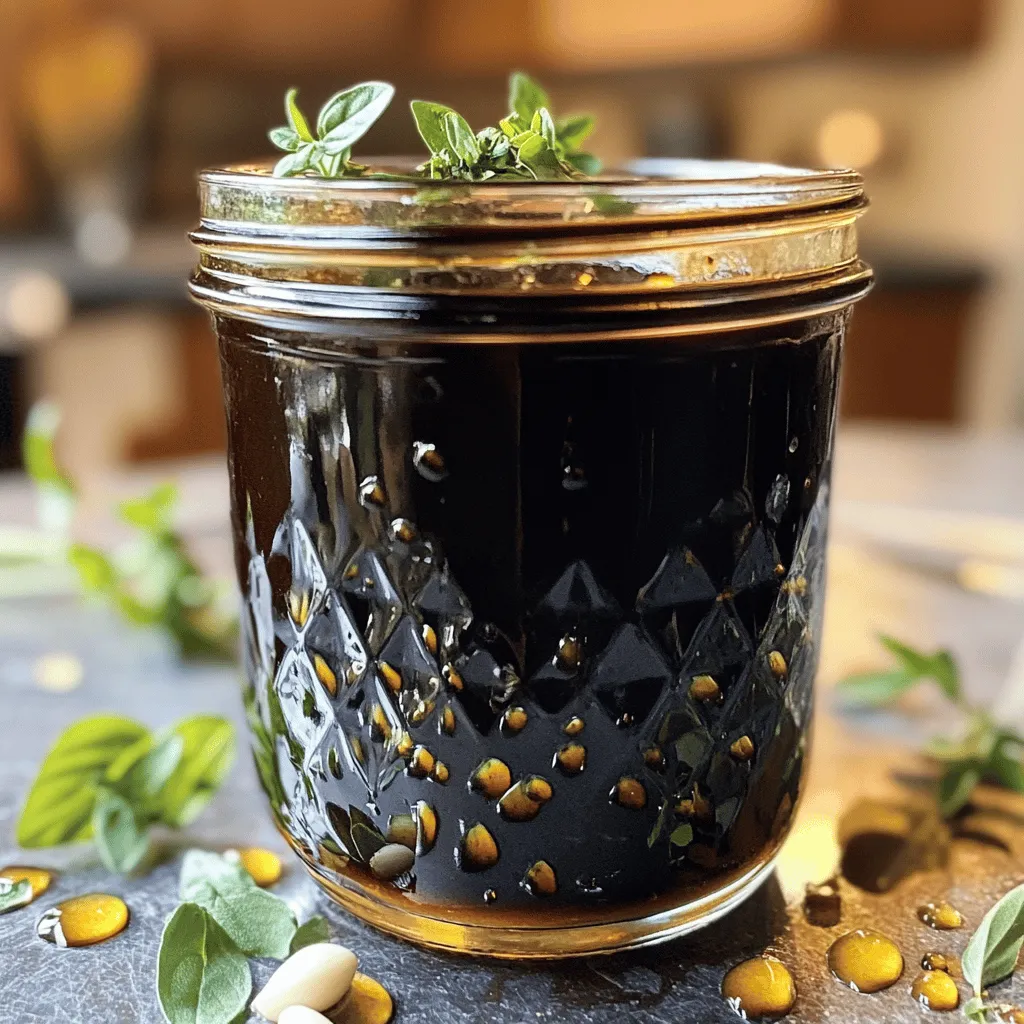
Homemade Balsamic Glaze Without Sugar Delight
Looking for a tasty way to enjoy balsamic glaze without the sugar? You’re in the right place! My Homemade Balsamic Glaze Without Sugar Delight transforms
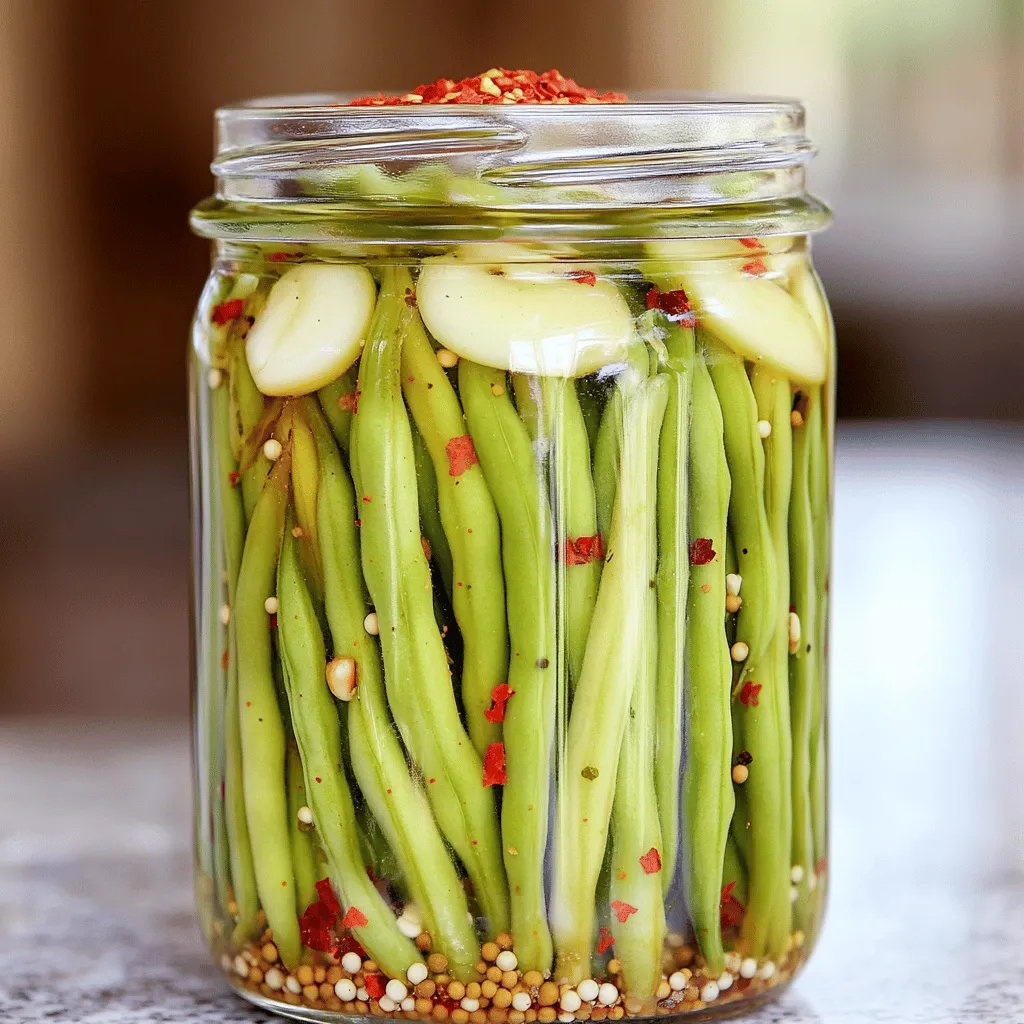
![To make Spicy Dilly Garlic Beans, you need fresh and simple ingredients. Here’s what you will need: - 1 lb fresh green beans, trimmed - 3 cloves of garlic, finely minced - 1 tablespoon extra virgin olive oil - 1 teaspoon red pepper flakes - 2 tablespoons fresh dill, finely chopped - 1 tablespoon apple cider vinegar - Sea salt, to taste - 1/4 teaspoon freshly ground black pepper - 1 teaspoon sugar (optional) Each ingredient brings its own flavor to this dish. The fresh green beans add a crisp texture. Garlic adds warmth, while red pepper flakes kick up the heat. Dill gives a fresh note, and apple cider vinegar brings a tangy twist. Sea salt and black pepper enhance all these flavors. You can use sugar to balance the heat, if needed. When selecting green beans, look for vibrant ones. They should feel firm and snap easily. Fresh dill should smell strong and fragrant. These choices will ensure your dish is as tasty as possible. For the full recipe, check the section above. You will enjoy how these simple ingredients come together for a delightful side dish! - Rinse and trim the green beans. This helps remove dirt and makes them neat. - Blanch the green beans for 3-4 minutes. This keeps them bright and slightly tender. - Plunge beans into ice water for quick cooling. This stops the cooking and locks in color. - Heat olive oil and sauté minced garlic in a skillet. This brings out the garlic's rich flavor. - Add red pepper flakes and infuse oil. This step adds a spicy kick to the dish. - Toss blanched green beans in the skillet. Make sure they get coated in the garlic oil. - Add fresh dill and apple cider vinegar. This brings a fresh taste to the beans. - Season and adjust to taste. Add salt, black pepper, and sugar if you want to balance the heat. This easy recipe makes a delightful side dish. You can find the full recipe for Spicy Dilly Garlic Beans in the earlier sections. Enjoy every bite! To make your Spicy Dilly Garlic Beans even better, you can adjust the red pepper flakes. If you love heat, add more. If you prefer a milder taste, use less. You can also experiment with other herbs or spices. Try adding a pinch of smoked paprika or a dash of cumin for a twist. Fresh herbs like basil or parsley can also add a unique flair. Presentation matters! Serve your beans on a vibrant platter to catch the eye. Scatter extra dill on top for an added pop of color. To brighten the dish, include lemon wedges on the side. A squeeze of lemon adds great freshness and lifts the flavors. Using ice water after blanching is key. It helps lock in the beans' bright green color and crisp texture. When you cook garlic, be careful not to burn it. Garlic cooks fast and can turn bitter. Sauté it just until fragrant; about one minute is perfect. These small tips will enhance the overall taste and look of your dish. {{image_4}} You can change up the beans in this dish. Try using yellow wax beans or even chickpeas. Both will bring a new flavor. You can also swap in different veggies. For instance, sliced bell peppers or zucchini work well. They add a nice crunch and color. Vinegar is key for the tangy taste. You can substitute apple cider vinegar with white wine vinegar if you prefer. This swap gives a milder flavor. Another option is rice vinegar, which adds a sweet touch. Each vinegar will give a unique twist. Making this dish vegan is easy. All the ingredients are plant-based, so you’re set. Just skip the sugar if you want a low-sugar option. The beans will still taste great without it. If you need a gluten-free option, you can relax. This recipe is naturally gluten-free. Always check your vinegar for hidden gluten if you buy pre-made. This dish fits many diets while keeping the flavor intact. To keep your Spicy Dilly Garlic Beans fresh, store them in the fridge. Place the beans in an airtight container. This helps prevent moisture loss and keeps them crisp. You can enjoy your beans for up to three days. For best results, let the beans cool completely before sealing them. This practice avoids steam buildup that can cause sogginess. If you have a vacuum sealer, that’s even better! It removes air and keeps the beans vibrant. If you want to keep them longer, freezing is a great option. First, make sure the beans are completely cool. Then, portion them in freezer-safe bags or containers. Remove as much air as possible to avoid freezer burn. To thaw, simply place the frozen beans in the fridge overnight. You can also use the microwave for quick thawing. Heat them gently to avoid overcooking. When reheating on the stove, add a splash of olive oil to bring back their flavor. Enjoy your beans even after freezing! For the full recipe, check out the details provided above. Spicy Dilly Garlic Beans are a vibrant, flavorful side dish. They feature fresh green beans, garlic, and dill. The addition of red pepper flakes gives them a spicy kick. The taste is a mix of fresh, tangy, and savory notes. This dish is crunchy and bright, making it a perfect addition to any meal. Yes, you can prepare these beans ahead of time. Blanch and cool the beans, then store them in the fridge. Keep them in an airtight container for up to three days. When you’re ready to serve, just heat them in a skillet with the garlic and spices. This saves time and allows the flavors to meld. Spicy Dilly Garlic Beans pair well with grilled meats and fish. They also complement hearty grains like quinoa or rice. Serve them alongside roasted chicken or a fresh salad for a balanced meal. Their bright flavor can elevate any dish, making them a versatile side. To adjust the spice, change the amount of red pepper flakes. Start with less if you prefer a milder flavor. You can also add a touch of sugar to balance the heat. For those who love spice, increase the flakes or add sliced jalapeños. This way, you can make the dish just right for your taste. For the full recipe, check the [Full Recipe]. Spicy Dilly Garlic Beans are easy to make and packed with flavor. You learned about the key ingredients, how to prepare them, and tips for enhancing taste and appearance. You can switch ingredients for variety, and my storage tips help keep leftovers fresh. This dish not only shines on its own but pairs well with many meals. Enjoy creating your own version, and don't shy away from making it your own. You’ll impress your guests and family with this delightful side!](https://roastedflavors.com/wp-content/uploads/2025/07/ef6d7567-726f-4d3c-88b9-8c8d1b8da828.webp)
Spicy Dilly Garlic Beans Flavorful and Easy Side Dish
Looking for an easy yet bold side dish? Try my Spicy Dilly Garlic Beans! This vibrant blend of fresh green beans, garlic, and dill brings
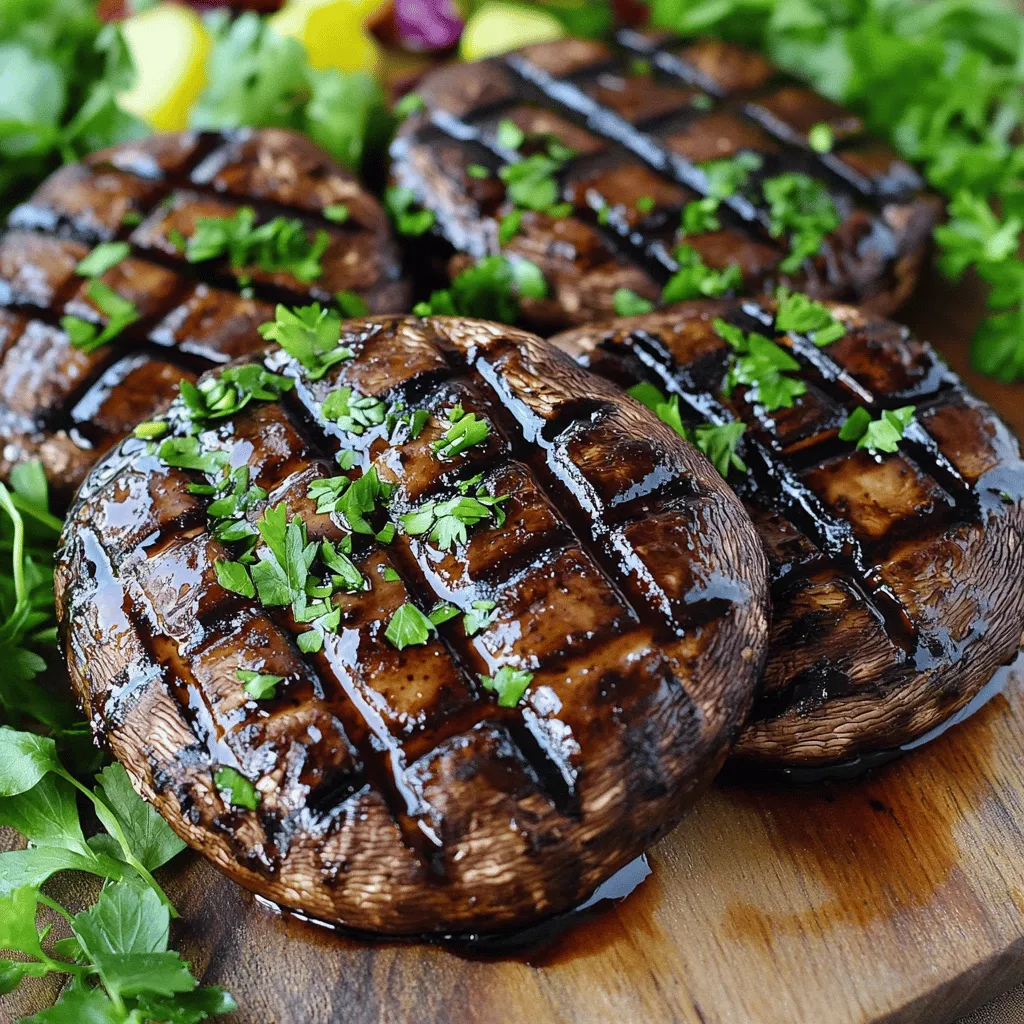
Grilled Portobello Mushrooms with Balsamic Glaze Delight
If you love bold flavors and hearty meals, you’ll adore grilled portobello mushrooms with balsamic glaze. These mushrooms pack a punch and are a healthy
. In this post, we covered how to make delicious pickled asparagus. I shared the key ingredients, from fresh asparagus to spices, and provided step-by-step instructions. You learned tips for crunch and flavor, along with variations for your taste. Remember to store your pickles correctly to enjoy them longer. Making and enjoying pickled asparagus can be simple and fun. With a little practice, you’ll have tasty snacks ready at home. Happy pickling!](https://roastedflavors.com/wp-content/uploads/2025/07/a9261fd7-c9c5-4f0b-ab94-1f6b0e0c74d6.webp)
Pickled Refrigerator Asparagus Crunchy and Flavorful Treat
Are you ready to add a crunchy, flavorful twist to your meals? Pickled refrigerator asparagus is the perfect snack or side dish! With just a
Quick Pickled Green Beans Tangy and Simple Recipe
Are you ready to add a zing to your meals? Quick pickled green beans are tangy, crunchy, and super easy to make! With just a
![To make grilled zucchini with balsamic glaze, you need fresh ingredients. Here’s what you will need: - 3 medium zucchinis, sliced into ½ inch thick rounds - 3 tablespoons extra virgin olive oil - Sea salt and freshly cracked black pepper, to taste - ½ teaspoon garlic powder - ½ teaspoon Italian seasoning blend - ½ cup balsamic glaze (can be store-bought or homemade) - Fresh basil leaves, for garnish These ingredients come together to create a tasty dish that shines on any table. The zucchinis offer a satisfying crunch, while the balsamic glaze adds a sweet tang. The olive oil helps the flavors mix, making each bite delicious. The salt and pepper bring out the natural taste of the zucchini. Garlic powder and Italian seasoning give a warm, comforting flavor. Fresh basil not only looks great but smells wonderful too! For the full experience, check the [Full Recipe]. It guides you step-by-step to create this flavorful treat. Preheat your grill to medium-high heat. This step is key for great results. A hot grill helps the zucchini cook evenly and get those nice grill marks. Take three medium zucchinis and slice them into ½ inch thick rounds. In a big bowl, combine these slices with three tablespoons of extra virgin olive oil. Make sure every slice gets a good coat of oil. Next, add sea salt, freshly cracked black pepper, half a teaspoon of garlic powder, and half a teaspoon of Italian seasoning blend. Toss everything together gently until the zucchini is well coated. This mix brings out the best flavors in your grilled zucchini. Now, it’s time to grill! Place the seasoned zucchini slices on the hot grill. Grill them for about 4-5 minutes on one side. Look for nice grill marks and a tender texture. During the last minute of grilling, drizzle half a cup of balsamic glaze over the zucchini. This glaze caramelizes and adds a sweet touch. Once done, carefully take the grilled zucchini off the grill and put them on a serving platter. You can arrange them in an attractive way. Finally, add fresh basil leaves for a pop of color and aroma. For the full recipe, you can check the earlier section. Enjoy your grilled zucchini with balsamic glaze! To grill zucchini well, heat your grill to medium-high. Aim for a temperature of about 400°F. This heat ensures even cooking and nice grill marks. Grill the zucchini for 4-5 minutes on one side. Flip them once you see the grill marks and they feel tender. To achieve perfect grill marks, place the zucchini at a 45-degree angle. After a few minutes, turn them 90 degrees to create a crosshatch pattern. This technique adds flair to your dish and enhances the visual appeal. For extra flavor, try adding herbs or spices. A sprinkle of smoked paprika or chili flakes can bring a kick. Fresh herbs like thyme or oregano also work great. You can even swap out the balsamic glaze. Try a lemon vinaigrette or a garlic-infused olive oil for a fresh twist. These options can elevate your grilled zucchini experience. Mix and match to create your own flavor profile. For the full recipe, refer to the earlier section. Enjoy cooking! {{image_4}} You can cook grilled zucchini in different ways. If you don't have a grill, use your oven. Preheat the oven to 400°F. Place the zucchini on a baking sheet, drizzle with olive oil, and season. Bake for about 20 minutes until tender. You can also use a stovetop grill pan. Heat the pan over medium heat. Add the zucchini slices and cook for about 4-5 minutes on each side. You can mix it up by adding other veggies. Try bell peppers, asparagus, or eggplant. Each vegetable brings its own taste. You can create a colorful veggie medley. Grilled zucchini pairs well with many dishes. It makes a great side for grilled chicken or steak. Serve it alongside a fresh salad for a light meal. For sauces, you can try a yogurt dip or a lemon vinaigrette. Both add a nice zing that complements the sweetness of the zucchini. You can also use marinara or pesto for more flavor. For a full recipe, check out the complete details to bring this dish to life! After enjoying your grilled zucchini, store leftovers in a safe way. First, let the zucchini cool to room temperature. Then, place it in an airtight container. This keeps the zucchini fresh and tasty. Grilled zucchini lasts about 3 to 4 days in the fridge. You can enjoy it as a side dish or in salads later. To reheat grilled zucchini, use a skillet or microwave. If you use a skillet, heat it on medium. Add the zucchini and warm it for a few minutes. This method helps keep the flavor and texture nice. If you use a microwave, heat it on medium power for about 30 seconds. Check if it’s warm enough and stir if needed. Avoid overheating to keep the zucchini from getting mushy. Yes, you can prepare grilled zucchini ahead of time. To do this, grill the zucchini as directed in the full recipe. After grilling, let them cool completely. Store the zucchini in an airtight container in the fridge. They will stay fresh for about 2-3 days. When you want to serve them, just reheat them on the grill or in a pan for a few minutes. This quick reheating brings back some of that lovely charred flavor. If you don’t have balsamic glaze, you can try other sauces. A simple mix of balsamic vinegar and honey works well. Just combine 1 part vinegar with 1 part honey and warm it slightly to blend. You can also use teriyaki sauce or a lemon vinaigrette. Each option brings a unique twist to the dish. Experiment to find what suits your taste best. To keep zucchini firm, slice it evenly. Aim for ½ inch thick rounds, as this helps them cook evenly. Make sure your grill is hot before adding the zucchini. This quick sear keeps the moisture inside. Grill for about 4-5 minutes per side. Avoid overcooking, as that leads to mushy zucchini. Following these tips helps ensure you get delicious, tender, yet firm grilled zucchini every time. Grilling zucchini is simple and tasty. You learned the right ingredients and steps for success. Zucchini's different cooking methods and flavor tips add variety. Proper storage keeps leftovers fresh, while reheating maintains taste. By exploring balsamic alternatives and seasoning options, you can customize your dish. Enjoy your grilled zucchini with various sides, making every meal delightful. Remember, cooking is fun, and experimenting will only improve your skills. Dive in and make this dish your own!](https://roastedflavors.com/wp-content/uploads/2025/07/d3eba0a6-220c-4443-a32a-15239400a04f.webp)
Grilled Zucchini with Balsamic Glaze Flavorful Treat
Looking for a vibrant side dish that bursts with flavor? My Grilled Zucchini with Balsamic Glaze is perfect for you! With simple ingredients and easy
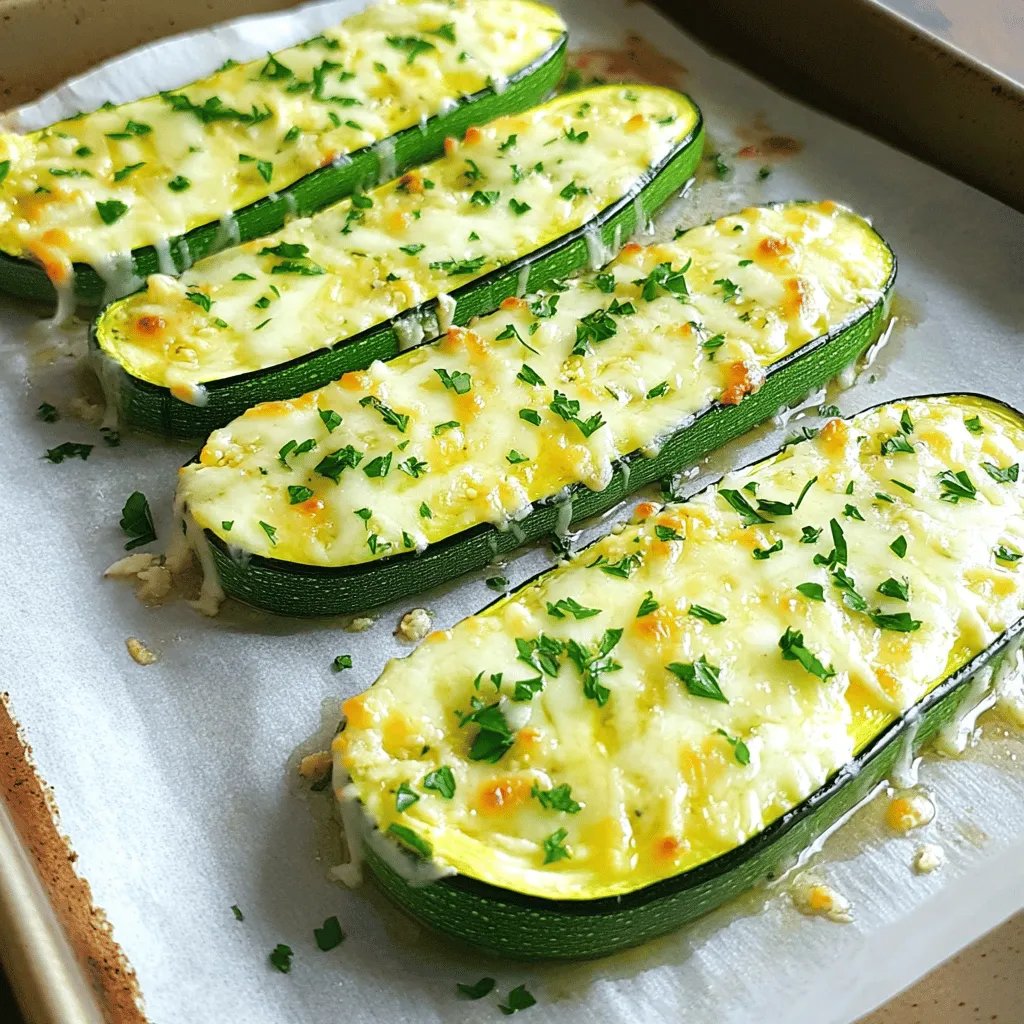
Cheesy Garlic Zucchini Steaks Tasty and Simple Recipe
If you’re looking for a fun and tasty dish, cheesy garlic zucchini steaks are here to impress! This simple recipe brings bold flavors right to
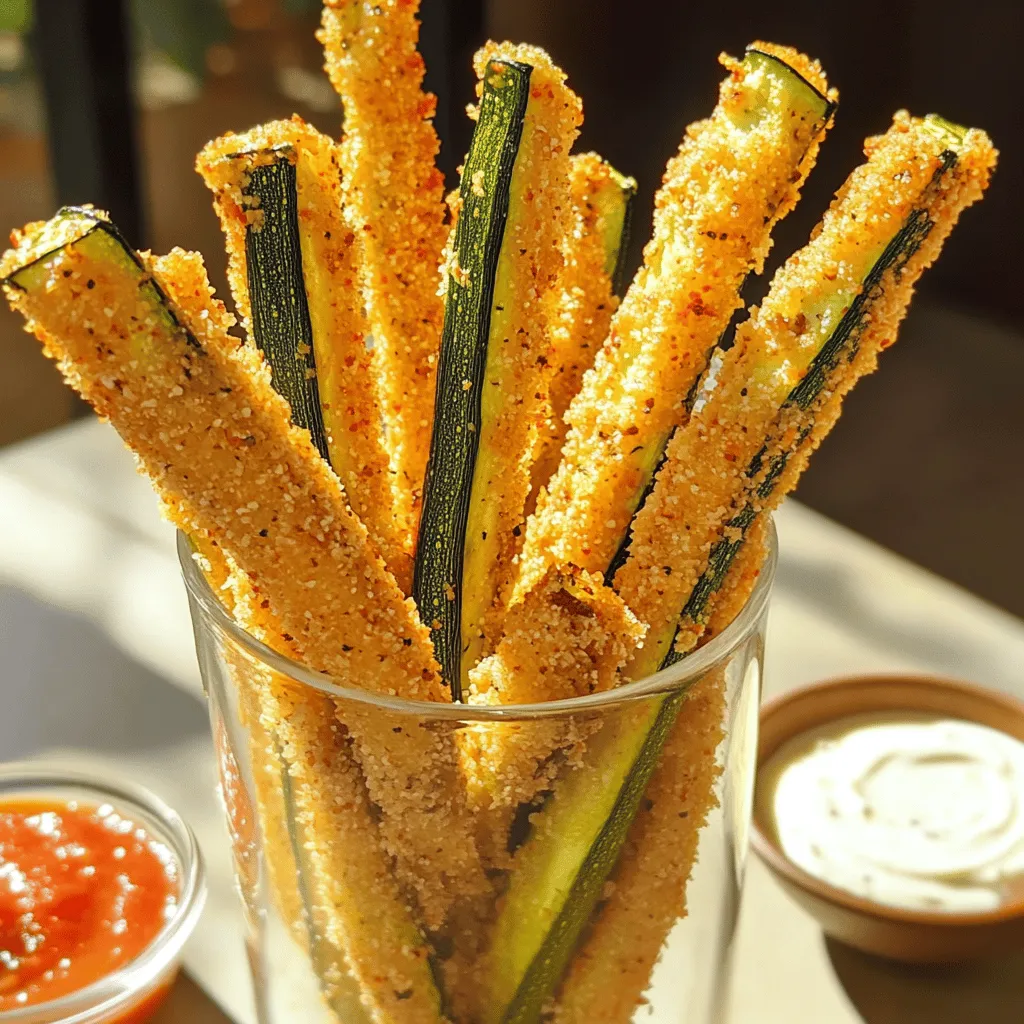
Baked Zucchini Fries Crispy and Flavorful Snack
Looking for a snack that’s both crunchy and tasty? I’ve got the perfect solution: Baked Zucchini Fries! These fries are easy to make and full
. You’ve learned how to make cheesy garlic zucchini steaks, from ingredient choices to baking techniques. Remember to prep your zucchini well and be mindful of cooking times. Enjoy trying various cheese and veggie combos for added flavor. Store leftovers properly to keep them tasty. With these tips and tricks, you’ll avoid common mistakes and impress everyone with your dish. Embrace the fun in cooking and enjoy every bite. Happy cooking!](https://roastedflavors.com/wp-content/uploads/2025/07/32ba849c-0f9b-4da3-8feb-ca2cbfa22762.webp)
Cheesy Garlic Zucchini Steaks Flavorful and Easy Recipe
Are you ready to elevate your veggie game with a dish that’s both tasty and simple? Cheesy Garlic Zucchini Steaks deliver rich flavor and satisfying