Appetizers
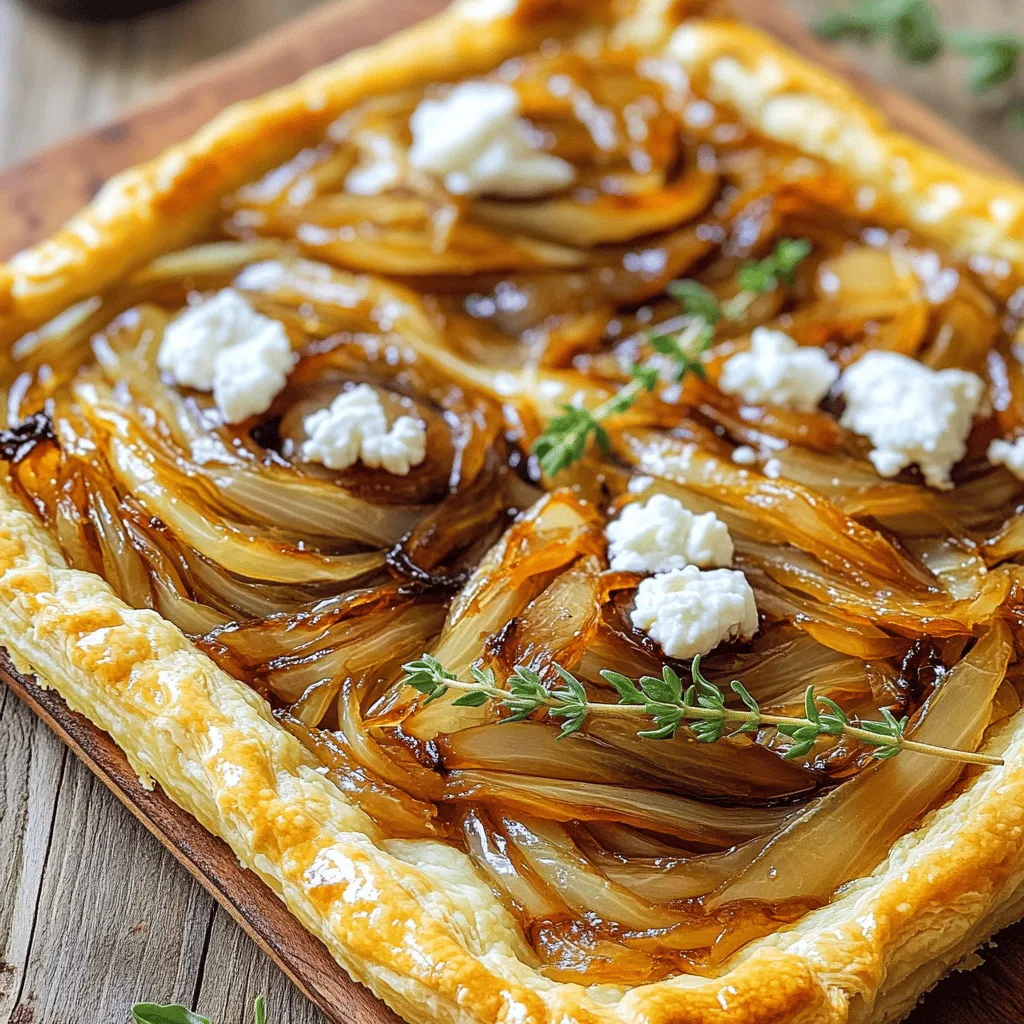
Caramelized Onion Tart Simple Flavorful Delight
If you crave a dish that’s both rich in flavor and easy to make, you’ll love my Caramelized Onion Tart! This simple recipe combines sweet
![- 1 can (8 oz) refrigerated crescent roll dough - 1 cup lump crab meat, drained and flaked - 1 cup cream cheese, softened - 1/2 cup shredded sharp cheddar cheese - 1/4 cup green onions, finely chopped - 1 tablespoon freshly squeezed lemon juice - 1 teaspoon garlic powder - 1/2 teaspoon Old Bay seasoning (optional) - Salt and pepper to taste - 1 egg, beaten (for egg wash) To make Crab & Cheese Stuffed Crescent Puffs, you need simple yet delicious ingredients. The star is the lump crab meat. It brings a sweet and ocean-fresh taste. The cream cheese gives a creamy texture that balances the dish. Sharp cheddar adds a nice kick, while green onions bring a bit of crunch and flavor. You might wonder about the Old Bay seasoning. It adds a hint of spice and depth. Feel free to skip it if you prefer. The lemon juice brightens the filling, making every bite refreshing. - Spices to enhance taste - Alternative cheeses (e.g., mozzarella) You can play with spices if you want. Try adding cayenne for heat or dill for a fresh taste. If you love cheese, swap in mozzarella for a gooey texture. - Baking sheet - Parchment paper - Mixing bowl - Pastry brush Using the right tools makes cooking easier. A baking sheet lined with parchment paper helps with clean-up. A mixing bowl is essential for blending the filling. Don’t forget a pastry brush for that golden egg wash! This recipe is all about making cooking fun and easy. Check the Full Recipe for more details on how to put it all together. - Preheat the oven to 375°F (190°C). - Unroll the crescent roll dough. Separate it into triangles along the pre-scored lines. - In a bowl, combine the crab meat, cream cheese, cheddar cheese, green onions, lemon juice, garlic powder, and Old Bay seasoning (if using). - Mix gently until well blended. This helps all the flavors come together. - Place a generous 1-2 tablespoons of the filling on the wide end of each triangle. - Roll the dough from the wide end to the tip. Pinch the edges firmly to seal the filling inside. - Arrange the stuffed puffs on a baking sheet lined with parchment paper. - Brush the tops with the beaten egg to give them a nice golden color. - Bake for 12-15 minutes until puffed and golden brown. You can find the full recipe in the previous section. Enjoy your cooking journey! To achieve the best texture, focus on the dough. Use fresh crescent roll dough for fluffy puffs. Roll the dough gently around the filling. This keeps air inside, making them light and airy. Make sure to pinch the edges tightly. This prevents any filling from leaking out during baking. Use a small amount of filling; too much can cause spills. Garnishing ideas can elevate your dish. A sprinkle of fresh parsley adds color and freshness. You can also use chives or dill for a twist. Pair these puffs with tasty dipping sauces. Cocktail sauce offers a nice tang. Lemon aioli brings a creamy, zesty flavor that complements the puffs well. Ovens can vary, so check your puffs as they bake. If your oven runs hot, reduce the bake time slightly. For even cooking, rotate the baking sheet halfway through. This helps all sides cook perfectly. If you use multiple trays, bake them one at a time for the best results. Follow the Full Recipe for step-by-step guidance. {{image_4}} You can switch up the main protein in these puffs. For a tasty twist, use shrimp or cooked chicken instead of crab. Both will bring their unique flavors while still being creamy and delicious. If you want a meat-free option, try a filling made of spinach and feta. This mix gives you a fresh taste and a nice texture, making it a great choice for vegetarians. Cheese is key to making these puffs creamy and rich. While cream cheese is a classic choice, feel free to explore other options. You can mix in mozzarella for a milder flavor or even pepper jack for a bit of spice. Combining different cheeses can create a new taste every time. If you need a dairy-free option, use a cream cheese alternative made from nuts. It still gives that creamy texture without the dairy. Want to kick up the heat? You can add spicy seasonings to the filling. Things like cayenne pepper or chili powder can make a big difference. If you love heat, consider adding jalapeños or a splash of hot sauce. This will give your puffs a spicy flair that many will enjoy. Adjust the spice to match your taste; it’s all about what you like! For the full recipe, check out the Crab & Cheese Stuffed Crescent Puffs. Store leftover puffs in the fridge. Place them in an airtight container. This helps keep them fresh. You can also wrap them in plastic wrap. Make sure to seal it well. This prevents air from getting in. Leftover puffs taste best within three days. You can freeze the puffs before baking. To do this, assemble the puffs and place them on a baking sheet. Freeze them for about an hour. Once frozen, transfer them to a freezer bag. Seal the bag tightly and label it. You can also freeze baked puffs. Let them cool, then place in a container. Use the same method as above. When you are ready to eat, reheat them in the oven at 350°F (175°C) for about 10-15 minutes. In the fridge, the puffs last about three days. If you freeze them, they can last up to three months. Check for signs of spoilage before eating. Look for strange smells or changes in color. If the puffs feel sticky or slimy, it’s best to throw them away. Proper storage keeps your crab & cheese stuffed crescent puffs tasting great. Look for a golden brown color on top. The puffs should be puffy and firm. If they are still pale, give them a couple more minutes. You can also check the bottom; it should be slightly crispy. Yes, you can make the filling a day in advance. Just store it in the fridge in a sealed container. When ready to use, let it sit at room temperature for a bit before filling the dough. This helps it spread easily in the puffs. There are many fun ways to use leftover filling. You can spread it on crackers for a snack. Try mixing it with pasta for a creamy dish. You can even use it in a sandwich or wrap for a tasty lunch. Absolutely! You can use puff pastry for a flakier texture. Phyllo dough is another option for a lighter bite. Just keep in mind that baking times may change, so watch them closely. Check the [Full Recipe] for more details. You learned how to make delicious Crab & Cheese Stuffed Crescent Puffs. We covered the ingredients needed, step-by-step instructions, and tips for perfecting your dish. Don’t forget that you can switch up ingredients for different flavors or save leftovers. Enjoy making these tasty bites for any occasion. Your family and friends will love them, and you’ll feel proud of your cooking skills. Try these today and savor every bite!](https://roastedflavors.com/wp-content/uploads/2025/05/d12e035c-e3c5-4eb8-b982-da78c05bb876.webp)
Crab & Cheese Stuffed Crescent Puffs Savory Delight
Are you ready to impress your guests with a mouthwatering appetizer? Crab & Cheese Stuffed Crescent Puffs are a quick, easy, and delicious choice. With

Spinach and Feta Puff Pastry Twists Quick Delight
Craving a tasty snack that’s easy to make? You’ll love my Spinach and Feta Puff Pastry Twists. This quick delight combines flaky pastry with savory
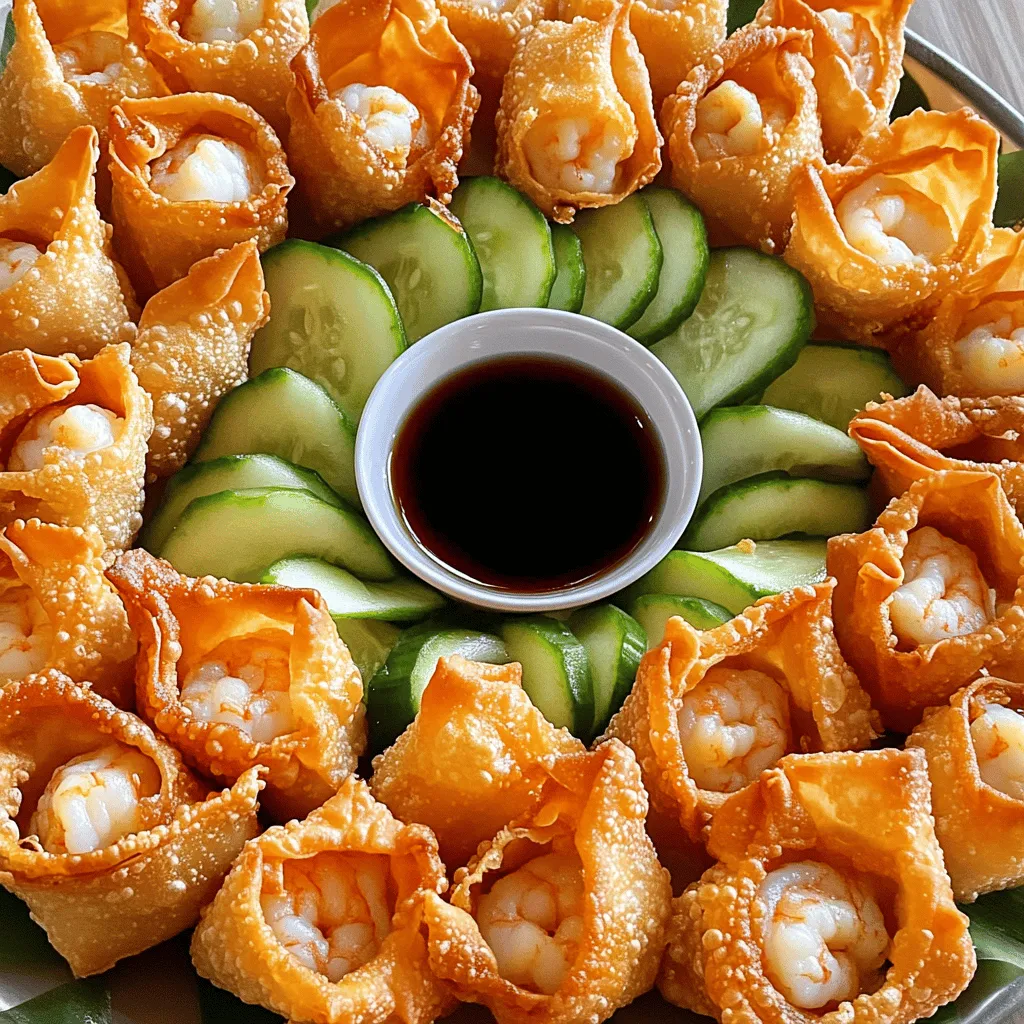
Easy Shrimp Rangoon Crispy and Flavorful Snack
Love crispy snacks that burst with flavor? You’re in for a treat with my Easy Shrimp Rangoon recipe! This quick guide will walk you through
![You need 1 pound of fresh asparagus. Look for bright green spears that feel firm to the touch. Trim the ends to remove any tough parts. This ensures tenderness and better bite. Asiago cheese is key for this recipe. Use 1 cup of shredded Asiago cheese for a rich flavor. Its nutty taste pairs well with the asparagus. You can find it in most grocery stores. Here are the rest of the ingredients you will need: - 1 cup breadcrumbs (preferably panko for extra crunch) - 2 large eggs, beaten well - 1/2 cup all-purpose flour - 1 teaspoon garlic powder - 1 teaspoon paprika - Salt and freshly ground black pepper, to taste - Olive oil spray for a light crisp This list covers everything for your crispy asparagus asiago spears. Check out the Full Recipe for detailed steps on how to prepare this tasty dish. First, preheat your oven to 425°F (220°C). This high heat will help our asparagus turn crispy. While the oven warms up, line a baking sheet with parchment paper. This will keep the spears from sticking and make cleaning easy later. Next, set up your breading station with three shallow dishes. In the first dish, add 1/2 cup of all-purpose flour. The flour helps the coating stick. In the second dish, beat two large eggs until well mixed. This will be our binding agent. In the last dish, combine 1 cup of breadcrumbs, 1 cup of shredded Asiago cheese, 1 teaspoon of garlic powder, 1 teaspoon of paprika, salt, and pepper. Mix these well to blend the flavors. Now take each asparagus spear and coat it in the flour. Shake off any extra flour. This step makes sure we don’t have too much. After that, dip the floured spear into the beaten eggs. Let any extra egg drip off gently. This step is key for a good coating. Lastly, roll the spear in the breadcrumb mixture. Press down lightly to make sure it sticks well on all sides. Place the breaded asparagus on the lined baking sheet in a single layer. Make sure they have space between them. This helps them crisp up nicely. Lightly spray the spears with olive oil. This gives them a golden color and extra crunch. Bake them in the preheated oven for 15 to 20 minutes. Flip them halfway to ensure even cooking. When they are golden brown and crispy, they are ready! Let them cool for a few minutes before serving warm. Enjoy the crunch and flavor of your crispy asparagus Asiago spears, a perfect addition to your next meal. For the full recipe, refer to the earlier section. To make your asparagus really crispy, use panko breadcrumbs. They create a light and airy texture. Make sure to spray the spears with olive oil before baking. This small step adds a nice crunch. Bake them at a high heat of 425°F (220°C). This helps the moisture escape quickly. Flip the spears halfway through baking for even crispiness. Serve these crispy asparagus spears right away for the best taste. They make a great appetizer or side dish. Pair them with a dipping sauce like ranch or garlic aioli. You can also sprinkle some extra Asiago cheese on top for more flavor. For a fun twist, serve them alongside a refreshing salad. This adds color and variety to your meal. One common mistake is overcrowding the baking sheet. Leave space between each spear so they crisp up well. Another mistake is not shaking off excess flour. This can make the coating too thick. Make sure to let the baked spears cool for a few minutes before serving. This helps them stay crispy longer. For more detailed steps, check the Full Recipe. {{image_4}} You can change the flavor with herbs or spices. Try adding dried oregano or thyme to the breadcrumb mix. Fresh herbs like basil or parsley also add a nice touch. A pinch of red pepper flakes can give a spicy kick. Experiment and find your favorite blend that suits your taste! If you need a gluten-free option, don’t worry! You can swap the flour and breadcrumbs for gluten-free versions. Use almond flour or gluten-free all-purpose flour in place of regular flour. For the breadcrumbs, try crushed gluten-free crackers or cornmeal. Your crispy asparagus will still shine with these swaps! Though Asiago cheese is tasty, you can use other cheeses too. Parmesan gives a similar flavor and crispiness. If you want a milder taste, mozzarella works well too. For a vegan option, try nutritional yeast. It adds a cheesy flavor without dairy. Choose what you love, and enjoy your crispy asparagus! For the full recipe, visit the [Full Recipe]. After making crispy asparagus Asiago spears, let them cool. Place them in an airtight container. This keeps moisture out and maintains crispiness. Store them in the fridge for up to three days. If they start to get soggy, you can re-crisp them by reheating. You can freeze crispy asparagus if you want to save some for later. First, let them cool completely. Arrange them in a single layer on a baking sheet. Freeze them for about an hour until solid. Then, transfer them to a freezer-safe bag. They can last up to three months in the freezer. When you're ready to eat, you can bake them from frozen. To reheat your asparagus spears, use the oven for the best results. Preheat your oven to 400°F (200°C). Place the spears on a baking sheet lined with parchment paper. Bake for about 10 minutes or until they are crispy again. You can also use an air fryer for a faster option. This way, you’ll enjoy that same great crunch as when they were fresh. To store leftover crispy asparagus, first let it cool completely. Then, place it in an airtight container. Keep it in the fridge for up to three days. Reheating in the oven helps to retain its crispiness. Use a low temperature to warm it without losing texture. Yes, you can use other cheeses. Parmesan cheese works well and gives a sharp flavor. Cheddar can also add a nice twist. Just remember that different cheeses may change the taste slightly. Experiment with your favorites to find the perfect match. To lower the calories, reduce the amount of cheese. You can also use less oil spray. Instead of breadcrumbs, try using crushed nuts for a lighter option. Baking instead of frying keeps it healthy while still being delicious. In this blog post, we explored making crispy asparagus. We covered key ingredients like fresh asparagus and Asiago cheese. I shared step-by-step instructions for preparing and baking. You learned tips for extra crispiness and common mistakes to avoid. We discussed tasty variations and how to store leftovers. With these insights, you can enjoy this dish often and easily. Happy cooking!](https://roastedflavors.com/wp-content/uploads/2025/05/b3f5caf9-7b20-479d-9434-6b0f51f3e20c.webp)
Crispy Asparagus Asiago Spears for Your Next Meal
Looking to add a tasty twist to your next meal? Try my Crispy Asparagus Asiago Spears! This simple yet delicious recipe combines fresh asparagus and
![To make these tasty crab rangoon egg rolls, you'll need the following ingredients: - 1 cup cream cheese, softened to room temperature - 1 cup lump crab meat, drained and gently flaked - 2 green onions, finely chopped - 1 teaspoon garlic powder - 1 teaspoon Worcestershire sauce - 1/2 teaspoon soy sauce - 20 egg roll wrappers - Oil for frying (such as vegetable or canola oil) - Sweet and sour sauce for dipping If you don't have lump crab meat, you can use imitation crab meat. It works well and is often cheaper. You can swap cream cheese with ricotta for a lighter filling. If you want less fat, consider using low-fat cream cheese. For a bit of heat, add some sriracha to the filling. Quality crab meat makes a big difference in flavor. Look for lump crab meat from trusted brands. Fresh crab meat has a sweet taste and tender texture. Check the label for "wild-caught" for the best quality. Always avoid canned crab meat, as it can taste fishy and less fresh. For the full recipe, check out the [Full Recipe]. Start by gathering your ingredients. You need cream cheese, lump crab meat, green onions, garlic powder, Worcestershire sauce, and soy sauce. In a bowl, mix the softened cream cheese and crab meat. Stir until smooth. Next, add the chopped green onions, garlic powder, Worcestershire sauce, and soy sauce. Mix well until everything is creamy and combined. This filling makes your egg rolls rich and tasty. Now, let’s wrap the egg rolls. Take one wrapper and place it on a flat surface. Point one corner toward you. Spoon about 2 tablespoons of the crab mixture in the center. Fold the bottom corner over the filling. Then fold the left and right sides towards the center. Now, roll the wrapper away from you, tucking it in tightly. To seal, brush a little water on the edge. Repeat this with the other wrappers until you finish the filling. This technique helps keep the filling inside while frying. Next, heat oil in a deep skillet or pot. You want the oil to reach 350°F (175°C). This is the perfect temperature for frying. Carefully add a few egg rolls at a time. Don’t overcrowd the pan, or they won’t cook evenly. Fry them for about 3-4 minutes. Look for a golden brown color on all sides. Once cooked, place the egg rolls on a plate with paper towels. This helps soak up any extra oil. For the best taste, serve them hot with sweet and sour sauce. Enjoy your crunchy snack! For the full recipe, check out the details above. To make your egg rolls extra crispy, use the right oil. I recommend vegetable or canola oil. Heat the oil to 350°F (175°C) before frying. This hot oil helps create a nice crunch. Fry a few egg rolls at a time. Overcrowding the pan can lead to soggy rolls. Fry them for about 3-4 minutes, turning them often for even cooking. One common mistake is skipping the water seal. After wrapping, wet the edge of the wrapper to keep them closed. If the filling is too wet, it can leak out. Make sure your crab mixture is well-blended and not too runny. Also, avoid frying in oil that isn’t hot enough. This can make your egg rolls greasy and soft. You can enhance the flavor of your crab rangoon egg rolls in many ways. Try adding a splash of hot sauce or some fresh herbs like cilantro. You can also mix in some shredded cheese for a creamy twist. If you like a bit of crunch, add finely chopped water chestnuts. These ideas can make your egg rolls stand out. For the full recipe, check out the section above. {{image_4}} You can swap crab meat for shrimp or chicken. Both proteins work well with the creamy filling. For shrimp, use small, cooked shrimp. Chop them into little pieces before mixing. For chicken, use cooked, shredded chicken. This gives you a tasty twist on the classic crab rangoon. The flavors blend nicely with the cream cheese. If you want a veggie option, you can make egg rolls without meat. Replace crab with a mix of veggies. Try using chopped mushrooms, bell peppers, and spinach. You can add tofu for extra protein. Blend these ingredients with the cream cheese for a creamy, tasty filling. This way, everyone can enjoy these egg rolls. Enhance the flavor of your egg rolls with spices and herbs. You can add a pinch of cayenne pepper for some heat. Fresh herbs like cilantro or basil can boost the taste too. Mix these into the filling for a fresh twist. Consider adding lemon zest for a bright flavor. Experiment with different spices to find your favorite taste. For the full recipe, check out the Crab Rangoon Egg Rolls section. After making your crab rangoon egg rolls, you might have some left. To keep them fresh, place the egg rolls in an airtight container. You can store them in the fridge for up to three days. Make sure they cool down before sealing the container. This helps maintain their crispiness. When it's time to enjoy your leftovers, you want them hot and crispy. I recommend using an oven to reheat them. Preheat your oven to 375°F (190°C). Place the egg rolls on a baking sheet lined with parchment paper. Heat them for about 10-12 minutes, turning them halfway through. This way, they regain their crunch. If you want to save your egg rolls for later, freezing is a great option. Once they cool, wrap each egg roll tightly in plastic wrap. Then, place them in a freezer-safe bag or container. Make sure to remove any air to prevent freezer burn. They can last up to three months in the freezer. When you're ready to eat, you can bake them directly from frozen. Just add a few extra minutes to the cooking time for perfect results. The best sauce for crab rangoon egg rolls is sweet and sour sauce. This sauce adds a nice touch of sweetness and tanginess that complements the creamy filling. You can also serve them with soy sauce or a spicy dipping sauce if you prefer more heat. Each dip enhances the flavor of the egg rolls, making them even more enjoyable. Yes, you can bake these egg rolls. Baking is a great option if you want a lighter snack. Preheat your oven to 400°F (200°C). Brush the egg rolls with a little oil and place them on a baking sheet. Bake for 15-20 minutes, turning halfway through. This method gives you crispy egg rolls without frying, while still being tasty. These egg rolls can last in the fridge for about 3 to 4 days. Make sure to store them in an airtight container to keep them fresh. If you want to enjoy them later, consider freezing them. Just remember to reheat them well before serving for the best taste and texture. For the full recipe, check out the earlier section! This blog post covered everything you need to make crab rangoon egg rolls. We discussed the right ingredients, how to prepare the filling, and tips for a crispy finish. I shared methods for storage and reheating too. Whether you want to substitute proteins or add extra flavor, you have options. Enjoy experimenting with these tasty treats! You now have the tools to create delicious egg rolls at home. Dive in and start cooking!](https://roastedflavors.com/wp-content/uploads/2025/05/4fc5dfa8-5211-4a0a-9148-5ec5f6198575.webp)
Easy Crab Rangoon Egg Rolls Crispy and Tasty Snack
If you’re craving a crunchy, creamy snack, you’re in the right place! Today, I’m sharing my easy recipe for Crab Rangoon Egg Rolls. With a
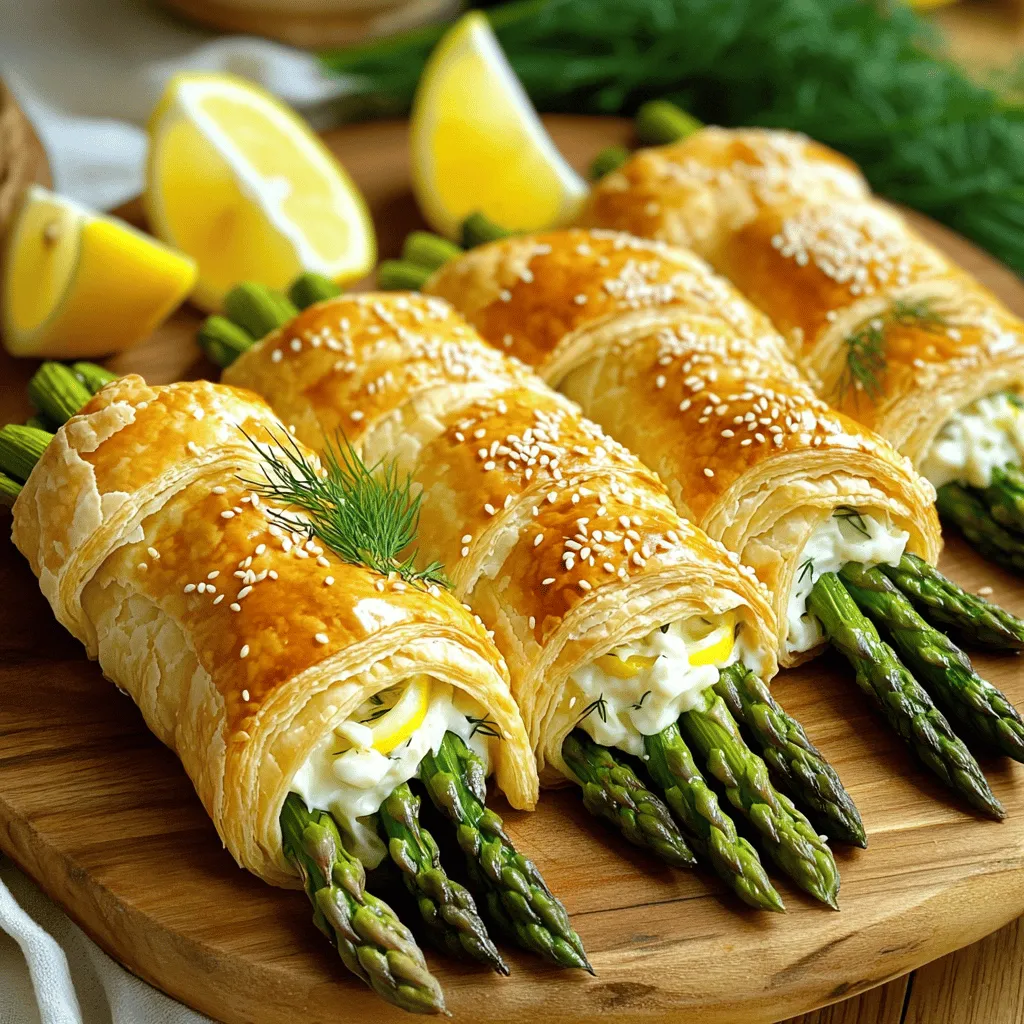
Asparagus Puff Pastry Bundles Tasty and Easy Recipe
If you crave a quick and delicious dish, you’ll love these Asparagus Puff Pastry Bundles. This easy recipe combines fresh asparagus with flaky pastry for

Bite-Sized Blooming Onions Crunchy and Flavorful Treat
If you love crunchy and flavorful snacks, you’ll want to dive into my Bite-Sized Blooming Onions recipe. These tasty treats are perfect for sharing or
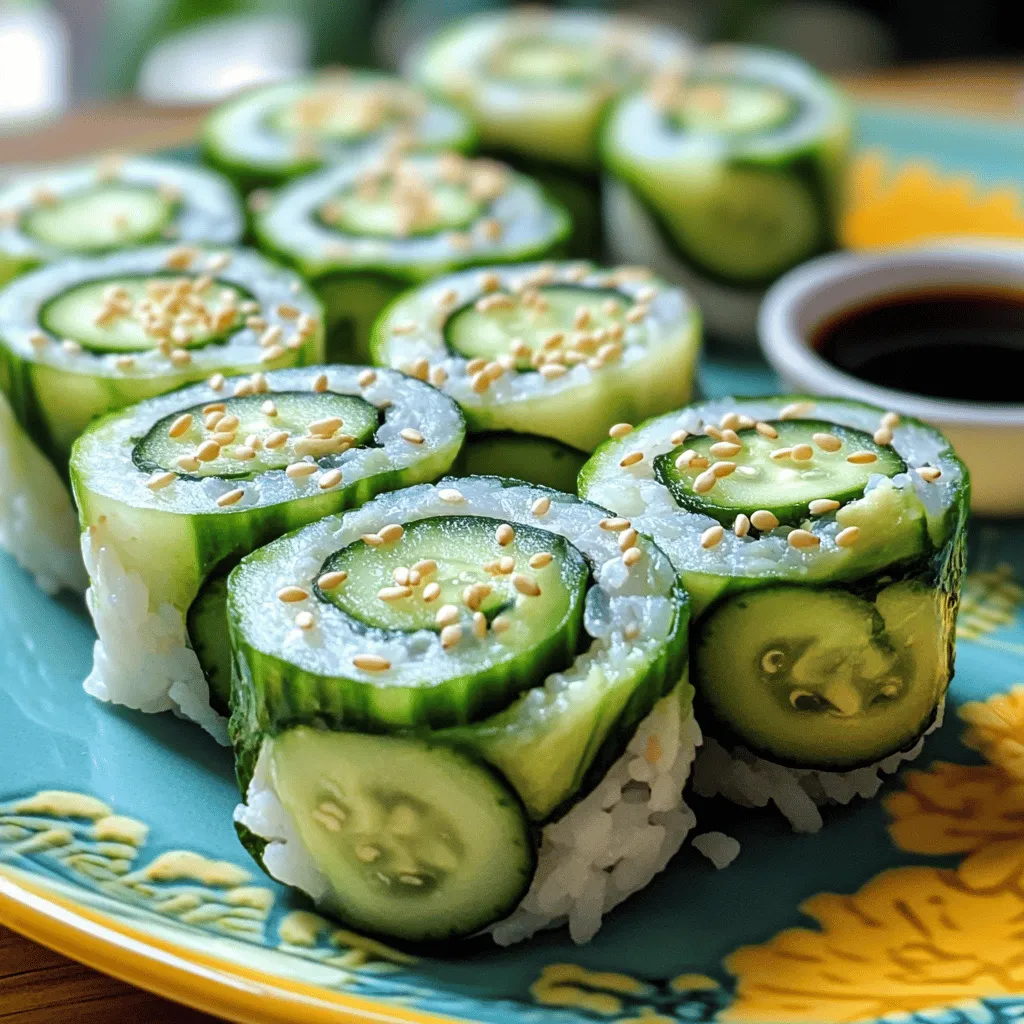
Cucumber Avocado Sushi Rolls Fresh and Flavorful Treat
Satisfy your taste buds with my Cucumber Avocado Sushi Rolls! This fresh and flavorful treat is easy to make and perfect for any meal. With

Spinach Artichoke Dip Stuffed Peppers Flavorful Treat
If you’re craving a fun, tasty twist on a classic, try Spinach Artichoke Dip Stuffed Peppers! This flavorful treat is not only easy to make