
Are you ready to impress your friends and family with a treat that’s both simple and delicious? In this recipe, I’ll guide you through making cannoli with creamy mascarpone filling. You’ll love the crispy shells filled with rich cream! With easy steps and common ingredients, you can make a dessert that shines at any gathering. Let’s dive in and create this delightful Italian classic together!
Ingredients
Main Ingredients for Cannoli Shells
To make the perfect cannoli shells, you need simple ingredients. Here’s what you’ll need:
– 1 cup all-purpose flour
– 2 tablespoons unsweetened cocoa powder
– 1 tablespoon granulated sugar
– 1/4 teaspoon sea salt
– 3 tablespoons unsalted butter, softened
– 1 large egg yolk
– 1/4 cup cold water
– Vegetable oil for frying
These ingredients create a crispy, delicious shell that holds the filling perfectly.
Filling Ingredients (Mascarpone & Ricotta)
The filling makes cannoli truly special. For the creamy filling, gather these items:
– 1 cup mascarpone cheese
– 1/2 cup ricotta cheese, well-drained
– 1/4 cup powdered sugar
– 1 teaspoon pure vanilla extract
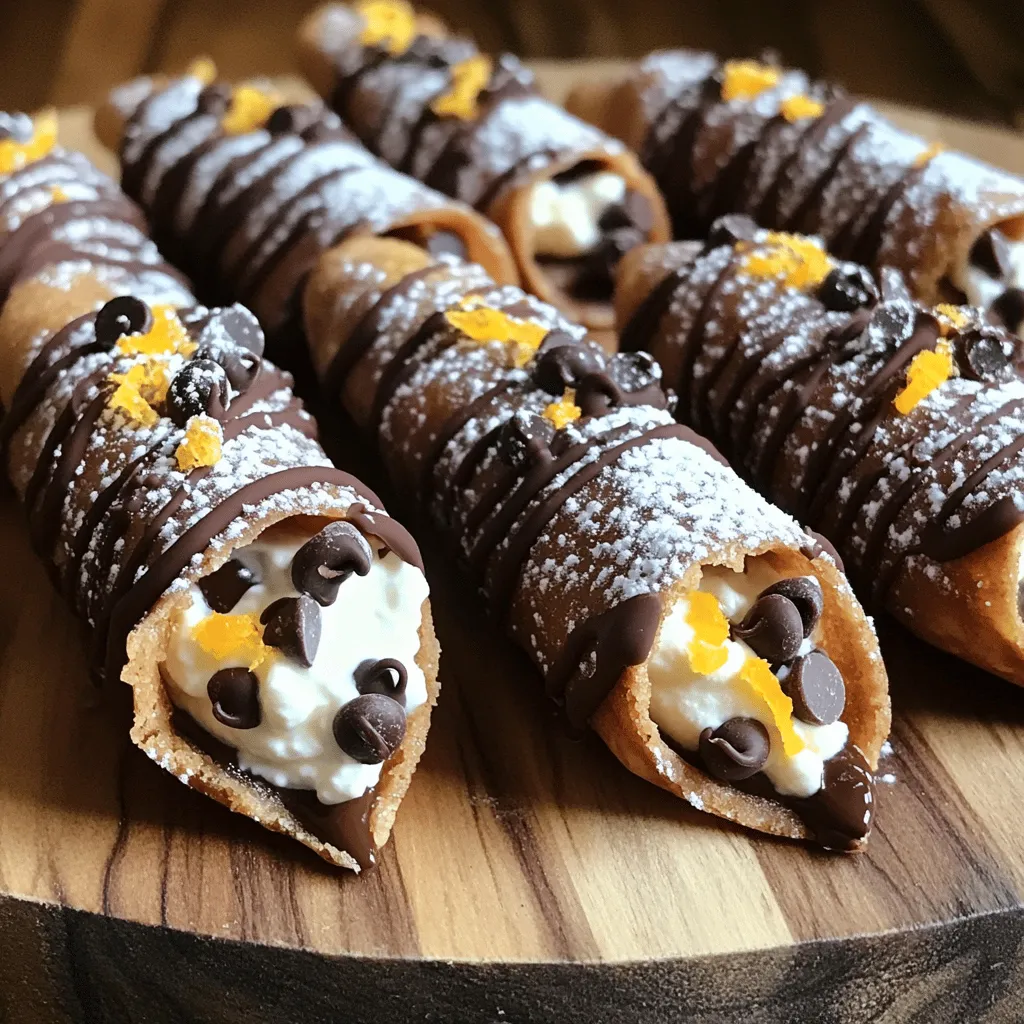
– 1/4 cup mini chocolate chips
– Zest of 1 orange
The blend of mascarpone and ricotta gives a rich and smooth texture. The orange zest adds a fresh twist.
Optional Garnishes and Toppings
To make your cannoli shine, consider these garnishes:
– Extra powdered sugar for dusting
– Fresh orange zest for a pop of color
– Mint leaves for a fresh touch
– Melted dark chocolate drizzle
These little touches enhance not just the look but the taste too. They make your cannoli even more inviting. You can find the full recipe to guide you through each step.
Step-by-Step Instructions
Preparing the Dough and Resting Time
First, you need to make the dough. In a big bowl, whisk together the flour, cocoa powder, sugar, and salt. Then, add the softened butter. Mix it with your fingers until it looks like crumbs. In a small bowl, combine the egg yolk and cold water. Gradually add this to the flour mix. Knead the dough until it’s smooth. Now, wrap it in plastic and put it in the fridge for about 30 minutes. This resting time helps the dough become easier to roll.
Rolling and Cutting the Cannoli Shells
After the dough rests, it’s time to roll it out. On a floured surface, roll the dough until it is 1/8 inch thick. Next, use a round cutter to make circles about 4 inches wide. Gather any leftover dough, re-roll it, and cut more circles. This process is fun and makes sure you have enough shells for your filling.
Frying the Cannoli Shells to Perfection
Now, you will fry the shells. Heat vegetable oil in a deep pan to 350°F (175°C). Take a dough circle and wrap it around a metal cannoli mold, overlapping the edges slightly. Use a bit of water on the seam to seal it. Gently lower the wrapped shells into the hot oil using a slotted spoon. Fry them for about 2-3 minutes until they turn golden brown. Once done, remove them and let them drain on paper towels. Carefully slide the shells off the molds while they are warm.
Making the Mascarpone Filling
For the filling, grab a medium bowl. Combine the mascarpone cheese, ricotta cheese, powdered sugar, vanilla extract, and orange zest. Add the mini chocolate chips for extra flavor. Use a hand mixer or spatula to blend until it is creamy and smooth. This filling is rich and delicious, making your cannoli special.
Assembling and Filling the Cannoli
When the shells are cool, it’s time to fill them. Take a piping bag fitted with a large round tip and fill it with the mascarpone mixture. Pipe the filling into each shell from both ends until they are fully stuffed. This makes each bite a delightful surprise. Finally, dust the filled cannoli with powdered sugar to add sweetness and a beautiful touch. Enjoy your delicious creation! For the full recipe, check out Decadent Cannoli Delights.
Tips & Tricks
Ensuring Crispy Cannoli Shells
To get crispy cannoli shells, use cold water in your dough. This helps the shells fry up nice and crunchy. Roll your dough thin, about 1/8 inch. Thicker dough can lead to chewy shells. Fry them in hot oil at 350°F (175°C) to achieve that perfect golden color. Fry in small batches so they cook evenly. Once fried, let them cool completely before filling.
Avoiding Common Mistakes
A common mistake is sealing the shells poorly. Make sure to press the edges firmly when wrapping the dough around the molds. Use water or egg wash to help seal them tight. If you don’t, they may pop open during frying. Also, avoid overfilling the cannoli. If you pack too much filling in, it can ooze out. Fill them just to the edge for the best results.
Presentation Tips for Serving
For a stunning presentation, arrange your filled cannoli on a nice platter. A sprinkle of powdered sugar adds a sweet touch. You can drizzle melted chocolate over them for an extra flair. A sprinkle of orange zest or small mint leaves can give your dish a bright pop of color. These simple steps will make your cannoli look as good as they taste.
Variations
Chocolate-Dipped Cannoli
You can make chocolate-dipped cannoli for a fun twist. After you fill the shells, melt some dark chocolate. Dip one end of each cannoli into the chocolate. Let the chocolate set on wax paper. This adds a rich flavor and extra sweetness.
Different Flavor Fillings
You can switch up the filling to keep things exciting. Try adding lemon zest for a bright taste. For a coffee flavor, mix in espresso powder. If you like fruit, consider blending in pureed strawberries or raspberries. Each flavor gives a new spin to this classic treat.
Vegan or Dairy-Free Options
For vegan or dairy-free cannoli, use coconut cream instead of mascarpone. Replace ricotta with blended tofu or cashews. Use maple syrup for sweetness. These changes keep the taste rich while making it suitable for different diets. Enjoy delicious cannoli that everyone can savor!
For the full recipe, check out the complete guide above.
Storage Info
How to Store Unfilled Cannoli Shells
Store unfilled cannoli shells in an airtight container. Keep them at room temperature. They will stay fresh for about three days. If you want to keep them longer, you can freeze them. Wrap each shell in plastic wrap, then place them in a freezer-safe bag. They can last up to two months in the freezer.
Storing Filled Cannoli
Filled cannoli taste best when eaten fresh. If you have leftovers, place them in the fridge. Use an airtight container to keep them fresh. They will stay good for about one day. However, the shells may soften over time due to the filling.
Best Practices for Freshness
To keep your cannoli tasting great, fill them right before serving. If you need to prepare ahead, store the shells and filling separately. Only combine them when you’re ready to eat. This way, you ensure a crispy shell with creamy filling. Dust with powdered sugar just before serving for the best look and taste.
FAQs
What can I use instead of mascarpone cheese?
You can use cream cheese as a substitute for mascarpone. Cream cheese has a thicker texture. Mix it with a bit of heavy cream to make it smoother. This blend gives you a creamy filling that tastes good.
How do I know when the oil is hot enough for frying?
To check if the oil is hot, drop a small piece of dough into the oil. If it sizzles and bubbles, the oil is ready. You can also use a thermometer. Aim for 350°F (175°C) for perfect frying.
Can I make cannoli shells in advance?
Yes, you can make cannoli shells ahead of time. After frying, let them cool completely. Store them in an airtight container at room temperature. They will stay fresh for a few days, ready for filling.
Are cannoli best served fresh or can they be made ahead?
Cannoli taste best when served fresh. If you make them ahead, fill them just before serving. This keeps the shells crispy and the filling fresh. Filled cannoli can get soggy if left too long.
How do I prevent the filling from leaking out?
To avoid leaks, make sure your shells are sealed well before frying. After frying, let them cool completely. Fill them only right before serving, and pipe the filling from both ends to ensure even distribution.
You now have the tools to create your own delicious cannoli. We covered the key ingredients for the shells and filling. The step-by-step guide helps you fry and assemble them perfectly. I shared tips on making them crispy and avoiding common mistakes. Don’t forget the fun variations and how to store them properly. Whether you enjoy classics or try new ideas, making cannoli can be easy and fun. Embrace your creativity, and enjoy every bite of your tasty treats.
Cannoli with Mascarpone Filling
Delicious Italian pastries filled with a creamy mascarpone and ricotta filling, perfect for dessert.
Ingredients
Instructions
- 1
Prepare the dough: In a large mixing bowl, whisk together the flour, cocoa powder, granulated sugar, and sea salt. Add the softened butter and blend using a pastry cutter or your fingers until the mixture resembles coarse crumbs. In a separate small bowl, combine the egg yolk and cold water. Gradually add this liquid to the flour mixture, kneading until a smooth dough forms. Wrap the dough in plastic wrap and refrigerate for about 30 minutes to allow it to rest and firm up.
- 2
Roll out the dough: On a lightly floured surface, roll the rested dough to a thickness of about 1/8 inch. Use a circular cutter, approximately 4 inches in diameter, to cut out circles from the dough. Gather any scraps, re-roll, and cut additional circles as needed.
- 3
Wrap the cannoli molds: Carefully roll each dough circle around a metal cannoli form, slightly overlapping the edges. Use a dab of water or egg wash on the seam to seal them securely, pressing the edges firmly to prevent them from opening during frying.
- 4
Fry the shells: In a deep frying pan or pot, heat vegetable oil to 350°F (175°C). Gently lower the wrapped cannoli shells into the hot oil using a slotted spoon. Fry them in batches for about 2-3 minutes or until they are golden brown and crisp all over. Once done, remove them with the spoon and place on paper towels to drain excess oil. Carefully slide the warm shells off the molds.
- 5
Make the filling: In a medium-sized bowl, combine the mascarpone cheese, ricotta cheese, powdered sugar, vanilla extract, orange zest, and mini chocolate chips. Using a hand mixer or a spatula, blend until the mixture is smooth and creamy, ensuring all ingredients are well incorporated.
- 6
Fill the cannoli: Once the fried shells are completely cooled to room temperature, fill a piping bag fitted with a large round tip with the mascarpone filling. Pipe the filling generously into each cannoli shell from both ends until they are fully stuffed.
- 7
Dust and serve: Before serving, lightly dust the filled cannoli with additional powdered sugar for a touch of sweetness and a beautiful presentation.
Chef's Notes
For a touch of sophistication, drizzle melted dark chocolate over the filled cannoli and garnish with fresh orange zest and mint leaves.


Recipe Creator
Remy
I’m Chef Remy, your recipe companion, here to bring warmth, bold taste, and simplicity to your kitchen.
View My Recipes