Skip to content
Roasted Flavors
  • Home
  • Appetizers
  • Desserts
  • Salads
  • Breakfast
  • Dinner
  • Privacy Policy
  • Contact
  • About

Chef Remy

Enchilada Pasta Flavorful Dish for Any Occasion

June 9, 2025 by Chef Remy
To make the perfect enchilada pasta, you need these key ingredients: - 8 oz pasta (penne or fusilli) - 1 tablespoon olive oil - 1 medium onion, diced - 2 cloves garlic, minced - 1 bell pepper (any color), chopped - 1 can (15 oz) black beans, drained and rinsed - 1 can (15 oz) diced tomatoes with green chilies - 1 cup corn kernels (fresh or frozen) - 1 tablespoon chili powder - 1 teaspoon cumin - 1 teaspoon smoked paprika - Salt and pepper to taste - 1 cup shredded cheddar cheese - 1 cup sour cream - Fresh cilantro for garnish These ingredients come together to create a dish that’s rich and satisfying. The black beans add protein, while the corn brings sweetness. The spices give it a warm kick. You can make this dish your own. Here are some optional ingredients to try: - Cooked chicken or ground beef for added protein - Avocado slices for creaminess - Jalapeños for heat - Lime juice for a zesty touch - Other cheeses like Monterey Jack or pepper jack Feel free to mix and match these options. They can change the flavor and texture of the dish. When picking your fresh ingredients, look for these tips: - Onions: Choose firm onions with dry, papery skins. Avoid any with soft spots. - Bell Peppers: Look for bright colors and a firm feel. They should be free from wrinkles. - Garlic: Pick bulbs that are plump and tight. Avoid any that feel soft or sprouted. - Corn: If using fresh corn, select ears with bright green husks. The kernels should be plump and milky when pierced. Using fresh ingredients will enhance the flavor of your enchilada pasta. Good produce makes all the difference! For the full recipe, check out the Enchilada Pasta Delight. Start by boiling water in a big pot. Add a pinch of salt to the water. Once it boils, drop in 8 ounces of pasta. I like penne or fusilli. Cook until it is al dente, about 8-10 minutes. Check the box for exact times. When done, drain the pasta and set it aside in a large bowl. In a large skillet, heat 1 tablespoon of olive oil over medium heat. Add 1 diced onion. Cook it for 3-4 minutes until it turns soft and clear. Next, add 2 minced garlic cloves and 1 chopped bell pepper. Stir and cook for another 2-3 minutes until the bell pepper is tender. Now, it’s time to mix in the fun stuff! Add 1 can of black beans, 1 can of diced tomatoes, and 1 cup of corn. Sprinkle in 1 tablespoon of chili powder, 1 teaspoon of cumin, and 1 teaspoon of smoked paprika. Season with salt and pepper. Stir well and let it simmer for 5 minutes. Then, gently fold in the cooked pasta. Sprinkle 1 cup of shredded cheddar cheese on top. Cover the skillet for 2-3 minutes to melt the cheese. Once the cheese is melted, remove from heat. Fold in half of 1 cup of sour cream for creaminess. Serve the enchilada pasta in bowls. Add a dollop of the remaining sour cream and some fresh cilantro on top. This adds color and flavor. You can even serve it in colorful bowls for a fun look. To avoid overcooking pasta, check it often. Cook it until it's al dente, which means it still has a little bite. Follow the package instructions for timing. Keep a close eye on it, especially in the last minute. Drain the pasta right away. Rinse it briefly with cool water to stop the cooking. This helps keep it perfect for your enchilada pasta. Spices are key to making enchilada pasta pop. Start with chili powder for heat and flavor. Cumin adds a warm, earthy taste. Smoked paprika gives it a nice smoky touch. You can also add garlic powder for extra depth. Feel free to adjust the spice levels to suit your taste. Mix and match spices to find your favorite blend. A dash of lime juice at the end brightens the dish even more. For a great melt, choose shredded cheddar cheese. It melts smoothly and has a rich flavor. You can also try Monterey Jack or a Mexican blend for a different taste. Grate your cheese fresh for the best melt. Avoid pre-shredded cheese if you can; it often has additives that prevent melting. Mix different cheeses for a unique flavor profile. A gooey, cheesy top will make your enchilada pasta shine. For the full recipe, check the recipe card above. {{image_4}} You can enjoy enchilada pasta in many ways. For a vegetarian dish, skip the meat. Use more beans or add lentils for protein. You can also add extra veggies like zucchini or mushrooms. If you love meat, try chicken, beef, or turkey. Cook the meat first, then mix it into the sauce. Both options are tasty and filling. If you want a kick, add spicy elements. You could use jalapeños or diced green chiles. Another great choice is to sprinkle in cayenne pepper or hot sauce. This adds heat and depth to the flavor. Adjust the spice level to fit your taste. Mix and match to find your perfect heat. If you need gluten-free options, many pastas are available. Look for pasta made from rice, quinoa, or chickpeas. These options work well in the recipe. Just make sure to cook them according to the package. You still get a delicious meal without gluten. It's all about finding what works for you. For the full recipe, check out the [Full Recipe]. To store leftover enchilada pasta, let it cool first. Place it in an airtight container. Make sure to seal it well to keep the flavor fresh. Store it in the fridge. It should last for up to three days. When you are ready to eat, just reheat it. If you want to freeze enchilada pasta, use a freezer-safe container. Portion it into smaller servings for easy meals later. You can freeze it for up to two months. When freezing, leave some space at the top. The pasta will expand as it freezes. To reheat enchilada pasta, you have a few options. You can use the microwave or stovetop. If using the microwave, cover the dish with a damp paper towel. Heat it in short bursts, stirring in between. If using the stovetop, heat over low heat and add a splash of water. This keeps the pasta from drying out. Enjoy your meal! Enchilada pasta is a fun twist on classic enchiladas. It combines pasta with enchilada flavors. You get a mix of cheese, beans, and spices. This dish is great for busy nights or gatherings. It’s colorful and packed with flavor. You can serve it warm and even top it with sour cream and cilantro. Yes, you can make enchilada pasta ahead of time. Just cook it and let it cool. Store it in the fridge for up to three days. When ready to eat, reheat it on the stove or in the oven. You may want to add a splash of water to keep it moist. This way, you save time when guests arrive. To spice up your enchilada pasta, add more chili powder or diced jalapeños. You can also use spicy diced tomatoes. Try adding a hot sauce of your choice. Adjust the heat to suit your taste. A little goes a long way, so start small. You can always add more! If you want to replace sour cream, try Greek yogurt. It gives a similar creamy texture. Cottage cheese can also work, but blend it first. For a dairy-free option, use cashew cream or avocado. These substitutes keep your dish rich and tasty without losing flavor. This article walked you through making enchilada pasta, from key ingredients to storage tips. You learned about essentials and options for custom flavors. We covered how to cook pasta just right and blend ingredients for a tasty meal. Remember, you can adjust spice levels and try new cheeses. Enjoy your delicious dish, and don’t hesitate to experiment. Each step brings you closer to a perfect plate of enchilada pasta.

Are you ready to spice up your dinner routine? Enchilada pasta is the perfect dish that blends the bold flavors of enchiladas with the comfort of pasta. Whether you’re cooking …

Read more

Categories Dinner

Easy Philly Cheesesteak Stuffed Cheesy Breadsticks Meal

June 9, 2025 by Chef Remy
To make these cheesy breadsticks, you'll need a few key items: - 1 lb ground beef or thinly sliced ribeye steak - 1 cup mixed bell peppers, diced (red, green, and yellow for color) - 1 small sweet onion, finely chopped - 1 cup provolone cheese, shredded - 1 cup mozzarella cheese, shredded - 1 teaspoon garlic powder - 1 teaspoon onion powder - Salt and freshly ground black pepper, to taste - 1 tablespoon olive oil - 1 package refrigerated pizza dough (approximately 13.8 oz) - 1 large egg, beaten (for egg wash) These ingredients create a savory mix that makes each bite a delight. You can switch things up with these optional ingredients: - Sliced mushrooms for added earthiness - Jalapeños for a spicy kick - Spinach for some greens - Different cheeses like cheddar or gouda for unique flavors Feel free to use what you have on hand. This dish is flexible! Choosing the right ingredients can elevate your dish. Here are some tips: - Meat: Choose fresh, high-quality beef. Ribeye gives great flavor. - Peppers: Opt for crisp and colorful peppers. They should look fresh and firm. - Cheese: Use good-quality cheese. It melts better and enhances taste. - Dough: Look for pizza dough that is fresh. Check the package date to ensure it’s not too old. With these tips, you’ll create a mouthwatering meal that everyone will love. For the complete process, check out the Full Recipe. First, you need to preheat your oven to 425°F (220°C). This step ensures your breadsticks bake evenly. While the oven heats, grab a baking sheet. Line it with parchment paper. This makes cleaning up easier later. In a large skillet, pour in a tablespoon of olive oil and heat it over medium heat. Once the oil is hot, add the chopped onion and mixed bell peppers. Sauté them for about five minutes. You want them to become tender and smell great. Next, if you chose ground beef, crumble it into the skillet. Cook it until it’s brown all over. If you picked ribeye, add those thin slices now. Stir until they are just fully cooked. Season your mix with garlic powder, onion powder, salt, and black pepper. Once it’s ready, remove the skillet from the heat and let it cool for a bit. Now it’s time to work with the pizza dough. Lightly flour your counter and roll out the dough to about 1/4 inch thick. Cut it into long strips, each around 4 inches wide. On one end of each strip, place a generous spoonful of your meat and veggie mix. Add slices of provolone and mozzarella cheese on top. This is where the magic happens! Carefully roll the dough over the filling. Start from the end with the filling and keep rolling until sealed. Pinch the edges tightly to prevent leaks. Place each breadstick seam side down on the baking sheet, spacing them out. Brush the tops with a beaten egg for a golden look. Finally, bake them in the preheated oven for 12-15 minutes. They should turn golden brown, and the cheese will bubble. Once they are done, let them cool for a few minutes, then serve them warm. Enjoy your Easy Philly Cheesesteak Stuffed Cheesy Breadsticks! For more details, check the Full Recipe. To make great breadsticks, the dough must be soft and easy to work with. Start with refrigerated pizza dough; it is simple to roll out. Roll the dough to about 1/4 inch thick. If the dough feels sticky, sprinkle a little flour on your surface. This will help the dough not to stick. Make sure to keep the edges even while rolling. This helps in getting uniform breadsticks. The filling needs good flavor. Use garlic powder and onion powder to boost taste. Salt and pepper will also add depth. Mix these seasonings with your meat and veggies. Taste the filling before you assemble. If it needs more flavor, you can add a pinch more salt or pepper. Adding fresh herbs like parsley or basil can also give a nice touch. For a cheesy breadstick, cheese choice matters. Use a mix of provolone and mozzarella for the best melt. Provolone adds a sharp flavor, while mozzarella brings creaminess. Spread the cheese evenly over the filling. Make sure to seal the edges well after rolling. This keeps the cheese inside while baking. Brush the breadsticks with egg wash for a golden finish. This step not only makes them look good but also helps the cheese melt perfectly. You can find the full recipe for these delicious breadsticks to explore more tips! {{image_4}} You can easily make these stuffed breadsticks vegetarian. Replace the meat with hearty veggies. Try using mushrooms, zucchini, or spinach. These options keep the taste rich and satisfying. You can also add black beans or chickpeas for protein. Use the same spices to keep the flavor strong. The cheese will still provide that creamy texture. While I love using ground beef or ribeye, there are other choices. Chicken or turkey tastes great in these breadsticks. For a spicy kick, consider adding chorizo or sausage. Each meat brings its own flavor. Just cook the meat fully before adding it to the breadsticks. This keeps everything safe and tasty. Cheese plays a big role in the flavor of these breadsticks. Provolone and mozzarella are classic, but you can mix it up! Try using cheddar for a stronger taste. Feta adds a nice tangy twist. You could even use a spicy cheese for added heat. Experiment with different blends to find your favorite combination. The Full Recipe offers a great base for your creative ideas. After enjoying your cheesy breadsticks, let any leftovers cool. Place them in an airtight container. This keeps them fresh and soft. Store the container in the fridge. They will stay good for up to three days. If you want to keep them longer, freezing is a great option. To reheat your breadsticks, preheat your oven to 350°F (175°C). Place the breadsticks on a baking sheet. Cover them loosely with foil to prevent drying. Heat for about 10-15 minutes. You want them warm and the cheese melty. If you prefer a crispier texture, bake them uncovered for the last few minutes. To freeze your breadsticks, wrap each one in plastic wrap. Then, place them in a freezer bag. Squeeze out the air to avoid freezer burn. They can last up to three months in the freezer. When you’re ready to enjoy, thaw them in the fridge overnight. Reheat as mentioned above for the best taste. Yes, you can use frozen pizza dough. Just let it thaw in the fridge overnight. Follow the package instructions for best results. I find that frozen dough can be just as good as fresh. It saves time and still gives great flavor. You can serve these breadsticks with a few tasty sides. Try marinara sauce for dipping. It adds a rich flavor that pairs well with the cheesy filling. A fresh salad or some crispy fries can also make a great side. The bright salad balances the cheesy richness. Cooking the filling takes about 10 minutes. Start by sautéing the onions and peppers for about 5 minutes. Add the meat next and cook until it's browned or cooked through. It’s quick and easy, making this recipe fun and fast. Yes, this recipe is great for meal prep. You can make the filling a day ahead. Store it in the fridge until you're ready to assemble. The stuffed breadsticks also freeze well. Just bake them straight from the freezer. It’s perfect for busy weeks. For the full recipe, check out the detailed instructions above. You learned how to make tasty Philly cheesesteak stuffed cheesy breadsticks. We discussed key ingredients, cooking steps, and tips for flavor and texture. Remember, you can customize to fit your taste! Store leftovers well, and enjoy them later. This recipe is great for meal prep too. With these skills, you can impress friends and family at your next meal. Get creative and have fun!

Are you ready for a mouthwatering treat? I’m excited to share my Easy Philly Cheesesteak Stuffed Cheesy Breadsticks meal! Combining gooey cheese and savory steak in warm, fluffy breadsticks, this …

Read more

Categories Appetizers

Strawberry Crunch Cheesecake Cones Delightful Treat

June 9, 2025 by Chef Remy
- 1 cup fresh strawberries, diced - 1 tablespoon granulated sugar - 1 teaspoon freshly squeezed lemon juice - 1 cup cream cheese, softened - 1/2 cup powdered sugar - 1 teaspoon pure vanilla extract - 1 cup heavy whipping cream - 1/2 cup crushed graham crackers - 1/4 cup toasted coconut flakes - 4 sugar cones Gathering the right ingredients is key to making Strawberry Crunch Cheesecake Cones. You need fresh strawberries to get that sweet and tangy taste. Start with 1 cup of fresh strawberries. Dice them up, so they mix well with the other ingredients. Then, add 1 tablespoon of granulated sugar. This sugar helps the strawberries release their juices. Also, include 1 teaspoon of freshly squeezed lemon juice for a little zing. Next, we move to the cheesecake mixture. Take 1 cup of cream cheese and let it soften. This makes it easy to mix. To this, add 1/2 cup of powdered sugar. This sugar gives a sweet taste without being gritty. Don't forget 1 teaspoon of pure vanilla extract for flavor. Finally, whip 1 cup of heavy whipping cream until it’s fluffy. This will make your cheesecake light and airy. Now, we need crunchy toppings. For that, grab 1/2 cup of crushed graham crackers. They add a great texture. Next, get 1/4 cup of toasted coconut flakes. They bring a nice crunch and flavor. Lastly, you need 4 sugar cones. These hold everything together and are fun to eat. For the full recipe, check out the complete instructions. Enjoy gathering these tasty ingredients! To start, we need to prepare the strawberries. First, we mix the diced strawberries with sugar and lemon juice. This process is called maceration. It helps the strawberries soften and brings out their sweet juice. Let them sit for about 10 minutes. You will notice how much more flavor they gain during this time. Now, we move on to the cheesecake filling. In a medium mixing bowl, beat the softened cream cheese until smooth. You can use an electric mixer or a sturdy whisk. Next, add the powdered sugar and vanilla extract. Keep mixing until everything is well combined and fluffy. This step is key for a rich and creamy filling. In a separate bowl, pour in the heavy whipping cream. Use a hand mixer or stand mixer to whip it until stiff peaks form. This means the cream should hold its shape well. Be careful not to over-whip. If you do, it can turn into butter, and we don’t want that! Next, we need to combine our ingredients. Gently fold the whipped cream into the cream cheese mixture using a spatula. This keeps the filling light and airy. Then, take the macerated strawberries and carefully fold them into the cheesecake filling. Ensure they are evenly mixed for the best flavor in every bite. Now, it’s time to fill the cones! Take each sugar cone and fill it generously with the cheesecake mixture. You can use a spoon, but a piping bag gives more control and looks nicer. Once filled, sprinkle some crushed graham crackers and toasted coconut flakes on top. This adds a lovely crunch and appearance. You can serve the cones right away for the best taste. If you want, refrigerate them for up to 30 minutes. This will chill them and help the filling firm up a bit. For a fun touch, garnish each cone with a fresh strawberry on top. This adds color and freshness to your delightful treat. For the full recipe, check the details provided earlier. To ensure a light and airy texture, mix the cream cheese until smooth. It should feel soft and fluffy. When adding the whipped cream, fold it in gently. This keeps air in the mixture. For sweetness, taste your filling. If you prefer it sweeter, add more powdered sugar. You can adjust this based on your own taste. For the best flavor, choose fresh sugar cones. They should be crispy and sturdy. If you can't find sugar cones, consider waffle cones or even edible cookie cups. Both options work well and add a fun twist. Get creative with serving your cheesecake cones. You can place them upright in a tall glass or a fun cone holder. This adds height and interest to your dessert table. For decoration, sprinkle extra crushed graham crackers on top. You can also add a fresh strawberry or a mint leaf for color. These small touches make your dessert look extra special. {{image_4}} You can change the fruit in this recipe. Try using blueberries or raspberries instead of strawberries. Each fruit adds a unique twist. You can also mix in flavored extracts. A hint of almond or lemon extract can elevate your cones. If you want a lighter option, use low-fat cream cheese. It still gives a creamy texture but cuts down on fat. You can also swap out regular sugar for sugar substitutes. This change works well for those watching their sugar intake. These cheesecake cones pair nicely with fresh fruit salad or a scoop of sorbet. You can serve them with a sweet tea or sparkling water for a refreshing drink. For special occasions, try displaying them on a colorful platter. Add a few bright flowers to make it festive. You can find the full recipe to get started. To keep your cheesecake cones fresh, store them in the fridge. Place them in an airtight container to prevent drying out. Ideally, enjoy them within two days for the best taste and texture. You can freeze cheesecake cones, but it's best to store the filling and cones separately. Place the filling in a container and freeze it. For the cones, wrap them in plastic wrap. To thaw, move the filling to the fridge overnight. When you're ready, fill the cones for a fresh treat. If you want to serve your cones later, avoid reheating them in the microwave. This can make the cones soggy. Instead, let them sit at room temperature for a bit before serving. This keeps the texture intact and ensures they taste great. Yes, you can make the filling ahead of time. Store it in an airtight container. Keep it in the fridge for up to two days. Just give it a good stir before using. This makes it easy for busy days! If you can't find sugar cones, don't worry! You have options. Look for waffle cones or even chocolate cones. They add a fun twist to your dessert. You can also use small cups if all else fails. To keep your cones crispy, fill them just before serving. You can also coat the inside with chocolate. Let it harden before filling. This creates a barrier against moisture and keeps your cones crunchy. Yes, you can use frozen strawberries! Thaw them first and drain any excess juice. They will still add great flavor. Just remember, they might be a bit softer than fresh ones. Serve the cones upright in a tall glass for a fun display. You can also add a fresh strawberry on top for color. If you want a chill treat, refrigerate them for 30 minutes before serving. This makes them extra refreshing! For the full recipe, check out the earlier section. This blog covered how to make delicious cheesecake cones using fresh ingredients. You learned about preparing strawberries, making the creamy filling, and topping off with crunchy goodies. I shared storage tips, serving suggestions, and variations to make these cones your own. Try different fruit flavors or healthier options to create your perfect treat. With a few simple steps, you can impress friends and family with this fun dessert! Enjoy every bite of your cheesecake cones.

Are you ready for a sweet treat that takes dessert to the next level? Strawberry Crunch Cheesecake Cones combine the classic cheesecake flavor with a delightful crunch and fresh strawberries. …

Read more

Categories Desserts

Cheesy Ground Beef Roll Flavorful Dinner Delight

June 9, 2025 by Chef Remy
- 1 lb (450g) ground beef - 1 cup shredded cheddar cheese - 1 cup shredded mozzarella cheese The main stars of this dish are the ground beef and cheese. Ground beef gives a rich flavor and texture. Cheddar and mozzarella add creaminess and a delightful stretch. Together, they create a filling that is hard to resist. - 1/2 cup cream cheese, softened - 1/2 cup plain breadcrumbs - 1/4 cup fresh parsley, finely chopped - 1 teaspoon garlic powder - 1 teaspoon onion powder - Salt and freshly ground black pepper to taste To hold everything together, I use cream cheese and breadcrumbs. Cream cheese adds a smooth texture, while breadcrumbs help the roll keep its shape. Fresh parsley brightens up the beef mix. Garlic and onion powders bring depth to the flavor. Don’t forget to season with salt and pepper for balance. - 1 egg, lightly beaten (for binding) - 1/4 cup barbecue sauce (for topping) Adding an egg helps bind the mixture even more. This step is optional but highly recommended. If you love a sweet and tangy flavor, spread barbecue sauce on top before baking. It adds a nice glaze and extra taste to the roll. For the full recipe, check out the Ultimate Cheesy Ground Beef Roll. 1. Preheat the Oven: First, set your oven to 375°F (190°C). This heat will cook the roll just right. Next, line a baking sheet with parchment paper. This step helps prevent sticking and makes cleanup easy. 2. Mix the Filling: In a large bowl, combine the ground beef with the cheeses. Add the cream cheese and breadcrumbs too. This mix brings great flavor and texture! 1. Season the Beef Mixture: Now, add fresh parsley, garlic powder, onion powder, and salt and pepper. Make sure to mix everything well. This helps the flavors blend together. 2. Rolling and Sealing Techniques: On a clean surface, lay out plastic wrap or parchment paper. Place the beef mix in the center and shape it into a rectangle about 1/2 inch thick. Roll it tightly from one end to the other. Pinch the ends to seal the filling inside. 1. Baking Time and Temperature: Place your roll seam-side down on the baking sheet. Spread barbecue sauce on top for extra flavor. Bake for 35-40 minutes. The roll is ready when it reaches 160°F (71°C) inside. 2. Resting and Slicing for Serving: After baking, let the roll rest for about 5 minutes. This step keeps it juicy. Then, slice it into pieces of your choice. Enjoy your cheesy ground beef roll! For the full recipe, refer to the Ultimate Cheesy Ground Beef Roll. To get the right texture in your cheesy ground beef roll, you need a good mix. Start with your ground beef. It should be fresh and not too lean. Lean meat can dry out during cooking. Binding ingredients are key. The egg and cream cheese hold everything together. If your mixture is too dry, it will fall apart. If it's too wet, it won't hold shape. Aim for a thick, but workable, consistency. Adding spices and herbs can boost the flavor. I always use garlic powder and onion powder. They add depth to the beef. Fresh parsley gives a nice, bright note. You can also try adding smoked paprika for a bit of warmth. For cheese flavor, use a mix of cheddar and mozzarella. Cheddar adds sharpness, while mozzarella gives that gooey stretch. If you want it extra cheesy, add more cheese to the filling. Serving your beef roll can be fun! Slice it into thick portions and place them on a wooden platter. This adds a rustic touch. To make it pop, garnish with fresh parsley. Consider pairing it with a crisp salad or roasted veggies. It adds color and nutrition. Use a nice plate to show off those cheesy layers. A drizzle of barbecue sauce on top can make it look mouth-watering. For the full recipe, check the details above! {{image_4}} You might want to switch up the ground beef. Try ground turkey or chicken for a lighter meal. You can even use lentils or mushrooms for a tasty vegetarian option. Cheese is also flexible. If you love Swiss or gouda, feel free to mix them in. Experimenting with cheese can add a fun twist to your roll. Add extra spices like paprika or cumin to change the flavor. A splash of hot sauce can also bring some heat. Adding a few tablespoons of Worcestershire sauce can deepen the taste. Don’t forget veggies! Chopped spinach, bell peppers, or mushrooms can boost nutrition. Mix them into your filling to make your roll even more delightful. Pair your cheesy ground beef roll with fresh salad. A side of roasted veggies works well too. You can also serve it with a warm bread roll for a complete meal. For drinks, try a light red wine or iced tea. These pair nicely with the rich flavors of the roll. Explore these ideas for a well-rounded dinner! To keep your cheesy ground beef roll fresh, store it in the fridge. Use an airtight container or wrap it tightly with plastic wrap. This keeps moisture in and prevents it from drying out. You can store it for up to three days. After that, the quality may drop, and it might not taste as good. You can freeze the roll either before or after cooking. If you freeze it before cooking, shape it and wrap it tightly. Use plastic wrap, then foil to prevent freezer burn. If you freeze it after baking, let it cool completely first. Then, wrap it tightly and place it in a freezer-safe bag. It can last up to three months in the freezer. To thaw, place it in the fridge overnight. For quick thawing, you can use the microwave on defrost. After thawing, reheat according to the instructions below. To keep the roll tasty and moist, reheating is key. The best way is to use the oven. Preheat your oven to 350°F (175°C). Place the roll in an oven-safe dish and cover it with foil. This helps keep the moisture in. Heat for about 20 minutes or until warmed through. You can also use the microwave for quick reheating. Place slices on a microwave-safe plate and cover with a damp paper towel. Heat in short bursts of 30 seconds until warm. However, this method may make the roll less crispy compared to the oven. For the best flavor and texture, I recommend using the oven when possible. Enjoy your cheesy ground beef roll! You can check the internal temperature. It should reach 160°F (71°C). Use a meat thermometer for accuracy. Stick it in the center of the roll. This helps ensure the beef is safe to eat. If it’s not at that temperature, continue baking. Yes, you can prepare the beef roll in advance. Mix the filling and shape the roll. Then cover it tightly in plastic wrap. Store it in the fridge for up to 24 hours. This saves time on busy days. You can also freeze it for longer storage. Just remember to thaw it before baking. I love pairing this roll with simple sides. Here are some great options: - Steamed broccoli - Mashed potatoes - A crisp garden salad - Roasted vegetables - Garlic bread For drinks, you can serve soda, iced tea, or even a nice red wine. These pair nicely with the flavors of the beef roll. This blog post covered how to make a delicious cheesy ground beef roll. You learned about the main ingredients, like ground beef and cheese, and how they come together. We discussed preparation, shaping, and cooking to ensure perfect results. Plus, I shared tips for flavor and texture, along with variations and storage ideas. Try adding your unique twist to this recipe. Enjoy your cooking adventure and share the joy of this tasty dish!

If you’re craving a dinner that’s both cheesy and satisfying, you’re in the right place! The Cheesy Ground Beef Roll is a winning dish that combines delicious ground beef with …

Read more

Categories Dinner

Garlic Butter Chicken with Rigatoni Tender Dish

June 9, 2025 by Chef Remy
- Chicken and Pasta Components - 2 chicken breasts, diced into bite-sized pieces - 8 ounces rigatoni pasta - Seasonings and Aromatics - 4 tablespoons unsalted butter, divided - 6 cloves of garlic, finely minced - 1 teaspoon dried oregano - 1 teaspoon paprika - Salt and freshly ground black pepper, to taste - Garnishes and Cheeses - 1 cup cherry tomatoes, halved - 1 cup fresh spinach, roughly chopped - 1/2 cup grated Parmesan cheese - Fresh basil leaves for garnish This dish bursts with flavor. The garlic and chicken work together well. The rigatoni holds all the creamy goodness. It’s a simple yet tasty meal that anyone can love. You can find the full recipe for Garlic Butter Chicken with Rigatoni at the end of this article. Each ingredient plays a role in making it special. Enjoy cooking it! To start, fill a large pot with water and add salt. Bring it to a boil. Once boiling, add the rigatoni. Cook it according to the package instructions until it is al dente. This usually takes about 10 to 12 minutes. When done, drain the pasta in a colander. Make sure to save about 1/4 cup of the pasta water for later. Next, heat a large skillet over medium heat. Add 2 tablespoons of unsalted butter. Once the butter melts, add the diced chicken. Season the chicken with salt, pepper, oregano, and paprika. Cook the chicken for about 6 to 7 minutes, stirring often. When it turns golden brown and is fully cooked, take it out and set it aside on a plate. In the same skillet, add the remaining 2 tablespoons of butter. Let it melt, then add the minced garlic. Sauté the garlic for about 1 minute. Stir it constantly until it is fragrant but not browned. This keeps the garlic from tasting bitter. After that, add the halved cherry tomatoes and chopped spinach. Stir until the spinach wilts and the tomatoes soften, about 2 to 3 minutes. Now, it’s time to bring everything together. Add the cooked chicken back into the skillet. Mix it well with the garlic and vegetables. This helps all the flavors blend nicely. Next, add the rigatoni to the skillet. Gently toss all the ingredients together. If it looks dry, pour in some of the reserved pasta water. This will create a creamy sauce that coats the pasta well. Finally, sprinkle the grated Parmesan cheese over the dish. Stir it in until it melts and coats everything. Taste the dish and add more salt or pepper if needed. Serve the garlic butter chicken rigatoni in shallow bowls or on a large platter. Garnish with fresh basil leaves for a pop of color and flavor. Enjoy every bite of this tender dish! For the full recipe, check out the details above. To make a great garlic butter sauce, start with fresh garlic. Fresh garlic gives a strong flavor. Mince the garlic finely for better taste. When sautéing, keep the heat moderate. This prevents the garlic from burning. Burnt garlic can make your sauce bitter. Add the garlic to the melted butter and stir. Let it cook for about one minute. You want it fragrant, not brown. If you like more flavor, add a pinch of red pepper flakes. This adds a nice kick! Cooking rigatoni well is key for a great dish. Use a large pot and plenty of water. The water should be salty, like the sea. This helps season the pasta as it cooks. Stir the rigatoni during cooking to prevent sticking. Check the package for cooking times. Aim for al dente, firm but not hard. Drain the pasta but save a bit of water. This starchy water can help blend the sauce later. For juicy chicken, cut it into even pieces. This ensures all pieces cook at the same rate. Season the chicken well with salt and pepper. Cook it in a hot skillet for a nice sear. Use two tablespoons of butter for a rich flavor. Stir the chicken often, so it cooks evenly. It should take about six to seven minutes. Look for a golden-brown color and no pink inside. Remove it from the skillet to keep it juicy and tender. {{image_4}} You can switch up the rigatoni for other pasta types. Fusilli or penne work great. Each shape holds the sauce well and adds a fun twist. You might also try spaghetti for a classic feel. Just remember to adjust cooking times based on the pasta you choose. If chicken isn't your thing, you can use shrimp or salmon. Both cook quickly and pair well with garlic and butter. For a heartier option, try diced turkey or even pork. Just make sure to cook them until they are done. You can easily make this dish vegetarian. Replace chicken with mushrooms or zucchini. Both add flavor and texture. Use vegetable broth instead of chicken broth for extra depth. You can also add more veggies like bell peppers or broccoli for a colorful plate. Try this with the full recipe for a delightful meal. You can store Garlic Butter Chicken with Rigatoni in the fridge. Place it in an airtight container. It stays fresh for about 3 to 4 days. When you want to enjoy it again, check for any spoilage before heating. If you want to save some for later, freeze it. Allow the dish to cool completely first. Then, place it in a freezer-safe container. It can last up to 2 months in the freezer. When ready to eat, thaw it in the fridge overnight before reheating. To reheat, use a skillet over medium heat. Add a splash of water or broth to keep it moist. Stir occasionally until heated through. You can also use a microwave. Heat it in short bursts, stirring in between. This helps evenly warm the dish. For the best taste, reheat just the amount you need. Garlic Butter Chicken with Rigatoni can last in the fridge for about 3 to 4 days. Store it in an airtight container to keep it fresh. Make sure to let it cool down before sealing it. Yes, you can prepare this dish ahead of time. Cook the pasta and chicken, then store them separately. Combine them when you're ready to serve. This keeps everything fresh and flavorful. This dish pairs well with a simple green salad or garlic bread. You can also serve it with roasted vegetables for extra nutrients and flavor. These sides balance the richness of the dish. Absolutely! Garlic Butter Chicken with Rigatoni is perfect for meal prep. You can portion it out for lunches or dinners. It reheats well, making it a convenient option for busy days. To change the spice level, add more or less paprika. You can also use a pinch of red pepper flakes for heat. If you prefer it milder, skip the paprika or use less. Adjust to your taste for the best experience. In this post, we covered how to make Garlic Butter Chicken with Rigatoni. We looked at key ingredients, cooking steps, and helpful tips. You learned about variations for different tastes. Storage details ensure your dish stays fresh. Cooking this meal can be quick and easy. You can customize it to suit your style. Enjoy delicious flavors with simple steps. Dive in and enjoy this satisfying dish!

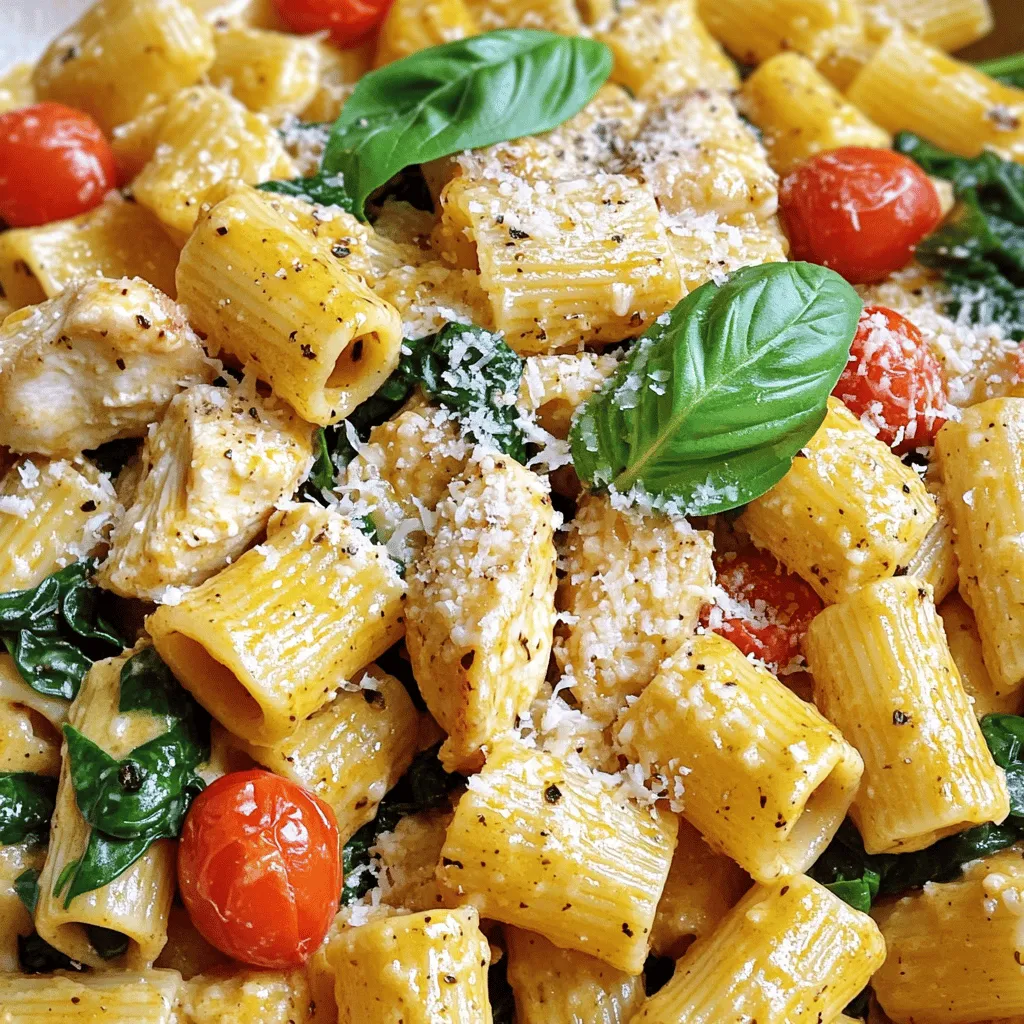
Are you ready to elevate your dinner game? Garlic Butter Chicken with Rigatoni is a rich, flavorful dish that’s sure to impress. With juicy chicken, tender pasta, and a creamy …

Read more

Categories Dinner

Garlic Butter Beef and Spinach Tortellini Delight

June 9, 2025 by Chef Remy
- 12 oz cheese tortellini - 1 lb ground beef - 4 cloves garlic, finely minced - 4 tablespoons unsalted butter - 6 oz fresh spinach, roughly chopped These ingredients form the base of your dish. The cheese tortellini brings a creamy texture. Ground beef adds protein and richness. Garlic and butter create a flavor boost that you can't resist. - 1/2 teaspoon red pepper flakes (optional for heat) - 1 teaspoon Italian seasoning blend - Grated Parmesan cheese, for serving Adding red pepper flakes gives your dish a nice kick. Italian seasoning blend enhances the overall taste. Grated Parmesan cheese on top makes everything taste even better. - Fresh parsley, chopped, for garnish - Lemon wedge Fresh parsley adds a pop of color and freshness. A lemon wedge can brighten flavors and add zest. Use these garnishes to make your dish visually appealing. For the complete recipe, check out the [Full Recipe]. - Boiling Water Preparation: Start with a large pot. Fill it with 4-6 quarts of salted water. Bring it to a rolling boil. The salt adds flavor to the pasta. - Cooking Time and Techniques: Add the cheese tortellini to the boiling water. Cook according to the package instructions, usually 3-5 minutes. Look for the tortellini to float to the top. When they do, they are ready. Drain them well and set aside. - Heat Level for Cooking: Use a large skillet and set it to medium heat. This helps the beef cook evenly. - Identifying Doneness: Add the ground beef to the skillet. Break it into smaller pieces with a spatula. Cook for about 5-7 minutes. The beef should be browned and no longer pink. If you see excess grease, drain it from the pan. - Tips for Garlic Cooking: Turn the heat to low. Push the cooked beef to one side of the skillet. This makes room for the garlic and butter. - Combining Beef and Butter: Add minced garlic and cubes of unsalted butter to the cleared side. Let the butter melt and stir the garlic for 1-2 minutes. Be careful not to let the garlic brown, as it can taste bitter. - Recognizing When Spinach is Done: Stir the garlic butter into the beef. Then, toss in the roughly chopped fresh spinach. Cook for 2-3 minutes, stirring often. The spinach should wilt and become tender. - Optional Spice Incorporation: If you like heat, sprinkle in the red pepper flakes. This adds a nice kick to the dish. - Mixing Ingredients Together: Once the spinach is wilted, add the cooked tortellini to the skillet. Sprinkle with Italian seasoning and season with salt and freshly cracked black pepper. - Heating Tips for Best Flavor: Gently toss everything together for 1-2 minutes. This allows the flavors to meld and ensures everything is heated through. Enjoy this dish as a comforting meal. For the full recipe, refer to the earlier section! To make a great garlic butter sauce, avoid burning the garlic. Burnt garlic tastes bitter and ruins the dish. Cook the garlic over low heat for just 1-2 minutes. Stir it often until it smells amazing. For butter types, I suggest unsalted butter. It lets you control the salt. You can also use ghee for a nutty flavor. You can cook tortellini in a few ways. The best method is boiling. Use a large pot of salted water. This helps the tortellini taste great. Always add enough salt. It should taste like the sea. If you want a twist, you can bake the tortellini. Just mix it with sauce and cheese, then bake until bubbly. How you serve the dish matters. Use a shallow bowl for a rustic look. It lets the colors pop. You can also use a white plate for a clean look. For garnishing, sprinkle fresh parsley on top. Add a lemon wedge for a bright touch. This makes the dish look even more inviting. For the full recipe, check the earlier section. {{image_4}} You can switch out ground beef for ground turkey or chicken. These options are leaner but still tasty. Ground turkey offers a mild flavor, letting the garlic and butter shine. Ground chicken is similar and easily absorbs flavors. For a vegetarian twist, use tofu. Firm tofu soaks up the garlic butter well. Just press and cube the tofu before sautéing. You can also season it with your favorite spices for extra flavor. Add bell peppers or mushrooms for a tasty crunch. Chopped bell peppers bring sweetness and color. Sauté them with the beef until soft. Mushrooms add an earthy flavor. Slice them and cook them in the same skillet until they brown. You can also incorporate kale or other greens. Simply chop the kale and add it with the spinach. It wilts quickly and boosts nutrition. Feel free to mix in any greens you have on hand. Switching up cheese can really change the dish. Try using ricotta or mozzarella instead of Parmesan. Ricotta adds creaminess, while mozzarella melts beautifully. You can also adjust seasonings to your taste. Adding fresh herbs like basil or thyme can brighten the dish. For a spicy kick, toss in some cayenne or chili powder. Experiment to find your perfect blend. For the full recipe, check out the [Full Recipe]. To keep your garlic butter beef and spinach tortellini fresh, use airtight containers. Glass or plastic containers both work well. Make sure to let the dish cool down first. Then, place it in the fridge. Aim to eat leftovers within three days for the best taste. Store your leftovers in the refrigerator at 40°F or lower. This helps keep bacteria away. Keep the tortellini in a well-sealed container. Label the container with the date. This way, you know how long it has been stored. To reheat your dish, you have two main options: microwave or stovetop. - Best Practices for Preserving Texture: When using the microwave, cover the dish loosely. Add a splash of water to keep it moist. Heat in short bursts, stirring in between. This helps prevent uneven heating. - Microwave vs. Stovetop Methods: The stovetop is great for keeping texture. Heat a skillet over medium heat. Add a bit of water or broth. Stir often until hot. This method keeps the tortellini from getting too soft. For long-term storage, you can freeze your tortellini dish. Use freezer-safe bags or containers. Make sure to remove as much air as possible. This helps prevent freezer burn. - Long-Term Storage Solutions: Frozen tortellini can last up to three months. Label the bags with the date. This helps you remember when you put them in the freezer. - Thawing Instructions: When you're ready to eat, thaw the dish in the fridge overnight. If you're in a hurry, you can microwave it on low power. Just make sure to stir occasionally for even thawing. For the full recipe, check out the detailed steps and ingredients! You can use ground turkey or chicken instead of ground beef. Both have a lighter taste. These proteins cook similarly and soak up flavors well. For a plant-based option, try crumbled tofu or lentils. They add a nice texture and protein without meat. Yes, you can prepare this dish ahead. Cook the tortellini and the beef mix separately. Store each in airtight containers in the fridge. When ready to eat, just heat and mix them together. This way, you save time and enjoy fresh flavors. To make this dish gluten-free, choose gluten-free tortellini. Many brands offer tasty options made from rice or corn. Ensure your butter and seasonings are also gluten-free. This way, everyone can enjoy this delicious meal. A fresh salad pairs nicely with this dish. Consider a simple green salad with lemon dressing. Crusty bread also makes a great side. You can dip it in the garlic butter sauce for extra flavor. This recipe for Garlic Butter Beef and Spinach Tortellini is easy and tasty. We covered key ingredients, cooking steps, and ways to enhance flavor. You can tweak it with different proteins and veggies, making it fit for your taste. Proper storage keeps leftovers fresh, while reheating tips help maintain quality. Enjoy this dish for a quick meal or a family dinner. With these tips, your kitchen can shine and your meal can impress!

Get ready to savor the mouthwatering blend of flavors in my Garlic Butter Beef and Spinach Tortellini Delight! This easy recipe combines cheesy tortellini with juicy ground beef, rich garlic …

Read more

Categories Dinner

Creamy Mini Lemon Cheesecakes Easy and Delicious Treat

June 9, 2025 by Chef Remy
To make these creamy mini lemon cheesecakes, you need a few key items. Here’s the list: - 1 cup graham cracker crumbs - 1/4 cup unsalted butter, melted - 2 tablespoons granulated sugar - 16 oz cream cheese, softened at room temperature - 1/2 cup granulated sugar - 1/4 cup sour cream - 2 large eggs - 1 teaspoon vanilla extract - Zest of 1 large lemon - 1/4 cup freshly squeezed lemon juice These ingredients work together to create the perfect balance of flavor and texture. The graham cracker crumbs give a nice crunch, while the cream cheese provides a rich, creamy filling. You can make your mini cheesecakes even more special with some fun extras. Here are a few ideas: - Fresh berries (strawberries, blueberries, or raspberries) - Fresh mint leaves for garnish - Whipped cream for a light touch - Lemon slices for a zesty pop These options add color and flavor. Fresh berries bring sweetness, while mint gives a refreshing note. If you need to modify the recipe, there are easy swaps you can make. Here are some ideas: - *Gluten-free*: Use gluten-free graham cracker crumbs or almond flour. - *Vegan*: Replace cream cheese with a plant-based cream cheese. Use flax eggs or applesauce instead of eggs. - *Dairy-free*: Substitute sour cream with coconut cream or dairy-free yogurt. These substitutions keep the essence of the mini cheesecakes while catering to dietary needs. You can still enjoy the delicious flavors without the worry! For the complete recipe, check the [Full Recipe]. First, set your oven to 325°F (160°C). This low heat cooks the cheesecakes evenly. Next, line a muffin tin with mini cupcake liners. This makes it easier to serve and remove them later. In a medium bowl, mix together: - 1 cup graham cracker crumbs - 1/4 cup unsalted butter, melted - 2 tablespoons granulated sugar Stir well with a fork until it looks like damp sand. This will be the base of your mini cheesecakes. In a large bowl, use an electric mixer to beat: - 16 oz cream cheese, softened - 1/2 cup granulated sugar - 1/4 cup sour cream - 1 teaspoon vanilla extract - Zest of 1 large lemon - 1/4 cup freshly squeezed lemon juice Beat until it’s smooth and creamy with no lumps. Then, gently add in: - 2 large eggs Mix in the eggs one at a time, just until blended. This keeps your filling light and fluffy. Now, carefully pour the cheesecake filling over the crust in each muffin cup. Fill them about 3/4 full. This lets them rise slightly while baking. Place the muffin tin in the oven and bake for 18-20 minutes. Look for set edges with a slightly jiggly center. After baking, turn off the oven. Crack the door open and let the cheesecakes cool for about 30 minutes. This slow cooling helps to avoid cracks. Once they cool to room temperature, cover them and refrigerate for at least 3 hours or overnight. This helps them firm up for the perfect bite. For the full recipe, you can refer to the earlier section. Enjoy making these delicious treats! To get that smooth and creamy texture in your mini lemon cheesecakes, start with room temperature cream cheese. Cold cream cheese can create lumps. Use an electric mixer on medium speed to beat the cream cheese first. Mix until it is very smooth before adding other ingredients. Gradually mix in sugar and sour cream. This step helps keep the filling light and airy. Make sure you scrape the bowl sides to mix everything well. Cracks can ruin the look of your cheesecakes. To avoid this, cool the cheesecakes gradually. After baking, turn off the oven and crack the door open. Let them sit in the warm oven for about 30 minutes. This slow cooling helps the cheesecakes set without sudden temperature changes. Also, avoid overmixing your batter once you add the eggs. Mix just until combined to keep air from building up. When it’s time to serve your mini lemon cheesecakes, add a pop of color. Top each cheesecake with fresh berries like strawberries or blueberries. A sprig of mint also looks nice. This not only makes them pretty but adds fresh flavors too. Serve them chilled for the best taste. If you want, place them on a nice platter for a beautiful presentation. For the full recipe, check the earlier sections. {{image_4}} You can switch up the flavors of your mini cheesecakes. Try adding chocolate for a rich twist. Just mix in melted chocolate with the cream cheese. You can also use fruit purees. For berry flavors, blend strawberries or blueberries into the filling. This gives a nice color and taste. Experiment with spices too, like cinnamon or nutmeg. Each flavor brings a new joy. For those with dietary needs, you can make these cheesecakes vegan. Use cashew cream instead of cream cheese. Substitute eggs with flax eggs or applesauce. For a sugar-free option, use a sugar substitute like erythritol. This keeps the sweetness without the sugar. These changes help everyone enjoy the treat! You can present your mini cheesecakes in fun ways. Use mini jars for a cute look. This makes each one a little dessert cup. You can also create a cupcake-style look. Simply pipe the filling into cupcake liners. Both styles impress your guests and add variety to your table. Check out the Full Recipe for more ideas! Store leftover mini lemon cheesecakes in an airtight container. This keeps them fresh and moist. Place the container in the fridge. They will stay good for up to five days. If you want, you can cover each cheesecake with plastic wrap for extra protection. You can freeze mini cheesecakes for later. First, let them cool completely in the fridge. Then, remove them from the muffin tin. Wrap each cheesecake tightly in plastic wrap. After that, place them in a freezer-safe bag or container. They will last for about three months in the freezer. When ready to eat, just thaw them in the fridge overnight. Reheat mini cheesecakes gently. Place them in the fridge to bring them back to the right temperature. Do not use a microwave, as this can make them soggy. Serve them cold for the best taste. Garnish with fresh berries or mint right before serving for a touch of color. This makes them look and taste even better! For the full recipe, refer to the main article. Mini cheesecakes last about five days in the fridge. Store them in an airtight container. This keeps them fresh and tasty. If you plan to keep them longer, consider freezing. Yes, you can use a different crust. Options include Oreo cookies, almond flour, or even a gluten-free crust. Each will give a unique flavor and texture to your cheesecakes. If your cheesecake cracks, don’t worry. It can happen to anyone. To fix it, you can cover the cracks with berries or whipped cream. This adds beauty and taste to your dessert. To make a cheesecake without eggs, use a mix of silken tofu or yogurt. Blend these until smooth and creamy. This will help set the cheesecake while keeping it rich and delicious. For the full recipe, check out the Creamy Mini Lemon Cheesecakes. You learned about making mini lemon cheesecakes, from the basic ingredients to clever tips. Each step helps create a creamy treat that's easy to customize. Remember to explore flavor variations and dietary needs. Store leftovers properly to enjoy them later. With these insights, you can bake with confidence and share delicious desserts. Happy baking!

Are you ready to indulge in a sweet, creamy delight? My Creamy Mini Lemon Cheesecakes are not just easy to make but also bursting with flavor. Perfect for any occasion, …

Read more

Categories Desserts

Ground Beef Enchiladas Simple and Satisfying Meal

June 9, 2025 by Chef Remy
- 1 lb ground beef - 1 small onion, finely chopped - 2 cloves garlic, minced - 1 teaspoon ground cumin - 1 teaspoon chili powder - 1 can (15 oz) black beans, drained and rinsed - 2 cups shredded cheddar cheese - 1 cup enchilada sauce (homemade or store-bought) - 8 small flour tortillas - 2 tablespoons olive oil - Salt and black pepper, to taste - Fresh cilantro and sour cream for garnish (optional) The main ingredients for this recipe center around ground beef, onion, garlic, cumin, and chili powder. These flavors blend well and create a rich base for the enchiladas. Ground beef adds protein, while the onion and garlic provide depth. Cumin and chili powder give that classic Mexican flavor. In the additional ingredients, black beans add fiber and a nice texture. Cheese is vital too. It melts beautifully and gives that gooey, satisfying bite. The enchilada sauce ties everything together. You can pick store-bought for speed or homemade for a personal touch. For the tortillas, small flour ones work best. They roll easily around the filling. Warming them helps prevent cracking. Olive oil adds richness, while salt and pepper season the dish perfectly. Finally, fresh cilantro and sour cream can brighten the meal, adding color and flavor. If you're ready to dive deeper, you can find the full recipe in the article. - Preheat the oven to 350°F (175°C). - Gather all ingredients and tools needed. - In a large skillet, heat 2 tablespoons of olive oil over medium heat. - Add 1 small onion, finely chopped, and 2 cloves of minced garlic. - Sauté for about 3-4 minutes until the onion is soft. - Increase heat to medium-high and add 1 lb of ground beef. - Cook while breaking apart the beef until it’s browned, around 5-7 minutes. - Stir in 1 teaspoon of ground cumin and 1 teaspoon of chili powder. - Season with salt and black pepper to taste. - Fold in 1 can of drained and rinsed black beans, cooking for 2 more minutes. - Warm 8 small flour tortillas in a separate pan for 30 seconds on each side. - This makes them easy to roll without cracking. - On each tortilla, place about 1/3 cup of the beef mixture in the center. - Add a sprinkle of shredded cheese on top. - Roll each tortilla tightly around the filling. - Place the rolled enchiladas seam-side down in a greased 9x13 inch baking dish. - Pour enchilada sauce over the top, covering all the tortillas. - Sprinkle the remaining cheese on top. - Bake in the preheated oven for 20-25 minutes. - Look for bubbling cheese and a golden brown top. - Let cool for a few minutes before serving. - Enjoy with fresh cilantro and a dollop of sour cream, if desired. For the full recipe, check out the Cheesy Ground Beef Enchiladas. How do you prevent tortillas from cracking? To keep tortillas from cracking, warm them first. Heat them in a pan for 30 seconds on each side. This makes them soft and easy to roll. You can also cover them with a damp cloth to keep them warm and moist while you work. What are the best methods for browning ground beef? Use medium-high heat to brown ground beef. Break it apart with a spatula for even cooking. Stir it often to avoid burning. This gives you a nice, rich flavor. Season the meat early with salt and pepper for better taste. How can you experiment with spices and herbs? Try adding spices like paprika or oregano for extra flavor. Fresh herbs like cilantro can brighten the taste. Start with small amounts, then add more as you taste. This helps you find what you like best. Should you use homemade or store-bought enchilada sauce? Homemade sauce often tastes fresher. You can control the spice level and ingredients. Store-bought sauce is quick and easy. Choose one with fewer additives for a healthier option. Both can work well for your enchiladas. What tips are there for choosing the right cheese? For enchiladas, cheddar or Monterey Jack are great choices. They melt well and add a creamy taste. Mix different cheeses for a richer flavor. Just make sure they are shredded for easy melting. How do you achieve the perfect melt and texture? To get a nice melt, sprinkle cheese on top of the enchiladas before baking. Bake them until the cheese is bubbling and slightly golden. This gives you a great texture. A little browning adds flavor and looks nice too. Explore the full recipe for Cheesy Ground Beef Enchiladas to put these tips into action. {{image_4}} You can swap ground beef for other proteins. Ground turkey or chicken works well. Both options keep the meal light and tasty. For a meatless choice, try using black beans or lentils. They add protein and flavor without meat. You can still enjoy a filling meal while being kind to the planet. Add a twist to your enchiladas with different flavors. For a Southwestern style, mix in corn and diced peppers. This gives a sweet and crunchy bite. If you like heat, add sliced jalapeños. They spice up the dish and bring a bold taste. Both styles can change your enchilada experience. Worried about gluten? Use gluten-free tortillas. They taste great and work just like regular ones. If you follow a low-carb or keto diet, try using lettuce wraps instead. This keeps your meal light while still being satisfying. You can enjoy delicious enchiladas without the carbs. To store your leftover enchiladas, allow them to cool first. Place them in an airtight container. This keeps them fresh and tasty. I like using glass containers, but plastic works too. Just make sure they seal well. You can freeze enchiladas before or after baking. If you freeze them unbaked, wrap each one in foil. This helps keep them from getting freezer burn. To freeze baked enchiladas, let them cool completely first. Then, cover them tightly with foil. When you’re ready to eat, thaw them in the fridge overnight. Bake at 350°F until hot. In the fridge, enchiladas last about 3 to 4 days. If you freeze them, they last up to 3 months. Check for signs of spoilage like a bad smell or odd colors. If anything seems off, it’s best to throw it out. Enchiladas are made of tortillas filled with various ingredients. The main filling often includes ground beef, cheese, and beans. You can use different meats, like chicken or turkey. Some people even make vegetarian enchiladas with vegetables or beans. The tortillas are rolled up and covered in a tasty sauce, usually enchilada sauce. The sauce can be red, green, or even homemade. Yes, you can make enchiladas ahead of time. To prepare, cook the beef mixture and fill the tortillas as directed. Instead of baking them, cover the dish with foil and refrigerate it. You can store them for a day or two before baking. Just remember to bake them longer if they are cold from the fridge. This lets the flavors meld and saves time on busy nights. There are many great sides to serve with enchiladas. You can try a simple salad with lettuce, tomatoes, and avocado. Rice and beans also make a nice pairing. For a crunchy touch, tortilla chips with salsa are a hit. When it comes to drinks, try serving them with a cold soda or iced tea. Adding a fresh salsa or guacamole on the side adds extra flavor. If you want to make these delicious dishes, check out the full recipe for Cheesy Ground Beef Enchiladas. Making enchiladas is simple and fun. We covered the main ingredients, cooking steps, tips, and variations. You can easily customize these dishes to suit your taste and dietary needs. Whether you want spicy or vegetarian options, there’s something for everyone. Proper storage keeps leftovers fresh for later enjoyment. I hope you feel inspired to create your own delicious enchiladas at home. Enjoy every bite!

Looking for a simple and tasty meal that’s sure to please everyone? Ground beef enchiladas check all the boxes! With just a handful of ingredients, you can create a cozy …

Read more

Categories Dinner

Honey Peach Cream Cheese Cupcakes Delightful Treat

June 8, 2025 by Chef Remy
To make these sweet treats, you will need: - 1 cup all-purpose flour - 1/2 teaspoon baking powder - 1/4 teaspoon baking soda - 1/4 teaspoon salt - 1/2 cup unsalted butter, softened to room temperature - 1/2 cup granulated sugar - 1/4 cup honey - 2 large eggs, at room temperature - 1 teaspoon pure vanilla extract - 1/2 cup cream cheese, softened - 1 large ripe peach, peeled and diced into small pieces - 1/4 teaspoon ground cinnamon - 1/4 cup powdered sugar, for frosting You can swap out some ingredients if needed: - Butter: Use coconut oil for a dairy-free option. - Honey: Maple syrup works well for a vegan treat. - Cream Cheese: Try a dairy-free cream cheese for a vegan twist. - Peach: Swap with other fruits like apricots or berries. Here are the tools you’ll need: - 12-cup muffin pan - Cupcake liners - Mixing bowls (medium and large) - Electric mixer - Whisk - Spatula - Toothpick (for testing cupcake doneness) - Wire rack for cooling These ingredients and tools make the perfect setup for your Honey Peach Cream Cheese Cupcakes. Happy baking! For the full recipe, see below. To start, preheat your oven to 350°F (175°C). Grab a 12-cup muffin pan and line it with colorful cupcake liners. This adds fun to your baking. In a medium bowl, mix 1 cup of all-purpose flour, 1/2 teaspoon of baking powder, 1/4 teaspoon of baking soda, and 1/4 teaspoon of salt. Whisk them well and set aside. In a larger bowl, cream together 1/2 cup of softened unsalted butter, 1/2 cup of granulated sugar, and 1/4 cup of honey. Beat this mixture on medium speed until it gets light and fluffy. This takes about 3 to 5 minutes. Next, add 2 large eggs one at a time. Mix well after each egg. Then, stir in 1 teaspoon of pure vanilla extract and 1/2 cup of softened cream cheese. Blend until smooth. Now, slowly add the flour mixture to the wet ingredients. Mix gently until just combined. Don’t overmix or your cupcakes will be tough. Using a spatula, fold in 1 large ripe peach, peeled and diced, along with 1/4 teaspoon of ground cinnamon. This adds great flavor and sweetness. Spoon the batter into the prepared cupcake liners, filling each about two-thirds full. This gives them room to rise while baking. Place the muffin pan in the oven and bake for 18 to 20 minutes. To check if they are done, insert a toothpick into the center of a cupcake. If it comes out clean, they are ready. Once baked, let the cupcakes cool in the pan for about 5 minutes. After that, move them to a wire rack to cool completely before frosting. For the frosting, use the remaining softened cream cheese and mix in 1/4 cup of powdered sugar. Beat until it’s smooth and creamy. Once your cupcakes are fully cool, frost each one generously with the cream cheese mix. For extra flair, top each frosted cupcake with a small slice of fresh peach and a drizzle of honey. This adds a lovely touch and enhances the sweetness. Enjoy this delightful treat! For the full recipe, check the details above. Baking can be tricky, but knowing common mistakes helps. Here are some key points: - Measuring Ingredients: Always use the right tools. Use dry measuring cups for flour and sugar. Liquid measuring cups work best for honey and other liquids. - Overmixing Batter: Mix just until combined. Overmixing makes cupcakes tough. You want light and fluffy treats. - Not Preheating the Oven: Always preheat your oven. This step helps your cupcakes rise properly. An oven that's too cool can lead to dense cupcakes. - Ignoring Cooling Time: Let your cupcakes cool before frosting. If they are still warm, the frosting will melt away. The right texture is key to great cupcakes. Here are my best tips: - Use Room Temperature Ingredients: Butter, eggs, and cream cheese should be at room temperature. This helps create a smooth batter and better texture. - Don’t Skip the Creaming Step: Cream butter and sugar well. This step adds air and makes your cupcakes light. - Fold in the Peaches Gently: When adding peaches, fold carefully. This keeps the batter airy and prevents it from collapsing. Adding ingredients can boost flavor. Here are some ideas: - Use Fresh Herbs: A hint of mint or basil can brighten the flavors. Try adding finely chopped mint to the batter for a refreshing twist. - Add Zest: Grate a little lemon or orange zest into the batter. The zest adds a bright note that pairs well with peaches. - Try Different Sweeteners: Instead of just honey, you can mix in brown sugar or maple syrup. This adds depth and richness to the flavor. Explore these tips as you bake your Honey Peach Cream Cheese Cupcakes. For the full recipe, check out the details earlier! Enjoy making these delightful treats! {{image_4}} You can switch the peaches for other fruits. Try ripe strawberries, sweet blueberries, or juicy raspberries. Each fruit brings its own flavor and color. This helps your cupcakes look and taste unique. Experimenting with fruits lets you create your own special recipe. Adding spices or extracts can boost flavors. Consider adding a dash of nutmeg for warmth. A touch of almond extract gives a nice twist. For a fun kick, mix in a bit of ginger. These small changes can make a big difference in taste. If you want gluten-free cupcakes, use a gluten-free flour blend. Many blends work well in baking. Just make sure to check the package for best results. You can still enjoy all the flavors without gluten. These gluten-free options keep the spirit of the Honey Peach Cream Cheese Cupcakes alive. To keep your Honey Peach Cream Cheese Cupcakes fresh, follow these tips. First, let the cupcakes cool completely after baking. Then, store them in an airtight container. This helps prevent them from drying out. If you want to keep them moist, you can add a slice of bread in the container. The bread will absorb extra moisture. Freezing cupcakes is a great way to enjoy them later. Start by allowing the cupcakes to cool down completely. Next, wrap each cupcake in plastic wrap. After that, place the wrapped cupcakes in a freezer-safe bag. Label the bag with the date. They can stay in the freezer for up to three months. When you want to enjoy one, take it out and let it thaw in the fridge overnight. Honey Peach Cream Cheese Cupcakes last about three days at room temperature. If you store them in the fridge, they can last about a week. However, you should check for signs of spoilage. If you see any mold or an off smell, it’s best to toss them. The texture might change after a few days, too. Fresh cupcakes should feel soft and moist. If they feel hard or dry, they are past their prime. Yes, you can use canned peaches. Drain them well and chop them into small pieces. Fresh peaches add a bright flavor and juicy texture, but canned peaches work well too. They can make the cupcakes softer and sweeter. Just remember to adjust the honey if the canned peaches are syrupy. You can make several swaps to match dietary needs. For a gluten-free version, use a gluten-free flour blend. If you need dairy-free cupcakes, replace butter and cream cheese with plant-based options. You can also use flax eggs instead of regular eggs. These changes make the recipe more inclusive while still keeping it delicious. To reheat leftover cupcakes, set your oven to 350°F (175°C). Place the cupcakes on a baking sheet and cover them with aluminum foil. Heat them for about 5-10 minutes, or until warm. You can also use a microwave. Heat a cupcake for 10-15 seconds. This method keeps the cupcakes moist and soft for a tasty treat anytime. For the full recipe, check the section above! You now have a complete guide for making Honey Peach Cream Cheese Cupcakes. We covered ingredients, substitutions, and tools you’ll need. I shared simple steps for baking, frosting, and tips to avoid mistakes. You can try different fruits or flavors to make the recipe your own. Proper storage will keep your cupcakes fresh longer. I hope you feel ready to bake and enjoy these delicious treats!

Get ready to bake something special! Honey Peach Cream Cheese Cupcakes are a sweet dream come true. With soft, moist cake and creamy frosting, they make perfect treats for any …

Read more

Categories Desserts

Crispy Ham & Cheese Puff Pastry Stacks Treats

June 8, 2025 by Chef Remy
- 1 sheet of puff pastry, thawed - 6 slices of deli ham (preferably smoked or honey ham) - 1 cup shredded Gruyère cheese (or substitute with mozzarella) - 1 egg, beaten (for egg wash) - 1 tablespoon Dijon mustard - 1 tablespoon fresh thyme leaves (optional) - Salt and pepper to taste - Sesame seeds for garnish (optional) - 2 tablespoons butter, melted Gathering quality ingredients is key for these crispy ham & cheese puff pastry stacks. Start with good-quality puff pastry. I like to use the frozen type that you can find at most grocery stores. Make sure to thaw it properly so it rolls out easily. The ham really makes a difference too. I prefer smoked or honey ham for a nice flavor. Gruyère cheese adds a rich taste, but you can use mozzarella if you like it milder. Don't forget the Dijon mustard; it adds a great kick. Fresh thyme is optional, but it gives a nice herbal touch. Salt and pepper enhance all the flavors, so season to your taste. For garnish, sesame seeds add a nice crunch. Finally, butter adds richness and helps with browning. When you have all your ingredients ready, you're set to create a dish that's not just tasty but also fun to make. If you want the complete details, check out the Full Recipe. - Preheat oven to 400°F (200°C). - Prepare baking sheet with parchment paper. - Roll out the pastry on a floured surface. - Cut into rectangles or squares. - Spread mustard on half of the pastry pieces. - Add a slice of ham and a handful of cheese. - Season with salt and pepper. - Layer with the remaining pastry pieces on top. - Brush with egg wash and melted butter. - Bake until golden brown, about 15-20 minutes. Following these steps will guide you in making Crispy Ham & Cheese Puff Pastry Stacks that are flaky, cheesy, and full of flavor. For the full recipe, check the detailed instructions provided earlier. Enjoy the process and the delicious result! To get the best crispiness, use an egg wash. This simple step adds a shiny look and a golden color. It also helps the layers stick together. Make sure to brush the tops with the beaten egg before baking. Adjust baking time if your stacks are larger or smaller. Keep an eye on them; they should puff up and turn golden brown. Adding herbs and spices can elevate your stacks. Try fresh thyme or rosemary for a nice touch. You can also use garlic powder or paprika for extra flavor. When it comes to cheese, Gruyère is great, but mozzarella works too. You might also enjoy cheddar for a sharper taste or feta for a tangy twist. One common mistake is overstuffing the pastry. This can cause it to burst during baking. Use just enough filling to keep it deliciously rich. Another mistake is not sealing the edges properly. Press down firmly around the edges to keep the filling inside. Proper sealing ensures your stacks hold together beautifully during baking. You can find the full recipe at the end of this article to guide you through making these delightful treats. {{image_4}} You can easily make these stacks meat-free. Just replace ham with sautéed vegetables. Bell peppers, mushrooms, and spinach work well. Sauté them in olive oil until soft. This adds great flavor and texture. Plus, it keeps the dish healthy and colorful. Cheese lovers can have fun experimenting. Try using cheddar, feta, or blue cheese. Each cheese brings a unique taste. Cheddar gives a sharpness, while feta adds creaminess. Blue cheese offers a bold flavor that pairs well with other ingredients. Mix and match to find your perfect combo. Incorporate seasonal herbs or spices for an extra kick. Fresh basil or rosemary brightens the dish. You can also use spices like paprika or cumin. These add warmth and depth. Seasonal ingredients make your stacks feel fresh and exciting, no matter the time of year. To keep your Crispy Ham & Cheese Puff Pastry Stacks fresh, place them in an airtight container. This will help avoid sogginess. You can store them in the fridge for up to three days. Before sealing, let them cool to room temperature. This step prevents moisture buildup, which can ruin their crispiness. When you're ready to enjoy your leftovers, reheating is key. The best way to keep them crispy is by using an oven. Preheat your oven to 350°F (175°C). Place the stacks on a baking sheet lined with parchment paper. Heat them for about 10-15 minutes. Check them often until they are warm and the tops are crispy again. If you want to save some stacks for later, freezing is a great option. Allow the stacks to cool completely. Then, wrap each stack tightly in plastic wrap. After that, place them in a freezer-safe bag or container. They can last up to three months in the freezer. To thaw, move them to the fridge overnight. For best results, reheat them in the oven as described above to restore their crunchy texture. Yes, you can prepare the stacks ahead of time. Assemble them and place them in the fridge. When ready to bake, let them sit at room temperature for 15 minutes. This helps them cook evenly. Bake them as directed, and they will taste fresh and delicious. If you don’t have powdered cheese, use shredded cheese instead. Gruyère is great, but mozzarella works too. You can mix different cheeses for fun flavors. Cheddar or Monterey Jack also make tasty options. Look for a golden-brown color on top. The stacks should puff up nicely. If they are golden and crispy, they are done. You can also check if they feel firm to the touch. Absolutely! Store-bought puff pastry saves time and is easy to use. Just thaw it according to the package instructions. It will still give you that flaky, crispy texture you want. Serve these stacks with a fresh salad or some veggie sticks. A dipping sauce, like mustard or ranch, also pairs well. You could even offer a side of soup for a warm meal. For detailed instructions on how to make these delicious Crispy Ham & Cheese Puff Pastry Stacks, check out the Full Recipe. It includes every step to ensure your stacks turn out perfect! The blog post covered how to make Crispy Ham & Cheese Puff Pastry Stacks. You learned about the ingredients, from puff pastry to flavorful cheeses. I provided step-by-step instructions for preparation and baking. Tips on achieving perfect crispiness and avoiding common mistakes were highlighted. In conclusion, this dish is easy, tasty, and can be varied to suit your tastes. Enjoy making it, and don’t hesitate to try different fillings and flavors. It’s a dish you'll love serving and sharing!

Are you ready to impress your friends with a delightful snack? Crispy Ham & Cheese Puff Pastry Stacks are simple yet packed with flavor. With flaky pastry, tender ham, and …

Read more

Categories Appetizers
Older posts
Newer posts
← Previous Page1 … Page96 Page97 Page98 … Page130 Next →

ROASTED RECIPES

Where bold flavors meet everyday meals. Warm, vibrant, and made to share. 🔥🥗🍴

PAGES

Home About Contact Privacy Policy Terms & Conditions Cookie Policy GDPR Policy Copyright Policy Disclaimer

CATEGORIES

Appetizers Desserts Salads Breakfast Dinner

Contact

  • Pinterest
  • Mail
Copyright © 2025 Roasted Flavors. All rights reserved.