Skip to content
Roasted Flavors
  • Home
  • Appetizers
  • Desserts
  • Salads
  • Breakfast
  • Dinner
  • Privacy Policy
  • Contact
  • About

Chef Remy

Green Goddess Salad Sandwich Fresh and Flavorful Meal

June 11, 2025 by Chef Remy
- 1 cup cooked and cooled chickpeas, drained - 1/2 cup creamy Greek yogurt - 1/4 cup tahini - 1 tablespoon fresh lemon juice - 1 tablespoon apple cider vinegar - 1/2 ripe avocado, mashed - Fresh herbs: parsley and basil - 1 garlic clove, minced - Seasoning: salt and black pepper - 4 slices whole grain bread - 1 cup baby spinach or mixed greens - Fresh cucumber slices I love using chickpeas in this sandwich. They add a nice, hearty base. The creamy Greek yogurt gives a rich texture that feels indulgent. Tahini brings a nutty flavor, which works so well with the other ingredients. Lemon juice gives a bright zing, while apple cider vinegar adds a tangy kick. The mashed avocado adds creaminess and a touch of healthy fat. Fresh herbs like parsley and basil give a burst of flavor. Garlic adds depth, making the taste more robust. For the bread, I prefer whole grain. It adds fiber and has a nice, nutty taste. I always layer baby spinach or mixed greens for a fresh crunch. Lastly, fresh cucumber slices add a refreshing bite. This combination makes the Green Goddess Salad Sandwich not just tasty but also a healthy choice. You can find the full recipe below to make this delicious sandwich at home. - Mixing the ingredients for the Green Goddess spread In a large bowl, add the cooked chickpeas, Greek yogurt, tahini, lemon juice, apple cider vinegar, and mashed avocado. This combo gives the spread a rich and creamy base. - Mashing and combining the mixture Use a fork or potato masher to blend everything together. Aim for a mix that is smooth but still has some chunks. This texture adds interest to your spread. - Toasting the whole grain bread Lightly toast the slices of whole grain bread. A golden brown color makes the bread crispy and tasty. It creates a nice contrast with the creamy filling. - Assembling the sandwich Take two slices of the toasted bread and spread a generous layer of the green goddess mixture on each. Top with baby spinach or mixed greens and fresh cucumber slices. Finally, place the other two slices on top to complete the sandwich. - How to serve the Green Goddess Salad Sandwich Slice each sandwich in half for easy eating. Arrange the sandwiches on a rustic wooden board. Add extra cucumber slices on the side for a fresh touch. Garnish with a sprig of parsley to make it look inviting. Enjoy this fresh and flavorful meal right away for the best taste. To really make this Green Goddess Salad Sandwich shine, you can adjust the seasoning. Start with the salt and pepper, then taste and tweak as needed. If you like it spicy, add a pinch of red pepper flakes. For a zesty kick, toss in some chopped pickles or a touch of hot sauce. You can also explore adding different herbs. Chives or dill can add a unique twist to the spread. Want to change things up? Try adding diced bell peppers or shredded carrots for extra crunch and color. You can also mix in some nuts or seeds, like sunflower seeds, for added texture and nutrition. Toasting your bread is key to a great sandwich. I recommend using a toaster, but you can also use a skillet. If you choose a skillet, heat it over medium heat. Add a little olive oil or butter to get that golden crust. Toast each slice for about 2-3 minutes on each side. You want the bread to be crispy and sturdy enough to hold all the tasty filling. Try toasting the bread just before you assemble the sandwich. This keeps it warm and crunchy. A perfect bite awaits! {{image_4}} For the Greek yogurt, you can use sour cream or silken tofu. Both offer a creamy base and will still give you a rich taste. If you want a dairy-free option, try using cashew cream or coconut yogurt instead. For tahini, sunflower seed butter works well. It adds a nutty flavor without the sesame. You could also use almond butter if you prefer. When it comes to bread, whole grain is great, but don’t stop there! Try sourdough, rye, or even a gluten-free option. Each bread brings a different taste and texture. You can also use pita or wraps for a fun twist. To make your sandwich even more exciting, think about adding toppings. You can layer in juicy tomatoes or crisp bell peppers for extra crunch. Thinly sliced radishes add a peppery bite that pairs well with the creamy spread. If you want more greens, try arugula or thinly sliced kale. For spreads, hummus adds a nice layer of flavor. You can also spread some pesto for a fresh taste. Don't forget to sprinkle some seeds or nuts on top for added crunch. These small changes can turn your Green Goddess Salad Sandwich into a new favorite dish. To keep your Green Goddess Salad Sandwich fresh, wrap it well. Use plastic wrap or a reusable container. Store it in the fridge for up to two days. If you notice any sogginess, you can separate the filling from the bread. This keeps both parts fresh longer. For best taste, eat the sandwich the same day you make it. However, if you do have leftovers, consider adding extra greens or cucumbers just before eating. For quick assembly, prep your ingredients ahead of time. Cook and cool the chickpeas a day before. Mix the Green Goddess spread and store it in an airtight container. Chop the herbs and keep them in a small bag in the fridge. Toast the bread right before you want to eat. This way, you enjoy a crisp and fresh sandwich without a lot of fuss. You can make this meal even faster by preparing double the batch. Just follow the Full Recipe. A Green Goddess Salad Sandwich is a fresh, vibrant meal. It features a creamy spread made from chickpeas, Greek yogurt, tahini, and herbs. The main components include: - Cooked chickpeas for protein - Creamy Greek yogurt for richness - Tahini for a nutty flavor - Fresh herbs like parsley and basil - Bright lemon juice for zing - Crunchy vegetables like cucumber - Whole grain bread for a hearty base This sandwich is colorful and packed with flavor, making it a fun meal option. Yes, you can easily make this recipe vegan! To do this, swap the Greek yogurt for a plant-based yogurt. You can also replace the tahini with a nut or seed butter. Here are your options: - Use almond or cashew yogurt instead of Greek yogurt. - Choose sunflower seed butter if you need a nut-free option. This way, you keep the flavor while making it vegan-friendly. The Green Goddess spread lasts about three days in the fridge. To keep it fresh, store it in an airtight container. Here are some tips: - Keep the spread covered to prevent it from drying out. - If it looks a bit brown, stir it well before using. Make sure to use it within three days for the best taste! In this blog post, we explored the Green Goddess Salad Sandwich. You learned the key ingredients like chickpeas, yogurt, tahini, and fresh herbs. We went through each preparation step, from mixing to toasting. Serving tips for the sandwich helped you create a delightful meal. I shared ways to enhance flavors and offered alternatives for the recipe. With proper storage and meal prep tips, this sandwich stays fresh and tasty. Enjoy making this fun dish and experiment with your own twists!

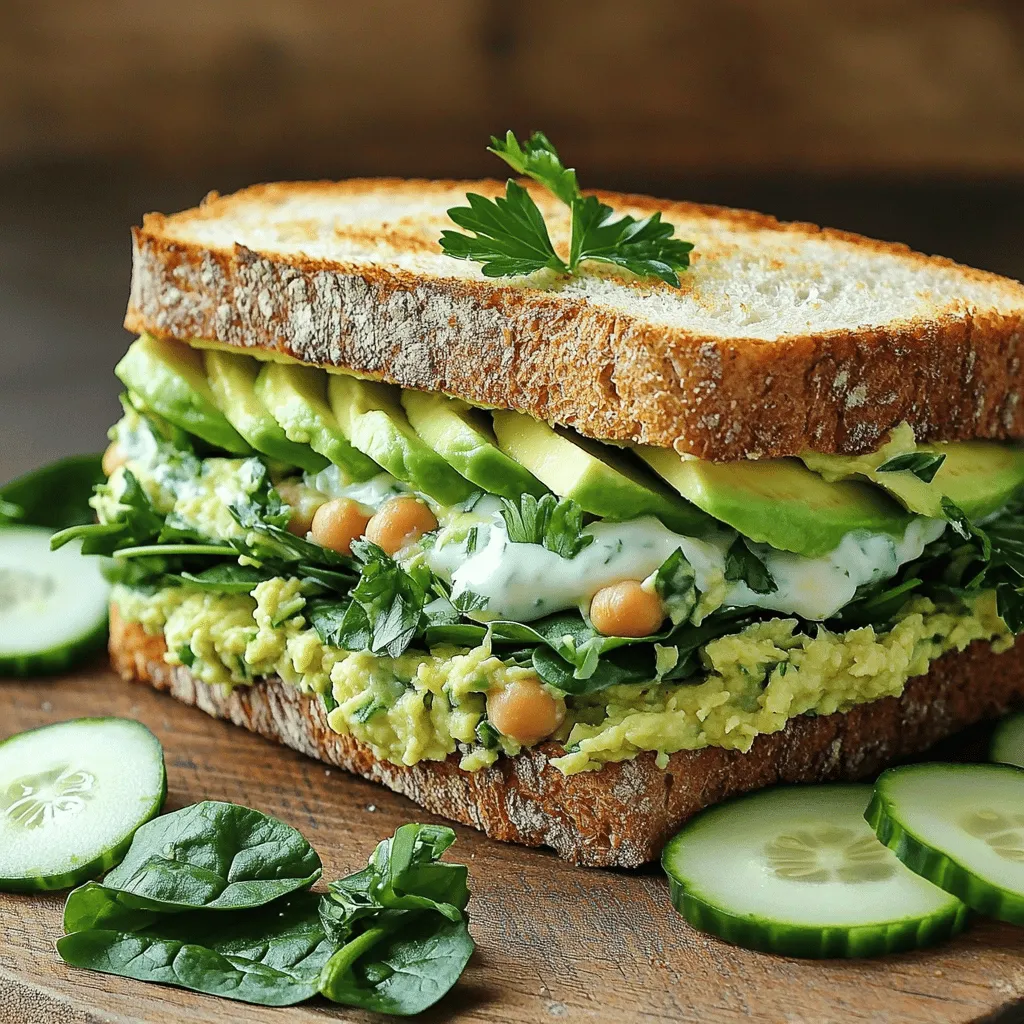
Looking for a fresh and tasty meal? The Green Goddess Salad Sandwich is perfect. It combines creamy ingredients and vibrant flavors. This sandwich is not only easy to make but …

Read more

Categories Salads

Gluten Free Peanut Butter Banana Muffins Delight

June 11, 2025 by Chef Remy
To make these delightful gluten-free peanut butter banana muffins, gather the following ingredients: - 2 ripe bananas, thoroughly mashed - 1/2 cup creamy peanut butter - 1/3 cup honey or pure maple syrup - 2 large eggs, at room temperature - 1 teaspoon pure vanilla extract - 1 cup gluten-free all-purpose flour - 1 teaspoon baking powder - 1/2 teaspoon baking soda - 1/4 teaspoon fine sea salt - 1/2 teaspoon ground cinnamon (optional) - 1/4 cup dark chocolate chips or chopped nuts (optional) These ingredients create a balance of flavors and textures. The ripe bananas add natural sweetness and moisture. Peanut butter gives a rich, nutty taste. Honey or maple syrup adds a hint of sweetness. The gluten-free flour keeps these muffins light and fluffy. Baking powder and baking soda help the muffins rise. A dash of salt enhances the flavors. Ground cinnamon offers warmth, while dark chocolate chips or nuts provide extra crunch. You can find the full recipe with detailed steps to whip up these tasty muffins. Enjoy the process! - Set oven temperature to 350°F (175°C). - Prepare muffin tin with liners or non-stick spray. - Combine mashed bananas and peanut butter. - Create a smooth, creamy mixture. - Incorporate honey (or maple syrup), eggs, and vanilla. - Ensure uniform mixture. - Whisk gluten-free flour, baking powder, baking soda, salt, and cinnamon. - Gradually fold the dry mixture into the wet. - Avoid overmixing. - Distribute batter evenly in muffin cups. - Fill halfway for rising. - Bake for 18-20 minutes. - Cool in tin for 5 minutes, then transfer to wire rack. For the complete recipe, check the Full Recipe. To make great gluten-free muffins, I suggest using a scale. This gives you precise measurements for every ingredient. A small mistake in measurement can change the texture. Always check your flour for gluten contamination. Cross-contamination can ruin your muffins. Store gluten-free flour in a separate spot. It helps keep your baking safe and tasty. You can add chocolate chips or nuts to your muffins for extra crunch. These options boost the flavor and texture. If you have a sweet tooth, feel free to adjust the sweetness. Use more honey or maple syrup if you like. Each bite should make you smile! Presenting your muffins well makes them more inviting. Serve them on a rustic wooden board. This adds charm and warmth to your dish. To make them look even better, garnish with banana slices. A drizzle of extra peanut butter on top makes it irresistible. Your guests will love the look and taste! Check out the Full Recipe for complete details on making these delightful muffins. {{image_4}} You can change the flavor of gluten free peanut butter banana muffins easily. Here are a few ideas: - Swap peanut butter: Use almond or cashew butter instead. This adds a new nutty taste. - Use different fruits: Applesauce or peaches can replace bananas. This will change the texture and flavor. These swaps give you many options to try. Each choice brings a unique taste to your muffins. Adapting these muffins for special diets is simple. Here are some easy swaps: - Replace honey: Use agave syrup for a vegan option. It works just as well and adds sweetness. - Egg substitutes: If you want an egg-free version, use applesauce or flaxseed meal mixed with water. This keeps the muffins moist. These substitutions make it easy for everyone to enjoy these tasty treats. Enjoy experimenting with these variations! You can find the full recipe for gluten free peanut butter banana muffins to guide you through the process. To keep your muffins fresh, store them in an airtight container. They stay good at room temperature for up to three days. If you want them to last longer, refrigerate them. This helps keep them moist and tasty for a few extra days. Freezing is a great way to save these muffins. First, freeze them in a single layer on a baking sheet. Once they are solid, transfer them to a freezer bag. This method prevents them from sticking together. When you want to enjoy one, just thaw or reheat as needed. This will give you the best taste and texture. For the full recipe, check the details above. Yes, you can make these muffins nut-free. Just substitute peanut butter with sunflower seed butter. This swap keeps the muffins tasty and safe for those with nut allergies. To check if the muffins are done, use a toothpick. Insert it into the center of a muffin. It should come out clean or with just a few moist crumbs. If it’s wet, bake them a bit longer. Absolutely! You can make these muffins vegan by using an egg replacement. Also, switch honey for pure maple syrup. This way, they fit a vegan diet perfectly. These muffins pair well with many tasty options. Try serving them with yogurt or fresh fruit. For extra flavor, add a smear of peanut butter on top. You can enjoy them in many ways! These muffins are easy to make and delicious to eat. We started with simple ingredients, like bananas and peanut butter. Then, we mixed them step-by-step for best results. Make sure to try different flavors and store them properly. Baking gluten-free can be fun and tasty with the right tips. Enjoy these muffins warm or with a topping you like. They are great for breakfast or a snack! Now, it’s your turn—get baking and savor each bite!

Are you ready for a tasty treat? These Gluten Free Peanut Butter Banana Muffins are perfect for breakfast or a snack. Made with simple ingredients like ripe bananas and creamy …

Read more

Categories Desserts

Crockpot Cheesy Potatoes & Kielbasa Easy Comfort Dish

November 11, 2025June 11, 2025 by Chef Remy
- 2 lbs baby potatoes, halved - 1 lb kielbasa sausage, sliced into rounds - 1 cup shredded sharp cheddar cheese - 1 cup shredded mozzarella cheese - 1 medium onion, finely diced - 3 garlic cloves, minced - 1 cup chicken broth (low sodium recommended) - 1 cup heavy cream - 2 teaspoons Italian seasoning - Salt and freshly ground black pepper to taste - Fresh parsley, chopped, for garnish You can use different cheeses or sausages if you want. For cheese, try gouda or pepper jack for a kick. If you prefer a healthier option, use turkey kielbasa. You can also swap out the heavy cream for a lighter milk or plant-based cream. Choosing the right baby potatoes is key. Look for firm and smooth potatoes without blemishes. For the kielbasa, pick a brand that is high in flavor and quality. When it comes to cheese, fresh blocks melt better than pre-shredded options. Grate your own for a creamier result. {{ingredient_image_2}} Start by washing the baby potatoes. Cut them in half to help them cook evenly. I like to use fresh potatoes for the best taste. Next, slice the kielbasa sausage into rounds. This adds great texture to the dish. Finely dice one medium onion. The onion gives a nice flavor. Finally, mince three garlic cloves. Fresh garlic adds a wonderful aroma to the meal. For the best flavor, layer the ingredients in the crockpot. First, place the halved potatoes at the bottom. This helps them cook well. Next, add the sliced kielbasa on top of the potatoes. Then, spread the diced onion and minced garlic over the sausage. Make sure to distribute them evenly. This allows the flavors to mix perfectly. Now it’s time to cook! In a bowl, whisk together one cup of chicken broth, one cup of heavy cream, two teaspoons of Italian seasoning, and a pinch of salt and pepper. Pour this creamy mixture over the layered ingredients in the crockpot. Cover the pot and choose your cooking setting. If you set it to low, cook for 6-7 hours. For a quicker option, set it to high and cook for 3-4 hours. The potatoes should be tender when done. After the cooking time, sprinkle one cup each of shredded sharp cheddar cheese and mozzarella cheese over the top. Cover the crockpot again for 15-20 minutes. This allows the cheese to melt into delicious gooeyness. Once melted, stir everything together gently. Finally, remove the lid and garnish with chopped fresh parsley for a pop of color. To ensure the potatoes are tender and the cheese melts just right, choose the right potatoes. Baby potatoes work best. Halve them for even cooking. Once your dish is done, let it sit for 15-20 minutes. This helps the cheese melt beautifully. Stir gently after it melts to combine everything well. You can always add more flavor! Consider these spices: - A pinch of paprika for a smoky touch. - Crushed red pepper flakes for heat. - Fresh herbs like thyme or rosemary for brightness. Toppings can elevate your dish. Try crispy bacon bits or crunchy fried onions. A sprinkle of green onions adds freshness too! If your potatoes are undercooked, try these fixes: - Cook longer on low heat. - Add a splash of chicken broth to help. For uneven cheese melting, ensure you layer it evenly. Stir gently after melting. If it clumps, add a bit more cream or broth to smooth it out. Adjusting heat settings can also help achieve an even melt. Pro Tips Pre-cook the Potatoes: For extra tenderness, you can parboil the baby potatoes for about 10 minutes before adding them to the slow cooker. This will enhance their cooking time and texture. Use Variety in Sausage: Experiment with different types of sausage, such as smoked or spicy kielbasa, to add unique flavors to the dish. Each type brings its own character! Cheese Variations: Feel free to mix in different cheeses like gouda or pepper jack for a twist on the traditional cheese blend. This will give your dish a distinct taste profile. Make Ahead: This dish is perfect for meal prep! Assemble the ingredients the night before and store them in the fridge. Just pop it in the slow cooker in the morning for an easy dinner. {{image_4}} You can make this dish vegetarian by swapping the kielbasa for plant-based sausage. Many brands offer tasty veggie sausage that mimics the flavor and texture of meat. You can also use mushrooms for a hearty bite. Slice them thick and layer them with the potatoes. This keeps the dish filling and satisfying without meat. Cheese is the star here, so feel free to mix things up. Instead of sharp cheddar and mozzarella, try gouda or pepper jack. Each cheese brings a unique flavor. You can also use a blend of cheeses for more depth. Just remember to keep the total amount of cheese the same. Adding some heat can elevate your cheesy potatoes. Try mixing in diced jalapeños or crushed red pepper flakes. You can also add a pinch of smoked paprika for a warm, smoky flavor. Fresh herbs like thyme or rosemary can enhance the dish, too. Just toss them in before cooking for great results. To store your cheesy potatoes and kielbasa, let the dish cool first. Place it in an airtight container. You can keep it in the fridge for up to three days. If you want to store it longer, freeze it. Use freezer-safe containers or bags. Make sure to remove as much air as possible to prevent freezer burn. When you're ready to enjoy leftovers, you have a few options. The best way is to reheat in the oven. Preheat the oven to 350°F (175°C). Transfer the dish to an oven-safe dish and cover with foil. Heat for about 20-25 minutes until it's warm. You can also use the microwave. Heat in short bursts of one minute, stirring in between, until heated through. This keeps the cheese from becoming rubbery. In the fridge, your cheesy potatoes and kielbasa last about three days. If frozen, it can last for up to three months. Just remember to label your containers with the date. This way, you’ll know when to enjoy them before they lose quality. Yes, you can prepare this dish ahead of time. To do this, chop your baby potatoes and kielbasa. Also, dice the onion and mince the garlic. You can store these in the fridge for up to a day. When you're ready to cook, simply add the prepped ingredients to the crockpot. This saves time and makes meal prep easier on busy days. Yes, you can cook this dish without a slow cooker. You can use an oven for this recipe. Preheat your oven to 350°F (175°C). In a large baking dish, layer the ingredients as you would in the crockpot. Cover it with foil and bake for about 1.5 hours. Check if the potatoes are tender, then add the cheese and bake uncovered for an extra 15 minutes. Yes, you can double this recipe in a crockpot. Make sure your slow cooker is large enough to hold all the ingredients. If it’s too full, the cooking time may change. You might need to increase the cooking time by an hour or so. Always check the potatoes for doneness before serving. This blog post covered everything you need to know about cooking with baby potatoes and kielbasa. We explored ingredients and substitutions for a perfect dish. I shared step-by-step instructions for preparing and layering in the crockpot. You also learned tips to enhance texture and flavor. Experiment with variations to suit your taste and learn how to store leftovers. Remember, cooking is about trying new ideas. Enjoy your culinary adventure with these easy recipes!

Comfort food lovers, rejoice! If you’re craving a heartwarming meal that’s simple and satisfying, look no further than my Crockpot Cheesy Potatoes & Kielbasa. This dish brings together creamy potatoes …

Read more

Categories Dinner

THE BEST Hot Fudge Brownie Bread Irresistible Delight

June 11, 2025 by Chef Remy
To make this delicious bread, gather these ingredients: - 1 cup all-purpose flour - 1/2 cup unsweetened cocoa powder - 1 teaspoon baking powder - 1/2 teaspoon salt - 1/2 cup unsalted butter, melted - 1 cup granulated sugar - 2 large eggs - 1 teaspoon vanilla extract - 1/4 cup hot fudge sauce (plus extra for drizzling) - 1/2 cup chocolate chips - 1/4 cup chopped walnuts (optional) You can easily swap some ingredients to fit your needs. For a dairy-free version, use plant-based butter. Almond milk can replace regular milk in most recipes. If you prefer nut-free options, skip the walnuts. You can use sunflower seeds for a crunch without nuts. For a lower sugar option, try using a sugar substitute or applesauce. These changes keep the bread tasty while meeting your dietary needs. Using good-quality ingredients makes a big difference. Fresh eggs create a richer taste. High-quality cocoa powder gives a deep chocolate flavor. Unsalted butter adds creaminess and helps control salt levels. The chocolate chips should be semi-sweet for a perfect balance of sweetness. When you invest in quality, you ensure each bite is full of flavor. This attention to detail leads to a truly unforgettable Hot Fudge Brownie Bread. Making the best hot fudge brownie bread is simple and fun. Here’s how to do it step by step. 1. Preheat your oven to 350°F (175°C). Grease a 9x5-inch loaf pan well. This helps the bread come out easily. 2. Mix the dry ingredients. In a medium bowl, whisk together: - 1 cup all-purpose flour - 1/2 cup unsweetened cocoa powder - 1 teaspoon baking powder - 1/2 teaspoon salt 3. Combine the wet ingredients. In a large bowl, mix: - 1/2 cup unsalted butter, melted - 1 cup granulated sugar Mix until smooth and shiny. 4. Add eggs and vanilla. Beat in: - 2 large eggs (one at a time) - 1 teaspoon vanilla extract Mix until fluffy and light in color. 5. Fold in the dry mix. Gradually add the dry ingredients to the wet mixture. Use a rubber spatula and mix until no flour is visible. Be careful not to overmix. 6. Add the fudge and chocolate chips. Stir in: - 1/4 cup hot fudge sauce - 1/2 cup chocolate chips - 1/4 cup chopped walnuts (optional) Make sure they are evenly mixed. 7. Pour into the pan. Transfer the batter into your prepared loaf pan. Use a spatula to smooth the top. 8. Bake. Place the pan in the oven and bake for 35-40 minutes. Look for a toothpick inserted in the center. It should come out with a few moist crumbs. 9. Cool down. Once baked, take the pan out and let it cool for 10 minutes. Transfer the bread to a wire rack for complete cooling. 10. Serve with fudge. Drizzle more hot fudge sauce over the loaf before serving. Enjoy every bite! Watch for these signs while baking: - The top should look set and slightly cracked. - The edges will pull away from the pan. - A toothpick test shows a few moist crumbs, not wet batter. - Oven temperature: Always preheat your oven. This is key for even baking. - Toothpick test: Use a toothpick to check doneness. Pull it out when you see a few moist crumbs. This method ensures your hot fudge brownie bread turns out rich, gooey, and delicious every time. For the full recipe, refer to the ingredients section above. To achieve that perfect fudgy texture, follow these steps: - Use room temperature eggs for better mixing. - Be careful not to overmix the batter. Stop mixing when you see no dry flour. - Add hot fudge sauce gently to keep the mixture rich and gooey. - Bake until a toothpick shows a few moist crumbs, not completely dry. Having the right tools makes baking fun and easy. Here’s what I recommend: - A 9x5-inch loaf pan for even baking. - Mixing bowls of different sizes for dry and wet ingredients. - A rubber spatula for folding ingredients without overmixing. - An oven thermometer to ensure the right baking temperature. Avoid these common pitfalls for best results: - Don’t skip greasing the loaf pan; it helps the bread come out easily. - Overbaking can dry out your bread, so watch the clock closely. - Forgetting to sift the dry ingredients can lead to lumps. - Adding too many chocolate chips can change the texture; stick to half a cup. For the full recipe, check out the Ultimate Hot Fudge Brownie Bread! {{image_4}} You can change the flavor of your brownie bread easily. Use dark chocolate for a richer taste. White chocolate adds a sweet twist. You can also use milk chocolate for a creamier texture. If you love nuts, try adding hazelnuts or pecans instead of walnuts. Each nut gives a unique crunch and flavor. For a gluten-free version, swap all-purpose flour with a gluten-free blend. Look for one that includes xanthan gum for the best texture. Make sure your cocoa powder is also gluten-free. This way, you can enjoy the same rich taste without gluten. Serving your hot fudge brownie bread warm makes it even better. Add a scoop of vanilla ice cream on top. The cold ice cream melts into the warm bread, creating a delicious mix. You can also drizzle whipped cream over the top for extra sweetness. It enhances the rich chocolate flavor and looks great on the plate. Enjoy this treat with friends or family for a special dessert! For the full recipe, check out the detailed instructions above. Store your leftover Hot Fudge Brownie Bread in an airtight container. This keeps it fresh for up to five days. If you have no container, wrap it in plastic wrap. Make sure to seal it tightly to prevent air from getting in. Store the bread at room temperature. Avoid putting it in the fridge, as it can dry out quickly. To freeze your Hot Fudge Brownie Bread, first let it cool completely. Wrap the bread tightly in plastic wrap. Then, place it in a freezer-safe bag or container. Make sure to remove as much air as possible. Label the bag with the date. You can freeze the bread for up to three months. When you're ready to eat, just thaw it in the fridge overnight. To reheat your Hot Fudge Brownie Bread, slice it first. Then, place the slices on a microwave-safe plate. Heat them in the microwave for about 10-15 seconds. This warms the bread and makes it soft. You can also reheat it in the oven. Preheat your oven to 350°F (175°C), and wrap the slices in foil. Heat for about 5-10 minutes. For added richness, drizzle some hot fudge sauce on top before serving. Enjoy your delicious treat! Yes, you can make this brownie bread ahead of time. It stores well at room temperature for about three days. Just wrap it tightly in plastic wrap to keep it fresh. You can also refrigerate it for up to a week. If you want to make it even earlier, freeze it. Wrap it well and store it in an airtight container. It can last up to three months in the freezer. When you’re ready to enjoy it, thaw it overnight in the fridge. If you don’t have hot fudge sauce, you can make a quick substitute. Melt chocolate chips with a bit of cream or milk for a simple sauce. You can also use chocolate syrup, though it may be thinner. Another option is to mix cocoa powder with sugar and some melted butter. This will give you a rich chocolate flavor in the bread. To check if your brownie bread is fully baked, use a toothpick. Insert it into the center of the bread. If it comes out with a few moist crumbs, it is done. If it comes out wet with batter, it needs more time. The edges should look set, and the top should be slightly cracked. Keep an eye on it during the last few minutes of baking to avoid overcooking. In this post, I shared how to make THE BEST Hot Fudge Brownie Bread. I covered the key ingredients, step-by-step instructions, and smart tips for success. Quality ingredients matter for great taste. I also offered flavor variations and storage tips. Keep these details in mind as you bake. You can create a delicious treat that impresses everyone. Enjoy every bite of your brownie bread and share it with your friends!

Are you ready to indulge in the ultimate sweet treat? Let me introduce you to THE BEST Hot Fudge Brownie Bread—a dessert that combines rich brownie goodness with the warmth …

Read more

Categories Desserts

Savory Slow Cooker Beef Stew Delight for Dinner

June 11, 2025 by Chef Remy
- Beef and Vegetables - 2 pounds beef chuck, cut into 1-inch cubes - 4 medium carrots, sliced into rounds - 3 medium potatoes, diced into 1-inch pieces - 1 large onion, finely chopped - 3 cloves garlic, minced - Broth and Seasonings - 4 cups beef broth (preferably low-sodium) - 2 tablespoons tomato paste - 1 tablespoon Worcestershire sauce (optional for enhancing flavor) - 1 teaspoon dried thyme - 1 teaspoon dried rosemary - 1 bay leaf - Salt and pepper to taste - Cooking Oil and Extras - 2 tablespoons olive oil - 1 cup frozen peas (to be added in the last 30 minutes of cooking) Gather these ingredients before you start. Each part plays a role in creating a rich flavor. The beef chuck gives your stew a hearty base. Use fresh veggies for the best taste. The tomato paste adds depth, while the herbs bring warmth. Don’t forget the Worcestershire sauce; it enhances the stew’s flavor. You may use low-sodium broth for a healthier option. Be sure to season to your taste. The frozen peas add color and sweetness at the end. For the full recipe, check out the Slow Cooker Savory Beef Stew Delight. This stew is full of love and warmth, perfect for any dinner. To start, I heat olive oil in a large skillet. I set the heat to medium-high. Next, I season the beef cubes with salt and pepper. This step is key to building flavor. I add the beef in batches, not overcrowding the skillet. I brown each cube on all sides until it gets a nice crust. This browning technique adds depth to the stew. Once the beef is browned, I transfer it to the slow cooker. I add the chopped onion first, followed by garlic, carrots, and potatoes. Layering is important here. It ensures that each ingredient gets tender and flavorful. I make sure to spread the veggies evenly over the beef. This helps with even cooking and flavor absorption. In a separate bowl, I whisk the beef broth with tomato paste, Worcestershire sauce, thyme, and rosemary. I make sure to dissolve the tomato paste fully. This smooth mixture will enrich the stew. Adding a sprinkle of salt and pepper at this stage boosts the flavor. I set the slow cooker to low heat for about 8 hours. If I’m short on time, I can set it to high for 4-5 hours. I check the beef for tenderness midway. It should be fork-tender by the time it’s done. In the last 30 minutes, I stir in the frozen peas. They add a sweet burst and vibrant color to the stew. Before serving, I taste the stew one last time. I adjust the seasonings if needed. I also remove the bay leaf carefully. This dish is now ready to serve and enjoy! For the complete recipe, check out the Full Recipe. To boost flavor, think about adding Worcestershire sauce. It gives a rich taste. You might also try fresh herbs like parsley or basil. These herbs add a nice touch. You can even toss in some mushrooms for depth. Experiment with spices to make your stew unique. Try adding smoked paprika for warmth. A dash of cayenne pepper can spice things up. You might also enjoy adding cumin for an earthy taste. Each spice changes the stew's profile. Cutting vegetables ahead saves time. You can chop onions, carrots, and potatoes the night before. Store them in the fridge to keep fresh. This makes dinner prep quick and easy. Frozen vegetables work great in stews. They save time and still taste good. You can use frozen peas or even mixed veggies. Just add them in the last 30 minutes of cooking for best results. Serve your stew with crusty bread for dipping. A simple green salad pairs well too. If you want grains, consider rice or quinoa. These sides balance the meal and add texture. For a lovely presentation, use deep bowls. Ladle the stew carefully to avoid spills. A sprinkle of fresh parsley adds color. You can even add a dash of black pepper on top for flair. Enjoy your savory delight! {{image_4}} You can switch up the meat in your beef stew. Using chicken or pork gives a new twist. For chicken, use thighs for more flavor. Cut them into bite-sized pieces. Cook the stew for about 6 hours on low. For pork, try pork shoulder. Cut it into cubes and follow the beef recipe. Both options will still make a hearty meal. If you prefer vegetarian options, replace the beef with hearty beans or lentils. Chickpeas or black beans work well too. Ensure to adjust the cooking time to about 4-6 hours on low. This way, you’ll still get a rich flavor without meat. You can also change the veggies in your stew. Seasonal vegetables can give depth to your dish. Try adding butternut squash in the fall or fresh green beans in the summer. You can even toss in mushrooms for an umami boost. If you are missing ingredients, don't worry! You can swap out potatoes for sweet potatoes. Use any root vegetable you like. Just remember to keep the cooking time the same. This ensures everything cooks evenly. Adding red wine gives your stew a nice depth. Choose a dry red wine, like Merlot or Cabernet Sauvignon. Pour in about a cup when mixing the broth. This will enhance flavors and add a rich aroma. You can also incorporate local spices. For instance, if you're in the Southwest, sprinkle in some cumin or chili powder. If you prefer a Mediterranean flair, try adding oregano or basil. These spices will make your stew unique and flavorful. For the full recipe, check out the Slow Cooker Savory Beef Stew Delight. To keep your Slow Cooker Savory Beef Stew Delight fresh, use airtight containers. For short-term storage, place the stew in the fridge. Ensure it cools before sealing. For longer storage, freeze it in portions. This way, you can enjoy it later without losing flavor. When reheating, use the stovetop for the best taste. Heat it slowly over low heat. Stir often to avoid sticking. If you prefer the microwave, use a microwave-safe bowl. Heat in short intervals, stirring in between. This keeps the stew moist and tasty. In the fridge, your stew lasts about three to four days. If frozen, it can stay good for up to three months. Always label your containers with dates. This helps you keep track of freshness. Enjoy your savory stew whenever you like! Yes, you can make this stew ahead of time. Meal prep saves time and makes dinner easy. You can cook it a day or two before. Just store it in the fridge once it cools. It tastes even better the next day as flavors blend. When you’re ready to eat, just reheat it on the stove or in the microwave. To thicken your beef stew, use a few simple agents. Cornstarch is a great choice. Mix 1 tablespoon with cold water to make a slurry. Stir it into the stew in the last 30 minutes of cooking. You can also mash some of the potatoes. This adds thickness and keeps the stew hearty. Beef stew pairs well with many sides. Some great options include: - Crusty bread - Mashed potatoes - Rice - Green salad - Roasted vegetables These sides help soak up the rich broth and add balance to the meal. Check the beef’s tenderness and temperature. It should be fork-tender and easy to shred. The best internal temperature for beef is 145°F. Use a meat thermometer to be sure. If it’s not tender, let it cook longer. The slow cooker makes sure the beef is juicy and flavorful. In this post, we covered how to make Slow Cooker Savory Beef Stew Delight. We explored ingredients, preparation steps, and tips for the best results. You learned easy ways to enhance flavor and swap ingredients. Storage tips help you keep stew fresh. Remember, cooking should be fun and easy. With practice, you’ll make this dish perfectly every time. Enjoy the rich, tasty stew with your favorite side dishes!

Looking for a warm, hearty meal that’s easy to make? Welcome to my Savory Slow Cooker Beef Stew Delight for Dinner! This dish is perfect for busy weeknights or lazy …

Read more

Categories Dinner

Mediterranean Baked Feta Eggs Flavorful Breakfast Delight

June 11, 2025 by Chef Remy
- 200g feta cheese, crumbled - 4 large eggs - 1 cup cherry tomatoes, halved - 1/2 cup Kalamata olives, pitted and halved - 1 small red onion, thinly sliced - 2 cloves garlic, minced - 1 teaspoon dried oregano - 1 teaspoon paprika - 2 tablespoons olive oil - Salt and black pepper to taste - Fresh basil or parsley for garnish To measure ingredients well, use a kitchen scale for accuracy. For the feta cheese, you can swap it with goat cheese if you prefer a different taste. Soft cheeses work best for this dish. Each serving of Mediterranean Baked Feta Eggs has about 350 calories. The dish offers a good mix of protein, healthy fats, and carbs. You get around 20g of protein, 25g of fat, and 10g of carbs per serving. This makes it a filling and nutritious choice for breakfast. Check the [Full Recipe](link) for more details on nutrition and serving sizes. First, set your oven to 375°F (190°C). Preheating helps cook your dish evenly. If you skip this step, the eggs may not set right. A hot oven ensures the feta melts perfectly and flavors blend well. In a medium baking dish, mix the halved cherry tomatoes, sliced red onion, and halved Kalamata olives. Pour in 2 tablespoons of olive oil. Season with salt, black pepper, dried oregano, and paprika. Toss everything well with your hands or a spoon. This step builds a tasty base for your eggs. Make four small wells in the vegetable mixture. Use a spoon for this. Carefully break an egg into each well. Try not to break the yolks. This keeps the yolks runny and delicious. The creamy yolk pairs well with the baked feta and veggies. Place the baking dish in your preheated oven. Bake for 20 to 25 minutes. Check the eggs around the 20-minute mark. The whites should be set, but the yolks should still be slightly runny and golden. This perfect doneness gives you a rich flavor. Once baked, let it cool for a few minutes before serving. You can find the Full Recipe for more details on this dish. To boost the flavor of your Mediterranean Baked Feta Eggs, try these spice combos: - Za'atar: Adds a herby, tangy taste. - Cumin: Gives a warm, earthy note. - Chili flakes: Adds a nice kick. You can add extra ingredients at different stages. For example, toss in fresh spinach right before baking. This adds volume and nutrients. If you prefer a creamier texture, mix in some heavy cream with the eggs. Serving can change how your dish feels. You can serve directly in the baking dish for a cozy vibe. Or, use individual ramekins for a classy touch. Garnishing is key! Fresh herbs like basil or parsley not only look great but also add fresh taste. You can also sprinkle some crumbled feta on top for extra flair. Baking is not the only way to prepare this dish. You can use a skillet on the stovetop. Just cook the veggies first, then add the eggs and cover. This method gives you a nice, creamy texture. To avoid overcooking your eggs, keep an eye on them. Check when the whites are set but the yolks are still soft. If they look done, take them out right away. This keeps the yolks runny and delicious. {{image_4}} You can easily switch up the cheese. Try goat cheese for a tangy twist. It melts well and adds a different flavor. You can also add more veggies. Spinach and bell peppers work great in this dish. They bring color and nutrients. Just chop them up and mix them in with the other veggies before adding the eggs. Want to spice things up? Consider adding Mediterranean spices like za'atar or sumac. These spices add depth and taste. For some heat, sprinkle chili flakes or add chopped jalapeños. They will give your dish a nice kick. Adjust the amount based on your spice tolerance. Pair your Mediterranean Baked Feta Eggs with fresh sides. A crisp salad complements the richness of the dish. Crusty bread is also a perfect match. It’s great for dipping into the creamy yolks. You can serve this for breakfast or brunch. It works well for any meal of the day. If you want to impress, serve in individual ramekins for a fancy touch. To keep your Mediterranean baked feta eggs fresh, follow these steps: - Allow the dish to cool completely. - Transfer leftovers to an airtight container. - Store in the fridge for up to three days. - Label the container with the date for easy tracking. Using glass containers can help maintain flavor and moisture. To reheat, avoid drying out the eggs. Here’s how: - Use the oven for even heating. Preheat to 350°F (175°C). - Place the dish in the oven. Cover it with foil to lock in moisture. - Heat for about 10-15 minutes. Check that it is warm throughout. You can use a microwave if you're short on time. Heat in 30-second bursts, stirring gently in between. Can you freeze baked feta eggs? Yes, but with some care. - Allow the dish to cool fully before freezing. - Use a freezer-safe container or wrap it tightly in plastic wrap. - Store for up to one month for the best quality. To thaw, move the dish to the fridge overnight. Reheat it in the oven or microwave as explained above. You can enjoy Mediterranean Baked Feta Eggs with many tasty sides. Here are some great options: - Crusty bread for dipping - Fresh arugula salad with lemon - Roasted potatoes for a hearty touch - Sliced cucumbers for a refreshing crunch - Olives for extra flavor These sides complement the creamy feta and rich eggs well. To check if your eggs are done, look for these signs: - The egg whites should be set and firm. - The yolks should remain slightly runny and golden. - A gentle jiggle is fine but no raw whites. Baking them for 20-25 minutes usually works perfectly. Yes, you can prepare Mediterranean Baked Feta Eggs ahead of time. Here are some tips: - Prep in advance: You can chop veggies and mix the feta the night before. - Batch cooking: You can bake a larger dish and serve it later. - Reheating advice: Simply warm them in the oven at 350°F (175°C) until heated through. This makes breakfast easy and quick! For the full recipe, check out the Mediterranean Baked Feta Eggs [Full Recipe]. Enjoy making this delightful dish! This blog post covered a delicious Mediterranean baked feta egg dish. We explored the main ingredients, their measurements, and the nutritional value. I shared step-by-step instructions for preparing and baking, along with tips to enhance flavor and presentation. Consider trying ingredient swaps or different serving ideas to make it your own. This dish is great for breakfast or brunch and easy to store and reheat. Enjoy creating this flavorful meal in your kitchen!

Start your day with a burst of flavor! Mediterranean Baked Feta Eggs combine rich feta, fresh veggies, and perfectly baked eggs into a delightful breakfast. In this post, I’ll guide …

Read more

Categories Breakfast

Crispy Fried Chicken Dinner that Delights Everyone

June 11, 2025 by Chef Remy
- Chicken pieces (legs or thighs) - Buttermilk - All-purpose flour - Garlic powder - Onion powder - Smoked paprika - Cayenne pepper - Vegetable oil (for frying) - Fresh herbs (for garnish) Gathering the right ingredients is key to a perfect crispy fried chicken. First, I like to choose chicken pieces, either legs or thighs. They stay juicy during frying. Buttermilk is my go-to for marinating. It adds flavor and keeps the chicken moist. All-purpose flour is essential for that crunchy coating. Next, I focus on seasonings. Garlic powder brings a bold taste. Onion powder adds depth. Smoked paprika gives a nice color and flavor. If you like spice, cayenne pepper is great. Adjust the amount to your taste. For frying, I use vegetable oil. It has a high smoke point, which is perfect for frying. Fresh herbs like thyme or parsley work well as a garnish. They add a pop of color and a fresh taste. For the complete recipe, check out the Full Recipe link. Enjoy your crispy fried chicken dinner that delights everyone! Marinating the chicken is key for flavor. I recommend at least 2 hours, but overnight is best. The buttermilk tenderizes the meat. It adds moisture and flavor. The acidity in buttermilk helps break down proteins, making the chicken juicy and soft. In a medium bowl, mix the all-purpose flour with spices. Combine garlic powder, onion powder, smoked paprika, cayenne pepper, salt, and pepper. Whisk well until the mixture is uniform. This mixture is what makes the chicken crispy. The right consistency should not be too thick or too thin. Once the chicken has marinated, remove it from the buttermilk. Let any excess drip off. Dredge each piece in the flour mixture. Make sure to coat them evenly. Shake off any extra flour. Place the coated chicken on a rack. This helps the coating stick better before frying. In a deep skillet, heat about 1 inch of vegetable oil over medium-high heat. To test if the oil is ready, drop a pinch of the flour mixture in. If it sizzles, the oil is hot enough. Place the chicken pieces skin side down in the hot oil. Fry in batches to avoid crowding. Cook for about 10-12 minutes until golden. Flip each piece and fry for another 8-10 minutes. After frying, use tongs to lift the chicken from the oil. Place it on a plate lined with paper towels. This drains excess oil and keeps it crispy. Let the chicken rest for a few minutes. Resting helps retain the juices and flavor. Before serving, sprinkle chopped fresh herbs on the chicken. This adds color and extra flavor. Serve the crispy fried chicken hot. Pair it with your favorite dipping sauces or crispy potato wedges. A fresh salad also complements this dish well. For the full recipe, check out Crispy Fried Chicken Delight. Enjoy your meal! To get that perfect crisp on your fried chicken, the oil temperature is key. Aim for 350°F (175°C) when frying. This heat ensures the chicken cooks evenly while forming a golden crust. A good rule of thumb is to use a thermometer to check the oil. When dredging, make sure to coat each chicken piece well. First, let the excess buttermilk drip off. Then, roll it in the flour mix. Shake off any extra flour. This helps the crust cling better. One common mistake is overcrowding the pan. If you add too many chicken pieces at once, the oil temperature drops. This makes the chicken greasy instead of crispy. Fry in small batches for best results. Another mistake is skipping the marination process. Marinating in buttermilk adds flavor and moisture. It also tenderizes the chicken. Do not rush this step for the best outcome. For frying, a cast-iron skillet works wonders. It holds heat well and gives a nice even cook. You can use a heavy-duty frying pan, too, as long as it’s deep enough. A digital thermometer is a must-have. It helps you monitor the oil temperature accurately. This way, you can avoid undercooking or burning your chicken. For more details, check out the Full Recipe for Crispy Fried Chicken Delight. {{image_4}} You can spice up your crispy fried chicken in many ways. Try adding different spices to the dredging mix. For a kick, use cayenne pepper, chili powder, or even hot sauce in your buttermilk. You can also go for a milder taste with herbs. Mixing in dried thyme, oregano, or rosemary in your flour gives the chicken a fresh flavor. If you want a healthier option, you can air-fry your chicken. This method uses hot air to cook the chicken, keeping it crispy without all the oil. Just coat the chicken as you would for frying and place it in the air fryer. Cook it at 375°F for about 25 minutes. Another great choice is oven-baking. Preheat your oven to 425°F. After coating the chicken, place it on a baking rack set over a sheet pan. Bake for about 30-35 minutes until golden brown. This method allows the chicken to cook evenly while keeping it crispy. Crispy fried chicken goes great with many sides. Classic choices include mashed potatoes, coleslaw, or cornbread. You can also serve it with a fresh green salad or mac and cheese. Dipping sauces can truly enhance your meal. Consider making homemade ranch, honey mustard, or spicy aioli. These sauces bring extra flavor and fun to your chicken dinner. For the full recipe, check out the Crispy Fried Chicken Delight. To keep your crispy fried chicken fresh, follow these tips: - Allow the chicken to cool to room temperature. - Place it in an airtight container. - Store it in the fridge. For safe storage, eat it within 3 to 4 days. After this time, the quality may drop, and it may not be safe to eat. When it’s time to enjoy leftover chicken, reheating properly is key. Here are some methods: - Oven Reheating for Crispiness: Preheat your oven to 400°F. Place the chicken on a wire rack over a baking sheet. Heat for about 15-20 minutes. This method keeps the chicken crispy. - Microwave vs. Air Fryer Reheating: Microwaving will warm the chicken but can make it soggy. For better results, use an air fryer. Set it to 375°F and heat for 5-7 minutes. This keeps the crunch intact. For the complete Crispy Fried Chicken Delight recipe, check out the Full Recipe. To get crispy chicken, follow a few simple tips. First, use cold buttermilk for marinating. It helps the coating stick. Second, ensure your oil is hot enough. The right temperature is key. A good test is to drop a bit of flour in; if it sizzles, you’re ready. Finally, avoid overcrowding the pan. Frying in batches keeps the oil hot and the chicken crispy. Yes, you can use different cuts of chicken. While legs and thighs are great, wings and breasts work well too. Just adjust cooking times for smaller pieces. For wings, fry them for about 8-10 minutes. For breasts, make sure they reach 165°F to be safe to eat. If you don’t have buttermilk, there are easy swaps. You can mix one cup of milk with a tablespoon of vinegar or lemon juice. Let it sit for a few minutes to thicken. Plain yogurt or sour cream can also work in a pinch. You can store crispy fried chicken in the fridge for up to four days. Make sure to place it in an airtight container. For longer storage, freeze it for up to three months. Just remember to reheat it properly to keep it crispy. Crispy fried chicken pairs well with many sides. Classic choices include mashed potatoes, coleslaw, or cornbread. You can also serve it with crispy potato wedges or a fresh salad. For a fun twist, try serving it with homemade dipping sauces like ranch or honey mustard. For the complete recipe, check out Crispy Fried Chicken Delight . Making Crispy Fried Chicken involves key ingredients, methods, and tips. You learned about marinating with buttermilk and the essential spices for flavor. I've shared step-by-step instructions that guide you through cooking crisp, golden chicken. Avoid common mistakes for the best results. Explore variations to keep this dish exciting every time you cook it. Enjoy your crispy fried chicken with delicious sides and sauces. With the right tools and techniques, you can impress anyone at your table!

Craving the ultimate comfort food? This Crispy Fried Chicken Dinner will delight your taste buds! In this post, I’ll guide you through every step, from marinating the chicken in rich …

Read more

Categories Dinner

The Best Soft Chocolate Chip Cookies Recipe Delight

June 11, 2025 by Chef Remy
- Importance of butter temperature: Start with butter that is soft, not melted. Room temperature butter helps create a creamy texture. This is key for soft cookies. - Role of sugars in texture: Brown sugar adds moisture, while granulated sugar adds crispness. This mix gives cookies a nice balance. Using more brown sugar helps keep them soft. - Flour type and its significance: All-purpose flour works best for this recipe. It has the right protein level for soft cookies. Avoid using cake flour or bread flour, as they may change the texture. - Nuts: You can add walnuts or pecans for a crunchy bite. They add flavor and texture. Feel free to leave them out if you prefer a pure chocolate experience. - Feel free to customize with different chocolate types: Try dark chocolate or milk chocolate chips. You can even mix in white chocolate for a fun twist. Be creative with your choices! - Dairy-free alternatives for butter: You can use coconut oil or vegan butter. These options still yield tasty cookies. Make sure they are softened like regular butter. - Gluten-free flour options: Substitute all-purpose flour with a gluten-free blend. Look for a blend that mimics the texture of regular flour. This keeps the cookie soft and yummy! For the complete recipe, check the Full Recipe section. First, you need to preheat your oven to 350°F (175°C). This temperature is key for soft cookies. While the oven heats, line two baking sheets with parchment paper. Parchment paper helps cookies bake evenly. You can also use silicone baking mats. Both choices work well, but parchment paper is my favorite. It keeps the cookies from sticking. In a large mixing bowl, combine one cup of softened butter, three-quarters cup of brown sugar, and a quarter cup of granulated sugar. Use an electric mixer here. Mix on medium speed for about 2-3 minutes. You want it fluffy and light. This step helps make your cookies soft. Next, add one large egg and one teaspoon of pure vanilla extract. Mix until everything is smooth. This adds flavor and moisture, making your cookies rich. In a separate bowl, whisk together two and a quarter cups of all-purpose flour, one teaspoon of baking soda, and half a teaspoon of fine sea salt. Slowly add this mix to the butter mix. Stir gently. Be careful not to overmix. Overmixing can make your cookies tough. You want just enough mixing to blend the flour in. Now, gently fold in one cup of semi-sweet chocolate chips. If you like, add half a cup of chopped walnuts or pecans. This extra step makes every bite a delight! Use a cookie scoop or a spoon to drop rounded tablespoons of dough onto your baking sheets. Space them about two inches apart. This spacing prevents them from merging as they bake. Bake your cookies for 10-12 minutes. Watch closely! You want the edges to turn a light golden brown. The centers should look soft and slightly underbaked. This creates that gooey texture we all love! Once baked, take them out and let them cool on the baking sheets for 5 minutes. This helps them set before transferring to a wire rack to cool completely. Enjoy your ultimate soft chocolate chip cookies! For the complete recipe, check the Full Recipe above. To make soft cookies, keep them slightly underbaked. When you take them out, the centers should look soft and a little shiny. This helps maintain that gooey goodness we all love. Next, use proper cooling techniques. Let the cookies sit on the baking sheet for 5 minutes before moving them to a wire rack. This helps them firm up without losing softness. Storing cookies correctly keeps them fresh longer. Use an airtight container to prevent air from drying them out. You can also add a slice of bread to the container. The bread helps keep cookies soft. If you want to enjoy your cookies later, store them at room temperature. They stay tasty for about a week. Freezing uncooked dough is a great way to have fresh cookies ready anytime. To freeze, scoop the dough into balls and place them on a baking sheet. Freeze until solid, then transfer the balls to a zip-top bag. When you want to bake, take out the dough balls. Thaw them in the fridge for a few hours before baking. This ensures even baking and keeps them soft. Enjoy your homemade treats! For the full recipe, check out the Ultimate Soft Chocolate Chip Cookies. {{image_4}} You can make your soft chocolate chip cookies even better! Add different extracts like almond or peppermint. This simple change gives your cookies a new twist. Just use 1 teaspoon of the extract you choose. You can also try adding spices. A pinch of cinnamon or nutmeg can boost the flavor. These spices add warmth and depth to your cookies. Experiment until you find your perfect mix! Want to make your cookies a bit healthier? Consider reducing the sugar. You can cut down on both brown and granulated sugar. This will still keep your cookies sweet but with less sugar. Another great option is to add oats. They give your cookies a nice texture. Just use 1 cup of old-fashioned oats. This will make your cookies chewy and filling! Make your cookies fit the season! For holidays, add fun ingredients like cranberries or orange zest. These add-ins bring a festive flair to your bake. Cranberries give a tart taste, while orange zest adds bright citrus notes. Try these variations to keep things exciting! For more ideas, check out the Full Recipe for the best soft chocolate chip cookies. For storing your soft chocolate chip cookies, choose airtight containers or zip-top bags. Airtight containers keep cookies fresh longer by blocking air and moisture. Zip-top bags are great for short-term storage and take up less space. Seal them tightly to keep your cookies soft. Your cookies will stay fresh for about a week at room temperature. If you store them in the fridge, they can last up to two weeks. Look for signs of spoilage like hardening, strange smells, or visible mold. If your cookies start to dry out, they need to be eaten soon! To rejuvenate your cookies, preheat your oven to 300°F. Place the cookies on a baking sheet and warm them for 5-10 minutes. This step brings back their soft texture and makes them taste fresh. You can also use the microwave for a quick fix. Heat them for about 10-15 seconds for a warm treat. Enjoy your cookies just like they came out of the oven! Your cookies may not be soft for several reasons. Here are common mistakes and how to fix them: - Overbaking: If you bake your cookies too long, they will harden. Check them at the lower time limit. - Low butter content: Butter gives cookies their rich texture. Always use the right amount. - Cold butter: Cold butter won't cream well. Ensure it’s softened to room temperature. - Wrong flour type: All-purpose flour works best for softness. Avoid using bread flour. Yes, you can use margarine, but it changes the cookie’s texture. Butter gives cookies a rich flavor. It also makes them softer and chewier. Margarine has more water, which can lead to a different texture. If you use margarine, aim for one with a high fat content. This helps keep some of the butter’s qualities. To make thicker cookies, consider these changes: - Add more flour: Increase the flour by a few tablespoons. This helps the dough hold its shape. - Chill the dough: Let the dough chill in the fridge for at least 30 minutes. This prevents spreading. - Use less sugar: Reducing sugar can help maintain thickness, but be careful not to cut it too much. - Increase baking soda: A bit more baking soda can help create a thicker cookie. Look for these visual cues to know your cookies are done: - Light golden edges: The edges should be set and lightly browned. - Soft centers: The centers should look slightly underbaked and soft. - Puffed appearance: Cookies will look puffy when done. They will flatten as they cool. Check your cookies at the 10-minute mark to ensure they don’t overbake. Enjoy your baking adventure with the Full Recipe for a delightful treat! Baking soft cookies takes precision and care. You learned about key ingredients, like the right butter temperature and flour type. The mixing step is crucial, as is knowing when to check for doneness. With tips on storage and freezing, you can enjoy fresh cookies anytime. Don’t shy away from experimenting with flavors or healthier options. Remember, your perfect cookie might just need a slight tweak. Happy baking!

Are you craving cookies that melt in your mouth? You’ve come to the right place! In this guide, I’ll share the secret to making the best soft chocolate chip cookies. …

Read more

Categories Desserts

Vegetarian Shepherd’s Pie Hearty and Wholesome Meal

June 11, 2025 by Chef Remy
The ingredients for a delicious Vegetarian Shepherd's Pie are simple and wholesome. Here’s what you need: - 2 cups cooked lentils (green or brown) - 1 large onion, finely chopped - 2 medium carrots, diced - 2 celery stalks, diced - 2 cloves garlic, minced - 1 bell pepper, diced (choose any color you like) - 1 cup frozen peas - 1 tablespoon tomato paste - 1 tablespoon soy sauce - 2 teaspoons fresh thyme (or 1 teaspoon dried thyme) - 1 teaspoon smoked paprika - Salt and freshly ground black pepper, to taste - 4 large potatoes, peeled and diced (for the mash) - 1/4 cup milk (can substitute with plant-based milk) - 2 tablespoons butter (or vegan butter for a dairy-free option) - Fresh parsley, chopped (for garnish) Each ingredient adds flavor and texture. The lentils provide protein. The vegetables bring color and crunch. Seasonings like thyme and smoked paprika give it warmth. Potatoes make a creamy topping that everyone loves. You can find the full recipe in the article above. Enjoy cooking this hearty meal! Start by cooking the potatoes. Place the diced potatoes in a large pot. Fill the pot with salted water. Bring the water to a rapid boil. Cook until the potatoes are tender, about 15 to 20 minutes. You can check them by piercing with a fork. Once cooked, drain the potatoes and return them to the pot. Now, let’s mash the potatoes. Add the butter and milk to the drained potatoes. Use a potato masher or fork to mash them. Aim for a smooth and creamy texture. Season with salt and freshly ground black pepper. Set your mash aside for later. Next, heat a splash of olive oil in a large skillet over medium heat. Add the chopped onion and minced garlic first. After a minute, add the diced carrots, celery, and bell pepper. Sauté this mixture for about 5 to 7 minutes. You want the vegetables to soften and smell great. Now, you’ll mix the lentils with the vegetables. Stir in the cooked lentils, tomato paste, and soy sauce. Add fresh thyme, smoked paprika, salt, and pepper. Cook everything together for about 5 minutes. This helps the flavors blend well. Finally, add the frozen peas and cook for another 2 minutes until they are warm. Preheat your oven to 400°F (200°C). In a baking dish, spread the lentil and vegetable mixture evenly as the base. Make sure it covers the bottom of the dish. Then, generously top it with the creamy potato mash. Spread the mash evenly to cover the filling completely. Place the assembled pie in the preheated oven. Bake for about 25 to 30 minutes. Check for doneness when the top is golden and a bit crisp. After baking, remove the pie from the oven and let it cool slightly. As a finishing touch, sprinkle freshly chopped parsley on top. This adds a fresh flavor and makes the dish look nice. You can serve the pie directly from the baking dish. For a fancier look, portion it onto plates and add extra parsley. Enjoy your hearty Vegetarian Shepherd’s Pie! For the complete recipe, check out the [Full Recipe]. - Choosing the right variety: Use green or brown lentils. They hold their shape well. Avoid red lentils; they turn mushy. - Cooking tips for optimal flavor: Rinse lentils before cooking. Add salt only after they are tender. This keeps them firm. - Types of potatoes to use: Use russet or Yukon Gold potatoes. They are starchy and mash easily. - Secret ingredients for creaminess: Add butter and milk or plant-based milk. Cream cheese can also add richness. - Additional herbs and spices: Try adding rosemary, sage, or bay leaves. They bring out great flavors in the filling. - Suggestions for homemade seasonings: Mix garlic powder, onion powder, and a pinch of cayenne. This adds depth and warmth to your dish. For the full recipe, check the complete guide to create your own Vegetarian Shepherd’s Pie! {{image_4}} You can easily make this dish gluten-free. One simple way is to replace soy sauce. Use tamari, a gluten-free soy sauce, for the same rich flavor. Always check labels on your ingredients to ensure they are gluten-free. Look for certified gluten-free products to avoid any cross-contamination. If you want a vegan version, swap out dairy and butter. Use plant-based milk like almond or oat milk for the mash. For butter, try vegan butter or olive oil. You can also boost plant-based protein by adding chickpeas or black beans to the lentils. This keeps the dish hearty and filling. Feel free to play with your veggies! Use seasonal options like zucchini, mushrooms, or sweet potatoes. They add unique flavors and textures. For extra taste, think about adding cheese on top or spices like cumin or chili powder. These can elevate the dish and make it your own. To keep your Vegetarian Shepherd’s Pie fresh, use airtight containers. Glass or plastic containers work well. Let the pie cool before sealing it. Store it in the fridge if you plan to eat it within a few days. For longer storage, freeze portions. Make sure to wrap them tightly in plastic wrap or aluminum foil. This helps prevent freezer burn. For the best texture, reheat the pie in the oven. Preheat it to 350°F (175°C). Place the pie in an oven-safe dish, covered with foil. Heat for about 20 to 25 minutes. If you prefer a microwave, cut a slice and microwave it for 2 to 3 minutes. Check if it's warm all the way through. In the fridge, Vegetarian Shepherd’s Pie lasts about 3 to 5 days. If frozen, it can stay good for up to 3 months. Always check for signs of spoilage before eating. If you see mold or smell something off, it’s best to toss it. Enjoy your meals safely! Making Vegetarian Shepherd’s Pie takes about 60 minutes. You spend 20 minutes getting everything ready. Then, you cook it for about 40 minutes. This time includes making the mash and baking the pie. Yes, you can switch up the vegetables! Feel free to try: - Zucchini - Mushrooms - Spinach - Sweet potatoes instead of regular potatoes These options add unique tastes and textures. Just chop them into small pieces for even cooking. Absolutely! You can prepare the filling and mash a day before. Just store them in the fridge. When you are ready, assemble and bake. This makes it easy for busy days. You can also freeze it for later. Just thaw overnight in the fridge before baking. Enjoy the tasty warmth of this dish anytime! Check the Full Recipe for more tips. In this article, we covered how to make a delicious Vegetarian Shepherd’s Pie. We outlined key ingredients like lentils, fresh veggies, and steps for perfect mashed potatoes. You learned about sautéing, combining, and baking the pie, plus important storage tips. You now have the tools to create a warm and flavorful dish. Be creative with flavors and ingredients to make it your own. Enjoy sharing this hearty meal with others!

Are you ready to dive into a cozy, hearty meal that’s packed with flavor? This Vegetarian Shepherd’s Pie is your ticket to comfort food paradise! With layers of savory lentils, …

Read more

Categories Dinner

Fluffiest Blueberry Pancakes Easy and Tasty Recipe

June 11, 2025 by Chef Remy
To make the fluffiest blueberry pancakes, gather these key ingredients: - 1 cup all-purpose flour - 2 tablespoons granulated sugar - 2 teaspoons baking powder - 1/2 teaspoon baking soda - 1/4 teaspoon fine sea salt - 1 cup buttermilk (you can mix 1 cup milk with 1 tablespoon lemon juice for a quick version) - 1 large egg, at room temperature - 2 tablespoons unsalted butter, melted, plus more for cooking - 1 cup fresh blueberries (or use thawed frozen blueberries) - 1 teaspoon vanilla extract This blend creates a light, airy pancake that’s perfect for soaking up syrup. For the best flavor, use fresh, ripe blueberries. They add sweetness and a burst of juice. Ensure the buttermilk is at room temperature. This helps the batter mix better and rise nicely. Sifting the flour and dry ingredients is key. It keeps the pancakes light and fluffy. If you have dietary needs, here are some swaps: - Use whole wheat flour for a heartier pancake. - For a dairy-free option, replace buttermilk with almond milk mixed with lemon juice. - You can swap the egg for a flax egg (1 tablespoon ground flaxseed mixed with 2.5 tablespoons water) for a vegan version. These options allow everyone to enjoy fluffy blueberry pancakes. Check the full recipe for step-by-step instructions. Start by gathering all your ingredients. This makes the process smooth and fun. In a large bowl, sift together: - 1 cup all-purpose flour - 2 tablespoons granulated sugar - 2 teaspoons baking powder - 1/2 teaspoon baking soda - 1/4 teaspoon fine sea salt Sifting helps your pancakes stay light and fluffy. In another bowl, whisk together: - 1 cup buttermilk - 1 large egg, at room temperature - 2 tablespoons melted unsalted butter - 1 teaspoon vanilla extract Make sure the egg is at room temperature for a better mix. If you don't have buttermilk, you can make a quick version. Just mix 1 cup of milk with 1 tablespoon of lemon juice. Let it sit for a few minutes. This will work just fine. Now, pour the wet mix into the dry ingredients. Use a wooden spoon or spatula to gently combine them. Mix until you see no dry flour. Don’t worry about lumps. Overmixing can make your pancakes tough. Next, fold in: - 1 cup fresh blueberries Be gentle to keep the blueberries whole. They will burst with flavor while cooking. Heat a non-stick skillet or griddle over medium heat. Lightly grease it with melted butter. For each pancake, pour about 1/4 cup of batter onto the skillet. Cook for 2-3 minutes. Look for bubbles forming on the surface. When the edges start to set, flip the pancake. Cook for another 1-2 minutes until golden brown. Repeat this with the remaining batter. Add more butter as needed. This keeps the pancakes from sticking. Enjoy your fluffy blueberry pancakes! For more details, check the Full Recipe. To get those light, fluffy pancakes, use fresh baking powder. This helps the batter rise well. Mix dry and wet ingredients gently. It’s okay if the batter is lumpy. Overmixing makes the pancakes tough. Let the batter rest for a few minutes. This allows the bubbles to form, which leads to fluffiness. A common mistake is using cold ingredients. Always use room-temperature eggs and buttermilk. This ensures better mixing and fluffiness. Avoid using too much flour. Measuring flour correctly is key. Use a kitchen scale if you can. Also, do not overcrowd the skillet. Cook pancakes in batches for even cooking. Serve your pancakes with fresh fruit on top. Extra blueberries or sliced bananas work well. Drizzle with pure maple syrup for sweetness. You can also add a dollop of whipped cream. For a twist, try a sprinkle of lemon zest for a fresh flavor. Enjoy them with crispy bacon or sausage for a complete meal. For the full recipe, see the section above. {{image_4}} You can make these pancakes even more delicious with fun add-ins. Try adding lemon zest for a fresh twist. Cinnamon can give a warm spice note. You could also mix in a handful of chopped nuts for crunch. If you love chocolate, mini chocolate chips work great too. Each choice adds a unique flavor and makes your pancakes special. If you need gluten-free pancakes, swap the all-purpose flour for a gluten-free blend. Most blends work well with this recipe. For a vegan version, use plant-based milk and a flax egg instead of a real egg. Mix one tablespoon of ground flaxseed with three tablespoons of water. Let it sit for a few minutes to thicken, then add it to your wet mix. Both options keep the pancakes fluffy and tasty. Serve your pancakes in fun ways to impress your family or friends. Stack them high and drizzle with honey or maple syrup. Top with whipped cream for a treat. Fresh fruits, like strawberries or bananas, add color and flavor. You could also create a pancake breakfast bar. Set out toppings like yogurt, nuts, and syrups for everyone to customize their stack. These ideas will make your breakfast exciting! To keep your fluffy pancakes fresh, stack them in a single layer. Place parchment paper between each pancake to prevent sticking. Then, put the stack in an airtight container. Store them in the fridge for up to three days. You can also freeze them for longer storage. To reheat pancakes, simply use a microwave or a skillet. For the microwave, place one pancake on a plate and heat for about 20-30 seconds. If using a skillet, warm it on low heat. Add a tiny bit of butter to the pan for extra flavor. Heat each pancake for around one minute on each side. This keeps them soft and tasty. For freezing, place cooled pancakes in a single layer on a baking sheet. Once frozen, transfer them to a zip-top bag. They can stay in the freezer for up to two months. To thaw, remove the pancakes from the bag and let them sit in the fridge overnight. You can also microwave them directly from the freezer for a quick breakfast. Enjoy your Fluffiest Blueberry Pancakes anytime! To make the fluffiest blueberry pancakes, follow these steps: 1. Mix dry ingredients: In a bowl, combine flour, sugar, baking powder, baking soda, and salt. 2. Whisk wet ingredients: In another bowl, blend buttermilk, egg, melted butter, and vanilla. 3. Combine: Pour the wet mix into the dry mix. Stir gently until just combined. 4. Add blueberries: Fold in fresh blueberries carefully to avoid smashing them. 5. Cook: Heat a skillet, add butter, and pour 1/4 cup of batter. Cook until bubbles appear. Flip and cook until golden. This method creates light and airy pancakes that are full of flavor. For the complete recipe, check out the Full Recipe section. Yes, you can use frozen blueberries! Just make sure to thaw them first. This helps prevent excess moisture in the batter. Thawed blueberries mix well without breaking apart too much. They add a sweet burst of flavor in each bite. Several reasons can lead to flat pancakes: - Overmixing the batter: Mix until just combined; lumps are fine. - Old baking powder: Make sure it’s fresh for maximum rise. - Too much liquid: Stick to the recipe’s measurements for the best results. By following these tips, you’ll enjoy fluffy pancakes every time! To make the fluffiest blueberry pancakes, start with fresh ingredients. Follow all steps for mixing and cooking to achieve perfect results. Tips on texture and common mistakes help too. Explore variations for every taste, including gluten-free and vegan options. Store extras wisely and enjoy them later. Mastering these details ensures delicious pancakes every time. Now, grab your skillet and enjoy your fluffy creations!

Get ready to whip up the fluffiest blueberry pancakes you’ve ever tasted! In this easy and tasty recipe, I’ll show you how to achieve pancake perfection with simple ingredients and …

Read more

Categories Breakfast
Older posts
Newer posts
← Previous Page1 … Page95 Page96 Page97 … Page130 Next →

ROASTED RECIPES

Where bold flavors meet everyday meals. Warm, vibrant, and made to share. 🔥🥗🍴

PAGES

Home About Contact Privacy Policy Terms & Conditions Cookie Policy GDPR Policy Copyright Policy Disclaimer

CATEGORIES

Appetizers Desserts Salads Breakfast Dinner

Contact

  • Pinterest
  • Mail
Copyright © 2025 Roasted Flavors. All rights reserved.