Skip to content
Roasted Flavors
  • Home
  • Appetizers
  • Desserts
  • Salads
  • Breakfast
  • Dinner
  • Privacy Policy
  • Contact
  • About

Chef Remy

Healthy Greek Turkey Meatballs Quick and Tasty Recipe

June 13, 2025 by Chef Remy
To make these tasty meatballs, you'll need some key ingredients. Each one adds flavor and nutrition. Here’s what you need: - 1 lb ground turkey - 1/2 cup breadcrumbs (whole wheat or gluten-free) - 1/4 cup grated Parmesan cheese - 1/4 cup finely chopped onion - 2 cloves garlic, minced - 1/4 cup diced sun-dried tomatoes (drained) - 1/4 cup freshly chopped parsley - 1 teaspoon dried oregano - 1 teaspoon dried basil - 1/2 teaspoon salt - 1/4 teaspoon black pepper - 1 large egg - 1 tablespoon olive oil (plus more for greasing) These ingredients work together to create a rich flavor and a healthy dish. If you want to jazz up the meatballs, consider adding these optional ingredients: - Feta cheese for a tangy kick - Spinach for added greens - Red pepper flakes for some heat - Lemon zest for a fresh twist Mixing in any of these options will bring new flavors to your dish. Each serving of these meatballs is not just tasty but also nutritious. Here’s a quick look at what you’ll get per serving: - Calories: Approximately 250 - Protein: 25g - Carbohydrates: 18g - Fiber: 2g - Fat: 10g This meal is a great source of lean protein, making it perfect for a healthy diet. For the full recipe, check the details above. To make healthy Greek turkey meatballs, start by preheating your oven to 375°F (190°C). Grab a baking sheet and line it with parchment paper or lightly grease it with olive oil. This helps with easy removal later. In a large mixing bowl, combine 1 lb of ground turkey, 1/2 cup of breadcrumbs, and 1/4 cup of grated Parmesan cheese. Mix these well using your hands or a spatula until they are fully blended. Next, add 1/4 cup of finely chopped onion, 2 cloves of minced garlic, and 1/4 cup of diced sun-dried tomatoes. Toss in 1/4 cup of freshly chopped parsley, 1 teaspoon of dried oregano, 1 teaspoon of dried basil, 1/2 teaspoon of salt, and 1/4 teaspoon of black pepper. Stir until all ingredients are mixed nicely. Finally, crack 1 large egg into the bowl and mix gently. Be careful not to over-mix, as this can lead to tough meatballs. Now it’s time to shape your meatballs. Using your hands, roll the mixture into small balls, about 1 to 1.5 inches in diameter. Place each meatball on the baking sheet, ensuring there is space between them for even cooking. Drizzle a little olive oil over each meatball. This helps them brown nicely in the oven. Bake the meatballs in your preheated oven for 20-25 minutes. They should turn golden brown and be fully cooked inside. To be sure, check the internal temperature with a meat thermometer. It should read 165°F (74°C). Temperature safety is key when cooking meatballs. Always ensure that your turkey meatballs reach an internal temperature of 165°F (74°C). This helps kill harmful bacteria and keeps your meal safe to eat. Use a meat thermometer for accuracy. Let the meatballs rest for a few minutes after baking. This allows the juices to settle, making them more flavorful. Enjoy your tasty and healthy Greek turkey meatballs warm, perhaps with tzatziki sauce or a Greek salad for a refreshing twist. For the full recipe, check out the Mediterranean Delight Turkey Meatballs section above. To keep your meatballs juicy, use ground turkey with some fat. Fat gives flavor and moisture. Adding breadcrumbs helps too, as they soak up juices. Mixing in grated cheese adds richness. Finally, don’t over-mix your meatball mixture. This keeps them tender. Baking meatballs is easy and healthy. It lets the fat drip away. For more flavor, try pan-searing them first. Heat olive oil in a skillet, brown each side, then transfer to the oven. This gives a nice crust and enhances the taste. You can also grill them for a smoky flavor. Serve your meatballs with tzatziki for a cool contrast. A Greek salad adds freshness, too. You can also pair them with whole wheat pita or brown rice for a hearty meal. Try drizzling some lemon juice over them for a zesty kick. For a fun touch, slide them onto skewers with veggies. For the complete recipe, check out the Full Recipe section. {{image_4}} You can easily make these meatballs gluten-free. Just swap regular breadcrumbs for gluten-free ones. This keeps the texture nice and soft. For dairy-free options, skip the Parmesan cheese. You can use nutritional yeast for a cheesy flavor without dairy. This small change can still bring a tasty twist to your dish. Want to mix things up? Use ground chicken instead of turkey for a different taste. You can also add different herbs like thyme or rosemary. Chopped olives or feta cheese can add a briny flavor. If you enjoy spice, add red pepper flakes to the mix. These swaps let you create a new flavor with each batch. These meatballs are very versatile. You can serve them in a rich tomato sauce over pasta for a classic meal. Pair them with a fresh Greek salad for a light lunch. You could also make a meatball sub, topped with marinara and cheese. These options will surely impress your family and friends. For the full recipe, check out the Mediterranean Delight Turkey Meatballs. To keep leftover meatballs fresh, place them in an airtight container. You can store them in the fridge for up to three days. If you have more than you can eat in that time, freezing is a great option. Make sure the meatballs cool completely before you freeze them. This helps avoid ice crystals that can ruin texture. When you're ready to enjoy your leftover meatballs, reheating properly is key. You can use the oven for the best taste. Preheat your oven to 350°F (175°C). Place the meatballs on a baking sheet and cover them with foil. Heat for about 15-20 minutes until warm. You can also use a microwave, but it may not keep them as juicy. If you want to freeze your meatballs, line a baking sheet with parchment paper. Place them in a single layer and freeze for about an hour. Once they are firm, transfer the meatballs to a freezer bag. Be sure to remove as much air as possible to prevent freezer burn. You can keep them frozen for up to three months. When you’re ready to use them, thaw them in the fridge overnight before reheating. For the full recipe, check the original guide. You can use oats or crushed crackers as a substitute. Both options bind well. Ground almonds or chickpea flour also work. These alternatives add unique flavors. Use the same amount as breadcrumbs. Adjust seasonings to match your choice. Yes, you can prepare these meatballs ahead of time. Shape them and place them on a tray. Cover with plastic wrap and refrigerate for up to 24 hours. You can also freeze them for longer storage. Just remember to thaw before cooking. Check the internal temperature with a meat thermometer. It should reach 165°F (74°C) for safety. Look for a golden brown color on the outside. The meatballs should feel firm to the touch. If they are slightly springy, they are likely done. Enjoy them warm for the best taste. For the full recipe, check the main section. In this post, we explored how to make healthy Greek turkey meatballs. We covered key ingredients and shared step-by-step instructions for perfect meatballs. I provided tips to keep them juicy and suggested ways to adjust flavors. You learned how to store leftovers and answered common questions about this dish. Healthy meals can be easy and tasty. Don’t hesitate to try these meatballs today!

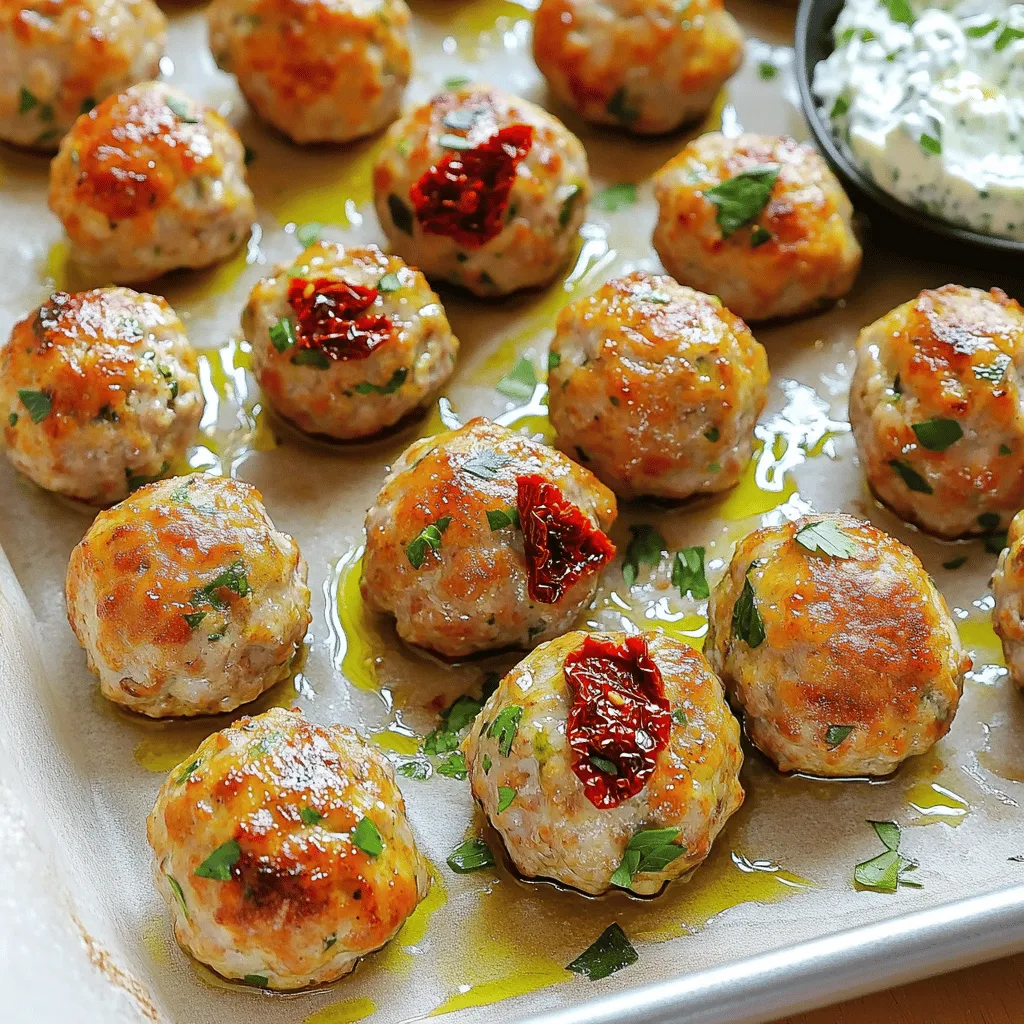
Are you ready to impress your taste buds with a healthy twist? In this guide, I’ll show you how to make Healthy Greek Turkey Meatballs that are both quick and …

Read more

Categories Dinner

Chickpea Cucumber Salad Fresh and Flavorful Delight

June 13, 2025 by Chef Remy
- 1 can (15 oz) chickpeas, drained and rinsed - 1 large cucumber, diced - 1 cup cherry tomatoes, halved - 1/2 red onion, finely chopped - 1 red bell pepper, diced - 1/4 cup fresh parsley, chopped - 1/4 cup feta cheese (optional) Chickpeas are the star of this dish. They add protein and fiber. Cucumber brings a nice crunch and freshness. Cherry tomatoes give a sweet burst. The red onion adds a mild bite, while the bell pepper adds color and crunch. Fresh parsley gives a herb taste, and feta adds creaminess if you choose to use it. - 3 tablespoons extra virgin olive oil - 2 tablespoons freshly squeezed lemon juice - 1 teaspoon ground cumin - Salt and pepper to taste This dressing is simple yet full of flavor. Olive oil adds richness. Lemon juice gives a bright, zesty taste. Cumin adds warmth and a hint of earthiness. Adjust the salt and pepper to make it just right for you. - Whole-grain pita bread - Grilled chicken or seafood This salad goes well with whole-grain pita bread. It also pairs nicely with grilled chicken or seafood for a complete meal. You can serve it as a side or a main dish. Check out the full recipe to get all the steps! - In a large bowl, combine the chickpeas, cucumber, cherry tomatoes, onion, and bell pepper. - Use a spatula to mix them gently. - Next, add the chopped parsley and feta cheese, if you’re using it. - In a separate bowl, whisk together the olive oil, lemon juice, cumin, salt, and pepper. - Mix until the dressing is smooth and well combined. - Drizzle the dressing over the salad mixture. - Toss everything gently to coat all the ingredients. - Let the salad sit for 15 minutes before serving. - This helps the flavors blend and taste better. For the full recipe, check out the Chickpea Cucumber Fiesta Salad 🥗 section. - Adjust seasoning based on taste. Start with a little salt, then add more if needed. - Use fresh herbs for a vibrant flavor. Parsley, cilantro, or dill brighten the dish. - Serve in a clear glass bowl for a colorful display. It lets the colors pop! - Garnish with extra parsley and feta. This adds a nice touch and looks appetizing. - Prepare in advance for quick meals. This salad tastes better after flavors blend. - Store dressing separately until serving. This keeps the salad crisp and fresh. For the full recipe, check out the Chickpea Cucumber Fiesta Salad. {{image_4}} You can easily make this salad vegan by leaving out the feta cheese. This keeps it light and fresh. If you want more creaminess, add diced avocado. Its rich texture and flavor will enhance the dish. If you don't have chickpeas, you can use black beans instead. They add a nice twist and are full of protein. You can also mix in other vegetables like corn or carrots for added crunch and flavor. This keeps your salad exciting and fun. In summer, try adding zucchini for a fresh taste. Zucchini has a mild flavor that pairs well with the other ingredients. In winter, consider adding roasted vegetables, like sweet potatoes or Brussels sprouts, for a warm touch. These changes keep the salad vibrant and tailored to the seasons. For the full recipe, check out the Chickpea Cucumber Fiesta Salad. You can store leftover chickpea cucumber salad in the fridge. Use an airtight container to keep it fresh. It tastes best when eaten within 2-3 days. After that, the veggies may lose their crunch. If you have more salad than you can eat, freeze the salad mix. Just leave out the dressing. You can keep it in the freezer for up to a month. When you’re ready to enjoy it, thaw the salad in the fridge. This keeps it safe and tasty. Sometimes, leftovers need a little boost. Add fresh herbs like parsley or cilantro to bring back the flavors. A squeeze of citrus can also brighten the taste. You can even toss in extra vegetables like bell peppers or carrots for a new twist. These simple steps will make your salad feel fresh again. For the full recipe, you can refer back to the main sections. Typically, this salad lasts 2-3 days when stored properly. To keep it fresh, use an airtight container. The crispness of the cucumber and the flavors of the salad will stay better this way. If you see any signs of spoilage, it's best to toss it out. Yes, you can make this salad ahead of time. However, it's best to add the dressing right before serving for optimal freshness. This will help keep the vegetables crunchy and full of flavor. If you mix in the dressing too soon, it may make the salad soggy. Chickpea Cucumber Salad pairs well with grilled proteins. You can serve it alongside chicken, fish, or shrimp. It also goes great with pita bread or as a side dish for various meals. This salad adds a bright touch to any plate and will impress your guests. For the full recipe, check this out: [Full Recipe]. This blog post walked you through a simple and tasty Chickpea Cucumber Salad. You learned about the main ingredients and how to make a flavorful dressing. I shared tips to enhance taste and presentation, along with storage advice. Feel free to tweak this salad to fit your diet. Remember, it's a versatile recipe for any meal. Enjoy making it fresh or preparing it ahead for busy days. You now have everything you need to create and enjoy this bright, healthy salad!

Looking for a fresh and tasty dish that’s easy to make? Let me introduce you to my Chickpea Cucumber Salad! Packed with crunchy veggies and hearty chickpeas, this salad is …

Read more

Categories Salads

Honey Garlic Chicken Flavorful Dinner You’ll Love

June 13, 2025 by Chef Remy
Chicken and Marinade Components: - 4 chicken thighs, bone-in and skin-on - 1/2 cup honey - 1/4 cup low-sodium soy sauce - 4 cloves garlic, minced - 1 tablespoon fresh ginger, grated - 1 tablespoon rice vinegar - 1 teaspoon sesame oil Seasoning and Garnishing Ingredients: - Salt and black pepper, to taste - 2 tablespoons green onions, finely chopped (for garnish) - Sesame seeds (for garnish) Suggested Accompaniments: - Freshly steamed rice - Seasonal vegetables Honey garlic chicken shines with its sweet and savory taste. You can play with the ingredients to fit your taste. The chicken thighs bring richness, while honey adds sweetness. The soy sauce gives a nice umami kick. Garlic and ginger add depth, making each bite a delight. When serving, I love pairing this dish with rice and veggies. The rice soaks up the sweet sauce. It balances the flavors and makes it a full meal. You can find the full recipe above to guide you step by step. Feel free to add your twist with fresh herbs or spices. Cooking should be fun! Don’t hesitate to experiment with these ingredients. Enjoy the process and make this dish your own. To get great flavor, marinate the chicken well. Use a large bowl to mix the honey, soy sauce, garlic, ginger, rice vinegar, and sesame oil. Whisk until they blend nicely. Make sure to set aside 1/4 cup of the marinade for later. This step is key for rich flavor. Place the chicken thighs in a resealable bag or dish. Pour the marinade over the chicken. Seal the bag or cover the dish with plastic wrap. Let it chill in the fridge for at least 1 hour. For the best taste, let it sit overnight. Reserving the marinade is important. You’ll use it later to baste the chicken. This keeps it juicy and adds depth to the flavor. First, preheat your oven to 375°F (190°C). This ensures even cooking. While it heats, get a large oven-safe skillet and place it on medium-high heat. Take the chicken out of the marinade. Season both sides with salt and black pepper. Place the chicken, skin-side down, in the hot skillet. Sear for 5-7 minutes. You want the skin to turn golden brown. Flip the chicken and sear the other side for about 5 minutes. Once seared, pour the reserved marinade over the chicken in the skillet. Move the skillet to the preheated oven. Bake for 25-30 minutes. Your chicken is done when it reaches 165°F (74°C) inside. The sauce should be sticky and bubbling. After baking, let the chicken rest in the sauce for about 5 minutes. This helps all the flavors blend together. When you are ready to serve, plate the chicken and drizzle the sauce over it. Enjoy your sweet and sticky honey garlic chicken! For the full recipe, check the earlier section. - Searing Techniques: Start by patting your chicken dry. This helps the skin crisp up. Heat your skillet on high before adding the chicken. Sear skin-side down for 5-7 minutes until golden brown. This method locks in juices while creating a nice crust. - Temperature Control: Keep your heat at medium-high. Too hot will burn the skin, while too low will make it soggy. Use a meat thermometer to check the chicken's internal temperature. Aim for 165°F (74°C) for safe eating. - Using the Right Cookware: A heavy, oven-safe skillet works best. Cast iron or stainless steel skillets distribute heat evenly. Avoid non-stick pans for searing; they don’t give a nice crust. - Additional Ingredients for Variation: You can add crushed red pepper flakes for heat. Sliced bell peppers or snap peas also add crunch and color. Feel free to mix in your favorite veggies during the baking step. - Recommended Seasonings: Besides salt and pepper, try adding garlic powder or onion powder for depth. Fresh herbs like thyme or rosemary can also bring layers of flavor to the dish. - Time Management Tips: Marinate your chicken overnight for the best flavor. While the chicken cooks, prep your sides. Steamed rice or roasted veggies pair well and save time. {{image_4}} You can easily switch the chicken for other meats. Pork works well with honey garlic sauce. Use pork chops or tenderloin for a tasty twist. Beef also pairs nicely. Try flank steak marinated in the same sauce for a different flavor. If you prefer plant-based meals, tofu is a great option. Use firm tofu, cut it into cubes. Marinate the tofu just like the chicken. You can also use tempeh. Its nutty flavor enhances the dish. Both options soak up the honey garlic sauce well. Grilling honey garlic chicken adds a smoky flavor. Preheat your grill to medium heat. Cook the marinated chicken on the grill for about 6-8 minutes per side. Ensure the chicken reaches 165°F (74°C) for safe eating. Slow cooking is another great method. Place the marinated chicken in a slow cooker. Set it on low for 6-8 hours or high for 3-4 hours. The chicken will become tender and flavorful. If you need a quick meal, use a pressure cooker. Cook the chicken on high pressure for about 10-12 minutes. The sauce thickens and the flavors blend perfectly. Each method gives you a unique take on this recipe. For the full recipe, check out the detailed instructions above. How to Store Leftovers After your meal, let your honey garlic chicken cool down. Place any leftovers in a shallow container. This helps them cool faster. Cover the container tightly with a lid or plastic wrap. You can store it in the fridge for up to four days. If you want to keep it longer, freeze it. Wrap the chicken in aluminum foil or freezer bags. This will keep it fresh for up to three months. Recommended Containers For best results, use airtight containers. Glass containers work great because they don't stain or hold odors. If you use plastic, make sure it’s BPA-free. This keeps your food safe and healthy. Label your containers with the date. This way, you know when to use them. Best Practices for Reheating Chicken When you’re ready to eat, take out your chicken from the fridge or freezer. If frozen, let it thaw in the fridge overnight. To reheat, use an oven or stovetop for the best results. For the oven, set it to 350°F (175°C). Place the chicken in a baking dish, cover it with foil, and heat for about 20 minutes. On the stovetop, heat a skillet over medium heat. Add a splash of water or broth to keep it moist and warm it for about 5-10 minutes. Tips for Retaining Moisture and Flavor To keep your chicken juicy, avoid high heat. Slow and steady is the way to go. When reheating, add a few drops of honey or soy sauce. This will help bring back the sweet and sticky flavor. If you have extra marinade, use it! Drizzle it over the chicken while it heats. This keeps the chicken flavorful and adds moisture. What can I serve with Honey Garlic Chicken? You can serve Honey Garlic Chicken with steamed rice or noodles. Add some fresh veggies like broccoli or green beans for color and crunch. A simple salad also pairs well. How can I make this dish gluten-free? To make this dish gluten-free, use tamari instead of regular soy sauce. It has a similar taste and is safe for gluten-sensitive diets. Always check labels to ensure all ingredients are gluten-free. Can I use boneless chicken for this recipe? Yes, you can use boneless chicken thighs or breasts. The cooking time will be shorter, so check them after 20 minutes. Boneless chicken cooks faster but still absorbs the delicious sauce. How long does it take to cook chicken thighs? Cooking chicken thighs takes about 25-30 minutes in the oven at 375°F. Always ensure they reach an internal temperature of 165°F. This ensures they are safe to eat and juicy. Can I change the sweetener in the recipe? Yes, you can use maple syrup or agave nectar instead of honey. Each will give a slightly different flavor, but they all work well with the garlic and soy sauce. What’s the best way to tell if chicken is cooked through? The best way to check chicken doneness is by using a meat thermometer. Insert it into the thickest part of the chicken. If it reads 165°F, the chicken is cooked and safe to eat. In this blog post, we explored how to make the perfect Honey Garlic Chicken. We discussed the key ingredients, marinating tips, and cooking steps. You learned about achieving crispy skin and enhancing flavor. We also covered different variations and storage tips. By following these steps, you can enjoy a delicious meal that impresses. Experiment with the tips to make this dish your own. Happy cooking!

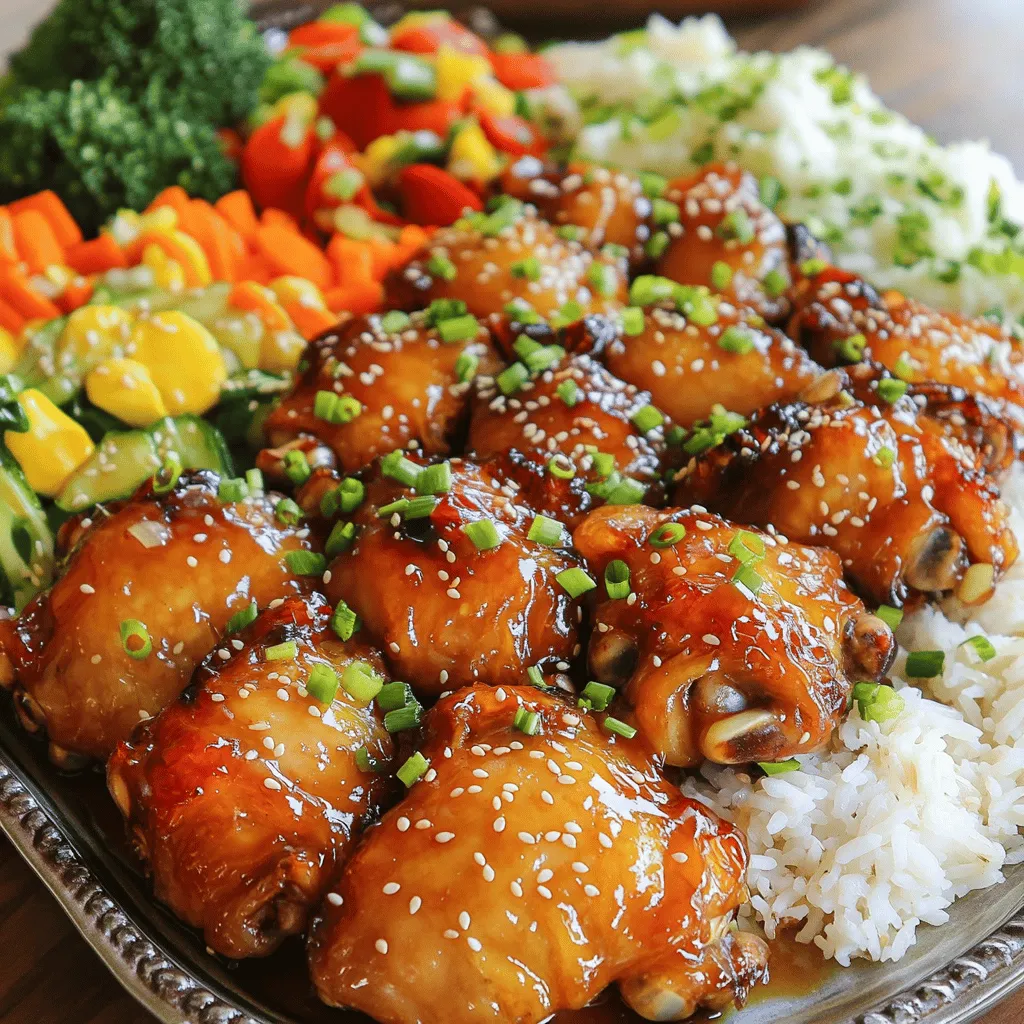
Looking to impress your family with a delicious meal? Honey Garlic Chicken combines sweet and savory flavors for a dish you’ll absolutely love. In this article, I’ll guide you step-by-step, …

Read more

Categories Dinner

Classic Spicy Moroccan Fish Flavorful and Easy Recipe

June 13, 2025 by Chef Remy
- Fish and pantry staples: - 4 white fish fillets (cod or halibut recommended) - 2 tablespoons extra virgin olive oil - 1 can (14 oz) diced tomatoes, well-drained - 1 cup vegetable broth - 1 tablespoon freshly squeezed lemon juice - Salt and freshly cracked black pepper to taste - Spices and seasoning details: - 1 teaspoon ground cumin - 1 teaspoon ground coriander - 1 teaspoon sweet paprika - ½ teaspoon cayenne pepper (adjust based on spice preference) - 1 teaspoon ground turmeric - 2 garlic cloves, finely minced - Fresh herbs and garnish: - Fresh cilantro, roughly chopped (for garnish) - Lemon wedges (for serving) Gather all these ingredients before you start cooking. Each one plays a key role in building the rich, spicy flavor of this dish. The fish fillets will absorb the spices, making them flavorful and tender. The tomatoes and broth create a delicious sauce that ties everything together. Fresh cilantro and lemon add brightness. Don't skip these last touches; they make a big difference! You can find the full recipe to guide you through each step. To start, we need to prepare the spice mixture. In a large bowl, mix the olive oil, ground cumin, ground coriander, sweet paprika, cayenne pepper, ground turmeric, minced garlic, and a good pinch of salt and pepper. Whisk them together until smooth. Next, take your fish fillets and gently place them in the bowl. Make sure to coat them well with the spice mix. Cover the bowl with plastic wrap and refrigerate it for at least 30 minutes. This helps the flavors really sink in. Now, let’s make the tomato sauce. Heat a large skillet over medium heat. Add the drained diced tomatoes and vegetable broth to the skillet. Stir everything well. Bring the mixture to a gentle simmer. Let it cook for about 5 minutes. Stir it occasionally to blend the flavors. Once the sauce is ready, carefully add the marinated fish fillets into the skillet. Ensure they sit well in the sauce. Cover the skillet with a lid. Let the fish cook for 8 to 10 minutes. The fish should turn opaque and flake easily with a fork. This shows it is done. After the fish is cooked, take the skillet off the heat. Stir in the freshly squeezed lemon juice. This adds a nice tang to the sauce. Taste the sauce and adjust the seasoning. You can add more salt, pepper, or cayenne if you like it spicier. To serve, place the fish fillets on a dish. Spoon the spicy tomato sauce over them. For a beautiful look, garnish with chopped cilantro. Serve with lemon wedges on the side for an extra burst of flavor. Check out the Full Recipe for more details! When cooking Classic Spicy Moroccan Fish, you can choose different methods. You can cook it in the oven or on the stovetop. - Oven Preparation: Preheat your oven to 375°F (190°C). Place the marinated fish in a baking dish. Pour the sauce over the fish. Cover with foil and bake for about 20 minutes. This method keeps the fish moist and tender. - Stovetop Preparation: Heat a large skillet over medium heat. Add the sauce and carefully place the fish in it. Cover and cook for about 8-10 minutes. This method lets you monitor the fish closely. - Grilling Tips: If you want extra flavor, try grilling the fish. Preheat your grill and oil the grates. Grill the fish for about 3-4 minutes on each side. This creates a nice char and smoky taste. Adding the right herbs and spices makes a big difference. - Fresh Herbs vs. Dried Spices: Fresh herbs like cilantro bring brightness. Add them at the end of cooking for the best flavor. Dried spices blend well into the sauce. They build depth over time. - Adjusting Spice Levels: If you like it spicy, increase the cayenne pepper. For less heat, reduce it. Always taste your dish as you go. You can control the spice to suit your taste. Planning ahead can make cooking easier. - Marination Tips: Marinate the fish for at least 30 minutes. This allows the spices to soak in. You can marinate it overnight for even more flavor. - Making the Sauce in Advance: You can prepare the sauce ahead of time. Cook it, then store it in the fridge for up to 3 days. Reheat it when you’re ready to cook the fish. This saves time and lets the flavors meld. Using these tips will help you create a fantastic dish. For the full recipe, check the details above! {{image_4}} You can switch up the fish in this recipe. White fish like cod or halibut works best. But you can also use salmon or shrimp for a different taste. Salmon brings a rich flavor, while shrimp cooks quickly and adds a nice texture. Both options work well with the spicy sauce. For a plant-based version, use sturdy vegetables or tofu. Zucchini, eggplant, or chickpeas can replace the fish. For flavor, coat them in the same spice mix. Cook them in the sauce just like you would with fish. This way, you still get that Moroccan taste without any meat. Try local spices to give your dish a twist. If you like it milder, reduce the cayenne pepper or omit it. You can also add spices like coriander or fennel for a unique flavor. This lets you enjoy Classic Spicy Moroccan Fish in a way that suits your taste. To store leftovers safely, let the fish cool first. Place it in an airtight container. This helps keep the fish fresh and tasty. You can store it in the fridge for up to three days. If you want to enjoy it longer, freezing is a great option. To freeze the fish and sauce, let them cool completely. Use freezer-safe containers or bags. Remove as much air as you can to prevent freezer burn. The fish can stay fresh for up to two months in the freezer. When you want to eat it, thaw it in the fridge overnight. For the best results when reheating, warm it slowly on the stove over low heat. This will help keep the fish moist. You can also add a splash of vegetable broth or water to keep the sauce from getting too thick. Enjoy your meal! You can pair this dish with many tasty sides. Here are some ideas: - Couscous: Fluffy couscous soaks up the sauce well. - Quinoa: A healthy, nutty alternative that adds protein. - Rice: Any type of rice works great to balance flavors. - Steamed Vegetables: Broccoli or green beans add color and crunch. - Crusty Bread: Perfect for dipping into the spicy sauce. For special occasions, serve this fish with a fresh salad. A simple cucumber and tomato salad brightens the plate. Or, try a Moroccan carrot salad for a sweet kick. Yes, you can make this recipe in advance. Here are some tips: 1. Marinate the Fish: You can marinate the fish fillets the day before. This helps the spices soak in. 2. Prepare the Sauce: You can cook the sauce ahead of time. Store it in the fridge for up to three days. 3. Reheating: When ready to serve, gently heat the sauce on the stove. Add the marinated fish and cook until done. This method saves time and makes for a stress-free meal. Absolutely! You can easily adjust the spice level to fit your taste. Here are some ideas: - Mild Options: Use less cayenne pepper or skip it entirely. - Add Sweetness: A bit of honey can balance the heat. - Fresh Herbs: Adding more cilantro or parsley can cool down the dish. If you're cooking for kids or guests sensitive to spice, make mild versions first. You can always serve hot sauce on the side for those who want more heat. This article covered how to make delicious Classic Spicy Moroccan Fish. We discussed the best ingredients, including fish and spices. You learned how to marinate fish, prepare the sauce, and cook everything just right. I also shared cooking tips and ideas for variations, like vegetarian options. Finally, we went over safe storage practices. Remember, cooking is about having fun and trying new things. Enjoy experimenting with flavors and make this dish your own!

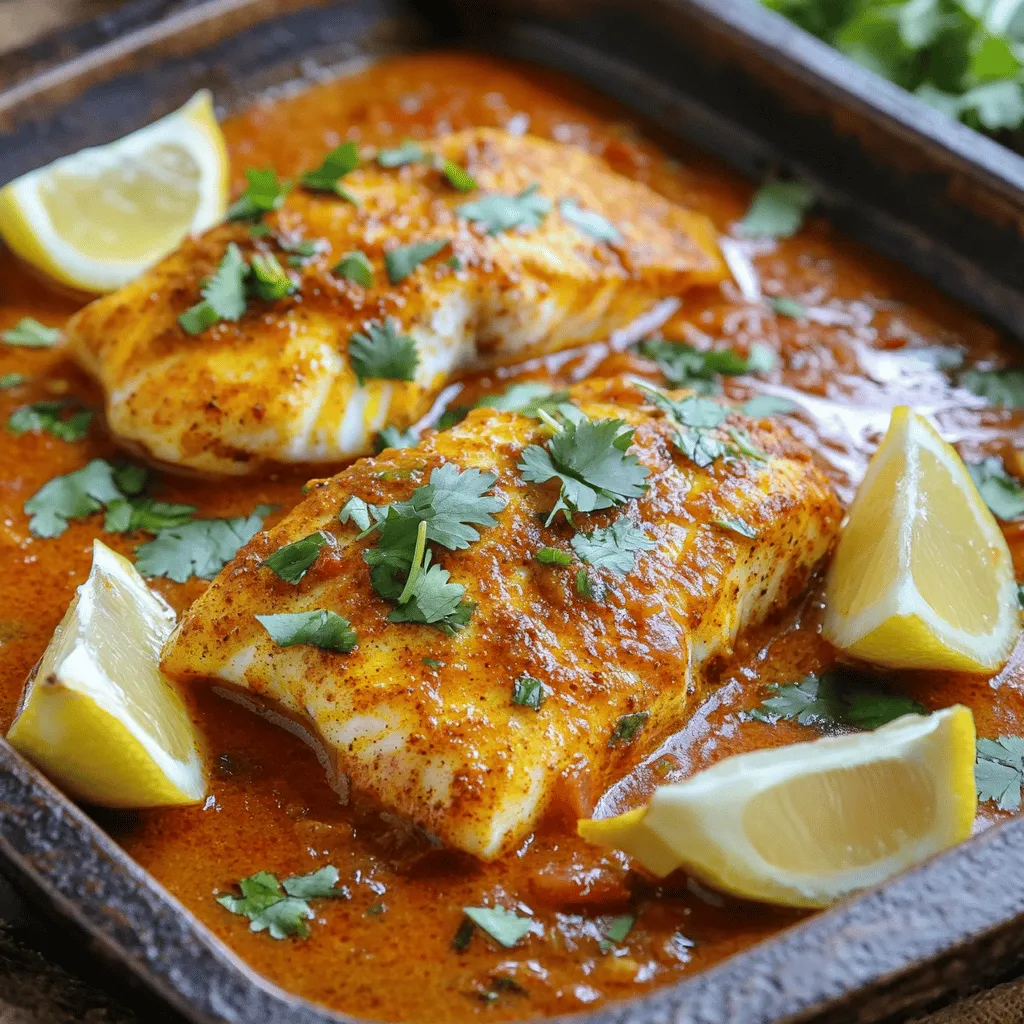
Are you ready to explore the bold flavors of Moroccan cuisine? This Classic Spicy Moroccan Fish recipe is easy to make and packed with zest. You can impress your family …

Read more

Categories Dinner

Creamy Tomato Pasta Delight Quick and Tasty Meal

June 13, 2025 by Chef Remy
To make a tasty creamy tomato pasta, you need some simple ingredients. Here’s what you will need: - 300g pasta (penne or fusilli) - 2 tablespoons olive oil - 1 medium onion, finely chopped - 3 cloves garlic, minced - 1 can (400g) crushed tomatoes - 1 cup heavy cream or coconut cream - 1 teaspoon dried basil - 1 teaspoon dried oregano - Salt and pepper to taste - Fresh basil leaves, for garnish - Grated Parmesan cheese, for serving (optional) These ingredients come together to make a rich and creamy sauce. The pasta provides a great base, while the tomatoes add a fresh taste. The cream makes the sauce smooth and comforting. Feel free to swap the cream for coconut cream if you want a dairy-free dish. Using fresh basil leaves adds a lovely touch to the final dish. If you want to see the full recipe, check out the section titled "Full Recipe." You'll find all the steps you need to create this delicious meal! Start by boiling a large pot of salted water. Use about 1 tablespoon of salt for every 4 quarts of water. Once the water boils, add 300g of pasta, like penne or fusilli. Cook it according to the package instructions. You want the pasta to be al dente, which means it should still be firm. This usually takes about 8 to 10 minutes. Before you drain the pasta, save 1 cup of the cooking water. This water helps adjust the sauce later. Next, grab a spacious skillet and heat 2 tablespoons of olive oil over medium heat. Once the oil is hot, add 1 finely chopped onion. Sauté the onion for about 5 minutes. Stir it occasionally until it becomes soft and clear. Then, add 3 minced garlic cloves to the skillet. Sauté for another minute, making sure the garlic does not brown. This gives the dish a lovely aroma. Now it’s time to create the sauce. Pour in 1 can of crushed tomatoes, along with 1 teaspoon each of dried basil and oregano. Stir everything well to mix. Bring this mixture to a gentle simmer. Let it cook for about 10 minutes. This allows the flavors to blend together beautifully. Once the sauce simmers, reduce the heat to low. Pour in 1 cup of heavy cream or coconut cream for a dairy-free choice. Stir until the sauce is smooth and warm. Taste the sauce and add salt and pepper to your liking. If the sauce is too thick, add some of the reserved pasta water until you reach your desired consistency. Now, add the cooked pasta to the skillet. Toss the pasta gently in the sauce. Make sure each piece is well coated and tasty. For the full recipe, check out the detailed directions to ensure you don't miss a step! To make your sauce just right, adjust its thickness with pasta water. After cooking the pasta, save one cup of the starchy water. If the sauce seems too thick, slowly add a bit of this water. It will help create a creamy texture. Balancing flavors is key. Always taste your sauce before serving. Add salt and pepper to enhance the flavors. A little more dried basil or oregano can brighten the dish. Just remember, start small and add more if needed. For a beautiful presentation, use shallow bowls to serve your creamy tomato pasta. This makes the dish look inviting. You can drizzle a little extra olive oil on top. It adds shine and flavor. Garnish your dish with fresh basil leaves. They not only add color but also a fresh taste. If you like cheese, sprinkle grated Parmesan over the top. This gives a nice salty kick to the dish. Try these tips next time you make the creamy tomato pasta from the Full Recipe. You'll impress your guests with both taste and look! {{image_4}} You can easily make creamy tomato pasta fit your diet. If you want a dairy-free version, try using coconut cream. It adds a rich flavor without the dairy. Just swap the heavy cream for an equal amount of coconut cream. If you are gluten-free, don't worry! There are many pasta options. Look for gluten-free penne or fusilli made from rice or lentils. These options work great and taste delicious. To make your dish even better, consider adding some vegetables. Spinach and bell peppers are great choices. They bring color and nutrition. Simply sauté them with the onions and garlic. If you want to boost the protein, you can add chicken or shrimp. Cook them in the skillet before adding the sauce. This makes the meal more filling and satisfying. For the full recipe, check out Creamy Tomato Pasta Delight. Enjoy your cooking! To keep your creamy tomato pasta fresh, store leftovers in airtight containers. This helps prevent moisture loss and keeps flavors intact. Your creamy tomato pasta can last in the fridge for about 3 to 5 days. Try to consume it within this time for the best taste. If you want, label your containers with the date to stay organized. Reheating creamy tomato pasta is easy. Use a skillet over low heat to warm it up gently. Add a splash of water or cream to keep it creamy. Stir often to avoid sticking. You can also use a microwave. Place your pasta in a bowl, add a bit of cream or water, and cover it. Heat in short bursts, stirring in between. This way, you keep the texture nice and smooth. Enjoy your delicious meal again! You can use penne or fusilli for this dish. These shapes hold the sauce well. They create a nice bite and texture. You can also try spaghetti or rigatoni. Choose your favorite or what you have on hand. Yes, you can make it ahead! Cook the pasta and the sauce separately. Store them in the fridge. When ready, reheat the sauce and mix in the pasta. This helps keep the pasta from getting soggy. To make this dish vegan, simply swap heavy cream for coconut cream. Use a plant-based pasta as well. Check the labels to ensure no eggs are in the pasta. This keeps the dish creamy and rich without dairy. This pasta pairs well with a fresh salad or garlic bread. You can also add roasted vegetables for more flavor. A light white wine or sparkling water complements the meal nicely. Yes, you can freeze this dish! Store it in an airtight container. It keeps well for up to three months. To reheat, thaw it in the fridge overnight. Then warm it gently on the stove, adding a splash of water if needed. For the full recipe, check out the detailed directions for making Creamy Tomato Pasta Delight. To make Creamy Tomato Pasta, gather a few simple ingredients. You will need: - 300g pasta (penne or fusilli) - 2 tablespoons olive oil - 1 medium onion, finely chopped - 3 cloves garlic, minced - 1 can (400g) crushed tomatoes - 1 cup heavy cream or coconut cream (for a dairy-free option) - 1 teaspoon dried basil - 1 teaspoon dried oregano - Salt and pepper to taste - Fresh basil leaves, for garnish - Grated Parmesan cheese, for serving (optional) Now, let’s dive into the steps. 1. Cook the Pasta: Start by boiling salted water in a large pot. Add the pasta and cook it until it is al dente. Before draining, reserve one cup of pasta water. This water helps adjust the sauce later if it is too thick. 2. Sauté Aromatics: In a large skillet, heat the olive oil over medium heat. Add the chopped onion and cook for about 5 minutes until it is soft and clear. 3. Add Garlic: Next, stir in the minced garlic for another minute. This step releases a lovely aroma. 4. Make the Sauce: Pour in the crushed tomatoes, dried basil, and oregano. Mix well and let it simmer for about 10 minutes. This lets the flavors blend together. 5. Incorporate Cream: Reduce the heat and add the heavy cream or coconut cream. Stir until the sauce is smooth and warm. 6. Season the Sauce: Taste the sauce and add salt and pepper. If it is too thick, mix in some reserved pasta water until it is just right. 7. Combine Pasta and Sauce: Add the cooked pasta to the skillet. Toss everything gently until the pasta is well-coated with the sauce. 8. Serve: Dish out the creamy tomato pasta right away. Top it with fresh basil leaves and grated Parmesan cheese if you like. This recipe takes about 30 minutes and serves four people. For a great look, serve the pasta in shallow bowls. Drizzle a bit of olive oil on top and add a sprig of fresh basil. Enjoy your meal! This blog post guides you through making a delicious creamy tomato pasta. You learned about the best ingredients, cooking steps, and helpful tips. We discussed variations for different diets and how to store leftovers. As you cook, remember to have fun and be creative. This dish is simple yet satisfying. Whether you stick to the recipe or make it your own, enjoy every bite! Happy cooking!

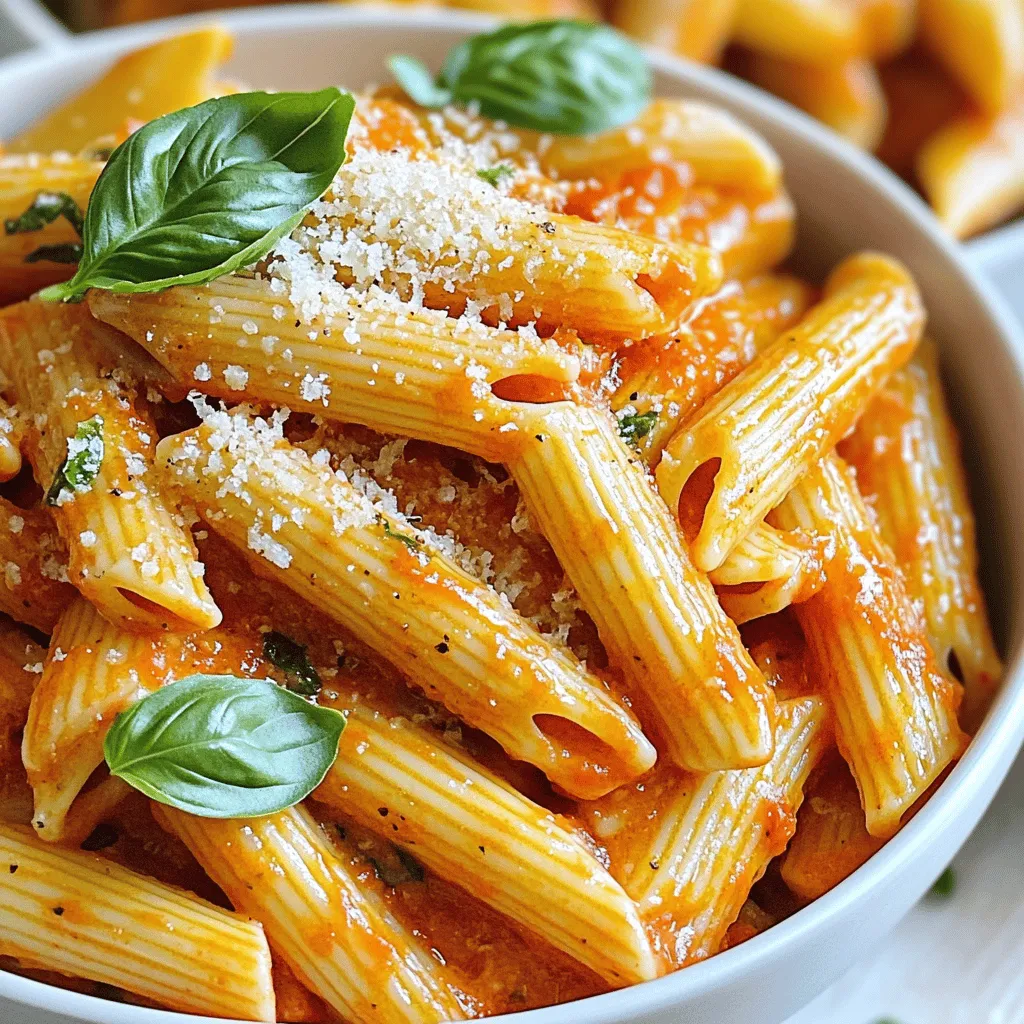
If you crave a quick and tasty meal, this Creamy Tomato Pasta Delight is for you! In just a few simple steps, you can make a rich and comforting dish …

Read more

Categories Dinner

High Protein Chicken Enchiladas Simple and Tasty Meal

June 13, 2025 by Chef Remy
- 2 cups cooked, shredded chicken breast - 1 cup black beans, rinsed and drained - 1 cup Greek yogurt Chicken is the star of these enchiladas. I recommend using cooked, shredded chicken breast for a lean protein boost. It keeps the dish flavorful and tender. Black beans add extra protein and fiber. They also bring a nice texture. Greek yogurt gives the enchiladas creaminess and a healthy twist. It replaces sour cream and keeps the dish light. - 1 cup corn (fresh or frozen) - 6 whole wheat tortillas - 1 cup enchilada sauce Corn adds a pop of sweetness. You can use fresh corn or frozen; both work well. Whole wheat tortillas are a healthier choice. They hold the filling without falling apart. Enchilada sauce is key for flavor. You can buy it or make your own. Just choose a low-sodium version if you can. - 1 teaspoon ground cumin - 1 teaspoon chili powder - Salt and pepper to taste Ground cumin has a warm, earthy flavor. It pairs well with chicken and beans. Chili powder adds a touch of heat. Adjust it to your taste. Salt and pepper enhance all the flavors. Just sprinkle them in until it tastes right. For the full recipe, check the earlier section. This dish is easy, tasty, and packed with protein. Enjoy your cooking! - Preheat oven to 375°F (190°C). - Prepare shredded chicken and rinse black beans. Start by preheating your oven. This step is key for getting your enchiladas crispy and tasty. While the oven heats up, grab your cooked chicken. You can use leftovers or cook it fresh. Shred the chicken with two forks for a perfect texture. Next, rinse your black beans under cold water. This helps remove extra salt and makes them fresh. - Combine chicken, beans, corn, and spices. In a large bowl, combine the shredded chicken, black beans, and corn. Corn adds sweetness and texture. Sprinkle in the ground cumin, chili powder, salt, and pepper. Mix everything well. Make sure the spices coat the chicken and beans evenly. This mix is the heart of your enchiladas. - Spread the filling in tortillas. - Roll and place in baking dish. Take a whole wheat tortilla and lay it flat on the counter. Spoon a good amount of the filling in the center. Roll the tortilla tightly, tucking in the sides. Place it seam-side down in a greased baking dish. Repeat this for all tortillas. You will have a dish full of delicious rolls! - Pour sauce and top with cheese. - Bake for 20-25 minutes. Once your enchiladas are in the baking dish, pour the enchilada sauce on top. Make sure to cover them well. Next, sprinkle shredded cheese over the sauce. This will melt into a gooey layer. Now, place the dish in the preheated oven. Bake for 20-25 minutes until the cheese is bubbly and golden. Enjoy your high protein chicken enchiladas! For those who want more details, check the Full Recipe. To ensure your tortillas roll easily, warm them first. Heat them in a pan for a few seconds or microwave them for about 10 seconds. This softens them, making rolling a breeze. For your sauce, mix half of the Greek yogurt with half of the enchilada sauce. This gives a creamy base. It enhances the flavor of your enchiladas. Make sure to stir well to combine both ingredients smoothly. Garnish your enchiladas with fresh cilantro. This adds a pop of color and flavor. You can also add sliced avocado on the side. It brings a creamy texture that pairs well with the enchiladas. Serve your dish on a large platter. This makes it look inviting. Add lime wedges for extra zest. It brightens up the flavors and makes the meal feel special. To boost protein, consider adding cooked quinoa or more shredded chicken. You can also use black beans or Greek yogurt. These ingredients keep your meal healthy and filling. For low-carb or gluten-free options, swap whole wheat tortillas for corn tortillas. They work well and provide a great taste. You can also skip the tortillas and make a bowl with the filling. This keeps the meal light while still being delicious. {{image_4}} You can easily switch chicken for turkey or quinoa. Turkey offers a similar taste but with less fat. Quinoa is a great option for a plant-based meal. It is high in protein and adds a nutty flavor. Whether you choose meat or grains, you can enjoy a tasty dish. Adding veggies boosts flavor and nutrition. You can mix in bell peppers, spinach, or zucchini. These add color and crunch to your enchiladas. Balance flavors by using mild and strong veggies together. For example, pair sweet corn with spicy jalapeños. This makes every bite exciting and fresh. Exploring different enchilada sauces can change the whole dish. You might try verde sauce for a tangy twist. Or, use a smoky chipotle sauce for heat. Cheese is another way to get creative. You can use cheddar, Monterey Jack, or even pepper jack for a spicy kick. Mixing different cheeses gives depth to your enchiladas. Check out the Full Recipe for more ideas! To keep your chicken enchiladas fresh, store them in the fridge. Place leftovers in airtight containers. This helps keep moisture in and flavors intact. Ideally, eat them within three to four days. If you want to keep them longer, freezing is a great option. You can reheat enchiladas in two ways: the oven or the microwave. For the best results, use the oven. Preheat it to 350°F (175°C). Cover the enchiladas with foil to keep them moist. Bake for about 15-20 minutes until heated through. If using the microwave, place enchiladas on a plate and cover with a damp paper towel. Heat in short bursts, checking often to avoid drying them out. To freeze chicken enchiladas properly, let them cool completely first. Then, wrap each one in plastic wrap. Place wrapped enchiladas in a freezer-safe container or bag. This helps prevent freezer burn. For best quality, use them within three months. To thaw, move them to the fridge overnight. Reheat as mentioned above. Enjoy your meal whenever you want! For the complete recipe, check the [Full Recipe]. Each serving of these enchiladas packs about 30 grams of protein. The main sources are shredded chicken, black beans, and Greek yogurt. Chicken breast offers around 26 grams of protein per cup. Black beans add about 15 grams per cup, while Greek yogurt adds another 10 grams. Together, they make a well-rounded protein meal. Yes, you can prepare these enchiladas in advance. Assemble them and store them in the fridge for up to 24 hours. Cover the dish tightly with plastic wrap or foil. When ready to cook, just remove the cover and bake them straight from the fridge. This saves time on busy days. Some great side dishes include: - Spanish rice - Refried beans - A fresh green salad - Corn on the cob - Chips and salsa These sides add flavor and texture to your meal, making it a full feast. Yes, store-bought enchilada sauce is a great option. Look for low-sodium varieties to keep the dish healthier. You can also try different flavors, like green or red sauces. Just pour it over your enchiladas as you would with homemade sauce. It saves time and still tastes great! For the full recipe, check out the details above. These chicken enchiladas are easy to make and tasty. We covered key ingredients like chicken, black beans, and spices. You learned how to prep, mix, and bake them perfectly. You also found tips for adding more flavor and nutrition. With variations and storage advice, you can enjoy these enchiladas anytime. Try different proteins and sauces to keep it fun. Now, it's time to gather your ingredients and make a delicious meal that you’ll love. Enjoy your cooking adventure!

Looking for a quick and tasty meal that packs a protein punch? These High Protein Chicken Enchiladas are just what you need! Made with simple ingredients like shredded chicken, black …

Read more

Categories Dinner

Quick Southwest Chicken Salad Tasty and Healthy Meal

June 13, 2025 by Chef Remy
- 2 cups cooked chicken breast, shredded - 1 cup canned black beans, rinsed and drained - 1 cup corn kernels - 1 red bell pepper, diced - 1 ripe avocado, diced - 1/2 cup cherry tomatoes, halved - 1/4 cup red onion, finely chopped - 1/4 cup fresh cilantro, chopped I love using cooked chicken breast in this salad. You can use rotisserie chicken for a quick meal. Canned black beans add protein and fiber. Corn kernels bring sweetness and crunch. Red bell pepper gives color and flavor. Ripe avocado makes it creamy. Cherry tomatoes add juicy bites. Red onion gives a nice zing. Fresh cilantro adds a burst of freshness. - Juice of 1 lime - 3 tablespoons extra virgin olive oil - 1 teaspoon ground cumin - 1 teaspoon chili powder - Salt and black pepper to taste The dressing is simple yet flavorful. Lime juice adds brightness. Extra virgin olive oil gives richness. Ground cumin and chili powder bring warmth and depth. Salt and black pepper enhance all the flavors. This dressing ties everything together and makes each bite tasty. This recipe makes four servings. Each serving is about 1.5 cups. You can adjust portion sizes based on your needs. If you want a light meal, serve smaller portions. For a heartier option, serve larger portions. This salad is perfect for lunch or dinner. Start by combining the salad ingredients. In a large bowl, mix these items: - 2 cups cooked chicken breast, shredded - 1 cup canned black beans, rinsed and drained - 1 cup corn kernels - 1 red bell pepper, diced - 1 ripe avocado, diced - 1/2 cup cherry tomatoes, halved - 1/4 cup red onion, finely chopped - 1/4 cup fresh cilantro, chopped Gently toss them to mix evenly. Next, prepare the dressing. In a small bowl, whisk together: - Juice of 1 lime - 3 tablespoons extra virgin olive oil - 1 teaspoon ground cumin - 1 teaspoon chili powder - Salt and freshly cracked black pepper Drizzle this dressing over the salad. Toss everything gently, being careful with the avocado. When you handle the avocado, do it with care. Cut it and add it last to keep it from mashing. Adjust the seasoning to fit your taste. If you want more kick, add extra lime or salt. For a great look, serve the salad in a large, shallow bowl. This makes it eye-catching. Garnish with extra cilantro leaves and lime wedges. This adds color and freshness to the dish. Enjoy your vibrant Southwest chicken salad! For the complete recipe, refer to the Full Recipe above. - Utilizing rotisserie chicken: This cooked chicken saves you time and adds great flavor. You just shred it and mix it in. - Pre-chopping vegetables: Chop your veggies in advance. Store them in the fridge for quick salad prep. - Adding extra toppings: Try adding cheese, tortilla strips, or jalapeños for extra crunch and flavor. - Using homemade dressings: Making your own dressing can boost freshness and taste. Mix lime juice, olive oil, and spices to get a zesty kick. - Overmixing ingredients: Too much mixing can mush the avocado and ruin the salad's texture. Toss gently to keep everything intact. - Underseasoning the salad: Always taste your salad before serving. If it lacks flavor, add more salt, lime juice, or spices. It makes a big difference! {{image_4}} You can easily change ingredients in this salad. Here are some tasty swaps: - Alternative proteins: Use tofu or shrimp instead of chicken. Both add unique flavors. - Vegetable substitutes: Try zucchini or extra bell peppers. They add crunch and color. These swaps keep the salad fresh and fun. Feel free to experiment! The dressing can also change based on your taste. Here are some ideas: - Different oil options: Avocado oil gives a rich flavor. It's a great choice if you want something different. - Spice additions: Smoked paprika adds a nice smoky taste. You can also try cayenne for heat. Mixing up the dressing can make the salad feel brand new every time you prepare it! You can easily adjust this salad for specific diets. Here’s how: - Making it gluten-free: All the ingredients are already gluten-free. Just check labels to be sure. - Vegan adaptations: Use chickpeas instead of chicken. You can also skip the cheese and use a vegan dressing. These adjustments let everyone enjoy this healthy meal! For the full recipe, check out the earlier section. To keep your Quick Southwest Chicken Salad fresh, store it in the refrigerator. Use airtight containers to prevent air from getting in. Glass containers work best, but plastic ones are fine too. Make sure to fill the container to reduce air space. If you have leftovers, you can freeze the salad. However, it's best to freeze only the chicken and beans. Other ingredients, like avocado and tomatoes, do not freeze well. To thaw, place it in the fridge overnight. Reheat the chicken gently in the microwave or on the stove. Avoid reheating the salad once it has dressing. In the fridge, this salad stays fresh for about 3 days. If you freeze it, the chicken and beans can last for about 2 months. Always check for any signs of spoilage before eating. Freshness matters! You can make this salad ahead of time. To prep, cook the chicken and cool it first. Chop the veggies, then store them in separate containers. Keep the dressing in another container. Combine everything just before serving. This keeps the salad fresh and crunchy. Yes, you can change the dressing easily. Try using Greek yogurt for a creamy twist. You can mix in some honey for sweetness or add garlic for more flavor. A splash of vinegar can give it extra zing too. This salad pairs well with many sides. Consider serving it with tortilla chips for crunch. You can also add some warm cornbread or a side of rice. Fresh fruit, like watermelon or berries, makes a great match too. Absolutely! This salad is great for meal prep. Store each serving in a container. Make sure to keep the dressing separate until you’re ready to eat. This way, the salad stays fresh longer. Enjoy it throughout the week! This blog post covered how to make a fresh Southwest chicken salad. We looked at key ingredients, dressings, and portion sizes. You learned step-by-step instructions for preparation and cooking tips. I shared valuable time-saving tips, flavor enhancements, and common mistakes to avoid. We explored ingredient swaps, dressing variations, and dietary adjustments. Lastly, I provided storage info and FAQ answers. With these insights, you can create a tasty salad that suits your needs. Enjoy mixing and matching to make the salad truly yours!

Looking for a quick, healthy meal? This Quick Southwest Chicken Salad packs flavor and nutrition. With juicy chicken, fresh veggies, and zesty dressing, it’s a tasty choice for lunch or …

Read more

Categories Salads

Whole30 Breakfast Casserole Simple and Tasty Recipe

June 13, 2025 by Chef Remy
For this Whole30 breakfast casserole, you need fresh and simple ingredients. Here’s what you will need: - 2 medium sweet potatoes, peeled and diced into small cubes - 1 cup fresh spinach, chopped into bite-sized pieces - 1/2 cup bell pepper, diced (any color for a vibrant dish) - 1/2 cup red onion, diced finely - 6 large eggs - 1/2 cup full-fat coconut milk - 1 teaspoon garlic powder - 1 teaspoon onion powder - Salt and freshly ground black pepper to taste - 1 tablespoon extra virgin olive oil - Fresh herbs for garnish (such as parsley or cilantro for color and freshness) These ingredients align with Whole30 rules. They provide great flavor and nutrition while keeping your meal compliant. Using fresh produce is key for this dish. Fresh vegetables add flavor and texture. Sweet potatoes give a hearty base, while spinach offers a burst of color and nutrients. Fresh herbs, like parsley or cilantro, brighten the dish. They not only enhance taste but also make it visually appealing. Always choose organic produce when possible. This choice supports health and local farms. If you want to mix things up, you have options. You can replace sweet potatoes with zucchini or butternut squash. These veggies also work well and are Whole30 friendly. Different greens, like kale or arugula, can replace spinach for varied flavors. If you need a dairy-free option, almond milk can substitute for coconut milk, but remember to check for additives. This flexibility lets you tailor the casserole to your tastes while staying within Whole30 guidelines. For the complete recipe, check out the Full Recipe link. To start, grab your sweet potatoes. Peel and dice them into small cubes. This helps them cook evenly. Next, chop your spinach into bite-sized pieces. You can use fresh baby spinach for a tender touch. Dice the bell pepper and red onion. I like to mix colors for a vibrant look. Once all your veggies are ready, heat a skillet over medium heat with olive oil. Add the sweet potatoes first. Cook them for about 5-7 minutes. Stir often until they soften and get a nice brown color. Then, add the bell pepper and red onion. Cook for another 5 minutes until the onions are clear. Finally, toss in the spinach and let it wilt down for 2 minutes. Now, it's time for the egg mixture. In a large bowl, crack six large eggs. Whisk them well until they blend. Add 1/2 cup of full-fat coconut milk for creaminess. Sprinkle in garlic powder, onion powder, salt, and black pepper. Mix until it's frothy and smooth. This adds flavor and richness. Carefully fold in the sautéed veggies. Make sure everything is well combined. This mixture will be the heart of your casserole. Next, pour the mixture into your greased 9x13 inch baking dish. Spread it out evenly so it cooks well. Preheat your oven to 375°F (190°C) while you prepare. Once ready, place the dish in the oven. Bake for 25-30 minutes. You’ll know it’s done when the center is set and the top is golden brown. After baking, remove the dish from the oven. Let it cool for 5 minutes. This helps with slicing. Before serving, add fresh herbs to make it pop. Enjoy your savory sweet potato and spinach breakfast casserole! You can find the full recipe to try this delicious dish. To boost the taste of your Whole30 breakfast casserole, use fresh herbs like thyme or oregano. These herbs add depth and freshness. You can also try adding a pinch of smoked paprika for a warm, smoky flavor. If you enjoy a bit of heat, consider diced jalapeños or crushed red pepper flakes. These simple tweaks will elevate your dish and keep it exciting. For a fluffy texture, beat the eggs well before mixing them with the veggies. Whisking incorporates air, making the casserole light and airy. Also, avoid overcooking the sweet potatoes. They should be soft but still hold their shape. This balance ensures a delightful bite in every forkful. Letting the casserole cool for a few minutes before slicing also helps it hold its shape. To save time, prep your ingredients the night before. Dice the sweet potatoes, bell peppers, and onions. Store them in an airtight container in the fridge. You can also whisk the egg mixture ahead and keep it chilled. When it’s time to cook, all you need to do is sauté the veggies and combine everything. This makes mornings easier without sacrificing flavor or freshness. For the full recipe, check the details provided. {{image_4}} You can boost the protein in your Whole30 breakfast casserole easily. Try adding cooked sausage or diced chicken. Ground beef also works well. Just cook the meat first, then mix it into the veggie and egg mix. For a meat-free option, use black beans or lentils. These add protein while keeping it plant-based. Feel free to swap in your favorite veggies. Zucchini, mushrooms, or broccoli can make great additions. Just remember to chop them small so they cook evenly. If you want more colors, add sliced carrots or cherry tomatoes. You can also use frozen veggies for convenience. Just make sure to thaw them first. Change the flavor of your casserole by adding spices or herbs. Try smoked paprika for a smoky kick. If you prefer a fresh taste, add basil or dill. You can even use a splash of hot sauce for some heat. Different cheese can also change the dish's vibe. Just make sure it fits Whole30 rules. Check out the full recipe for more tips on flavors and ingredients. To keep your Whole30 breakfast casserole fresh, let it cool first. Then, cover it tightly with plastic wrap or foil. You can also use an airtight container. Store it in the fridge for up to four days. This helps keep the flavors intact and prevents drying out. When you're ready to eat leftovers, preheat your oven to 350°F (175°C). Place the casserole in an oven-safe dish. Cover it with foil to keep it moist. Heat for about 15-20 minutes, or until warm. You can also use the microwave. Just heat in short bursts, checking often to avoid overcooking. If you want to save some for later, freezing is a great option. Cut the casserole into portions before freezing. Wrap each piece tightly in plastic wrap, then place them in a freezer-safe bag. This way, you can easily grab a portion anytime. You can freeze it for up to three months. When you’re ready to eat, thaw it in the fridge overnight and reheat as mentioned above. Enjoy the ease of meal prep with this simple method! Yes, you can make this Whole30 breakfast casserole ahead of time. Prepare the dish and store it in the fridge overnight. This makes mornings easier. Just bake it fresh in the morning or reheat it. The flavors blend well when made ahead. You can serve this casserole with fresh fruit, avocado slices, or a green salad. These sides add color and texture. A simple fruit salad brings sweetness, while avocado adds creaminess. You can also pair it with a hot sauce for a spicy kick. Yes, this recipe is very customizable. You can swap out vegetables based on what you like. If you need a dairy-free option, use almond milk instead of coconut milk. For added protein, you can add cooked chicken or turkey. This way, it fits many diets. This blog post covered how to make a Whole30 breakfast casserole. We explored compliant ingredients, fresh produce, and tasty alternatives. You learned step-by-step instructions for prepping, mixing, and baking. Tips on enhancing flavor and ensuring texture made your dish shine. We discussed protein options, veggie swaps, and more. Lastly, you got key storage details and answered common questions. Cooking can be fun and rewarding. You can enjoy this dish and feel good about eating it. Now, go make your Whole30 casserole a reality!

Looking for a delicious way to start your day on the Whole30 plan? This Whole30 Breakfast Casserole is simple to make and tastes amazing! Packed with fresh veggies and protein, …

Read more

Categories Breakfast

Dump-and-Bake Chicken Tzatziki Casserole Recipe

June 13, 2025 by Chef Remy
- 2 cups cooked chicken, shredded - 1 cup Greek yogurt - 1 cup cucumber, diced - 1 cup cherry tomatoes, halved - 1 cup cooked quinoa or couscous - 1/2 cup red onion, finely chopped - 1/4 cup fresh dill, chopped - 2 tablespoons lemon juice - 1 tablespoon olive oil - 1 teaspoon garlic powder - Salt and pepper to taste The main ingredients create a delicious base for the casserole. I use cooked chicken for protein and Greek yogurt for creaminess. The cucumbers and cherry tomatoes add freshness. Quinoa or couscous provides a nice texture and makes it filling. Fresh dill and lemon juice add bright flavors that remind me of tzatziki sauce. - 1/2 cup feta cheese, crumbled - 1/2 cup grated mozzarella cheese Cheese adds richness and depth. Feta cheese gives a tangy bite, while mozzarella melts perfectly. Together, they create a delightful topping that melds with the casserole below. - 1/4 cup fresh dill, chopped - 2 tablespoons lemon juice - 1 tablespoon olive oil - 1 teaspoon garlic powder - Salt and pepper to taste Seasonings bring everything to life. The fresh dill and lemon juice enhance the dish's bright flavors. Garlic powder adds a savory kick, while salt and pepper balance the overall taste. Olive oil keeps things moist and adds a touch of richness. For the complete list of ingredients and more, check out the Full Recipe. First, preheat your oven to 375°F (190°C). This step is key to getting a nice bake. A hot oven helps the flavors blend well. Next, grab a large mixing bowl. Add the following ingredients: - 2 cups cooked chicken, shredded - 1 cup Greek yogurt - 1 cup cucumber, diced - 1 cup cherry tomatoes, halved - 1 cup cooked quinoa or couscous - 1/2 cup red onion, finely chopped - 1/4 cup fresh dill, chopped - 2 tablespoons lemon juice - 1 tablespoon olive oil - 1 teaspoon garlic powder - Salt and pepper to taste Mix everything together with a spatula until it looks uniform. This makes sure each bite is full of flavor. Now, take a 9x13-inch casserole dish and lightly grease it. You can use cooking spray or olive oil. Spread the chicken mixture evenly in the dish. This helps it cook evenly. Time to add some cheese! Sprinkle 1/2 cup crumbled feta cheese and 1/2 cup grated mozzarella cheese over the chicken mixture. Make sure to cover it well for a cheesy delight. Cover the casserole dish tightly with aluminum foil. This keeps moisture in while it bakes. Place it in the preheated oven for 25 minutes. After 25 minutes, carefully remove the foil. Bake it for another 10-15 minutes. Look for bubbly cheese and a golden brown top. This is what you want for that perfect finish. Once it’s done, take the casserole out of the oven. Let it cool for about 5 minutes. This helps the flavors settle and makes it easier to serve. Enjoy your Dump-and-Bake Chicken Tzatziki Casserole! For the full recipe, check the details above. You can easily change ingredients to fit your needs. If you're lactose intolerant, use dairy-free yogurt. For a gluten-free option, swap quinoa with rice. If you want a lighter dish, use shredded turkey instead of chicken. You can also add more veggies like bell peppers or spinach for extra nutrition. To get the best texture, do not skip covering the casserole with foil. This keeps the dish moist while baking. After 25 minutes, uncover it to let the cheese brown nicely. Keep an eye on it to avoid burning. Trust me, the cheesy topping makes it perfect! Serve your casserole warm for the best taste. You can add a side salad to balance the meal. A simple mix of greens with lemon vinaigrette works great. Squeeze fresh lemon juice on top to brighten the flavors. For a fun twist, serve it with pita bread for dipping. Enjoy your meal! {{image_4}} You can make this dish vegetarian by omitting the chicken. Instead, use plant-based alternatives like chickpeas or lentils. These options add protein and texture. You can also try tofu for a different flavor. Just make sure to season your substitute well. This keeps the dish tasty and balanced. For a Mediterranean flair, add artichokes or olives. You can also mix in roasted red peppers for extra color. Another great idea is to swap quinoa with bulgur wheat. Each of these ingredients brings a unique taste. They enhance the overall flavor profile of the casserole. Plus, they keep it fresh and exciting. If you love heat, add some chopped jalapeños or crushed red pepper flakes. These will give your casserole a nice spicy kick. You can also try a dash of cayenne pepper for more heat. Just remember to balance the spice with the tzatziki sauce. This adds a creamy contrast to the dish. Adjust the heat to your taste for the best results. To keep your Dump-and-Bake Chicken Tzatziki Casserole fresh, store it in the fridge. Use an airtight container to lock in flavor and moisture. It stays good for about three to four days. Make sure it cools down before you seal it up. This helps prevent sogginess. If you want to enjoy this dish later, freezing works well. Portion the casserole into smaller containers for easy meals. Wrap the container tightly with plastic wrap, then foil. This extra layer protects against freezer burn. It can last up to three months in the freezer. When you're ready to eat, just thaw it in the fridge overnight. To reheat, you can use the oven or microwave. For the oven, preheat to 350°F (175°C). Cover the casserole with foil to keep it from drying out. Heat for about 20-25 minutes, or until it’s hot all the way through. In the microwave, use a microwave-safe dish and cover it loosely. Heat in short bursts, checking often. This keeps the flavors fresh and tasty. It takes about 50 minutes to make this casserole. You need 15 minutes for prep. Then, bake it for 35 minutes. This timing makes it perfect for a quick weeknight meal. Yes, you can use different proteins. Cooked turkey works well in this recipe. You can also use shredded pork or tofu for a vegetarian option. Just ensure the protein is cooked before mixing. This casserole is quite healthy. It has lean protein from chicken and is packed with veggies. Greek yogurt adds creaminess and protein, while quinoa or couscous provides fiber. The fresh ingredients give it vitamins and minerals too. Enjoy this dish knowing it's both tasty and nutritious. For the full recipe, click here. This blog post covered a simple, tasty Dump-and-Bake Chicken Tzatziki Casserole. You learned about the key ingredients, including cooked chicken, Greek yogurt, and fresh veggies. I shared step-by-step instructions for baking this meal perfectly. Plus, I offered tips for substitutions, serving ideas, and storage methods. Try different variations to suit your taste. Making a healthy, easy dish has never been better. Enjoy your cooking journey and share this dish with friends!

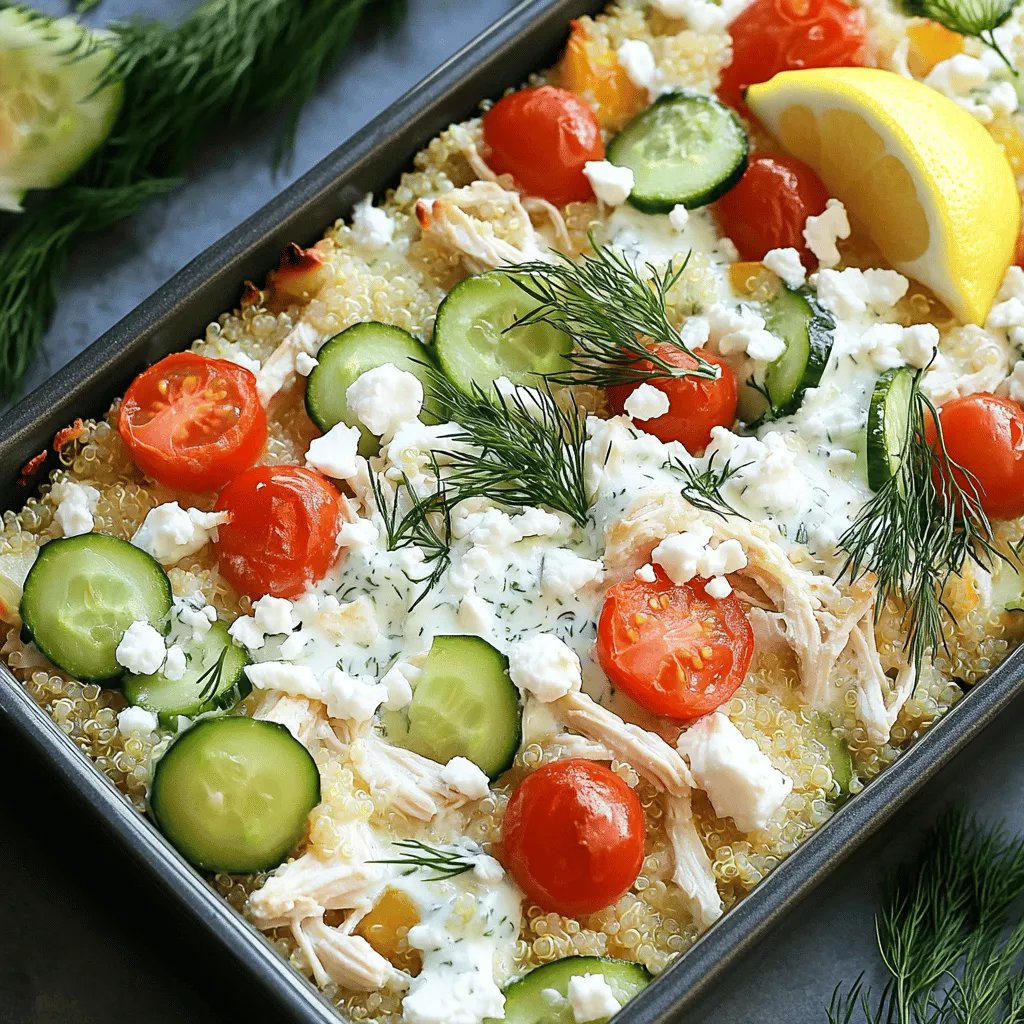
Craving a meal that’s easy, healthy, and packed with flavor? Try my Dump-and-Bake Chicken Tzatziki Casserole! This one-pan dish combines juicy chicken, creamy yogurt, and fresh veggies for a delicious …

Read more

Categories Dinner

Funnel Cake Bites Crispy Treats for Any Occasion

June 13, 2025 by Chef Remy
To make funnel cake bites, you need a mix of simple ingredients. You can create a rich and tasty treat that everyone will love. The recipe takes about 30 minutes. You can serve these bites for parties or family gatherings. Here’s a closer look at what you need: - 1 cup all-purpose flour - 2 tablespoons granulated sugar - 1/2 teaspoon baking powder - 1/4 teaspoon baking soda - 1/4 teaspoon salt - 1 large egg - 1 cup buttermilk - 1 teaspoon vanilla extract - Oil for frying (such as vegetable or canola) - Powdered sugar for dusting Each ingredient plays a key role. The flour gives structure, while sugar adds sweetness. Baking powder and baking soda make the bites fluffy. The egg helps bind everything, and buttermilk gives a nice tang. You can make your funnel cake bites even more fun with toppings. Here are some ideas: - Rich chocolate sauce - Homemade strawberry jam - Fluffy whipped cream These toppings add flavor and let you customize each bite. You can even set up a topping station for your guests. They will love making their own creations! Start by gathering your ingredients. You will need flour, sugar, baking powder, baking soda, salt, an egg, buttermilk, and vanilla. Sift the flour and dry ingredients in a bowl to mix them well. In another bowl, whisk the egg, buttermilk, and vanilla until smooth. Combine the wet mix into the dry mix. Stir gently until just mixed; lumps are okay! Heat about two inches of oil in a pot over medium heat. Aim for 350°F (175°C). Use a thermometer for best results. Fill a piping bag or squeeze bottle with your batter. Drizzle the batter into the hot oil in spiral shapes. Make small bites, around 2-3 inches wide. Fry for 1-2 minutes, turning them for even cooking. Look for a golden brown color. For crispy bites, make sure the oil is hot enough. If it’s too cool, the bites will soak up oil and become soggy. After frying, let the bites rest on paper towels to drain excess oil. Dust them with powdered sugar while warm. This keeps them light and adds sweetness. You can also set up a topping bar with chocolate sauce or strawberry jam for extra fun! To keep your funnel cake bites crispy, serve them right after frying. If you let them sit too long, they can get soggy. You can also use a wire rack instead of paper towels to cool them. This way, air flows around and keeps them crispy. Another tip is to avoid stacking them. If they pile up, moisture builds up and ruins the crunch. One common mistake is frying at the wrong temperature. If the oil is too cool, they absorb too much oil and become greasy. If too hot, they burn on the outside while staying raw inside. Always use a kitchen thermometer to check the oil temperature. Another mistake is overmixing the batter. A few lumps are okay. Overmixing makes the bites tough instead of light and airy. When frying, always add a few bites at a time. This helps keep the oil temperature steady. If you drop too many in, the oil cools down and changes the cooking time. Also, use a slotted spoon to turn the bites gently. This helps them cook evenly. Finally, keep an eye on the color. Look for a golden brown, which means they’re just right. For the full recipe and more tips, check out the Full Recipe. {{image_4}} You can make funnel cake bites even more fun by adding flavor. Try mixing in - 1 teaspoon of cinnamon for warmth. - 1 teaspoon of cocoa powder for a chocolate twist. - 1/2 cup of blueberries for a fruity option. These ingredients blend well and give your bites a unique taste. Toppings can change the game for funnel cake bites. While powdered sugar is classic, consider these options: - Rich chocolate sauce for a sweet finish. - Homemade strawberry jam for a fruity burst. - Creamy whipped cream for extra richness. - Chopped nuts for a crunchy texture. Feel free to mix and match to find your favorite combo! You can still enjoy funnel cake bites if you need a gluten-free choice. Simply swap the all-purpose flour with gluten-free flour. Many brands work well and can give you that crispy texture you want. Just check for a blend that contains xanthan gum for the best result. This way, everyone can join in on the fun! For the full recipe, refer back to the beginning of this article. Store leftover funnel cake bites in an airtight container. Keep them in the fridge for up to three days. To prevent them from getting soggy, place a paper towel at the bottom of the container. This helps absorb extra moisture. If you want them to stay crispy, avoid stacking them too high. To reheat, preheat your oven to 350°F (175°C). Place the funnel cake bites on a baking sheet. Bake them for about 5-7 minutes. This will help restore their crispiness. You can also use an air fryer for a quicker option. Heat them at 350°F for about 3-5 minutes. You can freeze funnel cake bites if you have extras. Arrange them in a single layer on a baking sheet and freeze for about an hour. Once frozen, transfer them to a freezer bag. They can last up to two months. To thaw, place them in the fridge overnight. Reheat them as mentioned before to enjoy their crispy texture again. You can tell when funnel cake bites are cooked by their color. Look for a deep golden brown shade. This usually takes about 1-2 minutes in hot oil. The texture should be crisp on the outside and soft on the inside. Use a slotted spoon to check a bite. If it is firm and golden, it's ready to come out. Make sure to turn them halfway through cooking for even browning. While frying gives funnel cake bites their classic taste, you can bake them. Preheat your oven to 400°F (200°C). Place the batter in small mounds on a lined baking sheet. Bake for about 10-12 minutes or until they look golden. They may not be as crispy, but they will still be tasty. You can brush them with melted butter and dust with powdered sugar for a special touch. Funnel cake bites are popular at fairs, carnivals, and festivals. Look for booths that sell fried treats. Many food trucks also offer them as a fun snack. If you're at an event, ask vendors if they have this delightful treat. You might find them served with fun toppings, adding to the excitement! If you can't find them, try making them at home using the full recipe. In this article, we explored how to make funnel cake bites. We covered the key ingredients, step-by-step instructions, and helpful tips for a great texture. You learned about storage and variations to spice things up. As you prepare these treats, remember that practice makes perfect. Avoid common mistakes, and feel free to experiment with different flavors. Enjoy your cooking journey, and share your results!

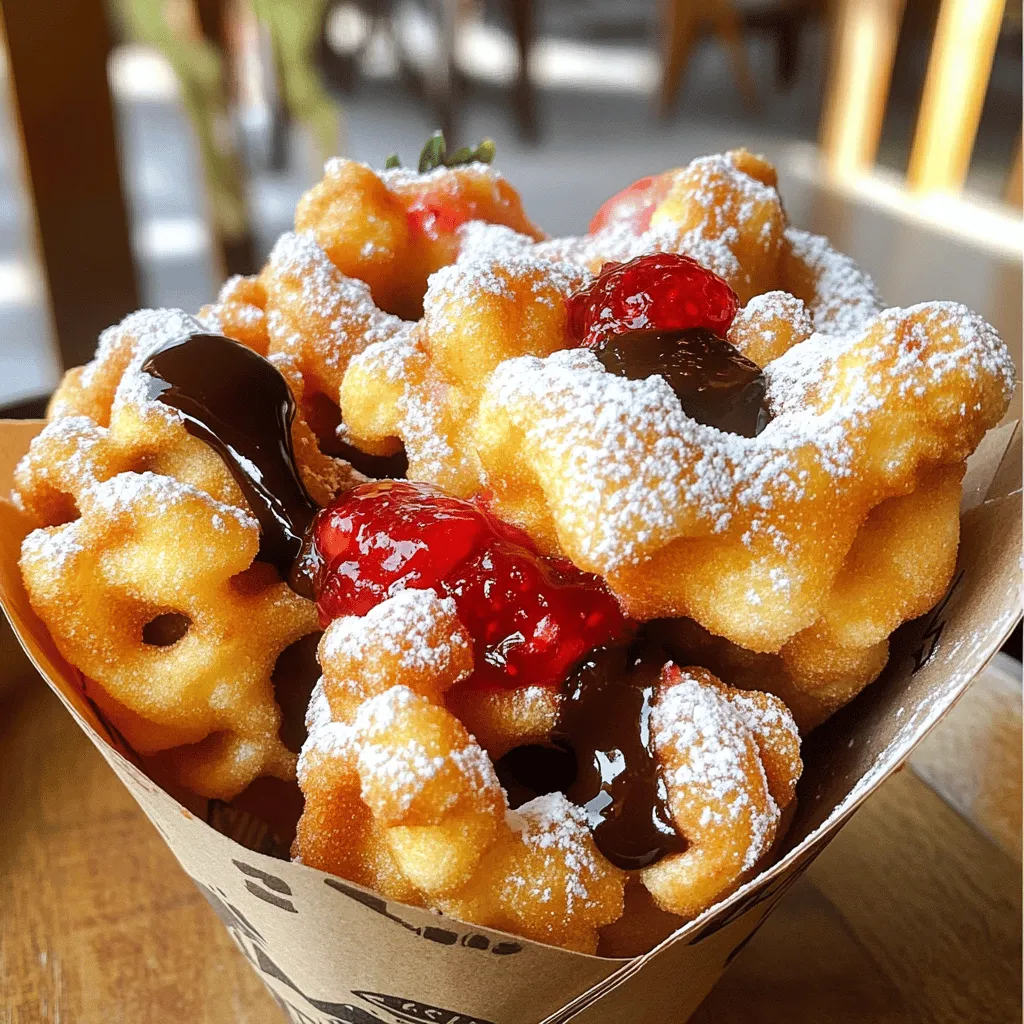
Are you ready to dive into the sweet world of funnel cake bites? These crispy treats are a showstopper for any occasion, whether it’s a fair, a birthday party, or …

Read more

Categories Desserts
Older posts
Newer posts
← Previous Page1 … Page92 Page93 Page94 … Page130 Next →

ROASTED RECIPES

Where bold flavors meet everyday meals. Warm, vibrant, and made to share. 🔥🥗🍴

PAGES

Home About Contact Privacy Policy Terms & Conditions Cookie Policy GDPR Policy Copyright Policy Disclaimer

CATEGORIES

Appetizers Desserts Salads Breakfast Dinner

Contact

  • Pinterest
  • Mail
Copyright © 2025 Roasted Flavors. All rights reserved.