Skip to content
Roasted Flavors
  • Home
  • Appetizers
  • Desserts
  • Salads
  • Breakfast
  • Dinner
  • Privacy Policy
  • Contact
  • About

Chef Remy

Healthy Chicken Pot Pie Soup Comforting and Simple Recipe

June 13, 2025 by Chef Remy
Here are the main ingredients you need for this warm soup: - 1 lb boneless, skinless chicken breasts, diced - 1 tablespoon extra virgin olive oil - 1 medium onion, finely diced - 2 cloves garlic, minced - 3 medium carrots, peeled and diced - 2 celery stalks, diced - 1 cup frozen green peas - 4 cups low-sodium chicken broth - 1 cup unsweetened almond milk (or any non-dairy milk) - 1 teaspoon dried thyme - 1 teaspoon dried rosemary - ½ teaspoon salt (adjust to taste) - ¼ teaspoon freshly ground black pepper - ½ cup whole wheat pastry flour (or regular whole wheat flour) - Fresh parsley, chopped, for garnish You can make swaps if you need to! Here are some ideas: - Use turkey instead of chicken for a leaner option. - Swap almond milk for any plant-based milk like oat or soy. - If you want to cut carbs, skip the flour and use cornstarch. - Add more veggies like bell peppers or spinach for extra nutrients. - Use coconut oil if you prefer a different fat for cooking. Each ingredient offers health perks: - Chicken: High in protein, great for muscle health. - Olive oil: Rich in good fats, good for heart health. - Onion and garlic: Packed with antioxidants and good for immunity. - Carrots: Full of beta-carotene, great for vision. - Celery: Low in calories, helps keep you hydrated. - Green peas: Good source of fiber and protein. - Low-sodium chicken broth: Keeps sodium low while adding flavor. - Almond milk: Low in calories and adds creaminess without dairy. - Thyme and rosemary: Add flavor and have anti-inflammatory properties. - Whole wheat flour: Offers fiber and helps with digestion. - Parsley: Provides vitamins and adds freshness to the dish. This healthy chicken pot pie soup is not only comforting but also packed with nutrients. Enjoy making it with the full recipe! To make Healthy Chicken Pot Pie Soup, start by gathering your ingredients. You will need: - 1 lb boneless, skinless chicken breasts, diced - 1 tablespoon extra virgin olive oil - 1 medium onion, finely diced - 2 cloves garlic, minced - 3 medium carrots, peeled and diced - 2 celery stalks, diced - 1 cup frozen green peas - 4 cups low-sodium chicken broth - 1 cup unsweetened almond milk - 1 teaspoon dried thyme - 1 teaspoon dried rosemary - ½ teaspoon salt - ¼ teaspoon freshly ground black pepper - ½ cup whole wheat pastry flour - Fresh parsley, chopped Now, prepare each ingredient. Wash and chop your veggies. Dice the chicken into small pieces. Mince the garlic and chop the parsley. In a large pot, heat the olive oil over medium heat. Add the chicken and cook for about 5-7 minutes. Make sure the chicken is no longer pink. Once cooked, remove the chicken and set it aside. In the same pot, add the diced onion and minced garlic. Cook for 3-4 minutes until the onion is soft. Next, add the diced carrots and celery. Stir and cook for another 5 minutes. Sprinkle the whole wheat pastry flour over the veggies. Mix well and cook for one more minute. This step helps the soup thicken later. Slowly pour in the chicken broth and almond milk while stirring. This keeps lumps from forming. Return the chicken to the pot. Add thyme, rosemary, salt, black pepper, and frozen peas. Mix everything well. Bring the soup to a gentle boil. Then, lower the heat and let it simmer for 20 minutes. Stir occasionally until the veggies are tender and the soup thickens slightly. To get the best texture for your soup, use whole wheat pastry flour. This flour adds a nice body to the soup. Stir constantly when you add the liquids to avoid lumps. If the soup seems too thick, add a little more broth or almond milk to reach your desired consistency. If you want it creamier, try adding more almond milk at the end. Taste the soup before serving. Adjust the salt and pepper if needed. Serve hot with fresh parsley on top. This adds flavor and a pop of color. For the full recipe, check the section above. Enjoy your cooking! To boost flavor without extra calories, use herbs and spices. Fresh thyme and rosemary work great. You can also add a splash of lemon juice. This adds brightness without fat. Try using low-sodium broth for a richer taste. It keeps the soup light yet flavorful while maintaining a healthy profile. One common mistake is overcooking the chicken. This makes it tough and dry. Cook it just until no longer pink, then set it aside. Another mistake is using too much flour. It can make the soup thick and heavy. Start with half a cup and adjust as needed. Lastly, don’t skip the garnishing. Fresh parsley adds flavor and looks great! I recommend using a large pot for even cooking. A heavy-bottomed pot helps prevent burning. If you want a creamier soup, blend part of it after cooking. This gives a smooth texture while keeping some chunky bits. You can also use a slow cooker. Just sauté the chicken and veggies first, then cook on low for 6-8 hours. This enhances the flavors beautifully. For the full recipe, check it out [here](Full Recipe). {{image_4}} You can make this soup without chicken. Use firm tofu or chickpeas instead. Both add protein and texture. Swap the chicken broth for vegetable broth for a rich flavor. Use almond milk or any other plant-based milk to keep it creamy. You can also add more veggies like mushrooms, zucchini, or corn for extra color and taste. If you need a gluten-free version, replace the whole wheat flour with gluten-free flour. This keeps the soup thick and hearty. Make sure your broth is also gluten-free. Most brands have options that fit. You can use cornstarch mixed with water as a thickener if needed. It works well and stays gluten-free. To give your soup a unique twist, add different herbs and spices. Fresh dill or parsley can brighten the flavors. For some heat, try a pinch of cayenne pepper. You can also toss in more vegetables, like green beans or sweet potatoes. These add both nutrition and flavor. Enjoy experimenting to find your favorite mix! For the full recipe, check out the detailed instructions above. To keep your Healthy Chicken Pot Pie Soup fresh, let it cool. Once cool, transfer it to an airtight container. Make sure to store it in the fridge. This soup stays good for about 3 to 4 days. Avoid leaving it out for long to prevent spoilage. When you are ready to enjoy your soup again, gently reheat it. You can do this on the stove over medium heat. Stir it often to prevent sticking. If the soup is too thick, add a splash of water or broth. Heat until it is warm throughout. You can also use the microwave. Just heat in short bursts, stirring in between. If you want to store your soup longer, freezing is a great option. Before freezing, let it cool completely. Use freezer-safe containers or bags, leaving some space for expansion. Label the containers with the date. The soup can freeze well for about 2 to 3 months. When you want to eat it, thaw it in the fridge overnight. Then, reheat as mentioned before. Enjoy your comforting soup anytime! Yes, you can! Try turkey, beef, or even seafood. Each option brings a unique taste. For turkey, use the same amount as chicken. For beef, choose lean cuts and cut them small. Seafood like shrimp or fish adds a fresh twist. Just adjust cooking times to ensure everything cooks well. One great way is to use unsweetened almond milk, which is low in calories. You can also blend a portion of the soup. This thickens it while keeping it light. Another option is to add pureed cauliflower or silken tofu for creaminess without many calories. These ingredients boost the soup's texture without heavy cream. This soup pairs well with whole-grain bread or a fresh salad. Bread adds a nice crunch and helps soak up the soup. A simple green salad with a light dressing keeps things fresh. You can also serve it with roasted veggies for added flavor and nutrients. Check out the Full Recipe for more ideas! This blog post shared the keys to making a healthy chicken pot pie soup. We covered the main ingredients, alternatives, and the benefits of each. You learned how to prepare and cook the soup, with tips for the perfect texture. We also discussed variations for different diets and how to store your soup. In the end, this dish is flexible and easy to make. You can adjust it to fit your tastes and needs. Enjoy creating your own healthy soup!

If you crave warmth and comfort in a bowl, try my Healthy Chicken Pot Pie Soup. This simple yet satisfying recipe combines the classic flavors of pot pie while keeping …

Read more

Categories Dinner

Breakfast Chili and Eggs Easy and Flavorful Recipe

June 13, 2025 by Chef Remy
- 1 can (15 oz) black beans - 1 can (15 oz) diced tomatoes - 1 small onion, chopped - 2 cloves garlic, minced - 1 bell pepper, diced - 1 jalapeño, finely chopped (optional) - 1 teaspoon ground cumin - 1 teaspoon chili powder - 4 large eggs - 2 tablespoons extra virgin olive oil - Salt and black pepper to taste - Fresh cilantro leaves for garnish - Ripe avocado slices for serving In this recipe, the ingredients play a key role in building flavor. The black beans add protein and texture. The diced tomatoes bring a juicy base, enhancing the dish. The onion and garlic provide a sweet and savory aroma. Bell peppers add a nice crunch, while jalapeños can give it a spicy kick. Cumin and chili powder deliver warmth and depth. Using high-quality olive oil makes everything richer. The eggs, poached in the chili, bring creaminess. Fresh cilantro brightens the dish, making it vibrant. And don't forget the avocado slices, which add creaminess and balance the heat. To see how to put these ingredients together, check the Full Recipe. - Heat olive oil in a skillet over medium heat. - Sauté onion and garlic until translucent, about 3-4 minutes. - Add bell pepper and jalapeño, cooking until tender, about 2-3 minutes. - Incorporate black beans, diced tomatoes, cumin, and chili powder into the skillet. - Simmer for 10 minutes to meld flavors together. - Create wells in the chili for the eggs. - Cover and cook until eggs are set to your desired doneness. This simple method allows the flavors to shine. I love how the warm spices mix with the beans and fresh vegetables. It makes breakfast exciting! Check out the Full Recipe for complete details. - To cook the eggs evenly, cover the skillet while they poach. - If you prefer a runny yolk, check the eggs at 5 minutes. Cook longer for firm yolks. - This dish shines with fresh avocado slices on top. - For a filling meal, serve with toasted bread or warm tortillas. - Sprinkle cheese on top for added creaminess and flavor. - Try adding fresh herbs, like cilantro or parsley, to garnish your dish. These tips will help you make the most of your breakfast chili and eggs. For the full recipe, check out the Sunny Breakfast Chili Delight! {{image_4}} If you want a vegetarian twist, skip the eggs. You can add more beans or tofu for protein. Consider using black beans, kidney beans, or chickpeas. Adding veggies like zucchini or corn makes it even better. These choices boost flavor and nutrition. Do you like it spicy? Adjust the jalapeño and chili powder to match your taste. For less heat, try milder peppers like bell peppers or banana peppers. You can also leave out the jalapeño entirely. This way, everyone can enjoy it. Want to mix things up? You can add proteins like cooked sausage or crispy bacon. This boosts the dish’s heartiness. Experiment with different beans such as pinto or white beans. Changing the type of peppers can also make a big difference. Try poblano or Anaheim peppers for unique flavors. Store any leftovers in an airtight container. This keeps the chili fresh and tasty. It will stay good for 3-4 days in the fridge. Just make sure to let it cool down before sealing the container. You can freeze the Breakfast Chili and Eggs for up to 2 months. It’s a great way to save extra portions. When you’re ready to eat, thaw it in the fridge overnight. This will help it heat evenly. Reheat the chili gently to avoid overcooking the eggs. You can use a skillet or microwave. If using a skillet, add a splash of water while reheating. This keeps the dish moist and delicious. Enjoy the flavors just like when it was fresh! Yes, you can prepare the chili mixture and add eggs just before serving. This way, the eggs stay fresh and perfectly cooked. You can store the chili in the fridge for a few days. When you are ready, heat it up and add the eggs. You can use kidney beans or pinto beans as alternatives. Both beans add great flavor and texture. This swap keeps your dish delicious and interesting. Omit any cheese and focus on plant-based ingredients. You can still enjoy the rich flavors without dairy. Fresh avocado adds creaminess and taste too. Absolutely! It's perfect for batch cooking and reheating throughout the week. Make a big batch and store it in containers. You can grab it for a quick breakfast any day. Serve it hot with fresh avocado slices, cilantro, and additional toppings as desired. You can also add hot sauce or cheese. This makes each bowl unique to your taste. Yes, consider adding hot sauce or more chili powder for additional heat. You can also try different spices to make it your own. Adjust the spice level to match your preference. This recipe for Breakfast Chili and Eggs is simple and tasty. You learned what ingredients to use and how to prepare them. I shared helpful tips for cooking and serving this dish. You can easily adjust the spice level and make it vegetarian or freezer-friendly. Experiment with flavors and toppings to make it your own. Enjoy a fun and hearty meal that warms you up and fuels your day. Dive in, get creative, and serve up some deliciousness!

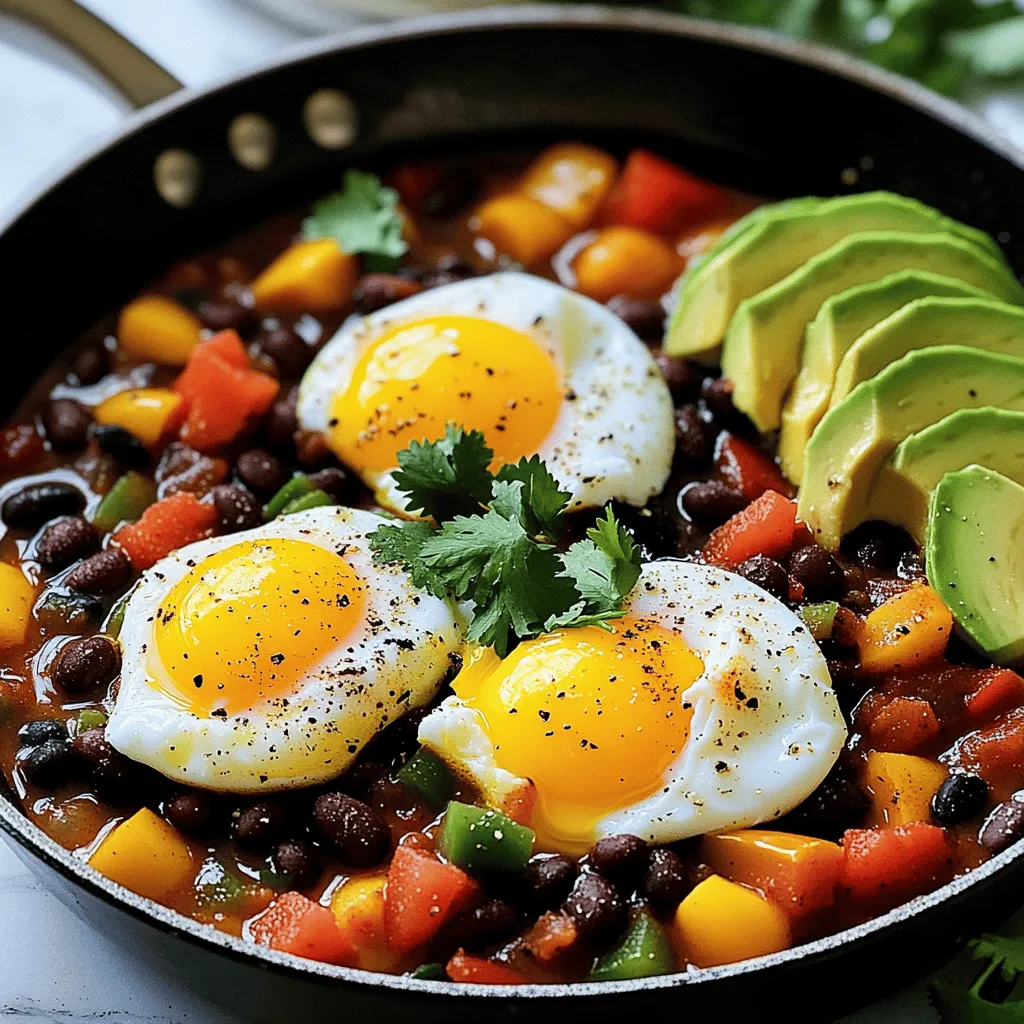
Start your day with a burst of flavor! This Breakfast Chili and Eggs recipe is easy to make and packed with taste. You’ll love how quick it is to prepare …

Read more

Categories Breakfast

Grilled Mozzarella Sandwich Perfectly Crispy Delight

June 13, 2025 by Chef Remy
- 2 slices of artisanal sourdough bread - 1 cup fresh mozzarella cheese, sliced into rounds - 1/4 cup sun-dried tomatoes, roughly chopped - 1/4 cup fresh basil leaves - 2 tablespoons flavorful pesto sauce - 2 tablespoons high-quality olive oil - Salt and freshly cracked black pepper, to taste - Optional: A sprinkle of red pepper flakes When I make a grilled mozzarella sandwich, I focus on the quality of my ingredients. Artisanal sourdough bread brings a chewy texture and a slightly tangy flavor. This bread is key to a perfect, crispy crust. Fresh mozzarella cheese is a star in this dish. I love how it melts beautifully, creating a gooey center. I slice it into rounds for even melting. Sun-dried tomatoes add a burst of sweetness. Their rich flavor contrasts wonderfully with the creamy cheese. I chop them roughly for a nice texture. Basil leaves bring a fresh note. They add a lovely aroma and balance the richness of the cheese. I always use fresh basil for the best taste. Pesto sauce is another layer of flavor. It enhances the taste of the sandwich with its herbs and garlic. I spread it on the bread for an extra kick. High-quality olive oil is essential. I brush it on the outside of the bread. This step ensures a golden crust that is crispy and inviting. Lastly, I season with salt and pepper. These simple spices elevate the flavors. I might add red pepper flakes if I want some heat. By choosing fresh, high-quality ingredients, I create a grilled mozzarella sandwich that’s a true delight. For the full recipe, make sure to check the details above! 1. Heat a non-stick skillet or griddle over medium heat. You want it warm but not smoking. This helps the bread toast nicely. 2. Take your slices of sourdough bread. Brush one side of each slice with olive oil. This oily side will create that crispy crust we all love. 1. On the un-oiled side of one slice, spread pesto sauce. Make sure to cover it evenly. This adds great flavor. 2. Layer fresh mozzarella cheese slices on top of the pesto. Next, sprinkle the chopped sun-dried tomatoes and fresh basil leaves. 3. Finish with a light sprinkle of salt, black pepper, and red pepper flakes if you like some heat. 4. Place the second slice of bread on top, oiled side facing out. Now you have a complete sandwich. 1. Gently place the sandwich in the preheated skillet. Cook for 3-4 minutes. You want the bottom to be golden brown. 2. Carefully flip the sandwich using a spatula. Press down slightly to help it cook evenly. Cook the other side for another 3-4 minutes. The mozzarella should melt into a gooey delight. 3. Once both sides are golden, remove the sandwich from the skillet. Let it rest for a minute before slicing it in half. For the full recipe, check out the Melty Mozzarella Delight Sandwich. When making a grilled mozzarella sandwich, start with your cheese. Choose fresh mozzarella for its creamy melt and rich flavor. Look for mozzarella packed in water, as it stays moist. If fresh mozzarella isn’t available, try low-moisture mozzarella. It melts well but has a firmer texture. Next, select the right bread. Artisanal sourdough is my go-to choice. Its crusty outside and soft inside create a great contrast. You can also use ciabatta or whole-grain bread for different flavors. Just make sure the bread is sturdy enough to hold all the yummy fillings. Heating your skillet right is key. Use medium heat to warm your skillet. Too high, and your bread might burn before the cheese melts. You want a nice golden color on both sides. To achieve perfect crispiness, brush the outside of the bread with olive oil. This oil creates a golden, crunchy crust. When cooking, press down gently with a spatula. This helps the sandwich cook evenly and makes sure the cheese melts perfectly. For serving, slice your sandwich diagonally. This makes it look appealing and easy to eat. Place it on a rustic wooden board for a cozy vibe. Add a few fresh basil leaves on the side for color. Pair your sandwich with a small bowl of extra pesto for dipping. This adds a burst of flavor. You might also serve it with a simple salad or some crunchy chips. Enjoy your melty masterpiece! For the complete recipe, check out the Full Recipe. {{image_4}} You can swap fresh mozzarella for other cheeses. Try provolone or fontina for a fun twist. If you want something creamier, use burrata. These cheeses melt well and create a rich flavor. Different spreads can also change your sandwich. Instead of pesto, try a spicy aioli or a tangy tapenade. You can even use hummus for a unique taste. Each spread gives a new texture and flavor. If you need gluten-free options, choose gluten-free bread. Many brands offer tasty choices that hold up well. You can use gluten-free sourdough or even lettuce wraps for a lighter version. For vegan alternatives, use plant-based cheese. Look for brands that mimic mozzarella's stretch. You can also make your own using cashews. For pesto, use nutritional yeast, basil, and olive oil to create a vegan spread. To make your sandwich even better, add slices of avocado. It gives a creamy texture and fresh taste. You can also roast some peppers for a smoky flavor. They add sweetness and depth. Try new herbs and spices too. Adding fresh oregano or thyme can brighten the sandwich. A sprinkle of smoked paprika can create a warm, earthy taste. Mix and match flavors to find your perfect combination! To keep your grilled mozzarella sandwich fresh, wrap it in foil or plastic wrap. Place it in an airtight container for best results. Store it in the fridge for up to three days. When you're ready to eat, you can reheat it in a skillet over low heat. This method helps maintain its crispness. Another option is to use the oven. Preheat it to 350°F (175°C) and heat for about 10 minutes. This keeps the bread crispy and the cheese melty. Yes, you can freeze grilled mozzarella sandwiches! Wrap each sandwich tightly in plastic wrap. Then, place them in a freezer-safe bag or container. It’s best to freeze them before reheating. They can last up to three months in the freezer. To reheat, let them thaw in the fridge overnight. Then, cook in a skillet or oven as mentioned earlier. You can keep leftover grilled mozzarella sandwiches in the fridge for about three days. After that, they might lose their taste and texture. Check for signs of spoilage, such as an off smell or mold. If you see any, it’s best to toss the sandwich. Enjoy your melty mozzarella delight fresh for the best taste! For the full recipe, check out the Melty Mozzarella Delight Sandwich section above. You can serve many tasty sides with grilled mozzarella sandwiches. Here are some ideas: - Simple Salad: A fresh green salad pairs well. Use mixed greens, cherry tomatoes, and a light dressing. - Tomato Soup: A warm bowl of tomato soup complements the sandwich's flavors. It adds a cozy touch. - Sweet Potato Fries: Crispy sweet potato fries provide a sweet contrast. They are fun and crunchy. - Pickles: Add some dill pickles for a tangy bite. They balance the richness of the cheese. - Chips: Serve with crunchy chips for extra texture. They make for a great snack alongside your meal. Yes, you can prep grilled mozzarella sandwiches ahead of time. Here are some tips: - Prepare the Filling: Slice the mozzarella and chop the sun-dried tomatoes and basil in advance. Store them in the fridge. - Assemble Before Cooking: You can assemble the sandwich but wait to cook it. Wrap it in plastic wrap to keep it fresh. - Cook Later: When ready to eat, heat the skillet and cook your sandwich. This ensures your bread stays crispy. - Store For Later: If you have leftovers, refrigerate them. Reheat in a skillet for the best taste. To make your sandwich extra cheesy, try these techniques: - Layer Cheese: Use more than one type of cheese. Mix mozzarella with provolone or fontina for depth. - Add Cheese Inside and Out: Spread a little cheese on the outside of the bread. This creates a cheesy crust. - Use Shredded Cheese: Shredded cheese melts quicker and covers more area. It gives an even melt. - Heat Gradually: Cook on low heat for longer. This allows the cheese to melt fully without burning the bread. - Experiment with Flavors: Mix in some cheese spreads or flavored cheeses. They can enhance the taste. Enjoy your grilled mozzarella sandwich to the fullest! For the complete recipe, check out the Full Recipe section above. This blog post explored how to make a perfect grilled mozzarella sandwich. We discussed ingredients like artisanal sourdough, fresh mozzarella, and sun-dried tomatoes. I shared tips on cooking, presentation, and storing leftovers. Remember, using quality ingredients makes a big difference. Try different variations to suit your taste. Enjoy your delicious creation, and don't be afraid to experiment!

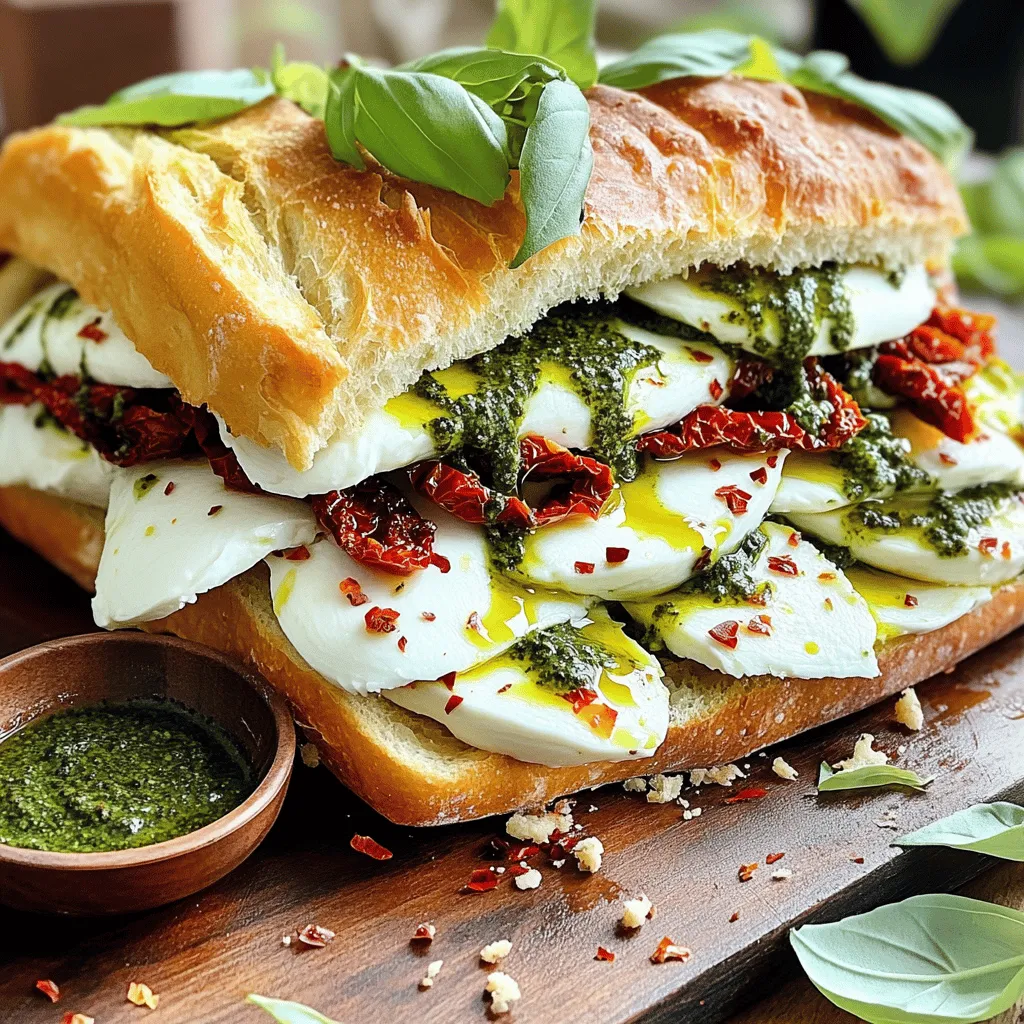
If you crave a warm, melty treat that’s crispy on the outside and gooey on the inside, you’re in the right place! This Grilled Mozzarella Sandwich combines fresh mozzarella, sun-dried …

Read more

Categories Dinner

Creamy Marry Me Shrimp Pasta Perfectly Cooked Delight

June 13, 2025 by Chef Remy
- 8 oz fettuccine pasta - 1 lb large shrimp, peeled and deveined - 2 tablespoons olive oil - 4 cloves garlic, minced - 1 cup heavy cream - 1 cup sun-dried tomatoes, chopped - 1 cup fresh spinach, roughly chopped - ½ cup grated Parmesan cheese - Garnish options: Fresh basil leaves The ingredients for Creamy Marry Me Shrimp Pasta blend together perfectly. Each component plays a key role in making this dish rich and flavorful. First, the fettuccine pasta is the heart of the meal. It holds the sauce well, giving each bite a creamy texture. Next, the shrimp adds a delightful taste. When cooked just right, shrimp becomes tender and juicy. Olive oil helps sauté the garlic, which brings out its strong aroma. Garlic adds depth to the dish, making it irresistible. The heavy cream transforms the sauce into a luscious base. It coats the pasta and shrimp beautifully, creating a dreamy texture. Sun-dried tomatoes offer a sweet and tangy touch. They brighten the dish and add a pop of color. Fresh spinach not only adds nutrition but also a lovely green hue. It wilts down perfectly, blending into the sauce. The grated Parmesan cheese gives a salty, nutty flavor. It melts in the warm sauce, enhancing its creaminess. Finally, garnishing with fresh basil leaves adds a fresh lift. They give a burst of flavor and look beautiful on the plate. For the full recipe, you can visit the provided link. Enjoy creating this dish that is sure to impress! To start, bring a large pot of salted water to a boil. Add the fettuccine pasta when the water is bubbling. Cook the pasta according to the package instructions, usually around 8 to 10 minutes. You want it to be al dente, which means it should still have a slight bite. To check, taste a piece before draining. Once cooked, drain the pasta but save a cup of pasta water for later. In a large skillet, add 2 tablespoons of olive oil. Heat it over medium heat until it shimmers. Then, add 4 cloves of minced garlic. Sauté the garlic for about one minute, just until you smell its aroma. Be careful not to burn it. Next, add the shrimp in a single layer. Cook them for 2 to 3 minutes on each side. You'll know they are done when they turn pink and opaque. Once cooked, remove the shrimp from the skillet and set them aside. In the same skillet, pour in 1 cup of heavy cream. Bring it to a gentle simmer over medium heat. As it heats, stir occasionally to prevent sticking. After a minute, add 1 cup of chopped sun-dried tomatoes and 1 teaspoon of red pepper flakes. Let the sauce simmer for about 5 minutes until it thickens slightly. Next, add 1 cup of roughly chopped fresh spinach to the sauce. Stir until the spinach wilts and blends into the creamy mix. Gradually mix in ½ cup of grated Parmesan cheese. Keep stirring until the cheese melts. If the sauce seems too thick, add a bit of the reserved pasta water until you reach your desired consistency. Now, return the cooked shrimp to the skillet, tossing them gently in the sauce. Add the drained fettuccine and mix everything together until well combined. Taste the dish and sprinkle in salt and pepper according to your preference. For plating, use deep bowls to serve the pasta. Garnish each serving with fresh basil leaves. This adds a lovely aroma and a pop of color. Enjoy your creamy marry me shrimp pasta! For the full recipe, check it out [here](#). How to avoid overcooking shrimp: To keep shrimp tender, cook them for just 2-3 minutes on each side. Look for a pink color and opaque texture. If they curl tightly, they may be overcooked. Best practices for creamy sauces: Start with low heat when making your sauce. This helps to prevent burning the cream. Stir frequently to keep the sauce smooth and creamy. If it gets too thick, add a bit of reserved pasta water. Suggestions for additional herbs and spices: Basil, parsley, and thyme add fresh flavor. You can also try a dash of oregano or Italian seasoning. For a kick, add more red pepper flakes or some cayenne. When to add extra salt and pepper: Taste your sauce after adding the shrimp and before serving. This is the best time to adjust salt and pepper. Start with a pinch and add more as needed. Plating tips for a romantic dinner: Use deep bowls for serving. Twirl the fettuccine into a nest shape for height. This makes your dish more inviting and elegant. Using garnishes to enhance visual appeal: Add fresh basil leaves on top for a pop of color. A sprinkle of grated Parmesan adds a nice touch too. You can also drizzle a bit of olive oil for shine. For a touch of romance, place a few sun-dried tomatoes around the edge. For a detailed recipe, check the Full Recipe for all the steps and ingredients! {{image_4}} For those with dietary needs, you can easily adjust this dish. - Gluten-free pasta alternatives: Look for gluten-free fettuccine made from rice or quinoa. These options cook similar to traditional pasta, keeping the texture you desire. - Dairy-free substitutions for cream and cheese: Use coconut cream or cashew cream instead of heavy cream. Nutritional yeast works well as a cheese substitute for that savory flavor. Feel free to switch up the seafood or add more veggies. - Using different types of seafood: You can use scallops, crab, or even lobster. Each option brings a unique taste to the dish. - Vegetable variations for added texture: Consider adding bell peppers, zucchini, or asparagus. These will not only enhance the flavor but also add color and crunch. Get creative with your sauce for a different twist. - Adding flavored oils or butters: Use garlic-infused olive oil or herb butter for extra depth. This small change can elevate the entire dish. - Experimenting with different cheese types: Try goat cheese, feta, or even a sharp cheddar. Each cheese will give a unique flavor profile and creaminess to your sauce. For the full recipe, you can refer to the Creamy Marry Me Shrimp Pasta recipe provided above. When you have leftovers of this creamy marry me shrimp pasta, it is key to store them right. Use airtight containers so the dish stays fresh. Glass or plastic containers work well. Make sure to cool the pasta before sealing. This helps prevent moisture buildup. To cool the pasta, let it sit at room temperature for about 30 minutes. Once cooled, place it in your container and put it in the fridge. The pasta will last for about three days. To reheat the pasta, use the stove for the best results. Place the leftovers in a skillet over low heat. Add a splash of water or extra cream to keep it creamy. Stir often to warm it evenly. You can also use a microwave, but be careful. Heat it in short bursts. Stir in between to avoid hot spots. Adding liquid helps keep the dish moist. If you want to save your creamy marry me shrimp pasta for later, freezing is an option. However, it is best to freeze the pasta and sauce separately. This helps maintain the texture. Place the cooked pasta in one bag and the sauce in another. Squeeze out the air before sealing. You can freeze them for up to three months. When you are ready to eat, thaw the sauce in the fridge overnight. Reheat it on the stove while cooking the pasta. This keeps everything fresh and tasty. Marry Me Shrimp Pasta is a modern dish known for its rich flavors. It combines shrimp, cream, and pasta, making it a comforting meal. Many believe it got its name from its ability to impress dates. The dish has roots in Italian cuisine, where seafood and pasta shine together. Its creamy sauce enhances the shrimp's sweetness, creating a delightful balance. Chefs worldwide have embraced this dish, adding their personal touches. To add heat to your shrimp pasta, use red pepper flakes. Start with a teaspoon and increase it to your taste. You can also add diced jalapeños or spicy sausage. If you love heat, try a splash of hot sauce in the cream sauce. Remember, balance is key, so adjust slowly to avoid overpowering the dish. Yes! You can make Marry Me Shrimp Pasta ahead of time. Cook the pasta and shrimp separately, then store them in the fridge. Prepare the cream sauce, then keep it in an airtight container. When ready to eat, just reheat the sauce and combine everything. This method keeps the pasta from getting soggy and maintains flavor. Wine enhances Marry Me Shrimp Pasta beautifully. A crisp white wine, like Pinot Grigio, pairs well. It balances the creaminess and brings out the shrimp's taste. For side dishes, consider a fresh salad or garlic bread. These options add texture and flavor, creating a perfect meal. Absolutely! Marry Me Shrimp Pasta is perfect for romantic dinners or celebrations. Its rich flavors and creamy texture feel luxurious. You can elevate your dining experience with elegant plating. Use deep bowls and add a sprinkle of extra cheese and fresh herbs for a beautiful finish. Presentation matters when serving Marry Me Shrimp Pasta. Start by using deep bowls for a cozy feel. Garnish with fresh basil leaves to add color and aroma. A light sprinkle of Parmesan cheese and red pepper flakes enhances the look. Arrange the shrimp artfully around the pasta for a professional touch. This blog post covered a quick and tasty recipe for Marry Me Shrimp Pasta. We started with key ingredients like fettuccine, shrimp, garlic, and heavy cream. I shared step-by-step cooking advice to get the perfect texture and flavor. We explored tips to enhance taste and ideas for personalizing the dish. In the end, this dish is great for any occasion. With a few simple changes, you can make it your own. Enjoy making it and impressing your guests!

Get ready to impress your taste buds with my Creamy Marry Me Shrimp Pasta! This dish combines perfectly cooked shrimp, rich cream, and fresh spinach, creating a delightful meal that …

Read more

Categories Dinner

Italian Basil Chicken Cutlets Flavorful and Easy Meal

June 13, 2025 by Chef Remy
To make Italian Basil Chicken Cutlets, you need fresh and simple ingredients. Here’s what you’ll need: - 4 boneless, skinless chicken breasts - 1 cup fresh basil leaves, finely chopped - 1/2 cup freshly grated Parmesan cheese - 1 cup panko breadcrumbs - 2 large eggs - 1/4 cup all-purpose flour - 2 cloves garlic, finely minced - 1 teaspoon dried oregano - Salt and pepper, to taste - Olive oil, for frying - Lemon wedges, for serving These ingredients come together to create a tasty dish. The chicken is tender and juicy, while the herbs and cheese add great flavor. I love using fresh basil; it brings a bright and aromatic touch. The panko breadcrumbs give a nice crunch, making each bite delightful. When gathering your ingredients, choose high-quality chicken and fresh herbs. Fresh basil and Parmesan cheese make a big difference in taste. You can find panko breadcrumbs at most grocery stores, and they’re worth it for that extra crunch. Don't forget the lemon wedges! They brighten the dish and enhance the flavors. If you want to see the full recipe, check out the complete guide. Begin by placing each chicken breast between two sheets of plastic wrap. Use a meat mallet or a rolling pin to pound the chicken. Aim for an even thickness of about 1/2 inch. This step is key. It helps the chicken cook evenly and stay tender. Now, create a production line with three shallow bowls. In the first bowl, mix the flour with a pinch of salt and some freshly ground pepper. In the second bowl, whisk the eggs until they are smooth and creamy. The third bowl holds the panko breadcrumbs, grated Parmesan cheese, chopped basil, minced garlic, and dried oregano. Mix well to spread the flavors. Take one chicken cutlet and lightly coat it in the flour mixture. Make sure to shake off any extra flour. Next, dip the cutlet into the egg mixture, ensuring it is fully covered. Finally, press the cutlet into the breadcrumb mix. This step is crucial for a nice, crispy coating. Repeat for all chicken breasts. In a large skillet, heat about 1/4 inch of olive oil over medium heat. To check if the oil is hot, drop a small piece of breadcrumb into it. If it sizzles, you are ready. Carefully place the breaded chicken cutlets in the skillet. Avoid overcrowding the pan. Fry each cutlet for about 4 to 5 minutes on each side. Look for a golden brown color to know they are done. Cook in batches if needed. Once cooked, move the chicken cutlets to a plate lined with paper towels. This helps soak up any extra oil. Serve the cutlets warm. Garnish with more chopped basil and add lemon wedges on the side. Squeezing the lemon over the cutlets adds a refreshing touch. Enjoy this flavorful dish! You can find the Full Recipe to guide you through every step. To make your Italian Basil Chicken Cutlets shine, use fresh herbs. Fresh basil truly adds a bright taste. You can also mix in oregano and thyme. A pinch of red pepper flakes gives a nice kick. For some zest, try lemon zest or a splash of lemon juice. These flavors will dance on your palate. Panko breadcrumbs are the secret to a crunchy cutlet. They are lighter and crispier than regular breadcrumbs. To get the most crunch, toast the panko lightly in a dry pan first. This step adds color and flavor. Be sure to press the breadcrumbs firmly onto the cutlets. This helps them stick during frying, ensuring a perfect texture. When frying, watch the oil temperature closely. If the oil is too hot, the cutlets will burn. If it’s too cool, they will absorb too much oil. Always fry in batches. Overcrowding the pan cools the oil down. This can lead to soggy cutlets. Cook until they are golden brown and always check for doneness with a meat thermometer. The chicken should reach 165°F for safety. {{image_4}} If you want to mix it up, try different options. For chicken, you can use turkey cutlets or pork chops. Both stay juicy and flavorful. Instead of panko breadcrumbs, you can use regular breadcrumbs or crushed crackers for a different texture. When it comes to cheese, try mozzarella or even feta for a tangy twist. You do not have to fry the chicken. You can bake or air-fry it. For oven-baking, preheat to 400°F. Place the breaded cutlets on a baking sheet lined with parchment paper. Bake for about 20 minutes or until golden and cooked through. For air-frying, set your air fryer to 375°F and cook for 10-12 minutes, flipping halfway through. Both methods keep the chicken tender and tasty. Want to add more flavors? Think about Mediterranean touches. Mix sun-dried tomatoes or olives into the breadcrumb mix. You can also add some Italian herbs like thyme or rosemary for an extra kick. These small changes can give your dish a whole new vibe while still keeping it simple and delicious. For the full recipe, check out the detailed instructions to make these flavorful cutlets. To store leftovers, let the chicken cutlets cool first. Place them in an airtight container. You can keep them in the fridge for up to three days. If you want to save them longer, freeze the cutlets. Wrap each cutlet in plastic wrap and then place them in a freezer bag. They will last up to three months in the freezer. Reheating chicken cutlets can be tricky. You want to keep them crispy. The best way is to use an oven. Preheat the oven to 375°F (190°C). Place the cutlets on a baking sheet. Heat them for about 10-15 minutes. You can also use an air fryer. Set it to 350°F (175°C) and heat for about 5-7 minutes. This keeps the outside crispy while warming the inside. The shelf life of Italian Basil Chicken Cutlets depends on how you store them. In the fridge, they stay fresh for about three days. If frozen, they can last up to three months. Just make sure to label the container with the date. Always check for signs of spoilage before eating. When properly stored, these cutlets remain tasty and safe to enjoy! For a great meal, pair these cutlets with simple sides. I recommend: - Garlic mashed potatoes - Steamed green beans - A fresh garden salad - Roasted vegetables - Pasta with olive oil and herbs These sides balance the flavors and make a complete meal. To check if the chicken is done, use a meat thermometer. The thickest part of the chicken should reach 165°F. If you don’t have a thermometer, cut into the thickest part of a cutlet. The juices should run clear, not pink. Always trust your senses to ensure safety. Yes, you can easily make this dish gluten-free. Use gluten-free breadcrumbs instead of regular panko. For the flour, swap it out for a gluten-free blend. These changes keep the taste while making it safe for those avoiding gluten. Absolutely! This dish is perfect for meal prep. You can bread and cook the cutlets ahead of time. Store them in the fridge for up to three days. Reheat them in the oven to keep them crispy. It saves time on busy days while still tasting fresh. For the complete recipe for Italian Basil Chicken Cutlets, check out the [Full Recipe]. This blog post covered how to make Italian Basil Chicken Cutlets. You learned about the key ingredients, like chicken, basil, and Parmesan. I walked you through step-by-step instructions for preparation, breading, and frying. We discussed tips for flavor and crispiness, plus some variations to try. In closing, with these easy methods and tips, you can create a delicious dish. Enjoy experimenting with flavors and cooking methods to make it your own!

Are you craving a tasty dinner that’s simple to make and full of flavor? Look no further! Italian Basil Chicken Cutlets are your answer. With just a handful of ingredients, …

Read more

Categories Dinner

No Bake Peanut Butter Oat Cups Easy and Tasty Treat

June 13, 2025 by Chef Remy
- 1 cup rolled oats - 1/2 cup natural peanut butter - 1/4 cup honey or maple syrup - 1/4 cup mini chocolate chips - 1/4 cup chopped nuts (such as almonds or walnuts) - 1 teaspoon vanilla extract - A pinch of salt Gather these ingredients first. Rolled oats provide a great base. Natural peanut butter gives rich flavor and protein. Honey or maple syrup sweetens the mix. Mini chocolate chips add fun bites. Chopped nuts bring crunch. Vanilla extract enhances all the flavors. A pinch of salt balances the sweetness. - Different nut butters - Dried fruits - Seeds like chia or flaxseed You can switch up nut butters for variety. Try almond or cashew butter for a twist. Dried fruits add natural sweetness and chewiness. Consider raisins, cranberries, or apricots. Chia or flaxseed packs extra nutrition. These add-ins make the cups even more exciting! - Mixing bowls - Microwave-safe bowl - Muffin tin - Spoon or spatula You will need a few tools for this recipe. Mixing bowls help combine the dry and wet ingredients. Use a microwave-safe bowl to melt the peanut butter and syrup. A muffin tin shapes your oat cups. A spoon or spatula lets you mix and serve easily. This recipe is simple and fun, allowing you to enjoy delicious no-bake peanut butter oat cups. Remember to check the full recipe for detailed steps. - Begin by placing 1 cup of rolled oats in a large bowl. - Add a pinch of salt to the oats. - Stir them together until they mix well. - In a microwave-safe bowl, add 1/2 cup of natural peanut butter and 1/4 cup of honey or maple syrup. - Heat this mixture for about 30 seconds to 1 minute. - Stir it until the mix is warm and smooth. - Add 1 teaspoon of vanilla extract and mix well. - Pour the warm peanut butter mixture over the oats in the large bowl. - Stir thoroughly to coat all of the oats. - Gently fold in 1/4 cup of mini chocolate chips and 1/4 cup of chopped nuts. - Line a muffin tin with paper or silicone liners. - Use a spoon to evenly distribute the oat mixture into each cup. - Press down firmly to make sure they hold together. - Place the muffin tin in the refrigerator. - Let the oat cups chill for at least 30 minutes. - This helps them firm up and keeps their shape. For the full recipe, check the details above. Enjoy making your no-bake peanut butter oat cups! You can make these cups your own. Try different flavors like almond butter or cashew butter. Add dried fruits like cranberries or raisins for extra taste. You can also mix in seeds like chia or flaxseed for nutrition. Adjust the sweetness by adding more or less honey or maple syrup. Taste as you go for the best results. Make your oat cups look fancy! Drizzle melted chocolate or extra peanut butter on top. This adds appeal and taste. Use decorative plates to serve them. A nice presentation makes these treats even more special for friends and family. Sometimes, things don’t go as planned. If your mixture seems too crumbly, add more peanut butter. This will help it stick together. If your cups fall apart when you take them out, they might need more chilling. Ensure they are cold enough before serving. This helps them hold their shape. {{image_4}} You can make your no bake peanut butter oat cups even better! A popular choice is chocolate peanut butter oat cups. Just add 1/4 cup of cocoa powder to the peanut butter mix. This gives a rich flavor that pairs well with the oats. If you want a nut-free option, use sunflower seed butter instead of peanut butter. This keeps the same creamy texture and taste without nuts. For those who follow a vegan diet, you can substitute honey with maple syrup. This makes your cups vegan-friendly and just as tasty. If you need gluten-free options, use certified gluten-free oats. This ensures that everyone can enjoy these treats without worry. Pair your oat cups with yogurt or fresh fruits. This adds a nice contrast in texture and flavor. You can also use them as a topping for desserts like ice cream or puddings. The crunchy cups work great on soft desserts, adding fun and flavor. Store your no bake peanut butter oat cups in an airtight container. This keeps them fresh and tasty. They will last for up to one week in the fridge. Each time you grab one, it will taste just as good as the first. If you want a longer shelf life, freeze the oat cups. They freeze well and are easy to thaw. Simply take them out before serving. Let them sit at room temperature or place them in the fridge to thaw overnight. Always label your containers with dates. This way, you know how long they have been stored. It helps you keep track of freshness. Additionally, keep them away from direct sunlight. Sunlight can cause them to spoil faster, losing that yummy flavor. No-bake peanut butter oat cups last up to one week in the fridge. Store them in an airtight container to keep them fresh. If you want them to last longer, you can freeze them. They will stay good for about three months in the freezer. Just remember to thaw them in the fridge before you eat them. Yes, you can make these cups ahead of time. They are great for meal prep. Just follow the recipe and store them in an airtight container in the fridge. This way, you can enjoy a tasty treat anytime. They will stay fresh for about a week. If you need a nut-free option, try sunflower seed butter or soy nut butter. Both work well and taste great. You can also use pumpkin seed butter. Each of these spreads gives a different flavor profile, so feel free to experiment. Yes, you can add protein powder to these cups. Just mix in one or two tablespoons of your favorite protein powder with the dry oats. This will boost the protein content without changing the taste too much. Try to choose a flavor that complements the peanut butter. You can use maple syrup or agave nectar instead of honey. Both will add sweetness and work well in the recipe. If you want a sugar-free option, try using mashed bananas or a sugar substitute. Just keep in mind that it might change the texture a bit. In this blog post, I shared a simple recipe for no-bake peanut butter oat cups. We covered the ingredients, step-by-step instructions, and helpful tips for customization. These tasty cups are easy to make and fun to adapt. You can experiment with flavors and choices to fit your needs. Whether for a snack or dessert, these treats are sure to please. Enjoy making this recipe and sharing it with others!

Are you ready for a quick, delicious snack that’s easy to make? No Bake Peanut Butter Oat Cups are just what you need! These tasty treats combine wholesome ingredients like …

Read more

Categories Desserts

Grilled Chicken & Broccoli Bowls Flavorful Meal Prep

June 13, 2025 by Chef Remy
- Chicken and Broccoli specifics For this dish, I use 2 boneless, skinless chicken breasts. They cook well and stay juicy. The broccoli should be 2 cups of fresh florets. Fresh broccoli adds great color and crunch. - Quinoa and Broth Selection You'll need 1 cup of quinoa. Rinse and drain it before cooking. For the broth, use 2 cups of chicken broth or vegetable broth. The broth adds nice flavor to the quinoa. - Seasonings and Toppings For seasoning, I recommend: - 2 tablespoons of olive oil, divided - 1 teaspoon of garlic powder - 1 teaspoon of onion powder - 1 teaspoon of smoked paprika - Salt and freshly ground black pepper to taste - Zest of 1 lemon - Juice of 1 lemon Optional toppings include sliced scallions, sesame seeds, and red pepper flakes. These add flavor and a nice touch to your bowl. You can find the complete cooking instructions in the Full Recipe. Marinating the chicken is key. It adds flavor and keeps it juicy. I suggest marinating for at least 30 minutes. If you can, marinate for 2 hours in the fridge. This helps the chicken soak up all the tasty spices. Ingredients for the marinade: - 1 tablespoon olive oil - 1 teaspoon garlic powder - 1 teaspoon onion powder - 1 teaspoon smoked paprika - Salt and freshly ground black pepper to taste To make fluffy quinoa, rinse it well before cooking. This removes the bitter coating. Use chicken broth or vegetable broth for extra flavor. Bring the broth to a boil before adding the quinoa. Alternative liquids for cooking: - Water - Coconut milk Preheat your grill to medium-high heat. Grill the chicken for about 6-7 minutes on each side. The internal temperature should reach 165°F (75°C). Use a meat thermometer to check doneness. Timing is crucial for perfect broccoli. Blanch it for 2-3 minutes until bright green. This keeps it tender-crisp. After blanching, drain the broccoli and rinse with cold water. This stops the cooking process. Start with a layer of fluffy quinoa in each bowl. Next, add the grilled chicken slices. Top with the blanched broccoli. For the finishing touch, drizzle with olive oil, lemon zest, and lemon juice. For garnish, consider adding sliced scallions or sesame seeds. You can also sprinkle red pepper flakes for heat. Presentation techniques: - Use colorful bowls for a vibrant display. - Arrange ingredients in sections for a nice look. You can find the full recipe in the previous sections. Enjoy your delicious Grilled Chicken & Broccoli Bowls! - Ensuring juicy grilled chicken: Marinate the chicken well. Use a mix of olive oil, spices, and lemon juice. This adds flavor and moisture. Grill the chicken over medium-high heat. Check that it reaches 165°F. Let it rest before slicing. This keeps it juicy. - Flavor-enhancing methods: Use fresh herbs like parsley or basil. Add them to the marinade for more taste. A squeeze of lemon adds brightness. For extra flavor, try smoked paprika or fresh garlic. These give depth to your meal. - Preparing in advance: You can marinate the chicken a day ahead. This makes dinner quick and easy. Cook the quinoa and blanch the broccoli in advance. Store them in the fridge. This way, you can assemble your bowls in no time. - Storing cooked components: Keep the chicken, quinoa, and broccoli in separate containers. Use airtight containers to keep them fresh. They last about 3-4 days in the fridge. This makes meal prep simple for busy weeks. - Pairing with sauces or sides: Drizzle your bowls with soy sauce or teriyaki for added flavor. A dollop of hummus or tzatziki can also work well. Serve with a side salad for extra crunch. - Best serving temperatures: Serve the bowls warm for the best taste. If you have leftovers, reheat the chicken and quinoa. The broccoli is best served cool or at room temperature. Enjoy your meal with friends or family for a delightful experience. For a detailed recipe, check the Full Recipe. {{image_4}} You can switch up the protein in your grilled chicken and broccoli bowls. Here are some tasty options: - Turkey breasts: Lean and flavorful, turkey is a great swap. - Pork tenderloin: This cut is juicy and cooks quickly. - Tofu: For a vegetarian option, use firm tofu. Marinate and grill it just like the chicken. - Tempeh: This fermented soy product adds a nutty taste and a nice texture. Each of these alternatives can give your bowls a new twist while keeping them healthy. Quinoa is a fantastic base for these bowls, but you can try other grains too. Here are some ideas: - Brown rice: Chewy and filling, brown rice pairs well with the chicken and broccoli. - Farro: This ancient grain has a nutty flavor and a chewy texture. - Barley: A hearty option, barley makes your meal even more satisfying. - Cauliflower rice: For a low-carb choice, use cauliflower rice. It cooks quickly and has a mild taste. These grains can change the feel of your meal while offering good nutrition. Seasonal vegetables can add freshness to your bowls. Here’s how to adapt your dish throughout the year: - Spring: Use asparagus or snap peas for a bright touch. - Summer: Add grilled zucchini or bell peppers for some color and flavor. - Fall: Roasted sweet potatoes or Brussels sprouts can enhance the dish. - Winter: Try kale or Brussels sprouts for a hearty option. Using herbs like basil in summer or rosemary in fall can also change the dish's flavor. Each season brings a chance to explore new tastes and textures. To store leftovers, place them in airtight containers. This keeps moisture in and air out. Make sure to cool everything to room temperature before sealing. For best freshness, consume the bowls within three days. Always label the containers with the date to track freshness. You can freeze the chicken and quinoa. However, broccoli does not freeze well. To freeze, let the chicken and quinoa cool completely. Pack them in freezer-safe bags or containers. When you’re ready to eat, thaw them in the fridge overnight. Reheat in the microwave or on the stove. Add a splash of broth or water to keep it moist. In the fridge, grilled chicken and broccoli bowls last about three days. Look for changes in color or smell as signs of spoilage. If the chicken feels slimy or the quinoa has an off odor, it’s best to toss it. Always trust your senses when deciding if food is still good. I recommend marinating the chicken for at least 30 minutes. This gives the flavors time to soak in. For even better taste, you can marinate it for up to 2 hours. The longer the chicken sits in the marinade, the more tasty it becomes. Yes, you can use frozen broccoli. However, it cooks a bit differently than fresh. You might want to steam or microwave it instead of blanching. This keeps the broccoli tender and bright green. Adjust cooking time since frozen broccoli may need a bit longer to cook through. You can replace quinoa with brown rice, couscous, or farro. Brown rice takes about 45 minutes to cook, while couscous cooks quickly in about 5 minutes. Farro usually takes 30-40 minutes. Each grain brings its own flavor and texture to the dish. To make this dish gluten-free, use quinoa or rice as your base. Both are naturally gluten-free. Make sure to check that any broth you use is gluten-free as well. This way, you can enjoy a safe and tasty meal. To reheat, use the microwave or oven. If using the microwave, heat on medium for 1-2 minutes. Stir halfway to keep the chicken juicy. If using the oven, warm at 350°F (175°C) for about 10 minutes. This helps keep the texture and flavor intact. Check that it’s heated through before serving. For the full recipe, check out the Grilled Chicken & Broccoli Bowls section. This post covered the essential ingredients and steps for making delicious chicken and broccoli bowls. You learned about marinating chicken, cooking quinoa, and blanching broccoli. I also shared meal prep tips and fun variations based on your tastes and seasons. Enjoy making this dish your own. You can mix or swap ingredients to fit your needs. With the right techniques, your meals will be fresh and tasty. Happy cooking!

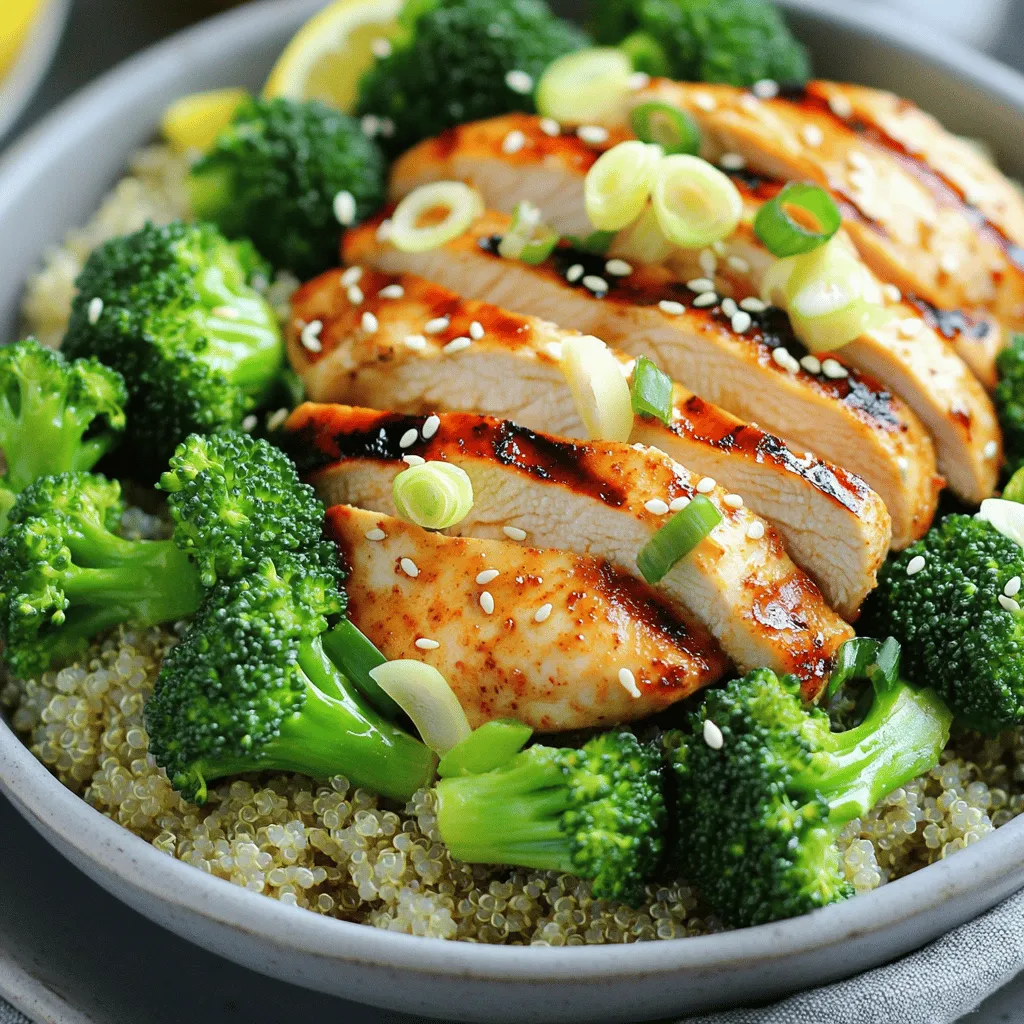
Looking for a quick and tasty meal prep idea? Let’s make Grilled Chicken & Broccoli Bowls that are not only delicious but also easy to prepare! With fresh chicken, vibrant …

Read more

Categories Dinner

Blueberry Oatmeal Breakfast Bars Healthy and Tasty Snack

June 13, 2025 by Chef Remy
To make these tasty Blueberry Oatmeal Breakfast Bars, you need a few simple items. Here’s your list: - 2 cups rolled oats - 1 cup almond milk (or your preferred milk) - 1 cup fresh or frozen blueberries - 1/4 cup honey or maple syrup - 1/4 cup natural peanut butter (or almond butter) - 1/2 teaspoon vanilla extract - 1 teaspoon baking powder - 1/2 teaspoon ground cinnamon - A pinch of salt - Optional: 1/4 cup chopped nuts or seeds (such as walnuts or chia seeds) These ingredients come together to create a delicious and healthy snack. The oats provide fiber, while blueberries add vitamins and antioxidants. Honey or maple syrup gives it sweetness, and peanut butter adds healthy fats. You can even mix in nuts or seeds for extra crunch. For the full recipe, refer to the earlier section. 1. Preheat your oven to 350°F (175°C). Prepare a 9x9 inch baking dish by lining it with parchment paper. This makes removal easy after baking. 2. In a large mixing bowl, mix the dry ingredients. Combine 2 cups of rolled oats, 1 teaspoon of baking powder, 1/2 teaspoon of ground cinnamon, and a pinch of salt. Stir until even. 3. In a separate bowl, whisk together the wet ingredients. Blend 1 cup of almond milk, 1/4 cup of honey or maple syrup, 1/4 cup of natural peanut butter, and 1/2 teaspoon of vanilla extract. Mix until smooth. 4. Combine the wet and dry ingredients. Pour the wet mix into the dry bowl. Stir until everything is well mixed. Make sure there are no dry spots left. 1. Fold in the blueberries. Add 1 cup of fresh or frozen blueberries. If you like, add 1/4 cup of chopped nuts or seeds. Gently mix to avoid breaking the berries. 2. Transfer to the baking dish. Pour the mixture into your prepared baking dish. Use a spatula to spread it evenly. Press down gently to make it compact. 1. Bake until golden brown. Place the dish in the oven and bake for 25-30 minutes. The edges should turn golden brown, and the center should be set. 2. Cool and slice the bars. After baking, let them cool in the pan for 10 minutes. Use the parchment paper to lift them out. Place the bars on a wire rack to cool completely. Once cool, slice them into bars. Enjoy your Blueberry Oatmeal Breakfast Bars! For the full recipe, check the details above. You can easily switch ingredients to fit your taste. If you want to try different types of milk, go ahead! Almond milk works well, but soy or oat milk are great too. Each milk gives a unique flavor. For sweeteners, honey is a classic choice. It adds a rich taste. Maple syrup is a fun swap for a lighter flavor. Both options are sweet, so use what you like best! Checking for doneness is key. The edges should be golden brown. The center should feel firm to the touch. If it wobbles, give it a few more minutes. Ovens vary, so you may need to adjust baking time. If your oven runs hot, check the bars a bit earlier. If it runs cool, they might need extra time. Always keep an eye on them! When serving, get creative with toppings! A dollop of yogurt adds creaminess. Fresh fruit on top makes it bright and fun. You can also sprinkle some nuts for crunch. Pair these bars with coffee or tea. The warm drink complements the bars well. Enjoy them as a quick breakfast or a snack anytime. They are versatile and delicious! {{image_4}} You can change the flavor of your Blueberry Oatmeal Breakfast Bars easily. Adding spices like nutmeg or ginger can give a warm twist. Just a pinch of these spices can take your bars to the next level. You can also add other fruits. Bananas or apples work great. They add natural sweetness and moisture. If you want to make your bars healthier, consider using less sweetener. You can cut back on honey or maple syrup. This will lower the sugar content without losing flavor. You can also go gluten-free. Simply choose gluten-free oats. They will work just as well in this recipe. To boost protein, try adding protein powder. This simple change makes your bars more filling. You can also include seeds like chia or flaxseed. These seeds add texture and healthy fats. They make your breakfast bars even better for you. For the full recipe, check out the complete guide above. To keep your blueberry oatmeal breakfast bars fresh, store them in airtight containers. This will help prevent moisture and air from making them soggy. You can also refrigerate or freeze them for a longer shelf life. In the fridge, they can last up to a week. If you freeze them, they can stay good for up to three months. At room temperature, these bars last about three days. Always check for signs of spoilage. If you see mold, or if the bars smell off, throw them away. Freshness is key to enjoying these tasty snacks. To enjoy your bars after storage, reheat them in the microwave. Heat for 10 to 15 seconds for a warm treat. You can also pop them in the oven at 350°F for about 5 minutes. This keeps the texture nice and chewy. Enjoy them warm for the best flavor! For the full recipe, click here: [Full Recipe]. Yes, you can use quick oats, but the texture will differ. Quick oats are smaller and cook faster. This will make the bars softer and less chewy. If you want a heartier bite, stick with rolled oats. They hold up better in the baking process. You can try almond butter or sunflower seed butter. Each has a unique taste. Almond butter adds a nutty flavor, while sunflower seed butter is great for nut-free diets. Both work well in the recipe. To make these bars vegan, swap honey for maple syrup. Use almond milk or another plant-based milk instead of dairy milk. This way, you can enjoy the bars without animal products. Yes, you can double the recipe. Just use a larger baking dish, like a 9x13 inch pan. Keep an eye on the cooking time; it may take a few extra minutes to bake through. Yes, they are quite nutritious! They provide fiber from oats and antioxidants from blueberries. Each bar is packed with energy and can help you feel full. You get healthy fats from the nut butter too. You can get creative with toppings! Try adding yogurt, fresh fruit, or a drizzle of honey. You can also sprinkle some chopped nuts for extra crunch. This makes each bar unique and tasty. You now have a tasty recipe for Blueberry Oatmeal Breakfast Bars. We covered the ingredients you need and the steps to make them. I shared tips for swapping ingredients and ways to keep your bars fresh. You can even get creative with flavors and add protein. These bars not only taste great but also offer nutrition. Customize them to fit your needs. Enjoy your homemade bars for breakfast or a snack. Happy baking!

Start your day right with delicious and healthy Blueberry Oatmeal Breakfast Bars! These bars offer a perfect blend of sweet and hearty flavors, making them a satisfying breakfast or snack. …

Read more

Categories Breakfast

Baked Ziti Flavorful Dish for Cozy Nights

June 13, 2025 by Chef Remy
- 12 oz ziti pasta - 2 tablespoons extra virgin olive oil - 1 medium onion, finely diced - 3 cloves garlic, minced - 1 bell pepper (any color), diced - 1 medium zucchini, diced - 1 jar (24 oz) marinara sauce - 1 teaspoon dried oregano - 1 teaspoon dried basil - 1/2 teaspoon red pepper flakes (optional for heat) - 1 cup ricotta cheese - 1 cup shredded mozzarella cheese - 1/2 cup grated Parmesan cheese - Fresh basil leaves for garnish - Salt and pepper to taste Gathering these fresh ingredients is key to making a great baked ziti. The ziti pasta acts as the base and holds all the flavors. I use olive oil to sauté vegetables, which adds depth to the dish. Onions, garlic, and bell peppers form a lovely aromatic base. Zucchini adds a nice texture and flavor. The marinara sauce brings everything together, while the herbs give it a warm, inviting taste. The ricotta cheese adds creaminess, and the mozzarella and Parmesan create a cheesy, golden crust. You can also adjust the spices to fit your taste. More red pepper flakes will add heat, and fresh basil gives a burst of flavor. Keep it simple, and let the quality of your ingredients shine. Check out the full recipe for more tips! Adjust your oven temperature to 375°F (190°C). This step is crucial for even baking. Fill a large pot with salted water. Bring it to a boil. Add the ziti pasta and cook it until it is al dente. This usually takes about 7 to 9 minutes. Once done, drain the pasta and set it aside in a large mixing bowl. In a large skillet, heat 2 tablespoons of olive oil over medium heat. When the oil shimmers, add 1 medium onion, finely diced. Sauté it for 3 to 4 minutes until the onion turns translucent. Next, add 3 minced garlic cloves, 1 diced bell pepper, and 1 diced zucchini. Cook these vegetables for another 5 to 7 minutes. They should be tender and colorful. Pour in a jar of marinara sauce, around 24 ounces. Sprinkle in 1 teaspoon of dried oregano, 1 teaspoon of dried basil, and 1/2 teaspoon of red pepper flakes if you like heat. Season with salt and pepper to taste. Stir well and let it simmer for about 5 minutes. This simmering time helps the flavors blend nicely. In your large mixing bowl, add the cooked ziti to the sauce mixture. Also, add 1 cup of ricotta cheese. Mix everything gently until the pasta is well-coated with the sauce. Grease a 9x13 inch baking dish with a bit of olive oil. Spoon half of the ziti mixture into the dish. Spread it evenly. Top this layer with half of 1 cup of shredded mozzarella cheese. Add the rest of the ziti mixture on top, followed by the remaining mozzarella cheese. Finish by sprinkling 1/2 cup of grated Parmesan cheese on top. Cover the dish tightly with aluminum foil and place it in your preheated oven. Bake for 25 minutes. After that, remove the foil to let the cheese brown. Bake for an additional 15 to 20 minutes. You want the top to be bubbly and golden brown. For a fresh touch, you can garnish it with basil leaves right before serving. Enjoy your cozy baked ziti! For the full recipe, click [here](#). To get the most from your baked ziti, let the sauce simmer longer. This helps mix the flavors well. A simple rule is to simmer it for at least 10 extra minutes. This extra time allows the spices to release their full taste. You will notice a richer, deeper flavor that will impress your guests. For a golden top, use the right technique with mozzarella cheese. After baking, remove the foil for the last 15 minutes. This step lets the cheese bubble and brown nicely. For an extra crispy finish, broil it for 2 minutes at the end. Keep a close eye to avoid burning! Seasoning is key to making your dish shine. Start with salt and pepper, but feel free to add more herbs. A pinch of garlic powder or a dash of Italian seasoning can enhance the taste. Always taste as you go. This way, you can adjust to your liking before it goes into the oven. {{image_4}} You can easily add meat to your baked ziti. Ground beef, sausage, or turkey work well. Just brown the meat in the skillet before adding the vegetables. This adds a rich flavor and texture. You can use any type of ground meat you prefer. Mixing in meat makes this dish more filling and hearty. If you want a meatless option, use more veggies. Spinach, mushrooms, or eggplant add great taste. You can also swap regular cheese for plant-based cheese. This keeps the dish creamy and delicious while being plant-friendly. These changes make baked ziti suitable for everyone. For a gluten-free version, try different pasta types. Look for gluten-free ziti or penne. Many brands offer great options made from rice or quinoa. Be sure to check the cooking time. Gluten-free pasta can cook faster than regular pasta. This way, everyone can enjoy baked ziti without worry. For the full recipe, check out the Cheesy Delight Baked Ziti. It's a great way to enjoy all these variations! To store leftovers, let the baked ziti cool. Place it in an airtight container. Keep it in the fridge for up to three days. This keeps the flavors fresh and tasty. When storing, make sure it is covered well to avoid drying out. You can also use plastic wrap on the dish before placing it in the fridge. To freeze baked ziti, follow these steps. First, let the dish cool completely. Then, wrap it tightly in plastic wrap. Use aluminum foil over the wrap for extra protection. You can freeze it for up to three months. When you’re ready to eat, thaw it in the fridge overnight before reheating. For reheating, use the oven for the best results. Preheat your oven to 350°F (175°C). Place the ziti in an oven-safe dish. Add a splash of water or extra sauce to keep it moist. Cover it with foil to stop it from drying out. Heat for about 20-25 minutes, or until it's warm all the way through. Enjoy your cheesy delight straight from the oven! Baked ziti lasts about 3 to 5 days in the fridge. Store it in an airtight container. This keeps it fresh and tasty. If you want to keep it longer, freezing is a great option. You can make baked ziti ahead of time. Prepare it the day before and store it in the fridge. Just cover it tightly with foil. When ready to bake, let it sit out for a bit. This helps it warm up. Then, bake it as normal. Baked ziti pairs well with many sides. Here are some great options: - Garlic bread for a crunchy bite - Side salad for freshness - Roasted veggies for added color - A light soup for a cozy touch These sides balance the meal and keep it fun. For more ideas, check out my other recipes! Baked ziti is a simple yet delicious dish you can easily make at home. We covered key ingredients, equipment, and step-by-step instructions to guide you. You learned how to enhance flavor and customize the dish to your liking. Remember, you can make baked ziti your own with different meats, veggies, and cheese. Enjoying this meal with friends or family makes it even better. Now, gather your ingredients, and let’s create something tasty together!

Baked ziti is the ultimate comfort food for cozy nights. This dish mixes pasta, rich marinara, and melted cheese into one delicious meal. Imagine a plate of warm, cheesy goodness, …

Read more

Categories Dinner

Cottage Cheese and Veggie Bake Healthy Dinner Idea

June 13, 2025 by Chef Remy
To make the Cottage Cheese and Veggie Bake, you need these key ingredients: - 2 cups cottage cheese - 1 cup fresh spinach, finely chopped - 1 zucchini, diced into small cubes - 1 bell pepper, diced (any color) - 1 medium carrot, grated - 1 medium onion, finely chopped - 2 cloves of garlic, minced - 1 teaspoon dried oregano - 1 teaspoon dried basil - 1/2 teaspoon salt - 1/4 teaspoon ground black pepper - 1 cup shredded mozzarella cheese - 1/2 cup breadcrumbs - 2 tablespoons extra virgin olive oil This dish shines with fresh produce and creamy dairy. The cottage cheese adds a rich base. Spinach gives color and nutrients. Zucchini and bell pepper bring crunch and sweetness. Grated carrot adds color, while onion and garlic boost the flavor. Choose fresh veggies for the best taste. Seasoning is key to a tasty bake. Dried oregano and basil add depth. Salt and black pepper enhance all the flavors. Breadcrumbs give a nice crunch on top. The olive oil helps everything blend and adds a touch of richness. Check out the Full Recipe for all the details. First, set your oven to 375°F (190°C). This helps it warm up while you get everything ready. Gather all your ingredients. You will need cottage cheese, spinach, zucchini, bell pepper, carrot, onion, garlic, and some spices. Make sure to chop and dice the veggies before you start cooking. This saves time later. In a large skillet, pour in the olive oil. Heat it over medium. Once hot, add the chopped onion and minced garlic. Cook these for about 3-4 minutes. You want the onion to turn soft and clear. Then, add the diced zucchini, bell pepper, and grated carrot. Stir it all together and cook for an extra 5-6 minutes. The veggies should start to soften, but not mushy. In a large bowl, mix the cottage cheese with the chopped spinach and the sautéed vegetables. Sprinkle in the dried oregano, dried basil, salt, and black pepper. Stir everything until it is blended well. Next, pour the mixture into a greased 9x9 inch baking dish. Spread it out evenly. Top it with shredded mozzarella cheese, making a nice layer. For added crunch, mix breadcrumbs with a little olive oil and sprinkle them on top. Bake in the oven for 25-30 minutes. The top should turn golden brown, and you will see bubbles. Once it's done, take it out and let it cool for a few minutes. Then, slice into squares. Serve warm, and maybe add a sprinkle of fresh basil or black pepper on top. Enjoy this tasty Cottage Cheese and Veggie Bake! For the full recipe, check the previous section. To get the best texture, choose fresh veggies. Fresh spinach adds a nice bite. Cook the vegetables until they are soft but not mushy. This keeps the bake light and fluffy. The mozzarella cheese on top melts beautifully. It gives a nice creamy layer that ties the dish together. If you are out of an ingredient, don’t worry! You can swap veggies based on what you have. Try using broccoli or mushrooms instead of zucchini. You can also use ricotta cheese instead of cottage cheese for a richer taste. If you want a lower-fat option, use low-fat mozzarella. Oven temperatures can vary. If your oven runs hot, check the bake a bit early. Look for a golden brown top and bubbly filling. For a cooler oven, you may need to bake a bit longer. It’s all about finding the sweet spot for your oven. Remember, every minute counts in making a perfect bake. For the full recipe, check out the complete instructions above! {{image_4}} You can boost the protein in your Cottage Cheese and Veggie Bake by adding cooked chicken or turkey. Dice or shred the meat into small pieces. Mix it in when you combine the cottage cheese and veggies. This makes the dish heartier and more filling. You can even use leftover rotisserie chicken for a quick option. If you want a vegetarian twist, keep the dish as is. It’s full of veggies and cottage cheese, which is great. For a vegan option, swap the cottage cheese with a plant-based alternative. Look for cashew or tofu-based cheeses. You can also use nutritional yeast for a cheesy flavor without dairy. While mozzarella is classic, you can try other cheeses too. Cheddar adds a sharp taste. Feta brings a nice tang to the dish. You can even mix different cheeses for a fun blend of flavors. Just remember to adjust the amount based on how cheesy you want it. Feel free to explore these variations to make this dish your own! You can find the Full Recipe in the previous sections for reference. After you make the Cottage Cheese and Veggie Bake, let it cool. Once cooled, cover it tightly with plastic wrap or foil. This helps keep the dish fresh and moist. Store it in the fridge for up to three days. Make sure to place it on a shelf, not in the door, to keep it at a steady temperature. If you want to save some for later, freezing is a great option. Cut the bake into individual portions. Wrap each piece tightly in plastic wrap, then place them in a freezer bag. Remove as much air as possible to prevent freezer burn. It can last up to two months in the freezer. When you’re ready to enjoy it again, thaw it overnight in the fridge. To reheat, place the portion in an oven-safe dish. Preheat your oven to 350°F (175°C). Cover the dish with foil to keep it moist. Bake for about 20 minutes or until heated through. For a crispy top, remove the foil for the last 5 minutes. You can also use a microwave. Heat on medium power for 2-3 minutes, checking halfway to stir. Enjoy your meal as if it were fresh! The Cottage Cheese and Veggie Bake lasts up to four days in the fridge. Just store it in an airtight container. This keeps it fresh and safe to eat. When you're ready to enjoy it again, check for any signs of spoilage before reheating. Yes, you can make this recipe ahead of time. Prepare the bake and store it in the fridge for up to two days before baking. Cover it tightly with plastic wrap or aluminum foil. This saves time on busy nights. If you want to freeze it, do so before baking. It can stay frozen for up to three months. You can serve many sides with Cottage Cheese and Veggie Bake. A fresh green salad pairs well. You can also enjoy it with whole-grain bread or a light soup. For a heartier meal, consider serving it with quinoa or brown rice. Each option adds flavor and texture to your dinner. For the complete recipe, check out the Full Recipe section. This blog post covered all you need for the Cottage Cheese and Veggie Bake. You learned about the right ingredients, step-by-step instructions, and helpful tips. We explored fun variations for any diet. Plus, I shared storage details to keep your dish tasty. In conclusion, enjoy making this bake at home. It’s simple and flexible. With these steps, you can create a dish your family will love.

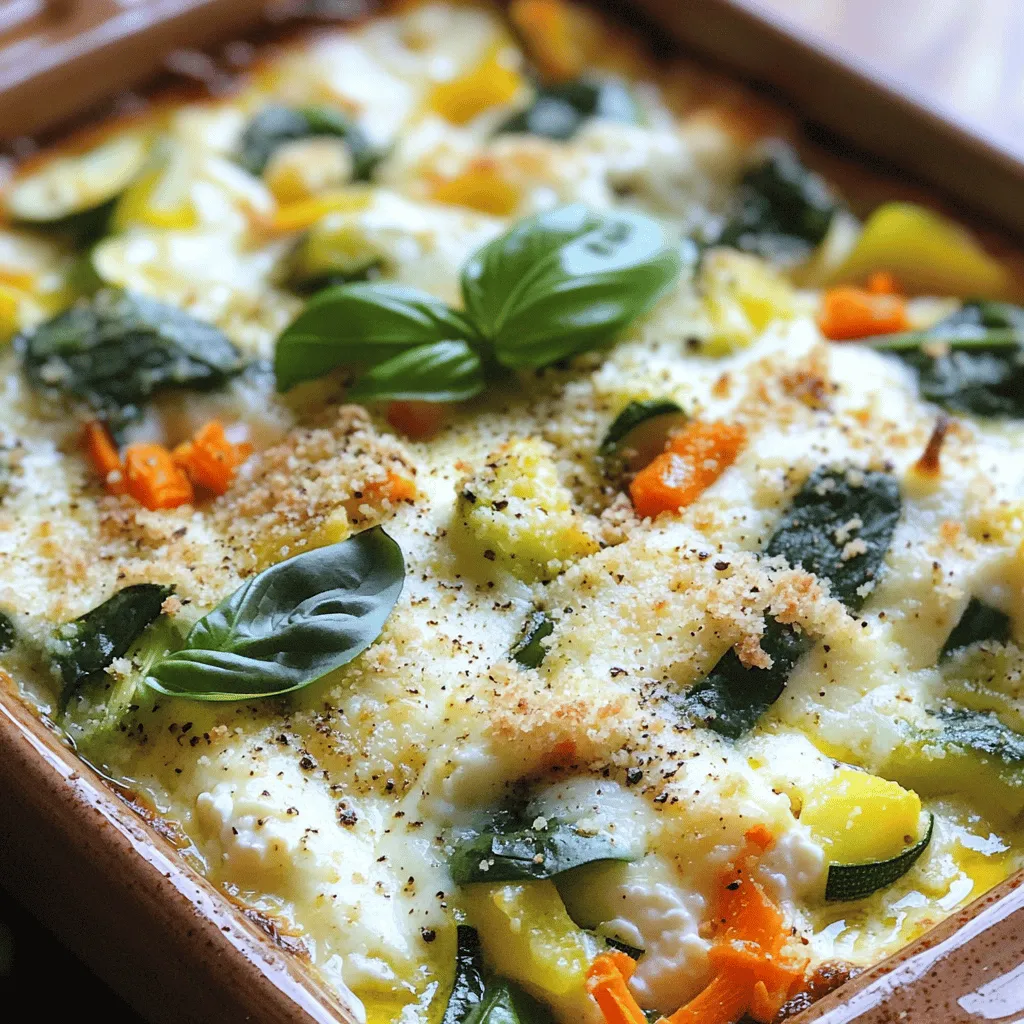
Looking for a tasty and healthy dinner? Try my Cottage Cheese and Veggie Bake! This dish is packed with flavor and nutrients. Plus, it’s easy to make and perfect for …

Read more

Categories Dinner
Older posts
Newer posts
← Previous Page1 … Page91 Page92 Page93 … Page130 Next →

ROASTED RECIPES

Where bold flavors meet everyday meals. Warm, vibrant, and made to share. 🔥🥗🍴

PAGES

Home About Contact Privacy Policy Terms & Conditions Cookie Policy GDPR Policy Copyright Policy Disclaimer

CATEGORIES

Appetizers Desserts Salads Breakfast Dinner

Contact

  • Pinterest
  • Mail
Copyright © 2025 Roasted Flavors. All rights reserved.