Skip to content
Roasted Flavors
  • Home
  • Appetizers
  • Desserts
  • Salads
  • Breakfast
  • Dinner
  • Privacy Policy
  • Contact
  • About

Chef Remy

Creamy Beef and Bowtie Pasta Simple and Savory Dish

June 13, 2025 by Chef Remy
Here’s what you need for this creamy beef and bowtie pasta dish: - 8 oz bowtie pasta - 1 lb ground beef - 1 medium onion, finely chopped - 3 cloves garlic, minced - 1 cup heavy cream - 1 cup beef broth - 1 cup frozen peas - 1 cup grated Parmesan cheese - 2 tablespoons olive oil - 1 teaspoon Italian seasoning - Salt and black pepper to taste - Fresh parsley, chopped (for garnish) These ingredients create a rich and creamy sauce that coats every bowtie perfectly. Each item plays a key role in the final taste. The ground beef adds protein and heartiness. The heavy cream creates that velvety texture we love. The peas add a pop of color and sweetness. Feel free to adjust the seasoning to fit your taste. Fresh parsley gives a nice finish. This recipe makes a comforting meal that feels special. You can find the full recipe to guide you through the cooking process. - Bring a large pot of salted water to a boil. - Cook bowtie pasta until al dente and drain. To cook the pasta, you need a large pot. Fill it with water and add salt. This helps flavor the pasta. Once the water boils, add the bowtie pasta. Follow the package instructions for timing. You want the pasta firm but not hard. This is called al dente. When it's done, drain the pasta in a colander and set it aside. - Sauté onion and garlic in olive oil. - Brown the ground beef with seasoning. Next, let’s prepare the beef mixture. In a large skillet, pour in olive oil and heat it over medium heat. Add finely chopped onions first. Stir them for about 3-4 minutes. You want them soft and clear. After that, add minced garlic. Cook it for one more minute until it smells good. Now, increase the heat to medium-high. Add ground beef to the skillet. Use a spatula to break it up as it cooks. Brown the beef for about 5-7 minutes. Sprinkle in salt, black pepper, and Italian seasoning to boost the flavor. - Add beef broth and simmer. - Stir in heavy cream until thickened. Now, it's time to make the cream sauce. Lower the heat back to medium. Carefully pour in the beef broth. Let it simmer for a few minutes. This helps all the flavors mix well. After that, slowly stir in heavy cream. Keep cooking for about 2-3 minutes. You want the sauce to thicken and become creamy. - Toss cooked pasta and peas with cream sauce. - Heat through for even coating. Now, we’ll bring everything together. Add the cooked bowtie pasta and frozen peas to the skillet. Toss them gently in the cream sauce. Make sure the pasta and peas are fully coated. Allow the dish to warm through for another 2-3 minutes. This ensures everything is hot and mixed well. - Incorporate grated Parmesan cheese. - Adjust seasoning to taste. Finally, remove the skillet from heat. Sprinkle grated Parmesan cheese over the pasta mixture. Stir it well until the cheese melts into the sauce. Taste the dish, and add more salt or pepper if needed. This step makes sure your creamy beef and bowtie pasta is just right. For the full recipe, refer to the section above. To get that perfect al dente texture, cook your bowtie pasta just right. Start by boiling a large pot of water. Add a generous amount of salt; this helps flavor the pasta. Follow the package instructions for cooking time. Typically, that means cooking it for about 8 to 10 minutes. Test the pasta a minute or two before the time is up. It should be firm but not hard. Drain it carefully in a colander and set it aside. To boost the flavor of your creamy beef and bowtie pasta, consider adding more spices or herbs. A pinch of red pepper flakes can add a nice kick. Fresh herbs like basil or thyme can brighten the dish. For the best creamy consistency, make sure to stir the heavy cream in slowly. This helps it blend smoothly with the beef broth. Cook it until it thickens slightly, which should take about 2 to 3 minutes. When serving this dish, think about pairing it with a light salad. A simple green salad with a vinaigrette works well. You can also add garlic bread for a tasty side. For garnishing, sprinkle freshly chopped parsley on top. This adds color and fresh flavor. If you love cheese, feel free to add more grated Parmesan on each serving. This makes it look extra special! For the full recipe, check out the complete instructions above. {{image_4}} If you want to switch things up, try different meats. Ground turkey or chicken works well. For a vegetarian option, use lentils or mushrooms. These swaps make the dish lighter and still tasty. You can also change the pasta. Shells or penne can add a fun twist. As for sauces, try Alfredo or a garlic cream sauce instead for new flavors. Adding veggies boosts the nutrition in your creamy beef and bowtie pasta. Think about tossing in spinach, broccoli, or bell peppers. You can even sneak in some zucchini or carrots for extra color. Sauté these veggies with the onion and garlic. Use seasonal ingredients like asparagus in spring or butternut squash in fall. This keeps the dish fresh and vibrant. If you like heat, consider adding red pepper flakes or fresh jalapeños. Sprinkle some flakes in the cream sauce for a mild kick. For more heat, chop up jalapeños and mix them in with the beef. You can also use a spicy sauce like arrabbiata. Just remember to adjust the creaminess to balance the heat. Add a bit more cream for a rich texture that cools the spice. For the full recipe, check out the Creamy Beef Bowtie Delight. To store creamy beef and bowtie pasta, let it cool down first. Place the leftovers in an airtight container. Make sure to close it tightly. This helps keep the dish fresh for about 3 to 4 days in the fridge. To keep the dish tasting great, cover it well. If you can, use plastic wrap before sealing the container. This extra layer keeps moisture in and air out. When you’re ready to eat, simply reheat the portion you want. If you want to save some for later, freezing works well. Transfer the cooled pasta to a freezer-safe container. Leave some space at the top, as the dish will expand when it freezes. You can also use freezer bags for easy storage. Just lay them flat for compact stacking. To thaw, move the container to the fridge for several hours or overnight. For a quick method, place the bag under cold water. Once thawed, reheat the pasta gently on the stove. Add a splash of cream or broth to keep it creamy. This will help it regain its delightful texture. For the full recipe, check the complete instructions. Yes, you can prepare this dish in advance. Cook the pasta and sauce separately. Store them in airtight containers. Refrigerate for up to three days. When ready to eat, combine them and heat on the stove. To keep the pasta creamy, add a splash of milk or broth when reheating. Heat gently over low heat. Stir often to prevent sticking. This method helps maintain the sauce's smooth texture. Absolutely! You can swap Parmesan for mozzarella or cheddar. Each cheese brings a unique flavor. Experiment with your favorite cheeses to find the best match for your taste. Pair this dish with a fresh salad or garlic bread. Steamed vegetables also work well. These sides add color and balance to your meal. They enhance the overall dining experience. Yes, this recipe is great for meal prep. You can easily double the ingredients for more servings. Portion out meals in containers for quick lunches or dinners. Enjoy your creamy beef and bowtie pasta throughout the week! This blog post covered how to make creamy beef and bowtie pasta. We explored key ingredients like bowtie pasta, ground beef, and Parmesan cheese. You learned step-by-step instructions, tips for enhancing flavor, and variations to try. Remember to store your leftovers properly for the best taste. With this guide, you can cook a dish that's not only delicious but also easy to prepare. Enjoy making it your own and share it with family or friends!

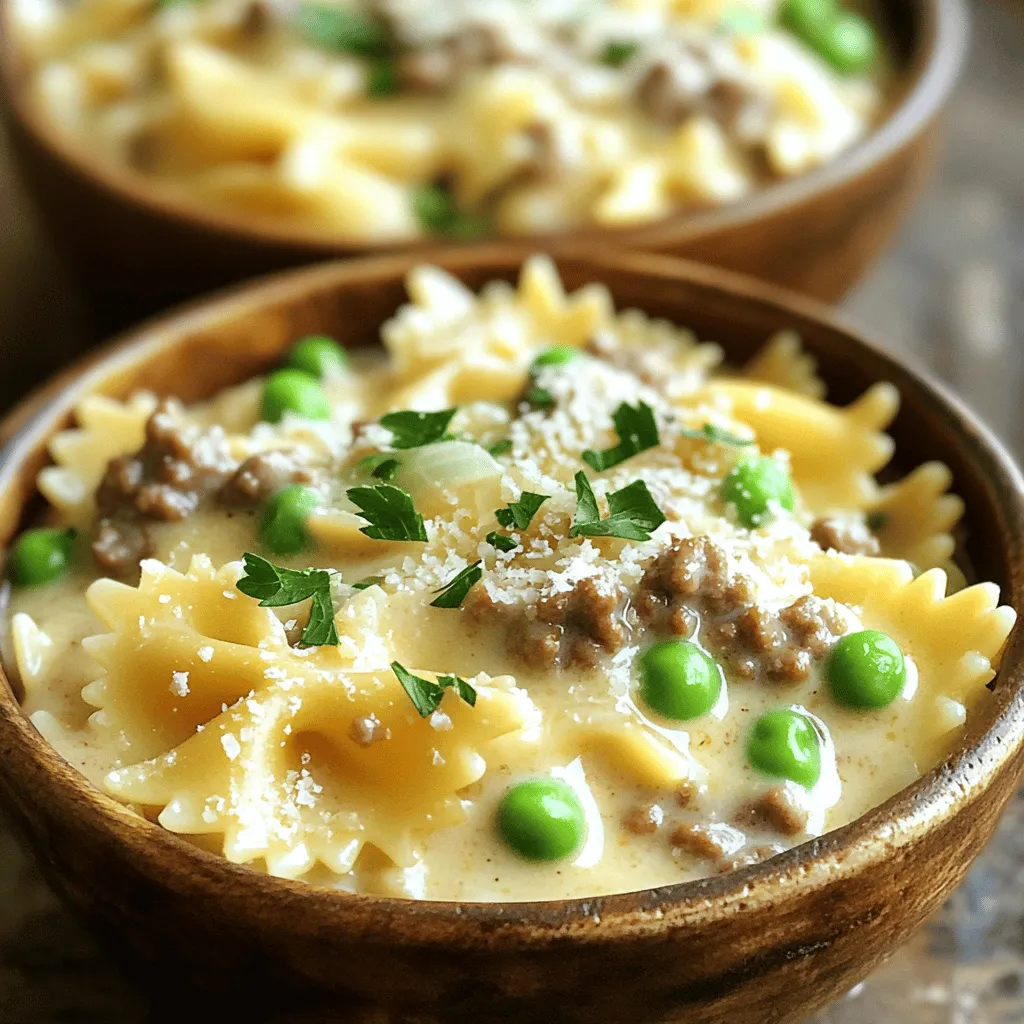
Are you looking for a quick and satisfying dinner? This Creamy Beef and Bowtie Pasta is your answer! It’s packed with flavor and super easy to make. With just a …

Read more

Categories Dinner

Air Fryer Salmon Recipe Tasty and Quick Dish

June 13, 2025 by Chef Remy
- 2 salmon fillets (approximately 6 ounces each) - 1 tablespoon extra virgin olive oil - 2 cloves garlic, finely minced - 1 tablespoon fresh parsley, finely chopped - 1 tablespoon fresh dill, finely chopped - 1 teaspoon freshly grated lemon zest - 1 teaspoon smoked paprika - Sea salt and freshly ground black pepper, to taste - Fresh lemon wedges for serving For this air fryer salmon recipe, you need fresh salmon fillets. Pick fillets that are firm and bright in color. You can also choose wild-caught salmon for a richer taste and better nutrition. Add olive oil for moisture and flavor. Minced garlic will enhance the dish. Fresh herbs like parsley and dill bring freshness. Lemon zest adds brightness and a hint of tartness. Smoked paprika gives a warm, smoky flavor that balances well with the fish. Use sea salt and black pepper to season the mix. Fresh lemon wedges offer a perfect finish. You can serve them alongside your salmon for a lovely touch. If you want the full recipe, make sure to follow the steps carefully for a delightful meal. Preheat your air fryer to a crisp 400°F (200°C). This step is key. Preheating helps cook the salmon evenly. It also gives you that lovely, crispy texture. If you skip this, your salmon might not cook right. In a mixing bowl, combine these ingredients: - 1 tablespoon extra virgin olive oil - 2 cloves garlic, finely minced - 1 tablespoon fresh parsley, finely chopped - 1 tablespoon fresh dill, finely chopped - 1 teaspoon freshly grated lemon zest - 1 teaspoon smoked paprika - Sea salt and freshly ground black pepper, to taste Stir well to form a fragrant herb paste. Use a fork or a spoon to mix evenly. The more you blend, the better the flavors will be. This herb mixture is what makes your salmon pop with flavor. First, gently pat the salmon fillets dry with paper towels. This helps achieve a nice sear. Place the fillets skin-side down on a clean plate. Next, spread the herb mixture generously over the top of each fillet. Press down gently with the back of a spoon. This helps the herbs stick well. Now, carefully arrange the salmon fillets in the air fryer basket. Make sure they do not touch each other. This allows for even cooking and good air flow. Cook the salmon in the air fryer for 10 to 12 minutes. Check if it is done by seeing if it flakes easily with a fork. It should appear opaque. Once finished, use tongs to remove the salmon. Let it rest for one minute. This keeps it juicy. Serve your crispy herb-crusted salmon with fresh lemon wedges for extra flavor. For the full recipe, refer to the earlier section. Enjoy your meal! To cook salmon just right, pay attention to time and heat. I recommend cooking at 400°F (200°C). For fillets about 6 ounces, cook for 10 to 12 minutes. Check the salmon near the end. The fish should look opaque and flake easily with a fork. Using a meat thermometer can help you get it perfect. Aim for an internal temperature of 145°F (63°C). This will ensure your salmon stays juicy and delicious. To add more flavor, try different herbs and spices. Fresh thyme, rosemary, or basil work great. If you like a kick, add some red pepper flakes. You can also switch up the seasoning based on what you enjoy. Adjust the salt and pepper to your taste. Start with a little, then add more if needed. Always remember, it’s easier to add than to take away! For more ideas, check out the Full Recipe for even more flavor tips. {{image_4}} You can change up the flavor of your air fryer salmon in tasty ways. For an Asian twist, try using soy sauce, ginger, and sesame oil. This combo gives the salmon a savory and rich taste. Add green onions and sesame seeds for a nice touch. For a Mediterranean flair, use olive oil, lemon juice, and oregano. This mix brightens the dish. You can also throw in some capers or olives for a salty bite. Both options give you a new spin on the basic recipe. If you need gluten-free options, the recipe is easy to adapt. Just skip any sauces with gluten. You can still enjoy the great taste of salmon. For those who avoid dairy, this recipe is naturally dairy-free. The olive oil and herbs keep it rich and flavorful without any cream. You can also try different fish if you want. Trout, tilapia, or even chicken can work in the air fryer, too. Just adjust the cooking time based on the thickness of the fish. This way, you can keep dinner exciting and fit your diet. For the full recipe, check out the complete instructions above. To store leftover salmon, cool it down first. Wrap the salmon tightly in plastic wrap or place it in an airtight container. This keeps the flavors fresh and prevents drying out. Cooked salmon lasts in the fridge for about 3 days. Make sure your fridge is at 40°F (4°C) or lower to keep it safe to eat. If you want to keep it longer, consider freezing it. When it’s time to reheat, I suggest using the air fryer again. Set it to 350°F (175°C) and warm the salmon for about 5 minutes. This method keeps the skin crispy. You can also reheat salmon in the microwave. Place it on a microwave-safe plate and cover it with a damp paper towel. Heat for 30 seconds at a time to avoid overcooking. To keep salmon moist, add a splash of water or lemon juice before reheating. This adds flavor and prevents dryness. Enjoy your tasty leftovers! You can tell if salmon is cooked well when it looks opaque and flakes easily with a fork. The flesh should be a lovely pink color inside. If you have a meat thermometer, check for a temperature of 145°F (63°C) at the thickest part. It is also key to let the salmon rest for about a minute after cooking. This resting time helps keep it juicy and allows the flavors to settle. Yes, you can cook frozen salmon in the air fryer! Just follow these steps: 1. Preheat your air fryer to 400°F (200°C). 2. Place the frozen fillets in the basket. 3. Cook for about 12 to 15 minutes, depending on thickness. 4. Check for doneness and adjust cooking time as needed. You may not need to add oil or seasonings until halfway through since the frost will melt. Air fryer salmon goes well with many side dishes. Here are some tasty options: - Roasted vegetables like asparagus or broccoli - Quinoa or rice for a filling base - A fresh salad with greens and a light vinaigrette - Mashed potatoes for comfort food These sides make your meal balanced and full of flavor. You learned how to make air fryer salmon in this post. We covered ingredients, step-by-step cooking, tips for perfect salmon, and variations. Remember, fresh herbs and lemon zest boost flavor. Cooking time matters; check it for doneness. Store extras well, so they stay tasty. You can even try different fish or flavors. I hope this makes cooking easy and fun!

Are you ready to make a tasty and quick air fryer salmon? This dish is perfect for busy weeknights or cozy weekends. I’ll guide you through easy steps and fresh …

Read more

Categories Dinner

Easy Mediterranean Baked Fish Flavorful Weeknight Meal

June 13, 2025 by Chef Remy
- 4 white fish fillets (such as cod, tilapia, or sole) - 1 large lemon, thinly sliced - 1 cup cherry tomatoes, halved - 1 red bell pepper, cut into thin slices - 1 small red onion, finely sliced - 2 cloves garlic, minced - 3 tablespoons extra virgin olive oil - 1 teaspoon dried oregano - 1 teaspoon dried basil - Salt and freshly ground black pepper, to taste - Fresh parsley or basil leaves, chopped for garnish This dish shines with fresh and simple ingredients. The fish fillets are the star, with their mild flavor. I love using cod or tilapia, as they cook well and soak up flavors nicely. The lemon slices add brightness, while cherry tomatoes bring sweetness. Red bell pepper and onion provide crunch and color. Don't forget the garlic! It adds depth to the dish. The olive oil keeps everything moist and brings richness. Oregano and basil are classic Mediterranean herbs that enhance the flavor profile. Feel free to adjust the salt and pepper to your taste. Fresh herbs like parsley or basil add a nice touch at the end. For the full recipe, check out the details that guide you through the cooking process. - Preheat the oven to 400°F (200°C). - In a large baking dish, lay the lemon slices in a single layer. This adds great flavor. - Place the white fish fillets directly on top of the lemon slices, spaced out evenly. - In a medium bowl, combine halved cherry tomatoes, sliced red bell pepper, red onion, and minced garlic. - Drizzle olive oil over the vegetables. Sprinkle with oregano, basil, salt, and black pepper. Toss well to coat. - Layer the vegetable mix over the fish fillets, ensuring they are well covered. This boosts flavor. - If any olive oil remains, drizzle it over the fish and veggies for extra richness. - Cover the dish tightly with foil. This helps trap steam and moisture. Bake for 20 minutes. - After 20 minutes, remove the foil and bake for an additional 10 minutes. The fish should flake easily with a fork and the vegetables should be tender. Enjoy this Easy Mediterranean Baked Fish by following the [Full Recipe]. - Ensure even spacing of fish fillets for uniform cooking. This helps each piece cook evenly. - Use fresh herbs for enhanced flavor. Fresh basil or parsley makes a big difference. - Serve directly in the baking dish or on individual plates. It looks great and saves time. - Pair with crusty bread or a light salad for a balanced meal. This adds texture and freshness. - Add capers or olives for a salty, briny twist. They bring a unique taste to the dish. - Experiment with different herbs like thyme or dill. Each herb adds its own flavor profile. These tips will make your Easy Mediterranean Baked Fish even more enjoyable. Trust me, they work wonders! For the full recipe, check out the details above. {{image_4}} You can switch up the fish in this recipe. If you want a richer taste, try salmon or halibut. Both add a lovely flavor and texture. Another fun option is to mix in shrimp. Shrimp brings a delightful seafood twist to your dish. You can also change the veggies to keep things fresh. Zucchini, asparagus, or artichoke make great substitutes. They offer different textures that add interest. For extra nutrition, add spinach or kale. These greens blend well and boost the meal's health factor. If you enjoy some heat, consider adding red pepper flakes. They give a nice kick without overpowering the dish. For more flavor depth, add a splash of white wine. It enhances the overall taste and makes the dish even more special. - Cool completely before storing in an airtight container - Keep in the refrigerator for up to 2 days Storing leftovers is simple. Allow the baked fish to cool down first. Then, place it in a tight container. This helps keep the fish fresh. You can eat it within two days. - Reheat in the oven at 350°F (175°C) for best results - Microwave can be used, but may result in a softer texture When you want to enjoy your leftovers, the oven works best. Preheat it to 350°F. Place the fish in an oven-safe dish, and heat until warm. If you use a microwave, be careful. It might make the fish a bit mushy. - Freeze portions in airtight containers for up to 3 months - Thaw in the fridge overnight before reheating If you want to keep it longer, freezing is a great option. Pack the fish in airtight containers. This can keep it fresh for about three months. When you are ready to eat, take it out of the freezer. Let it thaw in the fridge overnight. Then, reheat it as you like. For more details, refer to the Full Recipe. Yes, just ensure they are fully thawed before cooking. Thawing helps the fish cook evenly. You can place frozen fillets in the fridge overnight to defrost. If you're in a hurry, run them under cold water for a quicker thaw. Fish is done when it flakes easily with a fork and is opaque in color. When you poke it with a fork, the flesh should break apart easily. If it looks shiny and translucent, it needs more time. Always check the thickest part of the fish for doneness. Serve with rice, roasted vegetables, or a fresh green salad for great pairing. Rice adds a nice base, while roasted veggies give texture. A crisp salad brightens the meal. You can also add a slice of crusty bread to soak up the flavors. This baked fish recipe is simple and packed with flavor. You can easily customize it with different fish and veggies. Fresh herbs and spices elevate the dish, making it a crowd-pleaser. Use the tips for perfect cooking and storing leftovers, and feel free to try new variations. By exploring these ideas, you can enjoy tasty meals any time. Get cooking and create your own delicious masterpiece. Enjoy every bite!

Looking for a quick, tasty meal that impresses? This Easy Mediterranean Baked Fish is the answer! You can prepare it in just 30 minutes, making it perfect for busy weeknights. …

Read more

Categories Dinner

Grilled Salmon with Mango Salsa Flavorful Delight

June 13, 2025 by Chef Remy
- 4 salmon fillets (6 oz each) - 2 tablespoons extra virgin olive oil - Fresh ingredients for mango salsa - 1 teaspoon garlic powder - 1 teaspoon smoked paprika - Salt and freshly ground black pepper to taste - Juice of 1 juicy lime - Veggies for salsa: mango, avocado, red onion, red bell pepper, jalapeño - Fresh herbs: cilantro In this dish, the salmon shines with its rich flavor and tender texture. The mango salsa adds a burst of freshness and sweetness. You can use fresh ingredients for the salsa to enhance the overall taste. Each component plays a key role in building flavor. For the seasoning, garlic powder and smoked paprika bring warmth and depth. The lime juice adds brightness. Salt and pepper balance everything perfectly. The mango salsa is where the magic happens. You’ll chop ripe mango, creamy avocado, and crisp veggies. The jalapeño gives a nice kick, while cilantro brightens it all up. This mix creates a colorful, tasty topping for your salmon. When you gather these ingredients, you set the stage for a meal that is vibrant and delicious. Try using fresh herbs and ripe fruits for the best results. Follow the Full Recipe for step-by-step guidance on making this delightful dish. To start, gather your ingredients. In a small bowl, whisk together: - 2 tablespoons extra virgin olive oil - 1 teaspoon garlic powder - 1 teaspoon smoked paprika - Juice of 1 juicy lime - Salt and freshly ground black pepper, to taste Mix until it looks smooth. This marinade will add great flavor to the salmon. Next, take your four salmon fillets and place them in a shallow dish. Pour the marinade over the salmon. Make sure every fillet is well coated. Cover the dish with plastic wrap. Let it rest in the fridge for 15-20 minutes. This helps the flavors soak in. While the salmon marinates, let’s make the mango salsa. In a medium bowl, combine: - 1 ripe mango, peeled and diced - 1 ripe avocado, peeled and diced - 1 small red onion, finely chopped - 1 red bell pepper, diced - 1 small jalapeño, deseeded and finely minced - ¼ cup fresh cilantro leaves, chopped Gently toss these ingredients together. Add a pinch of salt and pepper to taste. Set the salsa aside for the flavors to blend. Now, it's time to grill! Preheat your grill to medium-high heat. If using a grill pan, heat it on the stovetop over medium-high heat. When hot, place the salmon fillets skin-side down on the grill. Grill for about 4-5 minutes on each side. The salmon should become opaque and flake easily. You’ll see those lovely grill marks! Once the salmon is done, carefully remove it from the grill. Let it rest for a couple of minutes. This helps keep it juicy. To serve, place each salmon fillet on a plate. Top it with a generous scoop of your fresh mango salsa. Enjoy this tropical flavor explosion! For the full recipe, check out the details above! To get tasty grill marks and perfect doneness, follow these steps: - Preheat your grill to medium-high heat. This makes sure it’s hot enough. - Oil the grill grates lightly. Use a paper towel dipped in oil and tongs. - Place the salmon skin-side down on the grill. This keeps the fish moist. - Don’t move the salmon around. Let it sear for about 4-5 minutes. - Flip gently using a spatula when it’s time. Grill the other side for 4-5 minutes. - To check doneness, make sure the fish flakes easily with a fork. With these tips, your salmon will shine on the grill. Want to switch things up? Here are some spices and herbs to try: - Cumin adds a warm, earthy note. - Dill brings a fresh taste, perfect with fish. - Chili powder can kick up the heat a notch. - Thyme gives a subtle, woodsy flavor. - Lemon zest brightens up the dish nicely. Mix and match these to find your favorite flavor combo. Make your grilled salmon pop on the plate with these ideas: - Serve on a colorful platter to add vibrancy. - Add lime wedges for a splash of color and zest. - Use fresh cilantro on top for a bright finish. - Arrange your mango salsa in a neat pile on top of the salmon. - Garnish with extra diced mango for a sweet touch. These small details will make your dish look as good as it tastes. For the full recipe, check out the Tropical Grilled Salmon with Mango Salsa. {{image_4}} You can switch up the salsa for a fun twist. Try using pineapple instead of mango. Pineapple adds a sweet, juicy flavor. You can also mix in peaches or kiwi. These fruits work well with salmon too. Just keep the same idea: fresh, colorful, and vibrant. A berry salsa is another great option. Combine diced strawberries or blueberries with lime juice. This adds a tangy taste that balances the rich salmon. Each fruit brings its unique flair to the dish. If grilling isn't for you, don't worry. You can also bake or pan-sear the salmon. For baking, preheat your oven to 400°F (200°C). Place the salmon on a baking sheet. Brush it with olive oil and season as you like. Bake for about 12-15 minutes. The fish should be opaque and flake easily. For pan-searing, heat a skillet over medium-high heat. Add oil and place the salmon skin-side down. Cook for 4-5 minutes, then flip and cook for another 4-5 minutes. This method gives a nice crispy skin. You can make this dish fit your diet. For a gluten-free option, just ensure all ingredients are gluten-free. Use fresh spices instead of processed ones. If you want a low-carb meal, skip the avocado or use less. You can also swap out the mango for more veggies. Chopped cucumbers or radishes add crunch without the carbs. By making these small adjustments, you can enjoy grilled salmon with mango salsa in many ways! To store leftover salmon and salsa, follow these steps. First, let the salmon cool to room temperature. Wrap each fillet in plastic wrap or place it in an airtight container. Store it in the fridge for up to three days. For the mango salsa, transfer it into a separate airtight container. It can also last for three days. Make sure to keep it sealed to prevent browning. To reheat the salmon, use the oven or a skillet. Preheat your oven to 350°F (175°C). Place the salmon on a baking sheet and cover it with foil. Heat for about 10-15 minutes. This keeps the fish moist. If using a skillet, add a little olive oil over medium heat. Heat the salmon for about 2-3 minutes on each side. For salsa, serve it cold. If you prefer warm salsa, heat it gently in a pan for a few minutes. When stored correctly, grilled salmon can last up to three days in the fridge. The mango salsa also stays good for three days. If you want to keep it longer, you can freeze the salmon. Wrap it tightly and store it in a freezer-safe bag. It can last for up to two months in the freezer. However, the salsa does not freeze well. Enjoy it fresh for the best taste! You typically grill salmon for about 8 to 10 minutes. Cook each side for 4 to 5 minutes. You want the fish to turn opaque and flake easily. Keep an eye on it to avoid overcooking. Yes, you can use frozen salmon. Make sure to thaw it completely first. Place it in the fridge overnight or run it under cold water. This helps keep the salmon moist. Fresh salmon offers better taste, but frozen works well too. Some great sides are: - Steamed asparagus - Quinoa salad - Roasted vegetables - Garlic mashed potatoes For drinks, try a crisp white wine or a light beer. These pair well with the fish and salsa. Absolutely! You can prepare mango salsa a day in advance. Keep it in the fridge in an airtight container. Just remember to add a little lime juice before serving. This keeps the salsa fresh and bright. For the full recipe, check out the Tropical Grilled Salmon with Mango Salsa. This blog post covered everything you need for a delicious grilled salmon dish. We discussed key ingredients and how to make a vibrant mango salsa. You learned step-by-step instructions for marinating and grilling the salmon, along with helpful tips for presentation. Explore variations to suit your taste, and follow my storage tips for leftovers. With these easy techniques, you can enjoy fresh, tasty meals that impress. Now it’s time to fire up that grill and enjoy every bite!

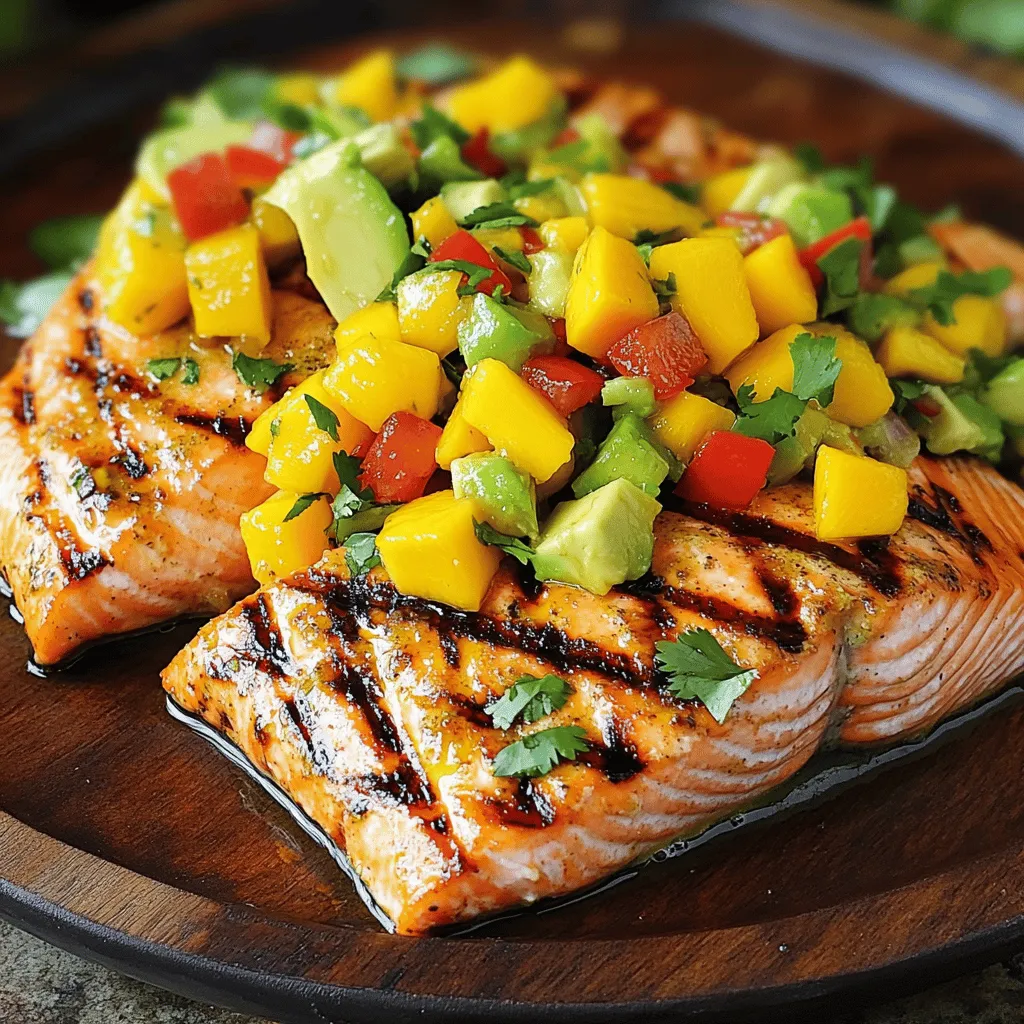
Get ready to savor a burst of flavor with grilled salmon topped with fresh mango salsa! This dish combines tender, juicy salmon with the sweetness of mango and a hint …

Read more

Categories Dinner

Tuscan Garlic Salmon Flavorful Recipe for Dinner

June 13, 2025 by Chef Remy
To make Tuscan Garlic Salmon, gather these fresh ingredients. Each one adds flavor and color to the dish. - Salmon Fillets: Use four fillets, about 6 ounces each. This fish is rich and tasty. - Garlic: You will need four cloves, finely minced. Garlic gives a strong, aromatic flavor. - Olive Oil: Three tablespoons of extra virgin olive oil add healthy fat and moisture. - Cherry Tomatoes: One cup of halved cherry tomatoes brings sweetness and juiciness. - Baby Spinach: One cup of fresh baby spinach adds color and nutrients. - Italian Seasoning: One teaspoon of this blend enhances the dish's flavor profile. - Lemon Juice: Use the juice of one fresh lemon for brightness and zest. - Additional Seasonings: Don’t forget sea salt and freshly cracked black pepper to taste. For the complete recipe, see the Full Recipe above. Start by preheating your oven to 400°F (200°C). This step is key for even cooking. A hot oven ensures that the salmon cooks perfectly. Next, take a large, oven-safe skillet. Pour in 2 tablespoons of olive oil and heat it over medium. Once the oil is shimmering, add the minced garlic. Sauté the garlic for about 30 seconds. The garlic should smell great but not brown. If it browns, it can taste bitter. Then, add the halved cherry tomatoes. Cook them for 3 to 4 minutes. They should soften and release their juices. After that, stir in fresh baby spinach. Cook for an additional 2 minutes until the spinach wilts. Season the mixture with Italian seasoning, salt, and pepper. This will boost the flavor. Now, create a space in the skillet for the salmon fillets. Push the tomato and spinach mix to the edges. Drizzle the last tablespoon of olive oil into the center. Place the salmon fillets skin-side down. Season each fillet with salt and pepper. Squeeze the fresh lemon juice over the salmon. Spoon some of the tomato-spinach mix on top of each fillet. This adds more flavor. Now, move the skillet to the preheated oven. Bake for 12 to 15 minutes. The salmon is ready when it flakes easily with a fork. Once cooked, take the skillet out of the oven. If you want, sprinkle freshly grated Parmesan cheese on top. This adds a rich creaminess. Finish by garnishing with fresh basil leaves for a bright touch. Serve the salmon on a white plate, and add a lemon wedge on the side. This not only looks nice but gives an extra zing. Enjoy your Tuscan Garlic Salmon! For the full recipe, check out the earlier section. To get the best Tuscan Garlic Salmon, timing is key. You want to cook the salmon until it flakes easily. Aim for 12 to 15 minutes in the oven at 400°F (200°C). If you cook it too long, it can dry out. Always check it a few minutes early. Salmon should be opaque and tender. Fresh ingredients make a big difference. Choose salmon that looks bright and fresh, not dull. Look for firm fillets with no brown spots. For tomatoes, pick ones that are vibrant and smell sweet. Fresh spinach should be crisp and green. Use good quality olive oil for the best flavor. To boost flavor, try these quick tips. Add a splash of white wine to the skillet after sautéing garlic. It adds depth and richness. You can also sprinkle some red pepper flakes for a mild kick. Fresh herbs like thyme or parsley can brighten the dish. For a twist, try a different cheese like feta instead of Parmesan. You can find the full recipe [here](#). {{image_4}} You can use other fish instead of salmon. Trout works well and has a mild flavor. Cod is another great choice, and it cooks quickly. These fish can soak up the Tuscan flavors just like salmon. Simply adjust your cooking time based on the thickness of the fillets. If you want to change up your veggies, try zucchini or bell peppers. Both add nice color and taste. You can also use kale instead of spinach. It gives a heartier texture and pairs well with garlic. Just make sure to cook them until they're tender but not mushy. Baking is an easy way to cook Tuscan Garlic Salmon. If you want a crispy outside, try pan-searing the fish first. Start in a hot skillet, then finish in the oven. You can also grill the salmon for a smoky flavor. Just be sure to watch it closely so it doesn’t overcook. Feel free to explore these variations to make the dish your own. For the full recipe, check out the detailed instructions above. Store your Tuscan Garlic Salmon in an airtight container. It stays fresh for up to three days. Let the salmon cool down before sealing it in. This helps prevent moisture buildup. If you want fresh flavors, eat it within this time. You can freeze Tuscan Garlic Salmon, but it’s best without the sauce. Wrap each fillet tightly in plastic wrap. Then, place them in a freezer bag. This method prevents freezer burn. The salmon can last up to three months in the freezer. When ready to eat, thaw it overnight in the fridge. To reheat, preheat your oven to 350°F (175°C). Place the salmon in a baking dish. Cover it with foil to keep it moist. Heat for about 15 minutes, or until warmed through. You can also use a microwave. Heat in short bursts of 30 seconds. Check to avoid overcooking. Enjoy your meal again with those rich Tuscan flavors! For the full recipe, visit the recipe section. Tuscan Garlic Salmon cooks in about 25 minutes. You need 10 minutes to prep and 15 minutes to bake. This quick time makes it perfect for a weeknight dinner. You can prep some parts of this dish ahead of time. Chop the garlic and tomatoes and wash the spinach. However, I recommend cooking the salmon fresh for the best taste. This dish pairs well with many sides. Try serving it with: - Steamed rice - Quinoa - Roasted vegetables - A fresh salad These sides enhance the meal and add variety. Yes, Tuscan Garlic Salmon is healthy. Salmon is rich in omega-3 fatty acids, which are good for your heart. The fresh veggies add vitamins and minerals. Plus, the dish uses olive oil, a healthy fat. It's a balanced meal you can feel good about! This blog post covered all you need for Tuscan Garlic Salmon. You learned about the key ingredients, easy steps to cook, and helpful tips. We also shared variations and storage info for your leftovers. Cooking can be fun and healthy, and this dish proves it. Experiment with fresh ingredients and try different fish. Meal prep can save you time and keep things tasty. Remember, cooking simple dishes can make you feel great. Enjoy your meal and share it with others!

If you’re looking for a simple yet delicious meal, you’ve come to the right place. This Tuscan Garlic Salmon recipe is packed with flavor and is perfect for dinner. With …

Read more

Categories Dinner

Salted Caramel Apple Pie Cheesecake Delight Recipe

November 12, 2025June 13, 2025 by Chef Remy
- 1 ½ cups graham cracker crumbs - ½ cup unsalted butter, melted - 2 tablespoons granulated sugar - 2 cups cream cheese, softened to room temperature - 1 cup granulated sugar - 1 cup sour cream - 4 large eggs, at room temperature - 1 teaspoon pure vanilla extract - 2 cups peeled and thinly sliced apples (Granny Smith recommended for tartness) - 1 teaspoon ground cinnamon - ½ teaspoon ground nutmeg - 1 cup salted caramel sauce (store-bought or homemade) - Flaky sea salt, for garnish I always choose fresh ingredients to boost flavor. Use high-quality cream cheese for a rich taste. Sour cream should be full-fat for creaminess. When picking apples, I recommend Granny Smith. Their tartness balances the sweetness of caramel. For the best crust, use real graham crackers, not the pre-packaged crumbs. The butter should be unsalted, so you control the saltiness. If making salted caramel, use good quality butter and sugar. You can easily adjust this recipe for dietary needs. For a gluten-free option, use gluten-free graham crackers or almond flour. If you're dairy-free, try vegan cream cheese and sour cream. Eggs can be replaced with flax eggs for a vegan version. Use maple syrup instead of sugar for a natural sweetener. Just remember, these changes may slightly alter the flavor and texture. {{ingredient_image_2}} Start by preheating your oven to 325°F (160°C). In a bowl, mix 1 ½ cups of graham cracker crumbs, ½ cup of melted unsalted butter, and 2 tablespoons of granulated sugar. Stir until the crumbs feel moist. Press this mixture firmly into the bottom of a 9-inch springform pan. Bake for 10 minutes, then let it cool completely. In a large bowl, beat 2 cups of softened cream cheese and 1 cup of granulated sugar with an electric mixer. Mix on medium speed until smooth. Add 1 cup of sour cream, and mix until blended. Next, add 4 large eggs one at a time, mixing on low speed after each addition. Finally, stir in 1 teaspoon of pure vanilla extract. In a medium bowl, take 2 cups of peeled and thinly sliced apples. Toss them with 1 teaspoon of ground cinnamon and ½ teaspoon of ground nutmeg. Make sure each slice is coated well in the spices. Pour half of the cheesecake batter over the cooled crust. Layer half of the spiced apples on top, then drizzle with half of the salted caramel sauce. Carefully pour the rest of the cheesecake batter on top and smooth it out. Arrange the remaining apple slices over this layer and drizzle the rest of the salted caramel sauce. Place the cheesecake in the preheated oven. Bake for 50 to 60 minutes. The center should be set but may still jiggle slightly. Turn off the oven and leave the cheesecake inside with the door slightly ajar for one hour. This helps to prevent cracks. After one hour, take the cheesecake out and transfer it to the fridge. Chill it for at least 4 hours, but overnight is best. When ready to serve, run a knife around the edge of the springform pan to loosen it. Remove the sides, then drizzle with more salted caramel sauce and sprinkle flaky sea salt on top. Enjoy your delicious creation! To get the best texture, start with room temperature ingredients. This includes cream cheese and eggs. When these are warm, they mix better, leading to a smooth filling. Mix the cream cheese and sugar well. You want no lumps. Add eggs slowly. Mix just until blended. Overmixing can cause the cheesecake to crack while baking. One big mistake is not preheating your oven. Always preheat to 325°F (160°C) first. Another error is removing the cheesecake too soon. The center should wobble slightly but be mostly set. Let it cool slowly in the oven to prevent cracks. Lastly, don’t skip chilling. Chilling for at least four hours helps it firm up. For a stunning look, drizzle extra salted caramel on top before serving. Sprinkle flaky sea salt over the caramel. This adds a nice pop of flavor. Use a sharp knife to slice cleanly. Wipe the knife after each cut for neat slices. Serve on a beautiful plate to impress your guests! Pro Tips Choose the Right Apples: Using Granny Smith apples gives the cheesecake a nice tartness that balances the sweetness of the caramel and cheesecake. Room Temperature Ingredients: Ensure that your cream cheese and eggs are at room temperature for a smoother filling without lumps. Prevent Cracking: Cooling the cheesecake gradually in the oven with the door ajar helps prevent cracks from forming on the surface. Flavor Boost: For an extra depth of flavor, consider adding a splash of bourbon or apple cider to the apple mixture before layering it in the cheesecake. {{image_4}} You can switch up the flavors in your cheesecake. Instead of apples, try fresh peaches or berries. Use a different spice blend, too. Pumpkin spice gives a warm, cozy feel. For a chocolate twist, add cocoa powder to the filling. You can also mix in chocolate chips for extra sweetness. The options are endless! Toppings can change the whole look and taste. Instead of salted caramel, use chocolate sauce or fruit glaze. A sprinkle of crushed nuts adds crunch and flavor. Whipped cream is a classic choice that never fails. You can even add a layer of thinly sliced fruits on top for a fresh touch. Get creative and make it your own! Making this cheesecake dairy-free is easy. Use vegan cream cheese and coconut milk instead of sour cream. For a gluten-free option, swap graham crackers for gluten-free cookies. You can find many great choices at the store. Just make sure to check the labels for any hidden gluten. These swaps make this dessert fit for everyone! To store your Salted Caramel Apple Pie Cheesecake, first let it cool completely. This step stops extra moisture from forming. Once cool, cover it tightly with plastic wrap or aluminum foil. You can also place it in an airtight container. This keeps the cheesecake fresh and tasty. Make sure it is in the fridge if you plan to eat it soon. When stored correctly in the fridge, your cheesecake lasts for about 5 to 7 days. Keep an eye on it. If you notice any off smells or changes in texture, it's best to toss it. Enjoying it within the first few days ensures you taste the full flavors of the salted caramel and apples. If you want to keep it longer, freezing is a great option. Slice the cheesecake into pieces for easy serving later. Wrap each slice in plastic wrap. Then place the slices in a freezer-safe bag or container. This way, you can enjoy a slice anytime. The cheesecake can last up to 3 months in the freezer. When you're ready to eat, thaw it in the fridge overnight. This keeps it creamy and delicious. Yes, you can make this cheesecake ahead of time. I recommend making it a day before you want to serve it. This allows the flavors to meld together nicely. Just remember to chill it in the fridge for at least four hours after baking. Overnight is best for a creamy texture. To slice cheesecake, use a warm knife. Dip the knife in hot water and wipe it dry. This helps create clean cuts. Make sure to slice through the filling and avoid dragging it. Repeat this for each slice for the best results. To prevent cracks, avoid overmixing the batter. Mix just until combined. Also, bake at a low temperature. Leaving the cheesecake in the oven with the door ajar helps it cool gradually. This reduces the chances of cracks forming on the top. Yes, you can use other apple types. While Granny Smith apples are great for tartness, feel free to try Honeycrisp or Fuji. These apples are sweet and firm. Just remember to slice them thinly for even cooking. You can replace sour cream with Greek yogurt or cream cheese. Both options will keep the cheesecake creamy. Adjust the sweetness slightly if you use Greek yogurt, as it can be tangier. This blog post covered all you need to know to make a great Salted Caramel Apple Pie Cheesecake. We went over the list of ingredients, tips for quality, and substitutions for specific diets. You learned the step-by-step process, from preparing the crust to baking and chilling the cheesecake. We shared tips for texture, common mistakes, and even variations and storage methods. With these insights, you can create a delicious cheesecake that fits your needs. Now, get baking and enjoy the sweet rewards!

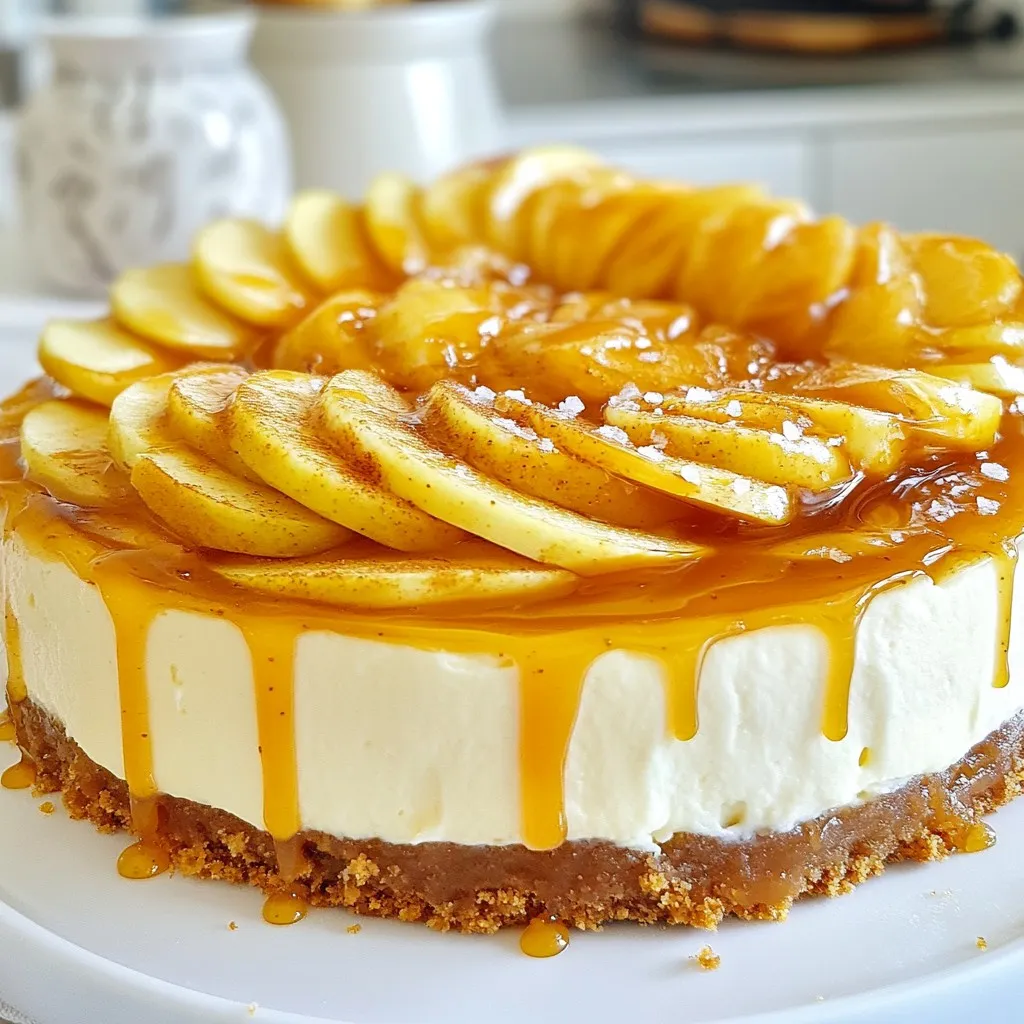
Get ready to impress your friends with my Salted Caramel Apple Pie Cheesecake Delight recipe! This dessert blends creamy cheesecake, sweet apples, and rich caramel for a taste you won’t …

Read more

Categories Desserts

Broccoli Bliss Salad Vibrant and Flavorful Delight

June 13, 2025 by Chef Remy
- 3 cups fresh broccoli florets - 1 cup cherry tomatoes, halved - 1/2 cup red bell pepper, diced - 1/4 cup red onion, finely chopped - 1/2 cup shredded carrots These main ingredients create a bright and crunchy base for the Broccoli Bliss Salad. Fresh broccoli florets bring a crisp texture and a vibrant green color. Cherry tomatoes add a juicy burst, while red bell pepper offers sweetness. Shredded carrots give a lovely crunch, and red onion adds a mild bite. Together, they form a delightful mix that makes this salad stand out. - 1/3 cup sunflower seeds - 1/4 cup feta cheese, crumbled (optional) For a little extra flavor and texture, consider adding sunflower seeds. They provide a nutty taste and a satisfying crunch. If you enjoy cheese, feta is a great option. Its creamy texture and salty flavor elevate the salad. You can also experiment with other dressings or add-ins to fit your taste. Think about adding nuts, seeds, or other cheese varieties for a twist. - 3 tablespoons olive oil - 2 tablespoons apple cider vinegar - 1 tablespoon honey - 1 teaspoon Dijon mustard - Salt and pepper to taste The dressing plays a key role in bringing all the flavors together. Olive oil adds richness, while apple cider vinegar gives a tangy kick. Honey balances the acidity with a touch of sweetness. Dijon mustard adds a sharp note that enhances the whole salad. Mixing these ingredients creates a smooth and tasty dressing that coats every bite perfectly. For the full recipe, check out the details provided earlier. Start with fresh broccoli florets. This step is crucial for the best salad. To make them tender yet crisp, I recommend blanching. Bring a pot of water to a boil. Add the broccoli and let it cook for just 1-2 minutes. This short cooking time keeps the bright green color. After that, quickly transfer the broccoli to an ice bath to stop the cooking. Drain the florets well before mixing them in a bowl. Once the broccoli is ready, add the fresh ingredients. Toss in halved cherry tomatoes, diced red bell pepper, finely chopped red onion, and shredded carrots. Use a spatula to mix gently. This helps to keep the veggies intact and fresh. For the dressing, grab a small bowl. Whisk together the olive oil, apple cider vinegar, honey, and Dijon mustard. I always add a pinch of salt and pepper for flavor. Whisk until the mixture is smooth and well combined. A good dressing should be creamy and flavorful. Now, it’s time to combine everything. Drizzle the dressing over the salad mixture. Use your spatula to gently toss the salad. You want every piece coated without smashing the ingredients. This ensures each bite bursts with flavor. Let the salad sit for about 10 minutes. This resting time allows the flavors to meld together. The tastes will develop beautifully, making each bite a delight. For the final touch, sprinkle sunflower seeds and optional feta cheese on top. This step adds crunch and a lovely burst of flavor. To make your Broccoli Bliss Salad pop, think about adding flavor boosters. You can toss in some garlic powder or red pepper flakes for a kick. Fresh herbs like basil or cilantro also add a nice touch. For marinating, let the salad sit for at least 10 minutes after dressing. This time lets the flavors blend perfectly. If you want even more taste, try adding a splash of lemon juice before serving. It brightens the salad and adds a fresh zing. Serving your salad beautifully makes it even more appealing. Use a large, shallow bowl to showcase the bright colors. After mixing, top your salad with extra sunflower seeds and crumbled feta. This adds texture and flair. To elevate it further, garnish with fresh herbs like parsley or dill. Not only do they look great, but they also add a wonderful aroma. You can even use colorful plates to enhance the visual appeal. {{image_4}} You can make Broccoli Bliss Salad even more fun by switching up the ingredients. Try using different vegetables or nuts. For example, add crunchy carrots, sweet bell peppers, or even some green beans. They all mix well with broccoli. You can also replace sunflower seeds with almonds or walnuts for extra crunch. If you follow a vegan or gluten-free diet, you can easily adapt this salad. Skip the feta cheese and use a vegan cheese instead. You can also make sure that any dressing you choose is gluten-free. Many dressings are naturally gluten-free, so check the labels. Adding fruits can give your salad a tasty twist. Try diced apples or fresh berries. They add sweetness and a pop of color. You can also mix in dried fruits like cranberries or raisins for a chewy texture. Experimenting with different cheeses can also change the flavor. If you want a sharp taste, try adding goat cheese or blue cheese. Both add a unique zing to the salad. Just remember to adjust the amount based on your taste. You can find the full recipe for Broccoli Bliss Salad to explore more options. To keep your Broccoli Bliss Salad fresh, store it in an airtight container. This helps prevent wilting and keeps flavors intact. Make sure to remove any extra dressing before storing. The salad will stay fresh for about three days in the fridge. If you notice any sogginess, add more fresh ingredients when you’re ready to eat. Use glass or plastic containers with tight lids. Glass containers are great because they don't stain or hold odors. For best results, eat the salad within three days. If you notice any off smells or changes in color, it’s best to toss it. Enjoy it at its peak freshness! Salads like this one are best enjoyed cold. If you want to warm it up, do so gently. Use a microwave and heat it for just a few seconds. This will help keep the broccoli crisp. I suggest eating the Broccoli Bliss Salad cold for a refreshing taste. The flavors are bright and lively when served chilled. If you enjoy warm salads, add sautéed vegetables or lightly steam the broccoli before mixing. This adds a unique twist to the dish! How long can I store this salad? You can store Broccoli Bliss Salad in the fridge for up to three days. Make sure to keep it in an airtight container. This helps keep the veggies fresh and crisp. Can I prep the salad in advance? Yes, you can prep the salad a day ahead. Just mix the veggies and dressing separately. Combine them right before serving for the best taste. What are the health benefits of broccoli? Broccoli is a superfood. It is low in calories and high in vitamins. It contains vitamins C and K, fiber, and antioxidants. Eating broccoli can help boost your immune system. It may also lower the risk of chronic diseases. Is this salad suitable for meal prep? Absolutely! Broccoli Bliss Salad is great for meal prep. It keeps well and is easy to portion out. Just remember to add the dressing right before eating to keep it fresh. Can I use frozen broccoli instead? Yes, you can use frozen broccoli. Just thaw it and drain any excess water. Fresh broccoli has a better crunch, but frozen works in a pinch. What can I serve with Broccoli Bliss Salad? This salad pairs well with grilled chicken or fish. You can also serve it with whole grains like quinoa or brown rice. For a lighter meal, enjoy it with a piece of crusty bread. For the full recipe, check out the details above. Broccoli Bliss Salad is a simple, healthy dish. This article covered main and optional ingredients, dressing tips, and storage methods. You can mix fresh veggies, create a tasty dressing, and consider fun variations. The salad is colorful and nutritious. Remember to experiment with flavors and presentations. Store leftovers properly to keep them fresh. As you make this salad, enjoy the tasty benefits of broccoli and all its friends!

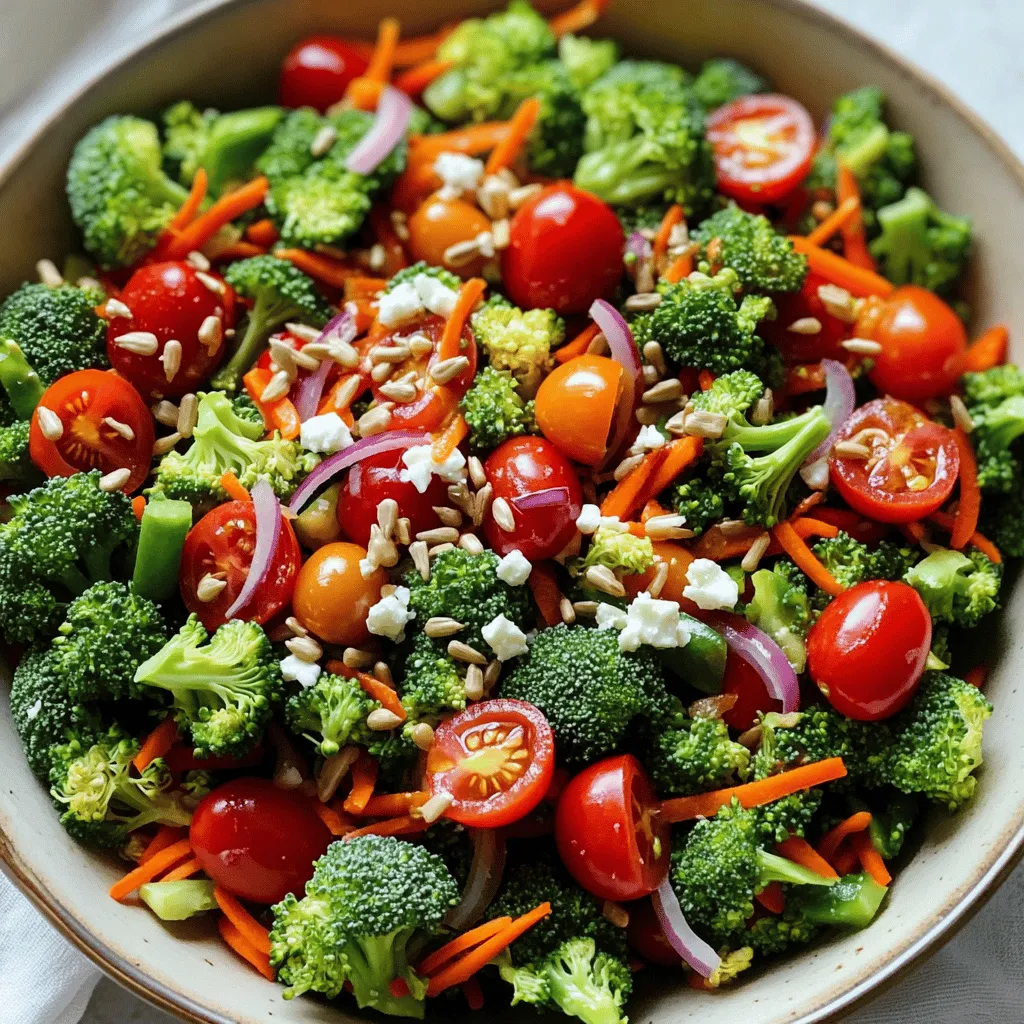
Looking for a fresh, vibrant dish that brightens any meal? The Broccoli Bliss Salad is packed with crisp broccoli, sweet cherry tomatoes, and crunchy carrots. This salad is not just …

Read more

Categories Salads

Savory Japanese Katsu Bowls Quick and Easy Recipe

June 13, 2025 by Chef Remy
- Boneless chicken breasts: The star of this dish. Chicken breasts are lean and cook quickly. - Panko breadcrumbs: These Japanese breadcrumbs create a light, crispy coating. They are key for that crunch! - All-purpose flour: This helps the chicken stick to the breadcrumbs. It adds a nice texture. - Large eggs: Eggs bind the flour and breadcrumbs, ensuring an even coat. - Salt and pepper: These enhance the chicken's flavor. Always season your food! - Garlic powder and onion powder: They add depth to the flavor. Simple but effective! - Vegetable oil: You need this for frying. It gives the katsu its golden color. - Jasmine rice: The perfect base for your katsu bowl. It’s fragrant and fluffy. - Shredded cabbage or lettuce: This adds crunch and freshness. A great contrast to the fried chicken. - Green onions: These add a nice pop of color and a mild onion flavor. - Tonkatsu sauce: A sweet and savory sauce that brings everything together. It’s a must-have! - Optional: Sesame seeds for garnish. They add a nice touch and extra flavor. Each ingredient plays its role. Freshness matters. Quality ingredients make a difference in taste and nutrition. - Protein Variations: You can swap chicken for pork or tofu. Each option offers a unique flavor profile. - Suggested Toppings: Try pickles for a tangy bite or extra sauces for more flavor. Experiment to find what you love! To make chicken katsu, first, pound the chicken. Place each chicken breast between two sheets of plastic wrap. Use a meat mallet or rolling pin to make them even and thin. Aim for about 1/2 inch thick. This keeps the chicken juicy when you cook it. Next, prepare your coating stations. You need three shallow dishes. In the first dish, mix flour with salt, black pepper, garlic powder, and onion powder. The second dish holds the beaten eggs. The third dish contains panko breadcrumbs, which give katsu its crunch. Now, let’s coat the chicken. Take one breast and dip it in the seasoned flour. Make sure to cover it well. Shake off the extra flour, then dip it in the eggs. Let any extra egg drip off. Finally, press it into the panko breadcrumbs. Ensure you cover it evenly for a good crunch. Heat your oil for frying in a large skillet. Pour in about 1/2 inch of vegetable oil and warm it over medium-high heat. To check if the oil is ready, drop in a small piece of breadcrumb. If it sizzles, it’s hot enough. Carefully add the coated chicken breasts into the hot oil. Fry each side for 4-5 minutes. You want them golden brown and cooked through. Once done, place the chicken on a plate lined with paper towels. This removes any extra oil. Now it’s time to build your katsu bowl. Start with a base of cooked jasmine rice in each bowl. Neatly lay the sliced chicken katsu on top of the rice. Next, add a handful of shredded cabbage or lettuce for some crunch and freshness. Finish your bowl by drizzling tonkatsu sauce over the chicken. Sprinkle sliced green onions and optional sesame seeds for a nice touch. Serving these katsu bowls hot makes them even better. Enjoy this delightful dish right away! To make your katsu crispy, focus on oil temperature. Heat your oil to about 350°F (175°C). This heat helps the breading turn golden brown. If the oil is too cool, your katsu will soak up oil and become soggy. Fry each piece for 4-5 minutes per side. Look for a nice golden color on the outside. If you don’t want to deep fry, try an air fryer. Coat the chicken as you would for frying. Then, set your air fryer to 380°F (193°C) and cook for about 10-12 minutes. This method gives you a crispy finish with less oil. One big mistake is overcooking the chicken. Always check the internal temperature. It should be 165°F (74°C) for safe eating. If you cook it too long, the chicken can dry out. Another mistake is soggy or uneven breading. Make sure to shake off excess flour and egg before adding the panko. Press down gently to help the crumbs stick. This step ensures the breading is even and holds up during frying. {{image_4}} You can choose different proteins for your katsu bowls. Chicken and pork are the most popular. - Chicken Katsu: This version is light and juicy. It has a mild flavor that pairs well with tonkatsu sauce. The chicken cooks quickly and stays tender. - Pork Katsu: Pork has a richer taste. It can be a bit fatty, which adds flavor. Cook it a little longer to ensure it’s done. If you're looking for plant-based options, try these: - Tofu Katsu: Use firm tofu. Slice it and coat it just like chicken. It absorbs flavors well. - Seitan Katsu: This wheat-based protein has a meaty texture. It’s great for those who want a more hearty meal. Katsu bowls vary by region in Japan. Each area has its own twist. - Hokkaido Katsu: This region often features a creamy curry sauce on top. The warmth of the curry adds a new layer of flavor. - Osaka Katsu: Here, they may use a thicker tonkatsu sauce. It's sweeter and richer, making each bite exciting. Each region also has unique toppings: - Pickled vegetables: These add a crunchy, tangy bite that contrasts the crispy katsu. - Egg: Some places serve a soft boiled egg on top. The yolk makes the dish richer and creamier. Exploring these variations can make your katsu bowls even more fun! For a complete recipe, check out the Full Recipe! To keep your katsu bowls fresh, store them in an airtight container. Place the chicken and rice in separate sections. This way, the chicken stays crispy, and the rice stays soft. You can store them in the fridge for up to three days. After that, the quality may drop. When it's time to enjoy leftovers, reheating can be tricky. To keep the chicken crispy, use the oven. Preheat the oven to 350°F (175°C). Place the chicken on a baking sheet and heat for about 10-15 minutes. This method helps to keep the crunch. If you're in a hurry, the microwave is an option. However, it may make the chicken soggy. To minimize this, place a paper towel under the chicken. This helps absorb extra moisture. Enjoy your katsu bowls warm, just like fresh! A katsu bowl is a Japanese dish featuring crispy fried meat, usually chicken or pork. The dish includes a base of rice, topped with sliced katsu and vegetables. Katsu bowls are popular in Japan and around the world. They show the blend of flavors and textures that make Japanese cuisine special. The crispy texture of the katsu contrasts nicely with the fluffy rice and fresh veggies. Making katsu sauce is simple. You need a few key ingredients: - 1/4 cup ketchup - 2 tablespoons soy sauce - 1 tablespoon Worcestershire sauce - 1 tablespoon sugar - 1 teaspoon mustard - 1 teaspoon garlic powder Mix these items in a bowl. Adjust the sweetness or tanginess to your taste. This sauce adds a rich flavor to your katsu bowl. You can also find premade tonkatsu sauce in stores for convenience. Yes, you can use frozen chicken for katsu. However, you must thaw it first. The best way to thaw chicken is in the fridge overnight. If you're in a hurry, you can soak it in cold water for a few hours. Make sure to cook the chicken right after thawing. This ensures it stays fresh and safe to eat. Katsu bowls pair well with various side dishes and drinks. Here are some great options: - Miso soup - Pickled vegetables - Edamame - Green salad with sesame dressing - Chilled sake or green tea These sides complement the rich flavors of the katsu and add variety to your meal. Enjoying different textures and tastes makes your katsu bowl experience even better. Katsu bowls combine fresh ingredients with tasty cooking methods. We covered key elements like the main ingredients, the importance of quality, and ways to customize your dish. I shared tips for cooking perfect katsu and avoiding common mistakes. Explore variations with different proteins to match your taste. Store leftovers properly and enjoy them later. Whether you're a beginner or an expert, making katsu bowls at home brings joy and flavor to every meal. Embrace this delicious journey and savor every bite!

Are you ready to dive into the delicious world of Japanese Katsu Bowls? This quick and easy recipe will have you savoring crispy, golden chicken or plant-based options all in …

Read more

Categories Dinner

Thai Chicken Salad Flavorful and Nutritious Meal

June 13, 2025 by Chef Remy
- 2 cups cooked chicken breast, shredded - 1 cup red cabbage, thinly sliced - 1 cup carrots, grated - 1 cucumber, julienned - 1 red bell pepper, thinly sliced - 1/4 cup fresh cilantro, chopped - 2 tablespoons fresh lime juice - 2 tablespoons fish sauce - 1 tablespoon honey - 1 tablespoon sesame oil - 1 teaspoon freshly grated ginger - 1 garlic clove, finely minced - 1/4 cup chopped peanuts (for garnish) - Salt and freshly ground black pepper, to taste Each serving of Thai Chicken Salad packs a punch of flavor and nutrition. You can expect about 350 calories per serving. The macronutrient breakdown is as follows: - Protein: 25g - Carbohydrates: 20g - Fats: 15g This salad is not just tasty; it's also a balanced meal you can enjoy any time. The fresh ingredients bring vitamins and minerals to your plate. The chicken gives you protein, while the veggies provide fiber. Enjoy this salad knowing it's good for you! For a complete cooking experience, check out the Full Recipe. To start, gather your ingredients. You need cooked chicken breast, red cabbage, carrots, cucumber, red bell pepper, and cilantro. In a large bowl, combine the shredded chicken with the thinly sliced red cabbage, grated carrots, julienned cucumber, sliced red bell pepper, and chopped cilantro. Gently toss the mixture. This step ensures all the flavors blend. Next, grab a small bowl to make the dressing. Whisk together fresh lime juice, fish sauce, honey, sesame oil, grated ginger, and minced garlic. Add a pinch of salt and ground black pepper. Keep whisking until everything mixes well. Taste it and adjust the seasoning if needed. You want a balance of sweet and salty. Now it’s time to bring everything together. Drizzle the dressing over the salad mixture. Gently toss again to coat every ingredient in that tasty dressing. Let the salad rest for about 10 minutes. This resting time helps the flavors meld beautifully. Just before serving, sprinkle the chopped peanuts on top for a nice crunch. Enjoy your fresh, vibrant meal! Want to see the full recipe? Check out the Full Recipe. To make the best Thai chicken salad, start with high-quality chicken and fresh produce. Look for chicken breast that is firm and pink. This shows it is fresh. For the veggies, pick vibrant colors. The red cabbage should be crisp, and the carrots should snap when you break them. Fresh herbs are key to great flavor. Use cilantro and mint for a bright taste. They add a nice touch to the salad. Always wash herbs well to remove dirt. After mixing the salad, let it rest for about 10 minutes. This time allows the flavors to blend well. It makes each bite more tasty. If you want to spice things up, add chili flakes for heat, or a splash of soy sauce for depth. You can also play with the dressing. Try adding a bit of peanut butter for richness or a splash of rice vinegar for tang. Serving the salad in a colorful bowl makes it eye-catching. You can also use individual plates for a special touch. For garnishing, sprinkle chopped peanuts on top for crunch. Add extra cilantro leaves and a lime wedge on the side. This not only looks good but lets guests add more flavor if they wish. For the full recipe, check out the provided details. {{image_4}} For a tasty vegetarian Thai chicken salad, swap chicken for tofu or chickpeas. Tofu adds a nice texture when cubed and grilled or pan-fried. Chickpeas bring a hearty feel and nutty flavor. You can also play with dressings. Try using peanut sauce for a creamier twist. Or mix lime juice with soy sauce for a tangy kick. Adjust the sweetness by adding a bit of maple syrup if needed. If you want to switch proteins, shrimp or beef work great in this salad. For shrimp, just sauté them for 2-3 minutes until pink. If you choose beef, thinly slice it and cook for 3-4 minutes for medium-rare. Remember to adjust cook times based on the protein you choose. This ensures everything stays tender and juicy. Embrace seasonal veggies for your salad. In spring, add snap peas or radishes for crunch. Summer calls for fresh corn or zucchini. In fall, try roasted sweet potatoes or butternut squash. Winter can include crunchy Brussels sprouts or kale. You can also change flavors with herbs. Use basil in summer or mint in spring for a fresh taste. Adjusting these elements keeps your salad exciting all year long. For the full recipe, check out the Thai Chicken Salad instructions. After you enjoy your Thai Chicken Salad, proper storage keeps it fresh. First, let the salad cool to room temperature. Then, place it in an airtight container. This helps prevent air from spoiling your meal. Glass or BPA-free plastic containers work well. They keep the salad crisp and tasty. Reheating salad can be tricky. I suggest you enjoy it cold for the best flavor. If you want to warm it up, use the microwave. Heat it gently at low power. This way, you keep the chicken moist and the veggies crunchy. Avoid overheating, as it can make the salad soggy. In the fridge, your Thai Chicken Salad lasts about three days. After that, it may lose its taste and texture. Look for signs of spoilage, like a strange smell or slimy veggies. If you notice these, it’s best to toss it out. Always trust your senses to keep your meals safe. Thai Chicken Salad has about 300 calories per serving. This is a healthy choice. The chicken adds protein, while the veggies provide fiber and vitamins. Each ingredient contributes to the total count. Yes, you can make Thai Chicken Salad ahead of time. I recommend prepping the salad and dressing separately. Store the salad in the fridge for up to two days. Keep the dressing in a jar. Add it just before serving. This keeps the salad fresh and crunchy. You can serve many dishes with Thai Chicken Salad. Rice is a great option. It complements the flavors well. You can also try spring rolls or grilled vegetables. They add variety and make your meal more filling. Yes, you can swap ingredients in Thai Chicken Salad. If you don’t like fish sauce, try soy sauce. For a crunch, use sunflower seeds instead of peanuts. You can also use different veggies like bell peppers or snap peas. Feel free to mix and match! Thai Chicken Salad, or “Yam Gai,” comes from Thailand. It reflects Thai cooking's love for fresh flavors. The dish combines sweet, salty, and sour tastes. It is often served at gatherings and family meals. Its bright colors and textures make it a feast for the eyes! This blog post explored the ingredients, step-by-step instructions, and variations for Thai Chicken Salad. We discussed fresh produce, dressings, and how to enhance flavors. You can mix and match proteins to suit your taste. Remember, resting the salad helps the flavors blend. Whether making it ahead or adapting the recipe, there are many ways to enjoy this dish. Keep leftovers fresh to savor them longer. Thai Chicken Salad is versatile and delicious, ready to please any palate. Enjoy experimenting with this recipe!

Looking for a meal that’s both delicious and nutritious? Thai Chicken Salad hits the mark! It pulls together fresh veggies, tender chicken, and zesty flavors for a dish that’s satisfying …

Read more

Categories Salads

Lemon Raspberry Cookies Fresh and Tasty Treat

June 13, 2025 by Chef Remy
Lemon raspberry cookies blend sweet and tart flavors. The buttery dough pairs perfectly with fresh raspberries. These cookies are easy to make and delicious to eat. You’ll love how bright they taste! - 1 cup unsalted butter, softened - 1 cup granulated sugar - 1 large egg - 2 teaspoons pure vanilla extract - Zest of 1 lemon - 2 cups all-purpose flour - 1 teaspoon baking powder - 1/2 teaspoon baking soda - 1/4 teaspoon fine sea salt - 1 cup fresh raspberries, gently mashed - 1 cup powdered sugar (for glaze) - 2 tablespoons freshly squeezed lemon juice (for glaze) These ingredients create a cookie that bursts with flavor. The butter gives it richness. The sugar adds sweetness. Lemon zest brightens the flavor, while raspberries add a lovely tartness. Each bite is a treat! First, set your oven to 350°F (175°C). This is the perfect temperature for baking. While the oven warms up, take two baking sheets and line them with parchment paper. This step helps the cookies not stick. It makes cleaning up a breeze! In a large bowl, add 1 cup of softened butter and 1 cup of granulated sugar. Use an electric mixer to beat these together until the mix is light and fluffy. This should take about 2-3 minutes. Next, crack in 1 large egg and pour in 2 teaspoons of pure vanilla extract. Add the zest of 1 lemon for a fresh kick. Mix until everything is well combined. In another bowl, whisk together 2 cups of all-purpose flour, 1 teaspoon of baking powder, 1/2 teaspoon of baking soda, and 1/4 teaspoon of fine sea salt. Gradually add this dry mix to the wet ingredients. Stir gently until just combined. Be careful not to overmix, as this can make the cookies tough. Now comes the fun part! Use a spatula to fold in 1 cup of gently mashed raspberries. Be gentle to keep some berry pieces intact for a burst of flavor. Grab a tablespoon and scoop rounded spoonfuls of cookie dough onto the prepared baking sheets. Leave about 2 inches of space between each scoop. This allows the cookies to spread while baking. Place the sheets in the oven and bake for 12-15 minutes. The edges should turn golden brown, while the centers may look soft. They will firm up as they cool. While the cookies bake, make a simple lemon glaze. In a small bowl, whisk together 1 cup of powdered sugar and 2 tablespoons of freshly squeezed lemon juice until smooth. Once the cookies are out of the oven, transfer them to a wire rack to cool. After they cool, drizzle the lemon glaze over the top using a fork or piping bag. Let the glaze set for about 10 minutes before enjoying your tasty treats. For the full recipe, check out the detailed instructions above! To get the best cookie texture, start with softened butter. This helps mix well with sugar. The goal is to create a light and fluffy mix. Do not overmix the dough after adding flour. Overmixing can lead to tough cookies. Bake until the edges are golden. The centers may seem soft but will firm up as they cool. When adding raspberries, be gentle. Use a fork to mash them lightly. This keeps some pieces whole and adds texture. Fold them into the dough carefully. If you mix too hard, the raspberries will break down. This can turn your cookies pink instead of keeping that vibrant color. Serve your cookies on a fun plate. A touch of lemon zest on top adds flair. For a colorful display, add fresh raspberries around the cookies. They look great and taste fresh. Enjoy them with a cup of tea or coffee for a perfect snack. For the full recipe, check the section above. {{image_4}} You can change the lemon and raspberry flavor. Try lime and coconut for a tropical twist. Or use orange zest with blueberries for a bright, fruity flavor. Almond and cherry also work well together. Each new combo brings a fun taste and look. To make these cookies gluten-free, swap all-purpose flour with a gluten-free blend. Look for one that includes xanthan gum. This helps keep the cookies chewy and soft. The taste stays great, and you still get that zing from the lemon and the pop from the raspberries. For a vegan version of these cookies, replace the egg with flaxseed meal. Mix one tablespoon of flaxseed meal with two and a half tablespoons of water. Let it sit for five minutes until it thickens. Use coconut oil instead of butter for a rich flavor. You can still enjoy the same tasty lemon and raspberry mix! To keep your cookies fresh, let them cool completely. Place them in a single layer. Use a plate or a container with a lid. If you have many cookies, stack them with parchment paper in between. This method helps prevent sticking and keeps them soft. You can freeze these cookies for up to three months. Allow the cookies to cool fully first. Place them in an airtight container or a freezer bag. Make sure to remove as much air as possible. When you want to eat them, thaw them at room temperature for a few hours. You can warm them in the oven for a few minutes, too. The best container for cookies is one that seals tightly. Glass or plastic containers work well. Avoid using metal containers, as they can change the cookie's flavor. If you choose a bag, try to use a resealable freezer bag. This helps keep the cookies fresh and tasty. Yes, you can use frozen raspberries. They work well in this recipe. Just remember to thaw and drain them first. This helps avoid excess moisture in your cookies. If you skip this step, your cookies may become too wet. The flavor will still be great, but fresh berries add a unique texture. Lemon raspberry cookies stay fresh for about one week. Store them in an airtight container at room temperature. If you want to keep them longer, you can freeze them. These cookies freeze well for up to three months. Just make sure to wrap them tightly before placing them in the freezer. You can use coconut oil or a vegan butter substitute. Both options work nicely in this recipe. If you choose coconut oil, use it in the same amount as butter. Just melt it slightly before mixing it with sugar. This swap keeps the cookies rich and tasty while being dairy-free. For a lighter option, you can also try applesauce, though it may change the texture slightly. We explored a simple recipe for lemon raspberry cookies. I shared the key ingredients, step-by-step instructions, and tips to perfect your baking. You can also try different flavors and variations to suit your taste. Remember, proper storage keeps cookies fresh longer. Baking can be fun and rewarding. Enjoy making these cookies and sharing them with friends and family. Happy baking!

Get ready to indulge in a burst of flavor with my Lemon Raspberry Cookies! Perfect for any occasion, these cookies blend zesty lemon and sweet raspberries into a delightful treat. …

Read more

Categories Desserts
Older posts
Newer posts
← Previous Page1 … Page90 Page91 Page92 … Page130 Next →

ROASTED RECIPES

Where bold flavors meet everyday meals. Warm, vibrant, and made to share. 🔥🥗🍴

PAGES

Home About Contact Privacy Policy Terms & Conditions Cookie Policy GDPR Policy Copyright Policy Disclaimer

CATEGORIES

Appetizers Desserts Salads Breakfast Dinner

Contact

  • Pinterest
  • Mail
Copyright © 2025 Roasted Flavors. All rights reserved.